
An old dresser can take up space or turn into something special, it all depends on what you do with it. That’s the fun of a dresser makeover. It’s a simple way to refresh a room without buying new furniture.
These makeovers are popular because they are inexpensive. With a little time and effort, you can transform a worn-out piece into a brand-new one.
Plus, you get to pick the colors, the finish, and even the knobs. It’s a project that lets you make something your own.
In this blog, I’ll show you real before-and-after dresser makeovers to spark ideas. You’ll also find tips on how to get started, what tools you need, and common ways people bring old dressers back to life.
If you’ve been considering a project like this, this guide can help you take the first step.
Before and After Dresser Makeovers
Dresser makeovers are one of the easiest ways to give old furniture new life. With a little work and a few changes, even a worn-out dresser can feel fresh and useful again.
These examples show how small updates in color, hardware, or finish can completely change a piece’s look.
1. From Glossy Red to Soft Gray
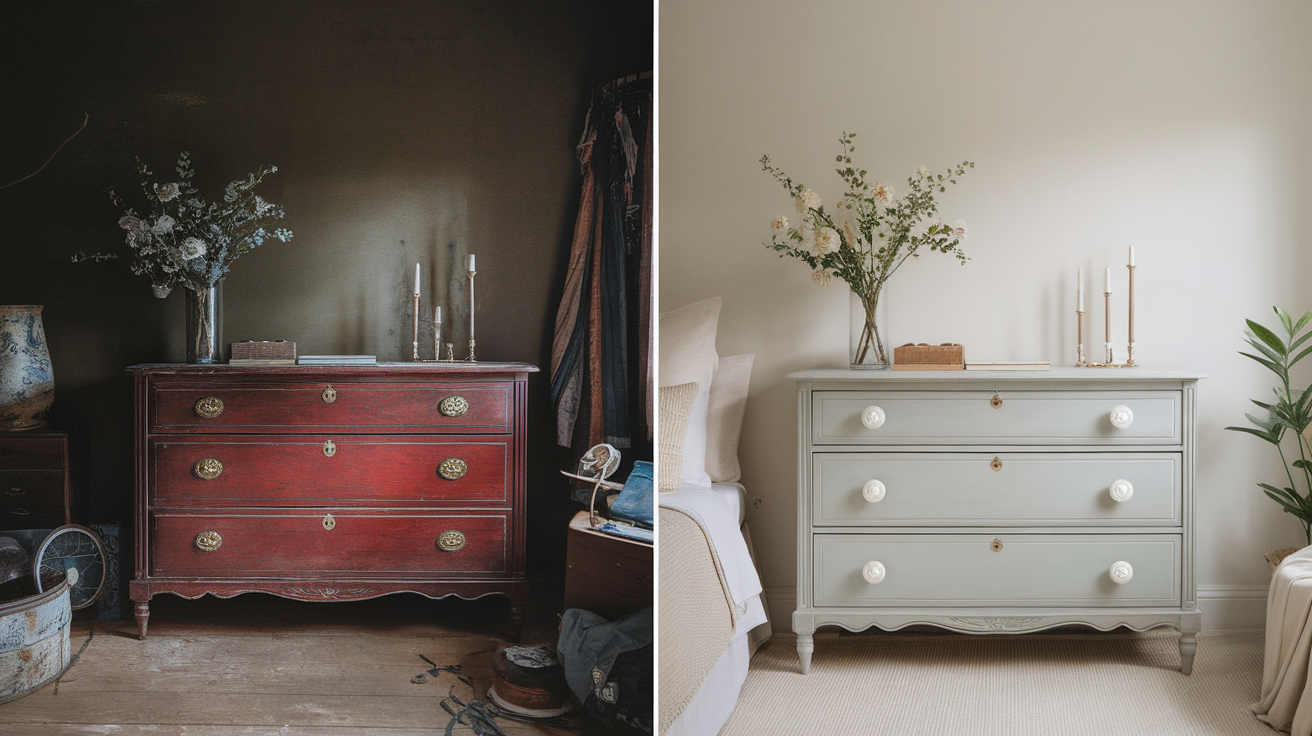
This dresser’s deep red finish made the room feel too dark and heavy. The shine reflected too much light and took over the space. A softer look was needed to balance out the room.
The glossy top was sanded to remove the shiny layer. After that, a soft gray paint was used to calm the overall feel. The lighter color complemented the neutral tones in the room well.
New white wood knobs replaced the older gold handles. The round shape and plain design helped the piece feel clean and relaxed. These small details made a big difference in the final result.
In just one weekend, the dresser looked completely refreshed. It now fits the space without being too noticeable. The paint and hardware worked together to create a balanced, quiet look.
2. From Damaged to Navy and Gold
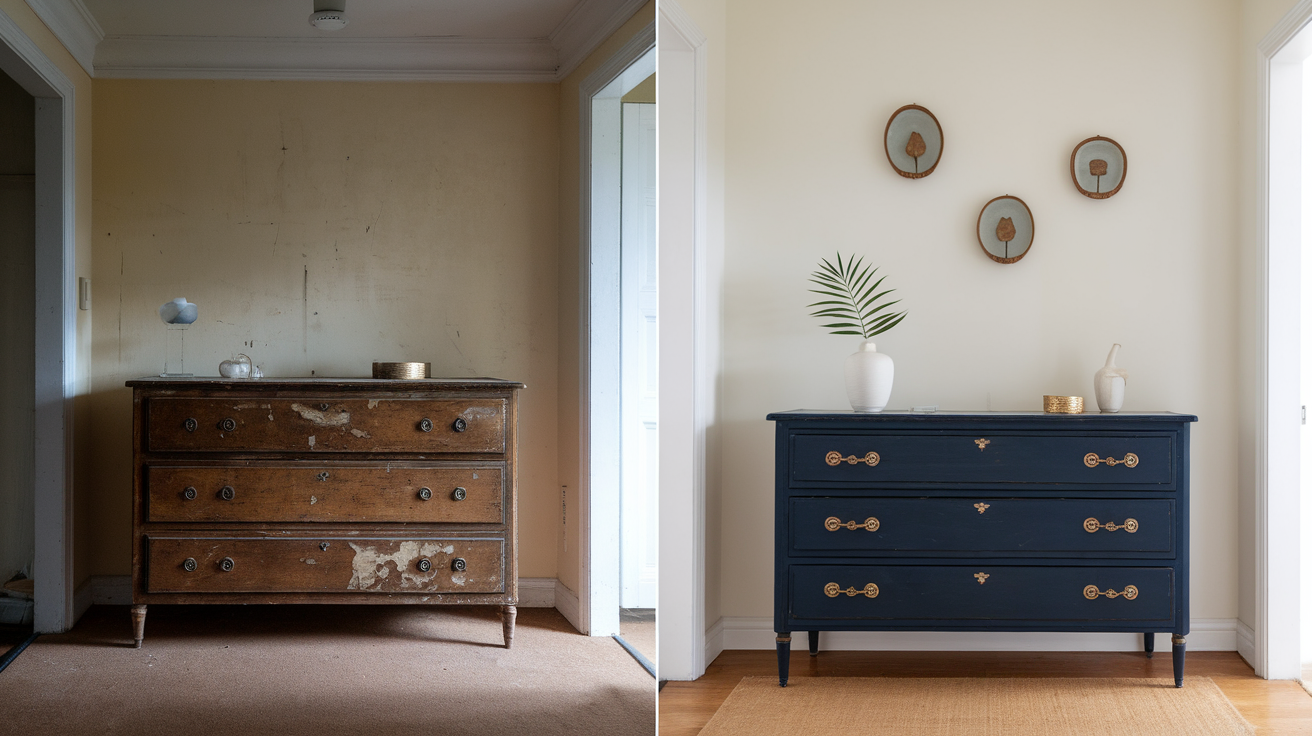
Years of wear had left this dresser with chipped corners and faded paint. One of the legs was loose, and the drawers didn’t open smoothly. Even though it looked rough, the shape and size were still useful.
After making repairs and sanding the surface, the dresser was painted in a deep navy blue. This bold shade gave the piece a more modern feel and effectively concealed the older damage. A smooth finish helped bring it back to life.
To add some shine, gold pulls were added to all six drawers. The new hardware gave the dresser a strong, clean look without being too much. It brought in just the right amount of contrast.
This makeover transformed the dresser into a standout piece in the hallway. The deep blue color gave it weight, while the gold added brightness. Now it functions as a useful and visually appealing storage spot.
3. From Outdated Stain to Two-Tone Style
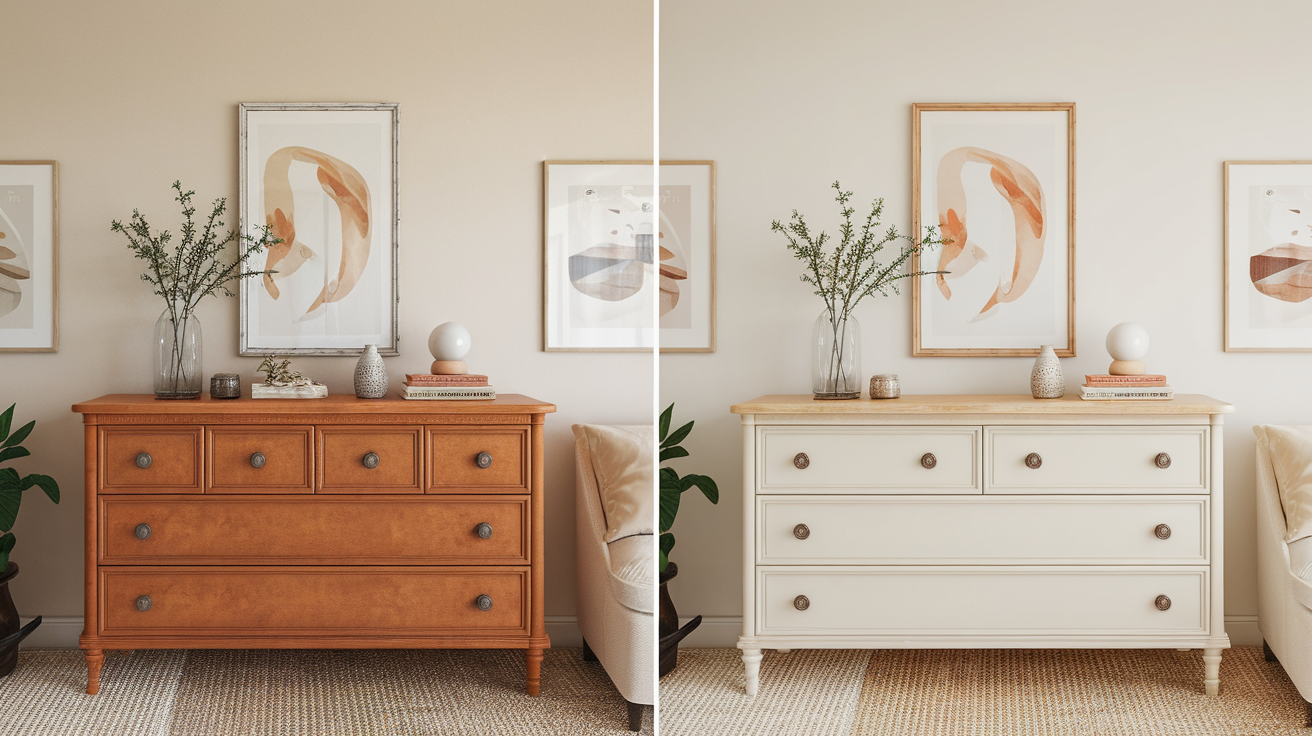
This dresser had an old orange stain that didn’t match the rest of the room. Even though its shape was simple, it looked bulky and flat. It needed a lighter, cleaner look to feel fresh again.
The top and drawers were sanded down to bare wood. A clear coat was applied to protect the wood and enhance its natural tone. The body was painted in a soft white for contrast.
Instead of buying new knobs, the owner kept the old ones and gave them a light polish. This helped tie the two finishes together, saved money, and kept the look simple.
The final result was clean and balanced. The mix of natural wood and white paint worked well in a guest room. It helped the dresser feel lighter while still adding some warmth to the space.
Popular Dresser Makeover Ideas
There are many ways to update a dresser based on your style, tools, and time. Some updates are quick, like changing hardware, while others involve painting or adding detail.
These ideas can help you pick a direction for your own project.
1. Painting and Staining
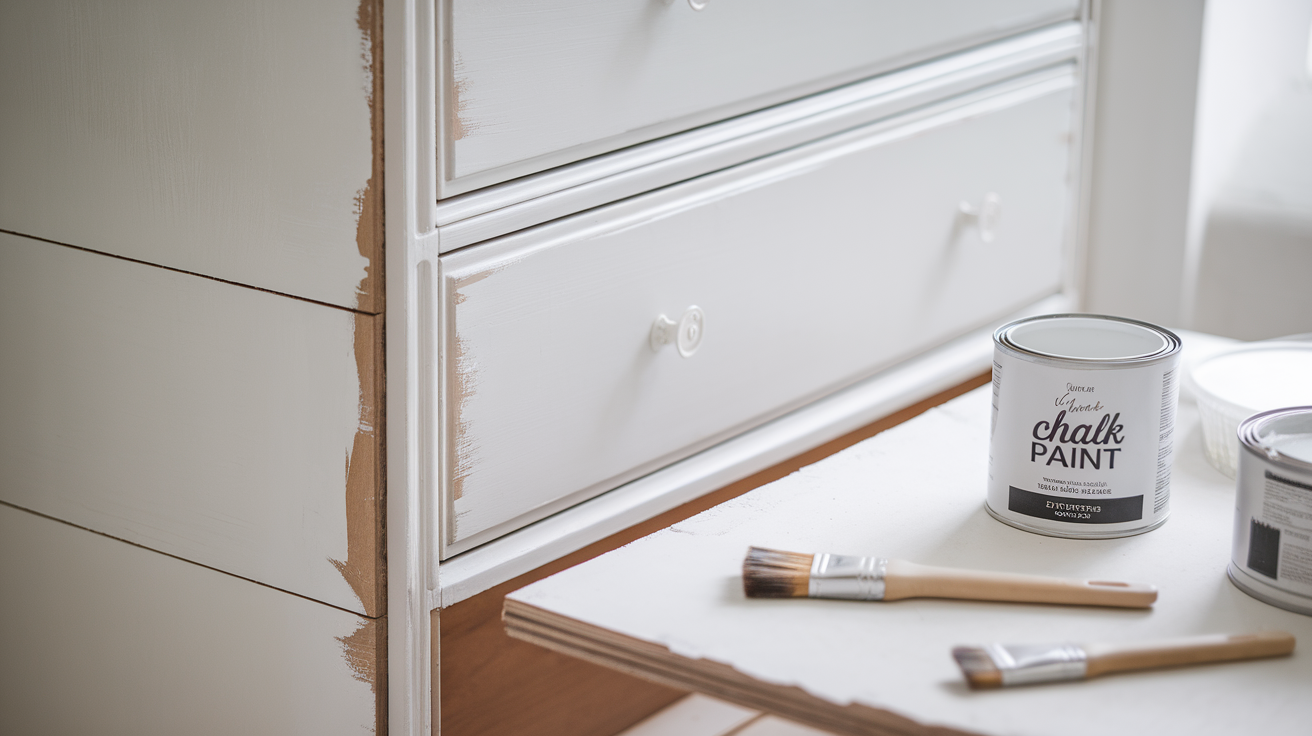
Painting is one of the easiest ways to refresh a dresser. Chalk paint, milk paint, or stain each gives a different look and feel. Stain is a good choice if you want to keep the wood grain visible.
Neutral shades like white or gray are safe and calm, while bold colors like navy or green can stand out more. Your color choice depends on how much you want the dresser to pop. Think about what fits best with your space.
Prep is important for a smooth finish. Sanding and using a primer help the paint last longer. A final topcoat will protect your work and give it a clean look.
2. Changing the Hardware

New knobs or handles can completely change the style of your dresser. Even without painting, hardware updates make a big difference. You can find modern, rustic, or vintage options in many finishes.
Modern styles often use black or brushed silver. Rustic looks may use wood or bronze, while glass knobs give a vintage touch. Each one adds something different to the piece.
I once swapped out old knobs for sleek black handles, and it made the whole dresser look brand new.
If the new hardware doesn’t match the old holes, you can fill and drill fresh ones. This makes sure everything lines up well. Always measure before installing.
3. Using Wallpaper or Stencils
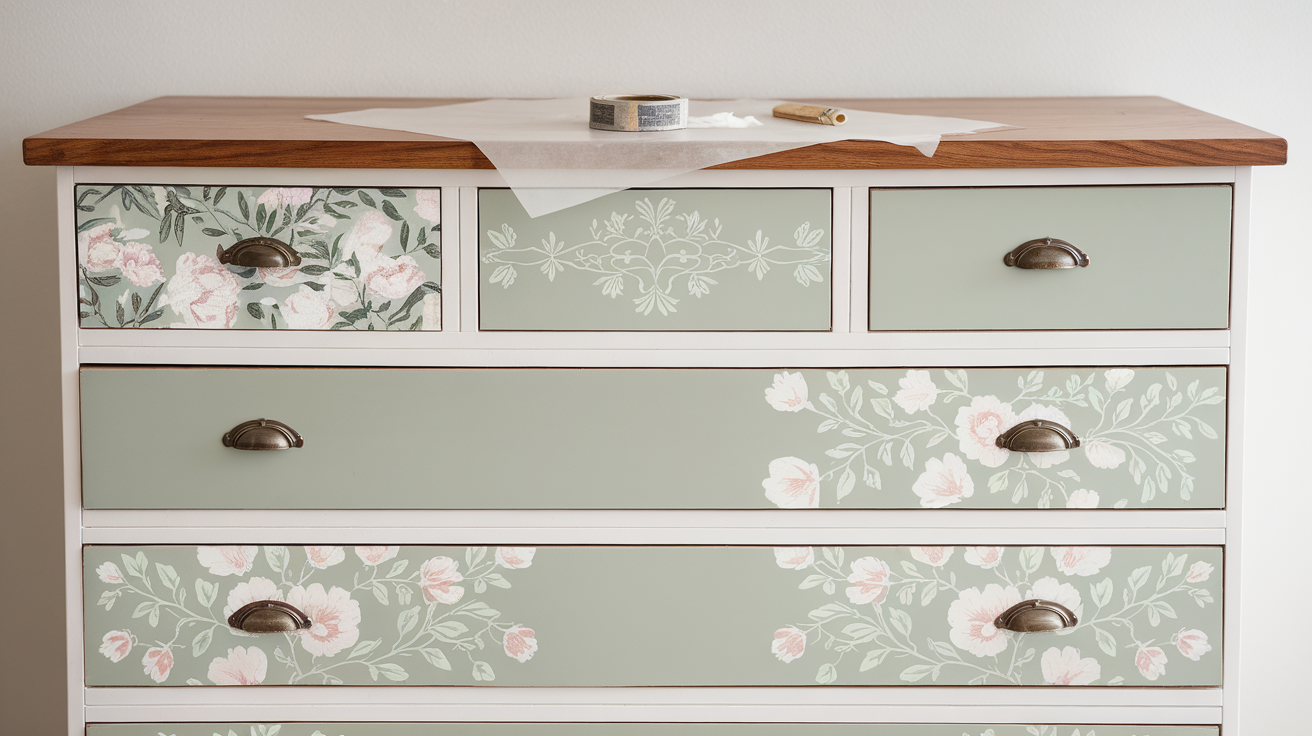
Wallpaper and stencils can add fun designs without much effort. Peel-and-stick wallpaper works well on drawer fronts or sides, while stencils let you add patterns using paint and tape.
Depending on your taste, you can create stripes, flowers, or shapes. Lighter designs can blend in, while darker ones stand out. These ideas work well to hide marks or uneven paint.
This method is affordable and adds a personal touch. It’s a great way to change the look without repainting the whole piece. You can also remove or cover it later if you want to switch styles.
4. Adding Trims or Overlays
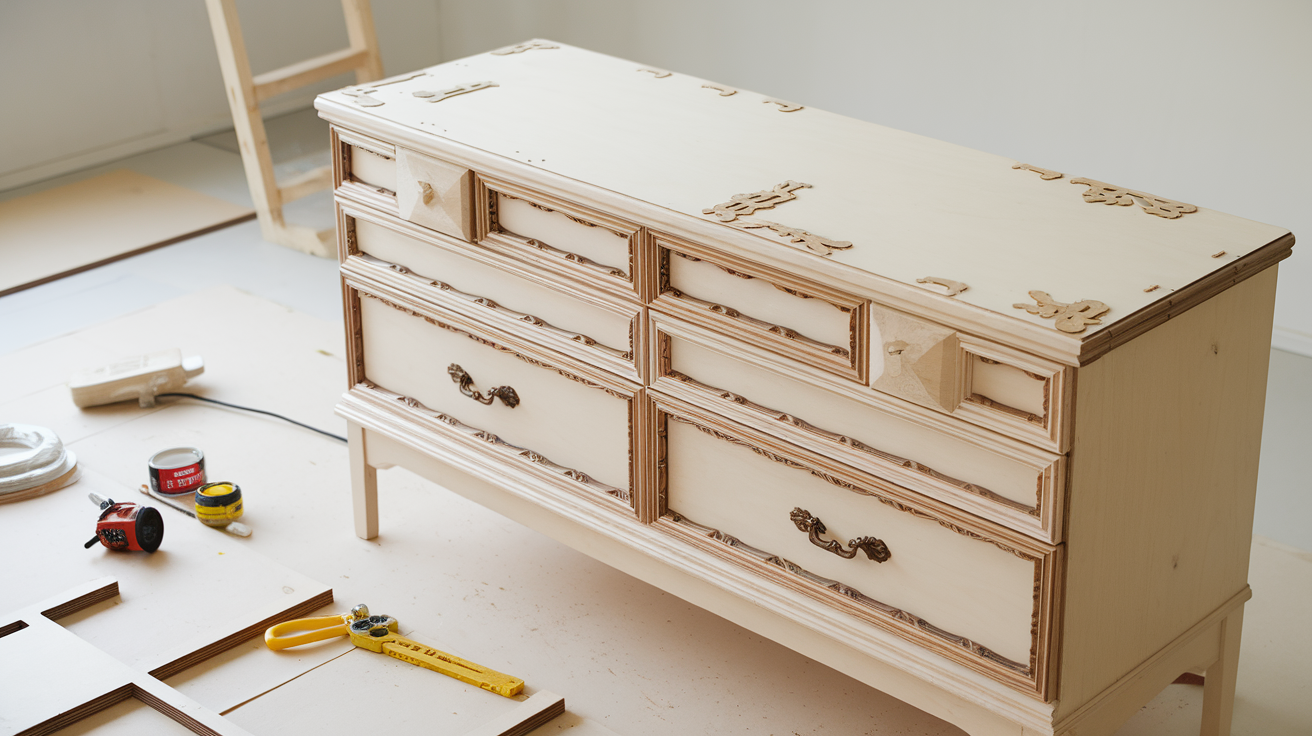
Trim and overlays give your dresser more shape and detail. Wood trim pieces are easy to find at most hardware stores. They can be cut and glued onto flat surfaces.
Adding trim to drawers makes them look paneled or built-in. You can also use overlays to frame the edges or sides. These small upgrades add depth and texture.
After adding trim, I usually just paint the piece one color or sometimes highlight certain areas. This makes it feel more finished. Light sanding helps smooth out any rough edges.
Step-by-Step Guide to a Dresser Makeover
Giving an old dresser a fresh look can be simple when you follow each step in order. A little planning and care go a long way toward a smooth and lasting finish. This guide will walk you through the process, one step at a time.
Step 1: Preparation and Cleaning
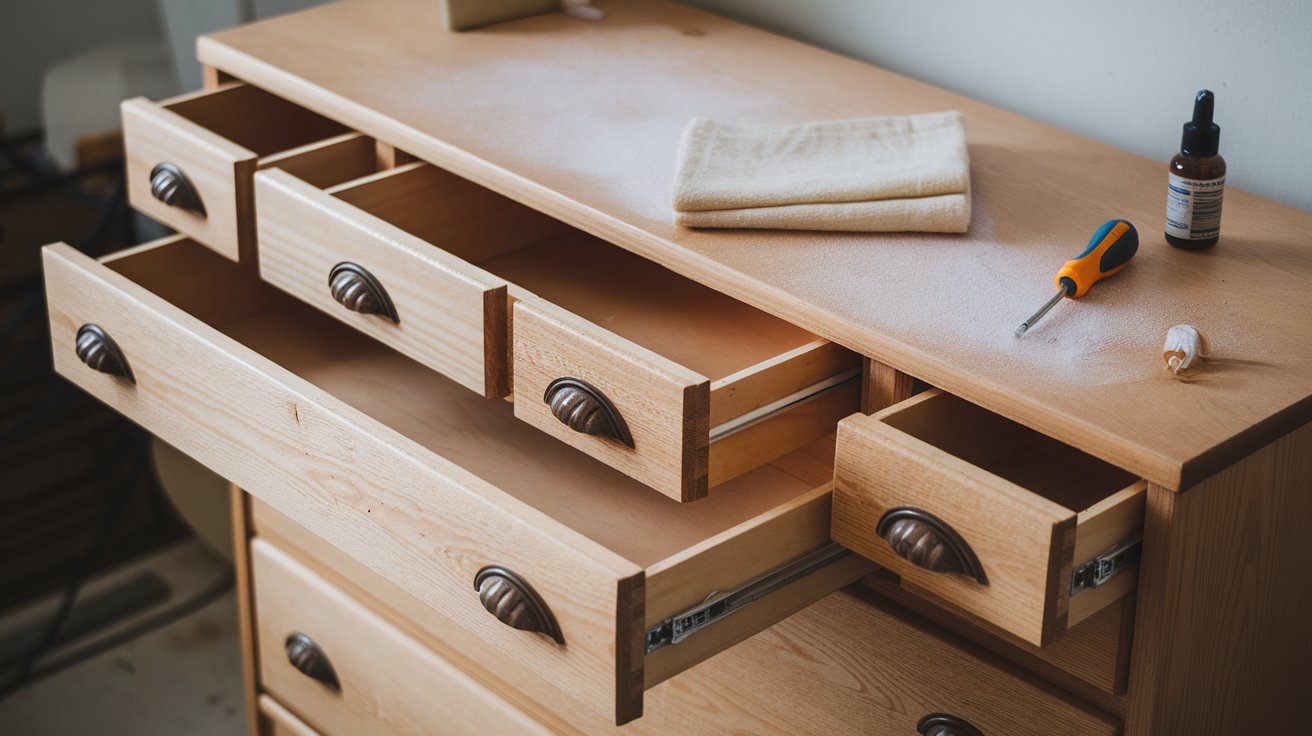
Start by removing all hardware, including knobs, handles, and any metal pieces. Take out the drawers and check for any signs of damage, like cracks or loose joints. It’s important to begin with a solid, clean surface.
Wipe the entire dresser down using warm water and a mild cleaner. Remove dirt, dust, and any leftover stickers or tape. Let it dry fully before moving on to the next step.
Inspect all surfaces for dents, peeling finish, or deep scratches. Fill any holes with wood filler and let it dry completely. A little extra prep now will help your final result look smooth and clean.
Step 2: Sanding and Priming
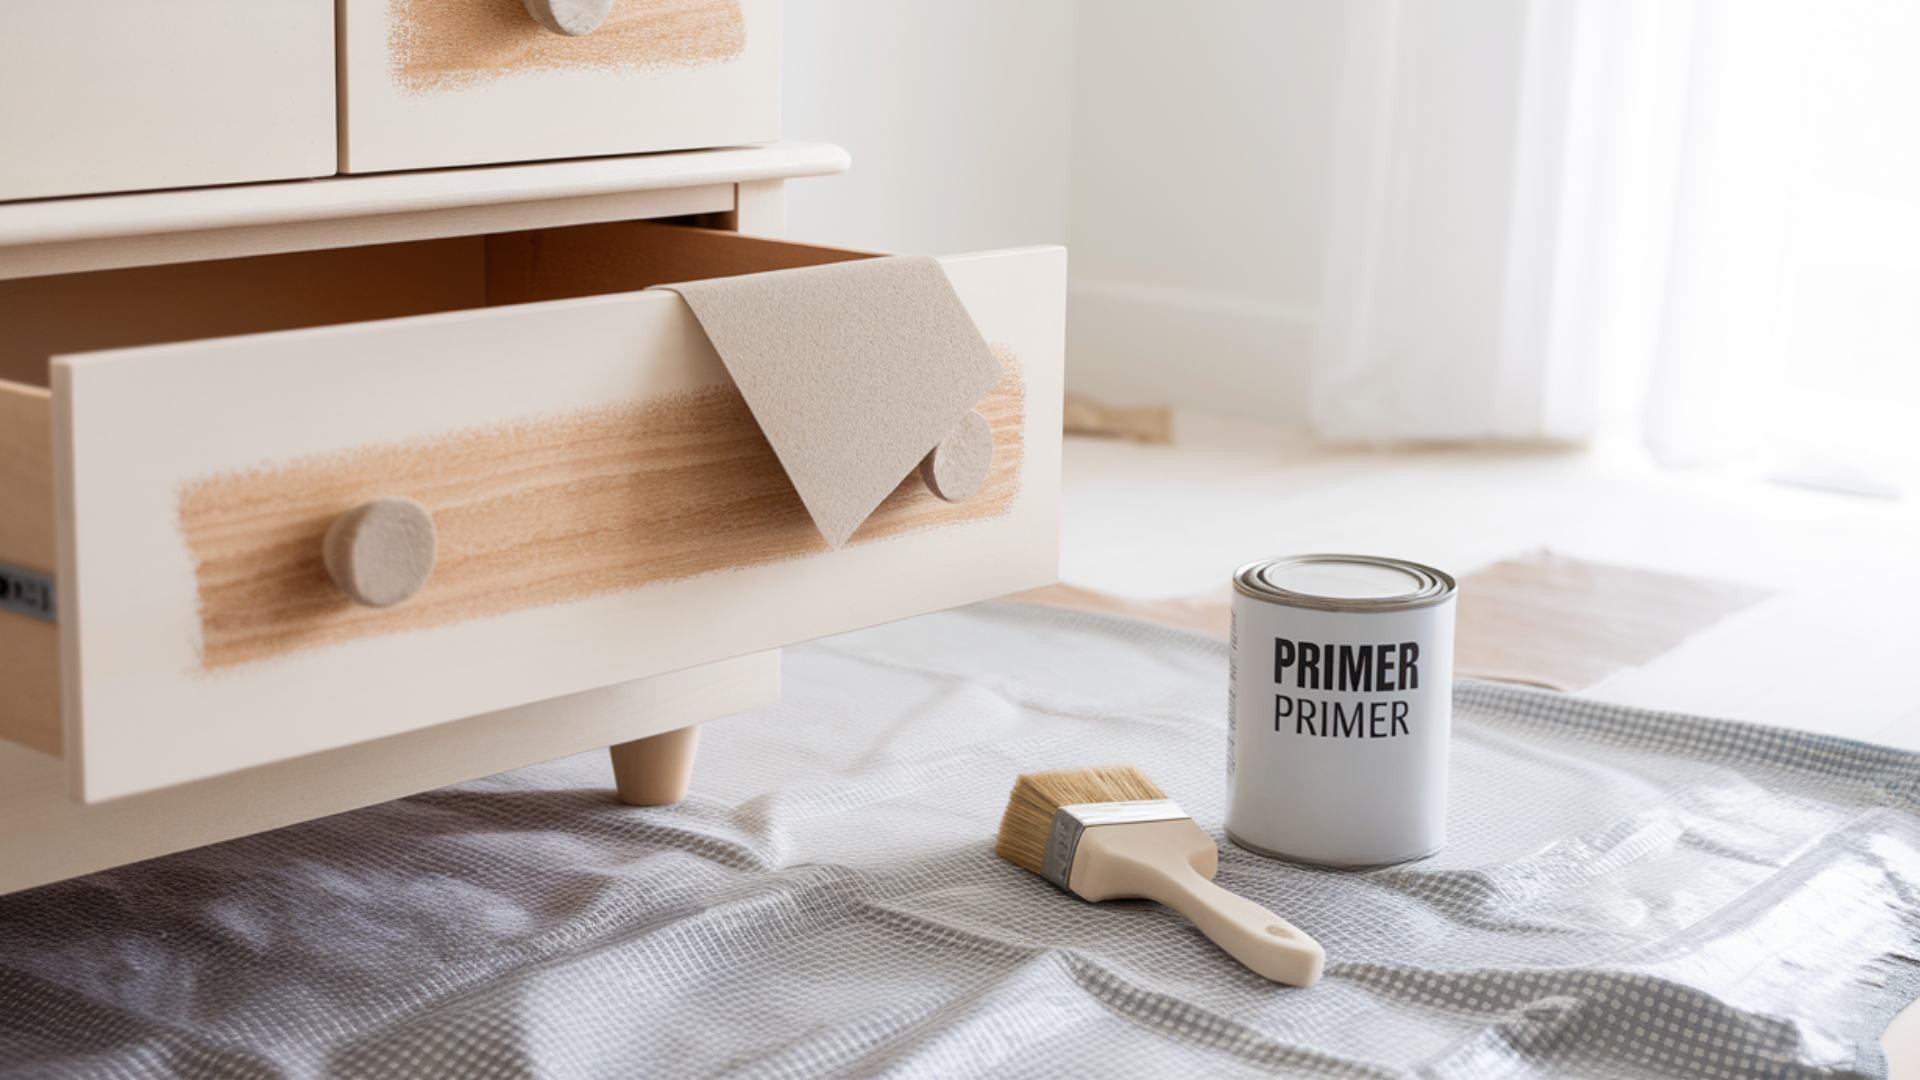
Once the dresser is clean and dry, lightly sand the surface with fine-grit sandpaper. This helps remove any remaining finish, allowing paint or primer to adhere better. Be sure to sand in the direction of the wood grain.
After sanding, wipe away all dust with a tack cloth or a damp rag. A clean surface is important for even coverage. Don’t forget the drawer fronts and side panels.
Apply a coat of primer, especially if you’re using a light paint color or painting over a dark finish. Primer helps block stains and creates a smooth base for the top coat. Let it dry completely before painting.
Step 3: Choosing Paint or Stain
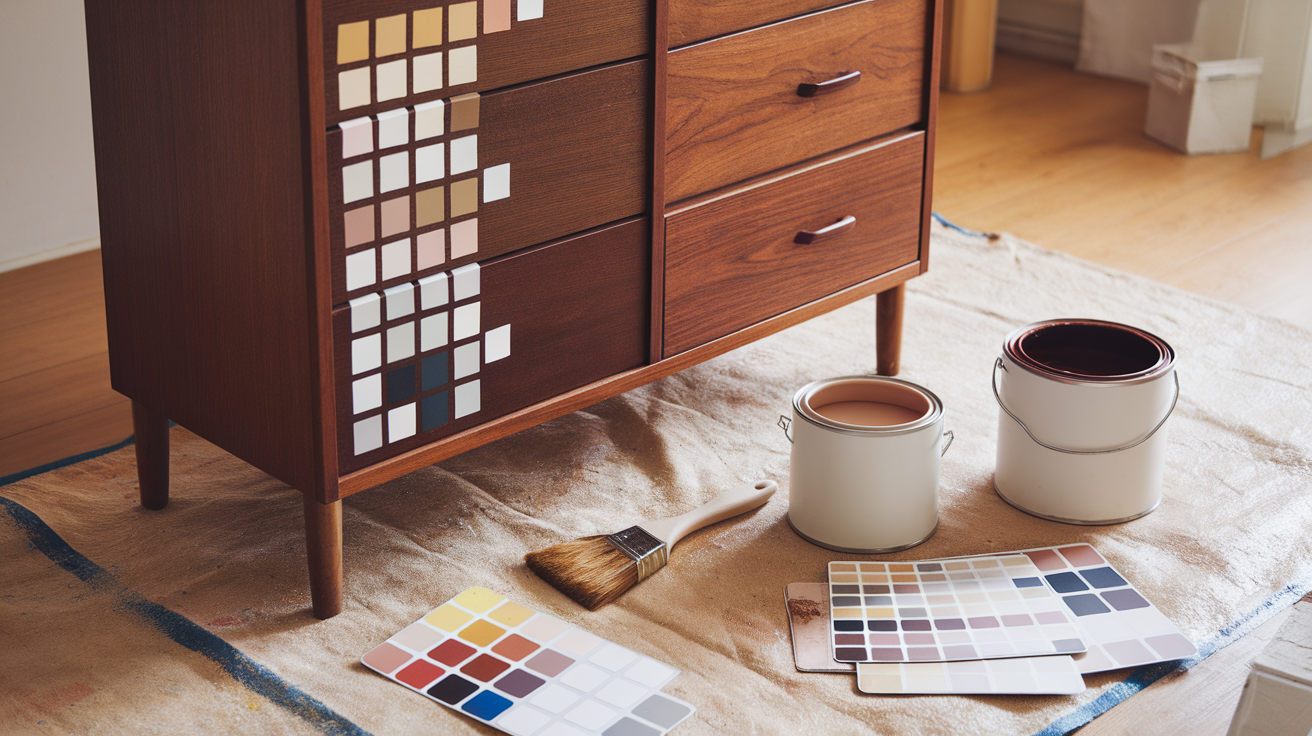
Now, it’s time to choose your finish. Paint will fully cover the wood, while a stain might be a better choice if you prefer to keep some of the wood grain.
Lighter colors can make a dresser feel fresh and bright, while darker shades give a bold, modern look. Consider where the piece will be placed and what other colors are present in the room.
Try out sample colors on the back or side of the dresser before painting the whole thing. This small test can help you feel more confident in your decision. Always go with a finish that fits your space and style.
Step 4: Applying Finishes and Hardware

Start with thin, even coats of paint or stain, using a brush or foam roller. Allow each coat to dry completely before applying another to prevent smudges or streaks. Two to three coats usually give the best coverage.
Check the finish under natural light to ensure it’s smooth and even. If needed, lightly sand between coats for a cleaner result. Be patient with drying—it helps the finish last longer.
Once everything is dry, reattach your hardware or add new knobs or pulls. Make sure they line up straight and fit tightly. After this final step, your dresser is ready to use again.
Best Paints and Tools for Dresser Makeovers
Using the right paint and tools makes your dresser makeover smoother and helps the finish last longer. You don’t need fancy supplies, but choosing the right basics can make a big difference in how your project turns out.
- Chalk paint: Good for a matte finish and easy to apply without much prep
- Milk paint: Great for a soft, worn look with natural ingredients
- Latex paint: Durable and easy to clean, good for high-use areas
- Foam rollers: Give a smooth finish without brush marks
- Angled brushes: Help you get into corners and edges
- Sandpaper (120–220 grit): Used for prep and between coats if needed
- Tack cloth or damp rag: Removes dust before painting
- Screwdriver and tape: Helpful for removing hardware and taping off edges
Having these tools ready will save you time and help avoid problems during your makeover. Good prep and quality paint go a long way toward a smooth, lasting finish.
How to Choose a Dresser to Make Over?
Finding the right dresser is the first step to a good makeover. You don’t need something perfect—just a solid piece with potential.
Thrift stores, garage sales, estate sales, and online listings are great places to look. These spots often feature low-cost dressers that simply require a little care. Older pieces may be built better than new ones.
Look for a strong frame, working drawers, and no major cracks. Loose knobs or small chips are fine and easy to fix. Avoid dressers with water damage or warped wood.
Check that the drawers slide in and out smoothly without sticking. A quick test in-store can save you trouble later. If the dresser is steady and the wood is solid, you likely found a good one.
Common Mistakes to Avoid
Even small mistakes can lead to uneven results or paint that doesn’t last. Paying attention to the process helps you avoid doing extra work later.
- Skipping prep: Dirt, dust, and leftover finish can stop paint from sticking
- No sanding or priming: Paint may peel or look uneven without proper prep
- Painting too fast: Thick coats or short drying times lead to streaks or sticky surfaces
- Using the wrong finish: Matte paint in high-use areas may wear off quickly
- Wrong tools: Using the wrong brush or roller can leave marks or waste paint
Taking your time and doing each step with care makes a big difference. A little planning will help your dresser look better and stay that way longer.
Conclusion
A dresser makeover can do more than change how a piece looks—it can also give you a space that feels more like home. It’s a simple project that costs less than buying something new and gives you full control of the outcome.
You don’t need special skills or a long weekend to get started. With just a little patience, a plan, and some basic supplies, you can transform a tired dresser into something you’ll enjoy using every day.
In this blog, you’ve seen ideas, steps, and simple tips to help you try it yourself. This project fits any home and can be adjusted to your own style.
If you’ve already made one, feel free to share your before-and-after photos in the comments. And if not, maybe now is the time to grab a paintbrush and start.