-
Cutting a mirror at home might sound intimidating, but it’s actually something you can do with the right tools and a bit of patience. I remember the first time I tried – it wasn’t perfect, but it felt incredibly rewarding.
Whether you want a mirror to fit a small bathroom nook or a large frame you found at a thrift store, learning to cut your own mirror gives you more freedom and creativity.
But here’s the thing: glass can be unpredictable. It’s super important to be cautious and understand each step clearly before you begin.
In this guide, I’ll walk you through exactly how to cut a mirror safely and accurately, based on my own experience.
What Is Glass Cutting?
Glass fabrication is the process of customizing, shaping, or treating raw glass into useful components or finished products.
This involves several techniques such as cutting, grinding, drilling, polishing, tempering, edging, and finishing. Each step plays a key role in changing raw sheets of glass into functional and often decorative pieces.
One of the most common and essential techniques in glass fabrication is cutting. Glass cutting involves creating a controlled break along a score line.
This is done by scoring the glass surface in the desired shape or size, then applying gentle and consistent pressure to snap it along that line. A precise and well-made score line makes the process smoother and more accurate.
No matter if you’re working on a large industrial project or a small DIY task, the basics of glass cutting stay the same. However, the approach may vary depending on the glass’s thickness and size.
Tools and Materials for Cutting Glass
Cutting glass is much easier and safer when you have the right tools and setup. You’ll need two groups of items: cutting tools and support materials.
Cutting Tools
- Glass Cutter – For scoring the glass.
- Cutting Oil – Helps the cutter glide smoothly.
- Straight Edge Ruler / Metal Straightedge – Guides your cut.
- Glass Running Pliers – Used to snap the glass.
- Work Gloves & Protective Glasses – For safety.
Support Materials
- Plywood or Flat Surface – A solid base.
- Old Blanket or Fabric – To cushion the glass.
- Glass Cleaner & Paper Towels – For prepping the surface.
- Grease Pencil – To mark cutting lines.
- Painter’s Tape or Duct Tape – For extra support.
- Clamps (Optional) – To hold the glass in place.
These make the job smoother, even for beginners.
Step-By-Step Guide to Cutting a Mirror
This simple guide will help you cut glass or mirrors with ease. Even if you’re a beginner, these steps make the process smooth and manageable.
Step 1: Scoring the Line

The first step in cutting glass or a mirror is to gather all your tools and materials before starting. Clean the mirror thoroughly to ensure smooth scoring.
Lay a blanket or soft fabric on your stable work surface to cushion the glass. Put on your safety gloves for protection, then place the mirror on the workspace.
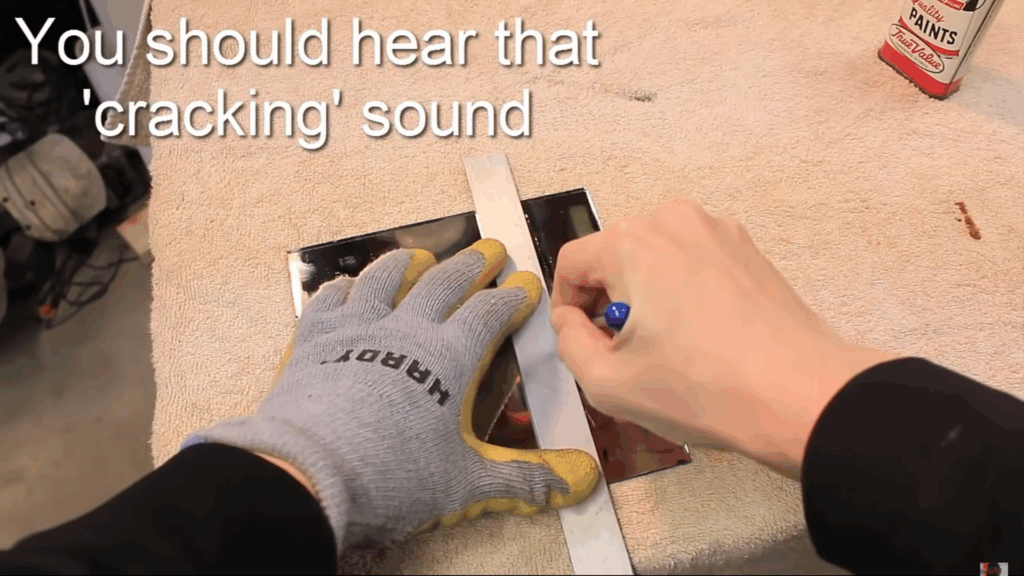
Apply a bit of cutting oil to both the cutter and the area you plan to cut. Use a straightedge ruler to guide your score, and hold it firmly in place. Press the cutter down and glide it smoothly along the marked line.
You should hear a slight cracking sound, which means the glass is being scored correctly. After scoring, inspect the line to make sure it’s even and continuous.
Step 2: Loosening the Glass
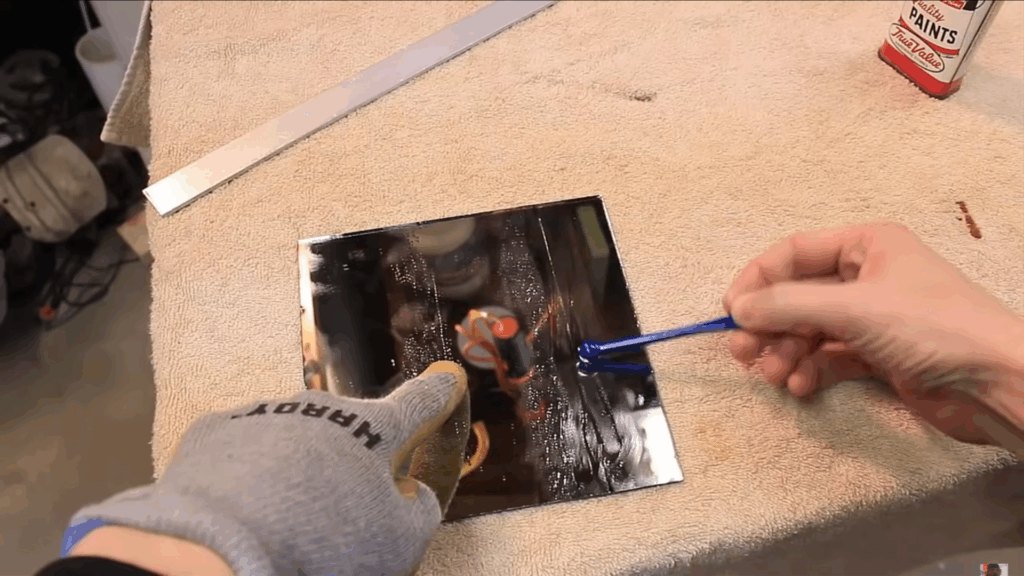
To snap and separate the cut glass, you’ll need to gently loosen it first. Flip your glass cutter to use the ball end, then lightly tap along the underside of the score line, on the side of the glass you don’t want to keep.
Focus your tapping close to the score line to help the break follow your intended path. This step encourages the glass to separate cleanly along the scored mark.
Step 3: Snapping the Glass
This is the final and most important step in the glass-cutting process. Put on gloves on both hands, and make sure you’re wearing safety goggles; this part can cause small shards to fly.
Position the glass so that the score line is right at the edge of your table or work surface. With steady hands, press down gently but firmly on the side of the glass you don’t want to keep.
Apply even pressure until the glass snaps cleanly along the score line. Take your time; rushing can lead to cracks or jagged edges.
Final Tip: To smooth sharp edges after cutting, use a metal file, nail file, or fine-grit sandpaper. Rounding over the edges helps prevent cuts and makes the glass safer to handle.
For a more detailed understanding, watch the full YouTube video by @DaveWirth.
Applications of Glass Cutting
I’ve found that cutting and customizing glass based on my needs makes a huge difference in how smoothly a project goes. When the glass is shaped just right, everything fits better, works better, and feels more manageable in daily life.
These are some situations where I’ve found glass cutting to be especially useful:
- Windows and doors in construction
- Automotive glass production
- Stained glass art and decoration
- Glassware and bottle manufacturing
- Glass tabletops and shelving
- Electronic device screens
- Optical lens fabrication
- Laboratory glassware
- Jewellery making
- Greenhouse construction
- DIY and craft projects
These uses are truly essential in our daily lives and help make things more convenient.
Common Mirror Cutting Issues
When cutting mirrors or glass, even with the right tools and precautions, a few common problems can still arise. These issues may seem minor, but they can affect the final result and the safety of your project.
- Cracks and Chips: These often happen when too much pressure is applied or if the score line isn’t clean. If you notice cracks forming, stop cutting immediately. Continuing could lead to an uneven or unsafe break.
- Uneven Breaks: Sometimes the glass doesn’t snap cleanly along the score line. In such cases, use running pliers to gently press along the line. This helps encourage an even, clean break.
By understanding these common issues, you’ll be better prepared to avoid them or fix them quickly. With patience and care, you can still achieve a professional-looking result.
When to Call a Professional?
Learning to cut glass is a useful skill, but it’s important to know your limits, especially if you’re just starting out. I’ve learned that there are times when calling a professional isn’t just helpful – it’s necessary.
If you need to make complex shapes, work with thick or tempered glass, or require high precision for a project, it’s best to leave it to an expert.
Professionals have the tools and experience to handle tough jobs safely and accurately, reducing the risk of injury or wasted materials. Sometimes, taking the safe route is the smartest choice.
Final Thoughts
With the proper equipment, techniques, and safety measures, you can effectively cut mirrors to suit your requirements.
Take your time, ease into the process, and prioritise safety. Practice on smaller and thinner pieces first before moving to a big project.
For big and thick mirrors, consider seeking guidance from a professional. Make sure to learn along the way, and don’t put too much pressure on yourself in the attempt.
If its your first time, you may struggle with cracks or uneven breaks, but don’t be worried, even the most experienced struggle with these.
The best advice would be to leave such delicate work in the hands of a professional, but if you are willing and eager to learn, then this is the simplest guide for you.