
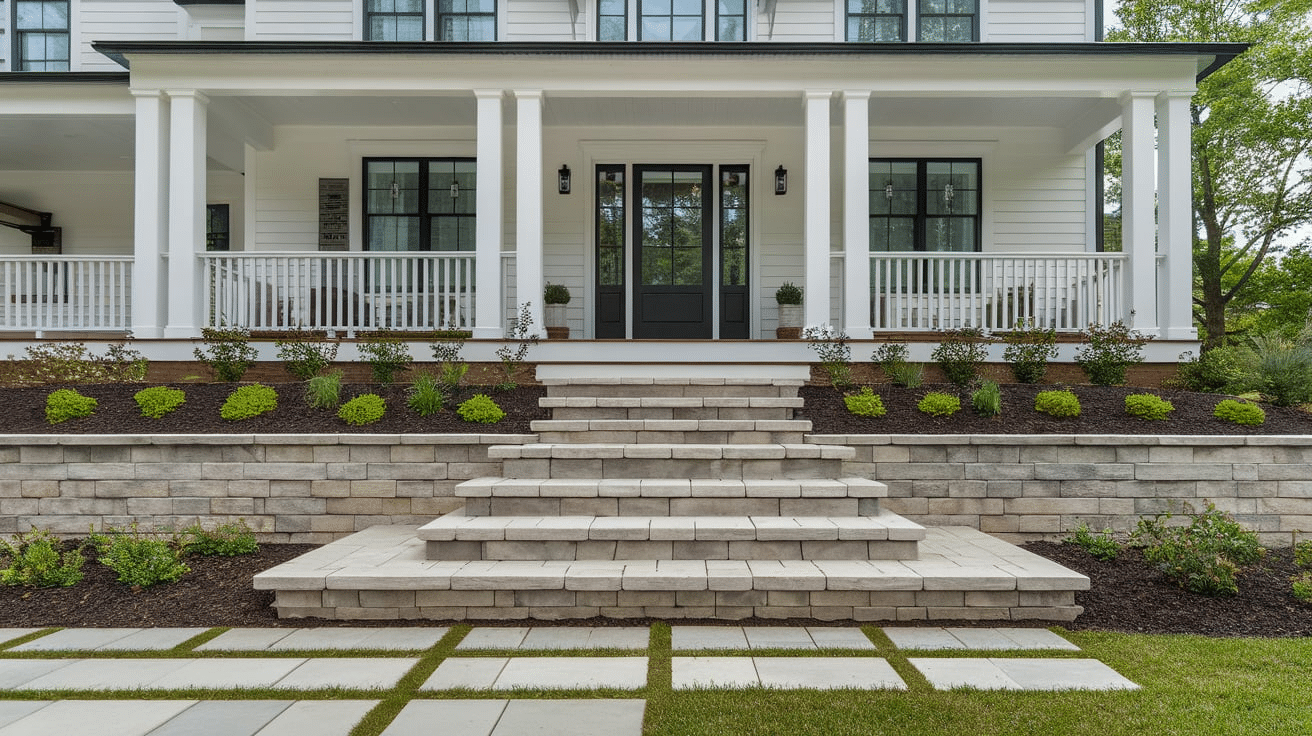
Are you thinking about adding paver steps right up against your house? It’s a great way to make your outdoor space look nicer and easier to walk on.
Paver steps can help you move safely between different levels in your yard or connect your patio to your back door. They also add a clean, stylish look that boosts your home’s curb appeal.
But before you start, it’s important to plan things out. You’ll need to consider safety, drainage, the right materials, and how the steps will fit in with the rest of your yard.
In this blog, I’ll explain everything you need to know—from picking a design to installing and maintaining your paver steps. Whether you’re doing it yourself or hiring a pro, this guide will help you get the job done right the first time.
Why You Need Paver Steps Against Your House

Paver steps aren’t just for looks—they make getting around your yard safer and easier. Let’s see why they’re a great addition to your home.
-
Safe and Easy to Walk On: If your yard has a slope or drop, paver steps help you move up and down safely. No more slipping on wet grass or struggling to climb a hill.
-
Connects Different Levels: Do you have a patio, porch, or raised doorway? Steps make it easy to move from one level to another without jumping or stretching.
-
Boosts Curb Appeal: Paver steps give your home a clean and finished look. They make your front or back entrance stand out in a good way.
-
Custom Looks: You can choose the color, size, and shape of your pavers to match your house and yard style.
-
Strong and Long-Lasting: Pavers are made to handle heavy foot traffic and bad weather. Once installed right, they can last for years without cracking or shifting.
-
Helps with Water Drainage: When done correctly, paver steps can help guide rainwater away from your house, protecting your foundation and keeping your yard from getting soggy.
-
Low Maintenance: Paver steps are easy to clean and fix. If one gets damaged, you can just replace that one without tearing out the whole thing.
As you can see, paver steps do a lot more than you might think. They’re a smart, stylish, and lasting upgrade for any home.
Considerations for Adding Paver Steps Against House
Before you start building paver steps against your house, it’s important to plan everything out. Good planning will save you time, money, and stress.
1. Check the Area Around Your House
Take a good look at where you want the steps to go. Is the ground flat or sloped? Are there things like bushes, pipes, vents, or wires in the way? You need a clear spot with enough space for the steps to fit safely and comfortably. Also, check how the steps will connect to your door, patio, or walkway.
2. Think About Water Drainage
Water should always flow away from your house—not toward it. If your steps don’t drain properly, rainwater can build up and damage your foundation. Make sure the ground is slightly sloped away from the house. You might also need to add a drain or move a downspout to keep water from pooling around the steps.
3. Choose the Right Spot for Function and Looks
Pick a place where the steps will be useful and look good. You want the steps to be easy to use, not hidden or in the way. Think about how you walk through your yard and what path feels most natural. Also, picture how the steps will look from the front or back of your house.
4. Decide If You’ll DIY or Hire Help
Building paver steps is a big job. If you like DIY projects and have some experience with digging, leveling, and stacking pavers, you might be able to do it yourself. But if the job seems too big or complicated, hiring a pro might be worth it. They’ll have the tools and know-how to do it right the first time.
Taking the time to plan properly can make a huge difference. It helps you avoid mistakes and gives you a better final result.
Designing and Planning Paver Steps
Once you’ve planned everything out, it’s time to get creative! There are lots of ways to design your paver steps so they match your style and make your home look great.
1. Pick the Right Paver Material
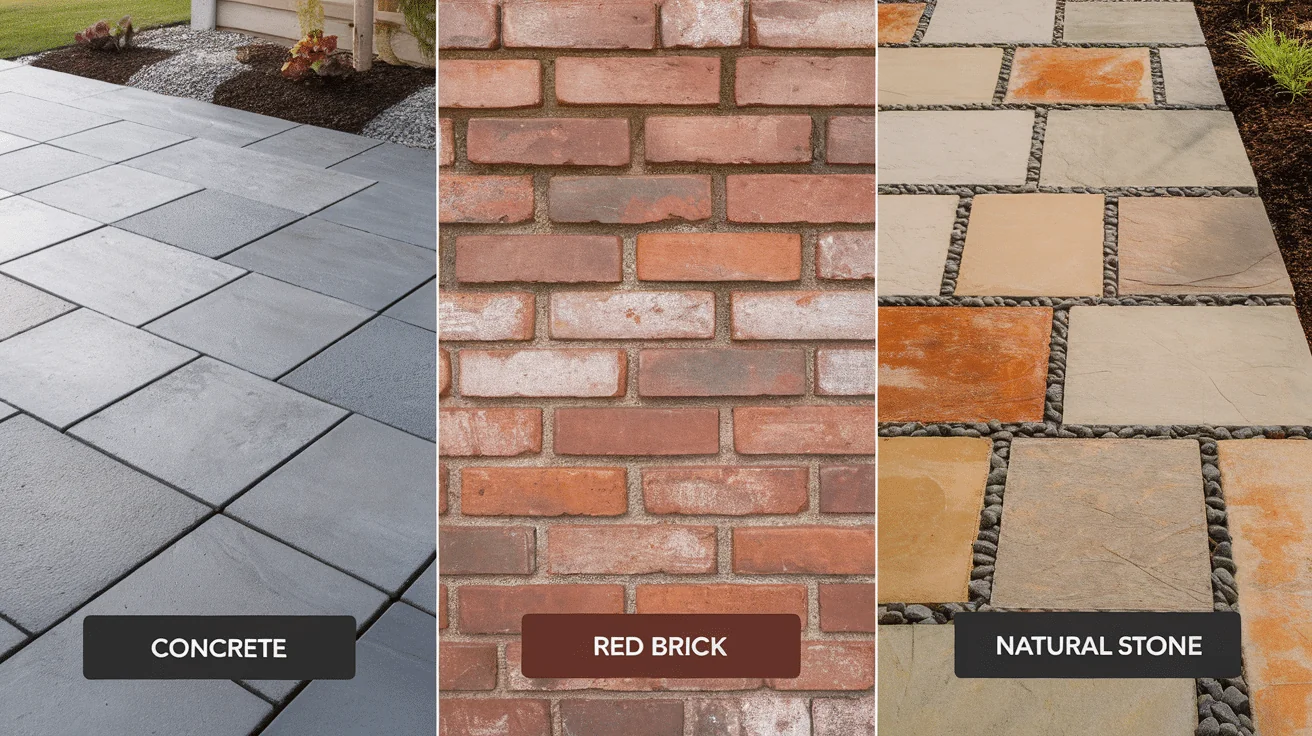
Pavers come in different materials, each with its own look and feel. Choose the material that fits your budget and the look you want for your yard.
- Concrete pavers are popular because they’re strong, easy to find, and come in many shapes and colors.
- Brick pavers are great for a classic or cozy look. Their rich color complements many house styles.
- Natural stone pavers: These give a more natural or fancy feel. Stone can be more expensive, but it looks really nice and lasts a long time.
2. Choose Your Step Shape
Not all steps have to look the same. You can design them to match your space and style. Consider how people will walk in that area and what will make them feel comfortable.
- Straight steps: These are simple and work great when you need to go up or down in a straight line.
- Curved steps: These look softer and fancier. They work well in garden areas or near curved patios.
- Wide steps: These make a big, grand entrance and give you more space to walk or decorate.
- Narrow steps: Good for small areas where you don’t have a lot of room.
3. Mix in Landings
- A landing is a flat space between steps. If your steps are tall or long, landings make the climb easier and safer.
- They also give your design a more relaxed and open look.
- You can even add plants, lights, or a bench near the landing to make it feel like part of your yard’s design.
Designing your paver steps is a chance to show off your style while making your yard more useful. Don’t be afraid to mix things up or get a little creative.
Materials and Tools
Before you start building your paver steps, make sure you have everything you need. Here’s a list of common materials and tools for the job:
- Paver stones (brick, concrete, or natural stone)
- Gravel or crushed stone (for the base)
- Paver sand (for leveling layer)
- Polymeric sand (for filling joints)
- Edging restraints (to hold pavers in place)
- Paver adhesive or mortar (optional, for added strength)
- Landscape fabric (optional, to block weeds)
- Shovel (for digging the area)
- Wheelbarrow (to move materials easily)
- Hand tamper or plate compactor (to pack the base)
- Level (to make sure everything is even)
- Rubber mallet (to tap pavers into place)
- Measuring tape (to plan your layout)
- Paver saw or chisel and hammer (to cut pavers if needed)
Having the right tools and materials makes the job easier and helps your paver steps last longer!
Step-By-Step Guide To Installing Paver Steps Against House
Now that you’ve planned everything and picked your design, it’s time to build your paver steps. If you like DIY projects and feel ready to get your hands dirty, this guide will walk you through the basic steps. Just take your time, follow each step carefully, and you’ll be proud of the results.
Step 1: Mark the Area & Dig the Space
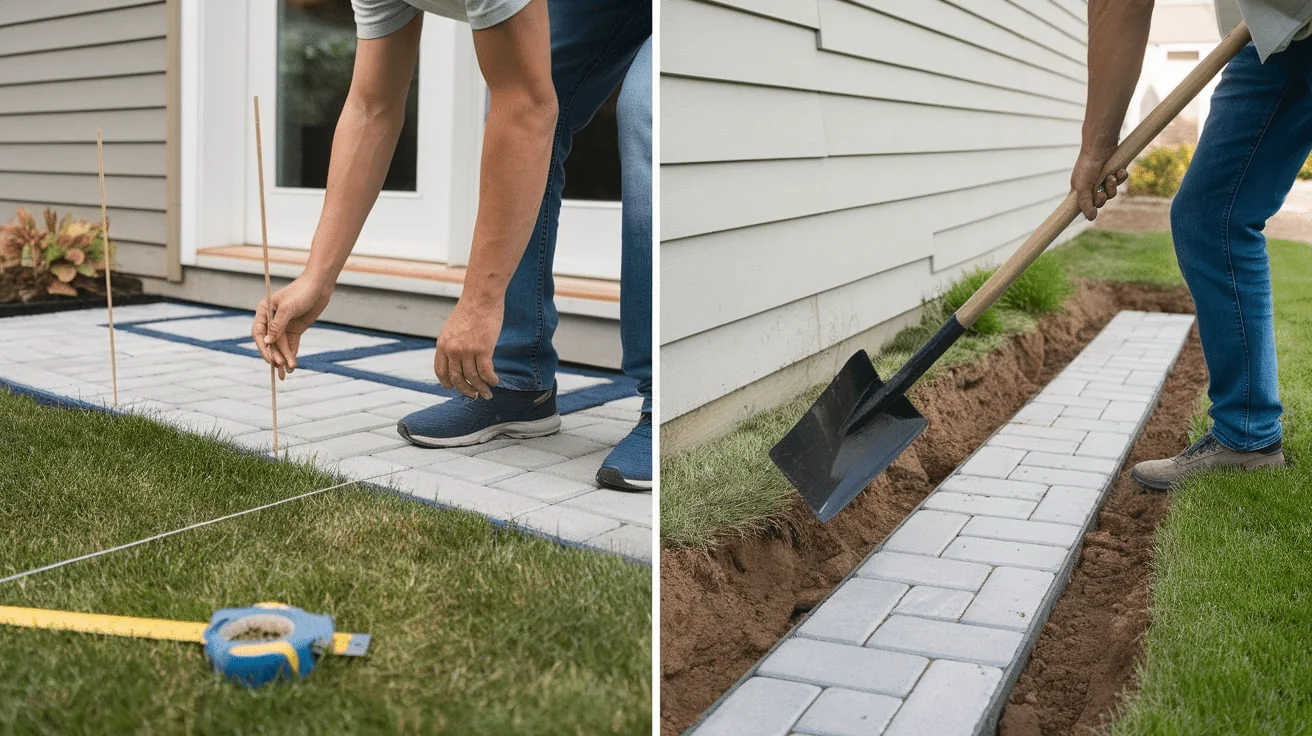
- Start by marking where your steps will go. Use wooden stakes and string or spray paint to outline the space. Make sure everything lines up with your house, door, or walkway.
- Figure out how many steps that means. A good step height is around 6 to 7 inches tall.
- Next, you need to dig. Remove grass, dirt, and any plants in the marked area. Dig down deep enough to fit a solid base—usually about 6 to 8 inches below where the bottom step will be.
Step 2: Create a Strong Base
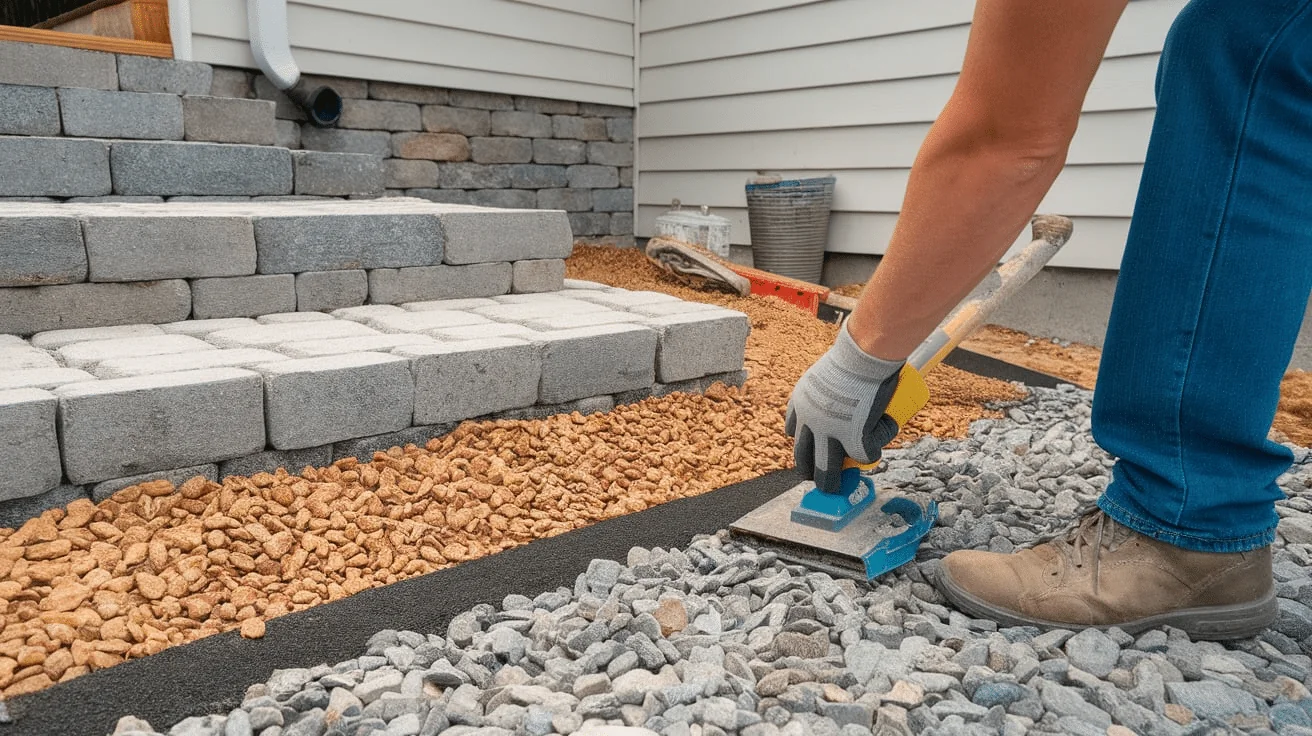
A strong base keeps your steps from shifting over time.
- Add gravel: Pour 4 to 6 inches of crushed stone or gravel into the hole and spread it evenly.
- Tamp it down: Use a hand tamper or plate compactor to press the gravel down tight, making it solid and strong.
- Check for level: Use a level to make sure the surface is flat. Good leveling now will help the rest of the job go smoothly.
Step 3: Add Sand Layer
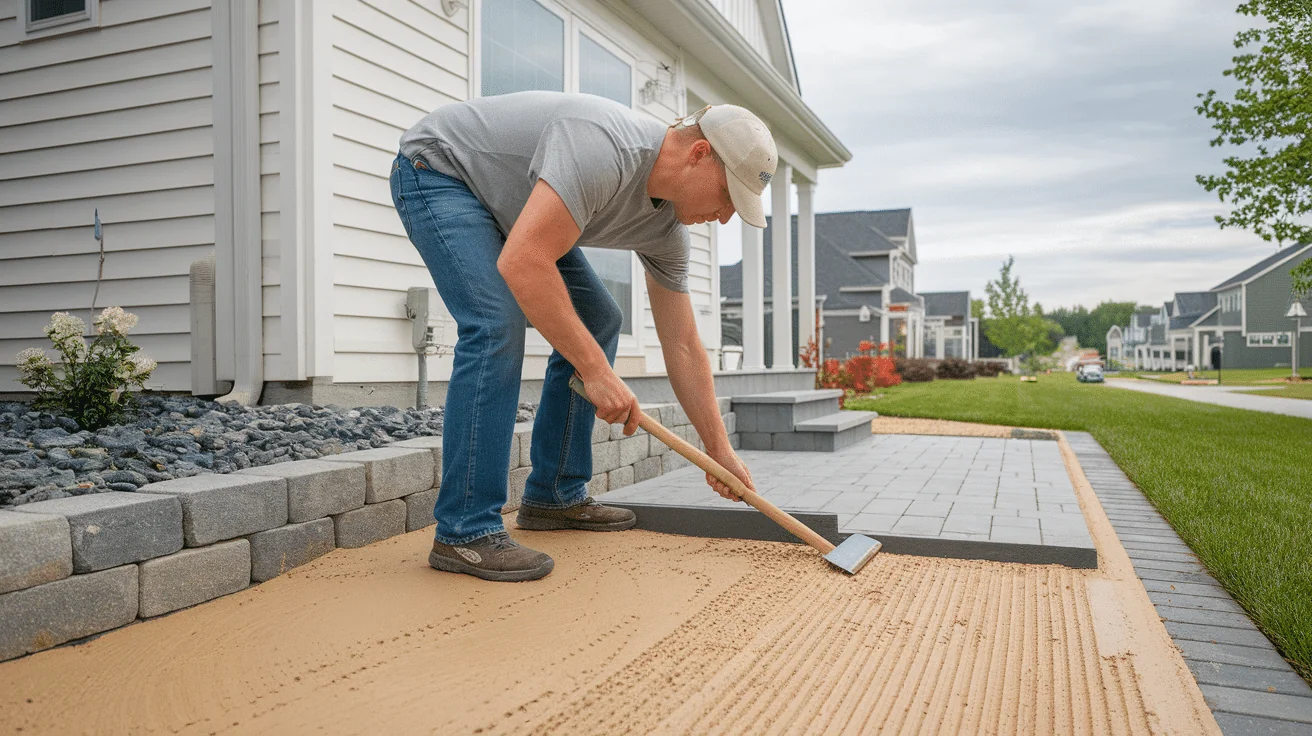
Pour about 1 inch of coarse sand on top of the gravel. This will help level the pavers as you lay them.
- Spread the sand evenly: Use a board or rake to smooth it out.
- Make it level: Again, use your level to check.
Step 4: Build the First Step
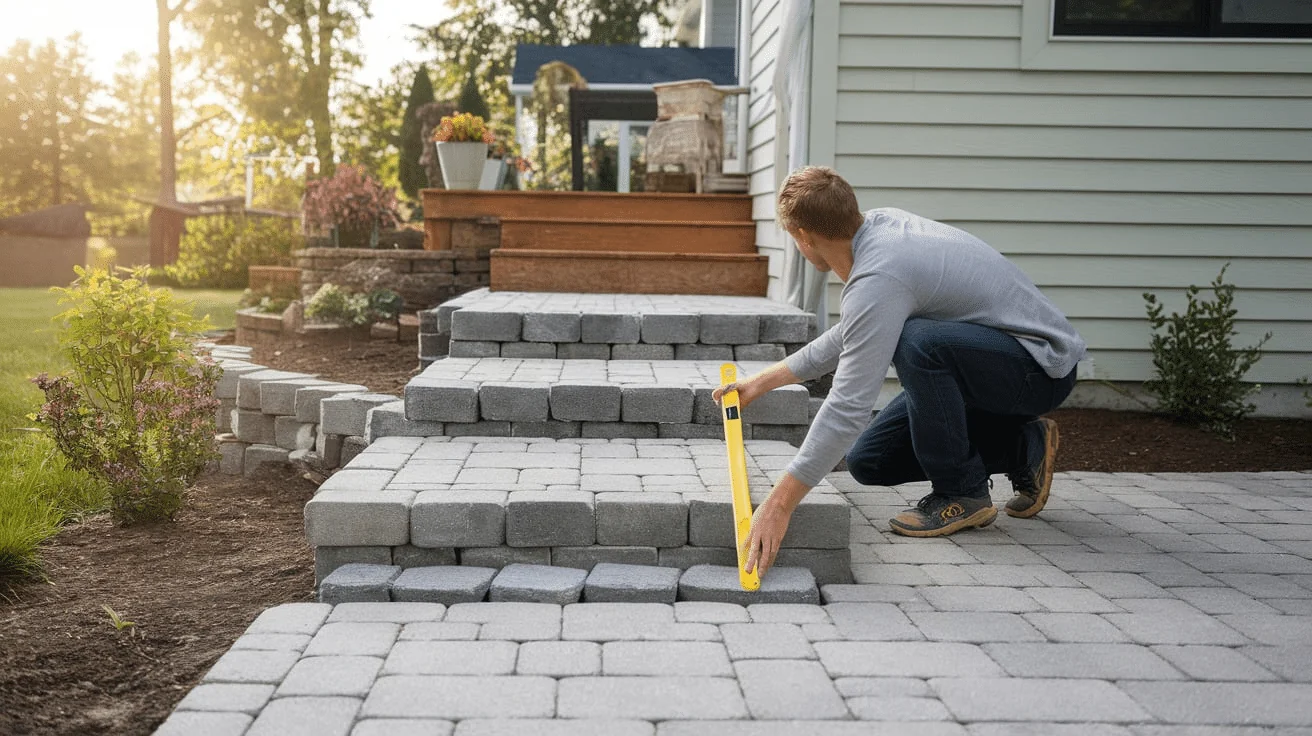
Start with the bottom step and build up from there. It’s the most important one—if it’s crooked, all the others will be too.
- Place your pavers: Set the pavers in the sand and press them down. Make sure they’re straight and even.
- Tap gently: Use a rubber mallet to tap each one into place.
- Check level and spacing: Keep checking your level and leave small gaps between pavers for joint sand later.
Step 5: Build the Next Steps
Once the first step is completed, proceed to the next. Before laying the next row of pavers, you’ll need to backfill behind each step with gravel and sand.
- Repeat the process: Add gravel, tamp it down, add sand, and lay pavers.
- Stagger joints: Avoid lining up joints exactly on top of each other. This helps your steps stay strong.
- Keep everything square and level: Take your time and check often.
Step 6: Cut Pavers If Needed
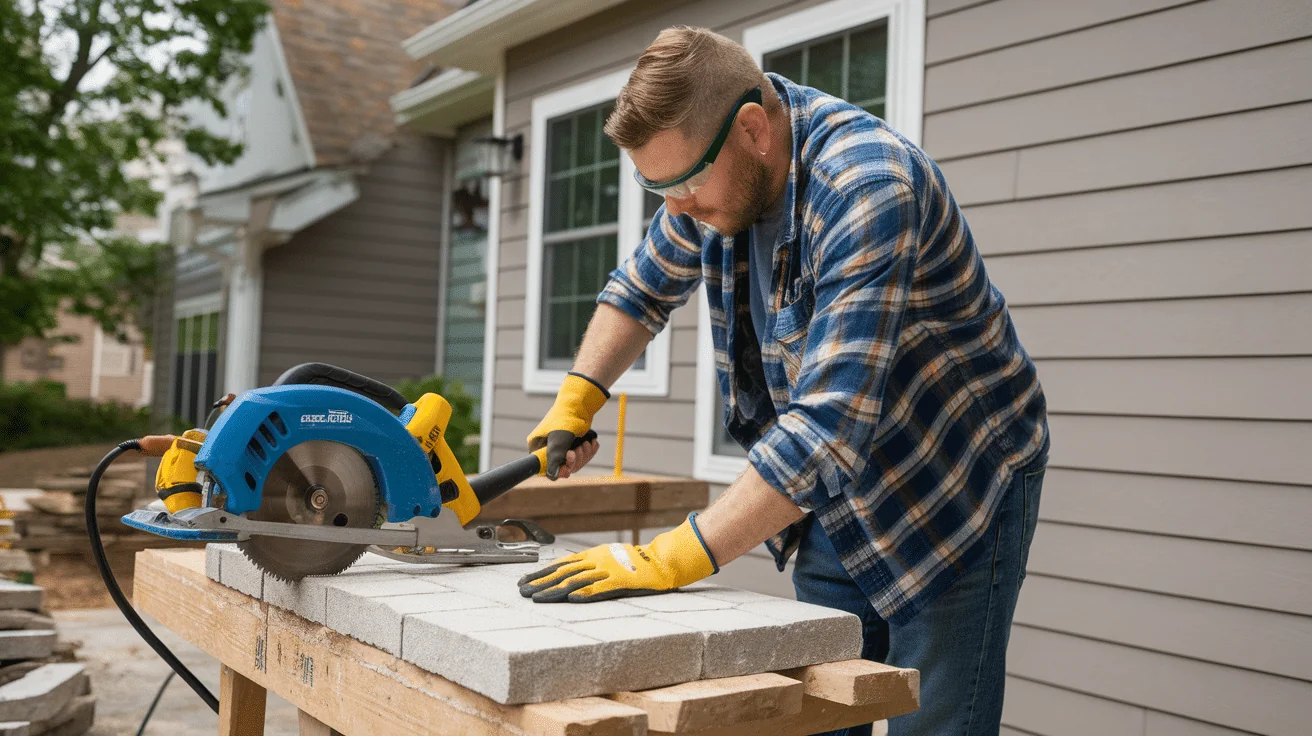
Some pavers might need trimming to fit just right, especially on the sides or curves.
- Use a paver saw or chisel: A paver saw is best for clean cuts, but you can also score and break pavers with a hammer and chisel.
- Wear safety gear: Always wear gloves and safety glasses when cutting.
Step 7: Fill the Joints
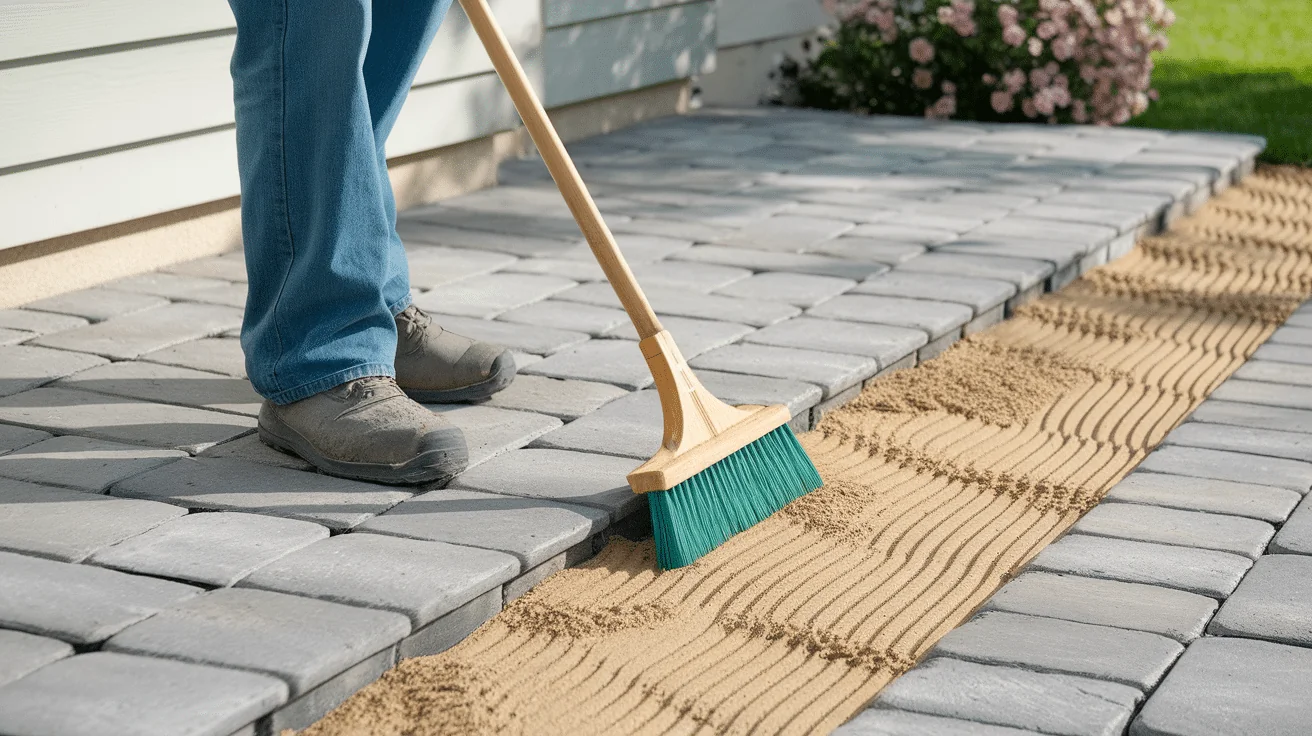
Once all your pavers are in place, fill the gaps between them.
- Pour joint sand: Use polymeric sand or regular paver sand.
- Sweep it in: Brush the sand into all the cracks and joints.
- Water it: If using polymeric sand, lightly mist it with water to help it set and harden.
Step 8: Compact and Finish
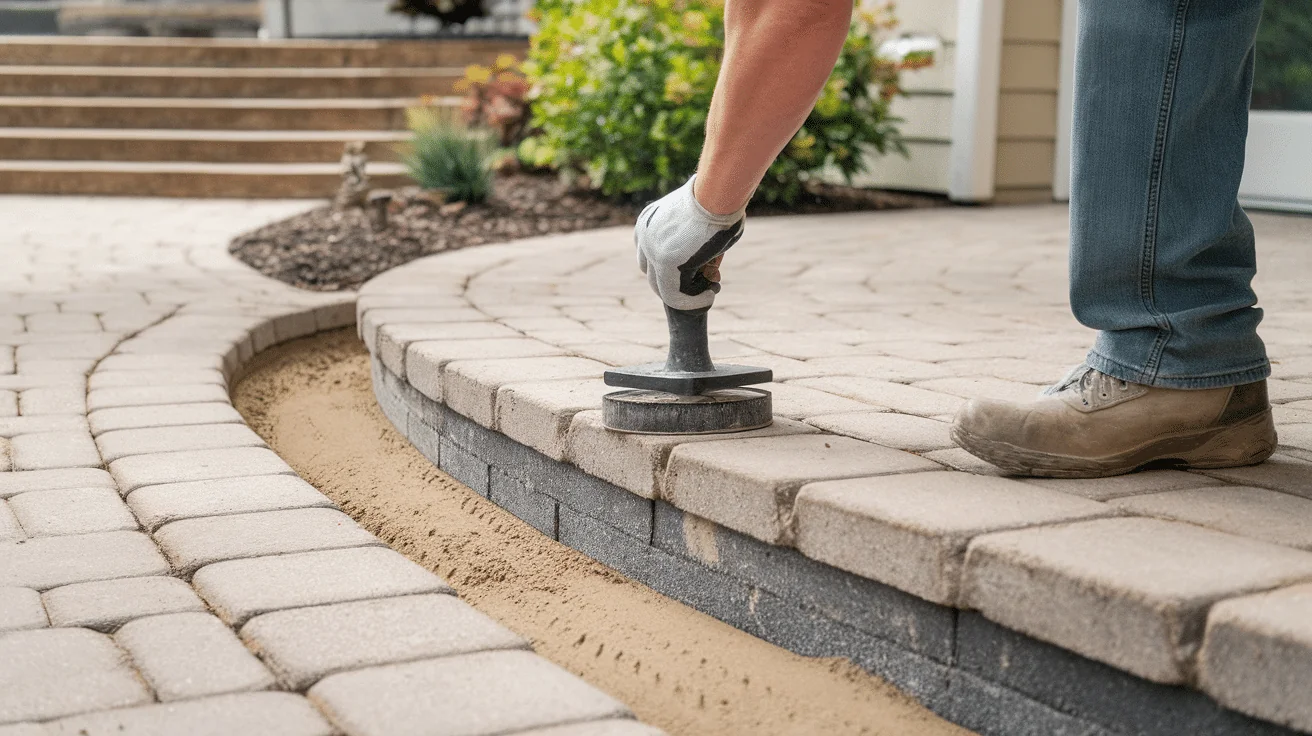
- Compact the surface: Use a tamper to press everything down one last time. This locks the pavers into place.
- Clean up: Sweep off extra sand, put away tools, and step back to admire your work!
Installing paver steps takes effort, but the result is strong, safe, and beautiful. Whether you’re going up to your door or down into your yard, you’ll be glad you took the time to do it right.
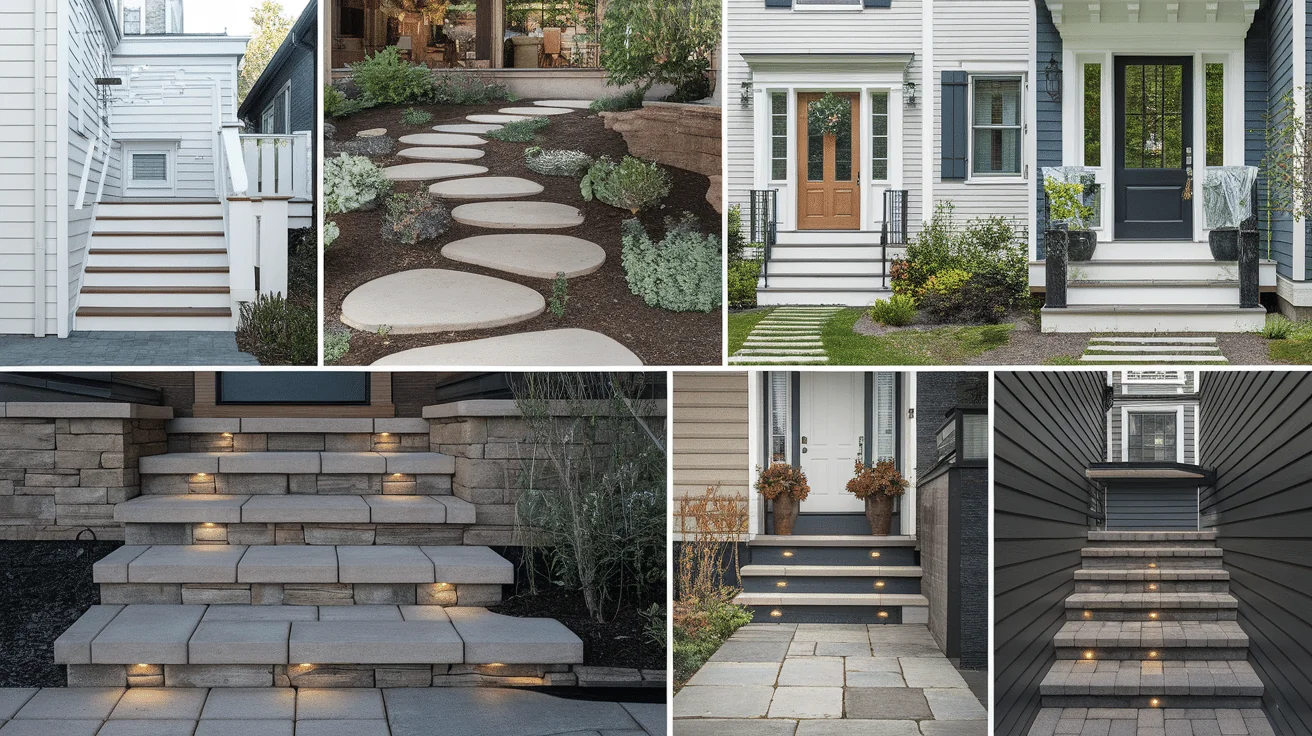
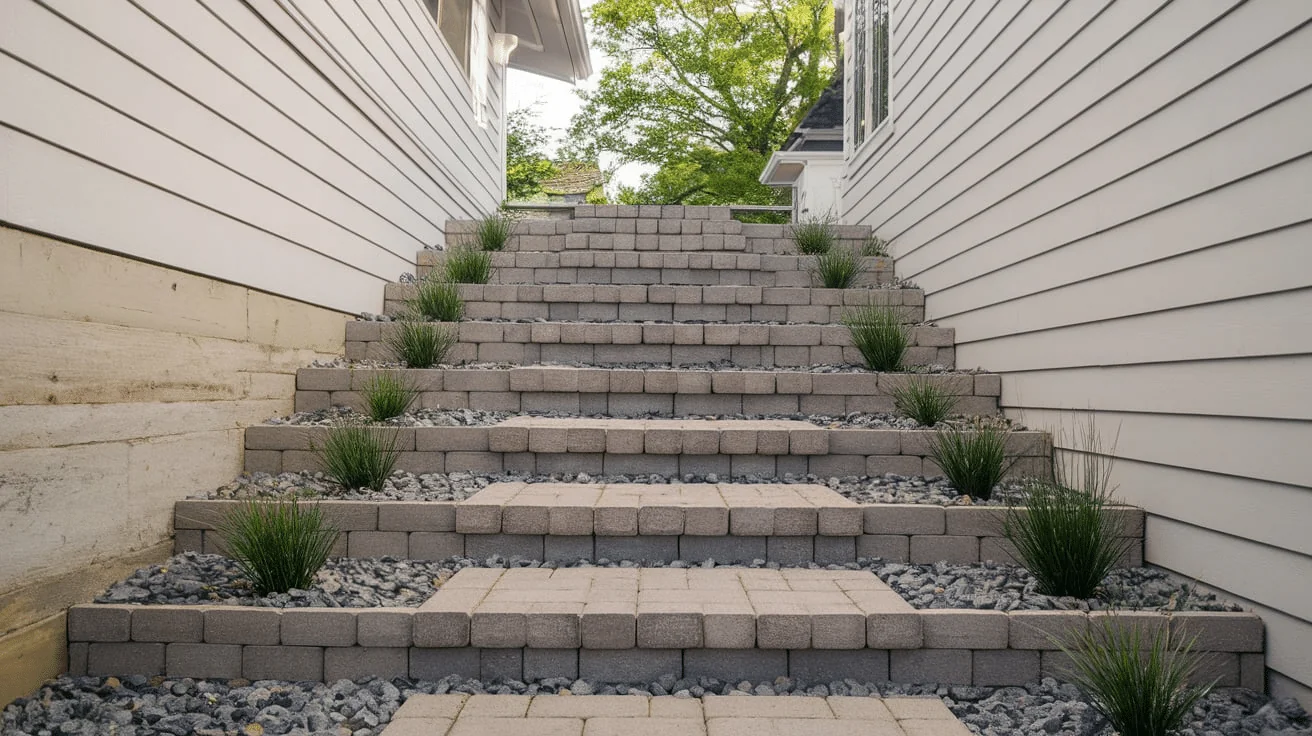
Popular Ideas for Paver Steps Against House
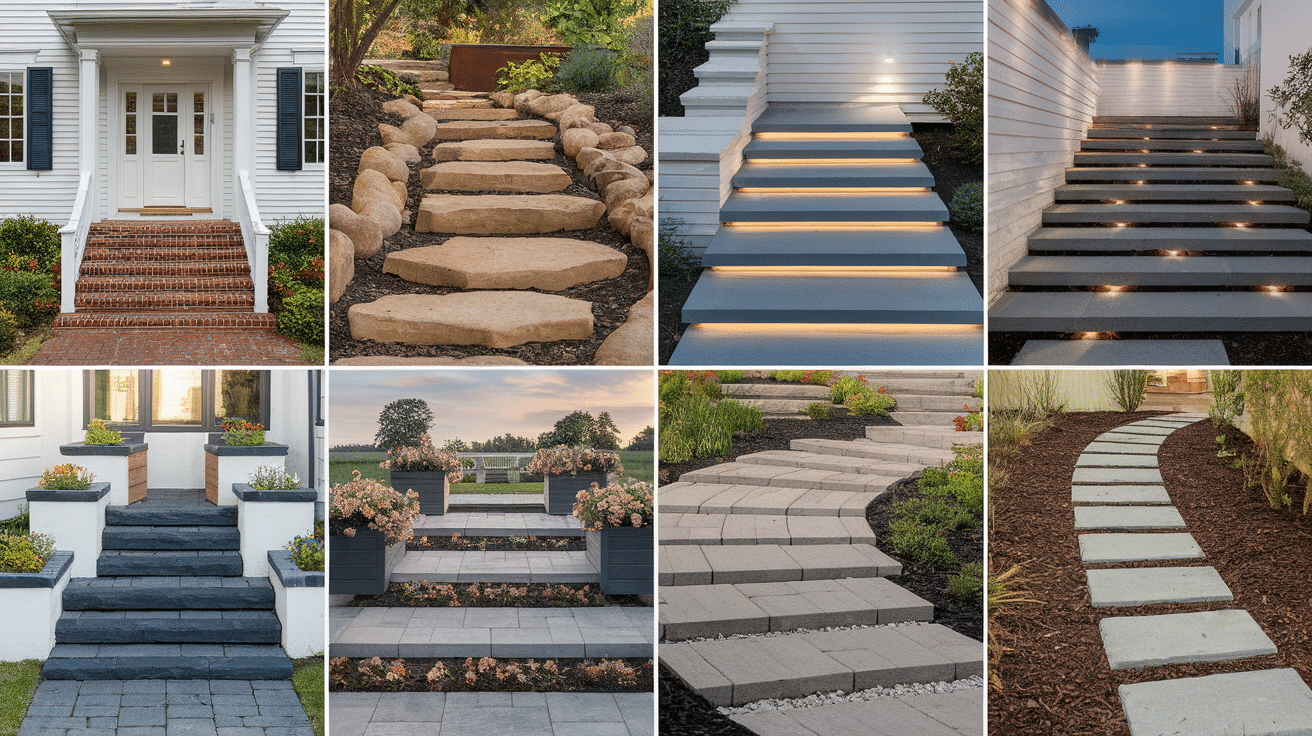
Do you need a little inspiration before you start your project? There are so many ways to make your paver steps look amazing and match your home’s style.
1. Classic Brick Look: Use red or brown brick pavers for a warm, timeless feel. These steps look great with older homes, cottages, and farmhouses. Add black metal railings for a charming touch.
2. Natural Stone Vibes: Try rough-cut stone pavers for a more natural, outdoor look. These work great in gardens, wooded yards, or homes with rustic style. Let grass or moss grow between the stones for extra charm.
3. Modern and Sleek: Go for smooth, gray concrete pavers with clean lines. This style looks amazing with modern homes or black-and-white exteriors. Use LED strip lights under each step for a cool nighttime glow.
4. Two-Tone Design: Mix two colors of pavers—like tan and gray—to create borders or patterns on each step. This adds interest and makes your steps stand out without being too flashy.
5. Wide Steps with Planters: Make each step extra wide and leave space on the sides for flower pots or small shrubs. This softens the look and makes your entry feel super welcoming.
6. Curved Steps: Instead of going straight, try building your steps in a gentle curve. This adds movement and flow, and it looks really nice in gardens or near patios.
7. Rustic Wood + Paver Combo: Use wood for the risers (the vertical part) and pavers for the treads (the part you step on). This mix of textures gives a cozy, cabin-style feel that’s perfect for backyards.
8. Stepping-Stone Style: Create steps that feel like large stepping stones placed into a slope. Leave space between each step and fill it with mulch or gravel. It’s simple, laid-back, and great for garden paths.
Paver steps don’t have to be boring. With just a little planning and style, you can turn them into a beautiful feature that makes your yard and home stand out. Pick the look that feels right for you, and have fun with it!
Maintenance Tips for Paver Steps
Keep your paver steps looking great and lasting long with these easy tips:
-
Sweep regularly to remove dirt, leaves, and debris.
-
Wash with water or mild soap to clean off stains and grime.
-
Seal the pavers every couple of years to protect against weather and fading.
-
Check for loose pavers and reset them if needed.
-
Pull weeds from joints or use polymeric sand to block growth.
-
Watch for settling and add sand under sunken pavers to level them out.
-
Avoid harsh chemicals that can damage the surface.
A little care goes a long way—your steps will stay safe, strong, and good-looking for years!
Conclusion
Adding paver steps against your house is a great way to make your yard safer, more useful, and better-looking. Whether you’re connecting a patio to your back door or making it easier to walk up a slope, paver steps can really improve how your outdoor space works.
With the right planning, design, and materials, your steps can last for years and still look great. You can keep things simple or get creative with styles and extras like lighting or plants. The best part? You don’t need to be a pro to get started—just take your time, follow the steps, and ask for help if you need it.
No matter what style you choose, paver steps are a smart upgrade that will make your home more inviting and easier to enjoy every day.