
Creating a bathroom that’s stylish and accessible is one of the most rewarding upgrades you can make.
You might be planning for aging in place, helping a loved one with mobility needs, or simply thinking ahead; thoughtful design can improve safety, comfort, and independence.
In this blog, I’ll share a real-life bathroom makeover that truly inspired me. It was more than a remodel; it gave someone the freedom to move safely within their own home.
From grab bars to a wheelchair-friendly sink, every detail mattered.
If you’re considering how to improve your bathroom for yourself or someone you care about, this guide will help you get started with confidence.
Why Build an Easy Access Bathroom?
I believe that accessibility doesn’t mean clinical or boring.
It means creating a space where everyone can feel comfortable, confident, and safe.
From preventing falls to reducing daily strain, accessible design empowers users to navigate their routines with greater ease.
And with modern materials and finishes, you don’t have to sacrifice beauty to achieve usability.
In fact, many of today’s accessibility upgrades blend in beautifully with contemporary decor.
What to Know Before Remodeling an Accessible Bathroom
Before selecting materials and tools, consider who will use the bathroom and what they’ll need.
Are you designing for an aging parent, someone with mobility challenges, or planning ahead for yourself?
Each situation is unique, and thoughtful design can enhance comfort, safety, and independence. Walk through the space and envision daily tasks, such as showering or reaching for a towel.
Will the grab bars be close enough? Can a wheelchair roll under the sink? These small details matter for both safety and dignity.
Once you know who you’re designing for and how they’ll move through the space, you’re ready to choose the right materials.
What You’ll Need
Before starting your remodel, it’s helpful to gather your essentials. Many of these products are available at home improvement stores or online.
Materials & Fixtures:
- 12×12″ Travertine tile
- 2×2″ and 3×6″ accent tiles
- Brushed nickel shower curtain rod
- ADA-compliant grab bars (multiple sizes)
- Pivot-down shower bench
- Handheld showerhead and standard showerhead
- Raised lavatory sink
- High-rise faucet
- Offset drain sink basin
- Barrier-free shower pan
- Power bars, robe hooks, and towel hooks
Tools:
- Tile cutter or wet saw
- Drill and wall anchors (for grab bars)
- Level
- Wrench set
- Silicone sealant
- Screwdrivers
Step-by-Step Guide: Accessible Bathroom Remodel
This fully remodeled, easy-access bathroom shows how each upgrade can improve accessibility while still looking great and lasting long.
Step 1: Replace Deep Stall Fixtures with an Open Layout
The first step in the remodel is to open up the space by removing deep stall fixtures that limit movement and accessibility. This creates a more functional and breathable environment.
Key features include:
- Removal of enclosed shower units to allow for easier entry and exit
- Open, barrier-free layout that supports wheelchair and walker users
- Retiling with 12×12″ travertine for a high-end, natural stone look
- Use of 2×2″ and 3×6″ accent tiles for visual interest and improved slip resistance
This foundational change makes the space feel more welcoming while significantly improving safety and mobility.
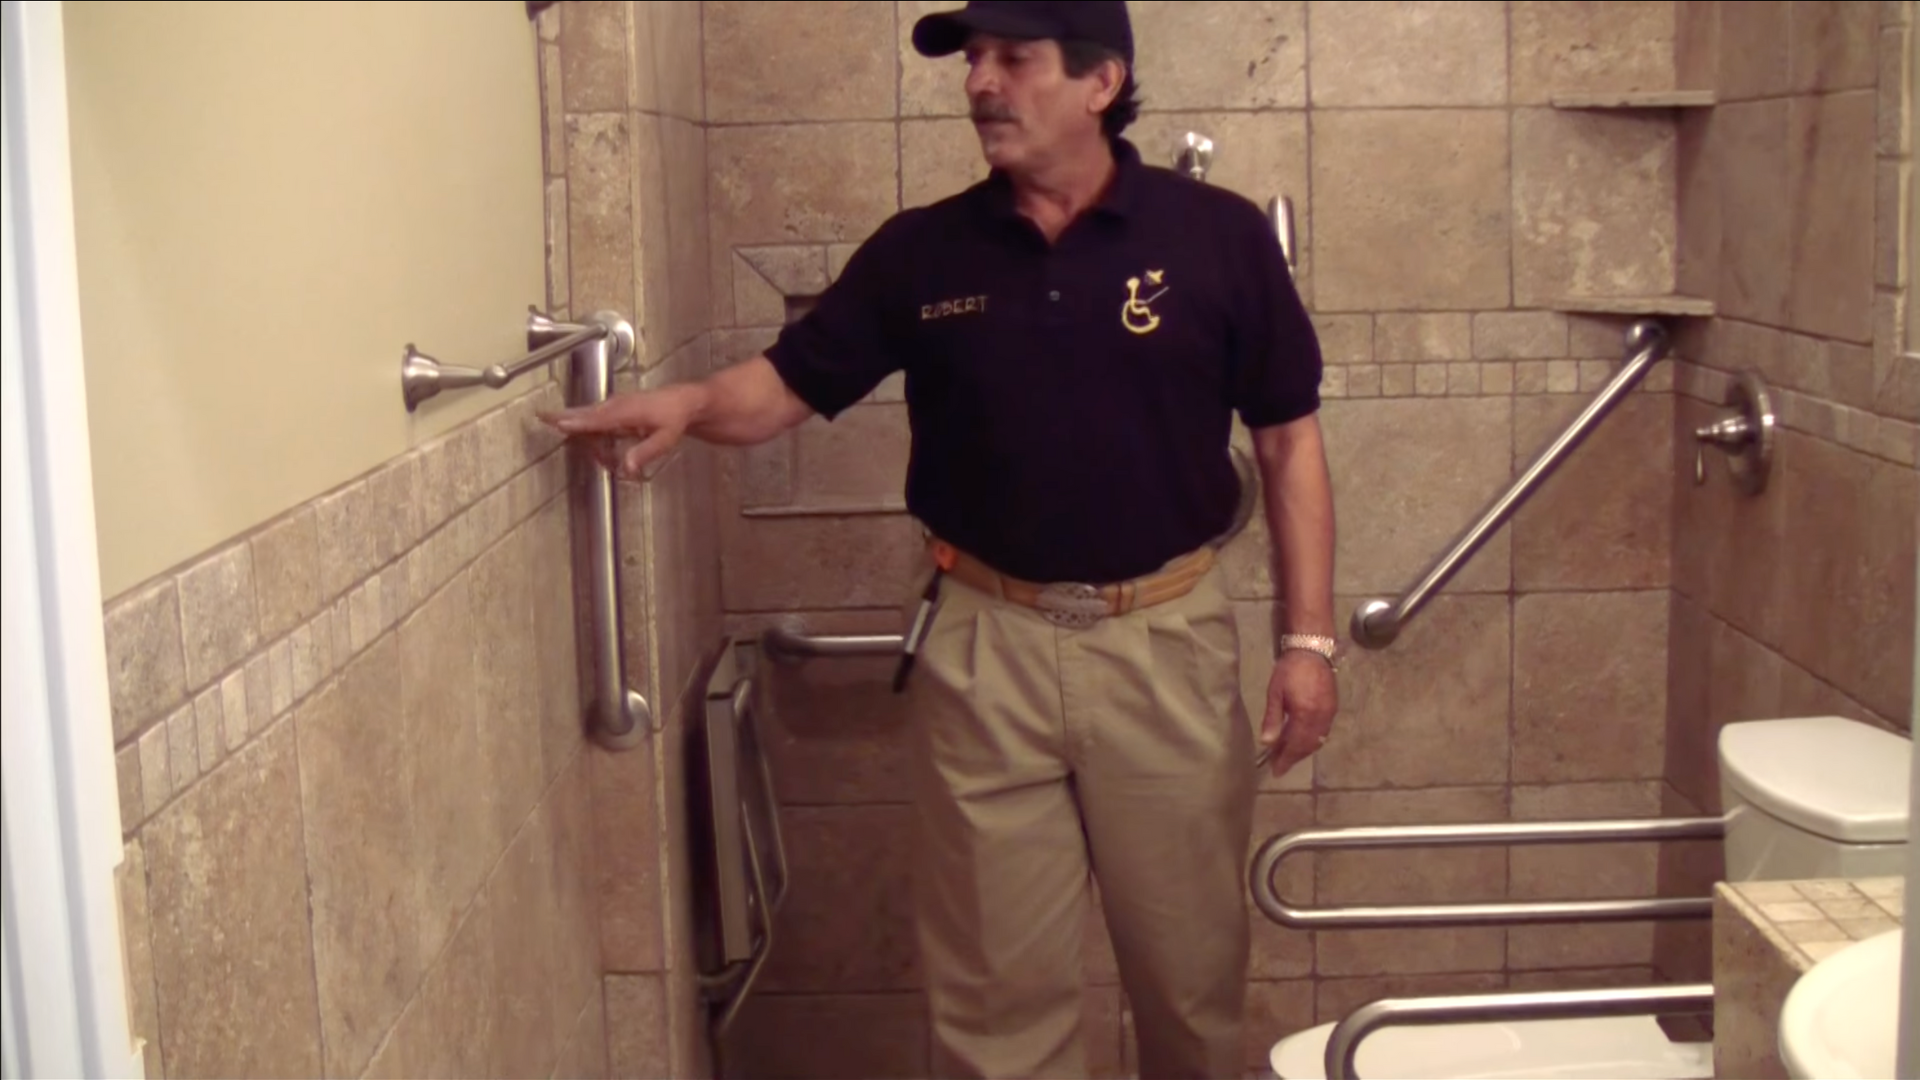
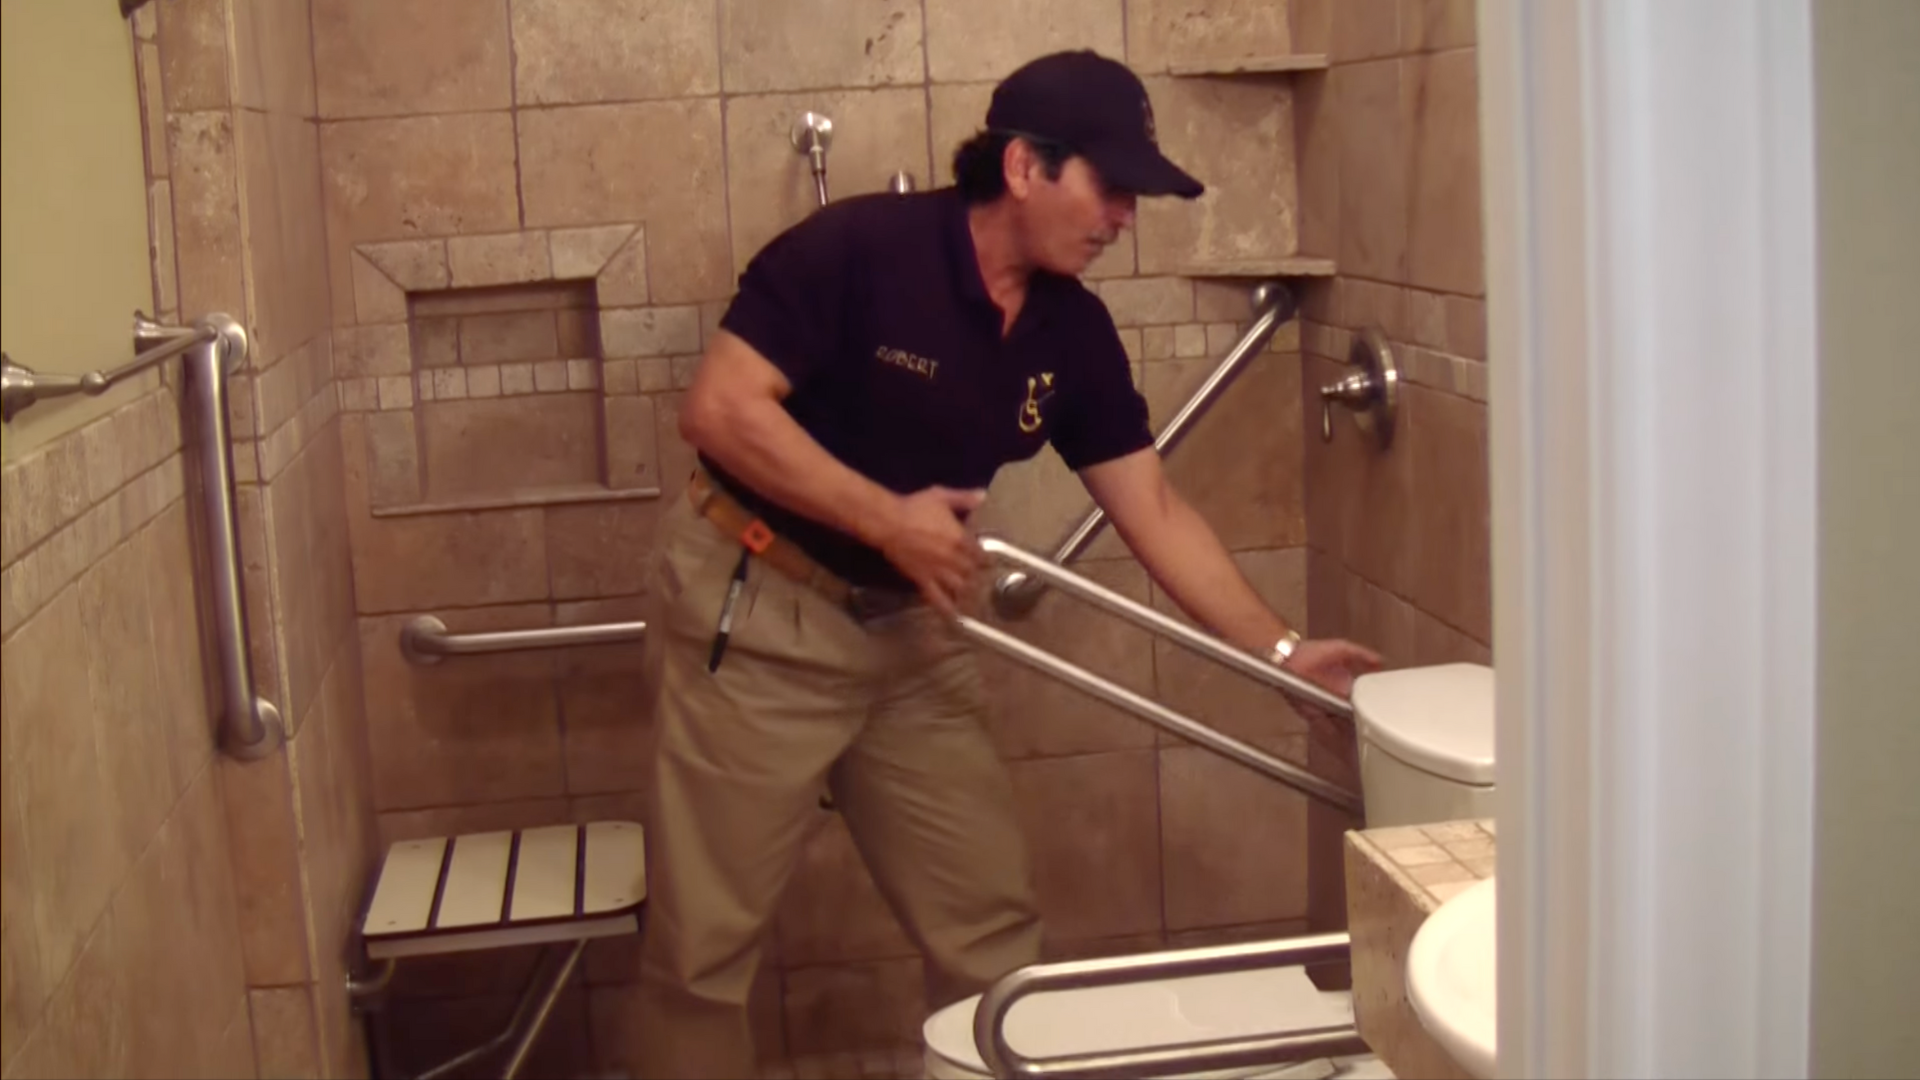
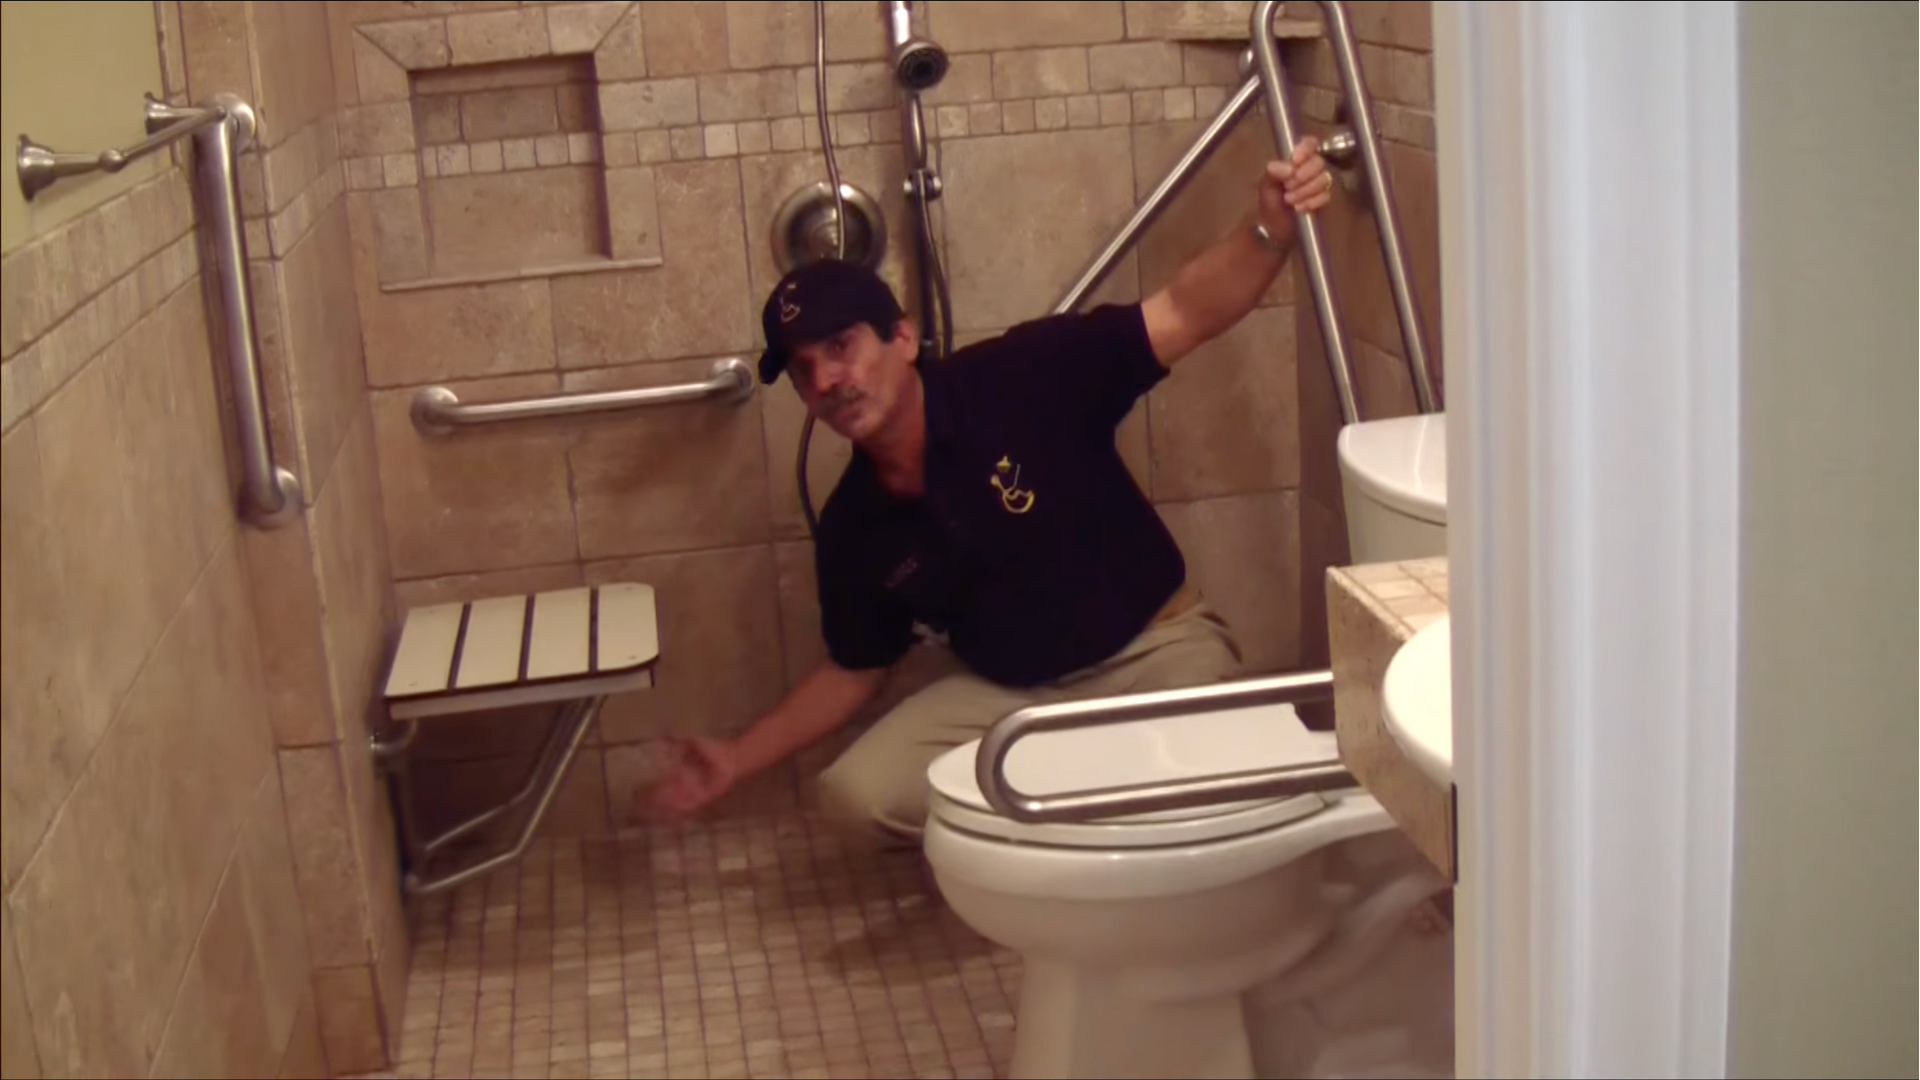
Step 2: Install Multiple ADA-Approved Grab Bars
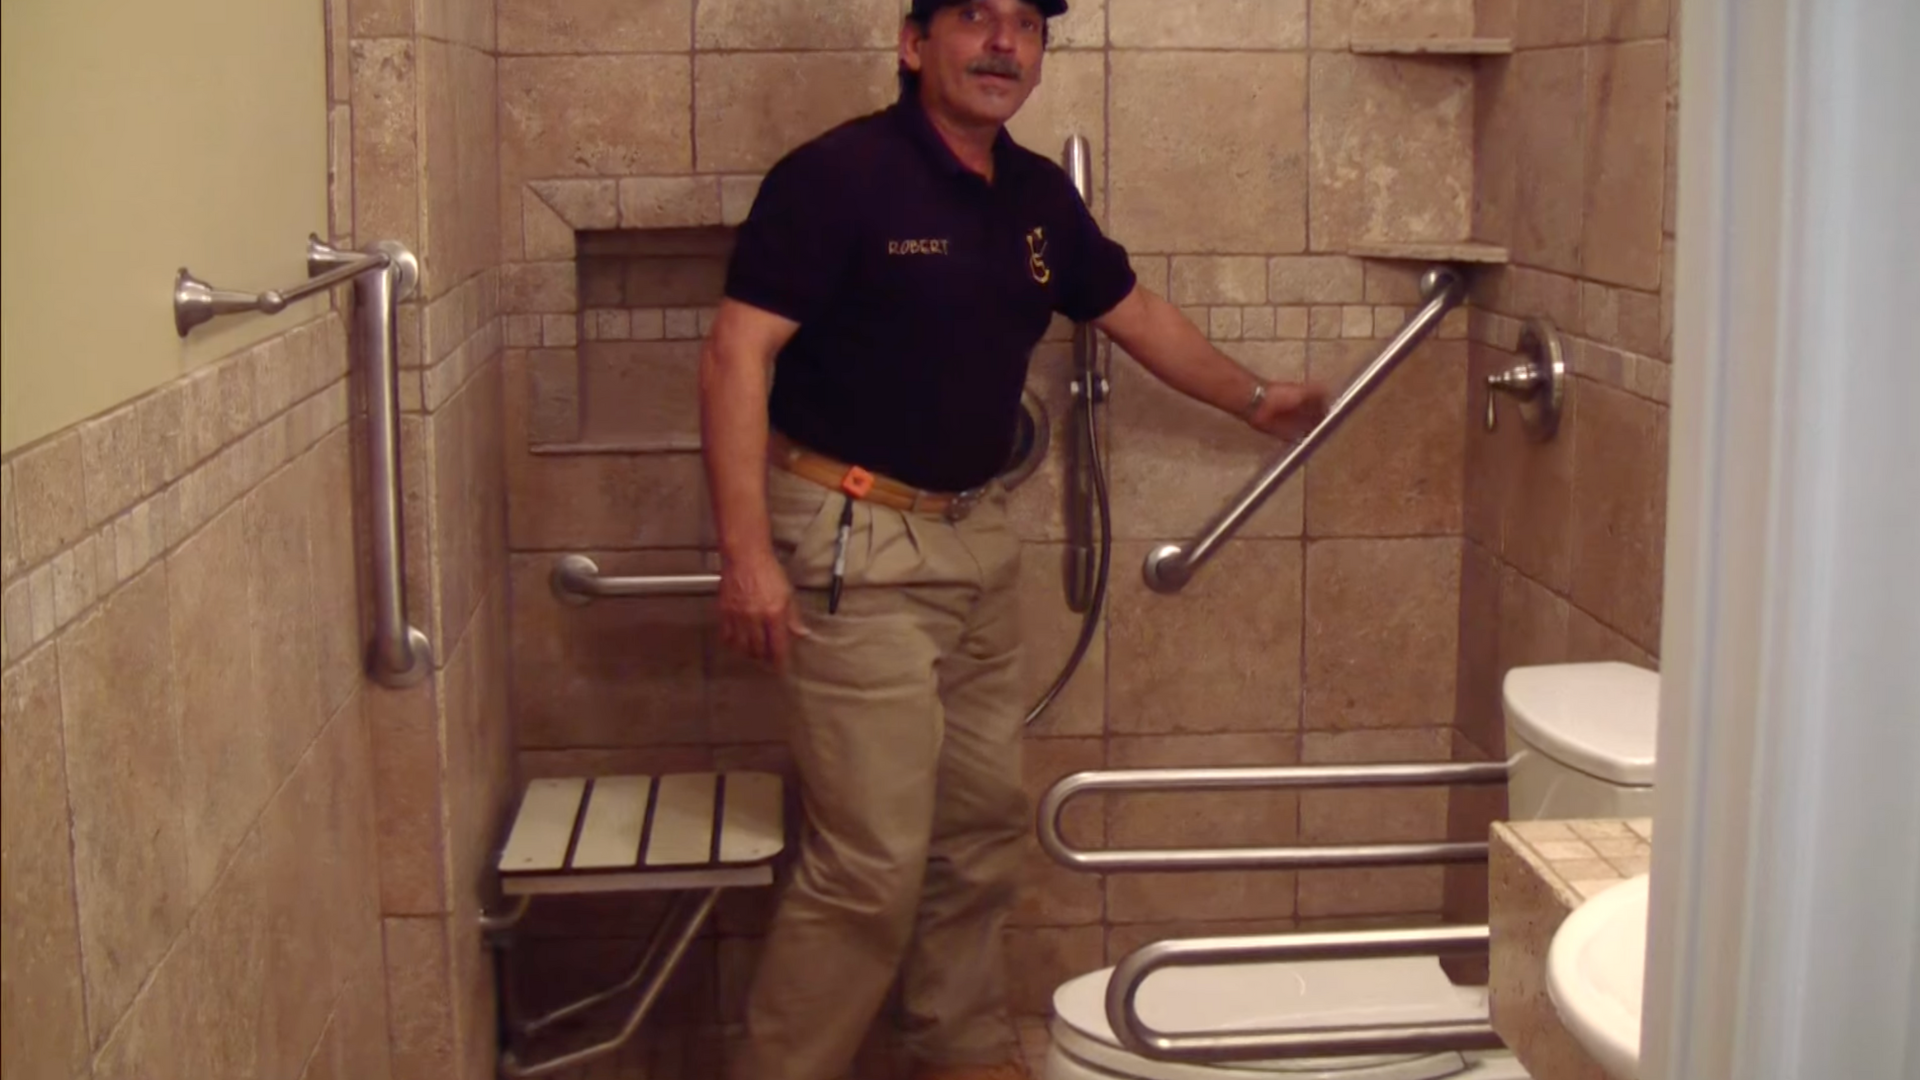
Grab bars play a key role in making a bathroom safer and more accessible.
In this remodel, several strategically installed elements are used to offer balance and support throughout the shower area.
Key features include:
- A horizontal grab bar on the main shower wall for steady support while standing
- Diagonal bars in caddy corners for flexibility of grip and assistance from multiple angles
- A grab bar near the faucet controls allows users to brace while adjusting water settings
- Brushed nickel finishes that coordinate with other fixtures and resist rust
These placements help reduce the risk of slips and falls while giving users the stability they need to move confidently in the space.
Step 3: Add a Pivot-Down Bench for Safer Showering
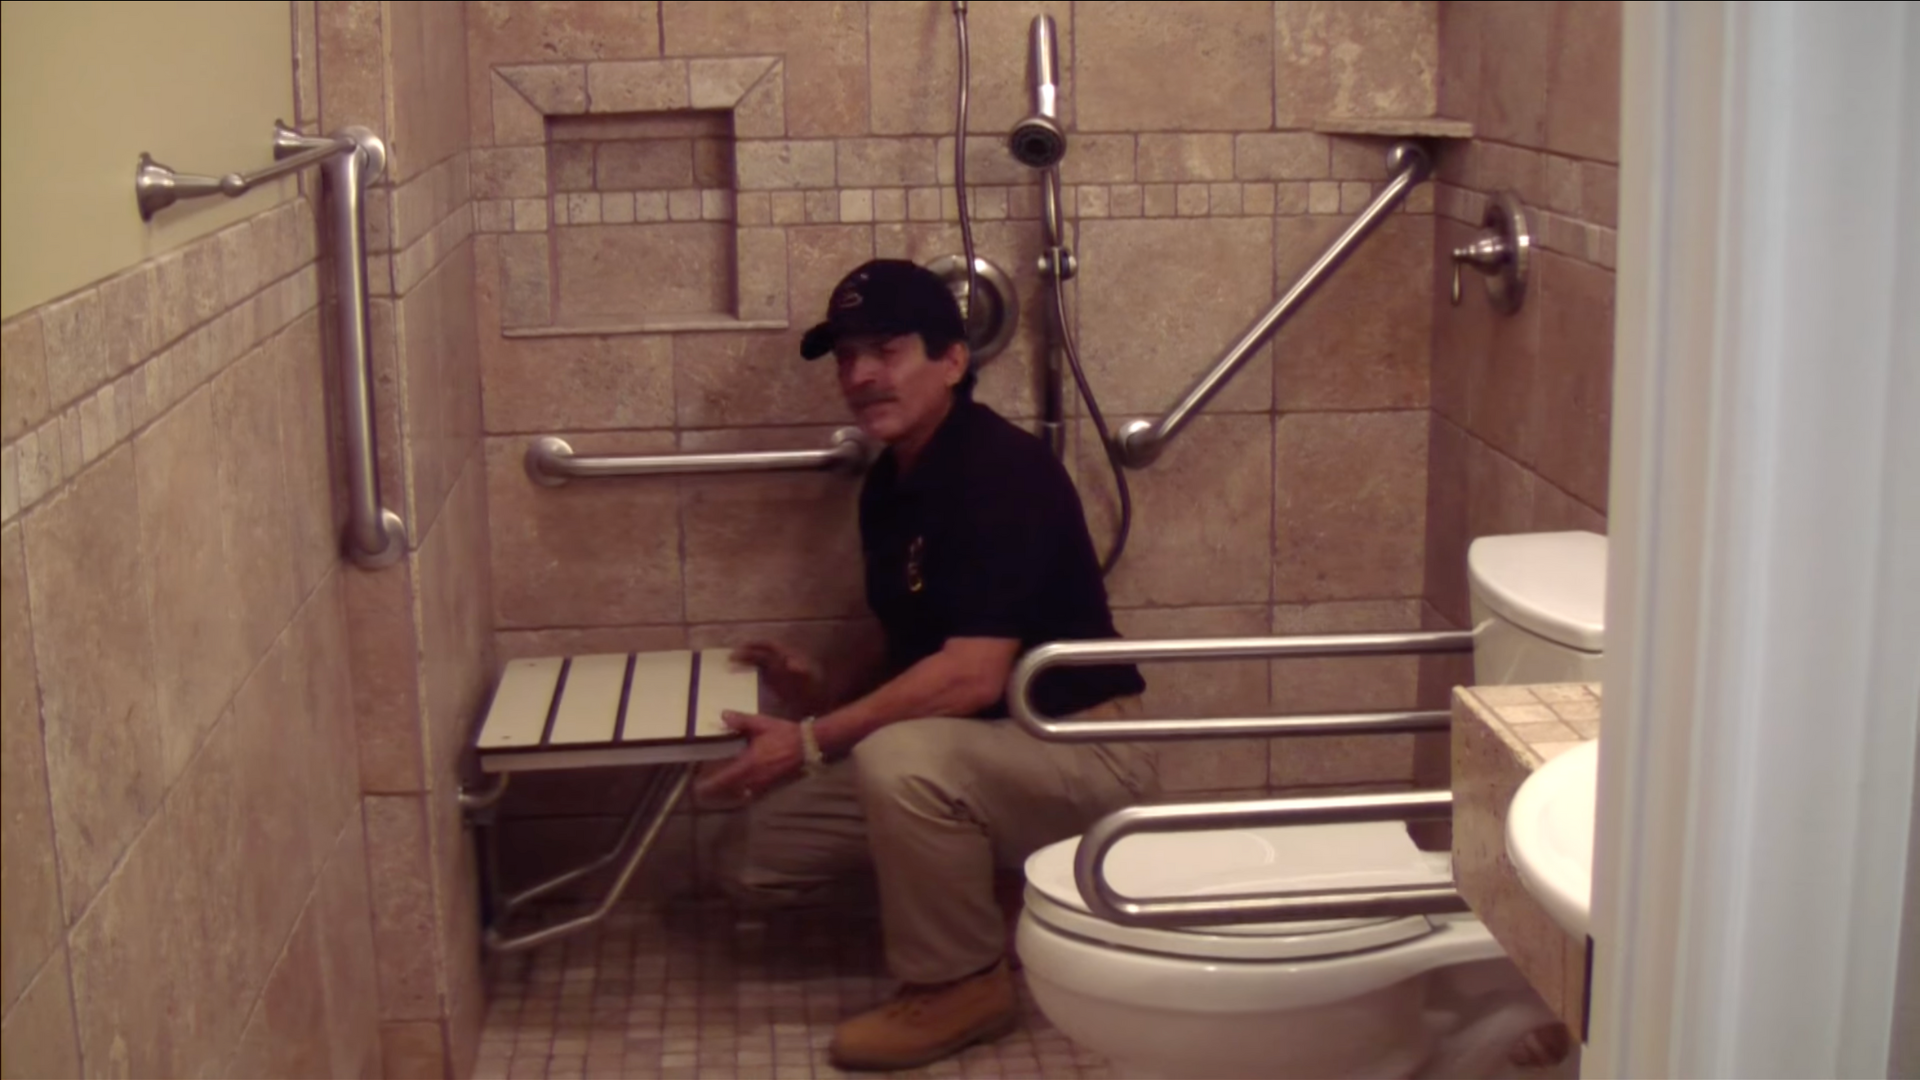
Installing a pivot-down bench in the shower adds both safety and comfort, especially for individuals who need seated support while bathing.
This upgrade is a thoughtful addition to the remodel.
Key features include:
- A wall-mounted bench that folds down for use and tucks away when not needed
- Ideal for elderly users or individuals with limited lower-body strength
- Space-saving design, making it perfect for shared or compact bathrooms
- Weight capacity up to 1,000 lbs, ensuring durability and peace of mind
This bench makes independent showering easier and safer, while also maintaining a clean, uncluttered look when not in use.
Step 4: Upgrade Shower Fixtures for Flexibility and Comfort
To increase comfort and usability, install dual shower systems.
These provide users with greater control over their shower experience and ensure flexibility for people with varying mobility levels.
Key features include:
- A handheld showerhead with adjustable height and reach, perfect for seated use
- A standard wall-mounted showerhead for a familiar and upright shower experience
- Faucet controls are positioned near the bench, reducing the need to reach or stand
- Brushed nickel finishes that match other fixtures and resist corrosion
This thoughtful combination allows each user, whether seated or standing, to enjoy a safe, customizable, and comfortable shower routine.
It’s a small upgrade with a big impact on accessibility and independence.
Step 5: Make the Sink Area Wheelchair-Friendly
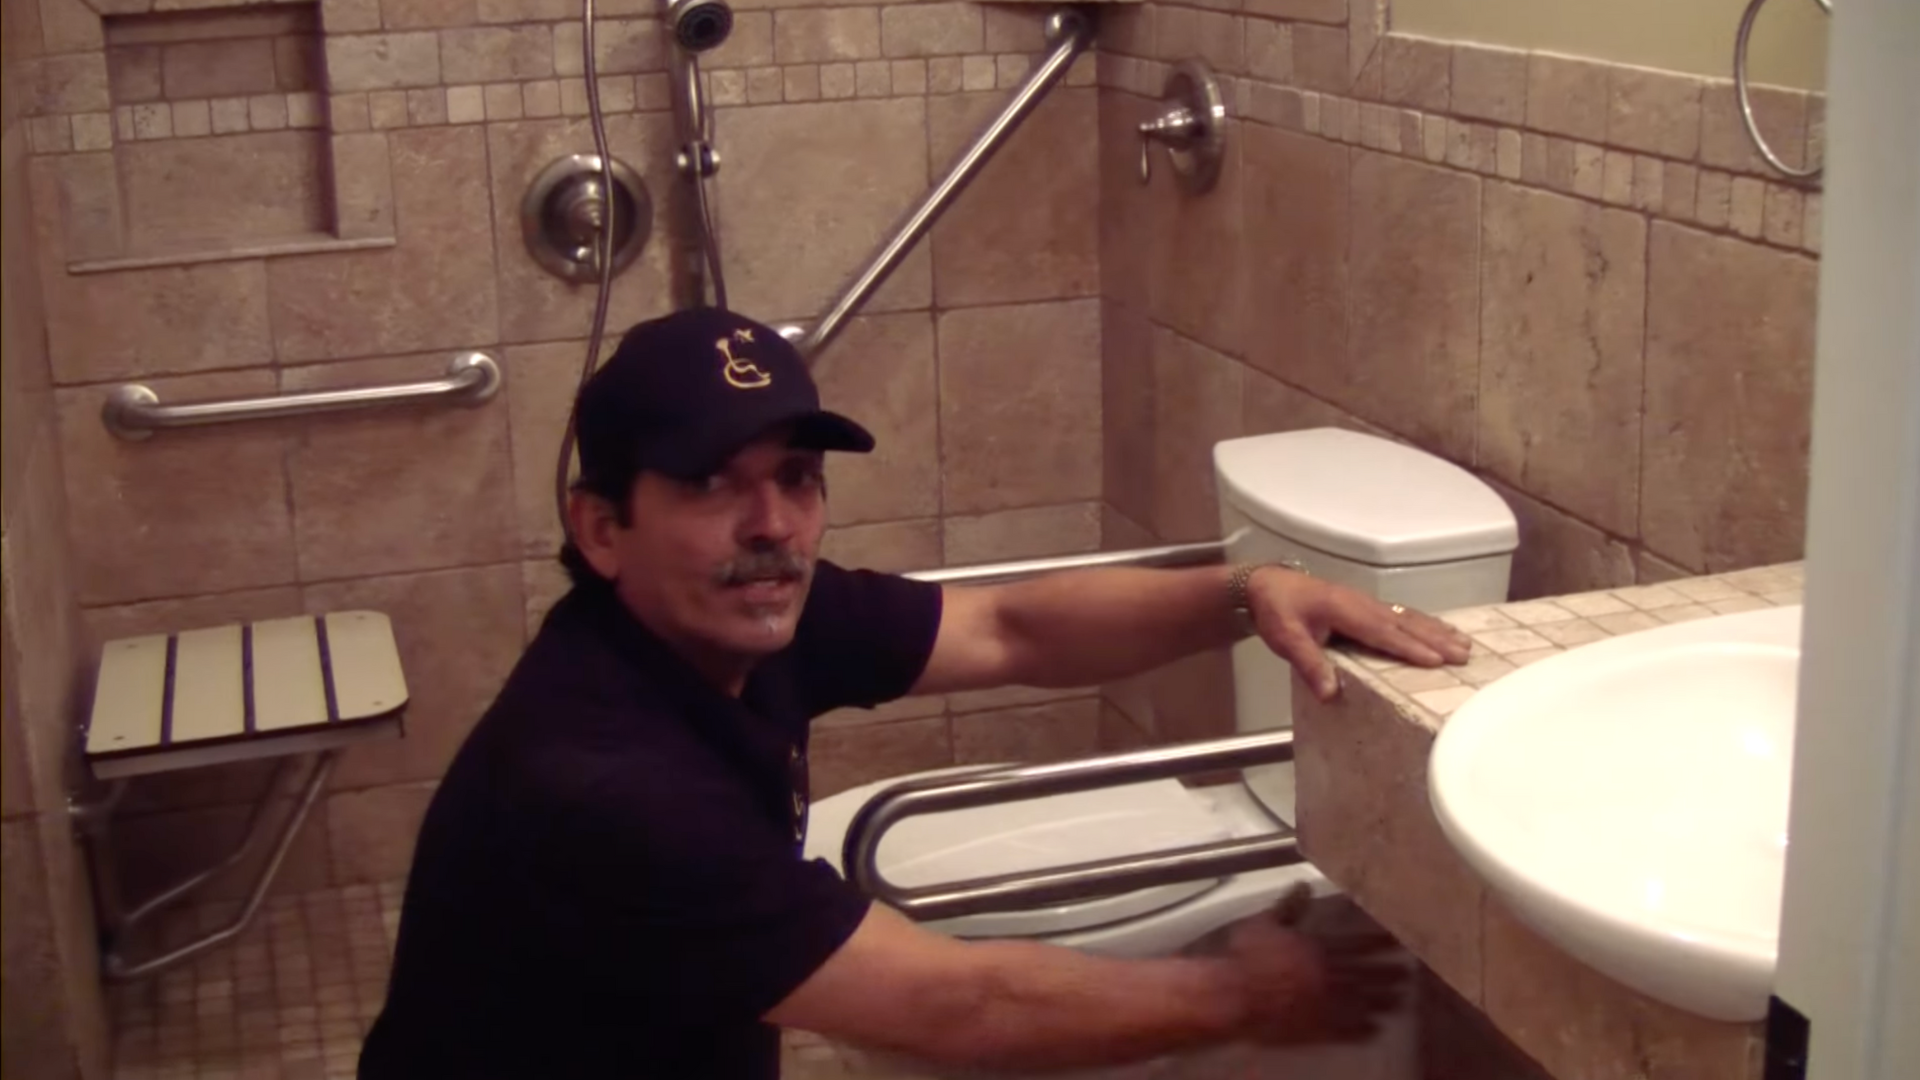
Creating a functional and inclusive sink area is the priority in this remodel.
The design ensures ease of use for wheelchair users without compromising on style.
Key features include:
- A raised lavatory sink with open space below for full roll-under access
- A 3-inch high-rise faucet, making it easier to reach without strain
- An offset drain is placed to the side to provide more knee and leg room
- A sleek, modern look that blends accessibility with aesthetics
This thoughtful configuration allows for safe and comfortable use while maintaining a streamlined, elegant appearance.
It’s a smart way to support independence and dignity in daily routines.
Step 6: Add Convenient Wall Accessories and Finishing Touches
The final touches of this remodel focus on accessibility and everyday convenience. These small additions help keep the space functional, organized, and user-friendly.
Key features include:
- Power bars for plugging in grooming tools, toothbrushes, or other devices
- Robe and towel hooks installed at reachable heights for seated or standing users
- A barrier-free shower curb, flush with the floor for smooth and safe entry
Together, these details complete the bathroom with practical upgrades that support independence, reduce physical strain, and maintain a clean, modern aesthetic.
This guide is inspired by “Handicap bathroom remodeling” by @ezaccessbathrooms. For a more detailed understanding, watch:
Tips for a Successful Remodel
- Always consult ADA guidelines or local codes for measurements and product selection.
- Prioritize safety features like grab bars and non-slip tile first.
- Consider professional installation for plumbing, tile, and electrical work.
- Choose finishes that are durable and easy to clean, such as brushed nickel and sealed stone.
- Think long-term: Build today for how you’ll want to live tomorrow.
Conclusion
Transforming a standard bathroom into an easy-access space can dramatically improve daily living for individuals with mobility needs, while also adding value and peace of mind to your home.
I was genuinely inspired by how thoughtful the design in this remodel was, and I hope it sparks ideas for your own space.
From barrier-free entryways and pivoting benches to wheelchair-accessible sink areas, every detail in this bathroom was designed to make life a little easier.
With the right materials, planning, and professional help when needed, your bathroom can become a safe, modern, and comfortable place for everyone in the home.
Be sure to refer to the timestamps to grab helpful screenshots from the video as you work through your own renovation plan.
Creating a bathroom that’s stylish and accessible is one of the most rewarding upgrades you can make.
You might be planning for aging in place, helping a loved one with mobility needs, or simply thinking ahead; thoughtful design can improve safety, comfort, and independence.
In this blog, I’ll share a real-life bathroom makeover that truly inspired me. It was more than a remodel; it gave someone the freedom to move safely within their own home.
From grab bars to a wheelchair-friendly sink, every detail mattered.
If you’re considering how to improve your bathroom for yourself or someone you care about, this guide will help you get started with confidence.
Why Build an Easy Access Bathroom?
I believe that accessibility doesn’t mean clinical or boring.
It means creating a space where everyone can feel comfortable, confident, and safe.
From preventing falls to reducing daily strain, accessible design empowers users to navigate their routines with greater ease.
And with modern materials and finishes, you don’t have to sacrifice beauty to achieve usability.
In fact, many of today’s accessibility upgrades blend in beautifully with contemporary decor.
What to Know Before Remodeling an Accessible Bathroom
Before selecting materials and tools, consider who will use the bathroom and what they’ll need.
Are you designing for an aging parent, someone with mobility challenges, or planning ahead for yourself?
Each situation is unique, and thoughtful design can enhance comfort, safety, and independence. Walk through the space and envision daily tasks, such as showering or reaching for a towel.
Will the grab bars be close enough? Can a wheelchair roll under the sink? These small details matter for both safety and dignity.
Once you know who you’re designing for and how they’ll move through the space, you’re ready to choose the right materials.
What You’ll Need
Before starting your remodel, it’s helpful to gather your essentials. Many of these products are available at home improvement stores or online.
Materials & Fixtures:
- 12×12″ Travertine tile
- 2×2″ and 3×6″ accent tiles
- Brushed nickel shower curtain rod
- ADA-compliant grab bars (multiple sizes)
- Pivot-down shower bench
- Handheld showerhead and standard showerhead
- Raised lavatory sink
- High-rise faucet
- Offset drain sink basin
- Barrier-free shower pan
- Power bars, robe hooks, and towel hooks
Tools:
- Tile cutter or wet saw
- Drill and wall anchors (for grab bars)
- Level
- Wrench set
- Silicone sealant
- Screwdrivers
Step-by-Step Guide: Accessible Bathroom Remodel
This fully remodeled, easy-access bathroom shows how each upgrade can improve accessibility while still looking great and lasting long.
Step 1: Replace Deep Stall Fixtures with an Open Layout
The first step in the remodel is to open up the space by removing deep stall fixtures that limit movement and accessibility. This creates a more functional and breathable environment.
Key features include:
- Removal of enclosed shower units to allow for easier entry and exit
- Open, barrier-free layout that supports wheelchair and walker users
- Retiling with 12×12″ travertine for a high-end, natural stone look
- Use of 2×2″ and 3×6″ accent tiles for visual interest and improved slip resistance
This foundational change makes the space feel more welcoming while significantly improving safety and mobility.
Step 2: Install Multiple ADA-Approved Grab Bars
Grab bars play a key role in making a bathroom safer and more accessible.
In this remodel, several strategically installed elements are used to offer balance and support throughout the shower area.
Key features include:
- A horizontal grab bar on the main shower wall for steady support while standing
- Diagonal bars in caddy corners for flexibility of grip and assistance from multiple angles
- A grab bar near the faucet controls allows users to brace while adjusting water settings
- Brushed nickel finishes that coordinate with other fixtures and resist rust
These placements help reduce the risk of slips and falls while giving users the stability they need to move confidently in the space.
Step 3: Add a Pivot-Down Bench for Safer Showering
Installing a pivot-down bench in the shower adds both safety and comfort, especially for individuals who need seated support while bathing.
This upgrade is a thoughtful addition to the remodel.
Key features include:
- A wall-mounted bench that folds down for use and tucks away when not needed
- Ideal for elderly users or individuals with limited lower-body strength
- Space-saving design, making it perfect for shared or compact bathrooms
- Weight capacity up to 1,000 lbs, ensuring durability and peace of mind
This bench makes independent showering easier and safer, while also maintaining a clean, uncluttered look when not in use.
Step 4: Upgrade Shower Fixtures for Flexibility and Comfort
To increase comfort and usability, install dual shower systems.
These provide users with greater control over their shower experience and ensure flexibility for people with varying mobility levels.
Key features include:
- A handheld showerhead with adjustable height and reach, perfect for seated use
- A standard wall-mounted showerhead for a familiar and upright shower experience
- Faucet controls are positioned near the bench, reducing the need to reach or stand
- Brushed nickel finishes that match other fixtures and resist corrosion
This thoughtful combination allows each user, whether seated or standing, to enjoy a safe, customizable, and comfortable shower routine.
It’s a small upgrade with a big impact on accessibility and independence.
Step 5: Make the Sink Area Wheelchair-Friendly
Creating a functional and inclusive sink area is the priority in this remodel.
The design ensures ease of use for wheelchair users without compromising on style.
Key features include:
- A raised lavatory sink with open space below for full roll-under access
- A 3-inch high-rise faucet, making it easier to reach without strain
- An offset drain is placed to the side to provide more knee and leg room
- A sleek, modern look that blends accessibility with aesthetics
This thoughtful configuration allows for safe and comfortable use while maintaining a streamlined, elegant appearance.
It’s a smart way to support independence and dignity in daily routines.
Step 6: Add Convenient Wall Accessories and Finishing Touches
The final touches of this remodel focus on accessibility and everyday convenience. These small additions help keep the space functional, organized, and user-friendly.
Key features include:
- Power bars for plugging in grooming tools, toothbrushes, or other devices
- Robe and towel hooks installed at reachable heights for seated or standing users
- A barrier-free shower curb, flush with the floor for smooth and safe entry
Together, these details complete the bathroom with practical upgrades that support independence, reduce physical strain, and maintain a clean, modern aesthetic.
This guide is inspired by “Handicap bathroom remodeling” by @ezaccessbathrooms. For a more detailed understanding, watch:
Tips for a Successful Remodel
- Always consult ADA guidelines or local codes for measurements and product selection.
- Prioritize safety features like grab bars and non-slip tile first.
- Consider professional installation for plumbing, tile, and electrical work.
- Choose finishes that are durable and easy to clean, such as brushed nickel and sealed stone.
- Think long-term: Build today for how you’ll want to live tomorrow.
Conclusion
Transforming a standard bathroom into an easy-access space can dramatically improve daily living for individuals with mobility needs, while also adding value and peace of mind to your home.
I was genuinely inspired by how thoughtful the design in this remodel was, and I hope it sparks ideas for your own space.
From barrier-free entryways and pivoting benches to wheelchair-accessible sink areas, every detail in this bathroom was designed to make life a little easier.
With the right materials, planning, and professional help when needed, your bathroom can become a safe, modern, and comfortable place for everyone in the home.
Be sure to refer to the timestamps to grab helpful screenshots from the video as you work through your own renovation plan.