
Ever walked into a room and felt something was off? Chances are, your curtain rod might be the silent culprit. Let’s be real: store-bought curtain rods are expensive and often boring.
Most options cost $50-$100, with limited styles that rarely match your vision. What if you could create exactly what you want for a fraction of the price?
Good news: You don’t need advanced woodworking skills or special tools. This guide is perfect for:
- Budget-conscious decorators
- Renters wanting personalized spaces
- First-time DIY enthusiasts
- Anyone tired of generic home decor
I’ll walk you through simple steps to design custom curtain rods that reflect your style. By the end, you’ll have the confidence to create something truly unique.
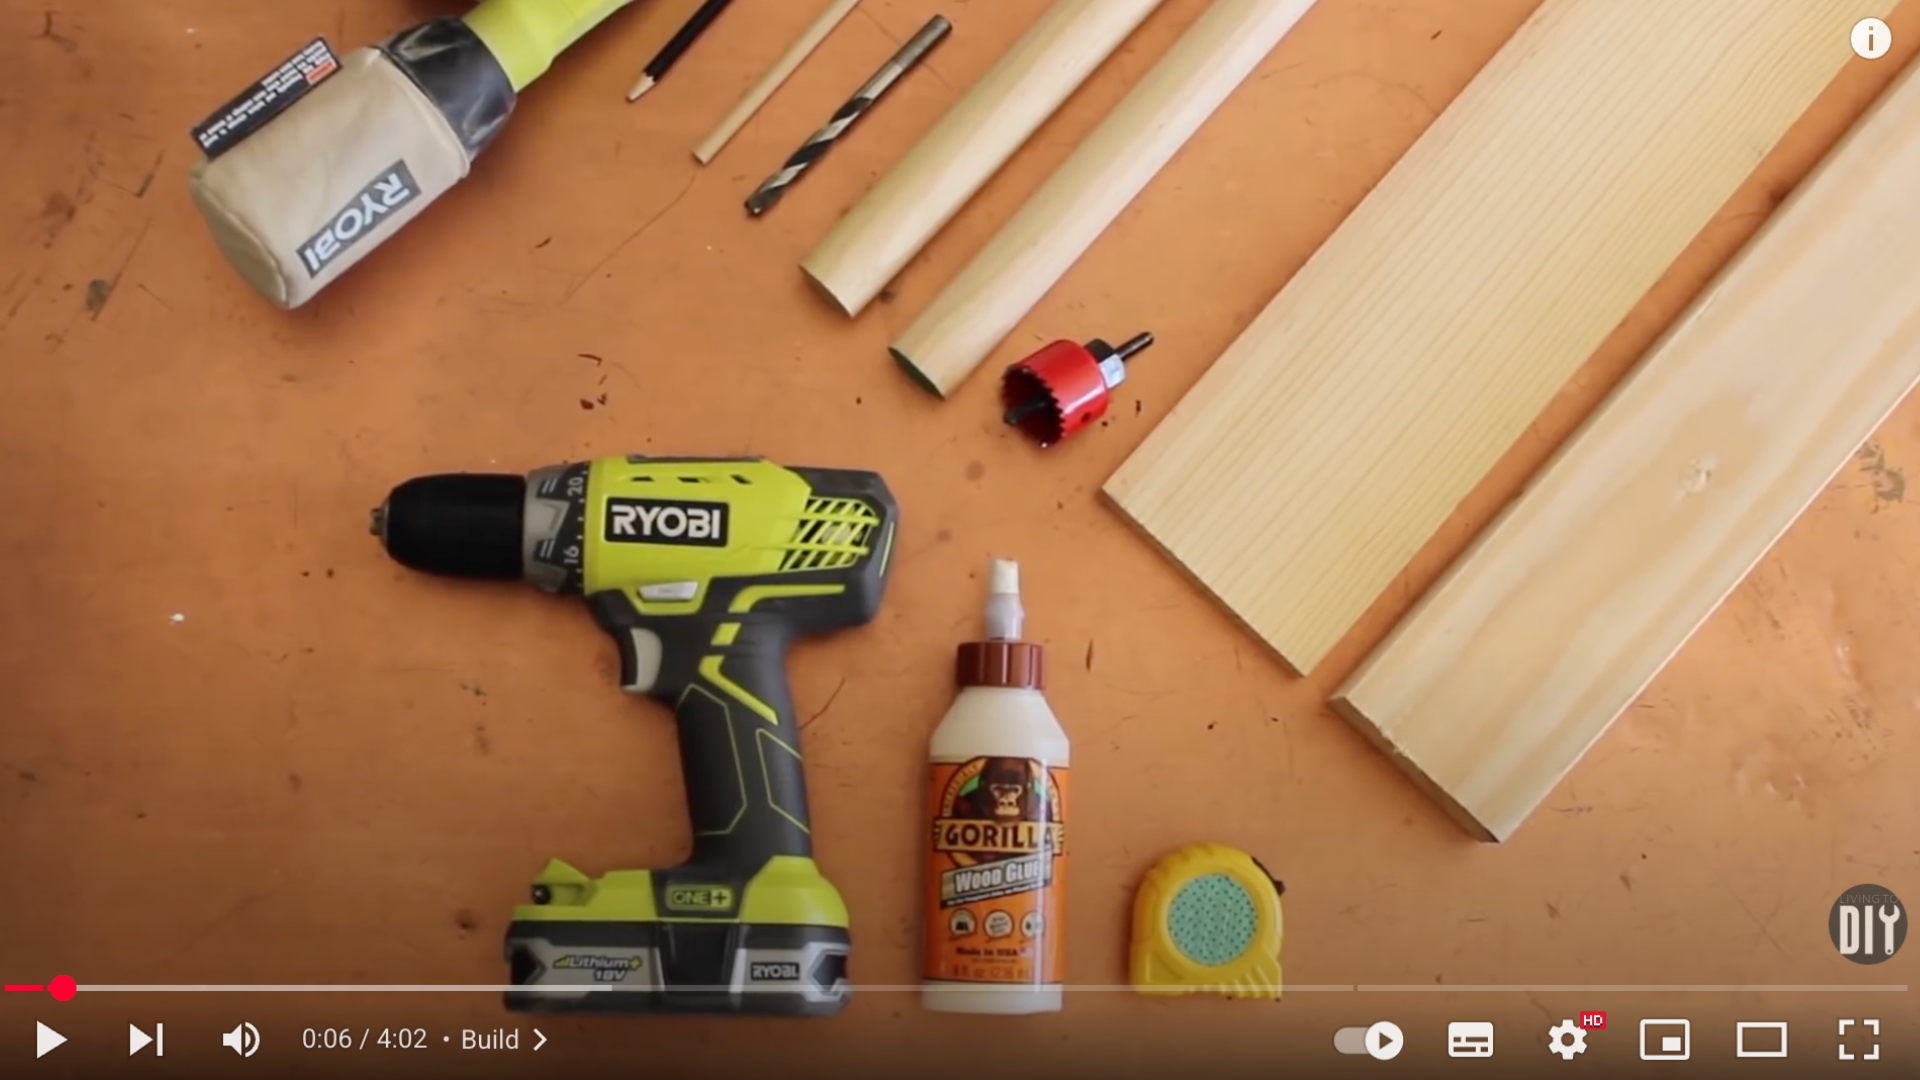
Tools and Materials for Your DIY Curtain Rod
- Wood glue
- Wireless drill
- Two pieces of scrap wood (one thinner, one thicker)
- Measuring tape
- Thick dowel (to hold the curtain)
- Thin dowel (for extension)
- Drill bit (to match the thin dowel size)
- Hole saw (to match the thick dowel size)
- Sandpaper or orbital sander
- Screws
- Stud finder
- Curtain of your choice
Step-By-Step Instructions: DIY Curtain Rod
Change your windows with a custom curtain rod that matches your style and saves money. Follow these detailed steps to create a professional-looking window treatment.
Step 1: Gather and Prepare Materials
Begin by gathering all the necessary items. Choose a thicker dowel rod that’s strong enough to support your curtains and a thinner dowel for extending the length, if required.
You’ll also need two kinds of wood: a thinner, wider board to serve as the wall-mounted base and a shorter, thicker piece to cradle the dowel rod.
Don’t forget your power drill, drill bits, hole saw, and wood glue. The creator used scrap wood, making this a zero-cost project; therefore, repurpose what you already have if possible.
Step 2: Cut the Wood to Size
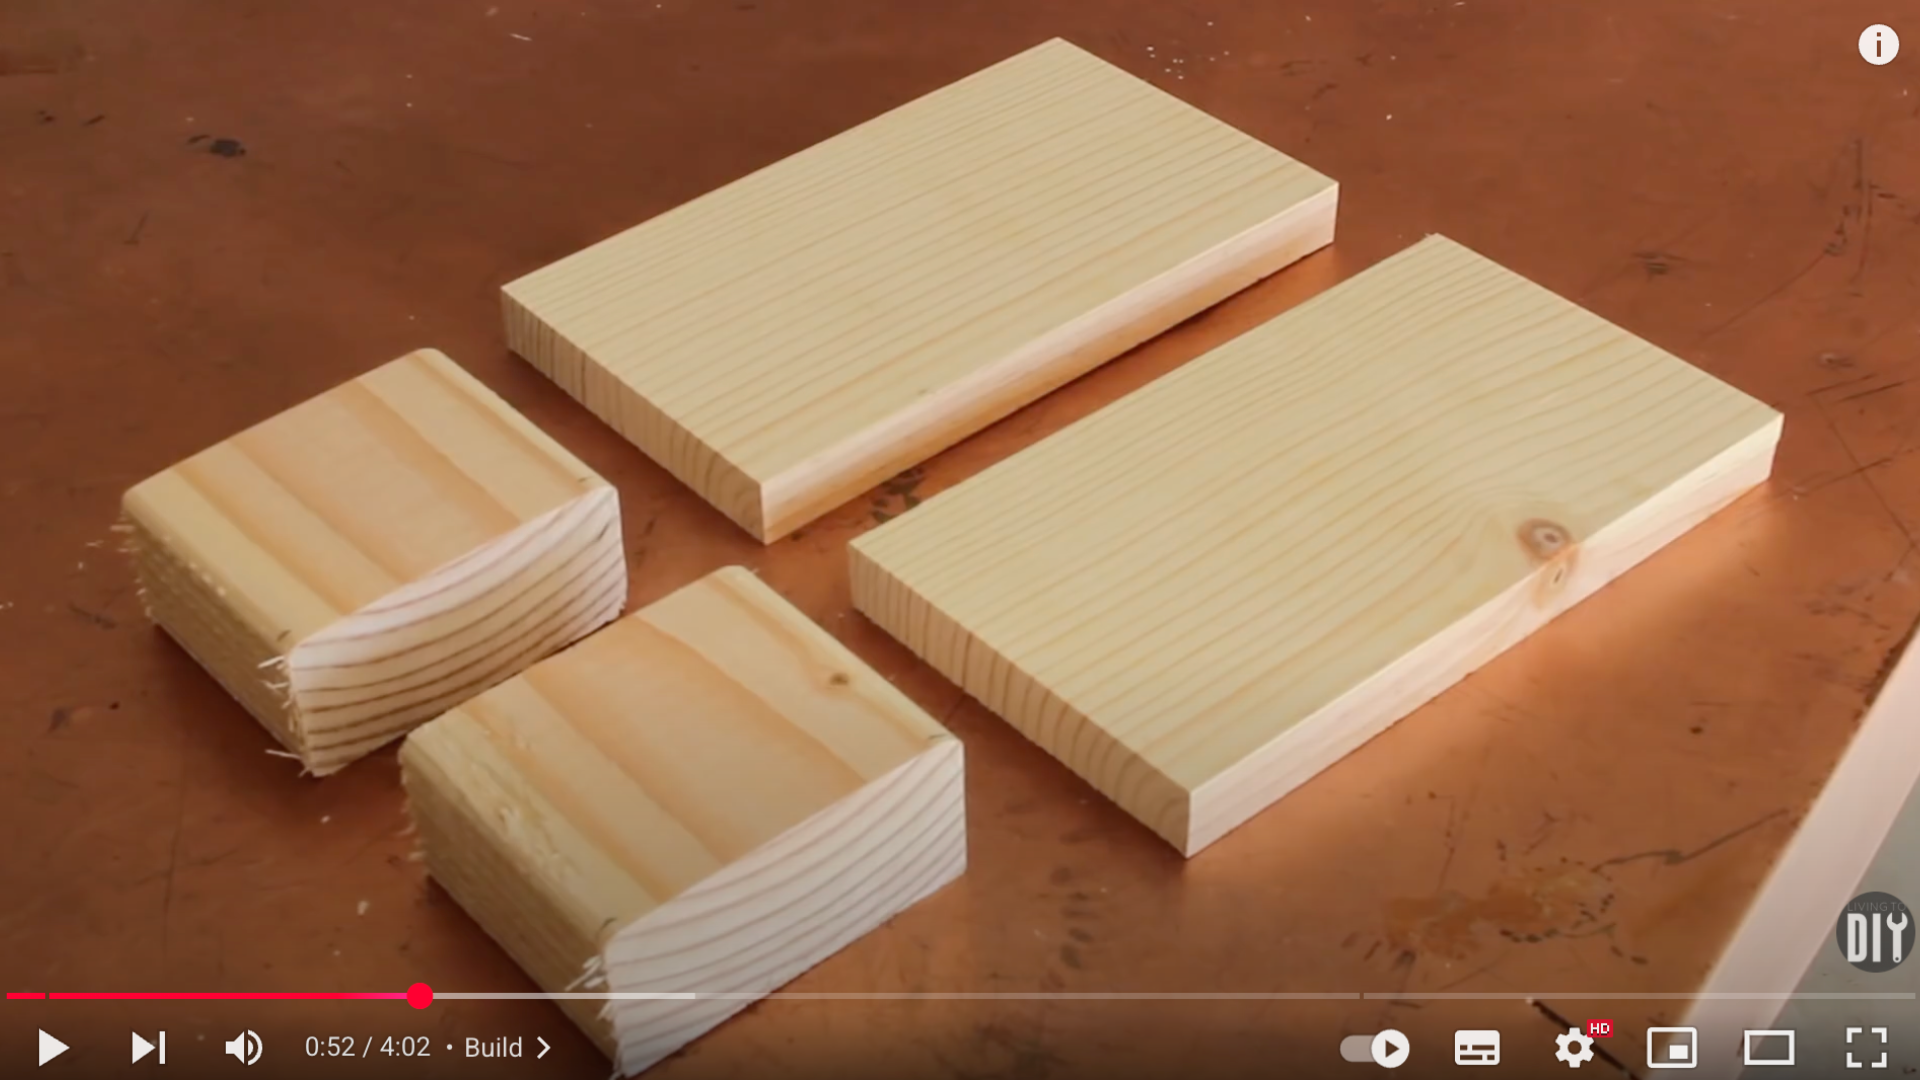
Use a saw to cut two identical backplates from the thinner board. Each piece should be around ⅛ inch thick, which keeps the curtain mount low-profile but sturdy.
Next, cut two 3-inch pieces of the thicker wood; these will act as brackets to hold the rod in place.
Each bracket will have a circular cutout to hold the curtain rod, which will be added later using the hole saw.
Step 3: Extend the Curtain Rod (If Needed)
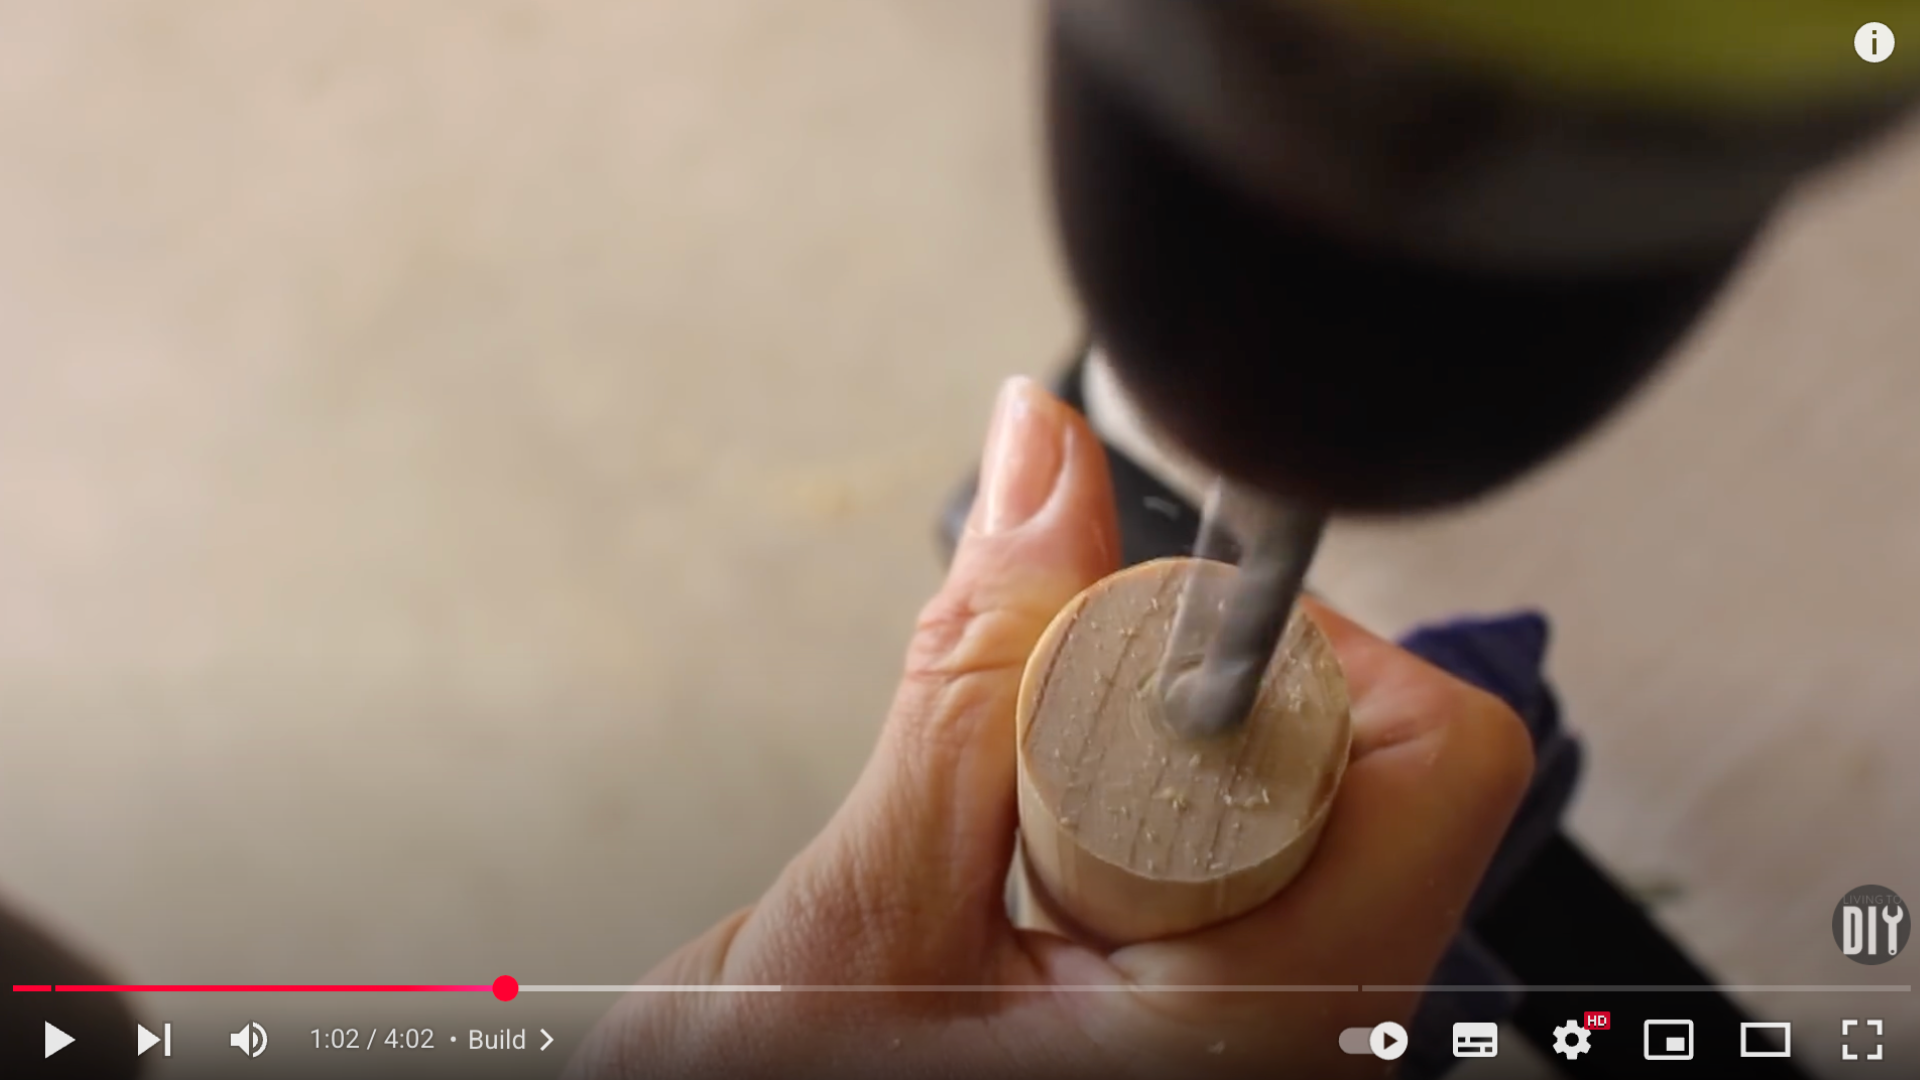
If your thicker dowel rod isn’t long enough to span your window, extend it using a thin dowel as a dowel pin.
First, drill a small hole in the center of both dowel ends (the main rod and the extension piece).
These holes should match the diameter of your thin dowel. Apply wood glue inside the holes and insert the thin dowel halfway into one rod.
Then slide the second rod over the exposed end of the dowel pin. Add extra glue at the joint to ensure a tight, permanent bond.
Step 4: Drill the Bracket Holes
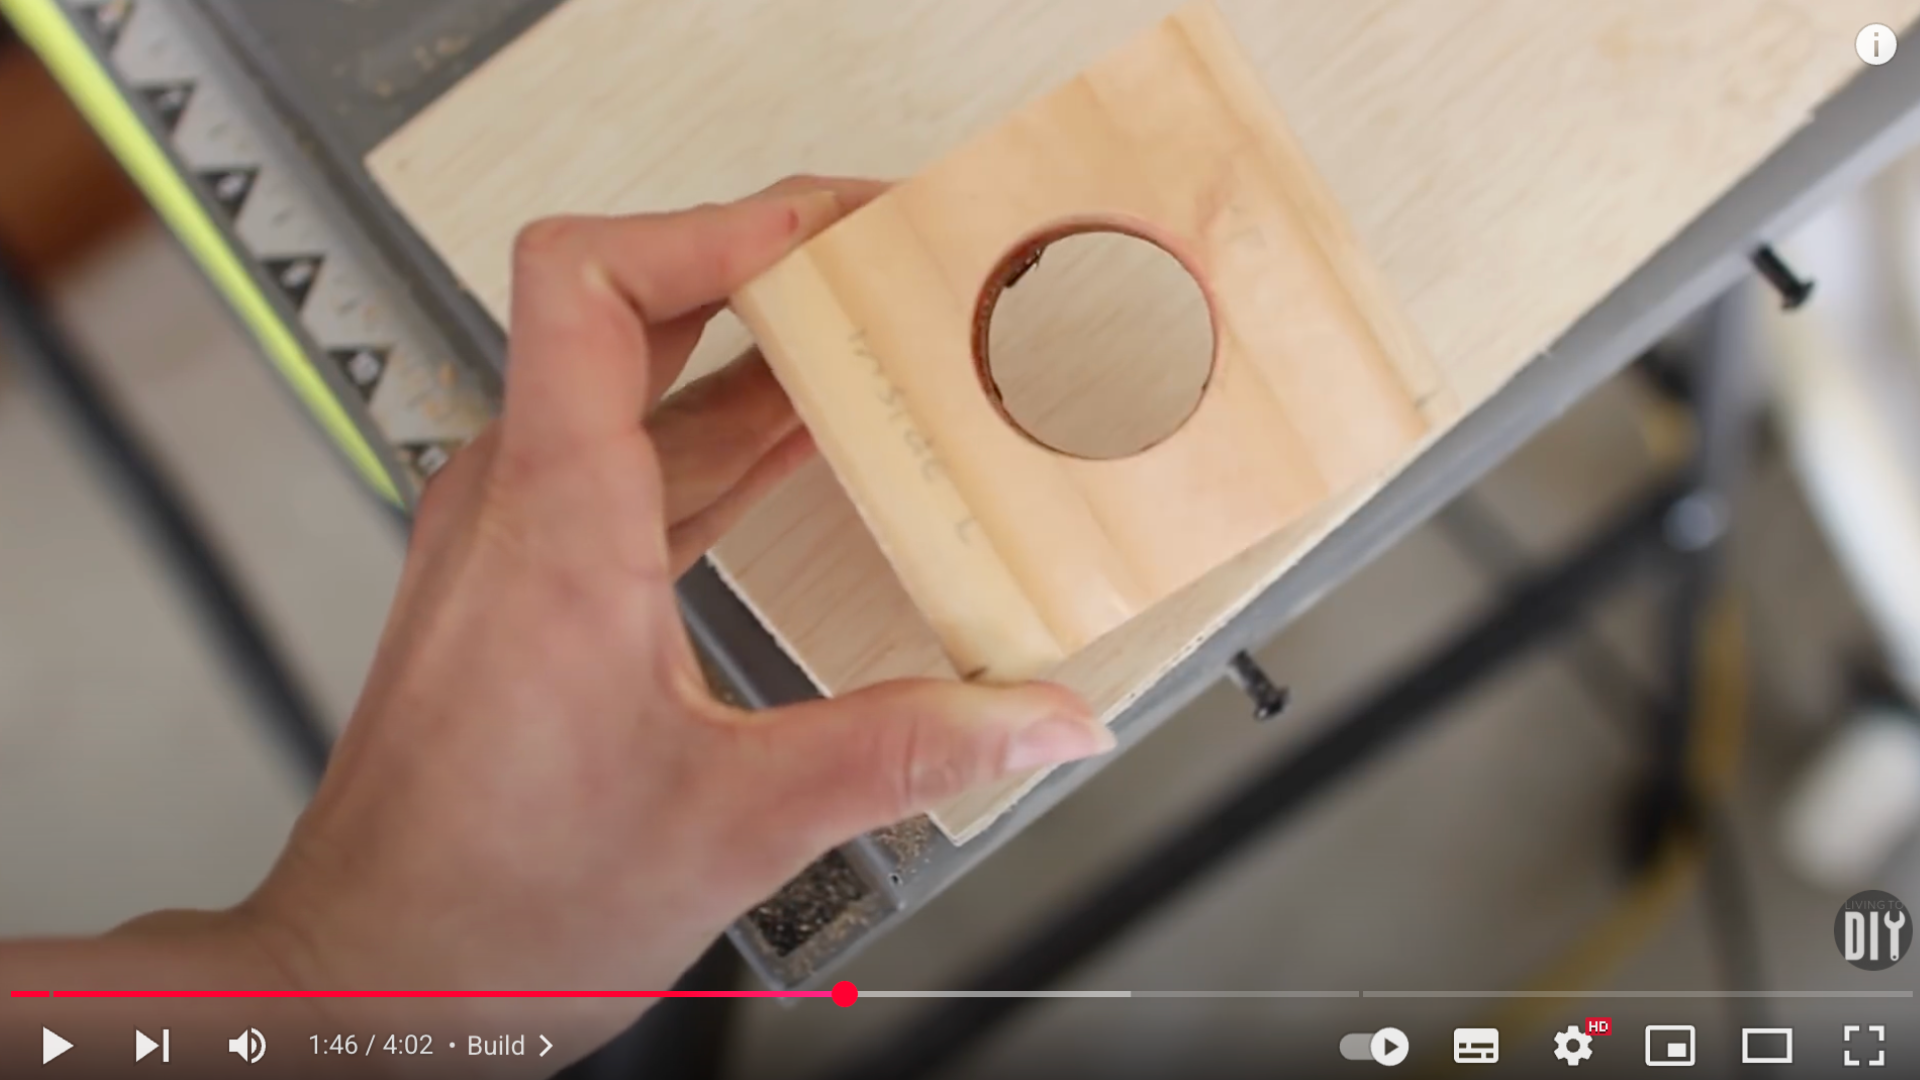
Place one of the thick wood blocks on top of a backing plate and trace a circle that matches the size of your curtain rod. Clap the wood securely to prevent movement.
This step is crucial because the hole saw can kick back when it hits resistance. Drill slowly and steadily using the hole saw to cut a half-circle groove in each bracket.
This groove is where the curtain rod will rest once mounted. After drilling, smooth the inside edges with sandpaper or an orbital sander to remove splinters and rough cuts.
Step 5: Sand All Surfaces
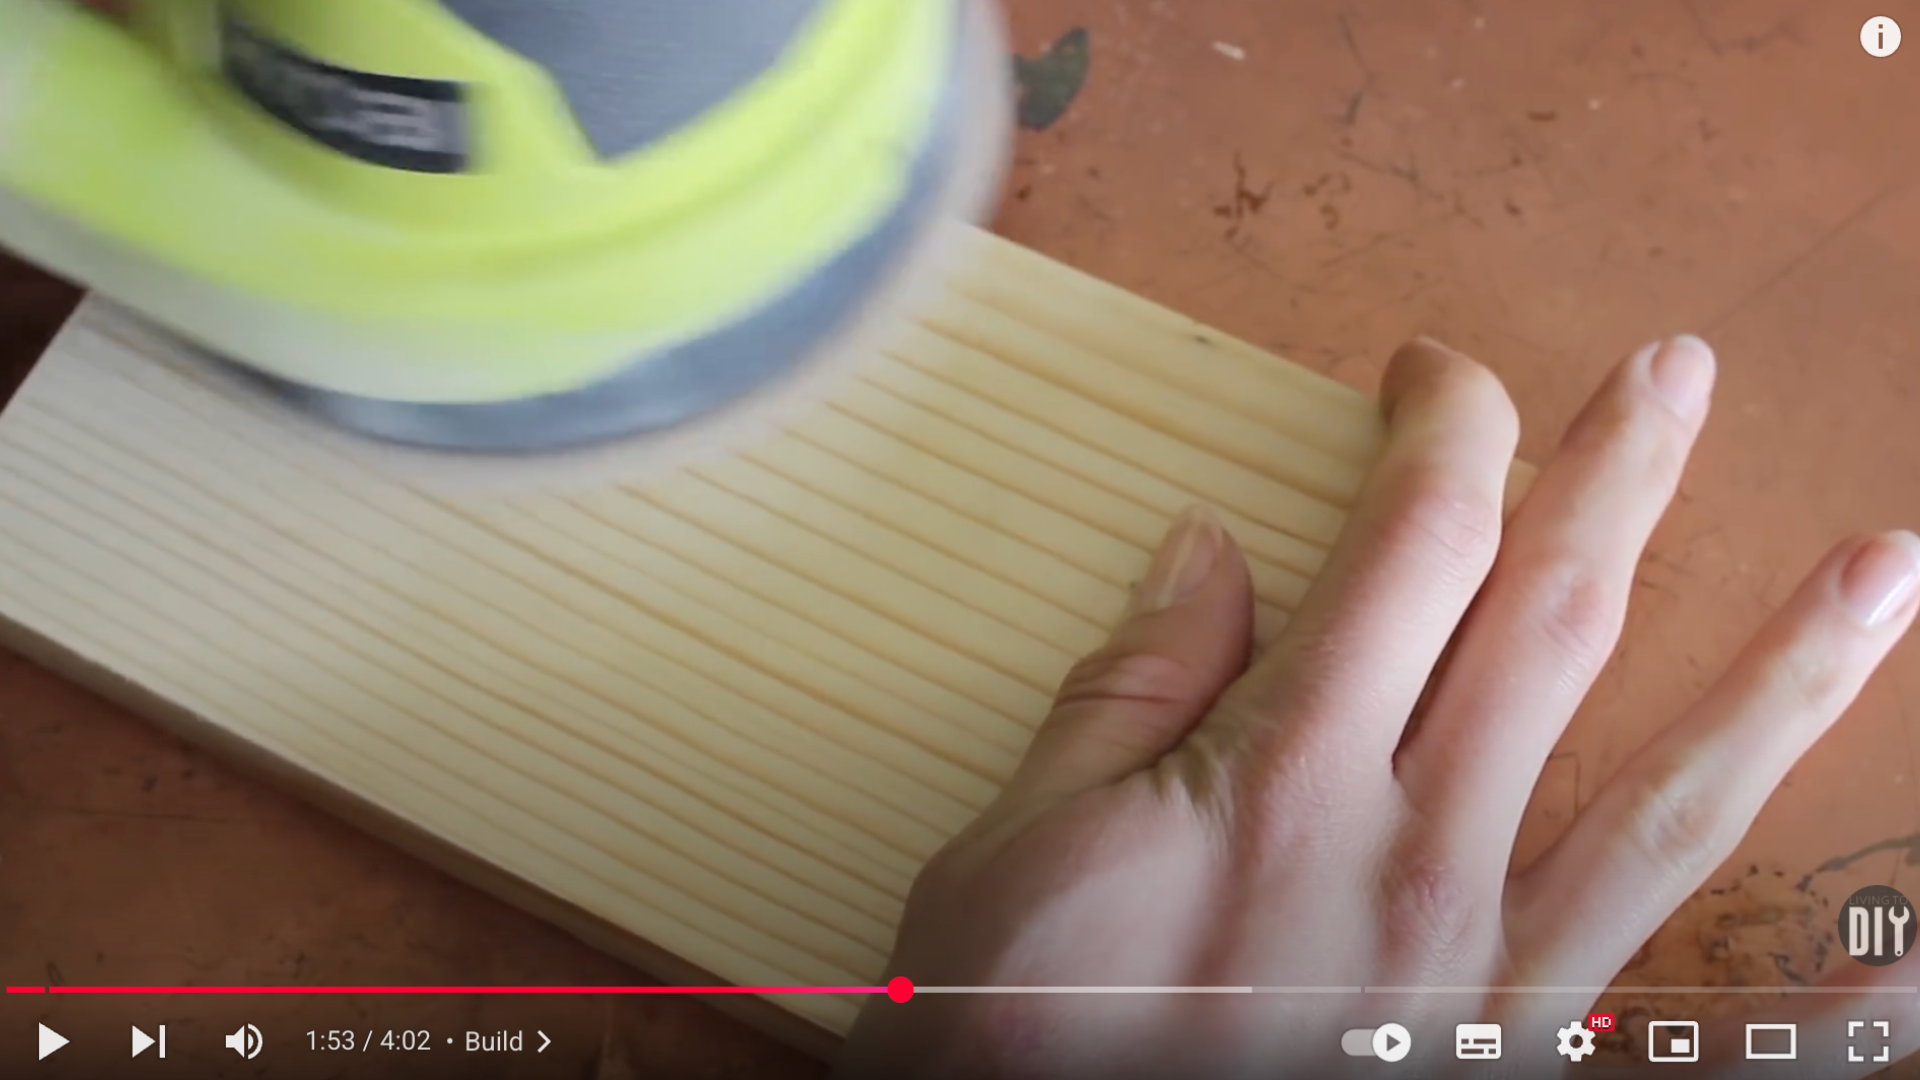
To get a clean, polished finish, sand all wooden pieces thoroughly. An orbital sander speeds things up, but hand sanding with 120-grit paper works just fine.
Focus especially on the edges, corners, and the area where your curtains will come into contact with the rod.
A smooth surface ensures the rod looks great and doesn’t snag the fabric.
Step 6: Assemble the Curtain Rod Brackets
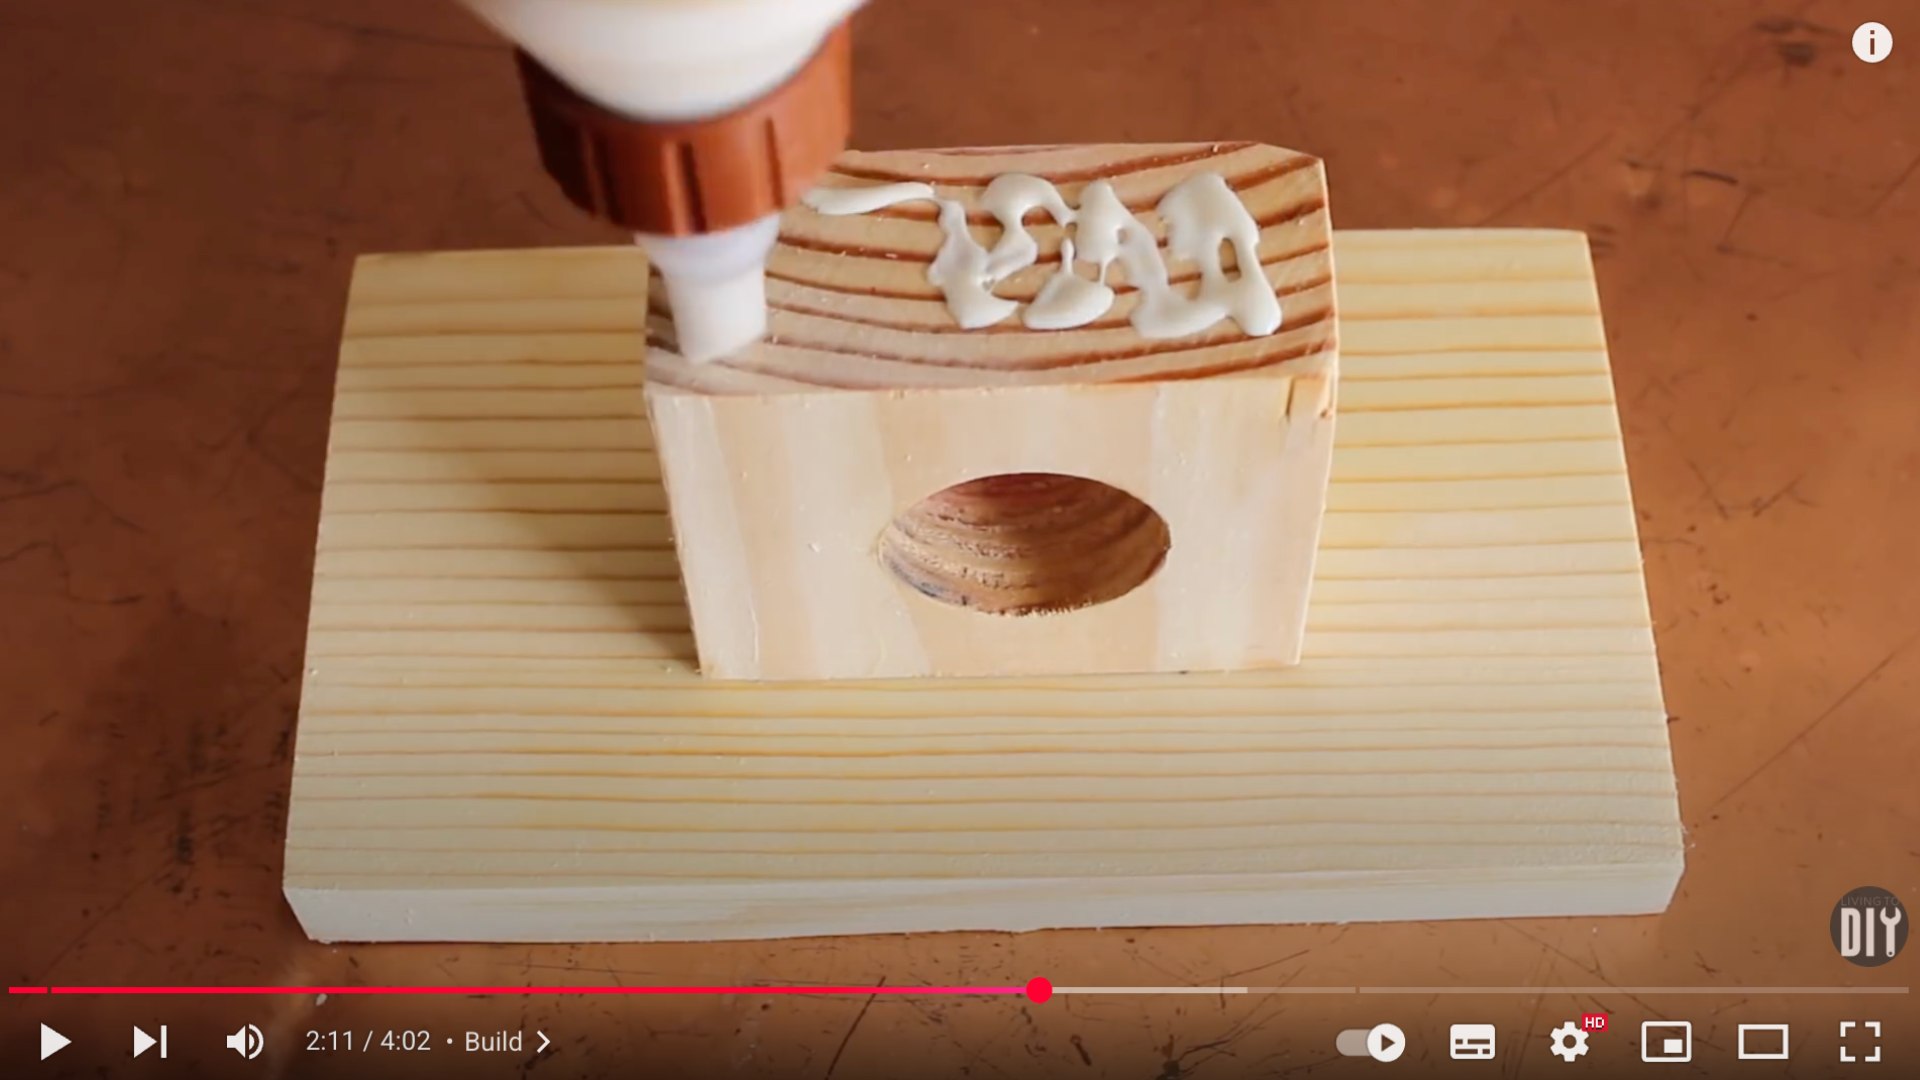
Now it’s time to glue and screw the brackets together. Position each thick piece with the hole facing upward at the center of the backing board.
Apply a generous layer of wood glue, then press them together firmly.
Use a measuring tape to ensure even spacing from the edges. Flip the whole piece over and drive two screws through the backplate into the thicker wood block.
Avoid screwing through the center hole, you want that space to remain clear for the dowel.
Step 7: Install the Brackets on the Wall
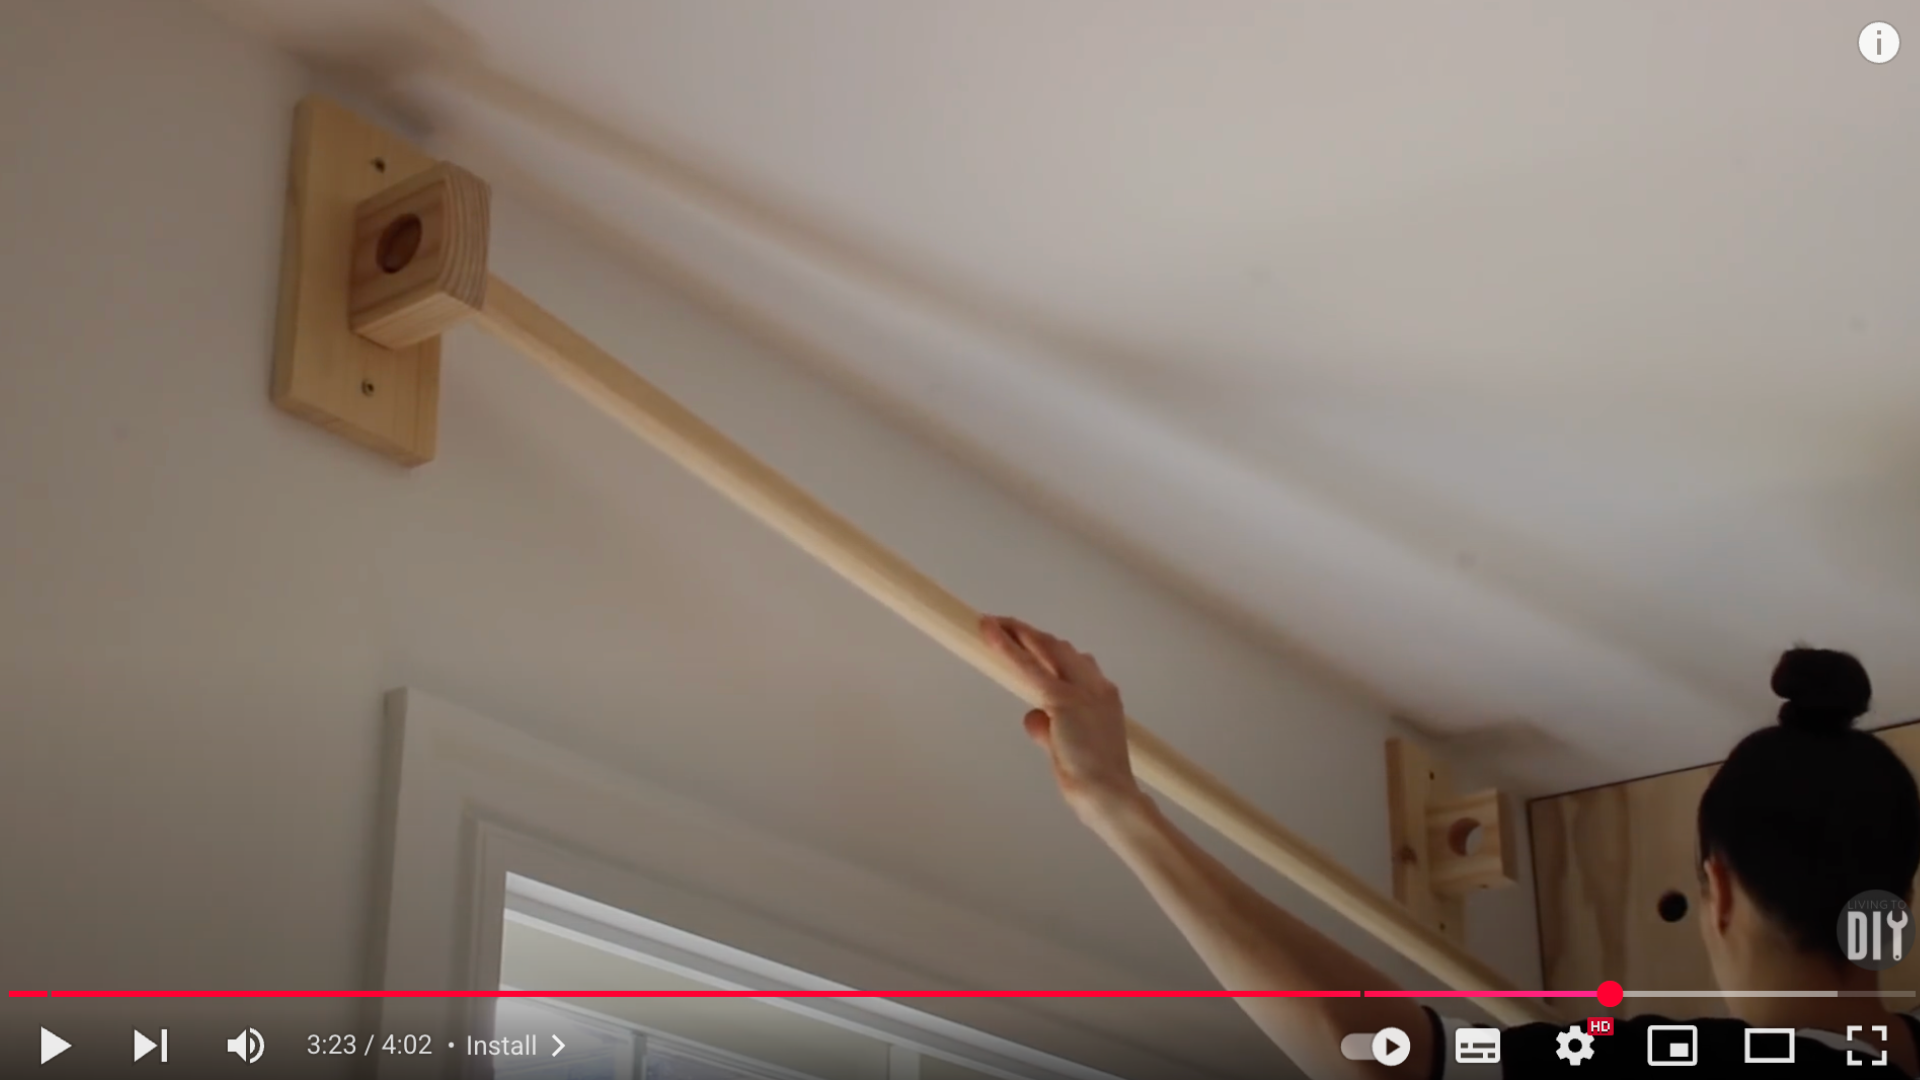
Use a stud finder to locate studs on either side of your window frame. This ensures the curtain rod can hold heavy fabric without pulling out of the wall.
Mark your spots and use long wood screws to attach each bracket directly into the studs through the backplate.
Double-check that the brackets are level and aligned, or your curtains will hang unevenly.
Step 8: Add the Curtains and Finish
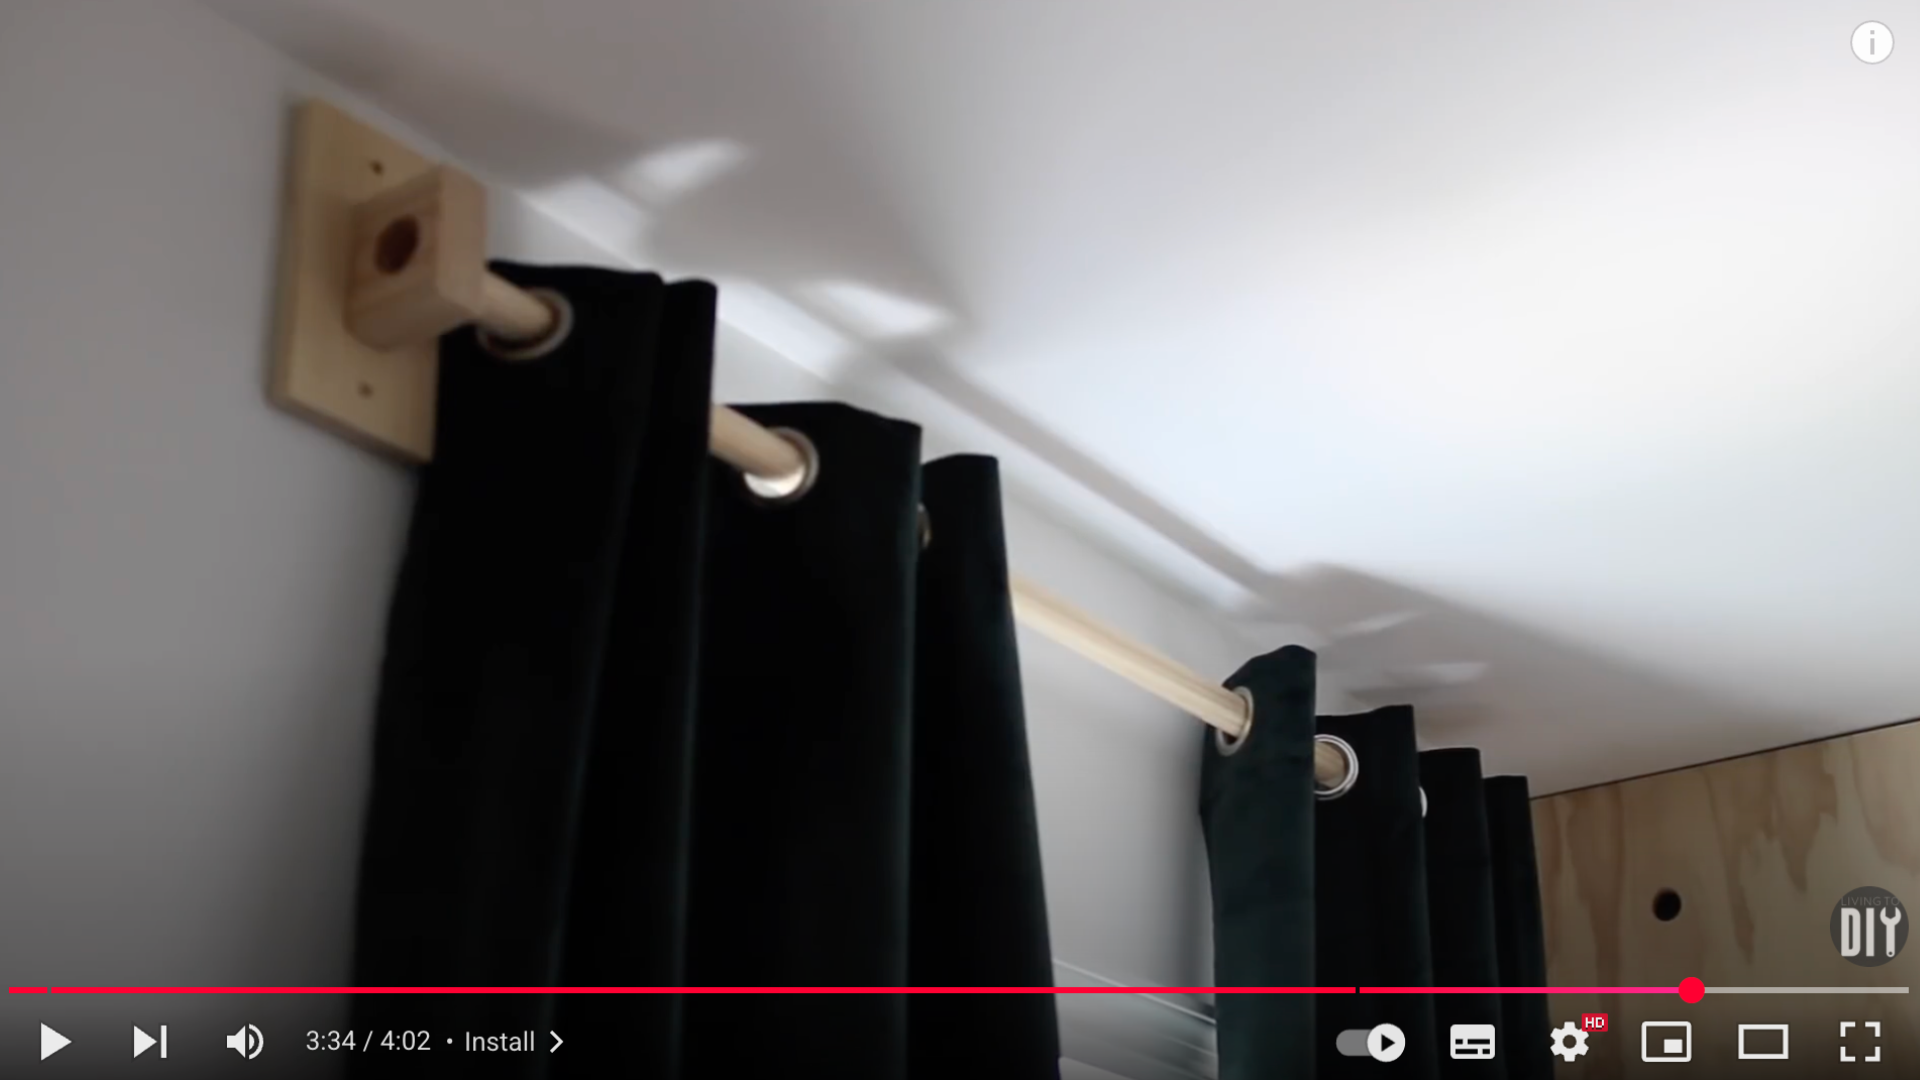
Slide your curtains onto the dowel before placing it into the bracket grooves. Once in position, your DIY curtain rod is complete! You can also stain or paint it to match your room decor.
This step-by-step tutorial is based on a fantastic video from Living to DIY with Rachel Metz. Huge thanks to Rachel for sharing such a clear and detailed guide. You can watch the original video on her YouTube channel or view it below.
Affordable Ways to Make Curtain Rods on a Budget
I found easy ways to make stylish curtain rods without spending much. In this section, I’ll share simple tricks to turn everyday items into creative, budget-friendly window solutions.
1. Budget-Friendly Curtain Rod Materials: Creating custom curtain rods doesn’t mean emptying your wallet. I’ve discovered multiple wallet-friendly solutions that change ordinary materials into beautiful window treatments.
2. Wooden Wonders: Wooden dowels are my secret weapon. Home improvement stores sell them for pennies. A 4-foot dowel might cost just $3-$5.
3. Metal Magic: Copper pipes are another game-changer. Hardware stores often sell remnant pieces at discount prices. A 5-foot copper pipe typically runs $10-$15. You can spray paint them to match any room’s color scheme.
4. Nature’s Curtain Rods: Branches from your backyard can become pretty window accessories. Look for straight, sturdy branches about 1-2 inches thick. Remove bark, sand smooth, and seal with clear varnish.
5. Bracket Hacks: Brackets don’t need to be expensive. Drawer handles make surprisingly awesome curtain rod supports. Thrift stores sell these for mere cents. Wall hooks from clearance bins work wonderfully too.
6. End Caps: Don’t overlook end caps. Recycled doorknobs, wooden balls, or clearance decorative finials can change basic rods. Check hardware store clearance sections. I once found beautiful brass knobs for just $1 each.
Maintenance and Caring Tips
Maintaining your handcrafted curtain rods doesn’t have to be complicated. With a few simple steps, you can keep them looking pristine and functioning smoothly for years to come.
1. Gentle Cleaning Techniques: Dust is the silent enemy of beautiful rods. I’ve learned that different materials need different cleaning approaches. For metal rods, use a soft microfiber cloth. Avoid harsh scrubbers that might scratch the surface.
2. Bracket Maintenance Matters: Brackets are the unsung heroes of your curtain rod. Check them every few months for stability. Loose brackets can cause sagging or uneven curtain hanging.
3. Refreshing Your Rod’s Look: Style changes happen. Your rod can change with them. A quick coat of spray paint can change your rod’s entire appearance. Choose colors that complement your current room design.
4. Easy Swapping Strategies: Keep your original mounting brackets and create multiple rods to switch out seasonally or when you want a new look. Store extra rods in a closet or under the bed. They’re lightweight and take up minimal space.
5. Storage and Care Tips: When not in use, wrap your rods in soft cloth or bubble wrap. This prevents scratches and keeps them in top condition. A little care goes a long way. Your DIY curtain rods are an investment in your home’s style.
Conclusion
Creating your own curtain rod isn’t just about saving money; it’s about personal triumph. Every time you look at that rod, you’ll feel a spark of pride knowing you built it yourself.
You’ve changed a simple home project into something unique. No more boring store-bought designs. Your space, your rules.
What’s next? I recommend trying:
- Matching curtain tiebacks
- No-sew curtain projects
- Custom window treatments
Your DIY journey has just begun. Share your creation in the comments! Snap a picture, tell us your challenges, or ask questions. Community matters.
Crafting things with your own hands isn’t just a skill, it’s an adventure. Keep creating, and most importantly, remember to have fun with your home projects.
Ready to show off your new curtain rod?