
Want to give your bathroom a new look without spending too much money? Your old vanity might look worn, but it still works well. Many homeowners face this same issue – they want change but don’t want to buy new furniture.
Good news: spray painting your bathroom vanity offers a budget-friendly fix. This method creates a smooth, factory-like finish that makes old cabinets look fresh again. With the right tools and steps, you can complete this project in a weekend.
This guide teaches you how to prep your vanity, choose the right materials, and create a lasting finish. We’ll walk through each step, share useful tips, and help you avoid common mistakes.
Let’s turn your tired vanity into a beautiful bathroom centerpiece.
Why Choose Spray Paint for Your Bathroom Vanity?
Spray paint offers clear benefits when updating your bathroom vanity. The method creates a smooth surface that brush painting often can’t match. With less effort, your vanity will look fresh and new than other painting approaches.
The tiny paint particles from spray cans spread evenly across surfaces, meaning your finished vanity will have no brush marks or roller texture. The fine mist fills small grooves and covers detail work with ease, ensuring better coverage in hard-to-reach spots and corners.
Most people find spray painting faster than using brushes or rollers. You can coat the entire vanity surface in minutes instead of hours. The paint dries quickly, too, which helps prevent dust from settling on wet areas.
The final look matters most for bathroom furniture. Spray paint gives your vanity a clean, professional appearance. The finish resembles factory-made pieces, with no signs of DIY work. Your guests might think you bought a new vanity altogether.
This method works well on various materials. Wood, laminate, and metal vanities all accept spray paint nicely. You’ll spend less time prepping and more time enjoying your updated bathroom space.
Step-by-Step Guide to Painting Bathroom Vanity or Built-In Cabinets
Step 1: Hardware Removal and Organization
Start by taking off all knobs and handles from your vanity. Clean each metal piece with furniture cleaner and a glycerin soap scrub pad. Store these pieces in marked containers.
Write clear labels with tape to match each piece to its spot. This makes putting everything back much easier later.
Step 2: Door and Face Plate Detachment
Now, remove all doors from their hinges. Put clear tape labels on each door and write matching marks inside the door frames. Look behind where the knobs were – you’ll find extra screws there.
Take these out so you can remove the face plates. This gives you better access for painting all surfaces.
Step 3: Surface Preparation
It’s time to sand every surface. Use a quality sander and work until each area feels slightly rough. Pay extra attention to any shiny spots – these need more work. Make sure to get into every corner and edge.
Always wear a mask during this step. If you’re working inside, use a sander that collects dust as you work.
Step 4: Deep Cleaning
Clean every surface thoroughly after sanding. Use special cleaning wipes or tack cloths to remove all dust and oils. Go over each area twice to ensure nothing gets missed. Let all surfaces dry completely before moving to the next step.
Step 5: Primer Application
Apply bonding primer made for cabinets. Use a fine cabinet roller for the main areas and a brush for spots the roller can’t reach. Let the primer dry fully. For the best results, you might need two coats. Light sanding between coats helps create the smoothest surface.
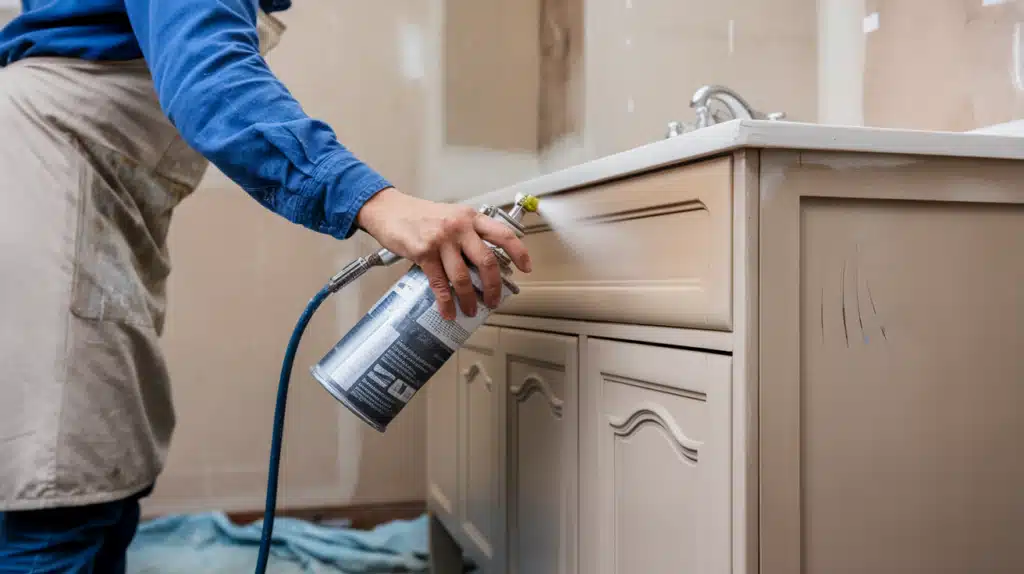
Step 6: Paint Application
For the best finish, use cabinet-grade paint or water-based lacquer. A paint sprayer creates the smoothest result, but brushes work, too. Apply thin, even coats and wait for each coat to dry completely. Most vanities need two coats for perfect coverage.
Step 7: Reassembly
Once the paint dries fully, start assembling everything. Follow your labels to match doors with their original spots. Test each door’s movement. Replace hardware carefully to avoid scratching your new paint job.
Step 8: Final Inspection
Look over your work in good light. Check for any missed spots or uneven areas. Make sure doors align properly. Test all drawers and doors for smooth operation. Fix any small issues now before they become bigger problems.
Video tutorial
Watch the full YouTube tutorial on how to spray paint bathroom vanity.
Maintenance and Care for Your Newly Painted Vanity
1. Regular Cleaning Methods
Keep your painted vanity clean with mild soap and warm water. Use a soft cloth to wipe surfaces gently. Skip harsh cleaners or scrubbing pads – they can scratch the paint. Work in small sections and dry each area with a clean cloth.
2. Daily Protection
Wiping spills quickly can protect your vanity from water damage. Keep bathroom items on small trays or mats, which prevents water rings and product stains. Use drawer liners to prevent items from scratching the inside surfaces. Watch for drips from soaps or toothpaste.
3. Weekly Check-ups
Look over your vanity each week for signs of wear. Check spots that get lots of use, like around handles and drawer edges. Clean these areas often to stop dirt build-up. Feel for any rough spots that might need attention.
4. Monthly Care
Give your vanity a thorough once-over each month. Check all surfaces in good light. Look for water spots or areas where the finish seems dull. Use a soft polish made for painted surfaces to bring back the shine. Pay attention to spots near the sink.
5. Touch-up Work
Keep some of your paint stored safely for touch-ups. When you spot a chip, clean the area first. Sand any rough edges lightly. Apply paint with a small brush. Let it dry fully. Blend the edges of your touch-up with the old paint for a smooth look.
6. Long-term Protection
Keep your bathroom well-aired to protect the paint. Use fans during showers to control moisture. Consider adding a clear coat in high-use areas for extra protection. Watch for signs that might need tightening to prevent extra wear.
Conclusion
Giving new life to your bathroom vanity takes time and attention, but the results make it worthwhile. A freshly painted vanity can make your whole bathroom feel different. The key lies in proper preparation and patience through each step.
Remember to focus on the small details—good sanding, careful cleaning, and steady painting all add up to create a lasting finish.
Take your time with each coat, and don’t rush the drying process. Your effort in the prep work pays off in the final look.
With these steps and tips, you can start your vanity painting project.
Soon, you’ll walk into your bathroom and see your updated space’s bright, clean look – thanks to a can of paint and your own skills.