
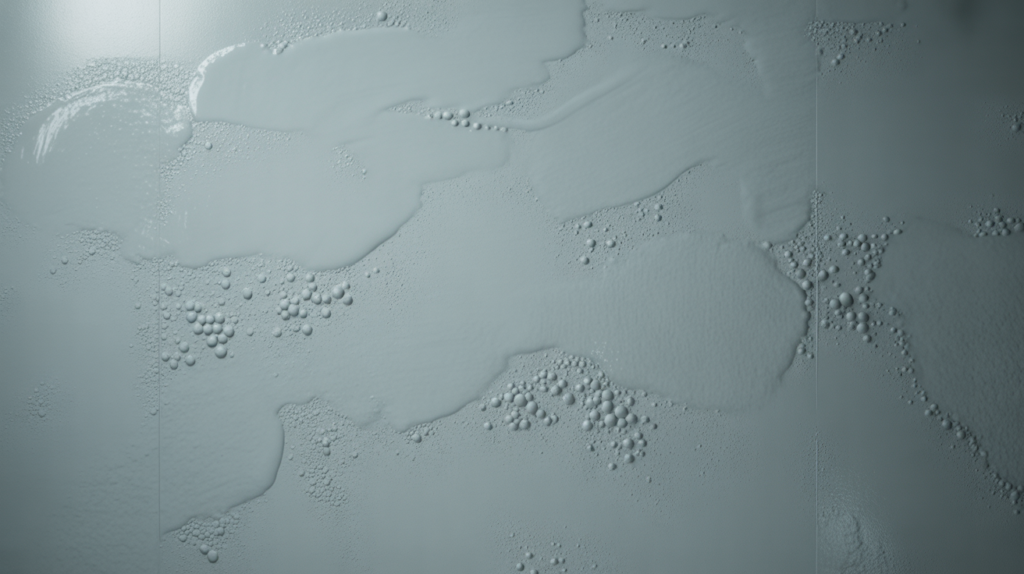
You’re rolling paint on the wall, and at first, everything looks perfect. Then, all of a sudden, bubbles start popping up under the surface and ruin the smooth finish you worked so hard for.
I’ve been there myself, and I know how frustrating it is. You spend time prepping, you pick good paint, and yet things still go wrong. It feels like all your effort just went to waste.
But here’s the good news: most paint bubbles don’t happen by chance. They happen for a reason, and once you know what causes them, you can avoid them.
In this guide, I’ll show you what really causes bubbles to form under paint.
You’ll learn how to prevent them from happening in the first place, and I’ll explain simple ways to address them if they do occur.
I’ve made every mistake, so you don’t have to. Stick with me, and your paint will always look smooth and clean.
Why Paint Bubbles Matter More Than You Think
Paint bubbles don’t just look unappealing; they can be a sign of a deeper problem.
Some are shallow and caused by how the paint was applied. Others go deeper and mean trouble underneath.
Surface bubbles usually come from rolling too fast or using thick paint. These are annoying but easy to fix.
Deep bubbles are more serious. They can indicate that there’s moisture behind the wall or that the surface wasn’t properly prepared.
If you don’t address the root cause, the bubbles will recur. Understanding why bubbles form helps you select the most effective fix.
You’ll know when to sand and repaint, and when it’s time to call a pro. The key is spotting the real issue early.
Common Causes of Bubbles in Paint When Rolling
Paint bubbles happen for three main reasons. Each category has its fixes. Let me break down what’s really going on.
1. Issues With the Paint Itself
Old paint is one of the most common causes of bubbles. Over time, the ingredients inside separate and don’t mix as well, allowing air to get trapped when you roll it out.
Thick paint causes problems, too. People often think it covers better, but it doesn’t spread smoothly. It traps air more easily, especially during fast rolling.
Using the wrong paint type is also important. For example, applying latex paint over oil-based paint without using a primer can lead to bubbling.
Even dirty or contaminated paint will cause trouble. Dust, dried chunks, or tiny bits in the can stop the paint from flowing right and ruin your finish.
2. Application Techniques
How you apply paint plays a huge role in if bubbles form. Rolling too fast creates air pockets that stick to your wall.
Using the wrong roller also causes trouble. Thick rollers pick up more paint but also trap more air, especially on smooth surfaces.
Overloading the roller with too much paint may seem like a shortcut, but it results in thick patches that bubble up.
Also, don’t just roll in one direction or ignore wet edges. That traps air, resulting in an uneven finish with marks and bubbles.
3. Environmental Factors
The weather around you affects paint just as much as the paint itself. If it’s too hot, the surface dries too fast, and any trapped air can’t escape in time.
High humidity causes the opposite problem. The paint doesn’t dry properly, and moisture in the air gets trapped under the surface, which leads to bubbles later.
Painting in direct sunlight is also risky. Some areas dry faster than others, which creates hot spots that bubble.
If the room is stuffy with little airflow, paint can’t cure right. Poor ventilation allows both heat and moisture to accumulate, leading to bubbling.
How to Prevent Paint Bubbles When Rolling
Stopping paint bubbles before they start is much easier than fixing them later. Below is a simple checklist I follow to keep every paint job smooth and bubble-free:
- Use high-quality paint: Always check the expiration date and stir it well before starting. Strain it if you see any lumps.
- Pick the right roller: Use a short nap for smooth walls and a longer nap for textured surfaces.
- Paint in the right conditions: Aim for a temperature between 50°F and 85°F, and avoid humid or rainy days.
- Keep air flowing: Use fans for steady airflow, and avoid painting in direct sunlight.
- Use the “W” method: Roll in a “W” shape, then fill in the empty spots with straight strokes for even coverage.
- Prep your walls well: Clean the surface, sand glossy areas, and apply primer if needed.
- Fix flaws first: Fill cracks or holes, and always use quality tools for smoother application.
With the right prep and technique, you can avoid bubbling and enjoy a flawless finish on every wall you paint.
How to Fix Paint Bubbles After They Appear?
Paint bubbles can appear even when you’re careful, but don’t worry, they’re usually fixable. Below is a step-by-step guide to help you smooth things out and get your wall looking great again:
- Let the area dry completely: Don’t rush into repairs while the paint is still wet. Wait at least 24 hours to avoid making the problem worse.
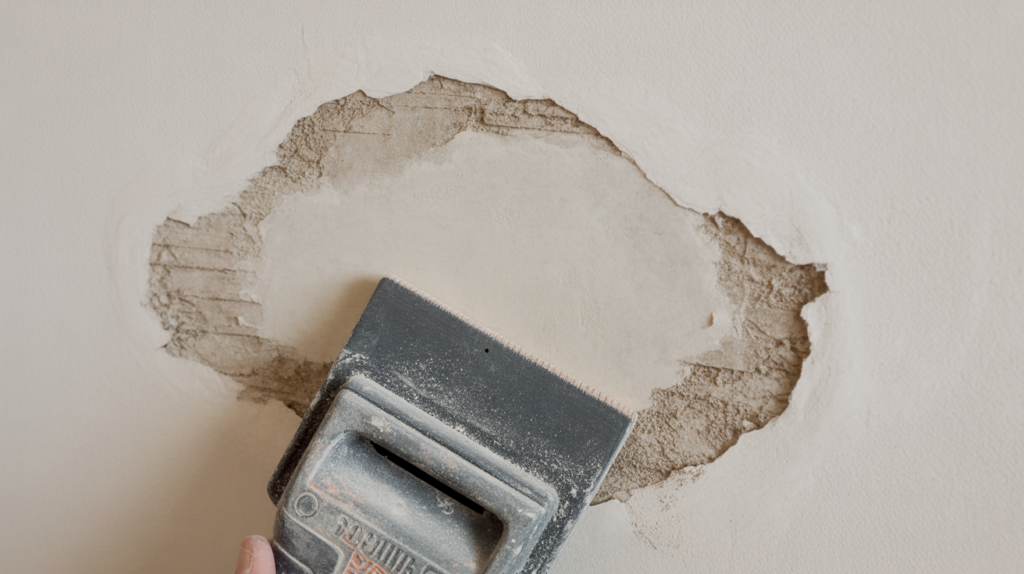
- Scrape off the bubbles: Use a putty knife or paint scraper to remove the bubbled paint gently. Be sure to get rid of any loose or peeling areas around the bubble, too.
- Sand the surface smooth: Lightly sand the area with fine-grit sandpaper until the surface feels even. Wipe away any dust with a clean cloth.
- Prime the spot: If the bubble happened due to moisture or a slick surface, apply a good-quality primer before repainting. This helps the new paint stick better.
- Repaint the area: Once the primer is dry, paint over the patch with a brush or roller, blending it into the surrounding paint. Apply thin coats and let each one dry before adding more.
- Fix the root cause: If moisture was the issue, check for leaks, high humidity, or poor ventilation. Solving that problem will prevent bubbles from recurring.
By taking the time to prep and repaint the right way, your wall can look as good as new, and you’ll keep bubbles from making another unwanted appearance.
Conclusion
Paint bubbles can be really frustrating, but they’re not a mystery.
In most cases, they’re caused by things you can control, like poor prep, bad technique, or painting in the wrong conditions.
The most important step is proper preparation. Clean your walls, use good paint, and pick the right tools.
Skipping steps might save you a few minutes now, but it often leads to hours of extra work later.
Patience matters as much. If you rush, the paint won’t dry right, and bubbles will form. Take breaks if it’s too hot, and allow each coat to dry completely before applying another.
Practice helps too. Test your roller and paint on a small area first to ensure they work properly. This is a smart move before embarking on a major project.
Even pros get bubbles sometimes. The difference is that they know how to stop them and fix them fast. Now that you’ve learned the right steps, so can you.
Got any questions or suggestions? I would love to hear them! Drop whatever you have in mind in the comment section!
Frequently Asked Questions
Do All Paint Bubbles Need Immediate Fixing?
Not always. Small surface bubbles can wait until the paint fully dries. However, deep or moisture-related bubbles should be checked and addressed immediately to prevent further damage.
Will Primer Stop Paint Bubbles From Forming?
Yes, using the right primer can help. It seals the surface, improves paint sticking, and prevents bubbles, especially when painting over glossy or mismatched paint types.
How Long Should I Wait Before Fixing Bubbles?
Allow the paint to cure for at least 24 to 48 hours. Fixing bubbles too soon, while the paint is still wet, can exacerbate the problem.
Should I Pop Paint Bubbles With a Pin?
Never pop paint bubbles while the paint is still wet. It can leave holes and uneven spots. Let the paint dry first, then sand and repaint the area if needed.
How Do I Know If Bubbles Will Keep Coming Back?
If bubbles keep returning, it likely means there’s a deeper issue, such as trapped moisture or poor preparation. Fix the root cause before trying to paint again.