
Hardwood floors can lose their shine over time. I’ve seen mine get scuffed, dull, and just not look as nice as they used to.
But that doesn’t always mean you need to sand them down or replace them. Sometimes, all they really need is a good buff.
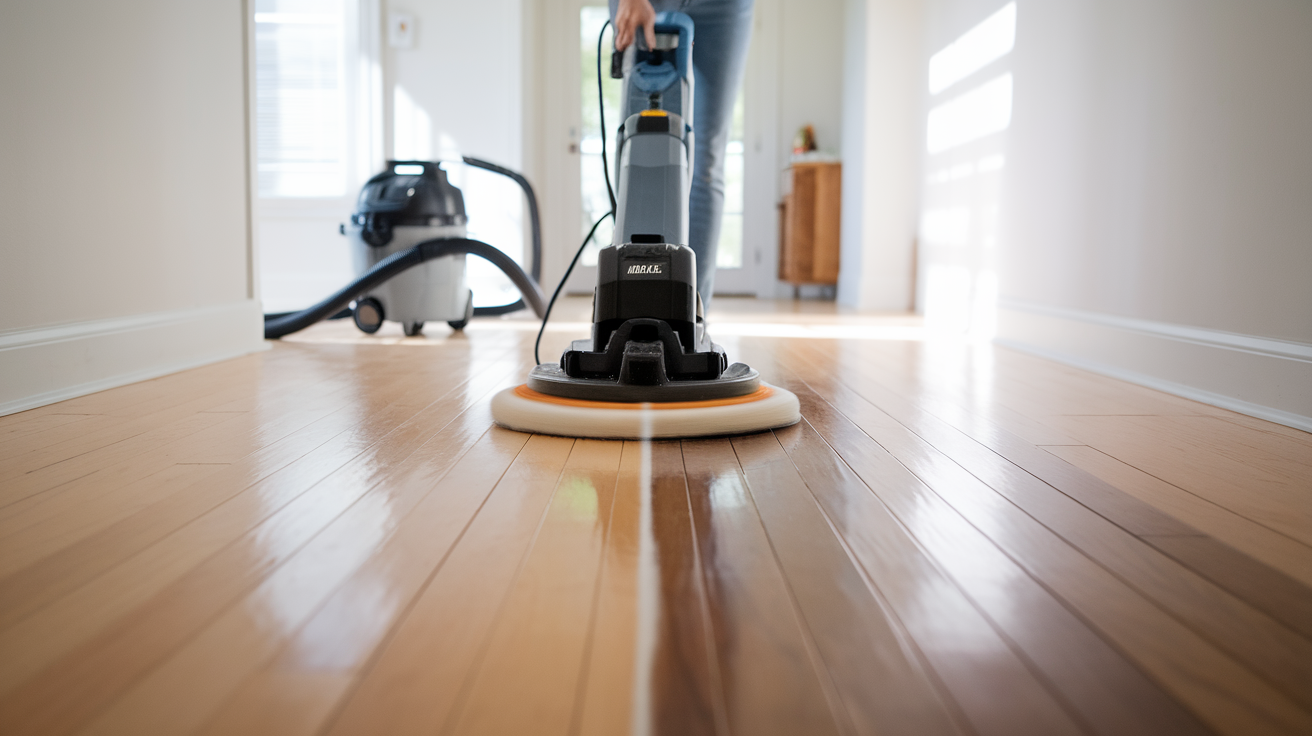
Buffing smooths the surface of your hardwood floors without removing too much of the finish.
I like how it evens out tiny scratches and brings back a clean, natural shine. It’s quicker and easier than sanding, and it helps your floors last longer.
When I buff my floors, they almost look new again. They feel smoother, have a nice glow, and it gives me more time before I need to think about refinishing.
If your floors look a little tired but aren’t badly damaged, buffing might be just what they need.
What is Buffing?
Buffing is a way to gently clean and smooth the top layer of your hardwood floors.
It doesn’t cut deep like sanding. Instead, it removes tiny scuffs, dull spots, and light scratches from the surface.
You use a machine called a floor buffer with a soft pad underneath. This pad spins in circles and lightly scrubs the floor. Think of it like polishing, just a little more powerful.
Buffing works best when your floors look worn but the finish is still okay. It won’t fix deep scratches or water damage.
But it does help your floors look cleaner, shinier, and smoother without a full refinish.
Most hardwood floors only need buffing every 3 to 5 years, depending on how much use they get.
In high-traffic areas like hallways or kitchens, you might buff more often. In low-traffic areas like bedrooms, you might go longer.
Buffing is the right choice when:
- Your floors look dull or cloudy but aren’t deeply scratched.
- The finish is worn, but the wood underneath is still in good shape.
- You want to bring back shine without a big project.
- You want to clean up before applying a new coat of polish.
Tools and Materials You’ll Need
Before you start buffing, gather these items. You don’t need to buy everything; some tools can be rented or borrowed.
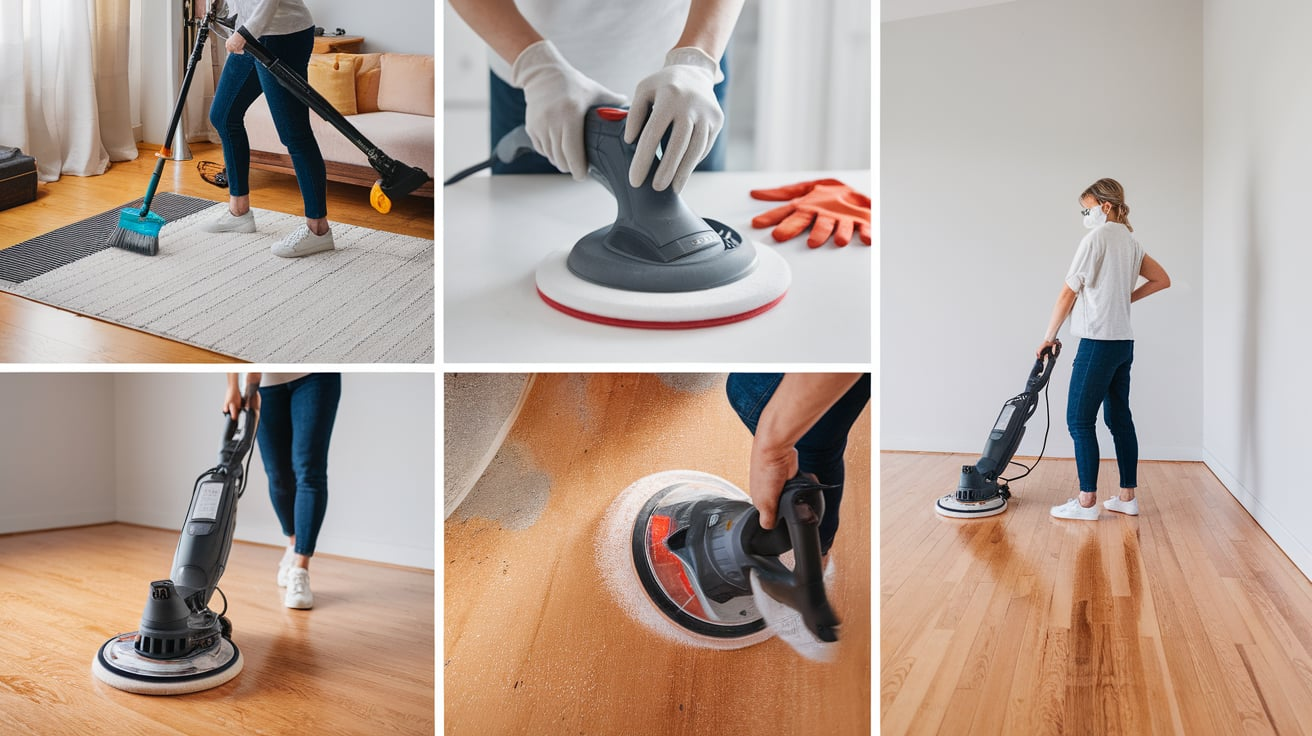
1. Floor Buffer: You can rent a floor buffer from most home improvement stores. It’s a heavy machine with a spinning pad that does the buffing. Staff at the rental desk can usually show you how to use it.
2. Buffing Pads: White pads are soft and good for light buffing. Red pads are a bit stronger and work well for scuffed areas.
3. Hardwood Floor Cleaner: Choose a cleaner made for wood floors. It will loosen dirt and grime so you don’t have to buff over messes.
4. Vacuum and Broom: Sweep and vacuum before buffing. If left behind, even small dirt or sand can scratch the floor.
5. Safety Gear:
- Dust mask: keeps you from breathing in fine dust.
- Gloves: helpful for handling the machine and cleaning.
- Knee pads: optional, but great for comfort if you’ll be kneeling.
6. Microfiber Mop or Tack Cloth: After buffing, use one of these to wipe up any remaining dust so your floor is clean and ready to shine.
Steps to Buff the Floor
Buffing might seem tricky at first, but once you get started, it’s actually simple.
Just go slow, follow each step, and don’t worry if it takes a little practice to feel comfortable with the machine.
1. Prepare Your Floor
- Remove all furniture, rugs, and floor mats from the room.
- Go over the area with a vacuum, especially along edges and corners.
- Use a cleaner made for hardwood floors; this step removes oils, footprints, and stuck-on grime.
- Wait until the floor is completely dry before you start buffing. Even a little moisture can cause the buffing pad to stick, smear, or leave streaks.
2. Set Up the Floor Buffer
- Place your buffing pad (white or red) onto the bottom of the buffer. Some machines have a holder or center-lock ring to keep it in place. Make sure it’s centered, or the machine might wobble.
- Plug the machine into a grounded outlet—avoid using extension cords unless they are rated for heavy equipment.
- Check the power switch and familiarize yourself with the handles. Many buffers have a safety trigger or handlebar control to turn them on.
- Always wear your dust mask and gloves before you begin.
Why it matters: A balanced setup helps the buffer spin smoothly and makes it easier to control.
3. Start in a Far Corner of the Room
Choose a corner at the far end of the room so you can work your way out without stepping on the freshly buffed area.
- Lower the buffer so it sits flat on the floor.
- Hold both handles firmly, but keep your arms relaxed.
- Turn it on while it’s resting flat, not tilted.
When you first turn it on, the machine might feel like it wants to run off in one direction. Don’t worry, that’s normal. Stay calm and hold your ground. Let the machine’s weight help you guide it.
4. Move in Slow, Even Strokes
The goal is to move the buffer gently over the floor, like you’re mowing the lawn.
- Don’t push or yank it, guide it with light pressure.
- Buff in straight lines, keeping the pad flat and steady.
- Move slowly so the pad has time to work on the surface.
- Don’t stop in one place with the buffer running; it can leave marks.
Tip: Keep the cord over your shoulder or to the side so you don’t trip or run over it.
5. Overlap Each Pass Slightly
When you reach the wall or edge of the room, gently turn the buffer and begin the next row. This overlap makes sure the floor looks even and smooth everywhere.
- Overlap each path by 2–3 inches to avoid streaks or missed spots.
- Keep a pattern going, row by row, just like mowing a lawn or painting a wall.
6. Take Breaks if You Need To
Buffing is physical work, especially in bigger rooms.
- If your arms or back get tired, pause and take a break.
- You’re not in a race; it’s better to rest than to rush and mess up.
- Stay hydrated, and take your time.
7. If the Machine Feels Hard to Control
If the buffer feels like it’s pulling or jerking too much:
- Let go of the tension in your arms and let the buffer settle flat.
- Ease off the controls and reset your stance, feet shoulder-width apart.
- Gently shift the handles left or right to steer. Don’t try to “muscle” it.
Practice tip: If it’s your first time, practice in a small section or hidden area (like behind furniture) to get used to the movement.
This helpful step-by-step video by @amresupply on YouTube shows you exactly how to buff hardwood floors.
After Buffing: Clean-Up and Final Touches
Once you’re done buffing, you’re almost there, but don’t skip these last steps. A good clean-up and a few smart tips can help your floor look even better and stay in good shape longer.
1. Wipe or Vacuum Leftover Dust
Buffing leaves behind fine dust, even if it’s hard to see.
- Use a vacuum with a hardwood-safe attachment to pick up the dust.
- Follow up with a microfiber mop or tack cloth to clean up any remaining debris.
2. Apply a Light Coat of Floor Polish or Refresher
If your floor looks dull or dry after buffing, this adds a nice shine and helps protect your floor for a longer period.
- Use a hardwood floor refresher or polish specifically designed for your type of finish, such as water-based or oil-based.
- Apply a thin, even layer using a clean mop or applicator.
- Let it dry completely before walking on it.
3. Let the Floor Dry Fully Before Walking or Replacing Furniture
- Wait at least a few hours, or overnight, if you applied a polish.
- Keep the area clear of shoes, pets, and heavy traffic until it’s dry.
- Use felt pads when moving furniture back to avoid scratching.
Conclusion
Buffing is a smart and easy way to keep your hardwood floors looking fresh, without doing a full refinish.
It smooths out light scratches, brings back that beautiful shine, and helps your floors last longer.
You don’t need to be a pro to do it. With a little time and the right tools, you can get great results on your own. It’s one of those small jobs that make a big difference.
Ready to restore the shine to your floors? Grab a buffer, take it slow, and enjoy the clean, smooth look when you’re done!