
Are you tired of wasted closet space? Look no further. This guide will show you exactly how to build a sturdy, custom closet shelf that fits your needs perfectly.
In this blog, you’ll learn everything from measuring your space to installing the final shelf. I’ve broken down each step so anyone can follow along—even if they’ve never picked up a drill before.
I’ve been building custom storage solutions for over 15 years, and I’ve made every mistake possible so you don’t have to. The method I’m sharing today has worked for hundreds of homeowners just like you.
Whether you have a small closet or a big walk-in, these easy steps will help you build a shelf for clothes, shoes, or storage—without spending much.
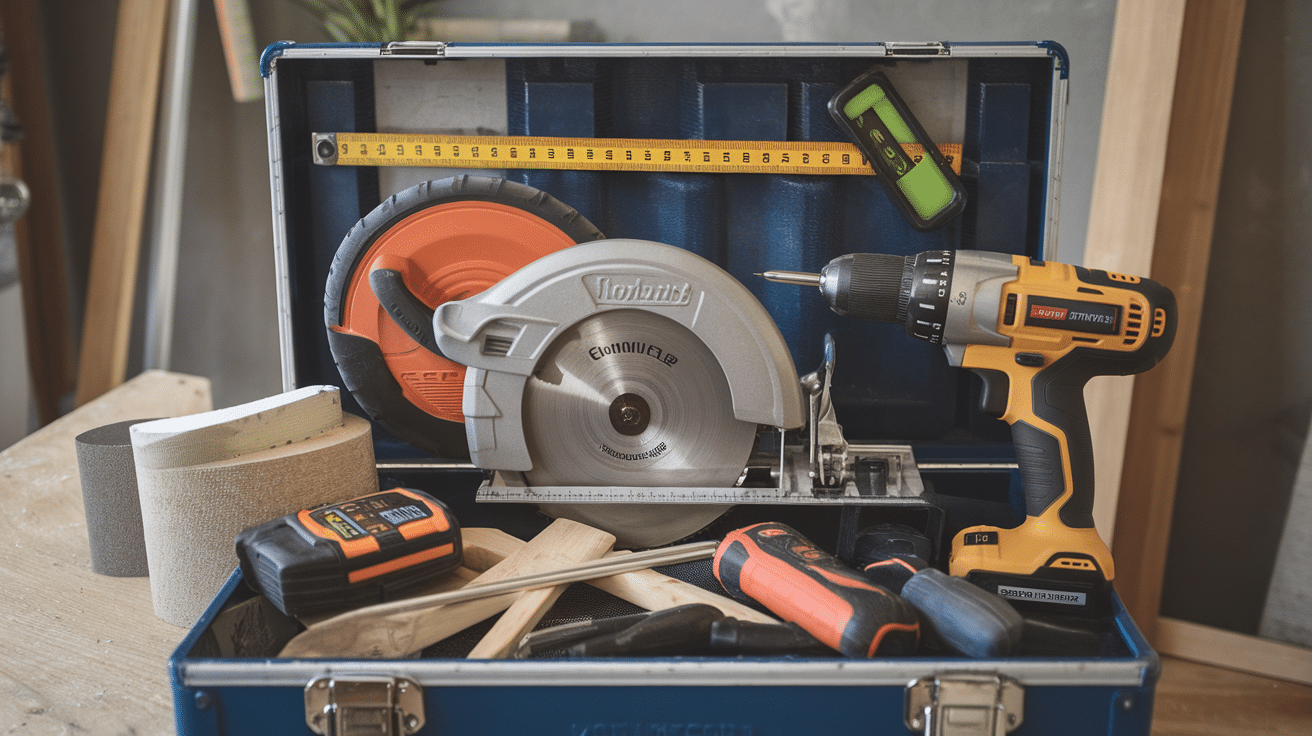
Items Needed to Create Closet Shelves
Before we dive into the building, let’s gather everything you’ll need. I’ve made this list based on what works best for most closet projects.
1. Tools
- Measuring tape
- Circular saw or hand saw
- Power drill
- Stud finder
- Level
- Screwdriver
- Sandpaper or sanding block
- Paintbrush or roller (if painting)
Don’t worry if you don’t own all these tools. Many can be borrowed from friends or rented for a day from hardware stores.
2. Materials
- Plywood or MDF boards (for shelves)
- 1×2 or 1×3 wood strips (for shelf supports/cleats)
- Screws or nails
- Wood filler
- Paint or wood stain (optional)
- Brackets (optional for extra support)
A quick tip: Measure your closet space before shopping. This saves you time and prevents wasted materials.
You might already have some of these items at home. Check your garage or toolbox before buying anything new!
Step-by-Step Guide for Building a Shelf
Measure your space and gather materials, including wood boards, screws, and a level. Cut your boards to size, locate wall studs, and install support cleats or brackets at your desired height.
Place your shelf on the supports, secure it in place, and finish with sanding and paint for a professional look.
Step 1: Measuring for Your Custom Closet Shelves

Evaluating Your Closet Space:
- Examine your closet carefully before starting any work
- Check if the depth accommodates standard hangers (typically 12″ minimum)
- Look for unusual corners or angles that might require custom cuts
- Identify any obstacles, such as light fixtures, outlets, or vents
- Measure the full height to maximize vertical storage potential
Step 2: Measuring Height, Width, and Depth
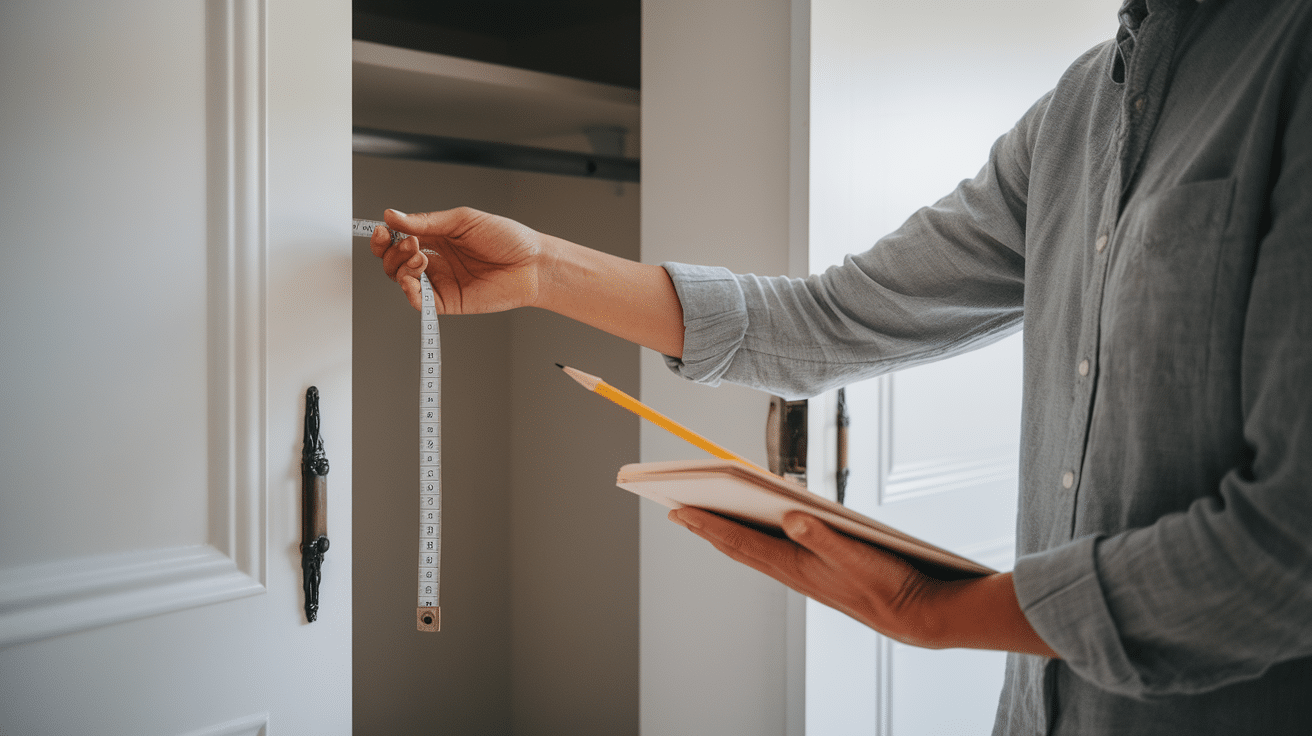
Measure and write the key dimensions:
- Width from wall to wall
- Height from floor to ceiling
- Depth from back wall to door frame
I always measure twice to be sure. Even small errors can lead to wasted materials and frustrating fixes later.
Step 3: Deciding Shelf Spacing Based on Your Needs
Different items need different spaces:
- Folded Shirts and Pants: 10-12 Inches
- Shoes: 6-8 Inches
- Storage Bins: Check your bin height + 2 Inches
- Books or Heavy Items: no more than 30 Inches between supports
Your closet should work for you, not the other way around.
Tips for Making the Most of Vertical Space
Don’t forget to look up! Most closets waste the top third of their space. Consider adding a high shelf for seasonal or rarely used items.
1. Sketching a Simple Layout Plan
Start by drawing the closet on paper—nothing fancy, just a basic sketch. Include all key measurements: height, width, and depth.
Mark where each shelf should go and how far apart they should be. Remember to note any doors, light switches, or vents.
This simple plan gives us a clear picture of what we are building and helps figure out how much wood and hardware we’ll need before making any cuts
2. Planning Your Shelf Layout
Now that we know the size of our space, think about what we’ll actually store on these shelves. Clothes? Shoes? Storage bins?
Group similar items together and plan shelf spacing to match—taller bins need more room, while shoes need less. Leave a little extra space so everything fits easily.
3. Choosing Between Fixed and Adjustable Shelves
Fixed shelves are stronger and simpler to build. I recommend these for most DIY projects.
Adjustable shelves give you flexibility to change your layout later. They require special hardware (shelf pins) and more precise drilling.
Your choice depends on your confidence level and how often you reorganize. For beginners, start with fixed shelves.
4. Considerations for Reachability and Visibility
Think about your height and what you can comfortably reach. The most useful shelves sit between waist and eye level.
Items you use daily should be easy to see and grab. Less-used items can go higher or lower.
Remember: A shelf that’s too high or too deep becomes a “black hole” where things get lost.
5. Ideal Spacing Between Shelves for Different Items
Different items need different spaces:
- Sweaters and Bulky Clothes: 12-14 Inches
- T-Shirts and Folded Jeans: 10-12 Inches
- Shoes and Purses: 8-10 Inches
- Storage Boxes: Measure your Boxes + 2 Inches
Leave more space for shelves that will hold heavier items.
Cutting and Prepping the Wood
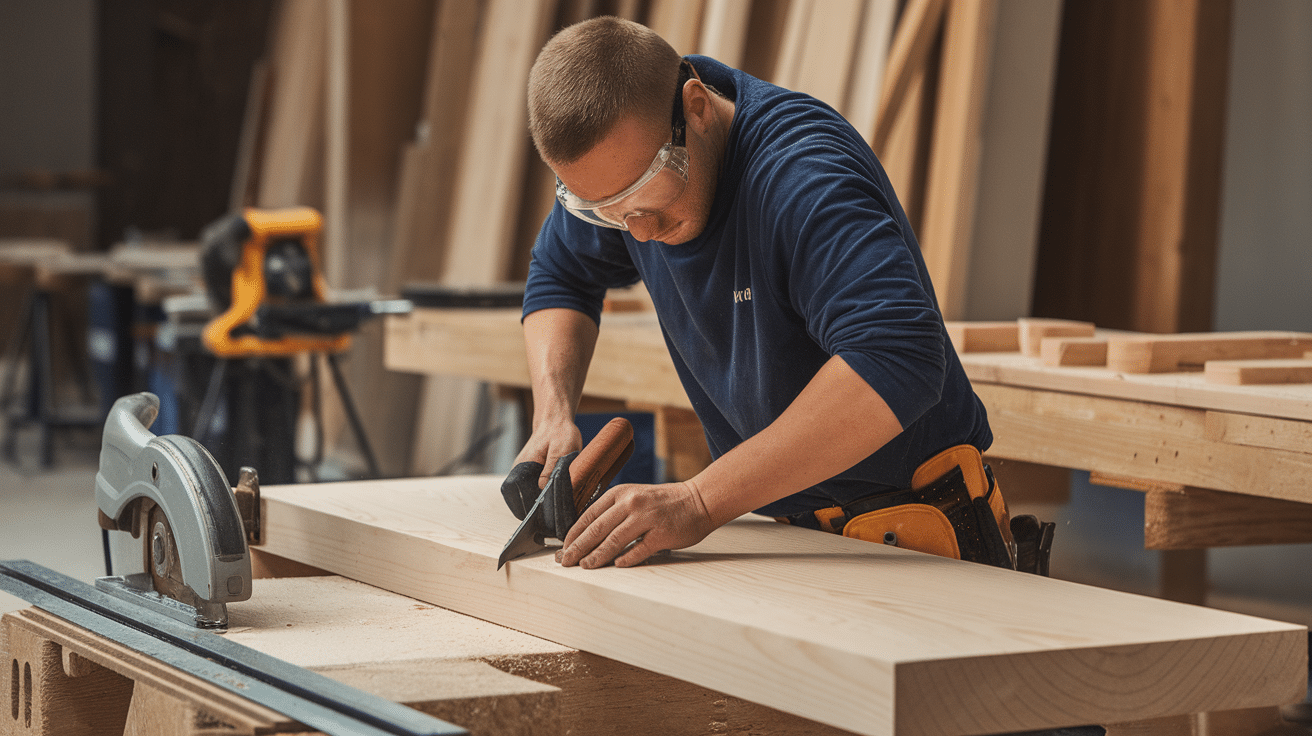
This is where your project begins to take shape. Take your time with this step – careful prep work makes installation much easier.
1. Marking and Cutting Shelves to Size
Transfer your measurements to your plywood or MDF boards. I always mark with a pencil and draw clear-cutting lines with a straight edge.
Before cutting, double-check your measurements against your closet sketch. The old saying “measure Twice, Cut Once” exists for A Reason!
When You’re Ready to Cut:
- Place your board on a stable surface
- Make sure the cutting line extends past the edge
- Cut slowly and steadily for the cleanest edge
- Support the off-cut piece to prevent splintering
If you’re using a circular saw, consider clamping a straight board as a guide for straighter cuts.
2. Sanding Edges for a Clean Finish
Raw-cut edges can be rough and even dangerous. Sand all edges until smooth using medium-grit sandpaper (80-120).
Work in one direction along the edge. Then, lightly sand the flat surfaces to remove any splinters or rough spots.
Wipe away all dust with a slightly damp cloth when finished.
3. Optional: Painting or Staining Before Installation
It’s much easier to finish your shelves before they’re installed. This will give you better coverage and avoid drips on your walls.
For painted shelves:
- Apply primer first if using MDF
- Use 2 thin coats rather than 1 thick coat
- Let each coat dry completely
For stained shelves:
- Test your stain on a scrap piece first
- Apply in the direction of the wood grain
- Wipe off excess promptly for an even color
Allow finished shelves to dry completely (24-48 hours) before installation to avoid smudges and fingerprints.
4. Installing Shelf Supports
-
Find the studs using a stud finder, and mark them.
-
Pick your support style—L-brackets, wall cleats, or shelf tracks.
-
Use a level to keep everything straight.
-
Pre-drill holes to make it easier and prevent splitting.
-
Measure twice to line everything up with your shelf plan.
5. Finding Studs for Secure Installation
Studs provide the best anchor points for your shelf supports.
Here’s how to find them:
Use your stud finder by placing it flat against the wall and sliding it slowly. When it signals a stud, mark the spot with a pencil. Make a second mark to find the stud’s center.
Studs are typically spaced 16 or 24 inches apart. Once you find one, you can often measure to locate others.
Don’t completely trust the stud finder! Verify by tapping a small nail into the wall where you think the stud is.
How to Level and Attach Wall Cleats?
Wall cleats are horizontal supports that run along the back wall. They need to be perfectly level:
- Mark your desired shelf height on one end of the wall
- Place your level on the wall and draw a straight line to the other end
- Position your 1×2 or 1×3 cleat along this line
- Drill pilot holes through the cleat into the studs
- Secure with 2½-inch screws driven into the studs
Check the level again after attaching. Even small slopes will be noticeable once shelves are installed.
1. Using Brackets or Anchors when Studs Aren’t Available
Sometimes, studs won’t align with your design. In these cases:
For drywall, Use toggle bolts or molly bolts that spread open behind the wall. For masonry: Use masonry anchors and screws designed for brick or concrete
Brackets provide extra support for deeper shelves or heavy items. Install them every 16-24 inches along the shelf length.
2. Attaching Side and Back Support Cleats
For a stronger shelf, add cleats to the side walls, too:
- Level these the same way as your back cleat
- Make sure side cleats are the same height as your back cleat
- Cut side cleats to match your shelf depth minus ¾ inch
The shelf will rest on these three cleats, creating a U-shaped support system that prevents sagging even with heavy items.
3. Installing the Closet Shelves
You’re in the home stretch now! This is where your planning pays off and your closet shelves come to life.
-
Place the shelf boards on top of your installed supports or brackets.
-
Check for level again. Even small tilts can cause things to slide or fall.
-
Secure the shelves with screws or fasteners (depending on your support style) so they stay in place.
-
Use a stud if possible when anchoring—this adds strength, especially for deep or long shelves.
4. Placing the Shelves on Top of Cleats/brackets
Position your prepared shelf boards carefully on top of your support cleats. Slide each shelf all the way back until it touches the wall.
If you’re working alone, first rest one end of the shelf on a side cleat, then carefully lift and position the other end.
Make sure the shelf sits flat on all support points. No rocking or gaps should be visible between the shelf and cleats.
5. Securing Shelves (optional for a Fixed Install)
For shelves that won’t shift or lift, secure them to your cleats:
Drill small pilot holes through the shelf into the cleats (2-3 holes per cleat)
Use 1-inch screws to attach the shelf to the cleats from above
Drive screws just below the surface of the wood
If you want to remove the shelves later, skip the screws. The weight of your items will usually keep shelves in place.
6. Checking Level and Stability
Before loading up your new shelves:
Place your level across the shelf in both directions to check for any slopes. Press down firmly on different points of the shelf to test for wobbles. Give the front edge a gentle tug to make sure it’s secure
If you notice any issues, now is the time to fix them. Small shims can level out uneven spots.
Test each shelf by placing a heavy book on it and checking for stability. If it passes this test, your installation is solid!
7. Finishing Touches
You’re almost done! These final steps transform your project from functional to professional-looking.
-
Fill any visible screw holes with wood filler for a clean look. Let it dry, then sand it smooth.
-
Touch up paint or stain if needed—especially on cut edges or spots that got scuffed during install.
-
Add shelf liners if you want to protect the wood and make cleaning easier.
-
Caulk gaps where shelves meet the wall for a built-in look (this is optional, but it makes a big difference).
-
Label storage bins or baskets if you’re using them—makes finding things easier later.
-
Install lighting if the closet is dark. Even a small LED strip or stick-on light can help.
8. Filling Screw Holes and Sanding
If you secured your shelves with screws, those holes need attention:
- Fill each hole with wood filler using a small putty knife
- Slightly overfill each hole (filler shrinks as it dries)
- Let dry completely according to package directions
- Sand flush with fine-grit sandpaper (180-220)
- Wipe away all dust with a clean cloth
This small detail makes a big difference in how finished your shelves look.
9. Painting or Staining (if Not Done Earlier)
If you installed raw wood shelves, now’s the time to finish them:
For painting in place:
- Use painter’s tape to protect walls
- Apply thin coats to avoid drips
- Use a small brush for edges and corners
- Allow extra drying time since air circulation is limited
For staining in place:
- Place drop cloths under your work area
- Apply the stain with a cloth rather than a brush for better control
- Wipe off excess quickly to prevent dripping
10. Adding Trim for a More Built-In Look (optional)
To make your shelves look custom-built:
- Add a thin strip of wood trim to the front edge of each shelf
- Secure it with wood glue and small brad nails
- Fill nail holes as you did with screw holes
This simple addition hides raw plywood edges and gives a more polished appearance.
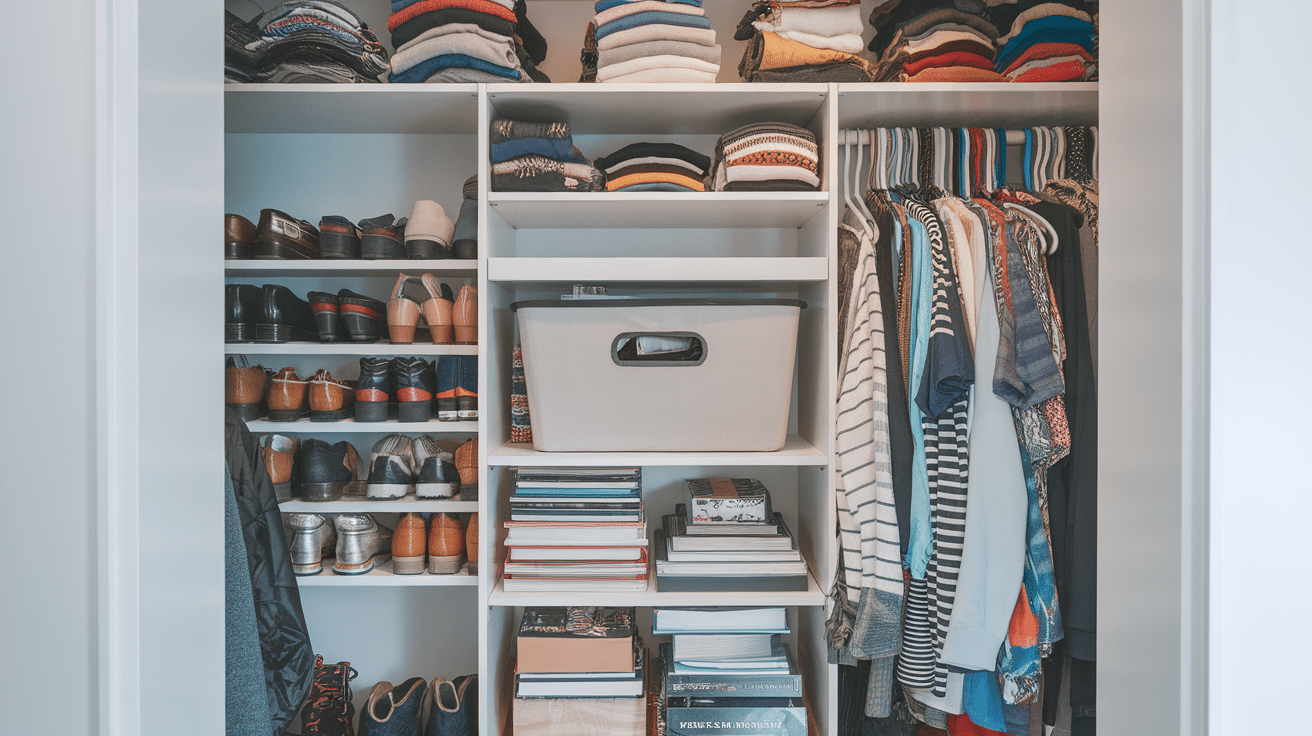
11. Labeling or Organizing Bins/Containers for Better Function
The best closet is one you can maintain easily:
- Group similar items together
- Use bins for small items that tend to get messy
- Label shelves or containers for family members to follow
- Consider clear containers so you can see the contents
Take a picture of your organized shelves. This gives you a reference to maintain your system over time!
Closet Shelf Design Ideas & Variations
1. Corner Shelves
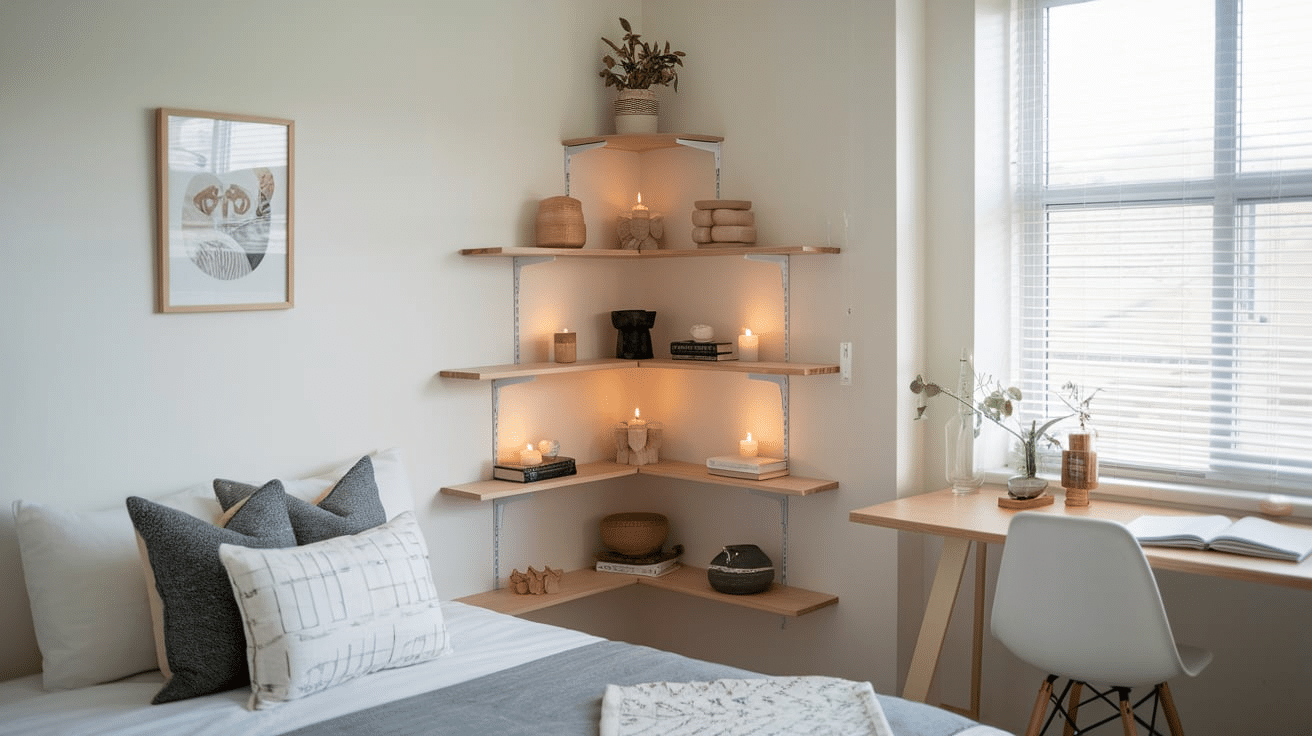
Don’t waste those awkward corners:
- Use triangular cuts to fill corner spaces
- Install corner shelves at varying heights for visual interest
- Perfect spots for items you don’t need to access daily
Corner shelves make use of every inch in your closet. For a stronger corner, use a block underneath where the two shelves meet.
2. Shoe Cubbies
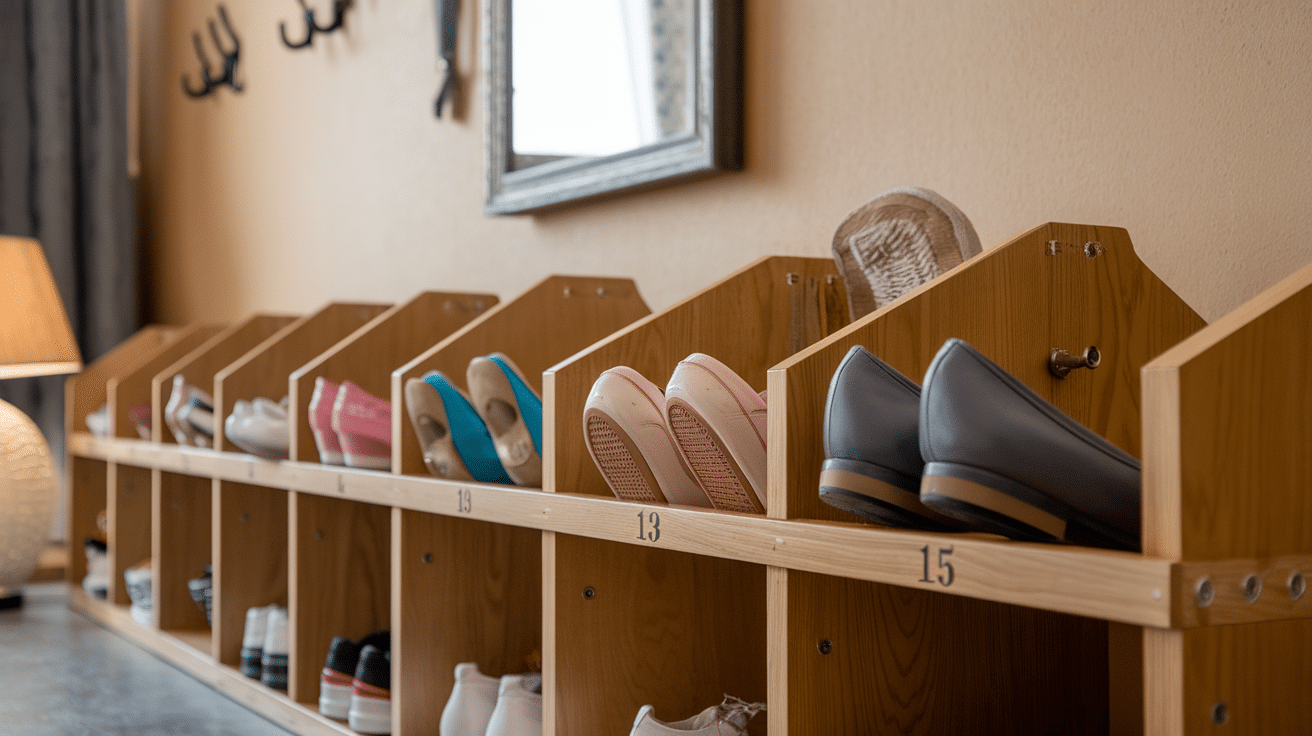
Keep your shoes visible and dust-free:
- Build shorter shelves (6-8 inches tall)
- Angle them slightly downward at the front
- Add small dividers between pairs for better organization
3. Vertical Dividers

Prevent stacks of folded clothes from toppling:
- Add thin plywood dividers every 12 inches
- Secure them perpendicular to your main shelves
- Great for keeping sweaters, jeans, and t-shirts neatly stacked
These simple additions will transform how you organize folded items.
4. Pull-Out Baskets
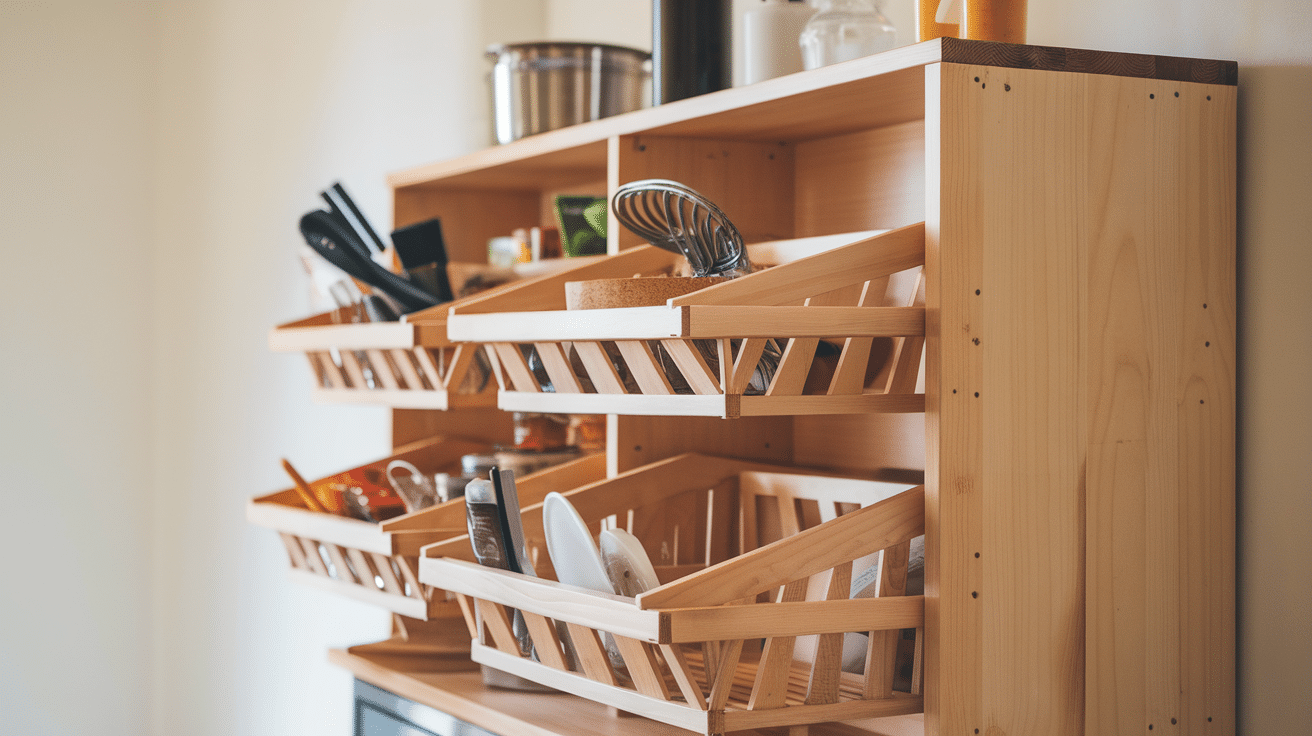
For Smaller Items that Tend to Get Lost:
- Install drawer slides on the underside of a shelf
- Attach wire or solid baskets to the slides
- Pull them out to easily see and access contents
5. Built-in Drawer
For a Truly Custom Look:
- Build simple drawer boxes from ½-inch plywood
- Add drawer slides to your shelf structure
- Attach drawer pulls for easy access
While more complex, drawers hide clutter and make your close
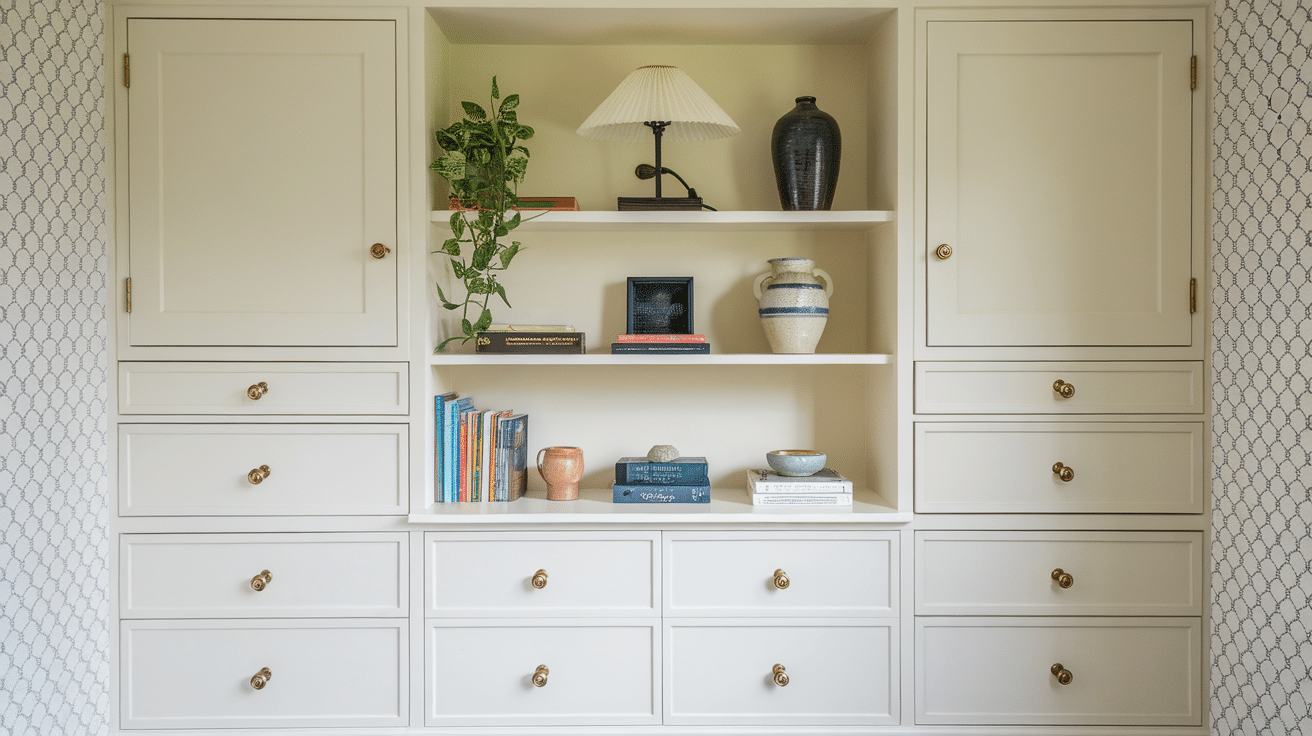
6. Open vs. Closed Storage Options
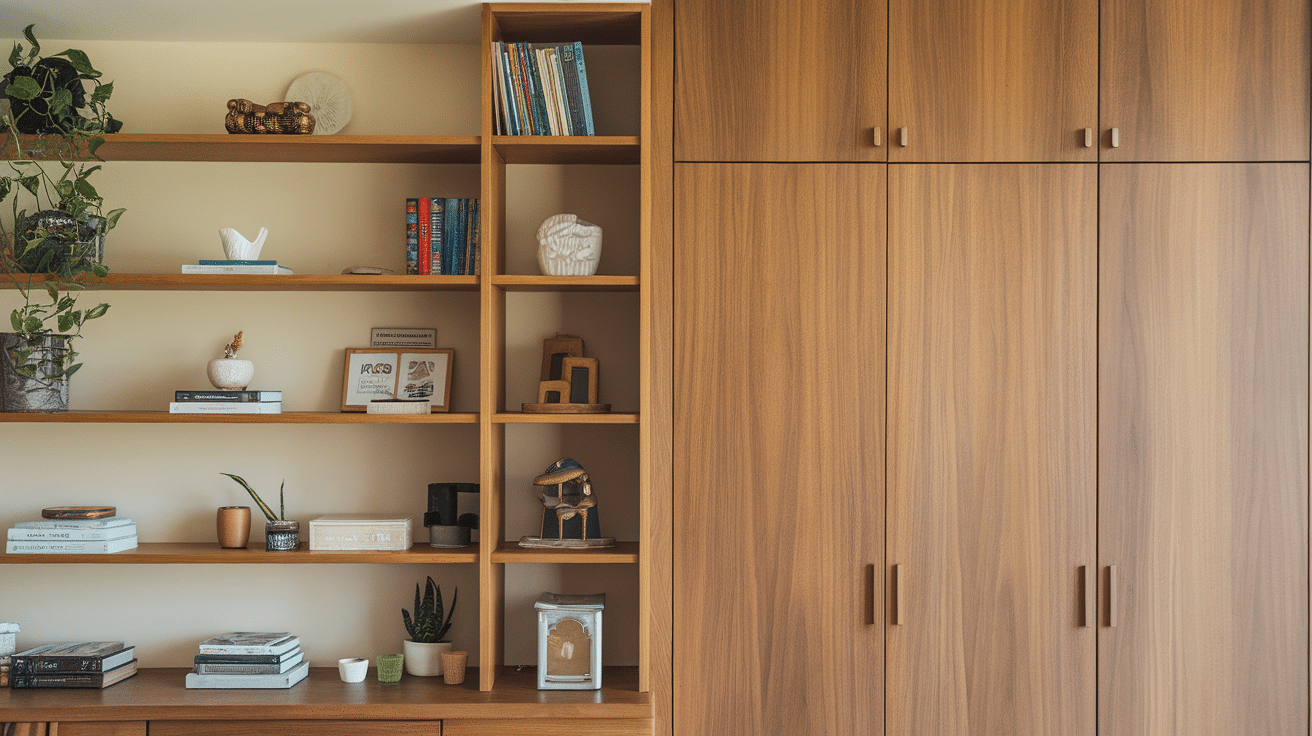
Consider Which Items You Want Visible:
- Open shelves work well for things you use daily
- Add cabinet doors to hide less attractive items
- Combine both for a balanced approach
I like to use open shelves for colorful or decorative items and closed storage for practical necessities.
Mix and match these ideas to create a closet that fits your specific needs. The best design makes your daily routine easier!
Common Mistakes to Avoid While Building Shelves
I’ve made all these mistakes myself, and they can ruin your project. Let’s make sure you don’t repeat them!
1. Not Measuring Twice Before Cutting
This is the most common error and the hardest to fix:
- Write down all measurements clearly
- Double-check numbers before making any cuts
- Remember to account for the thickness of the support cleats
- Verify that your tape measure hasn’t slipped when marking
A mistake of even ¼ inch can create gaps or force you to start over with new materials.
2. Overloading Unsupported Shelves
Even the strongest shelf will sag under too much weight:
- Keep the span between supports under 32 inches for books or heavy items
- Use thicker wood (at least ¾ inch) for longer shelves
- Add a front support strip to prevent bowing
- Consider how weight distributes – center is most vulnerable
I once had a shelf full of books collapse because I skipped proper supports. Learn from my mistake!
3. Not Anchoring to Studs
Wall anchors are helpful, but they’re no substitute for studs:
- Use studs whenever possible, especially for heavy-duty shelves
- When using anchors, choose ones rated for at least twice your expected weight
- Never rely on drywall alone to hold weight
The sound of a shelf ripping from the wall is something you never want to hear.
4. Skipping Leveling Tools
“looks Level” Is not the same as actual level:
- Use a proper level tool for all installations
- Check the level in multiple spots across each shelf
- Even a slight tilt can cause items to slide or roll
Small errors become very obvious once your shelves are loaded with items.
5. Using the Wrong Materials for Heavy Loads
Not all wood is created equal:
- Particle board sags quickly under weight
- MDF works for lighter items but not books or heavy storage
- Pine is softer and may dent with heavy objects
- Plywood or solid hardwood performs best for lasting shelves
Match your material to what you’ll store. For heavy items, invest in stronger materials – it’s cheaper than rebuilding later!
Maintenance Tips for Long-Lasting Shelves
With a little care, your DIY closet shelves can last for decades. Here’s how to keep them looking and working great.
1. Weight Limits and How to Prevent Sagging
Even well-built shelves have limits:
- Distribute heavy items across multiple shelves instead of loading one
- Place heavier objects near the ends where supports are strongest
- Watch for early signs of bowing in the middle
- Rotate stored items occasionally to prevent permanent sagging
If you notice a shelf starting to bend, add a middle support before it gets worse. A small piece of 1×2 attached to the wall can make a huge difference.
2. Repainting or Refinishing as Needed
Your shelves will show wear over time:
- Touch up chips or scratches promptly to prevent moisture damage
- Clean shelves thoroughly before refinishing
- Sand lightly between coats when repainting
- Consider adding a clear polyurethane top coat for extra protection
Most shelves need a refresh every 3-5 years, depending on use. Don’t wait until the finish is completely worn away.
3. Checking for Loosened Screws Over Time
Wood expands and contracts with temperature and humidity changes:
- Inspect all hardware every 6-12 months
- Tighten any loose screws you find
- Replace any stripped screws immediately
- Look for gaps developing between supports and shelves
A quick maintenance check takes just minutes but can prevent a shelf collapse.
Give your shelves a quick wipe-down monthly to remove dust and address any small issues before they become big problems. When you take good care of your custom shelves, they’ll take good care of your belongings!
Conclusion
You’re all set to give your closet a whole new look! Making your shelves is a fun and useful DIY project. Here’s a quick look back at what we did:
We started by making a plan and grabbing the supplies. Then, we measured, cut the pieces, and put everything together. I also shared some handy tips to help you avoid mistakes and build lasting shelves.
Your first shelf might not turn out perfect—and that’s totally fine. Every project helps you learn. What matters most is that you’re building something that works for you, not just using whatever the store sells.
I’d love to see what you made! Share your before-and-after photos in the comments. And if you get stuck or have questions, ask. Other DIYers here are always glad to help!
Happy building!