
You finally finished your jigsaw puzzle-piece by piece, hour by hour. It looks amazing, and you’re proud of it. But now what?
Leaving it on the table forever isn’t really an option, and taking it apart feels like a waste. Don’t worry – there’s a better solution!
In this blog, I’ll show you how to frame your puzzle at home, step by step. I’ll walk you through the entire process, from getting your supplies ready to hanging your framed puzzle on the wall.
This guide is easy to follow and perfect for beginners. You’ll learn how to keep your puzzle in one piece, protect it from damage, and turn it into art you can enjoy every day.
If you’ve been wondering how to frame your puzzle the right way, you’re in the right place. Let’s get started and give your puzzle the finish it deserves!
Why Frame Your Puzzle?
When you’ve spent hours putting your puzzle together and it’s finally complete, it’s more than just a bunch of pieces. It’s something you worked hard on and want to keep.
Framing your puzzle is a great way to make sure it stays in one piece and looks amazing for years to come.
When you frame your puzzle, you protect it from damage like spills, bending, or missing pieces. You also free up space on your table or puzzle board.
Best of all, a framed puzzle becomes a piece of art you can hang in your home.
Whether it’s a puzzle of your favorite place, a beautiful scene, or a gift from someone special, framing helps you turn it into something you can enjoy every day.
It’s an easy project that gives your hard work a lasting home.
What You’ll Need to Frame a Puzzle

Before you get started, make sure you have everything you need. Don’t worry, you won’t need any special tools or hard-to-find supplies.
- Your completed puzzle
- A picture frame
- A flat-bladed screwdriver or butter knife
- Pliers
- Framer’s tape
- Scissors or a craft knife
- A soft cloth
How to Frame Your Puzzle Step by Step
Turning your puzzle into a framed piece is easier than you might think. With just a few tools and a little time, you can follow these simple steps to get it done right.
Step 1: Get Your Frame Ready

Start by flipping your picture frame face down on a flat surface like a table or desk. Check for any cardboard corner protectors on the frame.
Some will slide right off, but others may be held on with staples. If that’s the case, use pliers to gently pull them out so you don’t damage the frame.
Once that’s done, make sure everything is clean and in good shape. Getting the frame ready first saves time and helps the rest of the process go smoothly.
Step 2: Take Out the Back of the Frame

Look around the edges of the back of your frame. You’ll see small metal tabs holding the backing board in place. Use a flat-bladed screwdriver or butter knife to gently bend these tabs upward.
Be careful not to scratch the frame or hurt your fingers. Once all the tabs are bent back, lift out the backing board and set it aside for now. You’ll use it again soon.
Don’t throw away anything – you’ll need every part of the frame. This step gives you room to insert the puzzle later, so make sure everything comes out easily and stays clean.
Step 3: Make a Puzzle Sandwich

This part helps keep your puzzle together while you flip it. Keep your finished puzzle on the board where you built it- don’t try to move it just yet.
Take the backing board you removed in the last step and gently place it on top of the puzzle.
You should now have a “sandwich” made of the puzzle board on the bottom, your completed puzzle in the middle, and the frame’s backing board on top.
Doing so holds the puzzle in place and keeps it steady while you move it around. It’s a simple trick, but it works really well!
Step 4: Flip the Puzzle Over Safely

Now it’s time to flip your puzzle sandwich. This step might sound tricky, but it’s actually pretty easy if you go slow and steady.
Hold both the bottom board and the backing board tightly, one hand on each side. Then gently flip the whole thing over. Now your puzzle should be resting on the backing board, face-up.
Check to make sure no pieces have moved. If they did, just nudge them back into place. You’re almost ready to tape the back.
Step 5: Tape the Back to Hold It Together

Now that your puzzle is face down on the backing board, it’s time to keep it all in one piece.
Grab your framer’s tape (or any strong, wide tape) and start placing strips across the back of the puzzle. Lay the tape flat and smooth as you go.
Try not to pull or lift any puzzle pieces while you’re doing this. Cover the entire back with tape, making sure every section is held in place.
This step helps the puzzle stay strong and stable inside the frame without using glue. Once the back is fully taped, you’re ready to move on.
Step 6: Clean the Frame Glass
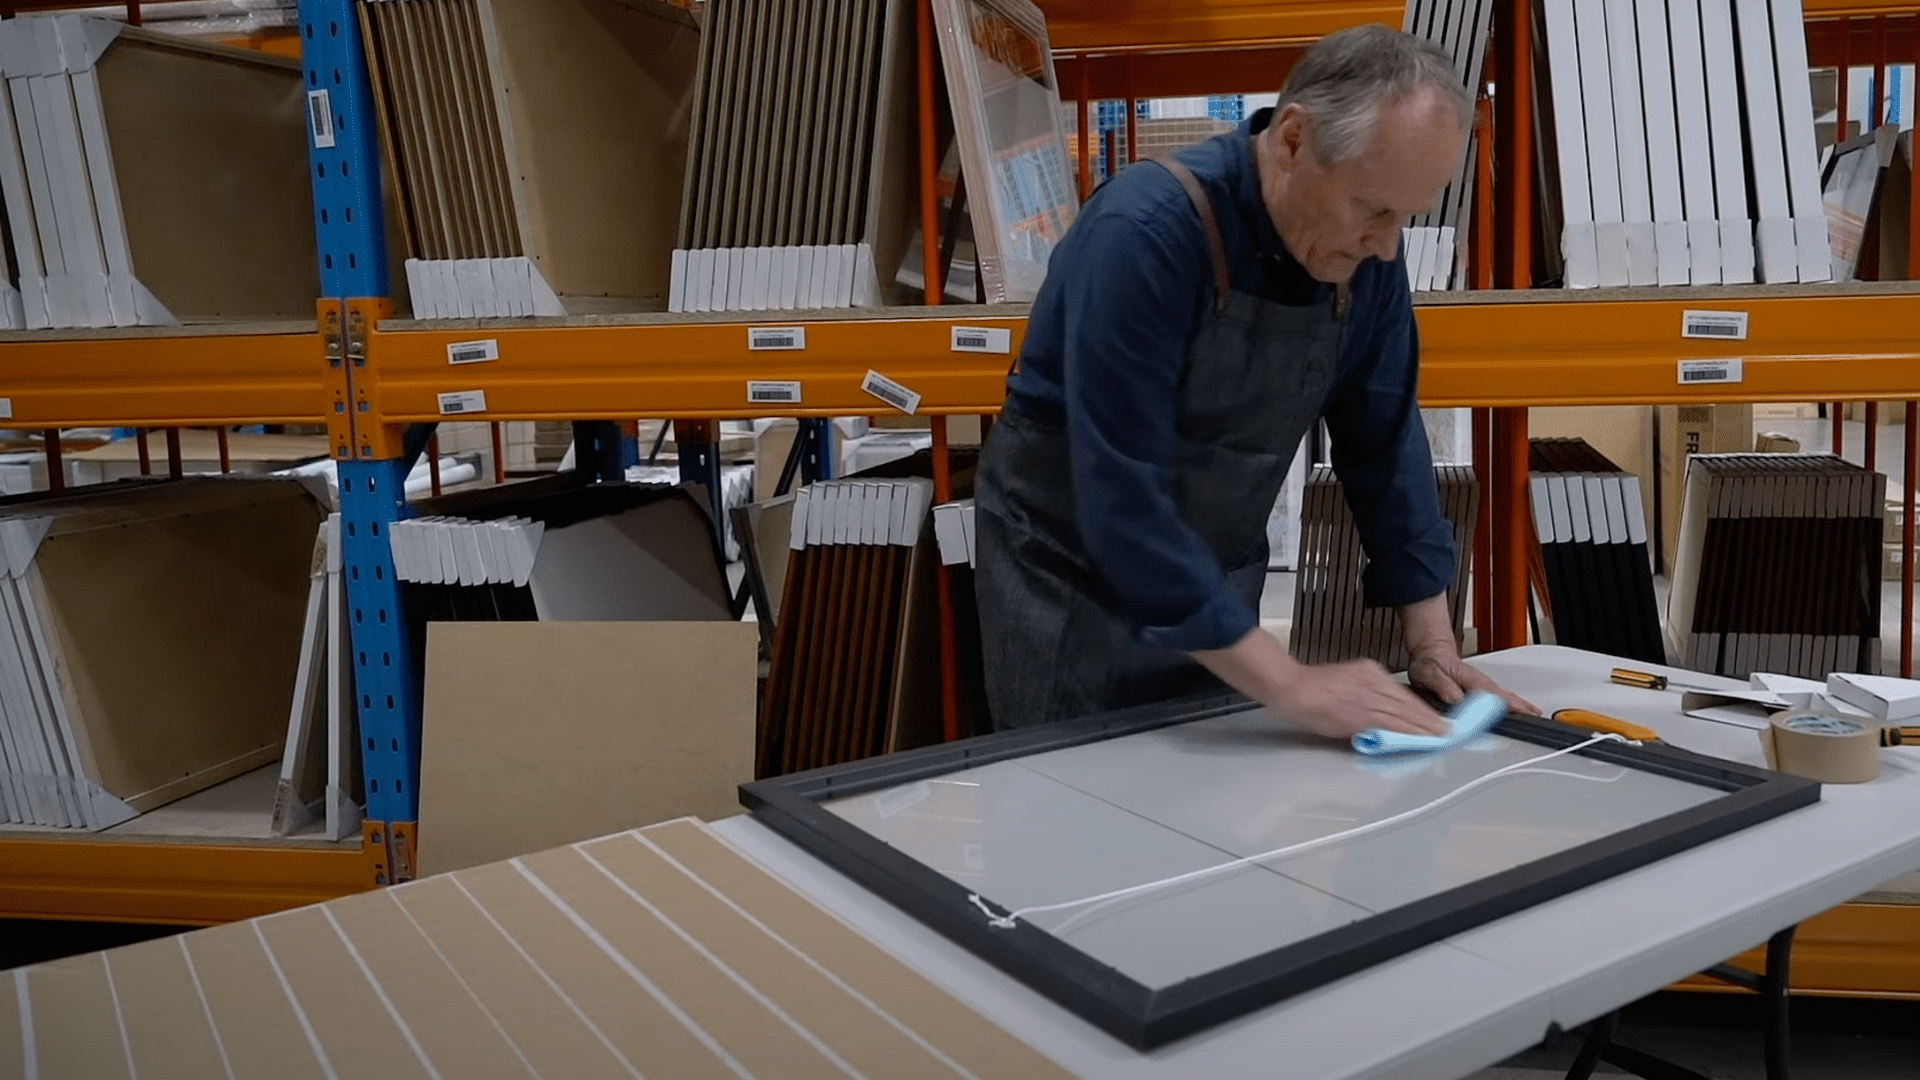
Before putting the puzzle into the frame, check the glass to see if it needs cleaning. It’s much easier to do it now than later.
Use a soft, clean cloth to wipe away any dust or fingerprints from the inside of the glass. Don’t take the glass out of the frame- clean it while it’s still in place to avoid accidents.
Be careful around the metal tabs so you don’t get scratched. A clean glass panel will make your puzzle shine and look even better when it’s hanging on the wall.
When you’re done, set the frame aside gently.
Step 7: Place the Puzzle in the Frame

This is the exciting part- putting your puzzle into the frame! Carefully lift your taped puzzle and backing board as one solid piece.
Line it up with the inside edges of the frame. Make sure the puzzle fits snugly and sits flat inside.
Before you close it up, check that the hanger on the backing board is at the top so your puzzle hangs the right way.
If everything looks good, gently lower the puzzle into place. Take your time need to rush this part. You’re almost done, and your puzzle is looking great already!
Step 8: Close the Frame Up

Now that your puzzle is in the frame, it’s time to close it up. Use your fingers or a flat-bladed tool to bend the metal tabs back down over the backing board.
Go slowly so you don’t bend them too far or scratch the frame. Make sure each tab is secure and holding the backing tightly in place. This helps your puzzle stay flat and protected.
Once all the tabs are down, flip your frame over and admire your work! Your puzzle is now a piece of art, ready to hang, gift, or show off to your friends and family.
To better understand the steps, watch this video on YouTube at @Frames Now to follow along for a clearer understanding.
Pro Tips for Framing a Puzzle
Framing a puzzle isn’t hard, but a few simple tricks can make the process smoother and the final result even better. Here are some pro tips I’ve learned that can save time, reduce mistakes, and help your framed puzzle look more polished.
- Use puzzle preserver sheets if you’re worried about pieces shifting before taping—they add stability during flipping.
- Lay your puzzle on a foam board while working; it’s sturdy, lightweight, and great for lifting.
- Use painter’s tape around the frame edge to prevent smudges or damage while flipping and handling.
- Pick a frame with enough depth to fit the puzzle without squishing it—some puzzles are thicker than others.
- Add backing paper or felt to the back of the frame for a clean, professional look and wall protection.
- Hang it with two wall hooks instead of one to keep it straight and secure over time.
These little details can make a big difference. Take your time, follow the steps, and add these tips as needed—you’ll end up with a puzzle frame you’ll be proud to hang.
Conclusion
Framing your puzzle is a fun and simple way to show off all the time and effort you put into finishing it.
I’ve done it myself, and it always feels good to turn something you worked hard on into a piece of art. Instead of letting it sit around or breaking it apart, you get to enjoy it every day on your wall.
You don’t need to be a pro, and you definitely don’t need glue. I used just a few basic tools and took my time-and the result looked amazing. You can do the same.
Now your puzzle is safe from getting bent, lost, or dusty. Whether it hangs in your bedroom, hallway, or living room, it’ll be a reminder of a job well done.
I hope these steps helped you feel more confident. So go ahead-frame that puzzle. You put in the work, and you deserve to enjoy it for years to come!