If your vanity is outdated, discolored, or simply doesn’t fit your style anymore, repainting your cabinets is one of the most affordable and impactful upgrades you can make.
In this guide, I’ll walk you through a full cabinet transformation, from cleaning and prepping to painting and finishing, all based on my personal experience.
I’ll also highlight what worked well, what I’d tweak next time, and how you can avoid common mistakes along the way.
If you’re looking for a beautiful, budget-friendly transformation with professional-looking results, this tutorial has everything you need to get started confidently.
How to Start Your Vanity Makeover the Right Way
Before you jump into painting, it’s important to slow down and get both your space and your mindset ready.
I know it’s tempting to jump right into the fun part, but trust me: spending extra time on prep will save you stress and help your results last longer and look more polished.
Think of this as laying the groundwork for a successful makeover.
You don’t need a garage full of fancy tools, but you do need the right ones and a bit of patience.
Cleaning your cabinets thoroughly, selecting high-quality paint, and protecting the surrounding area can significantly impact the outcome.
So before you pick up that brush, let’s go over everything you’ll need.
These simple prep steps will set you up for a smooth, satisfying transformation.
What You’ll Need
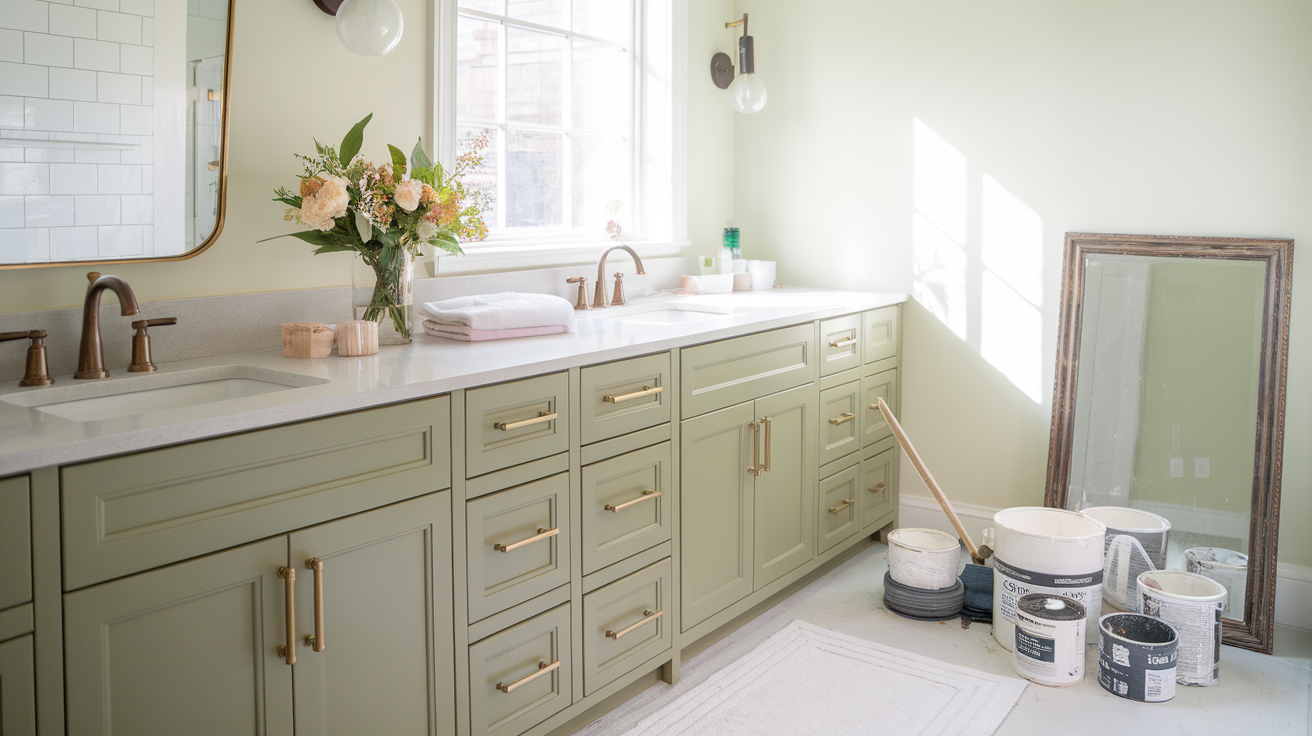
Below are the materials and tools I used to give my 1990s oak vanity a fresh new look. You can adapt these to your own space depending on the finish and paint brand you prefer.
Materials:
- Dixie Belle Silk All-in-One Mineral Paint (color: Hampton Olive)
- Dixie Belle White Lightning Cleaner
- Dixie Belle Slick Stick primer (for laminate areas)
- Tack cloth
- Painter’s tape
- Cabinet hardware (optional)
Tools:
- Synthetic paintbrush (dry)
- Spray bottles (for cleaning and rinsing)
- Reusable gloves
- Plastic spatula or scraper
- Vacuum cleaner
- 180-grit sandpaper
- Clean, dry towels
Step-by-Step Vanity Cabinet Makeover Tutorial
This tutorial walks you through each stage of the makeover, highlighting key details and helpful visuals from the video.
Step 1: Clean the Cabinets Thoroughly

Clean surfaces help paint stick better. Mix White Lightning cleaner with water in a spray bottle for easy use.
- Wear gloves to protect your hands.
- Spray the cleaner liberally across cabinet faces and grooves.
- Use a plastic spatula to clean out gunk from ridged cabinet details.
- Rinse thoroughly with a second spray bottle filled with clean water.
- Wipe dry with clean towels, including laminate sides and kick plates.
Step 2: Sand and Prep for Paint

A light scuff sanding improves paint adherence. Use 180-grit sandpaper to gently rough up the cabinet fronts.
- Avoid sanding laminate sides or kick plates.
- Wipe down with a tack cloth to remove dust.
- Use a vacuum in grooves where dust can collect.
This step is subtle but vital for a smooth finish later.
Step 3: Prime Laminate Surfaces with Slick Stick

Even though Silk Paint includes a built-in primer, laminate areas may need extra help. Apply Slick Stick to all side panels and kick plates.
- Use a dry brush for smooth application.
- Let it dry fully before applying paint.
This prevents peeling or uneven coverage on slick surfaces.
Step 4: Label and Prepare for Painting

Labeling drawers and doors before painting helps avoid mix-ups when reinstalling them.
- Use painter’s tape or a small tag to mark locations.
- Stir the paint thoroughly before beginning.
- Ensure your brush is completely dry before using Silk paint.
Unlike chalk-style paints, silk paint doesn’t mix well with water; you’ll need full coverage from your brush without thinning it out.
Step 5: Apply the First Coat of Paint

Start painting the cabinet doors and vanity base. Keep the drawers in place for the first pass, but you can remove them if you prefer easier access.
- Use long, smooth brush strokes.
- Don’t rework dried paint to avoid pulling.
- Keep a towel nearby in case of drips on countertops.
Let the first coat dry fully.
The manufacturer recommends waiting a few hours, but I allowed 24 hours due to humidity.
Step 6: Apply a Second Coat and Touch Up

Once the first coat is fully dry, remove the drawers and paint the inner cabinet frames for a clean look.
- Apply the second coat evenly.
- Spot-check for thin areas or missed corners.
- Use a third coat for extra durability or deeper color if desired.
Skip sanding between coats since the paint went on smoothly, but you can lightly sand if needed.
Step 7: Allow Time to Cure and Add Hardware

Silk All-in-One paint has a built-in topcoat and doesn’t require sealing. Still, it needs time to cure.
- Allow 21–30 days for full curing.
- Avoid heavy use during that time.
- Add hardware to reduce contact with painted surfaces and prolong the finish.
This blog has been inspired by “Bathroom Vanity Cabinet Makeover, Inexpensive DIY Project” by @Desert Life with Lindsey. For a more detailed understanding, watch here:
Tips for a Smooth Cabinet Makeover
- Use good lighting to catch drips and uneven areas.
- Label each door to save time during reinstallation.
- Use separate brushes for primer and paint if possible.
- Please don’t skip the cleaner or tack cloth step; they make a big difference!
Conclusion
This bathroom vanity makeover turned out to be one of the most satisfying DIY projects I’ve tackled.
If you’ve been staring at your own cabinets wondering where to start, I hope this guide showed you that with a little prep, some patience, and the right tools, you absolutely can take this on.
It’s amazing what a few coats of paint and thoughtful touches can do to transform a space.
DIY isn’t just about saving money; it’s about creating a home that feels like yours.
Thanks for following along with my project.
I’ll be sharing more easy transformations soon, so be sure to check back for more ideas and inspiration!