
When I put up my first metal roof, I didn’t think much about the screws. I figured you just grab a box, start at the edge, and work your way across.
But halfway through, I ran out. Twice. I had no clue how many screws I really needed or where to put them.
That’s when I realized screw spacing isn’t just a guessing game. It actually makes or breaks the whole install.
If you’re wondering how many screws you’ll need, where they should go, or how far apart they should be, you’re in the right place.
This guide covers it all: sheet sizes, spacing, patterns, mistakes to avoid, and how to calculate the total screw count based on your roof size.
Understanding Metal Roofing Screws
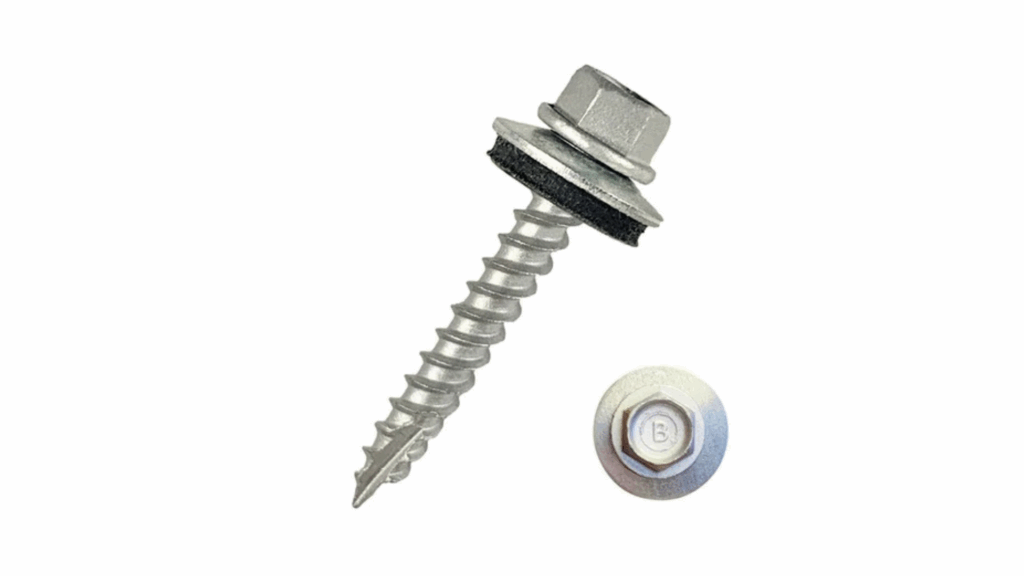
When choosing screws for metal roofing, it’s essential to know the options:
- Self-drilling screws are perfect for metal-to-metal connections, requiring no pre-drilling.
- Self-tapping screws work best for metal-to-wood framing, though pre-drilling may be needed.
- Screws come in various finishes: painted screws match your panel color and resist rust, while unpainted ones are simpler.
- Many screws include rubber washers to seal against water leakage.
- Zinc-coated steel is common, but stainless steel offers better durability in harsh weather.
Exposed fastener systems use screws with visible heads for ribbed panels, while concealed fastener systems hide screws under seams and require fewer screws.
Typical Screw Spacing Guidelines
Screw spacing isn’t one-size-fits-all, but there are basic rules that most installers follow. Standard screw spacing:
- Across the panel (horizontal): Screws go in every 18 to 24 inches along the purlins.
- Up the panel (vertical): Either on every ridge or every second ridge, depending on wind load and panel type.
- Roof vs. wall: Roof panels often need tighter spacing than wall panels due to uplift from wind.
A quick look at typical numbers:
| Panel Width | Screws Per Panel (Typical) | Spacing Interval |
|---|---|---|
| 36” | ~25–40 screws | Every 2 ft lines |
| 16” | ~15–30 screws | Every rib |
This gives you a rough idea. The exact count depends on your layout and fastener pattern.
Screw Pattern Layouts Explained
Now let’s talk patterns. You can’t just throw screws wherever you want. Most-used layouts:
- 36” panel: 5 screws across each fastener line
- 16” panel: 3 screws across each line
- Overlap areas: Always screw down both overlapping panels
- Ends and edges: These spots take more stress, so they need more screws
Use stitch screws: These are smaller screws that secure panel overlaps side-to-side. You don’t use them on the main ribs, just the seams.
If your area has high winds or snow, you might need to go heavier with edge screws and overlaps.
How to Calculate Screws Needed Based on Roof Size?
Figuring out the number of screws is easier when you break it down. Look at this basic method:
- Measure your total roof area (length × width).
- Divide that by the panel coverage area (panel width × panel length).
- Multiply by the average number of screws per panel.
Let’s say you’ve got a 1,000 sq ft roof. You’re using 3’ x 12’ panels. Each panel covers 36 sq ft. Then you’ll need around 28 panels (1000 ÷ 36 = ~28). If each panel takes 30 screws, that’s 28 × 30 = 840 screws.
But always buy 10 percent more to cover overlap areas, mistakes, or dropped screws.
Factors that Affect Screw Quantity
Not every roof is the same. Some factors change how many screws you’ll need:
- Wind zone: Coastal or storm-prone areas need tighter screw spacing.
- Roof pitch: Steeper roofs may need closer fastener lines to fight gravity.
- Panel style: Corrugated panels need more screws than standing seam panels.
- Framing type: Metal framing usually requires more screws than wood.
- Code requirements: Some states or cities have specific spacing codes.
Check your local building codes before you start. They might require certain patterns or screw counts for safety.
Mistakes to Avoid with Screw Spacing
I’ve made a few of these myself, so here’s what to avoid:
- Overdriving the screw: It crushes the washer and weakens the seal.
- Underdriving: Doesn’t pull the panel tight, which leads to leaks.
- Wrong pattern: Don’t use a wall panel pattern on a roof.
- Skipping edge screws: These spots are where most leaks or blow-offs start.
- Ignoring codes: This could cost you later if an inspector finds it.
Taking a few minutes to plan your pattern beats, you will redo the job later.
How Many Screws Per Sheet?
Different panel sizes mean different screw counts.
| Panel Size | Screws per Panel (Average) |
|---|---|
| 3’ x 12’ | 30–36 screws |
| 3’ x 10’ | 25–30 screws |
| 3’ x 8’ | 20–25 screws |
| 2’ x 8’ | 15–20 screws |
For smaller sheds, you’ll use fewer screws, but still need edge reinforcements. A tiny roof might only take a couple of hundred screws. A full house might take over 3,000.
Tips for Installing Screws Correctly
Screwing into metal might sound simple, but here’s what’s worked best for me:
- Use a screw gun with a clutch: It helps control depth.
- Keep the screw straight: Angle it and you’ll crack the washer.
- Go perpendicular to the panel: No tilt, no leaks.
- Check screw tightness later: Metal expands and contracts with heat.
- Don’t reuse old screws: They don’t hold well and may rust faster.
Following these simple tips can make the difference between a solid roof and one that gives you trouble down the line.
Maintenance Tips
After the install’s done, you’re not totally off the hook. It’s smart to check your roof every few years.
- Look for loose or rusted screws
- Tighten any that feel wobbly
- Replace cracked washers
- Inspect after storms or heavy snow
Most people don’t think about maintenance, but a quick check can stop a slow leak from turning into major damage.
Final Thoughts
Before you open your first box of screws, it pays to plan. Check your panel specs, measure your roof, and follow a solid pattern.
Always double-check local building codes and your panel manufacturer’s guide. Installation methods can vary from one panel type to another. Use their charts if they provide them.
And really, grab a few extra screws. You’ll thank yourself later.
If you started this wondering how many screws you need for your metal roof, you should now have your answer.
With the spacing tips and simple math covered here, you’re ready to install confidently. No guessing. No surprise trips to the hardware store.
Whether it’s a shed or a full roof, a smart screw plan means a smoother, longer-lasting result.
Frequently Asked Questions
How Many Screws Do I Need per Metal Roofing Panel?
It depends on your panel type, width, and screw pattern. A common estimate is about 80 to 90 screws per 100 square feet, but always check the manufacturer’s guide for exact spacing.
What Screw Pattern Should I Use for Metal Roofing?
A common screw pattern is placing screws at every rib on the eaves, ridge, and overlaps, and every other rib in the field. Some projects may require every rib throughout. Follow panel-specific recommendations.
Can I Reuse Screws from an Old Metal Roof?
No, it’s not recommended. Old screws may be stripped, rusted, or weakened. Always use new, corrosion-resistant screws for a secure and long-lasting hold.
Do I Need to Pre-Drill Holes for Metal Roofing Screws?
For most residential metal panels, self-tapping screws work fine and don’t require pre-drilling. However, if you’re working with thick steel or structural panels, pre-drilling might be necessary.
What Happens if I Don’t Use Enough Screws?
Using too few screws can lead to panel movement, leaks, and wind damage. Even spacing and the correct number of fasteners ensure your roof stays secure and weather-tight.