
I didn’t realize how important good bath sealing was until mine started leaking. Water dripped, mold crept in, and everything just looked worn out.
It wasn’t just unsightly, it was damaging the surrounding area too.
So, I decided to take matters into my own hands. With a bit of patience and the right tools, I resealed my bath like a pro.
It turned out cleaner, tighter, and far more satisfying than I expected. If your bathroom sealant is cracking, peeling, or letting water through, it’s time for a refresh.
Don’t wait for the damage to spread; this is one of those DIY tasks that’s totally manageable, even if you’re a beginner.
Ready to stop the leaks and freshen up your tub? Follow along with my guide and let’s seal it right the first time. Your bathroom (and wallet) will thank you.
Why Sealing a Bath Matters?
Sealing a bath is more than just a finishing touch; it’s a crucial part of maintaining a clean, dry, and protected bathroom.
A proper seal acts as a barrier, preventing water from leaking into gaps between your bathtub and the surrounding tiles or walls.
Without it, moisture can slowly seep into hidden areas, leading to mold, mildew, and even structural damage over time.
Not only does this compromise hygiene, but it can also become costly if repairs are needed.
Replacing or repairing sealant is a simple DIY job that can drastically improve the look of your bathroom while protecting it from long-term damage.
A fresh seal creates a clean, polished edge and helps your bathroom stay safe, functional, and visually appealing.
When to Reseal Your Bath
Worn silicone sealant around your bath can lead to water damage, spotting, and early signs that help you avoid mold and costly repairs.
- Cracked or Peeling Silicone: Aging silicone can dry out and crack, letting water seep into gaps and cause hidden damage.
- Black Spots or Mold: Mold along the seal means moisture is trapped, unsightly, and a potential health risk.
- Water Pooling or Dripping: Water gathering at the tub’s edge or leaking onto the floor signals a failing seal.
- Musty Smells: A lingering damp odor may mean water is trapped behind tiles or walls due to a broken seal.
- Sealant Pulling Away: Silicone that lifts from the tub or tile can no longer block water, even if it looks fine at first glance.
If you spot any of these signs, don’t wait. Resealing is a quick DIY fix that protects your bathroom from bigger headaches down the road.
How to Fix Common Problems with Bath Sealing
Fix small sealing issues early to prevent leaks, mold, and damage. Here’s how to troubleshoot and repair common problems:
1. Leaks After Sealing
If your bath is still leaking after sealing, chances are the sealant didn’t fully adhere or gaps were missed. Look closely for air bubbles, lifted sections, or missed corners.
Use a sharp knife or scraper to remove the flawed silicone.
Clean the area thoroughly with rubbing alcohol and dry completely. Reapply a smooth bead of high-quality, waterproof bathroom silicone.
Pro tip: Fill the bath with water before sealing to weigh it down and avoid future seal separation.
2. Sealant Won’t Adhere or Peels Off Easily
When silicone won’t stick or peels off shortly after application, it’s likely due to damp or dirty surfaces, or incompatible products.
Always strip away old sealant completely and clean the area with a degreasing solution. Dry it thoroughly, even using a hairdryer if needed. Apply only to bone-dry surfaces.
For glossy tiles or acrylic tubs, consider using a silicone primer for better bonding. Always use sealants suitable for bathroom surfaces like ceramic or porcelain.
3. Mold Keeps Growing on the Sealant
Persistent mold is usually a result of high moisture and poor air circulation. Even new sealant can fall victim if not maintained properly.
Remove and replace with mold-resistant silicone specifically designed for kitchens and bathrooms.
Ventilate your space well, open windows or use an extractor fan, and regularly dry the sealed edges after each use.
Weekly cleaning with vinegar or a diluted bleach solution also helps prevent mildew from taking hold on the new sealant.
4. Silicone Cracking, Shrinking, or Turning Brittle
Cracked or brittle silicone often signals poor product quality or incorrect application. Thin beads or applying silicone in extreme temperatures can also lead to failure.
Remove the damaged areas with a scraper and switch to a high-grade, flexible bathroom silicone. Apply a thicker, even bead that can flex with movement.
Avoid using old or partially cured silicone from open tubes, as it can degrade over time and won’t deliver a reliable seal.
5. Uneven, Lumpy, or Messy Finish
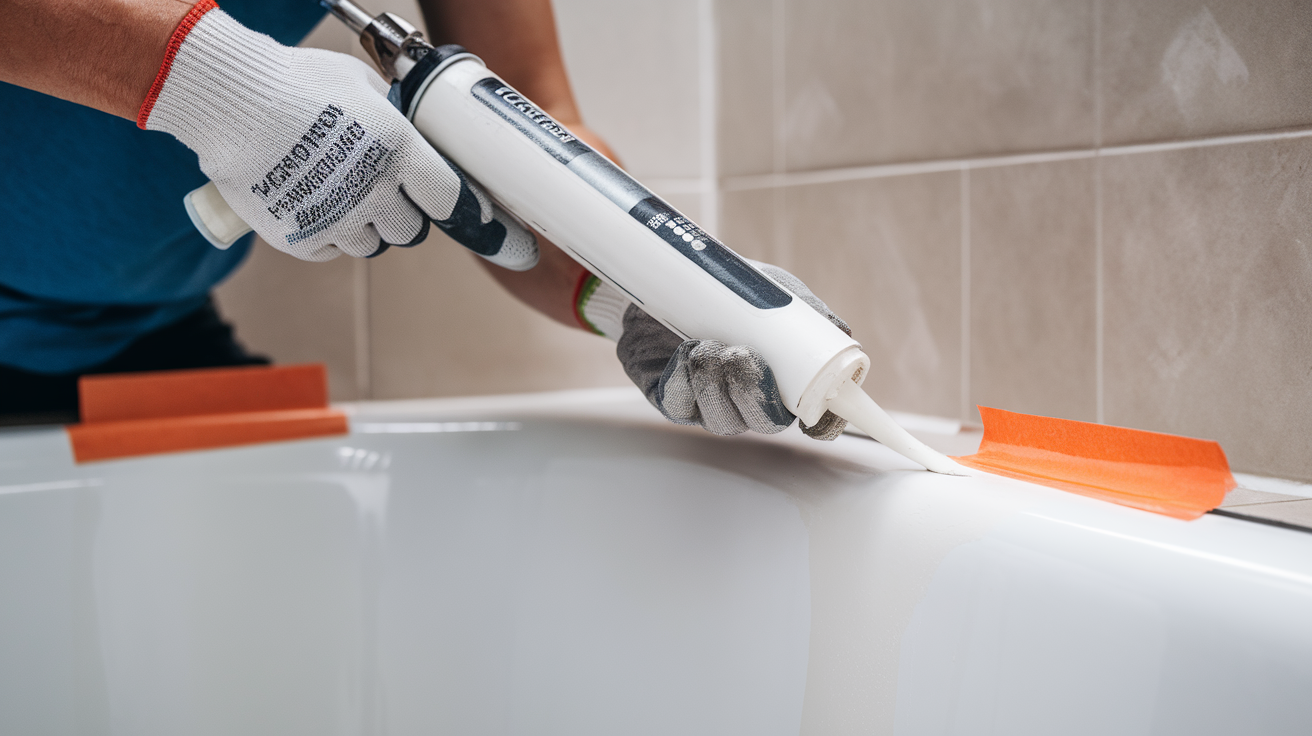
A messy seal usually comes from rushed work, over-smoothing, or skipping masking tape. To avoid this, tape off both sides of the seam before applying silicone.
Squeeze the bead slowly and evenly while maintaining steady pressure.
Smooth the bead once using a wet finger or a sealant tool, then remove the tape immediately before the sealant skins over.
Maintaining a Fresh Seal Over Time
Keeping your bath seal in good condition doesn’t require much effort, but it makes a significant difference. Regular maintenance helps prevent mold buildup and prolongs the life of your sealant.
- Wipe the seal down weekly with a dry cloth after showers to remove excess moisture and soap residue.
- Clean with a mild, non-abrasive cleaner monthly to prevent mildew from forming. Avoid harsh chemicals that can break down silicone.
- Inspect every few months for cracks, discoloration, or areas where the sealant may be pulling away.
- Reseal early if you spot damage; don’t wait for leaks to cause bigger problems.
Consistent care means your bath stays clean, safe, and watertight. A little upkeep now saves time and money later.
Common Mistakes to Avoid
Each of these mistakes can affect both function and appearance; taking the time to avoid them helps ensure lasting, neat results.
- Skipping Proper Prep: Failing to clean and dry surfaces or remove old sealant weakens adhesion and encourages early mold or peeling.
- Using the Wrong Type of Sealant: Bathroom projects require waterproof, mold-resistant silicone—general or acrylic caulk won’t last in constantly wet areas.
- Over-Smoothing the Seal: Smoothing too much can thin the bead, create air pockets, or cause uneven coverage, weakening the water barrier.
- Skipping Masking Tape: Not using tape often results in messy, wavy lines that are hard to clean and visually unappealing.
- Rushing Cure Time: Using the bath before the sealant fully cures (usually 24 hours) ruins the seal and may cause leaks.
Tips for a Successful Bath Sealing Job
You don’t need to be a pro to seal a bath, but a careful approach makes all the difference. Below are key tips for a smooth, watertight finish:
- Clean and Dry First: Remove old sealant and scrub the area with rubbing alcohol or degreaser.
- Choose the Right Silicone: Use mold-resistant silicone specifically designed for bathrooms, rather than all-purpose caulks.
- Tape the Edges: Painter’s tape keeps lines neat and cleanup easy.
- Cut Nozzle at an Angle: A 45° cut gives better control and a cleaner bead.
- Smooth in One Go: Use a wet finger or tool in one smooth motion, avoiding overwork.
- Fill the Tub Before Sealing: The weight of the water helps prevent gaps later.
- Let It Cure Fully: Wait at least 24 hours before using the bath.
- Inspect and Reseal If Needed: Fix any air bubbles or gaps after drying.
- Keep the Area Dry: Wipe down daily to extend the life of your seal.
A little effort now keeps your bathroom dry, clean, and mold-free for years.
Conclusion
I never thought I’d say this, but sealing the bath was actually satisfying. It wasn’t just about fixing a leak; it gave the whole bathroom a fresh, clean look.
The best part? I saved money and learned a useful skill along the way. It’s one of those DIY projects that’s easier than it looks, especially when you take your time and follow the right steps.
If you’ve been staring at cracked silicone or noticing water where it shouldn’t be, don’t wait.
Grab the tools, clear some space, and do it right this weekend. Something is empowering about solving a home issue on your own and doing it well.
Follow this guide, seal with care, and enjoy your leak-free bath with confidence. You’ve got this!