
Are you trying to fix a sloped yard or create more usable space on your property? A stamped concrete retaining wall might be the perfect solution. In this guide, I’ll show you everything about these strong, good-looking walls that hold back soil and add style to your yard.
I’ve built hundreds of retaining walls over 15 years, so I know what works and what doesn’t. You’ll learn why concrete is often better than wood or stone, how much these walls cost, and whether you can build one yourself.
By the end of this article, you’ll know exactly:
- If a stamped concrete wall is right for your yard
- How to plan your project
- What design options look best
- How to avoid common mistakes that waste money
Let me help you transform that problem area into your favorite part of your property.
What Is a Retaining Wall?
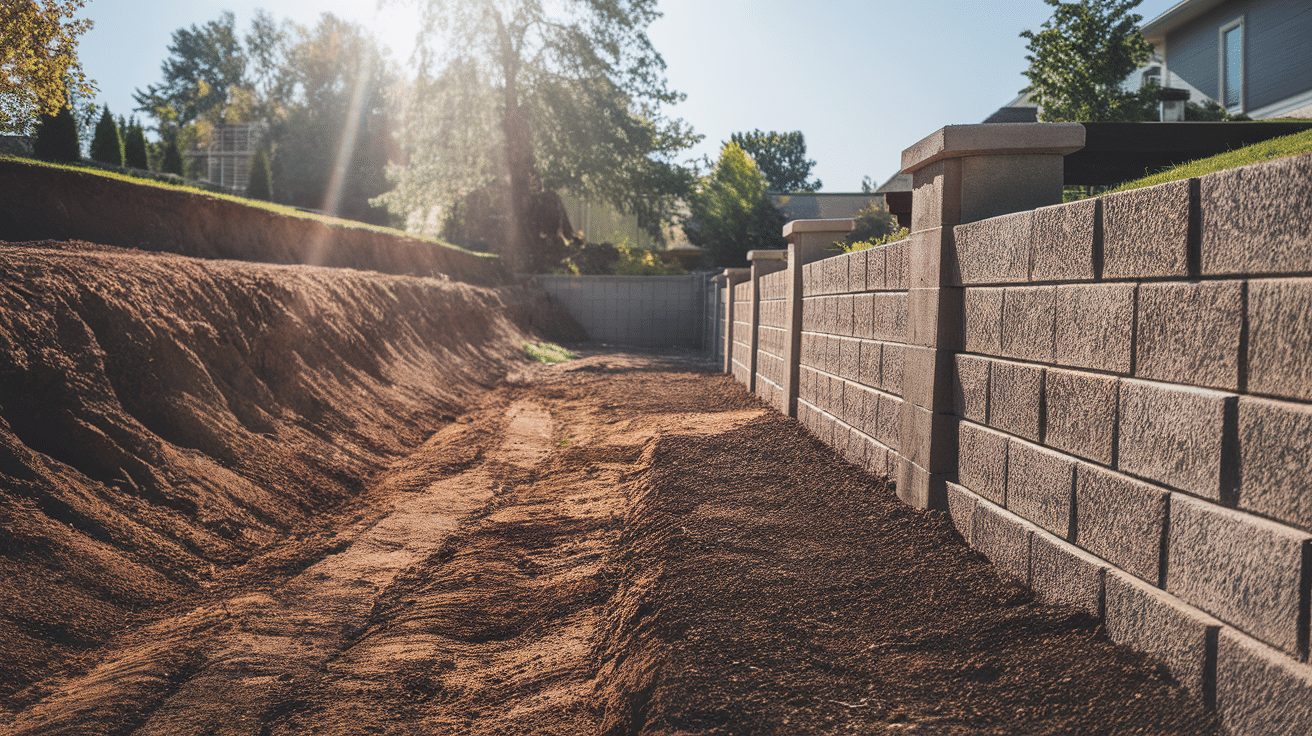
A retaining wall is simply a structure built to hold back soil when the ground level changes. I’ve seen these walls solve many problems in yards with slopes or hills. They stop erosion, create flat areas in sloped yards, and make spaces more useful.
Without a good retaining wall, rain can wash away soil and damage your property over time. These walls aren’t just useful—they can also become striking features in your landscape design.
Why Choose Concrete for a Retaining Wall?
I recommend concrete for retaining walls because it offers incredible strength and lasting value. Concrete walls can handle heavy pressure from soil and water without breaking down. They don’t rot like wood, and they stand firm through harsh weather year after year.
The best part? Concrete is very flexible in design. I can mold it into curves or straight lines, make it tall or short, and finish it in countless ways. Unlike some materials that limit your options, concrete lets you create exactly what you want. It’s also much more affordable than natural stone while providing similar strength.
What Does “Stamped” Mean in Stamped Concrete?
When I talk about “stamped” concrete, I’m referring to concrete that has patterns pressed into its surface while still wet. This process creates textures that look like brick, stone, slate, or other materials.
The stamping happens right after pouring the concrete. First, I add color to the mix or apply it to the surface. Then, using large stamps with patterns, I press designs into the concrete before it hardens. The result? Concrete that looks like expensive stone but costs much less.
The patterns can be simple or complex. I’ve made concrete look like cobblestone paths, Roman brick, and even wood planks. With stamping, you get the strength of concrete with the look of more costly materials.
Stamped Concrete vs Other Materials
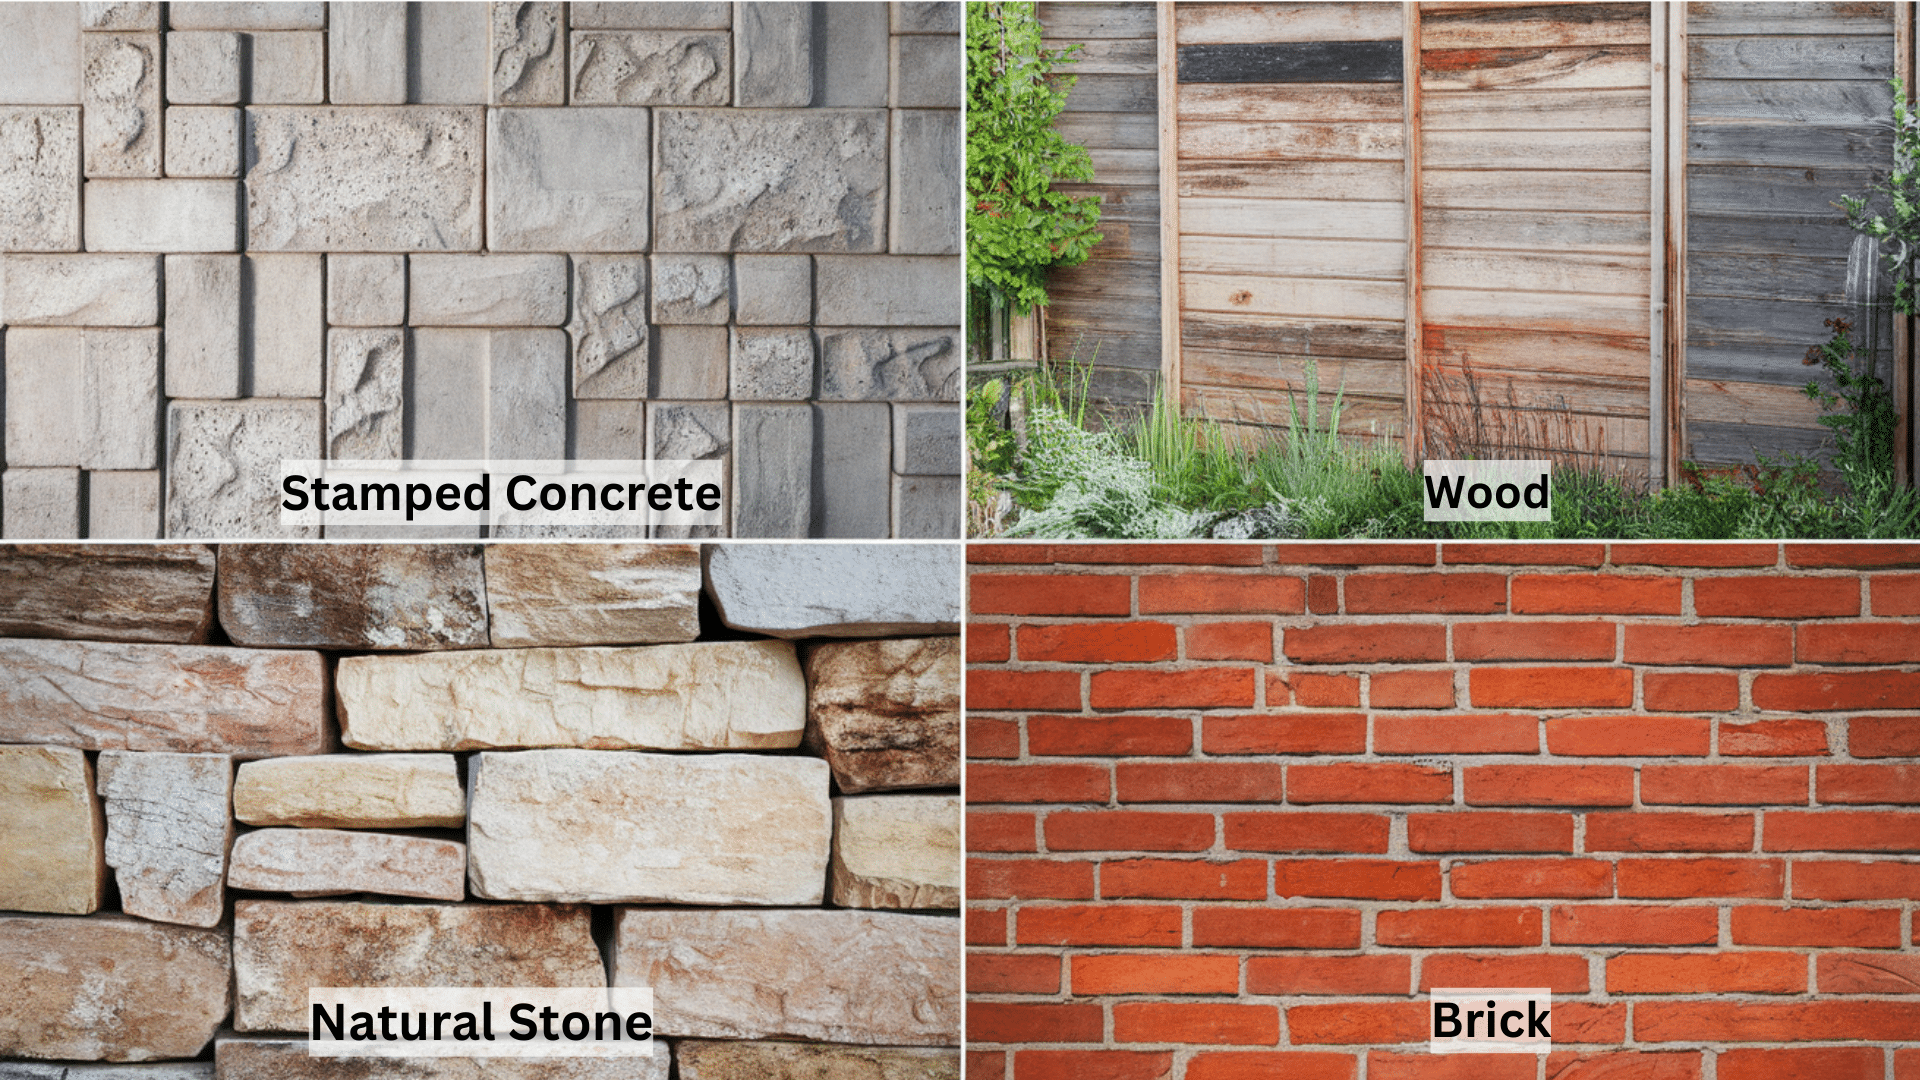
When I compare materials for retaining walls, I look at several factors:
Stamped Concrete:
- Cost: Medium initial cost, low long-term cost
- Look: Can mimic almost any material
- Strength: Very high
- Care Needed: Low to medium
- Pros: Extremely strong, very flexible in design
- Cons: Needs professional installation, can crack without proper base
Wood:
- Cost: Low initial cost, high long-term cost
- Look: Natural, warm
- Strength: Low to medium
- Care Needed: High
- Pros: Easy to install, lower upfront cost
- Cons: Rots over time, needs replacement, not good for tall walls
Natural Stone:
- Cost: Very high
- Look: Beautiful, authentic
- Strength: High
- Care Needed: Low
- Pros: Extremely beautiful, lasts generations
- Cons: Expensive, heavy, needs skilled installation
Brick:
- Cost: High
- Look: Classic, structured
- Strength: Medium
- Care Needed: Medium
- Pros: Classic look, good durability
- Cons: Limited color options, mortar needs maintenance
Best Places to Use Stamped Concrete Retaining Walls
I’ve found that stamped concrete retaining walls work best in these situations:
Sloped Front Yards
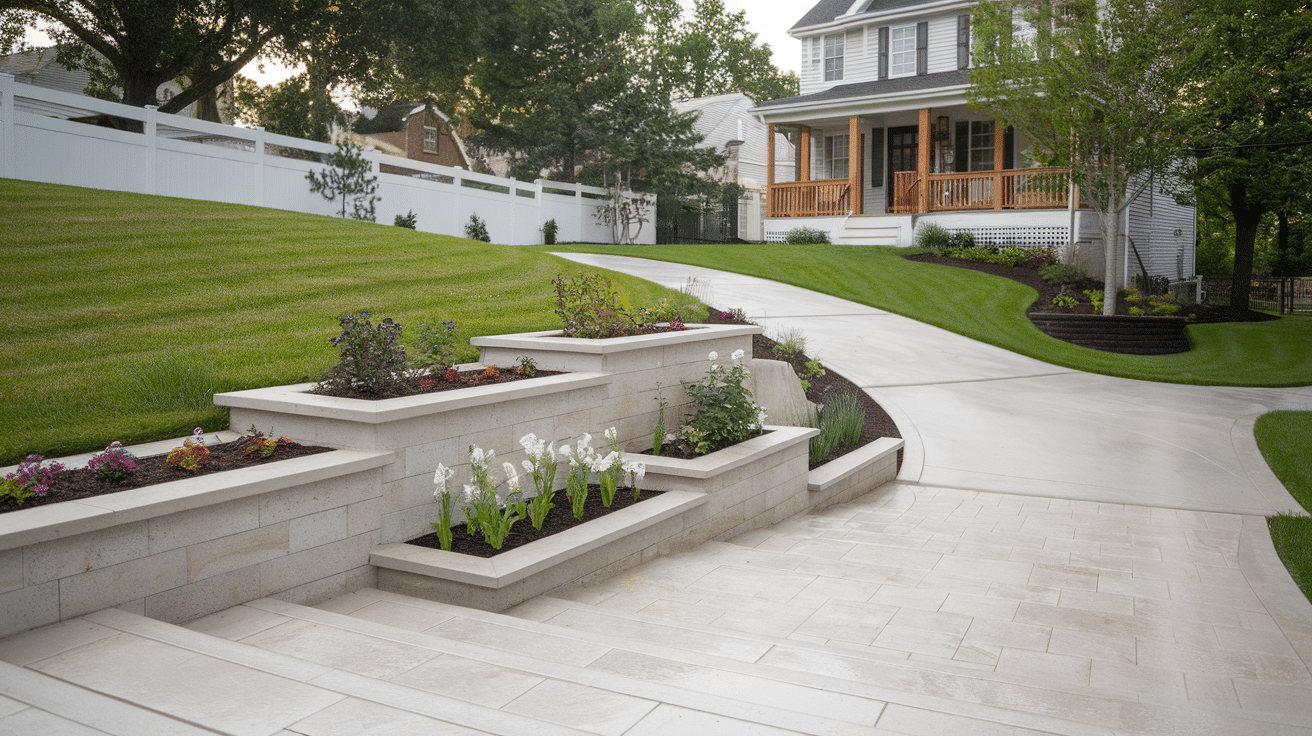
Create a level area while making your home’s entrance more impressive. Front yard walls not only solve drainage problems but also boost curb appeal. I often add built-in planters to these walls to soften their appearance with colorful flowers that welcome visitors.
Terraced Backyards
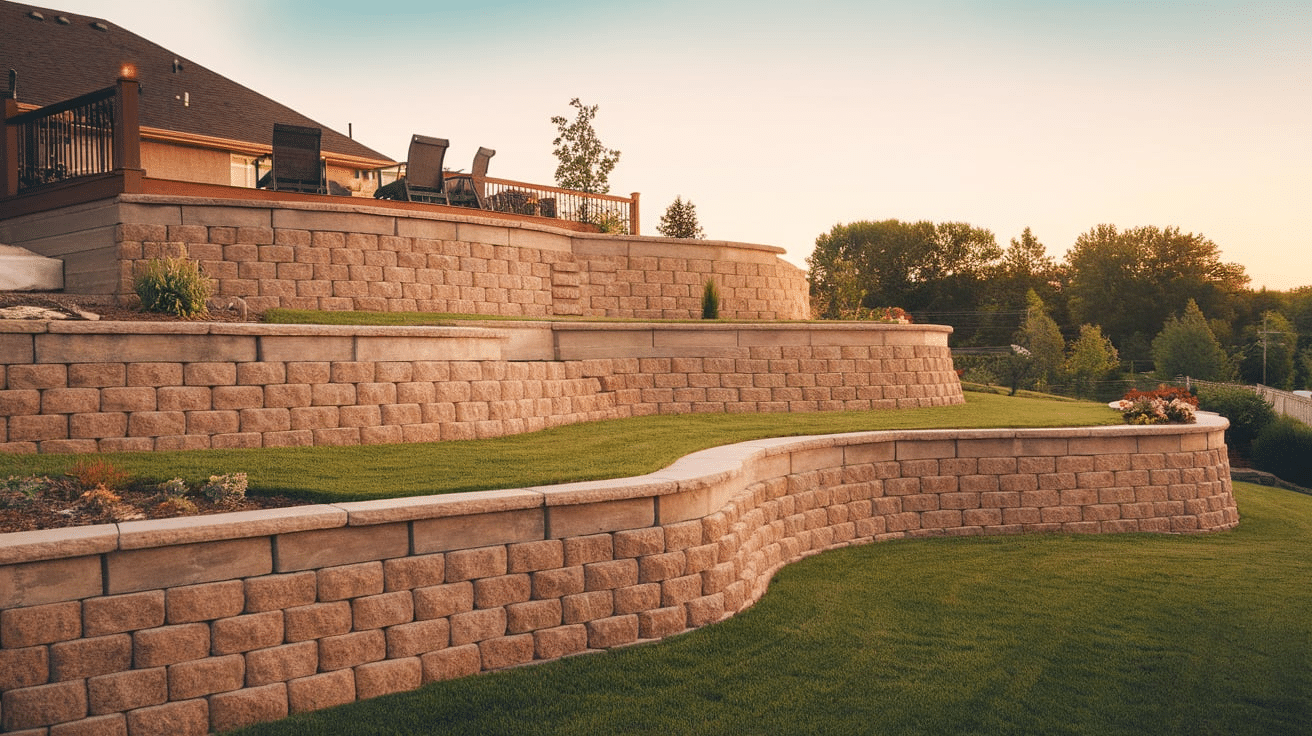
Turn a steep slope into useful garden spaces. By building multiple walls at different heights, you can create flat areas for patios, gardens, or play spaces. This solution makes previously unusable yard space functional while also controlling erosion that could damage your home’s foundation.
Around Pools
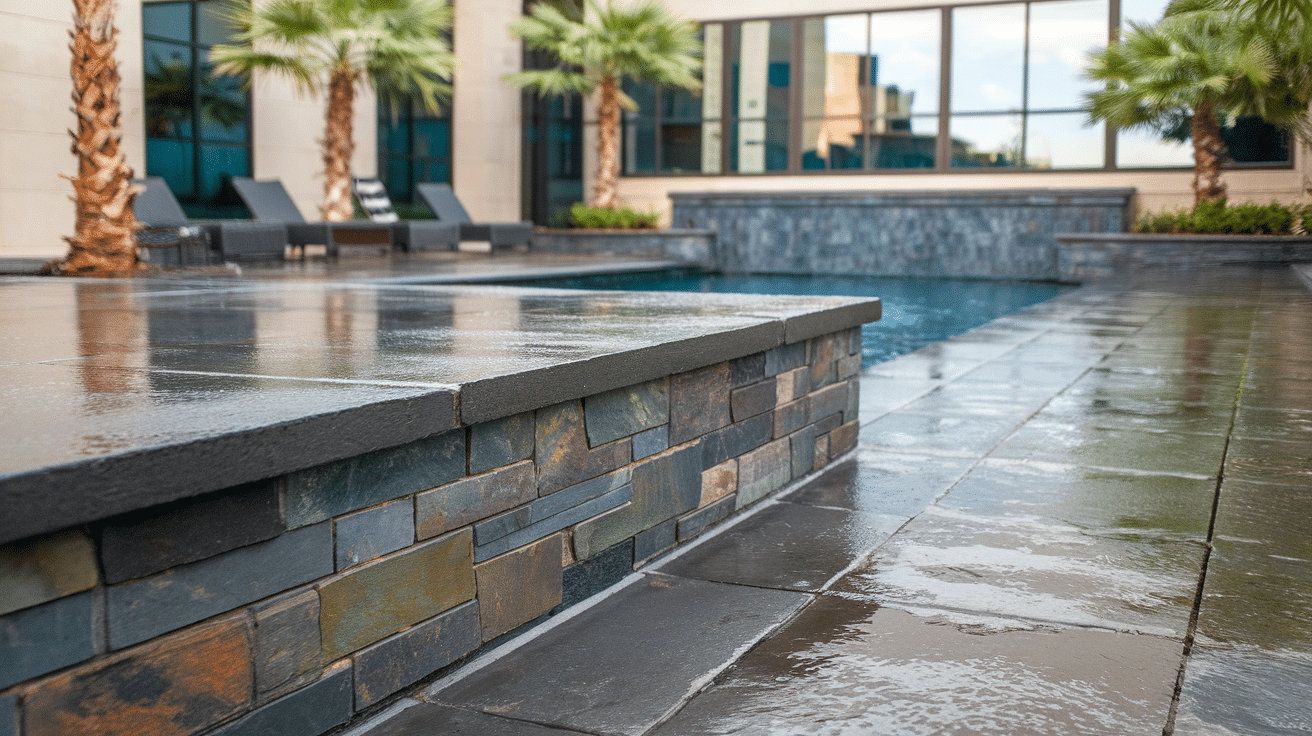
Separate the pool area from the rest of the yard with a wall that won’t rot from water exposure. These walls create a safety barrier and define the space. I recommend adding a textured top surface that remains cool to the touch even in the summer heat, making it comfortable for bare feet.
Property Boundaries
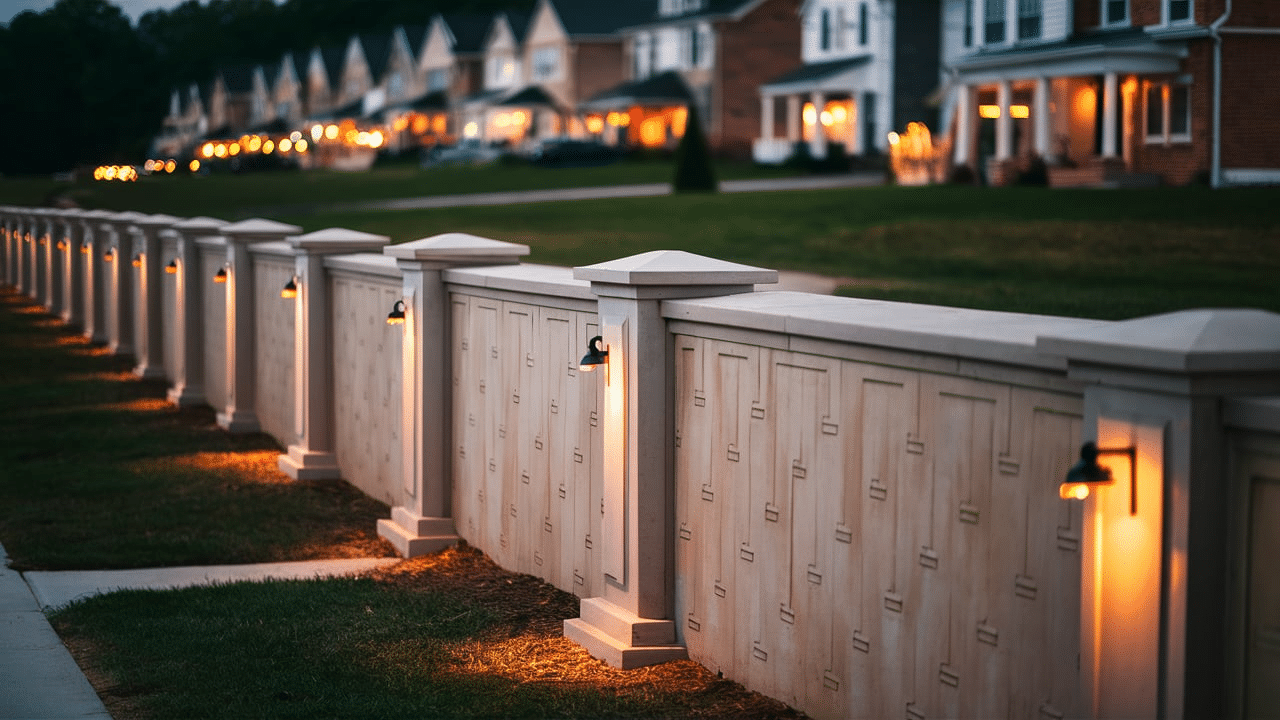
Mark your property line with a wall that adds privacy and style. Boundary walls can be designed with built-in columns for lighting and can reduce noise from busy streets. They also prevent neighbors’ pets from accessing your yard while clearly establishing where your land begins.
Garden Borders
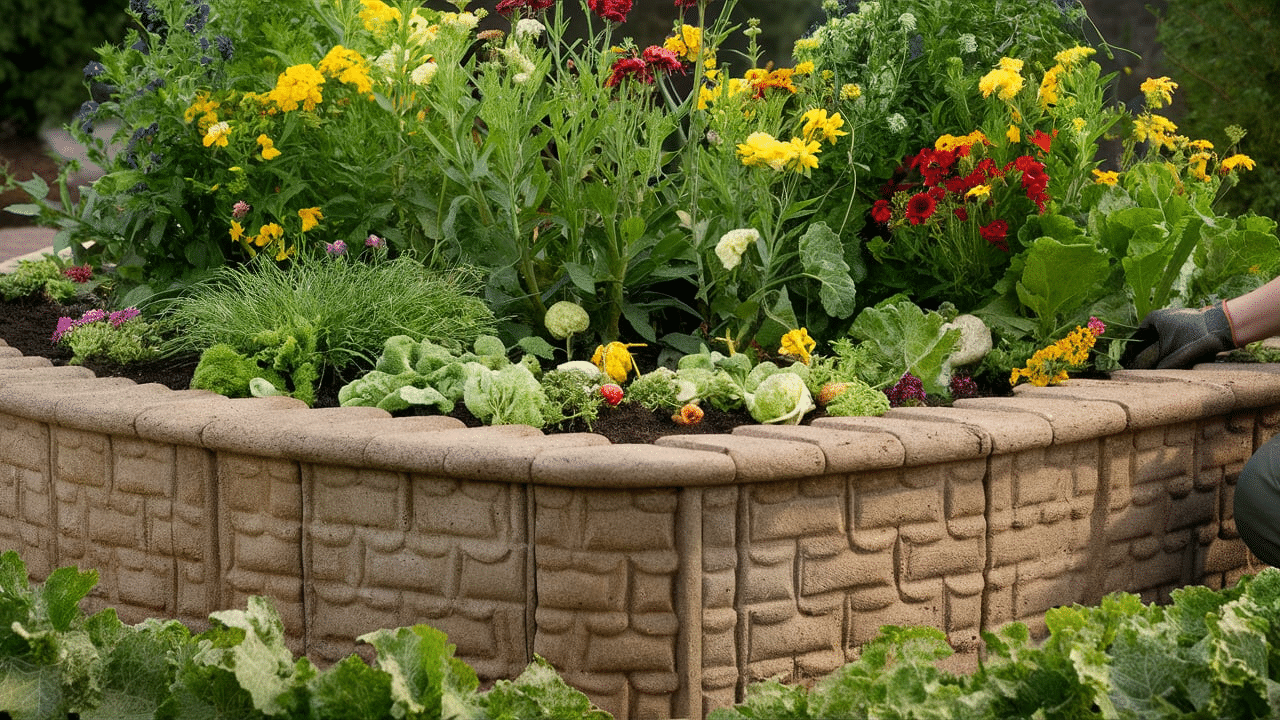
Create raised beds that are both useful and attractive. Garden border walls improve soil drainage and make tending plants easier by bringing them to a more comfortable height. They also protect your valuable plants from lawn mowers and foot traffic that might otherwise damage them.
Stamped concrete is especially good for visible areas where you want the wall to look as good as it functions. I’ve installed them in tight spaces where other materials wouldn’t fit and in high-end properties where looks matter as much as function.
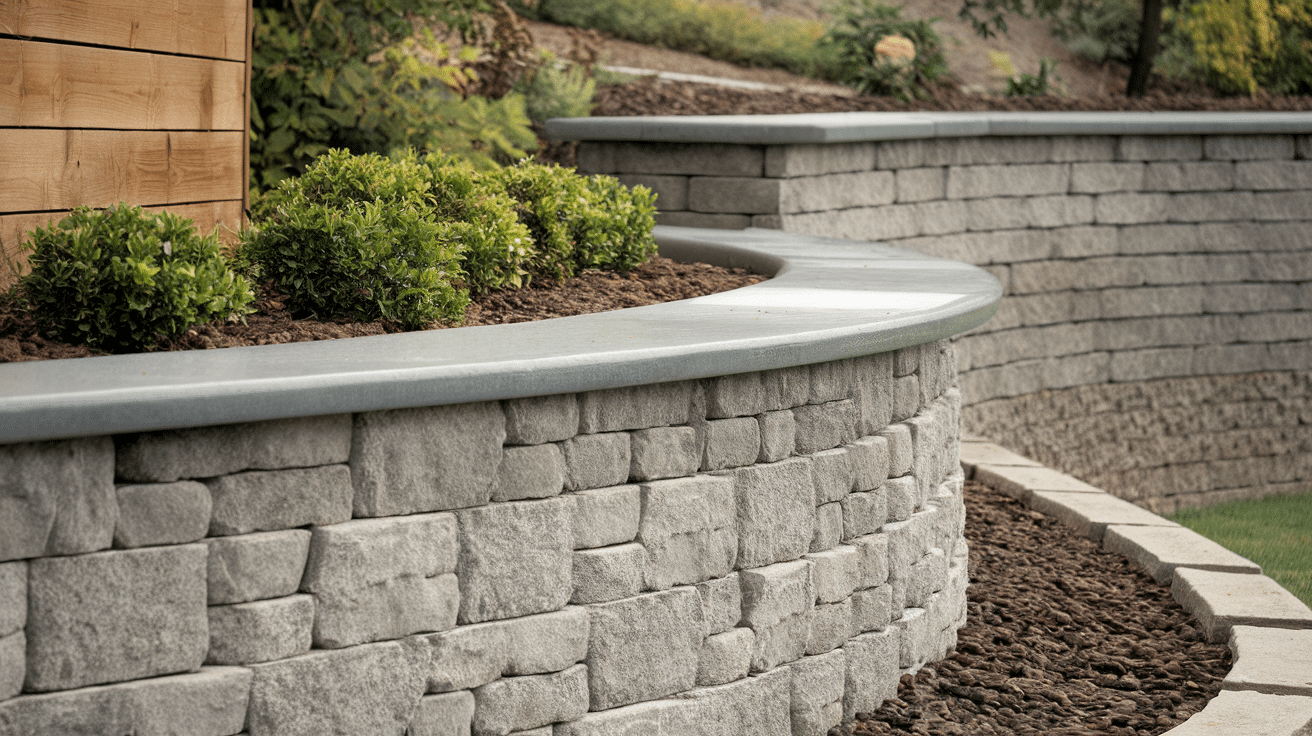
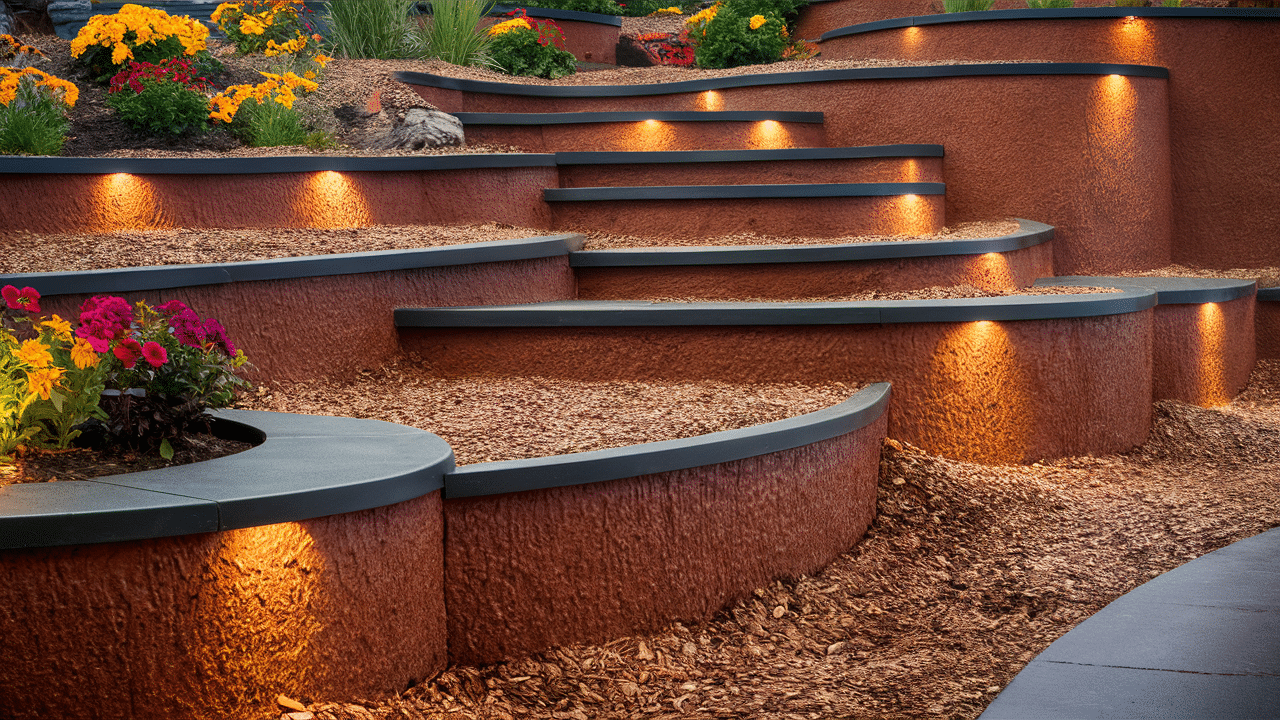
Design Ideas That Work
In my experience, these design approaches work especially well with stamped concrete walls:
- Match your home – Choose patterns and colors that complement your house. For brick homes, a brick pattern in a similar shade creates unity.
- Create contrast – For a modern look, try a smooth wall with just a small pattern at the top edge.
- Add built-in seating – Design wider sections where the top of the wall becomes a bench.
- Include lighting – Build small lights into the wall for safety and nighttime beauty.
- Combine with water features – Small waterfalls that run down the face of the wall add movement and sound.
- Add planters – Create sections in the wall where plants can grow, softening the concrete with greenery.
I always suggest taking photos of your space and looking at similar projects online before deciding. The right design makes all the difference in how the wall fits your outdoor space.
Things to Plan Before Building
Before I start any retaining wall project, I plan these crucial details:
- Height needs – Local rules often limit how tall you can build without special permits (usually 3-4 feet).
- Drainage solutions – Water building up behind a wall can cause major problems. I always include drainage pipes.
- Soil type – Different soils put different pressures on walls. Clay soils need stronger walls than sandy soils.
- Climate factors – Freeze-thaw cycles can damage concrete, so in cold areas, I use specific mixes and techniques.
- Access for equipment – Large projects need room for concrete trucks and other equipment.
- Timing – Concrete needs the right temperature to cure properly. I avoid extreme heat or cold.
Taking time to plan these elements saves money and headaches later. I’ve seen too many DIY walls fail because people skipped this planning stage.
How It’s Built: Step-by-Step
When I build a stamped concrete retaining wall, I follow these steps:
Step 1: Site Preparation
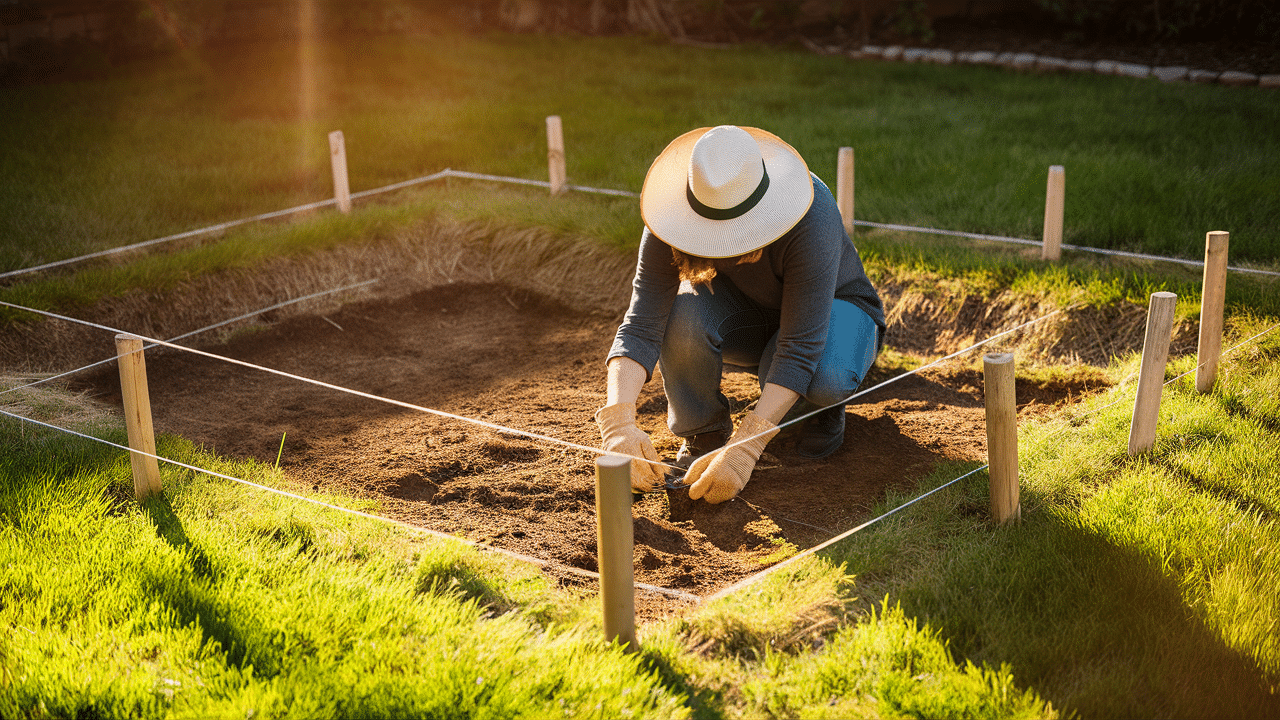
- Mark the location with wooden stakes and bright string to create clear boundaries.
- Take measurements several times to ensure accuracy and proper alignment.
- Check for underground utilities before digging – call your local utility marking service.
- Clear the area of plants, rocks, and other obstacles that could interfere with construction.
Step 2: Foundation Work
- Dig a trench for the foundation that is at least 6 inches deep and twice as wide as the wall thickness.
- Make sure the bottom is level across the entire length of the planned wall.
- Compact the soil at the bottom of the trench using a plate compactor.
- Pour a layer of gravel (about 2 inches) and compact it to create a solid base.
Step 3: Building Forms
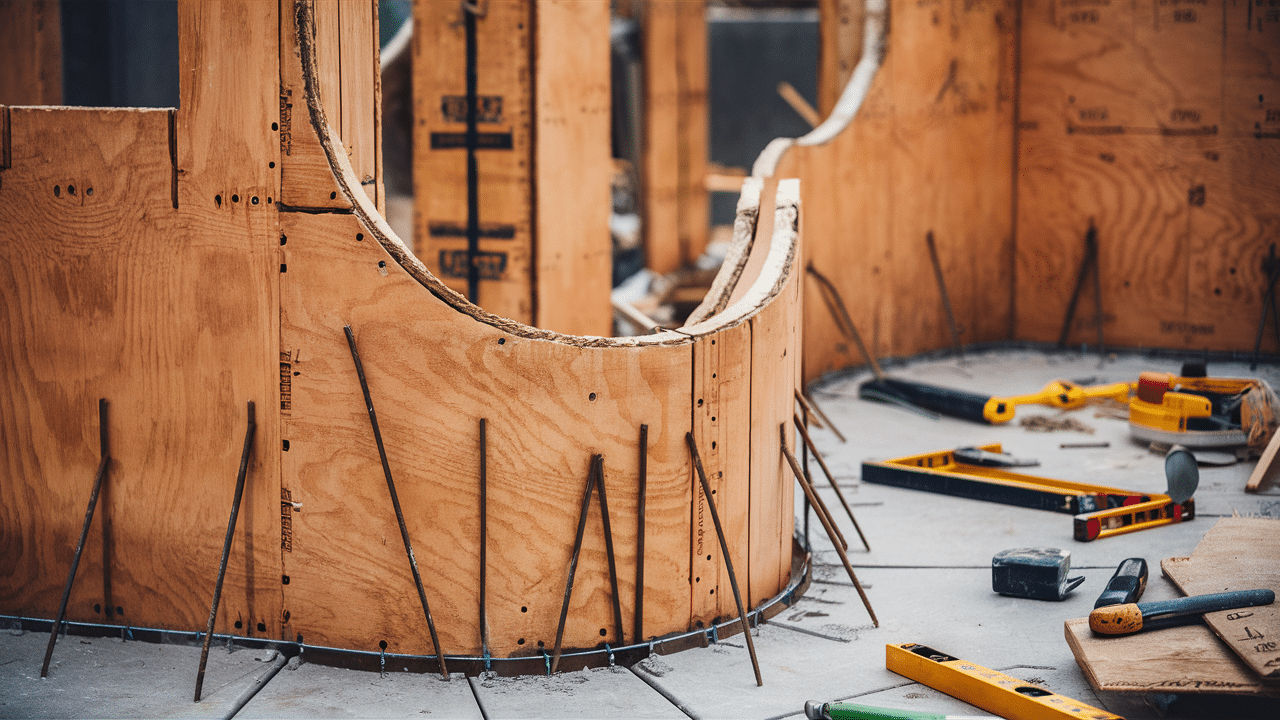
- Create forms using 3/4-inch plywood or special concrete form boards.
- Secure forms with stakes and braces every 2 feet to prevent bulging.
- Apply form release agent to all surfaces that will touch concrete to prevent sticking.
- For curved walls, use flexible materials like hardboard or special bendable forms.
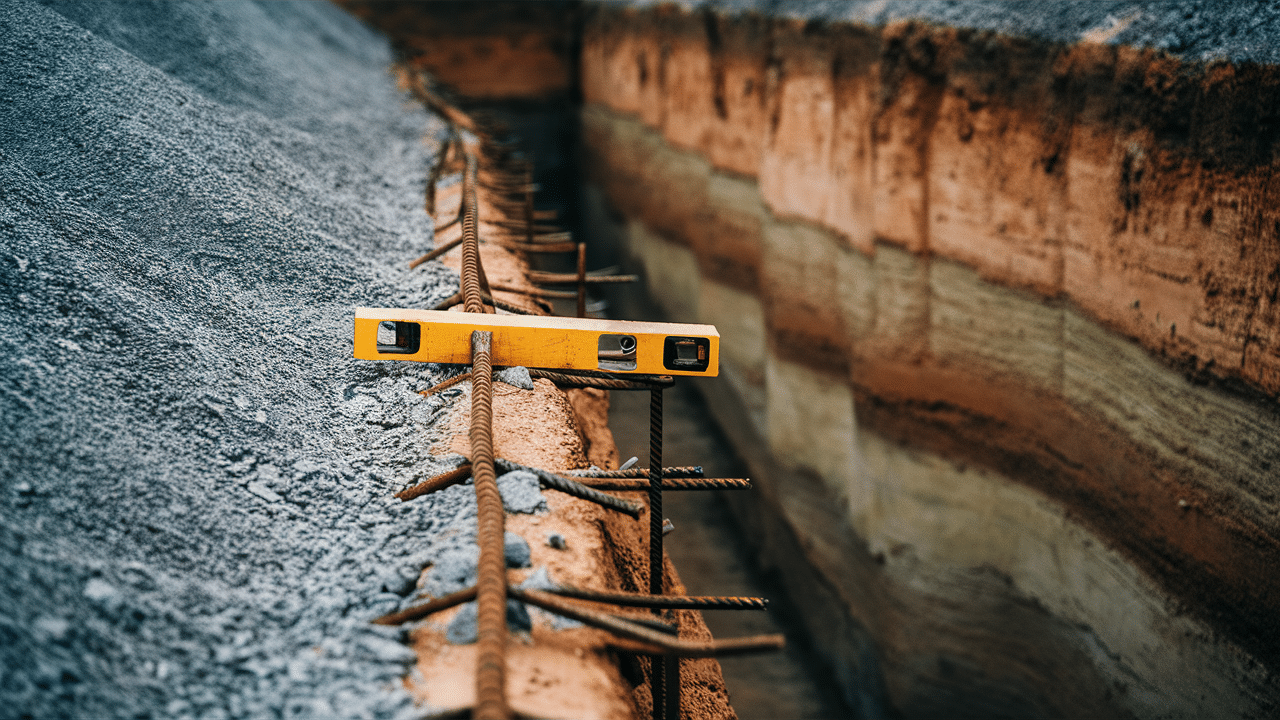
Step 4: Reinforcement Installation
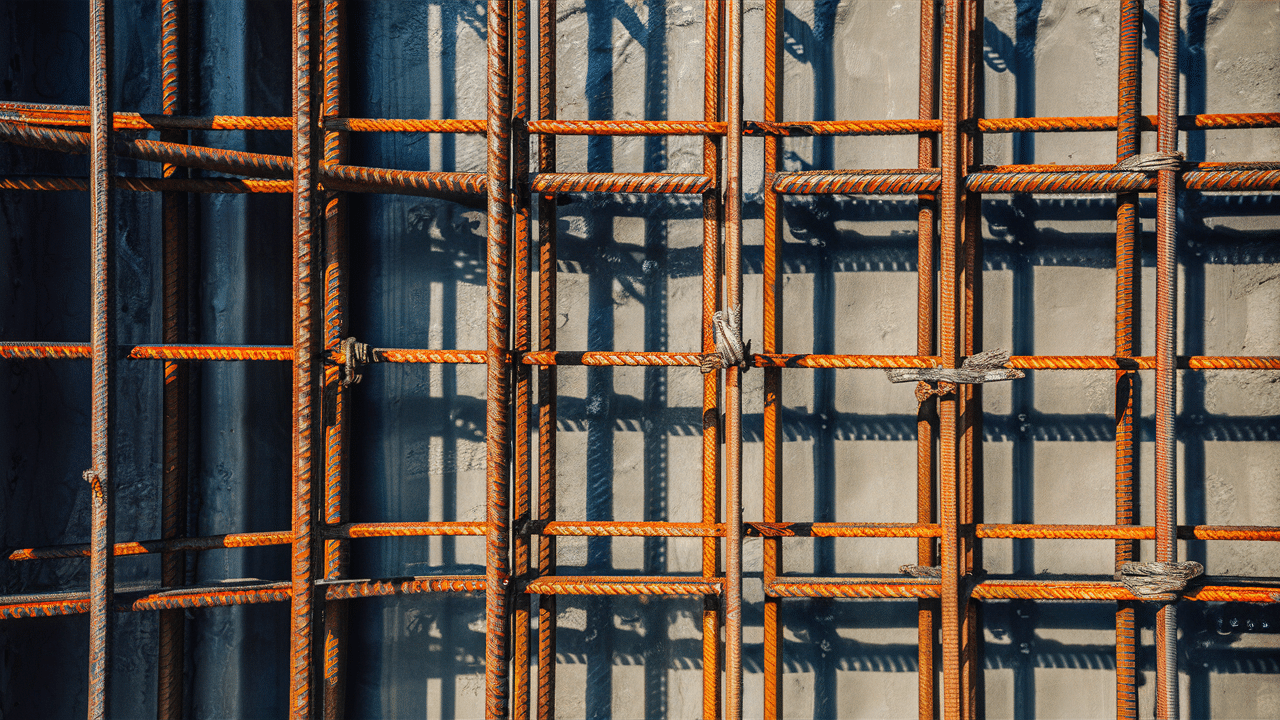
- Install reinforcement – metal rebar or mesh to strengthen the wall.
- Place vertical rebar every 12-18 inches, extending from the foundation to the top of the wall.
- Add horizontal rebar and tie to vertical pieces with wire ties.
- Make sure the rebar is positioned in the center of the wall, not touching the forms.
Step 5: Drainage System

- Add drainage behind where the wall will be – usually perforated pipe and gravel.
- Wrap the perforated pipe in landscape fabric to prevent clogging.
- Create a slight slope in the drainage pipe (about 1/4 inch per foot) to direct water away.
- Connect drainage to existing systems or daylight to a lower point in the yard.
Step 6: Concrete Pouring
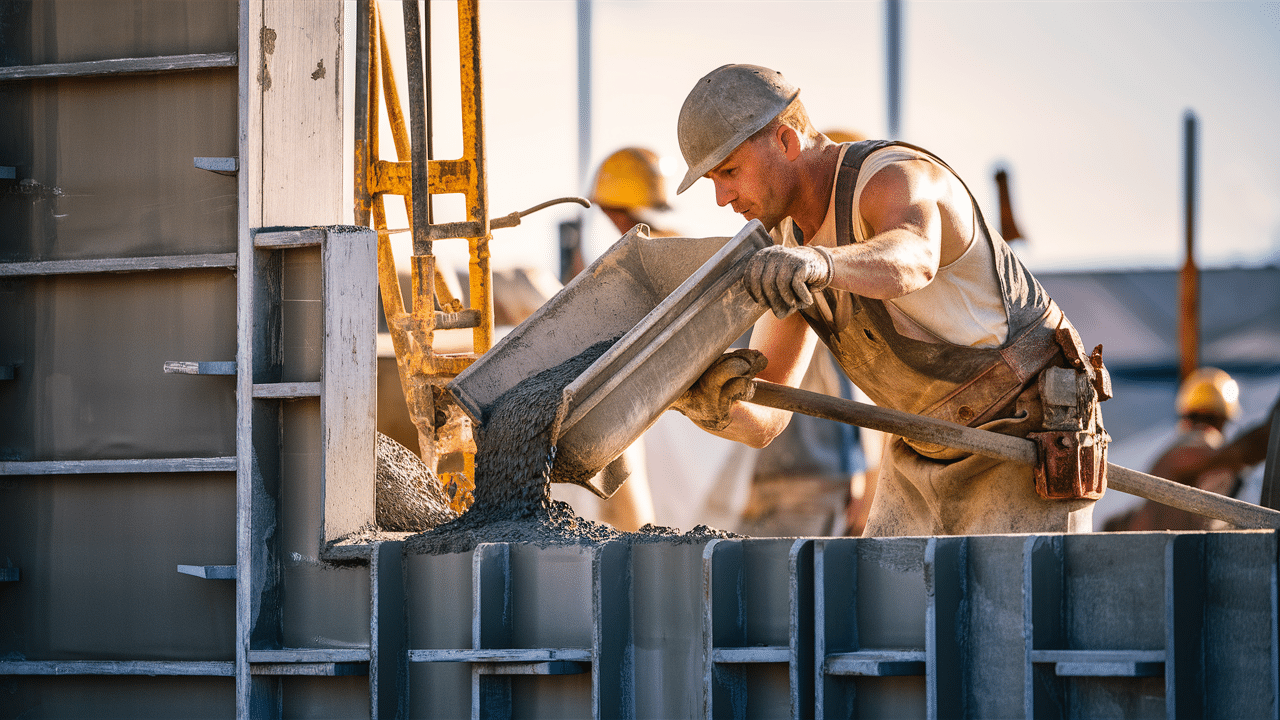
- Mix and pour concrete into the forms, working in sections for tall walls.
- Use concrete with a PSI rating of at least 3500 for retaining walls.
- Vibrate the concrete as you pour to eliminate air pockets and ensure density.
- For walls over 4 feet tall, pour in stages to prevent form failure from weight.
Step 7: Surface Preparation
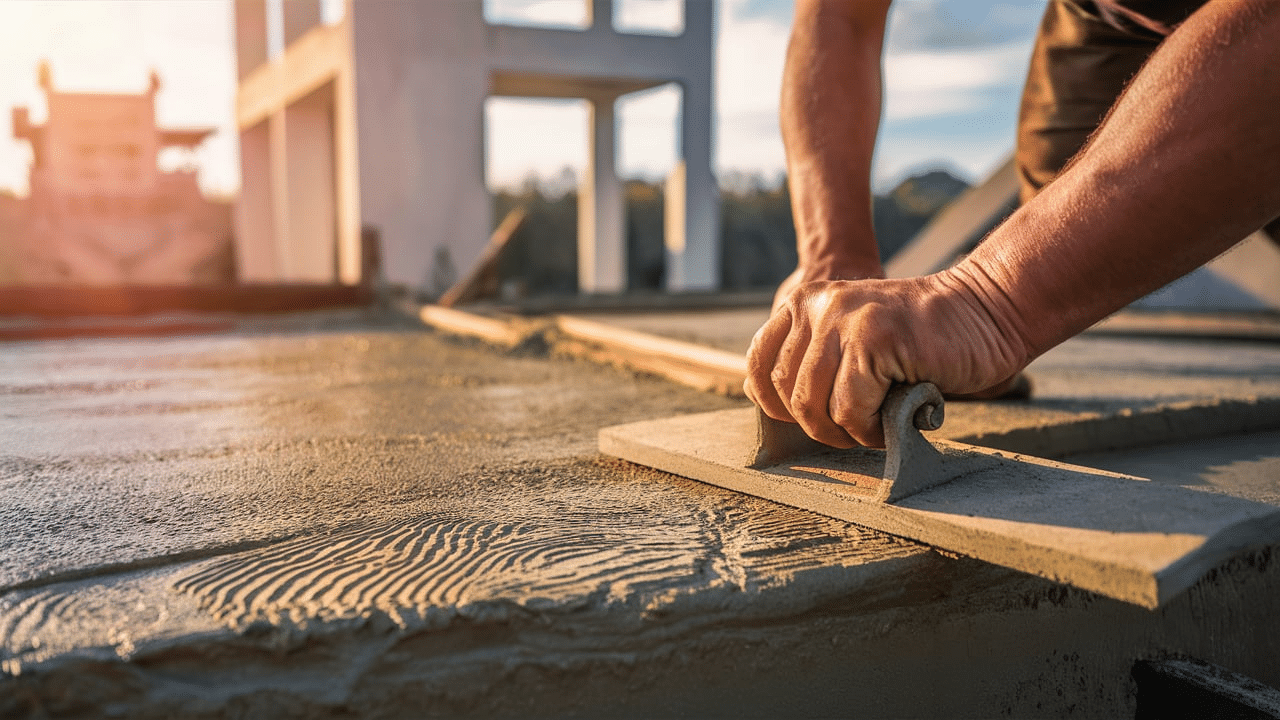
- Level and smooth the top surface with a screed board and trowel.
- Remove any large aggregate that might interfere with stamping.
- Wait for the “bleed water” to evaporate from the surface before moving to coloring.
- Test the firmness by pressing a finger into the surface – it should leave a 1/4-inch impression.
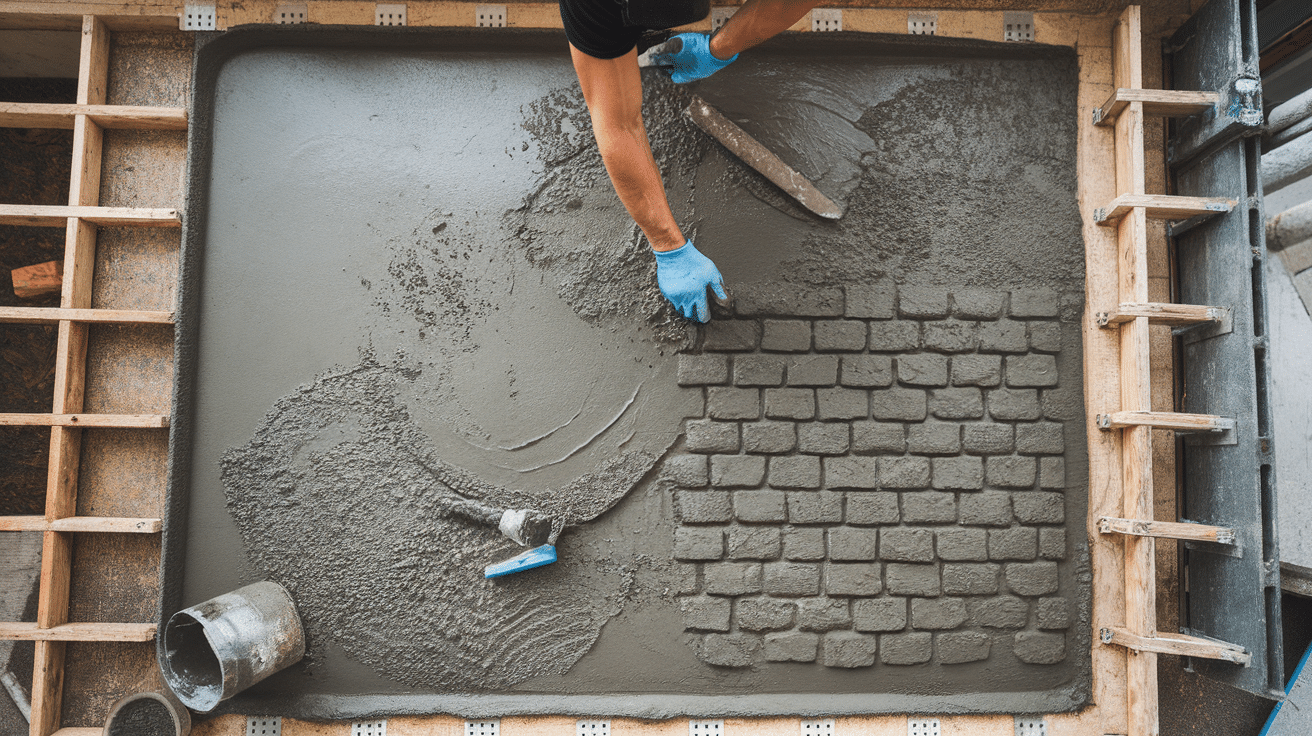
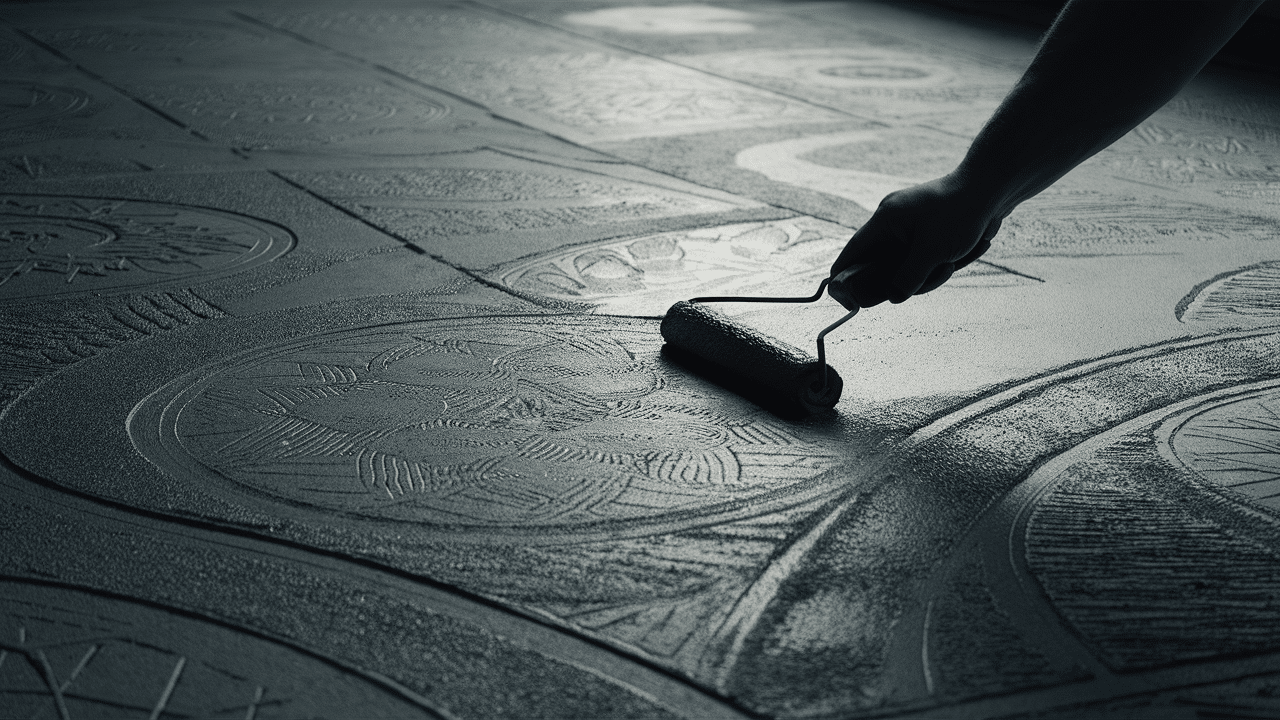
Step 8: Coloring Process
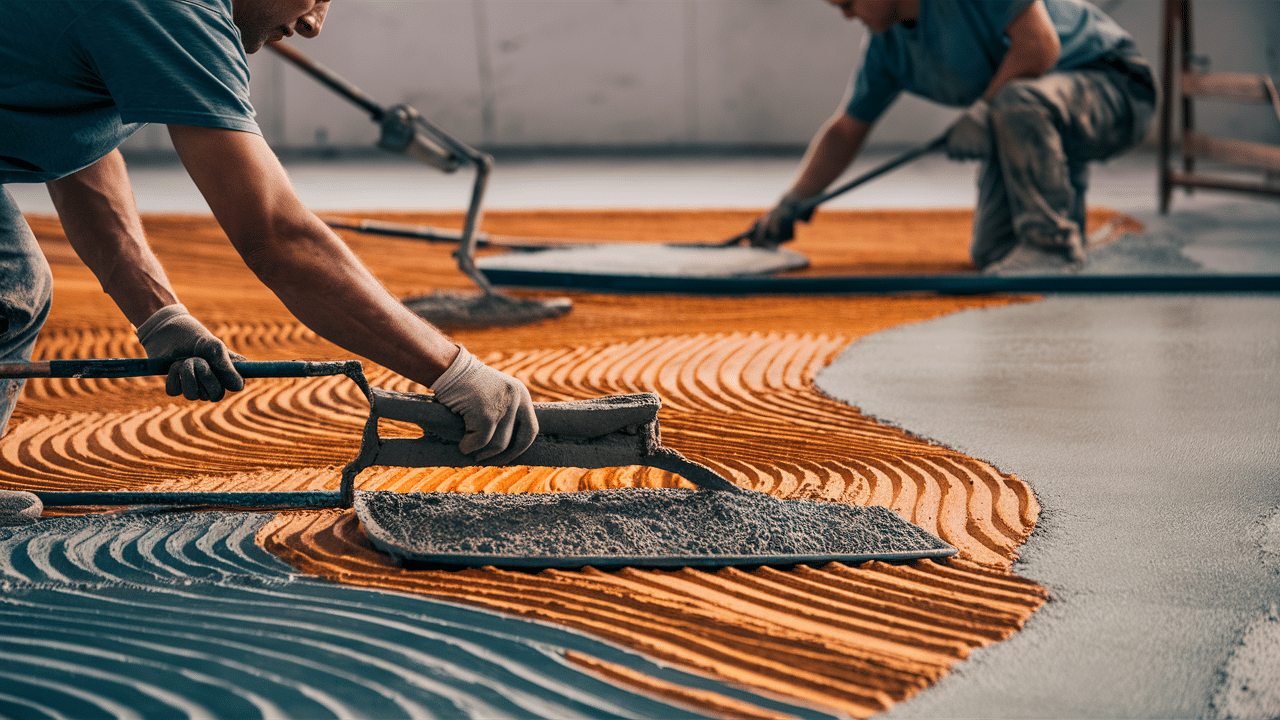
- Add color with concrete stain or color hardener.
- Apply color hardener in two passes, using about 60% on the first pass and 40% on the second.
- Work the color into the surface with a float tool.
- Apply a release agent (often a contrasting color) to prevent stamps from sticking.
Step 9: Stamping Technique
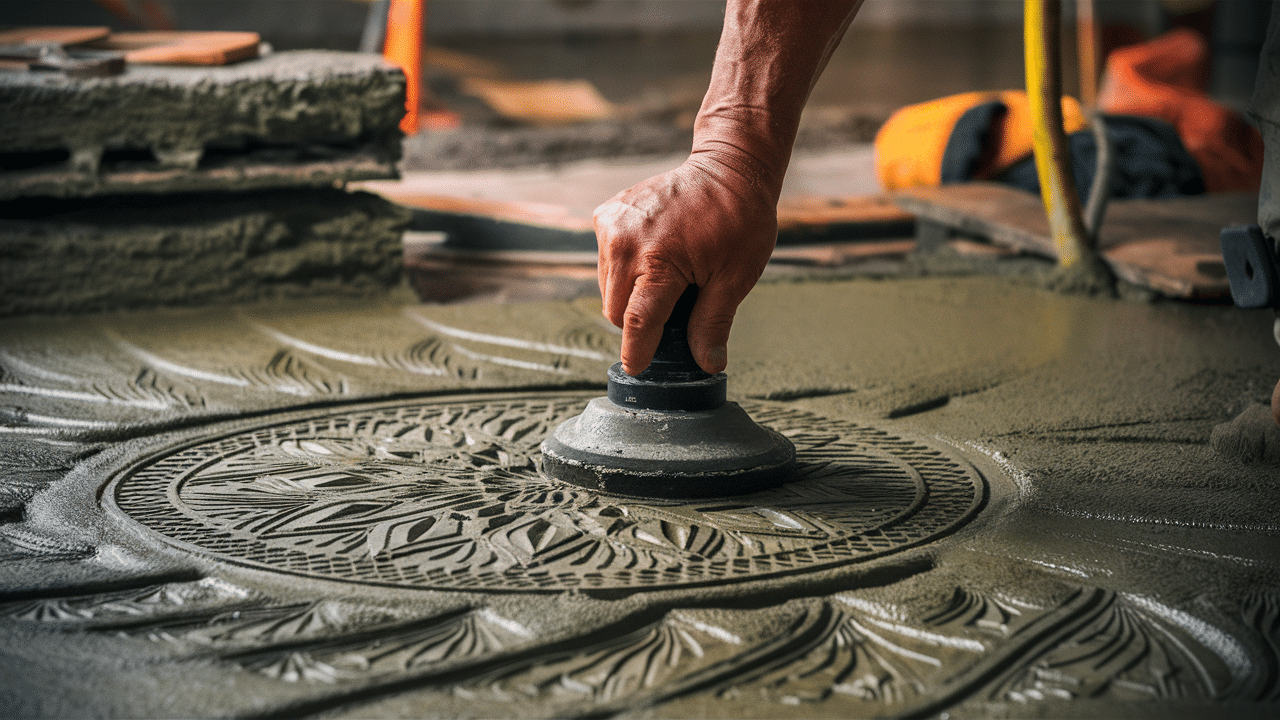
- Stamp patterns when the concrete is still wet but firm enough to hold an impression.
- Start stamping at the edges and work inward.
- Overlap the stamps slightly and use a tamper to ensure even depth.
- Use specialty tools for edges and tight spots where full stamps won’t fit.
Step 10: Finishing Touches
- Apply sealer after the concrete has cured (usually after about a week).
- Clean the surface thoroughly before sealing.
- Use a roller or sprayer to apply 2 thin coats of sealer, allowing drying time between coats.
- Add non-slip additive to sealer if the wall top will be walked on.
Step 11: Final Landscaping
- Backfill behind the wall with gravel for drainage (at least 12 inches wide).
- Add soil on top of the gravel, sloping away from the wall.
- Install any planned lighting, caps, or decorative elements.
- Add plants or mulch to complete the landscaping around the new wall
The whole process usually takes 1-2 weeks, including curing time. For large projects, I recommend hiring professionals who have the right equipment and experience.
How Much Does It Cost?
Based on my experience, here’s what you can expect to pay for a stamped concrete retaining wall:
Average cost range: $30-60 per square footage
What changes the price:
- Wall height – Taller walls cost more per square foot because they need stronger foundations
- Pattern complexity – Simple patterns cost less than intricate ones
- Color options – Multiple colors or special effects add to the price
- Site access – Hard-to-reach areas increase labor costs
- Soil conditions – Problem soils need more extensive foundations
Labor vs DIY:
- Professional installation: $25-45 per square foot for labor alone
- DIY materials: $15-25 per square foot (but requires skills and tools)
Long-term value: I’ve found that stamped concrete walls typically last 30+ years with minimal maintenance. Compared to wood walls that might need replacement after 10-15 years, concrete often saves money over time despite the higher initial cost.
For a typical 20-foot-long, 4-foot-high wall, expect to pay between $2,400 and $4,800 for professional installation.
How to Take Care of It
Keeping your stamped concrete wall looking good isn’t hard. Here’s my maintenance routine:
- Clean the surface once or twice a year using a garden hose and mild soap.
- Reapply sealer every 2-3 years to protect against stains and moisture.
- Check drainage regularly to make sure water isn’t building up behind the wall.
- Fix small cracks promptly with concrete patch products before they grow.
- Remove any plants growing too close to the wall – roots can cause damage.
In winter, be careful with salt and de-icers near your wall. They can damage the surface over time. I use sand instead for traction on icy surfaces near my walls.
With this simple care, your wall should stay beautiful for decades without major work.
DIY or Hire a Pro?
I’m always honest about when to DIY and when to call in experts. For stamped concrete retaining walls:
Consider DIY if:
- The wall is under 2 feet tall
- You have concrete experience
- You have access to the right tools
- You can gather friends to help on pour day
- You’re patient enough to learn the techniques
Hire a pro when:
- The wall is over 2 feet tall
- You want complex patterns or colors
- The site has drainage issues
- You need the wall to last for decades
- You want a warranty on the work
Building retaining walls involves structural knowledge that affects safety. In most cases, I recommend consulting with a professional before starting. Many failures I’ve seen in DIY walls result from not understanding the forces soil exerts on a wall.
Common Problems and Fixes
Even good walls can develop issues. Here are problems I’ve encountered and how to fix them:
Hairline cracks:
- Cause: Normal concrete shrinkage
- Fix: Fill with concrete crack sealer and monitor
Leaning wall:
- Cause: Poor drainage or foundation
- Fix: Small leans can be stabilized; severe cases need rebuilding
White powder (efflorescence):
- Cause: Mineral deposits from water
- Fix: Clean with mild acid wash and improve drainage
Fading color:
- Cause: Sun exposure and weathering
- Fix: Clean and apply new colored sealer
Drainage problems:
- Cause: Clogged or missing drainage
- Fix: Add or clean drainage channels behind the wall
Proper installation can prevent most problems. If you see your wall starting to lean or develop large cracks, get professional help immediately.
Final Thoughts
After building retaining walls for 15+ years, I can honestly say that stamped concrete offers the best balance of strength, looks, and value for most homes. Yes, it costs more upfront than some options, but the minimal upkeep and long lifespan make it worth the investment.
Before deciding, look at examples in your area. Feel the textures, see how they age, and think about what matches your home’s style. The right wall does more than hold back soil—it transforms how you use your outdoor space.
Good planning prevents problems. Focus on proper drainage, construction techniques, and choosing a pattern you’ll still love years from now.
Whether you hire a pro or tackle a small wall yourself, take time to get it right. A well-built, stamped concrete retaining wall becomes both a functional solution and a standout feature of your property.
Frequently Asked Questions
Do I Need a Permit to Build a Retaining Wall?
Most areas require permits for walls over 3-4 feet tall. Always check with your local building department.
Can an Existing Retaining Wall Be Stamped?
No, stamping must be done when the concrete is freshly poured. Instead, existing walls can be stained or faced with stone veneer.
Can Stamped Concrete Walls Be Curved?
Yes! Concrete forms can be built in almost any shape, making curves and angles possible.
Will My Stamped Concrete Wall Look Fake?
High-quality stamping with proper coloring looks surprisingly realistic, especially from a few feet away.
Do Concrete Walls Need Reinforcement?
Yes, almost all retaining walls should have steel rebar or mesh inside for strength.