
I’ve dealt with broken concrete more times than I can count.
Cracks in the driveway, chipped edges on the sidewalk, even sunken spots on the patio, it’s not just ugly, it’s also unsafe.
At first, I didn’t know if I needed to replace it all or if I could fix it myself. But over time, I learned that many concrete problems have simple solutions.
In this post, I’ll walk you through what causes concrete to break, how to spot the warning signs, and what you can do about it.
You’ll also find out when it’s time to call a pro and how much repairs might cost. If you’re working on a sidewalk, driveway, or patio, I’ve got you covered.
Let’s make your concrete safer, smoother, and better-looking—without wasting time or money. Here’s everything I’ve learned, step by step.
What Causes Concrete to Break?
Concrete may appear solid and long-lasting, but over time, various factors can slowly break it down.
I’ve seen cracks appear out of nowhere, edges start to chip, and whole sections begin to sink.
It usually doesn’t happen all at once. In most cases, the damage starts small and worsens if left untreated. That’s why it’s essential to understand what’s causing it.
Below are some of the most common causes of broken concrete. You may be surprised to learn that everyday weather, weight, and even nearby trees can all play a role.
- Freeze-Thaw Cycles: When water seeps into small cracks or pores, it freezes in cold weather. As it turns to ice, it expands and puts pressure on the concrete, leading to damage.
- Shifting Soil: The soil under concrete isn’t always steady. Rain, erosion, or poor compaction can make it move. When the base shifts, the slab can crack, tilt, or sink.
- Tree Roots: Trees planted too close to driveways or walkways can cause damage over time. Their roots grow over time and push up against the concrete with surprising force.
- Heavy Loads: Slabs aren’t built for everything. Parking heavy trucks or placing large equipment on top can put stress on the surface. That pressure leads to breaks.
- Poor Installation: If the concrete was mixed wrong or dried too fast, it may not hold up. Weak spots or missing support can cause early cracks.
- Water Problems: Water is one of concrete’s biggest enemies. It can soak in, weaken the soil below, and cause the slab to shift or fall apart.
- Age and Wear: Concrete breaks down over time. Rain, foot traffic, heat, and cold all take their toll. Even well-maintained surfaces can show signs of age.
When Can You Repair Broken Concrete?
Some concrete problems may appear severe, but can be resolved without replacing the entire slab. If the damage is minor and the base remains strong, a repair can save both time and money.
- Small Hairline Cracks: Tiny cracks that don’t go deep are usually surface-level. These can be filled with a crack sealant or concrete filler.
- Chipped Corners or Edges: Edges that break off can be patched with a concrete repair mix. As long as the rest of the slab is firm, there’s no need to replace it.
- Surface Scaling or Flaking: When the top layer starts to peel, it’s often due to water or poor curing. A resurfacer can smooth it out.
- Minor Unevenness or Settling: Slight sinking that doesn’t create significant gaps can be leveled with patching or foam injection. The goal is to make it even and safe again.
If the damage is light and not spreading, a simple repair is usually enough. It’s essential to act promptly before minor issues escalate into costly problems.
Repair Options for Broken Concrete
I’ve found that knowing the right method makes repairs faster, cheaper, and longer-lasting. Each option works best for a specific type of damage.
1. Crack Fillers
Some concrete cracks are shallow and can be easily fixed with the right product. These fillers are most effective on narrow or thin surface cracks.
Liquid Crack Fillers
These are thin, pourable solutions that flow into hairline cracks. They dry quickly and help seal the surface, keeping it water-resistant. Liquid fillers are ideal for driveways and patios with only minor damage.
Epoxy Kits
Epoxy is much stronger than regular filler. It bonds well and can handle pressure. These kits come with two parts that you mix and apply with a nozzle or spatula. I’ve used epoxy on my garage floor, and it hasn’t cracked again since.
Caulk Tubes
Concrete caulk is thicker and flexible. It’s easy to apply with a caulking gun and works well on cracks that might expand or shrink with the weather. This is a good choice for joints or edges.
2. Patching
If a chunk of concrete is missing or chipped, patching helps fill the gap and rebuild the surface. It’s best for damage that’s too big for simple fillers.
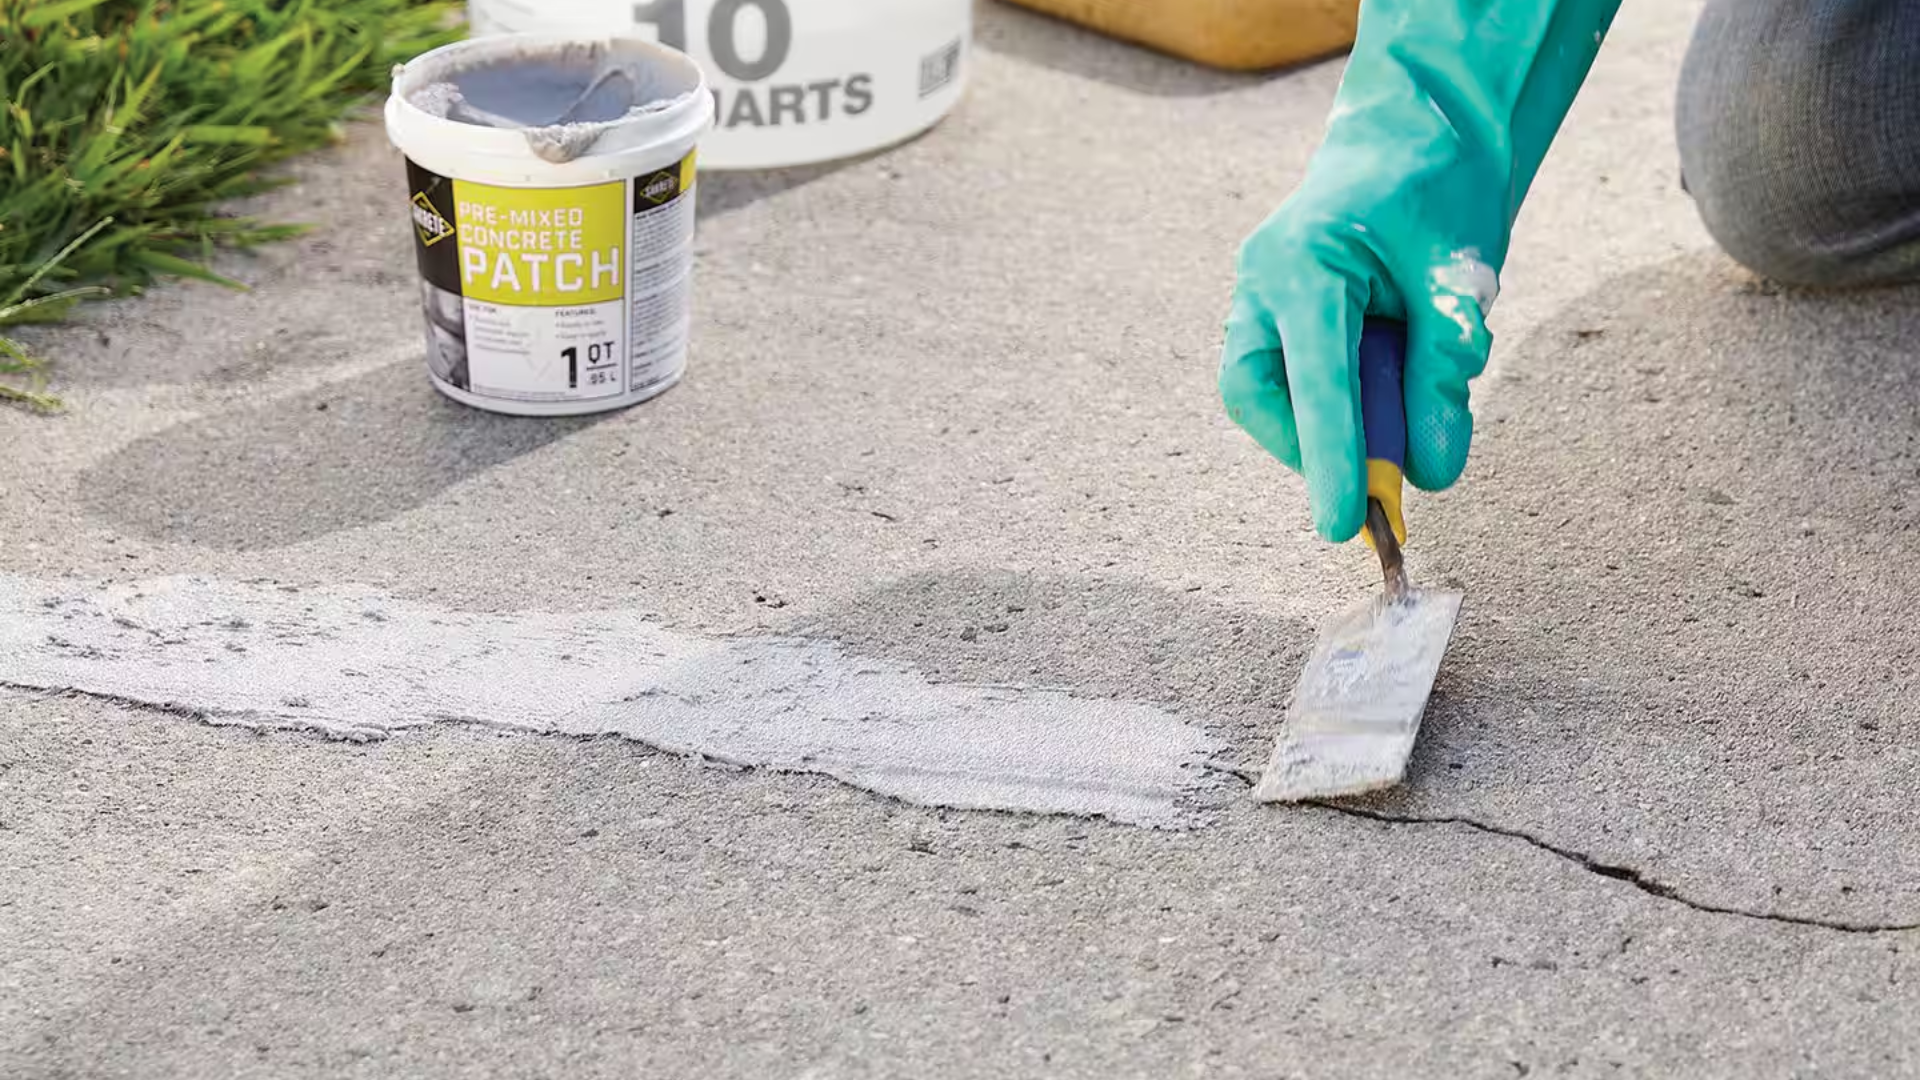
Concrete Patch Compound
This is a mix you throw on to fill holes or broken spots. It hardens like regular concrete but is made for minor repairs. Use it when the damage is deeper than a crack but not so severe that it requires full replacement.
Resurfacer for Shallow Damage
A resurfacer covers wide, shallow damage, such as flaking or surface wear. It spreads over the top like a thin layer, giving the slab a clean look.
3. Leveling (Slabjacking)
Sunken concrete slabs can be lifted instead of replaced. This is helpful when the surface is still intact but has dropped in certain spots.
Injecting Foam or Slurry Underneath
A professional drills holes in the slab and pumps in foam or cement slurry. The pressure lifts the slab back to its level position. It’s quick and doesn’t require complete removal.
Lifts Sunken Slabs
This method is excellent for uneven patios, sidewalks, and driveways. It restores the surface without tearing it out. It’s often cheaper than full replacement and less messy, too.
Using the proper repair method depends on the type of damage and its location. Fixing it early can prevent things from getting worse and save a significant amount of money in the long run.
What You’ll Need
- Quick-Setting Cement
- Acrylic Fortifier
- Concrete & Asphalt Cleaner
- Water
- Margin trowel
- Hammer and chisel or masonry grinder
- Drill with grinding disc (optional)
- Eye protection and waterproof gloves
- Stiff bristle brush
- Mixing container
Step-by-Step Guide to Repairing Broken Concrete
Fortunately, you don’t need to hire a contractor or replace the entire section. With the proper materials and a little time, you can repair chipped corners and rough edges on your own.
Step 1: Remove Loose or Damaged Concrete
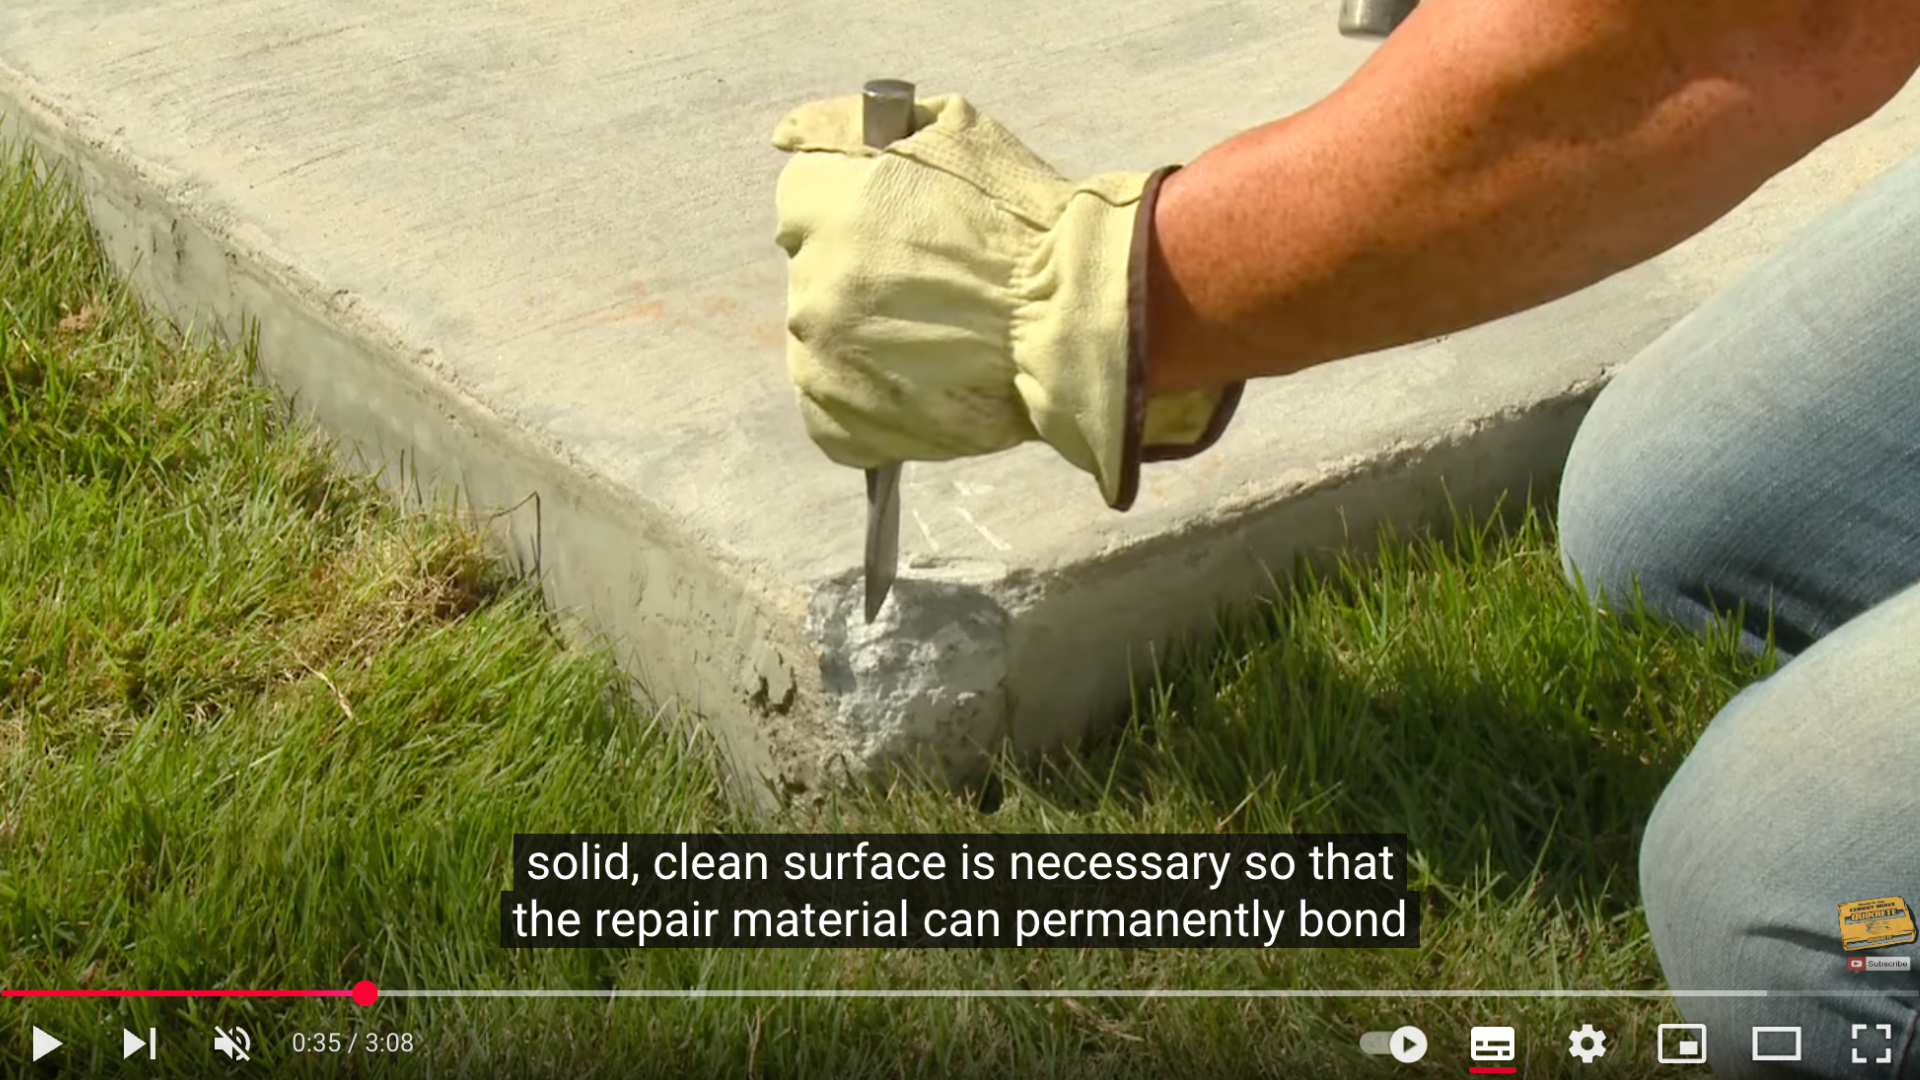
The first and most important step in repairing concrete is removing any weak, flaking, or crumbling material from the damaged edge.
Use a hammer and chisel to carefully break away loose concrete, or choose a masonry grinding disc with a drill for quicker removal.
This step ensures that the repair material bonds to a solid base, which is vital for lasting strength.
Do not skip this step; if the foundation is unstable, the repair will not be effective.
Step 2: Clean the Surface
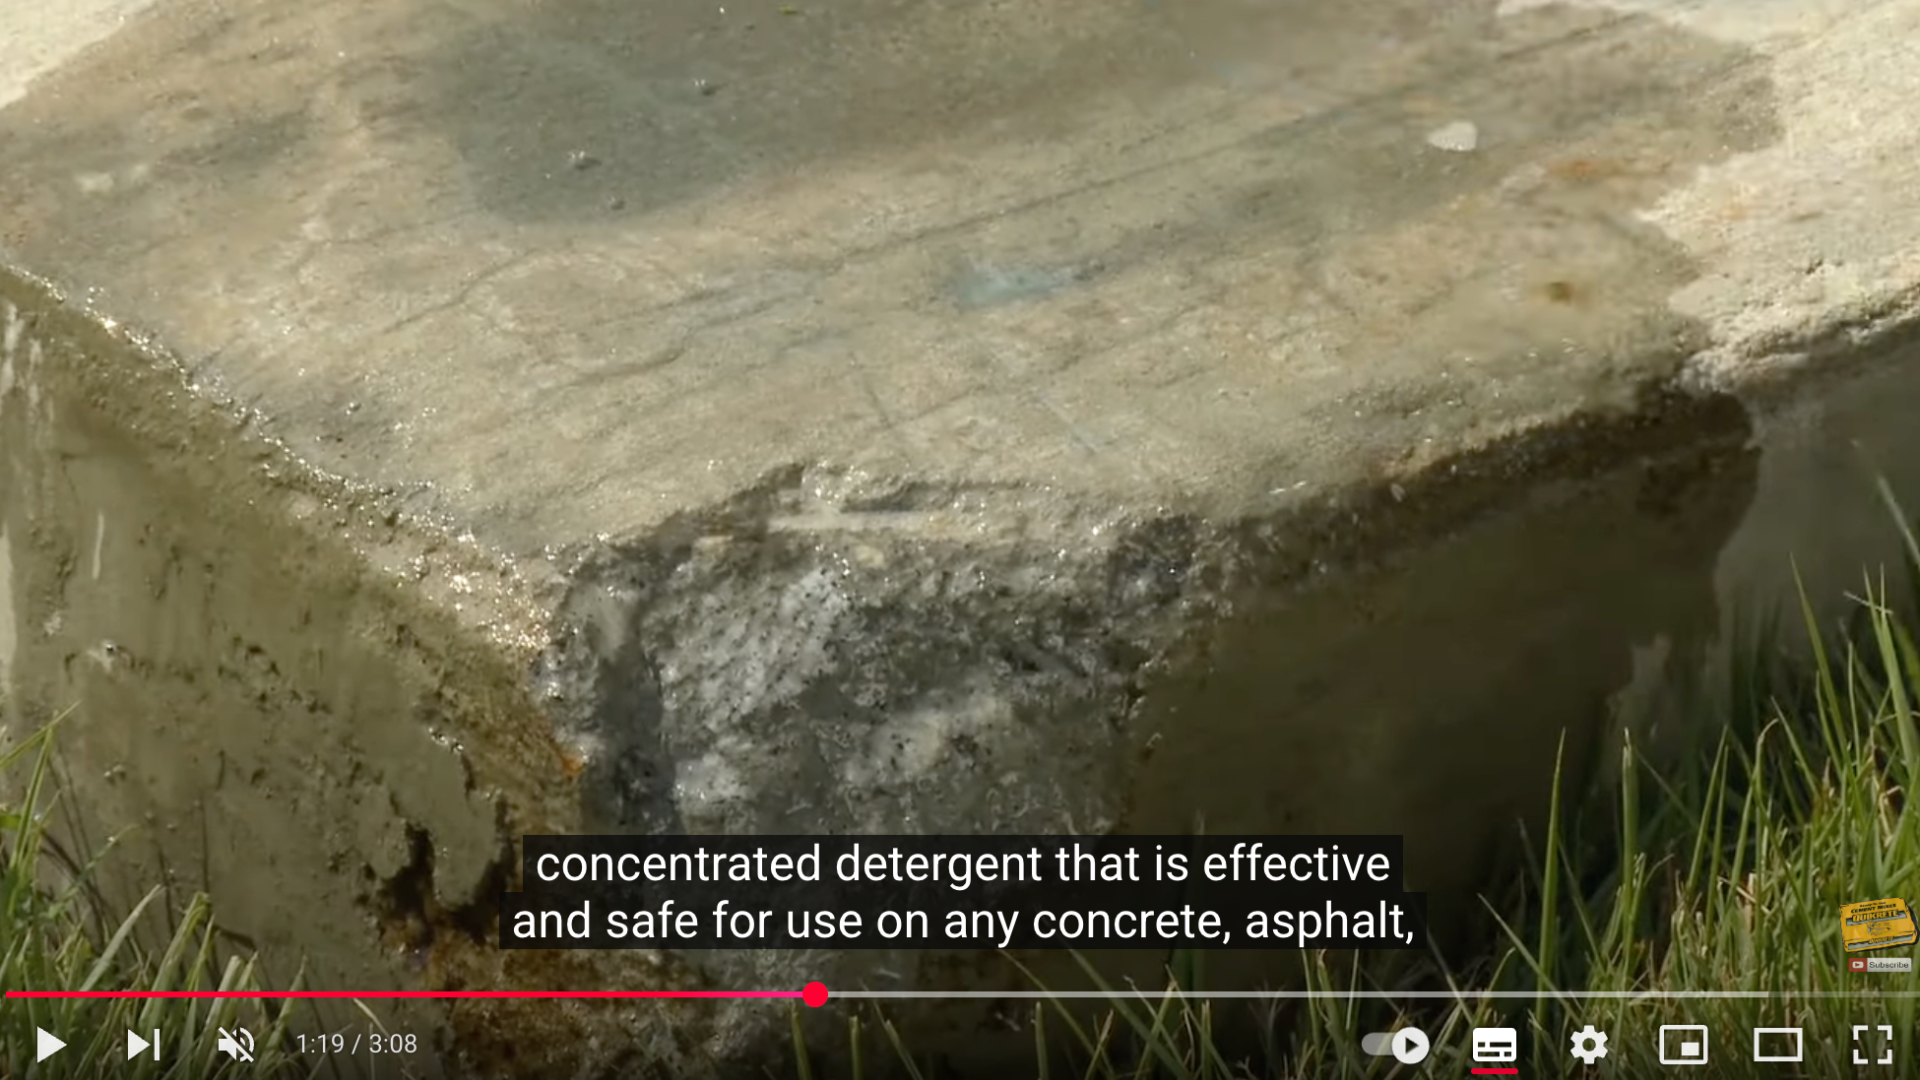
Once all the damaged concrete has been removed, thoroughly clean the repair area.
Use a stiff-bristled brush, along with Concrete & Asphalt Cleaner, to remove dust, dirt, and oil.
This cleaner is compatible with concrete and other surfaces and can be applied full-strength for stubborn stains or diluted for general cleaning.
After scrubbing, rinse the area thoroughly with clean water to remove any residue from the cleaner. Let the surface drain briefly before proceeding to the next step.
Step 3: Mix the Repair Material
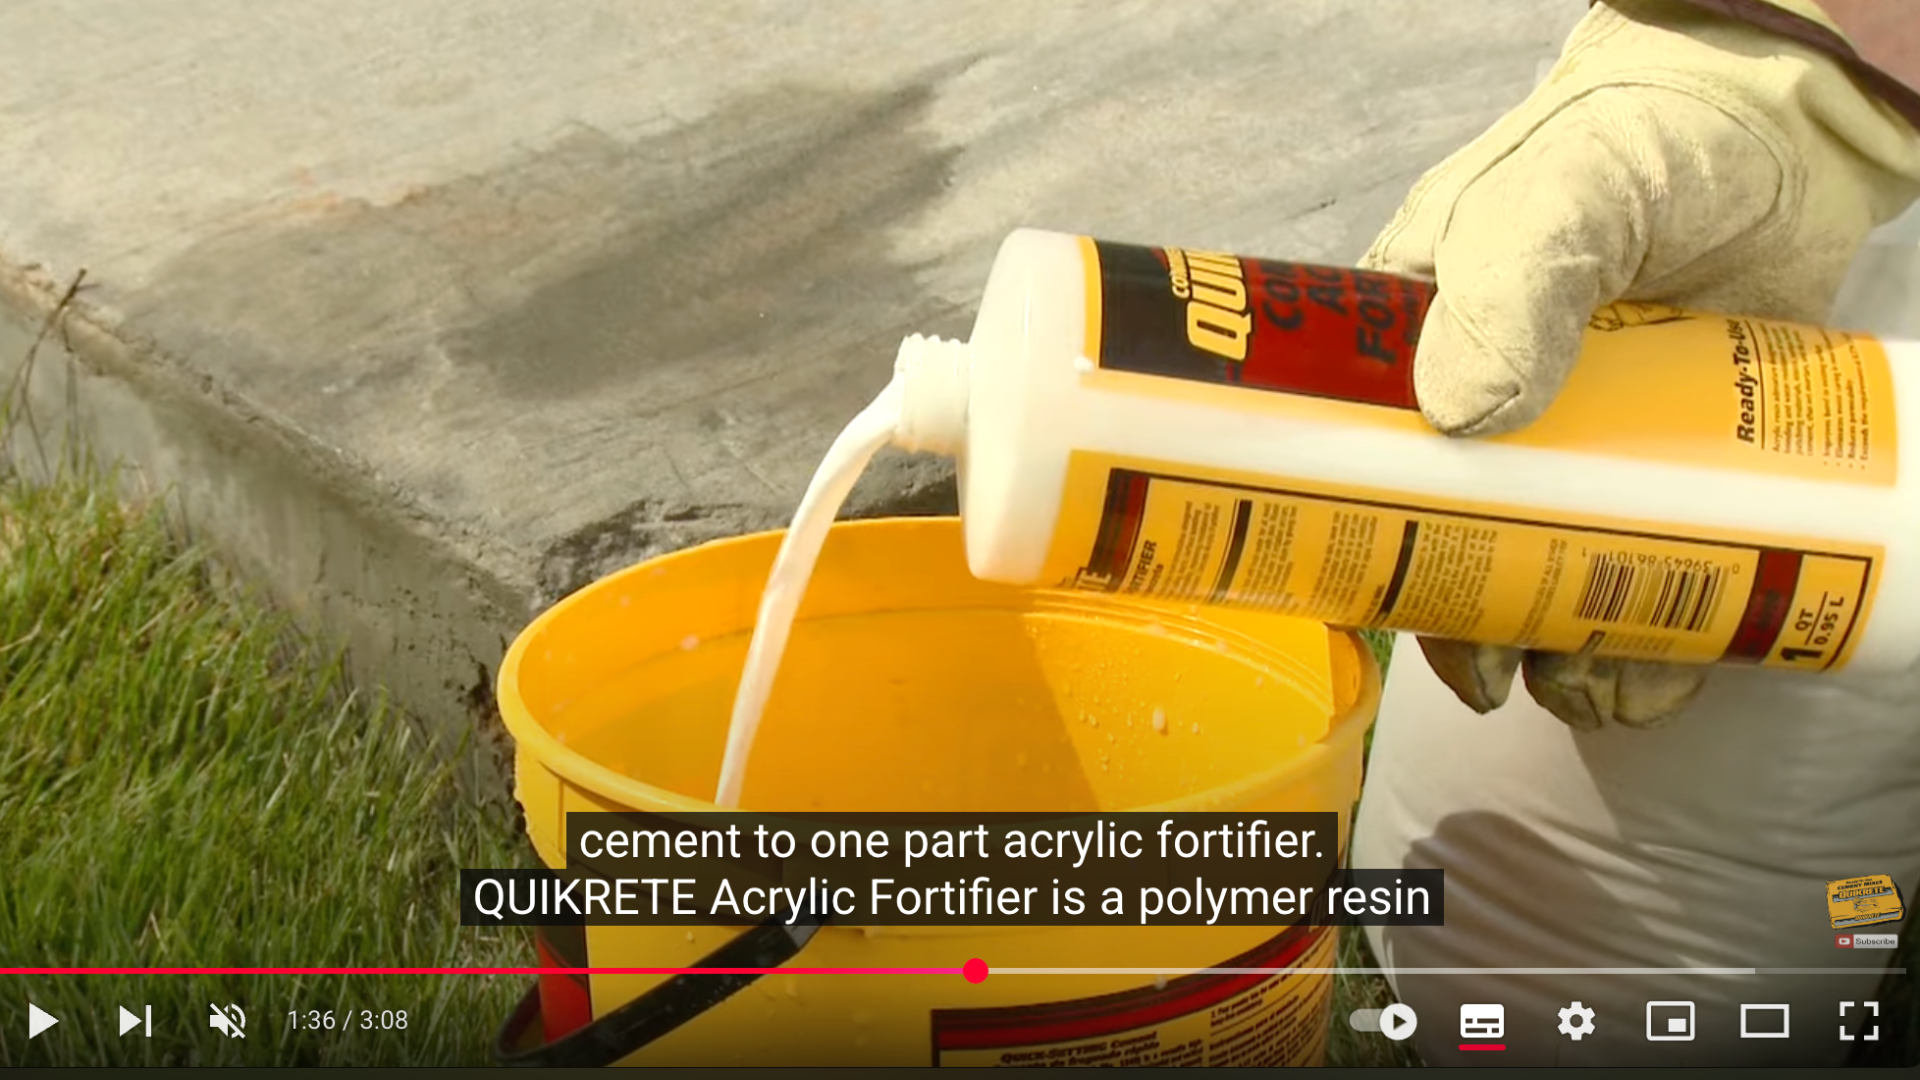
Now it’s time to prepare the repair material. In a clean mixing container, combine five parts Quick-Setting Cement with one part Acrylic Fortifier.
Use a margin trowel to mix the mixture thoroughly for three to five minutes, until it is smooth and free of lumps.
Be sure to mix only the quantity you can apply within five minutes, as the cement hardens quickly. Avoid adding extra water or fortifier once it starts to set.
Step 4: Pre-wet the Repair Area
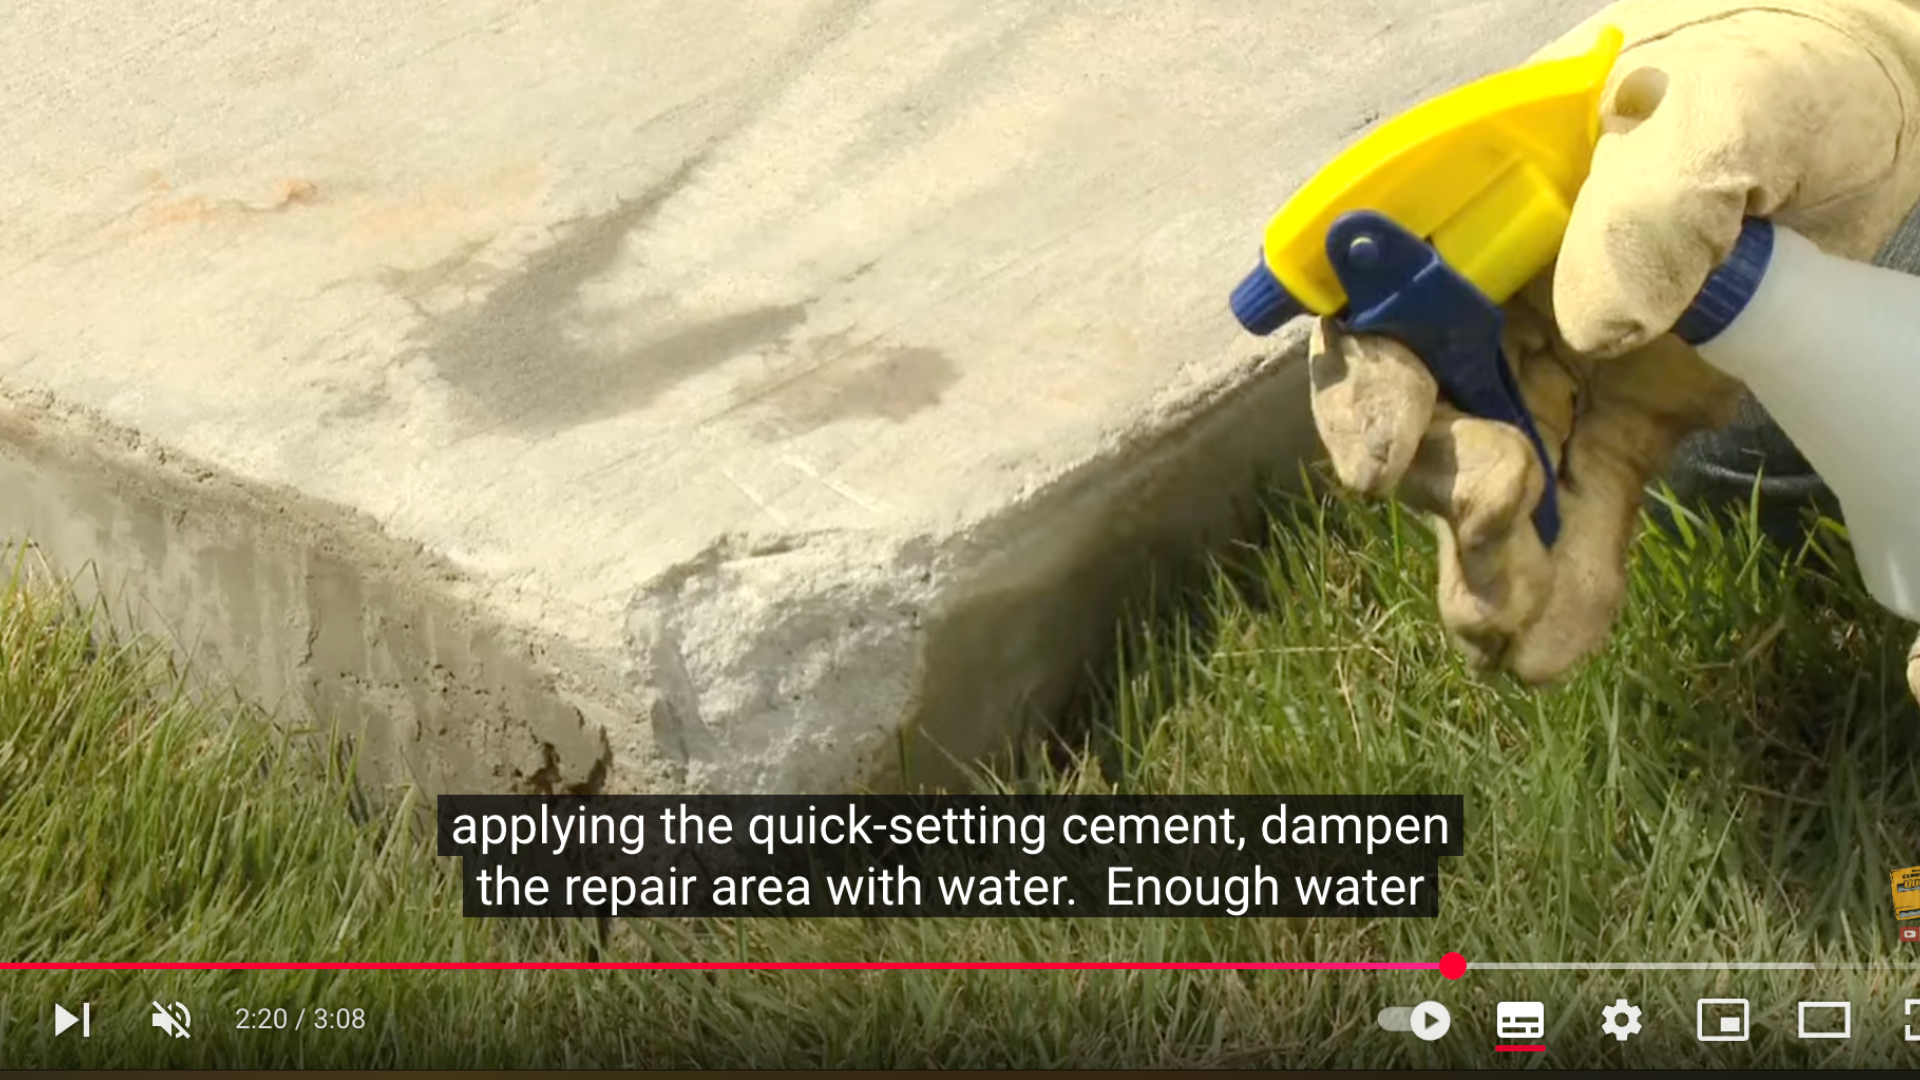
Before applying the cement mix, lightly moisten the area to be repaired.
The purpose is to ensure the surface is sufficiently hydrated to prevent drawing moisture from the fresh cement too rapidly.
However, make sure to remove any standing water by wiping it away or allowing it to drain off; a moist, but not saturated, surface is ideal.
The surface improves adhesion and reduces the risk of early drying, which can lead to shrinkage cracks.
Step 5: Apply the Quick-Setting Cement
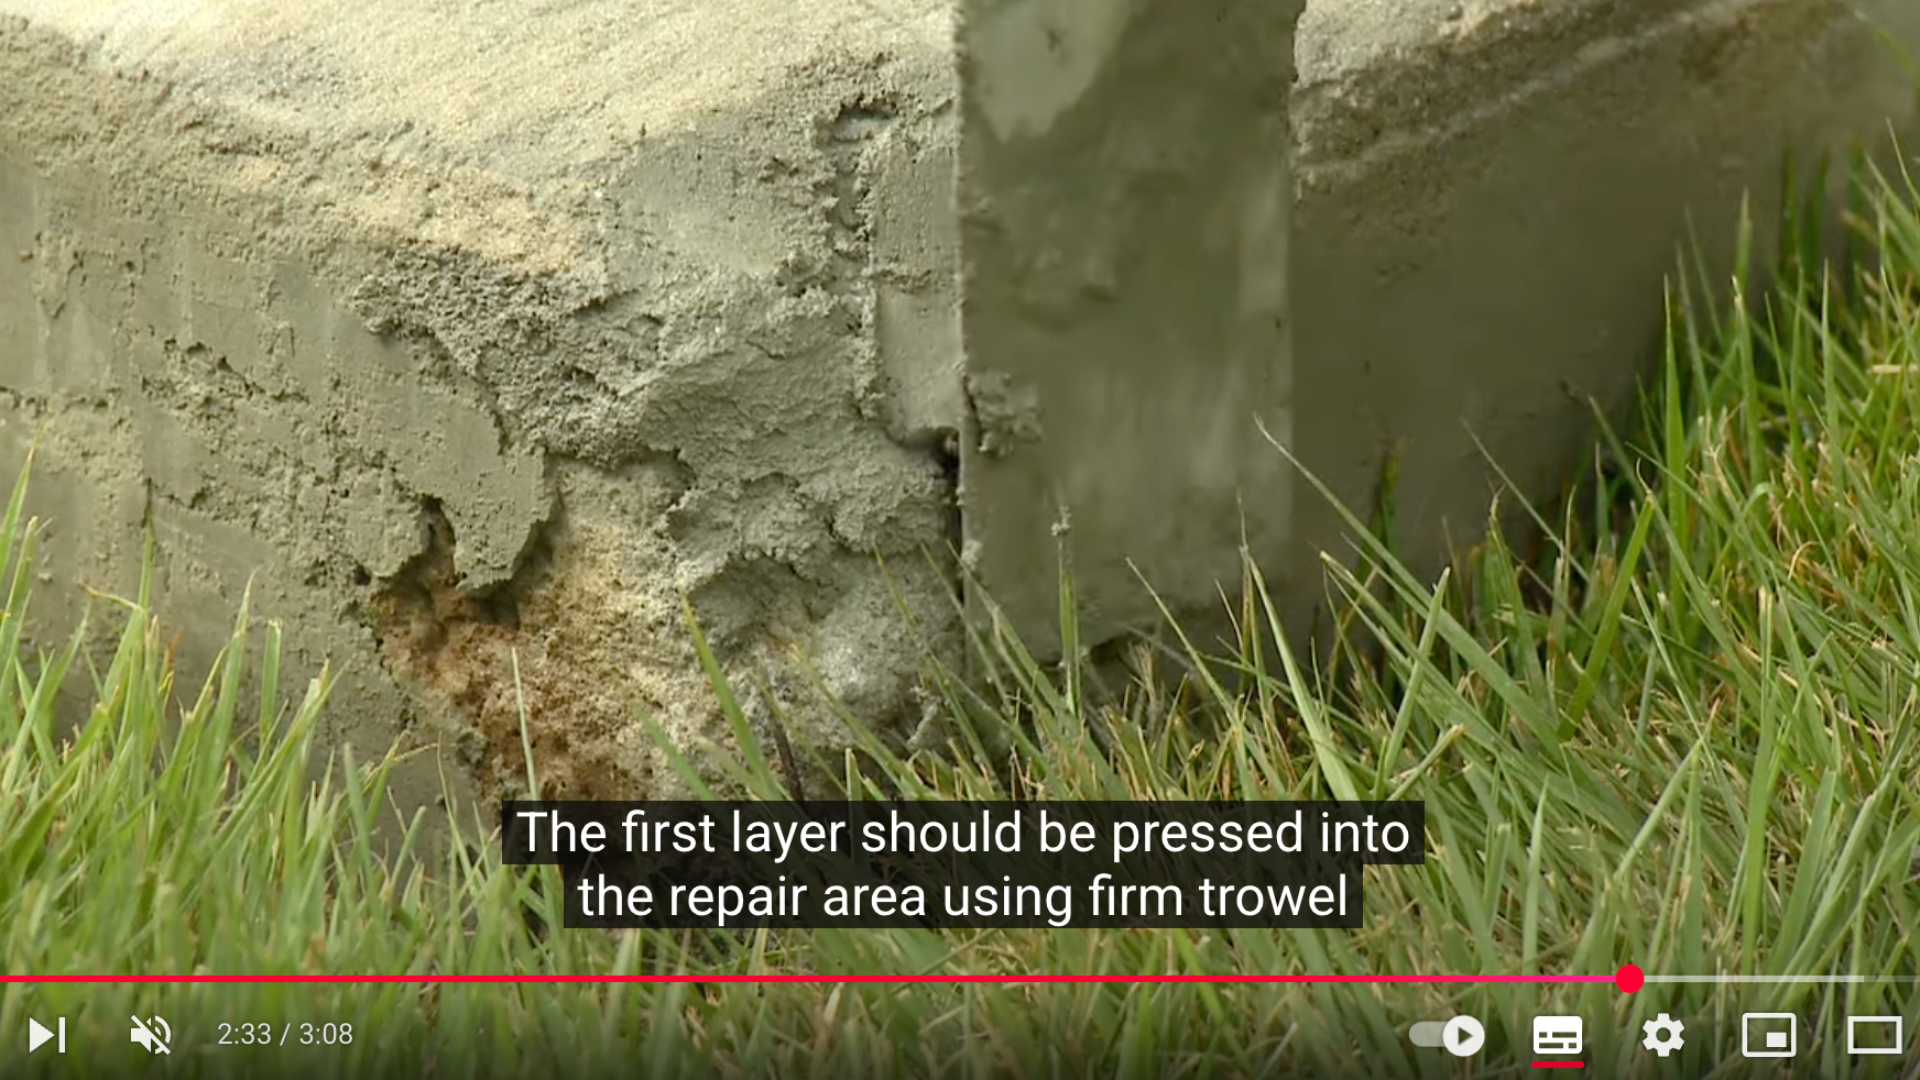
Start applying the mixed quick-setting cement using a margin trowel. Press the material firmly into the repair area to ensure it bonds well with the existing concrete.
Add the material in multiple passes instead of all at once; this technique helps maintain its form and prevents it from slumping.
Apply sufficient pressure to the initial layer to fill any gaps.
Continue applying until the patch slightly exceeds the original surface level. This extra thickness provides the necessary allowance to shape and smooth the edge.
Step 6: Shape the Repair
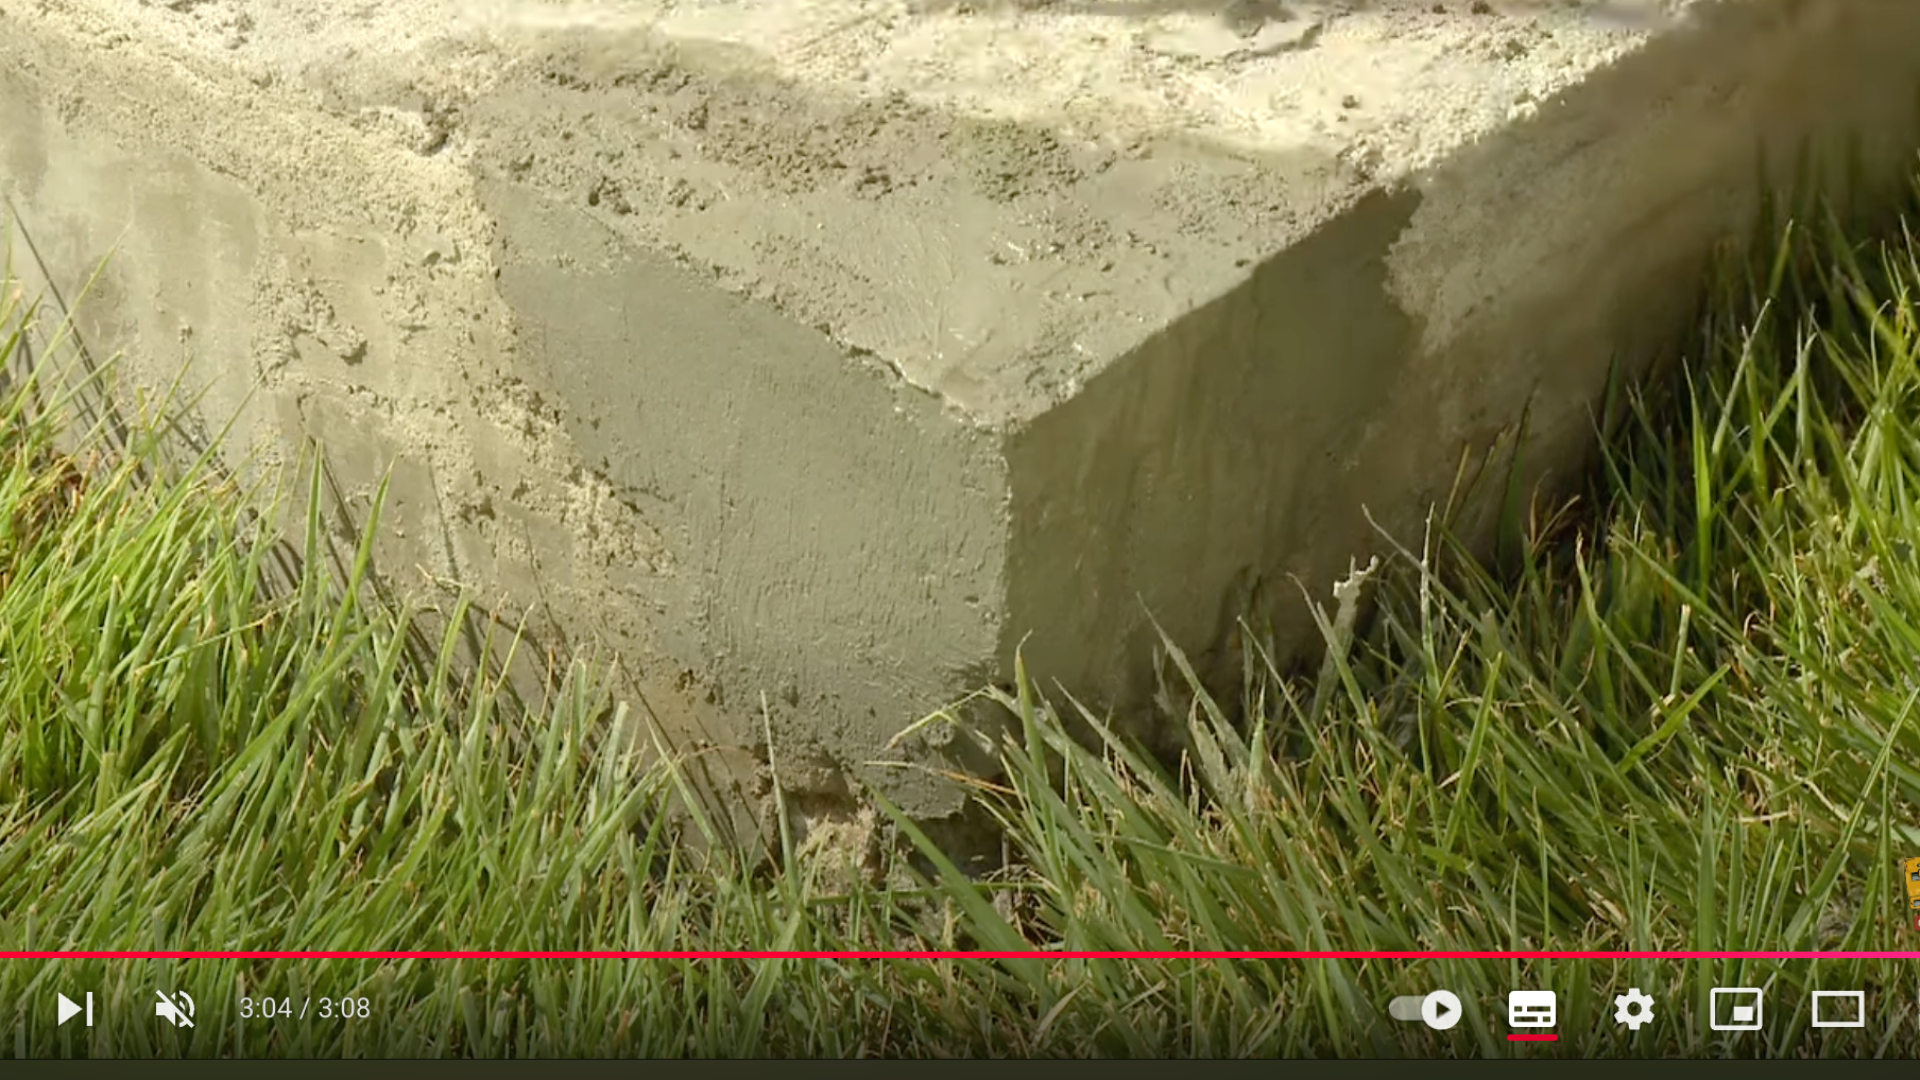
After five to ten minutes, the patch will become “thumbprint hard,” meaning it’s firm but still workable.
At this point, use the edge of your margin trowel to trim and refine the cement.
Try to match the original edge or corner profile of the damaged concrete so the repair aligns smoothly with the surrounding surface.
Since the cement is partially set, it will maintain its form and resist shifting as you work. This is the final opportunity to shape it accurately, so work carefully to achieve a clean finish.
To fully understand how the process unfolds, I suggest watching the video linked here by QUIKRETE.
It offers a detailed, easy-to-follow visual guide that complements the written instructions and enhances your overall understanding.
Tips for Success
- Work Fast: Since the cement sets quickly, prep everything before mixing.
- Layer Smart: Don’t try to build the shape in one go. Work in layers for a stronger hold.
- Cure in Hot Weather: If the temperature is above 90°F, lightly mist the patch for 24–48 hours to prevent cracks.
- No Forms Needed: Thanks to its thick texture, QUIKRETE Quick-Setting Cement holds shape without needing molds.
Safety Tips
Concrete work may seem simple, but it still poses some risks. Staying safe helps you avoid injuries and keeps the job running smoothly.
- Always Wear Protective Gear: Wear gloves, safety glasses, and a dust mask. Wet concrete and dust can harm your skin and eyes. I never start a repair without suiting up first.
- Don’t work on rainy or Very Hot Days: rain can interfere with curing, and heat can cause concrete to dry too quickly and crack. Choose a mild, dry day for the best results.
- Keep Kids and Pets Away Until Fully Cured: Concrete needs time to harden. Stepping on it too soon can ruin the surface or cause injuries. I once had to redo a slab because my dog walked over it too early.
Prevent Future Concrete Damage
Once you’ve repaired your concrete, it’s a good idea to keep it protected. A few simple steps can help it last much longer.
- Seal Concrete Every Few Years: A good sealer prevents water, stains, and chemicals from penetrating the surface.
- Avoid Heavy Vehicles on Slabs: Concrete can crack under too much weight. Don’t park trucks or equipment in areas not designed for them, such as walkways or patios.
- Fix Drainage Issues: Water pooling around the concrete weakens the base, causing cracks to form. Make sure your yard slopes away from slabs and clean your gutters regularly.
- Cut Tree Roots Near Slabs: Roots push up and break concrete over time. I had to remove a tree near my sidewalk once, and it saved me from more costly damage later.
When to Call a Pro?
Some concrete problems are just too big to handle on your own. If you’re unsure what’s causing the damage or the slab appears unsafe, it’s time to bring in an expert.
- Deep cracks across slabs. These often mean structural problems. A professional can check if the base is shifting or if the entire area needs to be replaced.
- Large or sinking driveways. If a whole section of your driveway is sinking, it may need lifting or a complete rebuild. This type of job requires specialized tools and training.
- You’re unsure of the cause. Guessing can lead to the wrong fix. I once spent hours patching a crack that kept coming back; turns out the soil underneath was the real issue.
How Much Does It Cost?
Fixing broken concrete doesn’t always mean a big bill. The cost depends on the extent of the damage and who is doing the work.
- DIY Repair: You can expect to spend $10 to $100 if you do it yourself. That covers patch kits, fillers, and basic tools. I once repaired a chipped step for under $30 with a small bucket of patch compound.
- Professional Fix: Hiring a professional costs more, typically ranging from $250 to $2,500. Crack repairs are on the lower end, while lifting or replacing large slabs will incur higher costs.
Conclusion
Fixing broken concrete doesn’t have to be hard.
With a little planning and the right materials, I’ve found that many repairs are totally doable on your own.
The key is to catch problems early. I’ve learned that small cracks or chips can quickly turn into bigger issues if left unattended.
It could be your driveway, sidewalk, or patio. If I see damage, I pay attention and act quickly.
Here’s what I focus on: identifying the damage, selecting the appropriate repair method, ensuring safety while working, and taking steps to prevent it from happening again.
Once I got the hang of it, fixing concrete no longer felt like a chore. It felt like an upgrade. It saves money, improves safety, and makes the space look significantly better.