
A DIY swing bed is a great way to add comfort and style to your outdoor space. Whether you want a cozy spot to relax, read a book, or enjoy the fresh air, building your own swing bed is a fun project that lets you customize it to fit your space and taste.
Not only will you save money by making it yourself, but you’ll also get the satisfaction of creating something beautiful and functional for your home. In this blog, I’ll walk you through the process of planning, building, and installing your very own swing bed.
This blog covers everything you need to know, from choosing the right materials to hanging it securely. So, grab your tools and get ready to make a relaxing space that you’ll enjoy for years.
What Is a Swing Bed?

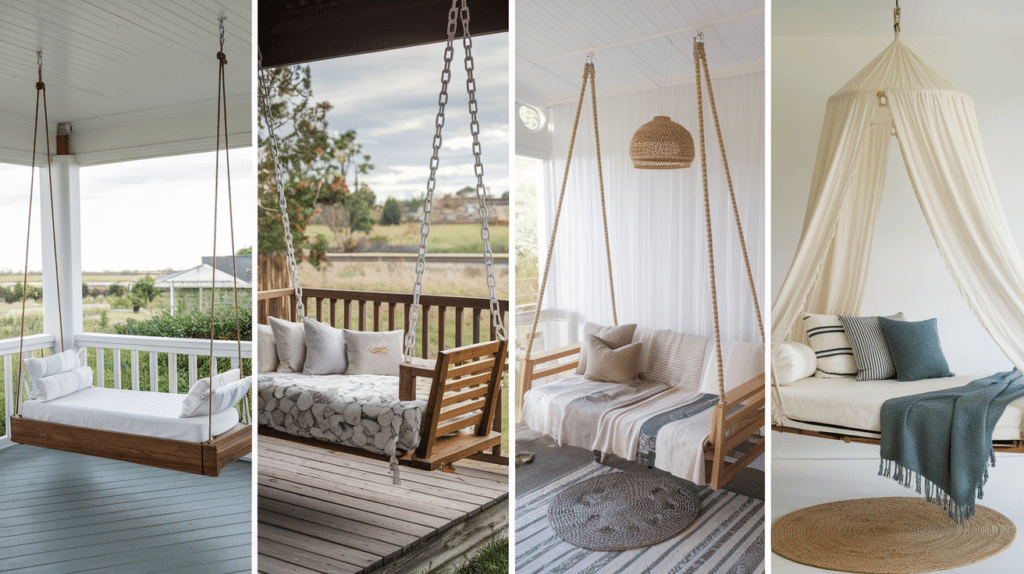
A swing bed is a cozy, comfortable bed that’s suspended from a frame or ceiling, allowing it to swing gently like a hammock.
It’s perfect for outdoor spaces like patios, porches, or gardens and offers a relaxing place to nap or read. Imagine a bed with a mattress, but instead of resting on the ground, it hangs from sturdy ropes or chains. The gentle rocking motion adds a calming feel, making it an ideal spot for relaxation.
Swing beds are great for adding both comfort and style to your outdoor area. They can be customized to fit your space and design preferences. If you want a place to relax by yourself or enjoy the outdoors with family and friends, a swing bed is a fun and unique addition to your home.
Benefits of a DIY Swing Bed
Building your own swing bed comes with a lot of great benefits. There are many reasons why you might want to take on this fun project:
-
Cost-Effective: Making your swing bed can save you money. Instead of buying a pre-made one, you can use affordable materials and build it yourself, while still getting a stylish piece for your outdoor space.
-
Customization: When you build a DIY swing bed, you get to choose the size, style, and materials. You can make it fit perfectly in your space and match your outdoor decor exactly how you want.
-
Satisfaction of Creating It Yourself: There’s something special about building your own furniture. Completing the project gives you a sense of pride and satisfaction, knowing you created something unique for your home.
-
Comfort and Relaxation: A swing bed offers a relaxing spot to unwind. The gentle rocking motion helps reduce stress, making it a perfect place to nap, read, or enjoy the outdoors.
-
Adds Charm to Your Outdoor Space: A swing bed is a great way to add style and charm to your patio, porch, or backyard. It becomes a standout feature that’s both functional and beautiful.
Building a DIY swing bed not only gives you a comfy spot to relax, but it’s also a fun and rewarding project that makes your outdoor space even better!
Planning Your Swing Bed
Before you start building your swing bed, it’s important to plan out every detail. Proper planning will make the construction process easier and ensure your swing bed is both comfortable and safe.
1. Choosing the Right Location
- Find a Sturdy Area: Look for a solid and level spot on your porch, patio, or in your backyard. Make sure the area can support the weight of the swing bed and the people using it.
- Consider the View: Think about where you want to place your swing bed for the best views. If it’s outside, you might want to face a beautiful garden or overlook a scenic area.
- Check for Safety: Avoid areas with low-hanging branches or close proximity to sharp objects. Ensure the space around the swing bed allows for safe movement.
2. Selecting Materials
- Wood: Choose weather-resistant wood such as cedar, redwood, or pressure-treated pine. These types of wood are durable and can withstand outdoor elements.
- Metal: For a more industrial look, metal framing is a good choice. Steel or wrought iron are strong options for support structures.
- Ropes or Chains: If you want a traditional hanging swing bed, you’ll need strong, durable ropes or chains. Make sure they are rated for outdoor use and can hold the weight of the bed.
- Cushions and Mattresses: Choose a thick, comfortable mattress or cushion made for outdoor use. Choose fabrics that are UV-resistant and water-repellent to withstand the elements.
3. Determining Size and Design
- Size: Decide if you want a smaller swing bed for one person or a larger one that can seat multiple people. Measure the area where you’ll place the swing bed to ensure it fits comfortably.
- Design Style: Decide on the design of your swing bed. It can be as simple as a platform bed or you can add features like a backrest, armrests, or even a canopy for extra shade.
- Height and Hanging Mechanism: Plan how high you want the bed to hang. Make sure the height allows for a comfortable swing without hitting the ground. You’ll also need to decide how the swing will be suspended (via chains, ropes, or a fixed frame).
4. Weight Support and Stability
- Check the Weight Capacity: Make sure the swing bed can hold the combined weight of the mattress, cushions, and anyone who will be using it. Add extra support if needed.
- Secure the Hanging System: If you’re hanging the swing from a ceiling or beam, make sure the structure is strong enough to support the weight. If you’re using a freestanding frame, ensure it’s designed for stability.
5. Weather Considerations
- Outdoor Durability: Ensure the materials you choose are weather-resistant. Wood should be sealed or stained to prevent damage from moisture, and fabrics should be mildew-resistant and UV-protected.
- Maintenance: Plan how to maintain the swing bed, especially if it’s exposed to harsh weather. For example, you might want to cover the mattress and cushions during rain or snow.
By carefully planning the location, materials, design, and safety features of your swing bed, you’ll be setting yourself up for a successful and enjoyable DIY project. Make sure to take your time with each step to ensure your swing bed is not only eye-catching but also safe and long-lasting.
Materials and Tools Needed
- Wood (cedar, redwood, or pressure-treated pine)
- Strong ropes or chains (galvanized steel recommended)
- Mattress or outdoor cushions
- Wood screws, nails, and wood glue
- Outdoor paint or sealant (for wood protection)
- Saw (circular or miter)
- Drill and drill bits
- Measuring tape
- Screwdriver
- Carpenter’s square
- Sandpaper or sander
Step-by-Step DIY Guide to Building a Swing Bed
Building a swing bed is a rewarding project that will add both comfort and charm to your outdoor space. Follow these simple steps to create your own swing bed.
Step 1: Measure and Plan Your Space
- Start by measuring the area where you want to hang your swing bed. Make sure you have enough space for the bed to swing comfortably without hitting walls or obstacles.
- Decide on the size of your swing bed based on available space and the number of people you want it to seat.
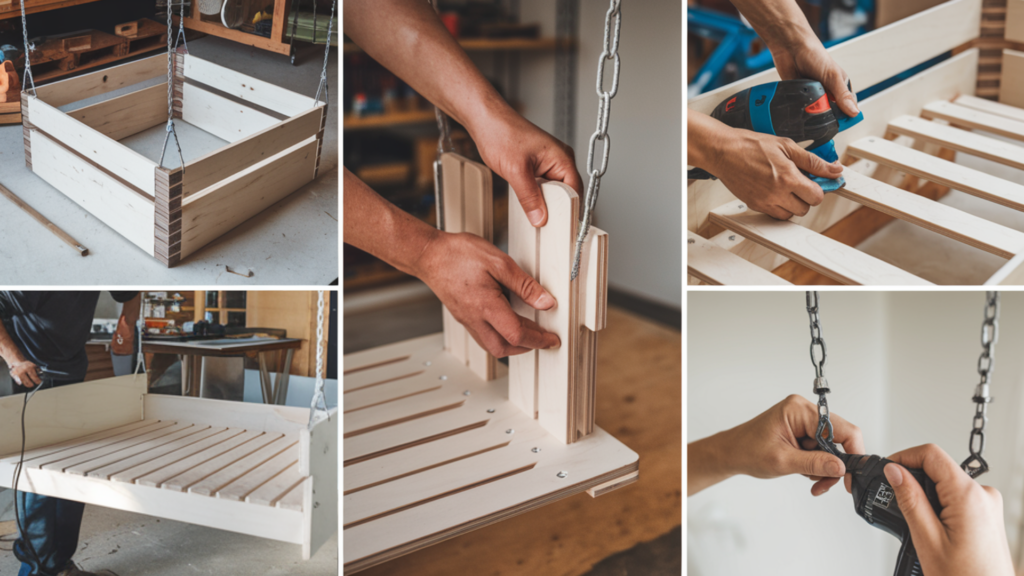
Step 2: Build the Frame
- Cut the Wood: Using your measurements, cut the wood pieces for the frame. You’ll need two long-side pieces, two short-end pieces, and cross slats for the base.
- Assemble the Base: Lay the long side pieces parallel to each other and attach the shorter end pieces to form a rectangular frame. Use wood screws to secure the corners and add wood glue for extra strength.
- Install the Slats: Place the cross slats evenly across the frame to support the mattress. Screw them in place, leaving small gaps between each slat for ventilation.
Step 3: Build the Backrest (Optional)
- Construct the Backrest Frame: Cut two vertical posts to the desired height for the backrest. Attach horizontal slats between the posts to create a sturdy backrest.
- Attach the Backrest: Secure the backrest frame to the rear of the base using wood screws. Ensure the backrest is at the correct angle for comfort.
Step 4: Sand and Finish the Frame
- Use sandpaper or a sander to smooth out any rough edges and surfaces. This will ensure that the swing bed is comfortable and safe to use.
- After sanding, apply a coat of outdoor paint or wood sealant to protect the wood from weather damage. Let it dry completely.
Step 5: Install the Hanging Hardware
- Mark Hanging Points: Measure and mark the spots where you will attach the swing to the ceiling or support beams. Make sure these points are aligned and spaced evenly for balance.
- Install Eye Bolts or Ceiling Hooks: Drill pilot holes at the marked locations and install heavy-duty eye bolts or ceiling hooks that are rated to hold the swing bed’s weight.
- Attach the Chains or Ropes: Cut the chains or ropes to the desired length, ensuring the swing hangs at a comfortable height. Attach one end of each chain or rope to the eye bolts or ceiling hooks and the other end to the four corners of the swing bed.
Step 6: Hang the Swing Bed
- Lift and Hang: With the help of a friend, carefully lift the swing bed and hang it from the chains or ropes. Check that it hangs level and swings freely.
- Adjust Height: If needed, adjust the length of the chains or ropes to ensure the swing bed is at the perfect height for sitting or lounging comfortably.
Step 7: Add Cushions and Comfort
- Place the Mattress or Cushions: Lay the mattress or cushions on the swing bed frame. Choose cushions made for outdoor use to withstand the elements.
- Decorate: To make the space even cozier and more inviting, add pillows, blankets, or a canopy.
Step 8: Test the Swing Bed
- Gently test the swing bed by sitting on it and giving it a little push to ensure it swings smoothly. Check the hardware to ensure everything is secure and properly installed.
- If the swing wobbles or is unstable, tighten the bolts or adjust the ropes to ensure it is safe for use.
Once everything is in place, your swing bed is ready for use. Relax and enjoy your new cozy outdoor retreat. Building a swing bed is a fun and satisfying project that enhances your outdoor space. With the right materials, tools, and a little bit of time, you can create a functional spot to relax and enjoy the outdoors.
Budgeting for Your DIY Swing Bed Project
When planning a DIY swing bed project, it’s important to budget for both materials and tools. Keeping track of potential costs can help you stay under budget and ensure you get the most value from your project.
1. Materials
-
Wood (Cedar, Redwood, Pressure-Treated Pine): $100 – $250
The cost depends on the type of wood and the size of the swing bed. Cedar and redwood are more expensive but offer better durability for outdoor use. -
Chains or Ropes: $20 – $50
High-quality, weather-resistant ropes or chains are essential for safety. Galvanized steel chains, which cost around $20 to $30, are a popular choice. -
Screws, Nails, and Wood Glue: $15 – $30
Basic hardware costs will vary, but you’ll need screws, nails, and wood glue to assemble the frame. -
Outdoor Mattress or Cushions: $100 – $300
Depending on the size and quality of the cushions or mattress, prices can range from $100 to $300 for a queen-sized option made for outdoor use. -
Outdoor Paint or Sealant: $20 – $50
A good outdoor paint or sealant is necessary to protect the wood from weathering. It also adds a finishing touch to the swing bed.
2. Tools
If you don’t already own some of the tools required, you may need to purchase or rent them:
- Circular Saw: $40 – $100
- Drill: $30 – $80
- Sander or Sandpaper: $10 – $40
- Measuring Tape and Carpenter’s Square: $10 – $20
- Screwdriver: $10 – $30
If you already have the necessary tools, you can save money. Otherwise, renting tools from a hardware store is an affordable option, usually costing around $15 – $30 per day.
3. Additional Costs
-
Decor (Optional): $20 – $100
Depending on your style, adding personal touches like pillows, blankets, or decorative items can cost between $20 and $100. -
Support Structure (If Needed): $50 – $200
If you don’t have a suitable overhead structure to hang the swing from, you might need to build or purchase a freestanding frame, which will add extra costs.
Total Estimated Cost:
- Low Budget: $250 – $350
- Mid-Range Budget: $350 – $600
- High-End Budget: $600 and up
By planning and budgeting for each material and tool, you can create a beautiful DIY swing bed without breaking the bank. Consider shopping around for deals and using reclaimed wood for even more savings.
Maintenance Tips for Your Swing Bed
-
Regular Cleaning: Wipe down the frame and cushions regularly to remove dirt and dust. Use mild soap and water for the wood and a gentle fabric cleaner for the cushions.
-
Check Hanging Hardware: Inspect the chains, ropes, or hanging hardware regularly for signs of wear or rust. Tighten any loose screws or bolts.
-
Reapply Sealant or Paint: To protect the wood, apply a fresh coat of outdoor sealant or paint annually to prevent weather damage.
-
Protect the Cushions: If your swing bed is exposed to rain, cover the cushions or store them when not in use to avoid water damage or fading.
-
Inspect for Stability: Periodically check the swing’s structure for stability and make sure it’s securely attached to the support beams.
By keeping up with these simple maintenance tasks, you’ll ensure your swing bed remains comfortable and durable for years.
Conclusion
Building your own DIY swing bed is a rewarding project that adds both comfort and functionality to your outdoor space. With the right materials, tools, and a little patience, you can create a customized swing bed that perfectly fits your style and needs.
Not only does a swing bed provide a cozy spot to relax, but it also enhances the look of your patio, porch, or backyard. Whether you choose to hang it from a ceiling or build a freestanding frame, the possibilities are endless.
Remember to plan your project carefully, stay within your budget, and choose durable materials that will hold over time. By following the steps of this blog, you’ll enjoy a relaxing, stylish outdoor retreat for years to come.
Frequently Asked Questions
Can I make a swing bed without a mattress?
Yes! Some people use thick cushions or a custom-built platform for seating instead of a mattress. You can choose any option that works best for comfort and style.
Can I customize the design of my swing bed?
Absolutely! You can adjust the size, add armrests, backrests, or a canopy, and choose different materials to fit your personal style and outdoor decor.
How long does it take to build a DIY swing bed?
Depending on your skill level and the complexity of the design, it typically takes 1-2 days to build and install the swing bed. Allow additional time for drying if you’re applying paint or sealant.