
When I first started learning about ADA grab bars for bathrooms, I quickly realized that correct placement is about much more than just meeting regulations.
It’s about creating a safe space where everyone, whether young or elderly, mobile or needing support, can feel confident and independent.
Installing grab bars properly means paying close attention to the exact measurements, angles, and locations that provide the most help. I know it can feel overwhelming at first, but you’re not alone.
In this guide, I’ll walk you through the key ADA standards, show you the best spots to place grab bars around toilets, showers, and tubs, and share practical tips to help make your bathroom safer and more accessible.
Together, we’ll make sure your bathroom works for everyone who uses it.
What Are ADA Grab Bars?
ADA grab bars are specially designed support bars installed in bathrooms to help people with mobility challenges maintain balance and safety.
The Americans with Disabilities Act (ADA) sets strict standards for these bars to ensure they provide reliable support.
These guidelines cover where grab bars should be placed, how high they should be mounted, and the type of materials used.
Grab bars are essential because they reduce the risk of falls, especially in wet, slippery areas like showers and around toilets.
They give users confidence and independence by offering sturdy handholds to help with sitting, standing, and moving safely.
Properly installed ADA grab bars make bathrooms accessible to everyone, regardless of age or ability, creating safer, more inclusive spaces.
ADA Requirements for Grab Bar Installation
Before placing grab bars, it’s crucial to understand ADA standards designed to maximize safety and usability.
- Height: Grab bars must be mounted between 33 and 36 inches above the finished floor. This height range is comfortable for most users, whether standing or sitting.
- Diameter: Bars should have a diameter between 1¼ and 1½ inches to provide a secure grip without being too bulky or slippery.
- Clearance: There should be at least 1½ inches of clearance between the grab bar and the wall to allow users to wrap their hands around the bar comfortably.
- Strength: Grab bars must support at least 250 pounds of force, so secure mounting into studs or with appropriate anchors is essential to ensure they hold firm under stress.
- Length and Placement: The length and location vary depending on the bathroom fixture (toilet, shower, tub), and exact measurements must be followed for compliance.
Grab Bar Placement in Key Bathroom Areas
Correct grab bar placement in toilets, showers, bathtubs, and transfer areas is vital for safety and accessibility. Following ADA guidelines ensures reliable support, reduces falls, and enhances independence for users with mobility needs.
1. Grab Bar Placement in Toilet Areas
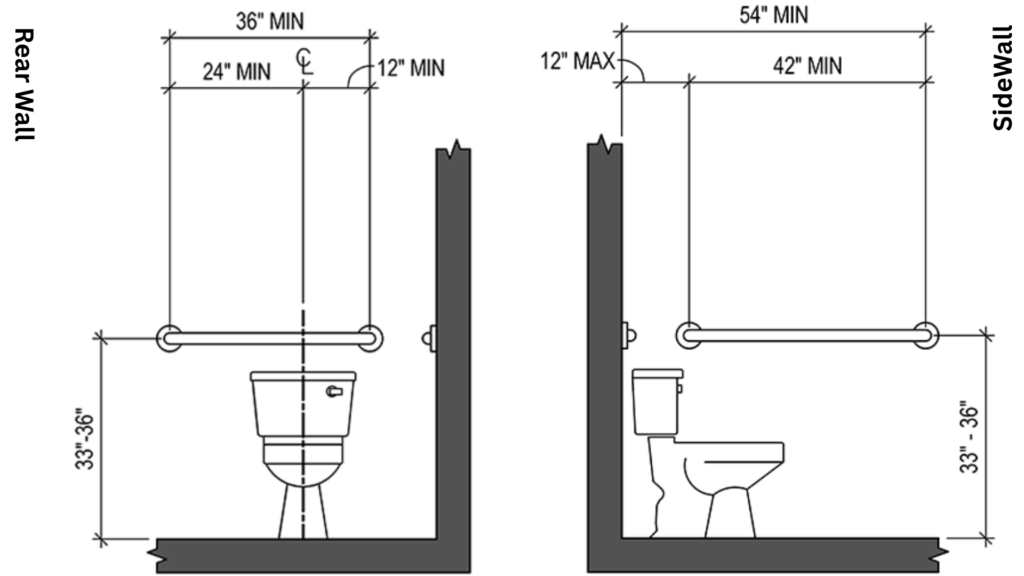
The toilet is a primary focus area for grab bar installation because many users need support when sitting down or standing up.
| Grab Bar Location | Length | Height from Floor | Placement Details |
|---|---|---|---|
| Side Wall Grab Bar | At least 42 inches | 33 to 36 inches | Mount horizontally on the side wall closest to the toilet, starting no more than 12 inches from the rear wall. |
| Rear Wall Grab Bar | At least 36 inches | 33 to 36 inches | Mounted horizontally on the wall behind the toilet, centered behind the toilet bowl. |
2. Grab Bars in Shower Stalls
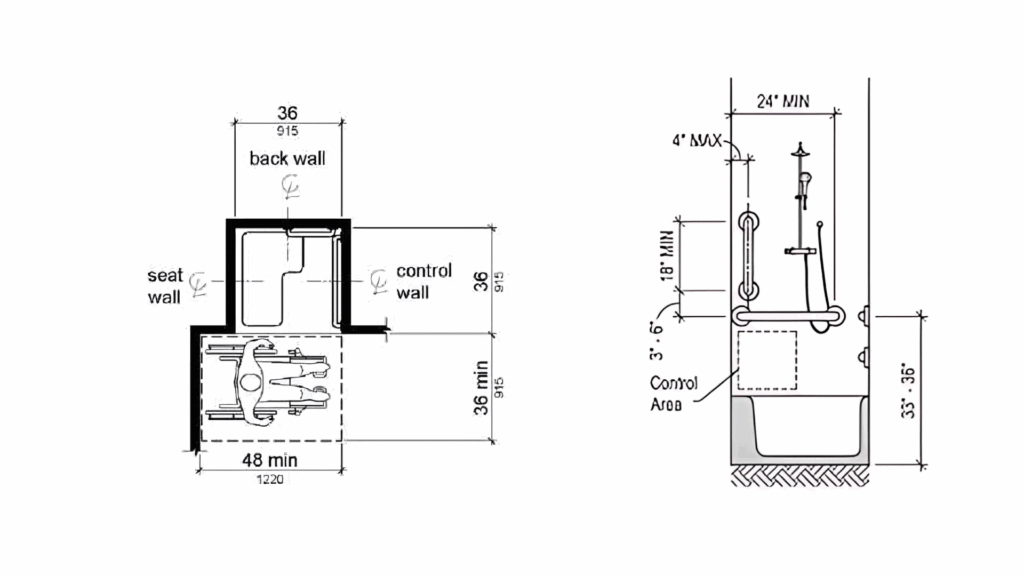
Showers present a greater risk of slipping, so grab bar placement here is especially important.
- Horizontal Bars: Should be mounted on the control wall and the back wall.Between 33 and 36 inches above the floor.Typically 24 inches on the control wall and 36 inches on the back wall.
- Vertical Bars: Optional but helpful near the shower entrance for extra stability. Bottom of vertical bar between 36 and 39 inches above the floor, placed 3 to 6 inches above the horizontal bar.
- Height and Length Specifications: Bars must be long enough to provide continuous support but not obstruct fixtures like shower seats. Position bars so they’re easy to reach from a seated or standing position.
3. Grab Bars in Bathtubs
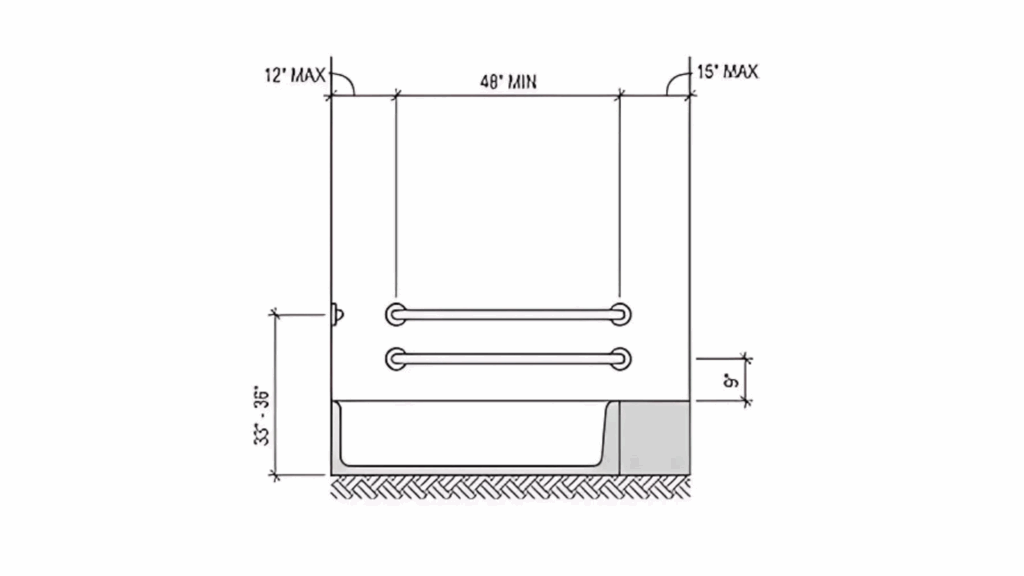
Bathtubs also require specific grab bar placement to assist users entering, exiting, and moving safely.
- Longitudinal Bar: Along the back wall, at least 36 inches long, 33 to 36 inches above the floor.
- Control Wall Bar: At least 24 inches long near the faucet and controls.
- Additional Bars: Vertical bars near the entrance or tub edge for extra support during transfers.
Tip: Properly placed grab bars reduce falls while stepping in and out of the tub.
Choosing the Right Grab Bar Materials and Styles
Choose bars that match your décor while prioritizing safety and functionality. Grab bars come in various materials and finishes to fit your bathroom’s style and needs.
| Grab Bar Type | Grip Comfort | Safety Features | Style Options | Best For |
|---|---|---|---|---|
| Stainless Steel | Firm, smooth | Rust-resistant, strong in wet areas | Basic to modern finishes | Long-term durability in wet environments |
| Plastic-Coated | Soft, warmer to touch | Improved visibility, non-slip surface | Multiple colors available | Users needing a softer, high-contrast option |
| Textured Finishes | Enhanced grip | Reduces slip when wet | May be limited in design options | Slippery conditions like showers and tubs |
| Decorative Styles | Varies by material | Combines safety with visual appeal | Brushed nickel, matte black, etc. | Design-conscious users prioritize aesthetics |
Common Mistakes in ADA Grab Bar Layout
Proper planning and installation prevent these issues, ensuring a safe and compliant bathroom.
- Incorrect height placement: Bars placed too high or too low reduce usability, making it harder for users to grip and maintain balance safely.
- Poor mounting: Improperly secured bars risk coming loose, causing accidents. Always mount into studs or solid backing for strength.
- Wrong length: Short bars limit the support area, making transfers and movement difficult. Ensure bars are long enough for a proper grip.
- Ignoring clearance: Insufficient space between the bar and the wall restricts the hand grip, decreasing safety. Maintain at least 1½ inches of clearance.
- Obstructed placement: Bars that are too close to controls or fixtures are hard to use. Clear access improves comfort and accessibility.
Tips for Making Your Bathroom Fully Accessible
Creating a truly accessible bathroom goes beyond just installing grab bars. It involves thoughtful additions, such as raised toilets, slip-resistant floors, and easy-access showers.
- Raised toilet seats: Raised seats make sitting and standing easier, reducing strain and improving safety for people with limited mobility.
- Non-slip flooring: Slip-resistant floors prevent falls by providing better traction, especially when surfaces are wet or slippery.
- Roll-in or walk-in showers: These showers feature no thresholds, enabling wheelchair users and individuals with mobility aids to enter safely and easily.
- Adjustable showerheads and handheld options: Flexible showerheads improve comfort and accessibility, allowing users to control water flow from various positions.
- Wide doorways and clear floor space: Wider entrances and open areas accommodate wheelchairs and mobility devices, improving bathroom usability and independence.
Conclusion
Getting the ADA grab bar layout right is more than just following rules—it’s about creating a safe and welcoming space for everyone in your bathroom.
I’ve learned that proper measurements, secure mounting, and thoughtful placement can significantly enhance safety and usability.
Whether you’re upgrading your current bathroom or building a new one, taking the time to understand and apply ADA guidelines will pay off.
You can choose to do it yourself or hire a professional, but either way, correctly installed grab bars help prevent falls and support independence.
If you’re ready to make your bathroom safer and more accessible, start with these layout tips.
You’ll create a space that works well for you, your family, and anyone who uses it. Let’s get started!
Frequently Asked Questions
What height should ADA grab bars be installed?
ADA grab bars should be mounted between 33 and 36 inches above the finished floor to ensure they are within comfortable reach and provide effective support for users.
How long should grab bars be near toilets?
Side wall grab bars near toilets should be at least 42 inches long, while rear wall bars should be at least 36 inches long to offer adequate stability and support.
Can grab bars be installed without wall studs?
Grab bars must be securely mounted into wall studs or solid backing to safely support at least 250 pounds, ensuring they provide reliable assistance and prevent accidents.