I never paid much attention to my coat closet. It was one of those spaces I just accepted, crammed with coats, boots, bags, and the occasional lost mitten.
Over time, it turned into a black hole for anything we didn’t know where else to put. One rainy Saturday, I opened the door, sighed at the mess, and decided it was finally time for a makeover.
I didn’t have a big budget or fancy tools, but I had a vision to turn that chaotic space into something clean, functional, and even a little pretty.
I spent the weekend clearing, painting, organizing, and styling it to fit my needs. The results? Game-changing.
If you’re staring at your own overcrowded closet and wondering where to begin, I’ve got your back. Let me show you how I took my coat closet from cluttered to calm: step by step.
Why a Coat Closet Makeover Is Worth the Effort?

A coat closet makeover may seem like a small project, but it can have a surprisingly big impact on the overall function of a home.
This entry closet sets the tone for organization, cleanliness, and mood the moment you walk in or out.
A well-organized coat closet helps streamline daily routines, making it easier to find jackets, shoes, umbrellas, or bags without having to dig through a mess. It saves time during busy mornings and eliminates the stress of clutter.
Adding extra rods, installing vertical shelves, or utilizing bins and hooks can significantly increase storage capacity without requiring additional square footage.
It also creates an opportunity to bring style into an often-overlooked space. Paint, wallpaper, or decorative lighting can turn a dull utility area into something visually appealing and cohesive with the rest of the home.
Once updated, the closet tends to stay more organized, encouraging better habits from everyone who uses it.
Whether the goal is better storage, easier access, or simply a tidier entryway, a coat closet makeover offers long-term benefits. It is a project well worth the time and effort.
Choosing a Theme or Style for Cohesion
Selecting a cohesive theme or style for the coat closet helps tie it seamlessly into the home’s overall look. Whether the home leans modern, rustic, or traditional, extending that design into the closet creates a unified look and feel.
A consistent style not only enhances visual harmony but also simplifies the decision-making process when choosing finishes, fixtures, and accessories.
Even in a small space, a well-defined theme can make a big impact. It turns the closet from a purely functional zone into a thoughtful, stylish extension of the home’s design.
- Scandinavian Simplicity: This look emphasizes clean lines, neutral colors, light wood tones, and a practical design. It’s perfect for small spaces, offering a calm, clutter-free feel.
- Farmhouse Beauty: Think warm wood accents, black hardware, wire baskets, and cozy textures. This theme blends rustic elements with functional storage.
- Vintage Glam: Incorporates bold wallpaper, gold or brass fixtures, and rich textures. Ideal for adding drama and beauty to a small, unexpected spot.
- Urban Utility: Features industrial elements like metal hooks, exposed wood, matte black finishes, and muted tones. It’s rugged, practical, and modern all at once.
Coat Closet Makeover: Step-By-Step Guide
Changing a coat closet is easier with a clear process. These steps cover everything from clearing out clutter and choosing a theme to installing smart storage and adding stylish touches ,perfect for creating a functional, beautiful space.
Materials Used and Their Purpose
Using the right materials is essential for a smooth and successful coat closet makeover. Each item plays a specific role in transforming the space from cluttered to custom-built.
- 2×4 Lumber: Used for building the support frame for the bench and drawer structure.
- Pocket Hole Jig & Screws: Helped join boards at strong angles without visible hardware.
- Stud Finder: Locate wall studs for securely attaching the frame and upper supports.
- Pre-primed Pine Shiplap: Added texture and a finished wall surface; easier to paint.
- Brad Nails & Nail Gun: Fastened trim, shiplap, and drawer faces cleanly and quickly.
- ½” Birch Plywood: Used to build durable, lightweight drawer boxes from leftover sheets.
- ¼” Plywood Panels: Covered pocket holes on drawer fronts for a cleaner finish.
- 1x4s and 1x1s: Created the face frame and trim around drawers for a custom-built-in look.
- Trim Pieces: Framed out the shiplap edges, giving the closet a polished, professional touch.
- Premium Wood Filler: Filled in nail holes and seams for a smooth painting surface.
- Sanding Sponges (120 & 240 grit): Smoothed wood and painted surfaces for finishing.
- Paint: Provided rich, dramatic color to walls and woodwork.
- Wagner Paint Stick EZ Roller: Made painting quicker and less messy by holding paint in the handle.
- Minwax Special Walnut Stain: Gave the bench and shelf a warm, rustic finish.
Step 1: Clear out And Clean the Closet

Begin by removing everything from the closet, including doors, shelving, and clutter. Give the space a thorough vacuum and wipe-down.
Clearing the area not only helps you visualize the design better but also ensures accurate measurements and a clean workspace.
This reset stage is essential for assessing the structure and preparing for any framing, repairs, or upgrades.
Step 2: Build the Frame for the Bench Area

Measure the closet’s width and depth, then cut 2×4 boards to fit. Use pocket holes to create clean joints and dry-fit the frame to test placement.
Once squared and level, attach the horizontal boards to the studs in the wall for strong support. This frame will later support the bench seat and should be both secure and well-aligned for stability.
Step 3: Install Drawer Support Boards

Add vertical support boards under the bench frame, positioned where drawers will go. These boards provide a structure to attach drawer slides and help stabilize the entire lower unit.
Though not connected to studs, they should be secured firmly in place. Position them with precision so drawer mechanisms align and operate properly within the closet structure.
Step 4: Attach Cross Supports and Upper Framing

Add cross pieces between horizontal supports using pocket holes, ensuring all parts are square and flush. This strengthens the frame and readies it for load-bearing tasks.
Double-check alignment with a level. The top framing will bear the weight of the bench and any seating activity, so take time to get the build accurate and secure.
Step 5: Prepare the Closet Walls for Shiplap

Remove any existing door hardware or trim to ensure a flat surface. If the closet had a shelf or rod, uninstall it to open the space.
Smooth out any uneven areas and confirm wall measurements before cutting materials. This step prevents interference when applying shiplap or trim later, giving the project a cleaner, more professional finish.
Step 6: Install the Shiplap Panels

Cut pre-primed pine or MDF shiplap to fit the closet walls. Use brad nails to secure each panel, working from the bottom up.
Adjust the width of certain boards for precise alignment. Shiplap adds a finished, decorative look and covers imperfections.
Maintain tight, even spacing throughout to create a uniform and visually appealing wall treatment.
Step 7: Build and Fit the Drawer Boxes

Construct drawer boxes using ½-inch birch plywood. Measure openings carefully, allowing for drawer slides and box clearance.
Cut sides, front, and back pieces, and assemble using pocket holes. Skip glue if future modifications are anticipated.
Ensure the boxes are square and slide smoothly into place. This step adds functional storage while enhancing the closet’s custom-built look.
Step 8: Install Drawer Slides and Boxes

Attach drawer slides to the vertical support boards, using spacers to maintain level and even placement.
Once mounted, slide in the drawer boxes and secure the slides to the boxes. Use scrap wood to maintain clearance during installation.
Proper alignment here ensures drawers glide smoothly and can handle regular use without loosening or jamming over time.
Step 9: Add Face Frame and Drawer Fronts

Create a face frame with 1x4s and 1x1s, attaching them around the drawer openings using brad nails.
This gives the lower unit a built-in look. For the drawer fronts, assemble rails and stiles with pocket holes, then cover with ¼-inch plywood panels.
Attach fronts to the boxes with a slight overlay and fill gaps or holes before painting.
Step 10: Trim and Paint the Interior

Use wood filler to patch holes and caulk to seal seams, and sand all surfaces smooth. Paint the closet interior using a high-quality brush and roller, or a paint stick roller for easier access.
Choose a durable, stylish paint color to match the home’s decor. Proper surface prep and painting elevate the finished look of the entire project.
Step 11: Install the Bench and Upper Shelf

Cut common boards to the correct dimensions for the bench seat and shelf. Sand thoroughly and stain with a wood finish like Minwax Special Walnut for warmth.
Attach boards with brad nails and secure supports underneath. This adds functionality and natural texture, completing the mudroom vibe while providing seating and overhead storage.
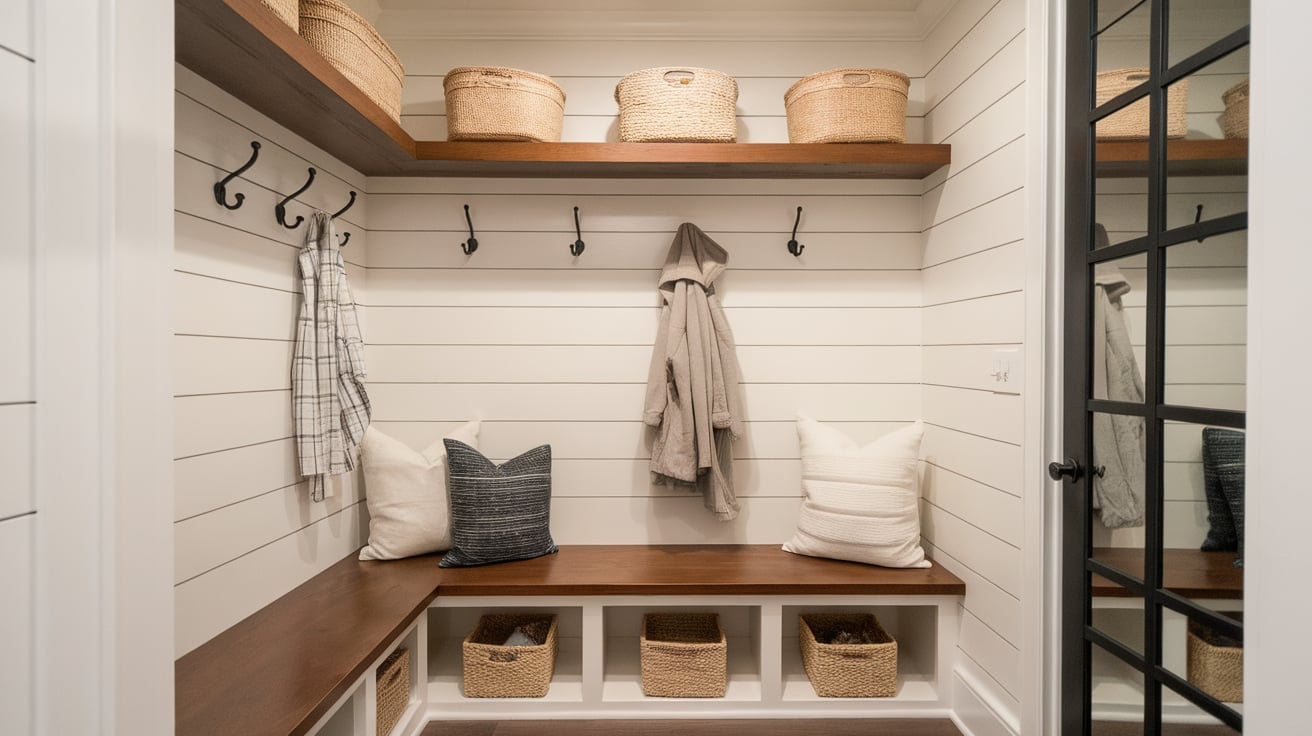
Step 12: Final Styling and Organization

With construction complete, add hooks, baskets, and decorative elements like cushions or wall art. Organize coats, shoes, and accessories neatly into their new designated spots.
The coat closet now functions as a mini mudroom, stylish, practical, and tidy. Final styling brings personality to the space and helps maintain long-term organization.
Recommended: You can watch this video by Glenda Chavezfor a clearer breakdown of the steps and to see the full makeover process in action. It’s a great visual reference to improve your results!
Tips for a Successful Coat Closet Makeover
Turn your entryway from chaotic to welcoming. Strategically declutter, maximize vertical space, and use smart storage solutions to create a highly functional and pleasing coat closet that serves your daily needs efficiently.
- Declutter Ruthlessly: This is the most crucial first step. Remove everything from the closet. Sort items into “keep,” “donate/sell,” “store elsewhere,” and “trash.” Be honest about what you actually use.
- Double Hanging Rods: Install a second rod below the main one for shorter items like kids’ jackets, vests, or folded pants, effectively doubling your hanging capacity.
- Shelving: Add shelves above the rod for hats, scarves, gloves, or bins of seasonal items. Adjustable shelves offer flexibility.
- Over-the-Door Organizers: Utilize the back of the closet door for hooks, hanging shoe organizers (great for accessories!), or shallow baskets for smaller items.
- Slim, Matching Hangers: Ditch bulky hangers and opt for slim, non-slip velvet or wooden hangers for a cohesive look and to save space.
- Bins and Baskets: Use clear or labeled bins for items that don’t hang well (gloves, scarves, hats) or for off-season items on higher shelves.
- Shoe Racks/Trays: Keep shoes off the floor with a multi-tiered shoe rack or a simple boot tray.
- Hooks: Install hooks on walls or the back of the door for items like umbrellas, dog leashes, or reusable bags.
- Consider Lighting: A motion-sensor battery-operated light can make a dark closet much more functional and pleasant.
- Regular Maintenance: Once organized, commit to a quick weekly or bi-weekly tidy-up to prevent clutter from accumulating again.
Common Mistakes to Avoid
Even with the best intentions, closet makeovers can go awry. This section highlights frequent missteps that undermine organizational efforts, from neglecting thorough decluttering to overlooking practical measurements
- Not Decluttering First: Trying to organize a closet full of unnecessary items is like trying to organize a junk drawer without emptying it. It’s a waste of time and effort.
- Overstuffing: Cramming too many items into the closet leads to wrinkles, difficulty finding things, and quickly negates any organizing efforts. Leave about 15-20% of the rod space open for easy access and air circulation.
- Ignoring Vertical Space: Only using the hanging rod and leaving empty space above or below is a huge missed opportunity, especially in small closets.
- Lack of a System: Simply putting things back wherever they fit without a designated spot leads to disorganization. Establish categories and zones.
- Not Measuring: Before buying any storage solutions, measure the dimensions of your closet (height, width, depth) to ensure everything fits properly.
Conclusion
If you’ve been waiting for the “right time” to tackle your coat closet, this is it. I put mine off for way too long, thinking it wasn’t important or would take too much effort.
But once I finally got started, I realized how satisfying it felt to create a space that actually works for me. A coat closet might be small, but the impact is big.
Every time I open the door now, I feel calm, not chaotic. You don’t need a huge budget or professional skills, just a weekend, some creativity, and a little determination.
Start small, stay consistent, and make it fun. Purge the extras, add your style, and build a system that lasts. You’ve got this.
So go ahead, pick your paint, roll up your sleeves, and create a coat closet you’ll love opening.