
Waiting for the wood stain to dry can bring any project to a standstill. It’s a common frustration, especially when time is tight, and the next step is on hold.
While most stains come with a “dry time” on the label, real-world results often vary. Temperature, humidity, stain type, and wood condition all play a part.
For those hoping to speed things up without messing up the finish, knowing what actually works matters.
This blog takes a closer look at how long wood stain really takes to dry and what can affect the process. It also shares simple, safe ways to help it dry faster and more evenly.
What is Wood Stain?
Wood stain is a finish that penetrates the wood surface and adds pigment, bringing out the natural grain and improving the appearance.
It’s different from paint, which sits on top of the wood. Stains can also offer some protection against water and wear, though they are often followed by a sealant or topcoat.
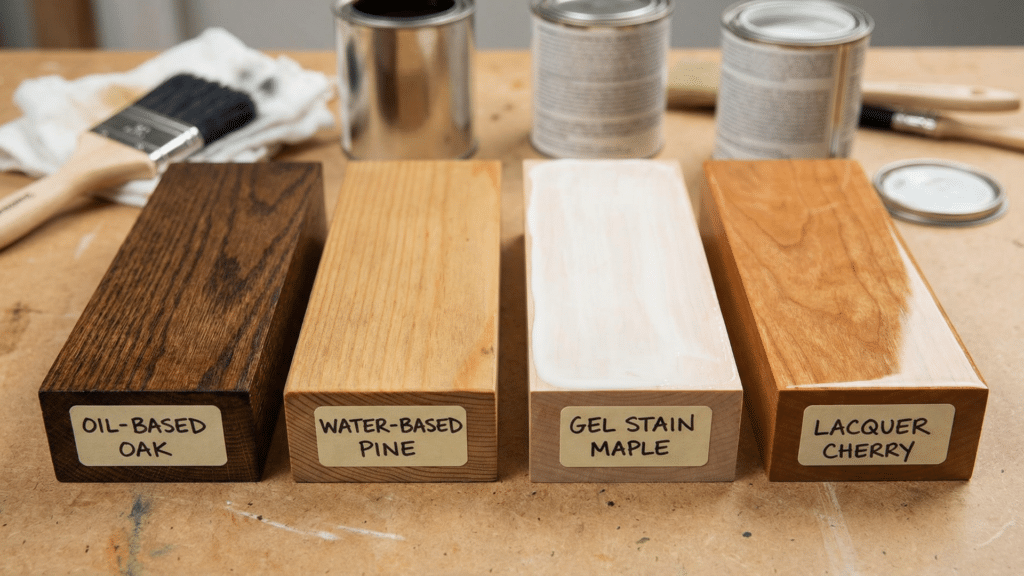
There are several types of wood stains, and each has a different base that affects how it dries:
- Oil-based stain
- Water-based stain
- Gel stain
- Lacquer-based stain
Understanding the differences is key to predicting dry time and planning your project.
Average Drying Time for Different Types of Stain
The drying time for wood stain can range from 1 hour to 72 hours, depending on the type of stain and conditions. Here’s a breakdown by stain type:
Oil-Based Stain
- Drying Time: 6–24 hours
- Cure Time: 72 hours or more
Oil-based stains are slower to dry but offer rich color and deep penetration. They’re a popular choice for outdoor furniture and hardwood flooring. The drying time can stretch longer in humid or cold environments.
Water-Based Stain
- Drying Time: 1–3 hours
- Cure Time: 24–48 hours
Water-based stains dry faster than oil-based options and are easier to clean up. These are ideal for indoor furniture or cabinets when time is a factor. However, they might not penetrate as deeply and could require multiple coats.
Gel Stain
- Drying Time: 8–24 hours
- Cure Time: 48–72 hours
Gel stains are thicker and behave more like paint. They tend to sit on the surface rather than soak in, so they take longer to dry, especially if applied too thickly.
Lacquer-Based Stain
- Drying Time: 15–30 minutes
- Cure Time: 12–24 hours
These stains dry quickly because their solvents evaporate quickly. However, they’re best left to professionals because of their strong fumes and quick set time, which can make them hard to control.
Difference Between Dry Time and Cure Time
Understanding the difference between dry time and cure time is essential to achieving the best results in any wood stain project. Here’s how they compare:
| Aspect | Dry Time | Cure Time |
|---|---|---|
| Definition | The time it takes for the stain to feel dry to the touch | The time it takes for the stain to fully harden and bond |
| Surface Condition | May feel dry but not ready for heavy use or topcoats | Fully set and safe for use, sealing, or heavy traffic |
| Next Step | Can apply a second coat or sealer after this point | Final stage, no further drying or chemical change needed |
| Typical Time Range | 1 to 24 hours, depending on stain type and conditions | 24 to 72 hours or more, depending on the environment |
| Risks of Rushing | Can cause smearing or uneven color | Can result in peeling, poor finish, or trapped moisture |
Factors That Affect Wood Stain Drying Time
Drying time isn’t always what the label says. Real-world conditions can significantly impact how long it actually takes for wood stain to dry.
1. Temperature
Wood stain dries best in temperatures between 60°F and 80°F. If it’s too cold, the stain may stay wet or tacky for much longer than expected.
Hot conditions can cause the surface to dry too quickly, trapping moisture inside. This can lead to uneven drying or peeling. Keeping a stable, moderate temperature helps the stain dry more evenly and on time.
2. Humidity
Humidity directly affects how fast the stain dries. High humidity slows down evaporation, keeping the wood surface damp for longer. Low humidity, on the other hand, allows moisture to escape more quickly and helps stains dry faster.
Try to work when the relative humidity is below 50% for the best results. In damp environments, consider using a dehumidifier to speed up the drying time of wood stain.
3. Air Circulation
Proper airflow is essential for quick, even drying. Stagnant air holds in moisture and slows down evaporation, making the stain take longer to dry. Good air circulation helps carry away the moisture and fumes from the surface.
Use fans or open windows to improve ventilation in indoor spaces. However, avoid pointing fans directly at the stain, which can cause streaks or dust to settle.
4. Type of Wood
Different wood types absorb stain at different rates. Softwoods like pine soak up stain quickly but may dry unevenly. Hardwoods such as oak or maple are denser and might resist absorption, slowing the drying process.
Wood that is too wet or freshly cut can also affect how the stain behaves. Make sure the wood is dry and acclimated to room conditions before applying any stain.
5. Surface Preparation
How the wood is prepped matters a lot. Smooth, sanded wood absorbs stain evenly and dries faster. Rough or glossy surfaces may resist the stain, causing it to sit on top and dry slowly.
Any dirt, oil, or leftover finishes can also block absorption. Always clean and sand the surface properly to ensure better stain penetration and reduce overall drying time.
6. Thickness of Application
Applying a thick layer of stain will significantly increase drying time. Thick coats trap moisture, leading to sticky surfaces and uneven drying.
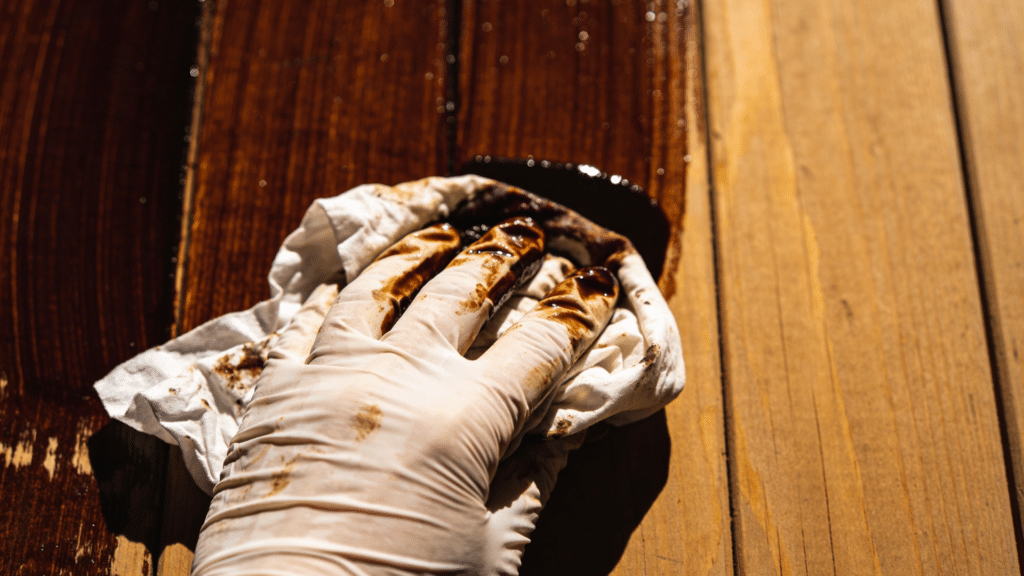
To avoid this, always apply a thin coat and wipe off any excess stain after a few minutes. This allows the stain to dry properly and prevents build-up. Thinner applications also help maintain a more even color and finish throughout the project.
Signs That Wood Stain is Fully Dry
To test if your stained surface is ready for a sealant or handling:
- Touch Test: The surface feels dry and not tacky.
- Smell Test: The strong odor has faded significantly.
- Wipe Test: A dry cloth wipes across the surface cleanly without picking up color.
If in doubt, wait an extra few hours. It’s better to be safe than to seal in a wet stain.
How to Speed Up Wood Stain Drying Time
If you’re working on a deadline, there are safe ways to help your stain dry faster. Here are some practical methods:
Apply Thin Coats
- Thin layers dry faster and more evenly.
- Use a brush or rag to wipe off excess stain after application.
Use a Fast-Drying Stain
- Water-based stains dry more quickly than oil-based stains.
- Some brands offer quick-dry formulas specifically made for fast turnaround.
Increase Air Circulation
- Place a fan nearby to keep air moving.
- Avoid blowing dust onto the surface.
Add Heat Carefully
- Use a space heater in colder conditions, but don’t aim it directly at the wood.
- Keep the room consistently warm, not just bursts of heat.
Lower the Humidity
- Use a dehumidifier in damp environments.
- Keep windows closed if outdoor humidity is high.
Use a Drying Tent (Optional)
- A plastic tent with a small heater or dehumidifier can speed up the process for small furniture.
- Make sure it’s well-ventilated to avoid fumes.
Common Drying Problems and How to Fix Them
Sometimes, drying doesn’t go as planned. Here are a few issues and solutions:
| Problem | Possible Causes | Fix |
|---|---|---|
| Stain feels sticky after 24+ hours | – Too much stain applied – Cold or humid conditions – Poor ventilation |
Wipe the surface with mineral spirits to remove excess. Improve airflow and let it dry for 24 more hours. |
| The stain looks uneven or blotchy | – Poor surface preparation – Uneven sanding – Extra stain not wiped off |
Lightly sand the surface. Apply a second, thinner coat, and be sure to wipe off any excess stain. |
| Topcoat peels after a few days | – The stain wasn’t fully dry before sealing – Wrong type of sealant |
Remove the topcoat. Allow the stain to dry completely, then reapply the appropriate sealant at the right time. |
Should You Sand Between Stain Coats?
Sanding between coats of stain is not always required. However, it can help in certain situations:
- If the wood grain has raised after staining
- If the surface feels rough or uneven
- If you’re using a gel stain and want a smoother finish
In these cases, lightly sand using 220-grit fine sandpaper after the first coat has dried.
Be sure to wipe the surface clean of all dust before applying another coat or sealant. This will ensure a smoother result and better product performance.
What to Avoid When Drying Wood Stain Faster
Trying to speed up wood stain drying time? Avoid these common mistakes:
- Don’t apply sealant too soon. It can trap moisture, leading to peeling or bubbling later.
- Don’t overheat the room. Too much heat dries the surface too fast, leading to cracks or an uneven finish.
- Don’t skip ventilation. Poor airflow slows drying and traps harmful fumes.
- Don’t cover or stack items on the stain. This blocks airflow, extending drying time.
Final Thoughts
Drying wood stain is a process that requires patience and the right conditions. While most people focus on applying the stain itself, understanding the drying time of wood stain is just as important for achieving a smooth, lasting finish.
Rushing the process can cause long-term problems like peeling, sticky surfaces, or poor color quality.
By adjusting temperature, airflow, and application methods, you can safely reduce drying time without risking the quality of your work.
Always test a small area, follow product instructions, and wait a little longer if unsure. With the right timing and setup, your stained wood will look great and be ready for use faster than you might think.