
Wood floors look great until they don’t. Dust builds up, spills happen, and before long, the floors that once looked warm and polished start looking dull and tired.
I’ve seen a lot of people make the same mistakes over and over: too much water, the wrong cleaner, or skipping steps that actually matter.
The good news is that cleaning wood floors the right way is not complicated. It just takes the right approach and a little consistency.
We will walk through everything you need to know, from the tools to grab before you start, to the step-by-step process, to the mistakes that can silently damage your floors over time.
Follow these steps and your wood floors will stay clean, protected, and looking their best for years to come.
Know Your Floor Type Before You Clean
Not all wood floors are the same. Cleaning the wrong way for your floor type can cause lasting damage. Check with your floor manufacturer if you are unsure which type you have.
Sealed Hardwood Floors
Most modern hardwood floors come factory-sealed with a polyurethane or similar finish. This protective layer sits on top of the wood, making the floor more resistant to moisture and stains.
Sealed floors can handle damp mopping with a pH-neutral cleaner, but the keyword is damp. The mop should never be soaking wet.
Even on sealed surfaces, too much moisture can still seep into the seams and cause the boards to swell or warp over time.
Unsealed Hardwood Floors
Unsealed floors have no protective coating, which means moisture goes straight into the wood. These floors are far more vulnerable and should be cleaned only with dry methods.
Sweep or vacuum regularly, and spot-clean with a barely damp cloth only when absolutely necessary.
Using a wet mop on unsealed hardwood is one of the fastest ways to cause irreversible damage, including warping, staining, and cracking.
Engineered Wood Floors
Engineered wood floors have a real-wood veneer on top, with layers of plywood or composite beneath.
They are more stable than solid hardwood to humidity and temperature changes, but they still need to be treated with care.
Use a damp mop and a hardwood-safe cleaner, and avoid soaking the surface. The veneer layer is thin, so aggressive scrubbing or excessive water can damage it just as easily as solid wood.
How to Clean Wood Floors Step by Step
Follow these steps in order for the best results. Each one builds on the last, so skipping ahead can undo the work you have already done.
What You Need Before You Start
Gather these supplies before you begin:
- Soft-Bristle Broom or Microfiber Dust Mop: For dry sweeping before any wet cleaning.
- Vacuum with Hard Floor Attachment: Use without a beater bar to avoid surface scratches.
- Spray Bottle: For applying cleaner in controlled sections.
- Microfiber Flat Mop: Picks up dirt and excess moisture without over-wetting the floor.
- pH-Neutral Hardwood Floor Cleaner: Such as Bona Hardwood Floor Cleaner or EcoLab No Rinse Neutral Floor Cleaner.
- Clean Dry Microfiber Cloths: For spot cleaning and drying.
- Bucket of Clean Water: For rinsing the mop head as needed.
- Felt Furniture Pads: To protect floors from scratches during and after cleaning.
Step 1: Sweep, Dust Mop, or Vacuum the Floor
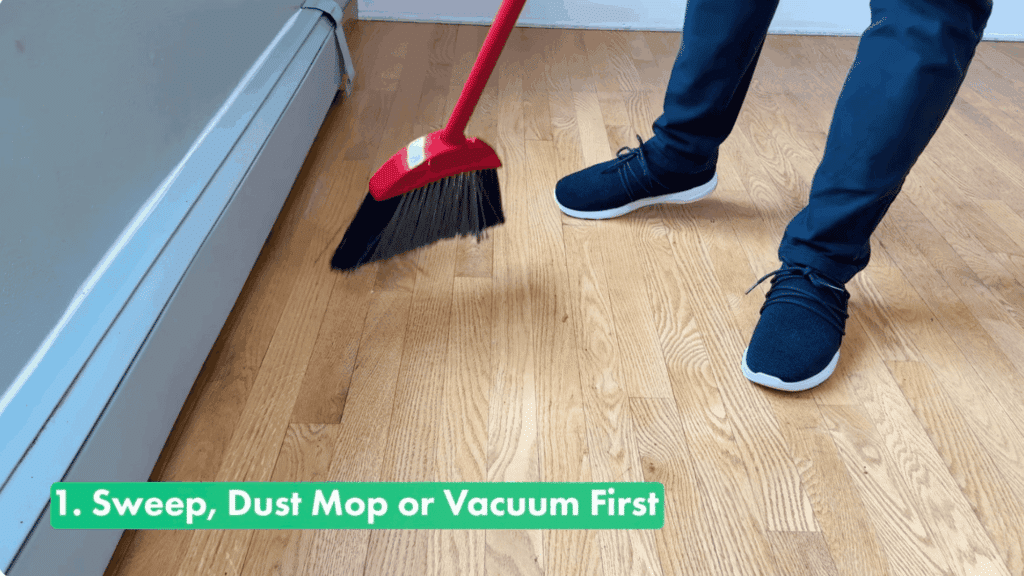
Start by removing dried dirt, debris, and hair from the surface before any wet cleaning begins. Use a soft-bristle broom, a microfiber dust mop, or a vacuum with a hard floor attachment.
Watch out for pebbles or small rocks on the floor. Do not sweep or vacuum these. Pick them up by hand and throw them away.
Dragging a rock across the surface or letting it spin in a vacuum can scratch the wood before you even start.
Step 2: Choose the Right Cleaner
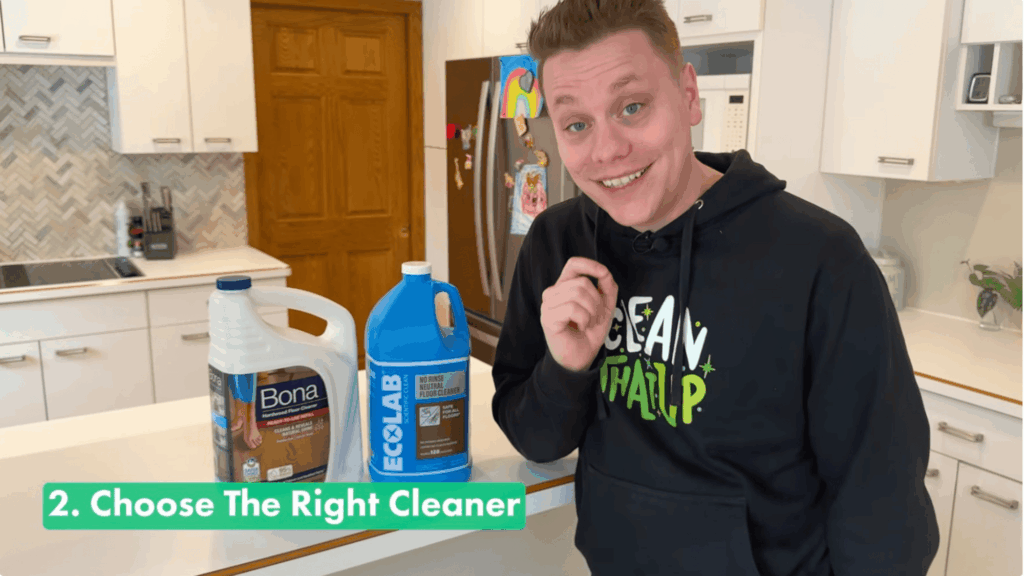
Use a pH-neutral cleaner made for hardwood floors. Two reliable options are Bona Hardwood Floor Cleaner and EcoLab No Rinse Neutral Floor Cleaner.
pH-neutral cleaners do not leave a sticky residue, which matters because residue attracts dirt and makes floors get dirty faster. Bona comes ready to use straight from the bottle.
EcoLab needs to be mixed with water, so check the dilution ratios on the label before you start.
Step 3: Do Not Use Too Much Water
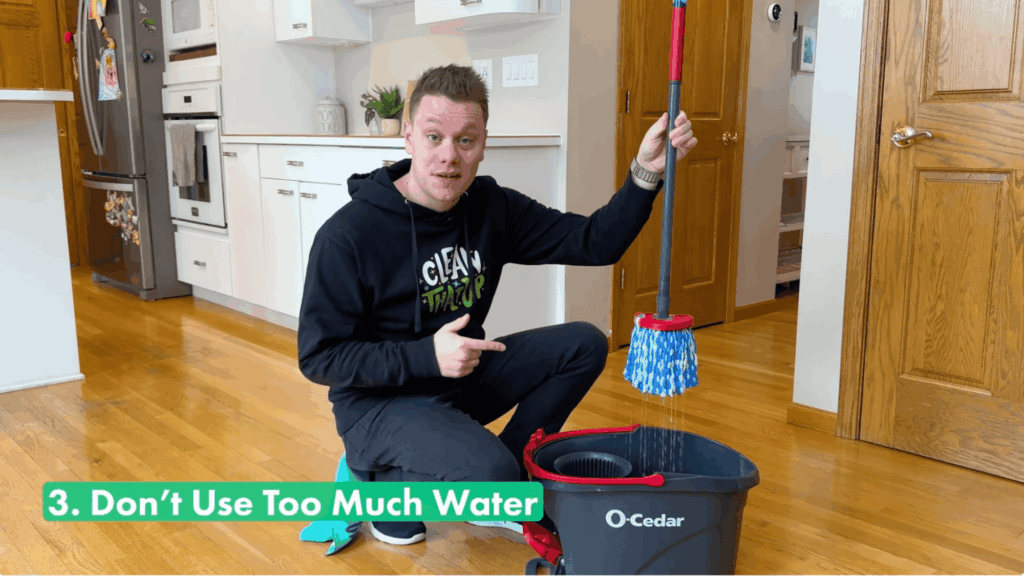
Too much water causes swelling, splintering, and cupping, which means the edges of the boards start to rise. Pour your cleaner into a spray bottle and apply it in small sections.
Follow immediately with a microfiber flat mop to pick up both dirt and excess moisture. Some mops have a built-in sprayer, which also works well.
The rule to keep in mind is less is more. Spray only what you are about to mop and never let liquid sit on the surface.
Step 4: Mop With the Grain
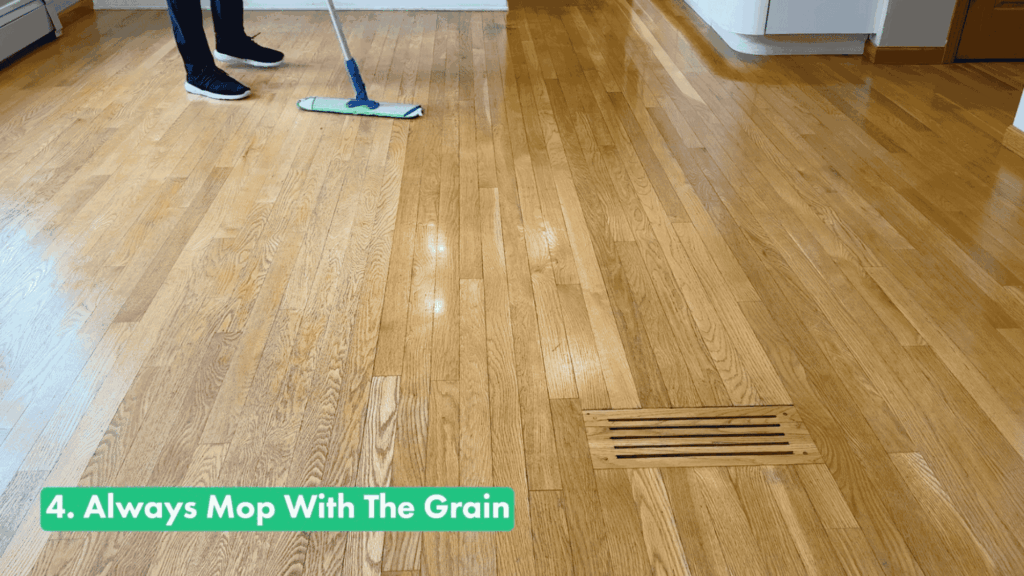
Always mop in the same direction as the wood grain. This cleans more thoroughly and prevents streaks as the floor dries.
Move in a snake pattern across the room so no area gets missed. If you are using a spin mop or traditional mop, wring the head out as much as possible before it touches the floor.
It should feel barely damp. A wet mop head leaves water in the cracks between boards, and that causes damage over time.
Step 5: Protect Your Wood Floors

Once the floor is clean and dry, add felt pads to the legs of all furniture sitting on the wood, especially dining chairs that get pulled out regularly.
This prevents scratches every time a piece moves. If you have wood floors in a kitchen or dining area, clean up spills as soon as they happen.
Wood and moisture do not mix well. The faster a spill gets wiped up, the less chance it has to seep in and cause lasting damage.
Watch this video for a visual walkthrough of the process.
How to Remove Stains From Wood Floors
Learn effective methods to remove common stains from wood floors, ensuring their appearance stays pristine without damaging the surface or leaving unwanted residue behind.
| Stain Type | Cleaning Method | What to Avoid |
|---|---|---|
| Water marks | Rub with a dry microfiber cloth; buff with wood floor polish | Excess water or steam |
| Food or grease | Dab with a cloth dampened with pH-neutral cleaner; wipe dry immediately | Oil-based soaps that leave residue |
| Pet urine | Blot immediately with paper towels; clean with hardwood-safe enzymatic cleaner | Soaking the area; ammonia-based cleaners |
| Scuff marks | Buff out with a clean sock or soft cloth; use baking soda on a damp sponge for heavier marks | Abrasive scrubbers |
| Paint splatters | Mix a few drops of dish soap with warm water; dab with a cloth until the paint loosens | Harsh chemical solvents |
| Ink or markers | Apply a small amount of rubbing alcohol to a cloth; blot gently | Pouring alcohol directly onto the floor |
| Mud | Let dry completely first; sweep or vacuum up dried mud; damp mop the remaining residue | Wet mopping fresh mud into the grain |
What Not to Use on Wood Floors
Remember not to use these items on wooden floors:
- Steam mops: High heat and moisture can discolor, warp, or crack the wood and may void your floor warranty
- Vinegar or ammonia: Both are too acidic or alkaline and will damage the finish over time, even when diluted
- Wet or soaking mops: Excess water seeps into seams and causes boards to swell, cup, or warp
- Wax or polish-based cleaners: Build up on the surface over time, attract dirt, and are difficult to remove without professional help
- Abrasive scrubbers or steel wool: Scratch and dull the surface finish permanently
- Multi-surface sprays with harsh chemicals: Not formulated for wood and can strip the protective finish
- Oil soaps: May leave a hazy, slippery residue that builds up with repeated use
- Beater bar vacuums: The rotating brush can leave fine scratches across the floor surface
How Often Should You Clean Wood Floors
To maintain wood floors’ beauty and durability, follow a cleaning schedule that includes sweeping, mopping, deep cleaning, and periodic polishing to prevent wear and tear.
| Cleaning Type | Frequency | Method |
|---|---|---|
| Dry sweep or dust mop | Daily or every 2 days | Soft-bristle broom or microfiber dust mop |
| Vacuum | 2–3 times per week | Hard floor attachment, no beater bar |
| Damp mop | Once a week | pH-neutral cleaner, microfiber flat mop |
| Deep clean | Once a month | Full room clean with cleaner and dry mop finish |
| Polish or refinish | Every 3–5 years | Professional-grade wood floor polish or refinisher |
| Sand and refinish | Every 10 years | Professional service recommended |
Tips to Keep Wood Floors Clean Longer
To preserve the beauty and longevity of wood floors, adopt simple habits like using doormats, protecting furniture, and cleaning spills promptly to minimize wear and tear.
- Place doormats at every entrance: Catches dirt, rocks, and moisture before they reach the floor
- Follow a no-shoes policy indoors: Shoes track in the most dirt, grit, and moisture of anything in the home
- Add felt pads to all furniture legs: Prevents scratches when chairs, tables, or sofas are moved
- Use furniture sliders when rearranging: Dragging furniture directly on wood causes deep gouges
- Place rugs in high-traffic areas: Hallways, entryways, and kitchen paths take the most wear
- Clean up spills immediately: The longer liquid sits on wood, the more likely it is to seep in and cause damage
- Maintain indoor humidity levels: Keep humidity between 35–55% to prevent the wood from shrinking or expanding
- Avoid direct sunlight on the floor for long periods: Use curtains or blinds to prevent UV fading and discoloration
Final Thoughts
Cleaning wood floors doesn’t have to be complicated. I’ve found that staying consistent, using the right products, and avoiding a few things that can cause damage over time are key.
I sweep regularly, mop with a barely damp microfiber mop, use a pH-neutral cleaner, and dry the floor immediately. By doing this week after week, my floors have held up beautifully.
Wood floors are a long-term investment in my home. When treated well, they can last decades without needing major repairs or refinishing.
I recommend starting with the steps in this guide and building a simple routine that works for your household.
Have you found a cleaning method or product that works well on your wood floors? Drop a comment below and share what’s been working for you!