
Rubber baseboards are a practical and durable choice for finishing the bottom edge of walls, especially in areas that see a lot of wear and tear.
Made from flexible rubber or vinyl material, these baseboards help protect your walls while creating a clean, professional look.
They’re a popular choice in commercial buildings, schools, gyms, and even homes, thanks to their resistance to scuffs, moisture, and everyday damage.
If you’re a DIYer like me – or even a renter with permission – this guide is for you.
I’ll walk you through each step I take to install rubber baseboards, from cutting to gluing to wrapping corners so thatyou can get a smooth, lasting finish yourself.
What Is a Rubber Baseboard?
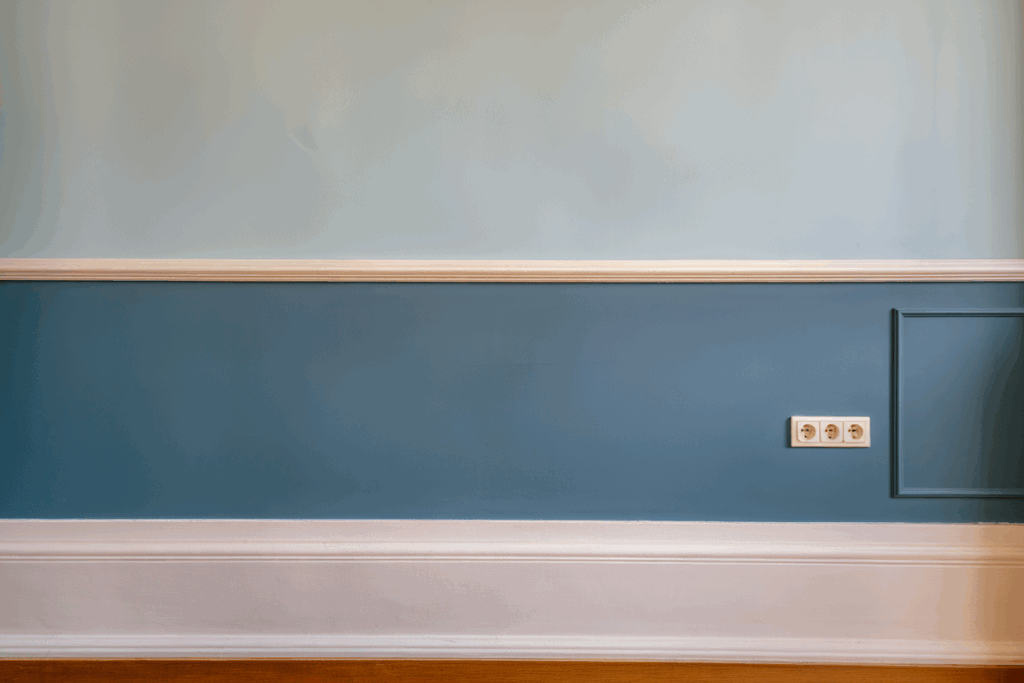
A rubber baseboard is a flexible wall trim made from durable rubber or vinyl material.
It’s designed to protect the base of your walls from scuffs, bumps, and moisture, while also giving a clean, finished look.
Unlike vinyl baseboards, rubber tends to be thicker, more durable, and softer to the touch, making it easier to install on uneven surfaces.
Rubber baseboards are commonly used in commercial spaces like schools, hospitals, offices, gyms, and kitchens.
However, they’re also ideal for residential use, particularly in basements, garages, laundry rooms, bathrooms, and mudrooms, where durability is most crucial.
Choose rubber baseboards when you need something easy to clean, flexible enough for corners and curves, and tough enough to withstanddaily wear.
They’re ideal for high-traffic areas or anywhere that moisture and dirt might be a problem.
Materials and Tools Needed
Before you get started, make sure you have the right tools and materials on hand. Having everything ready ahead of time makes the process smoother and helps you avoid mistakes.
- Rubber Baseboard:The main material being installed; flexible and suitable for corners and uneven surfaces.
- Utility Knife:Used to make partial cuts for mitering outside and inside corners.
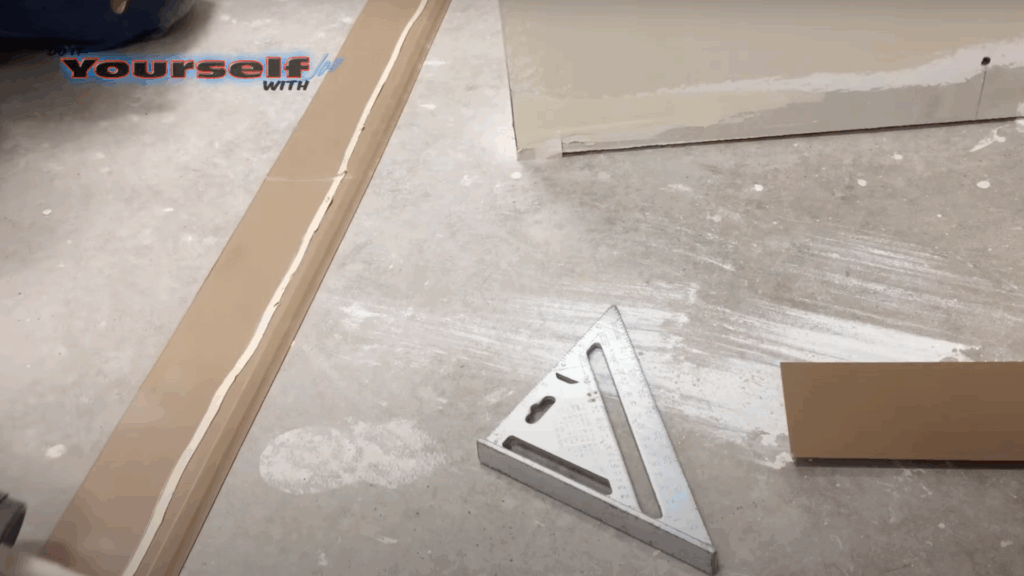
- Speed Square:Helps guide clean, straight cuts along marked lines.
- Measuring Tape:Measures wall lengths and marks cutting points accurately.
- Chalk or Pencil:Used to mark corners and cut lines on the back of the base.
- Heat Gun or Torch:Softens the rubber base to make it more pliable and prevent it from pulling away.
- Hot Melt Glue Gun:Used at tricky joints like corners and bullnose frames for extra holding strength.
- Cove Base Adhesive (Ball Base Adhesive):Standard adhesive applied in beads to secure the base to the wall.
- Caulk Gun:Dispenses cove base adhesive evenly along the rubber base.
- Tin Snips:Used to clip angles into the base for cleaner inside corner joints.
- Painter’s Tape (Blue Tape):Holds the base in place temporarily while the glue sets.
- Spare Blade or Knife Blades:Essential for clean cuts; dull blades make cutting harder and less precise.
Step-by-Step Guide: How to Install Rubber Baseboard
With the help of this guide, you can get long-lasting, enduring results at home or in business settings.
Step 1: Understand Where to Use Rubber Base
Rubber baseboards are typically found in industrial and commercial spaces, but they’re also great for garages, basements, and utility rooms in the home due to their durability and moisture resistance.
They hold up well against heavy wear and tear, making them ideal for high-traffic or work-heavy areas. Plus, they’re easy to clean and maintain, which adds to their practical appeal.
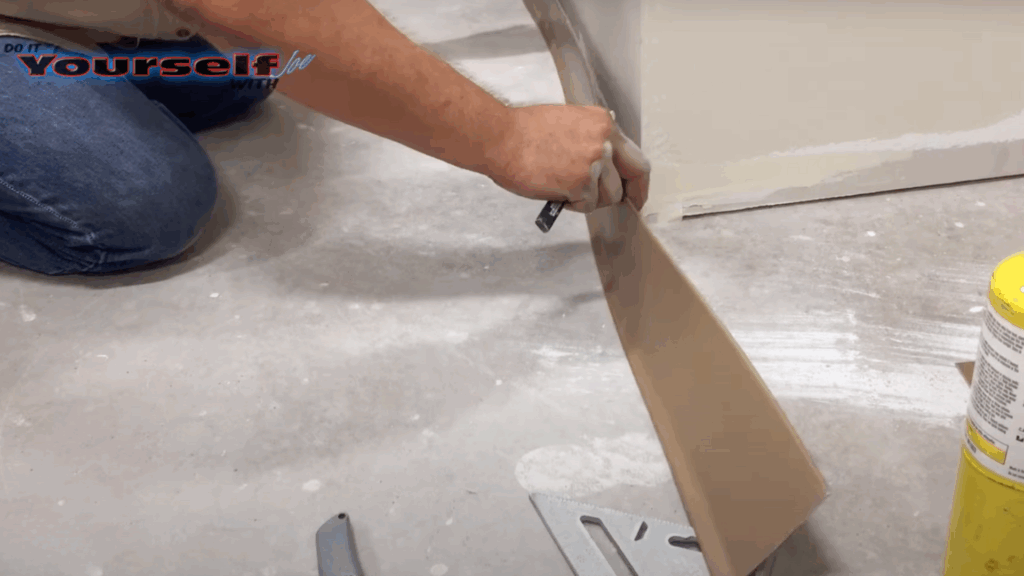
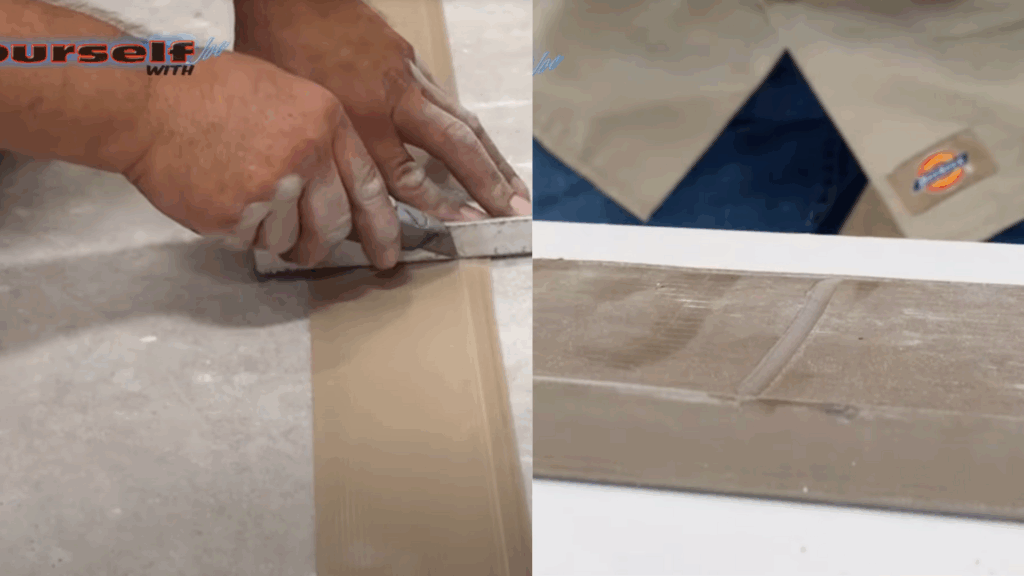
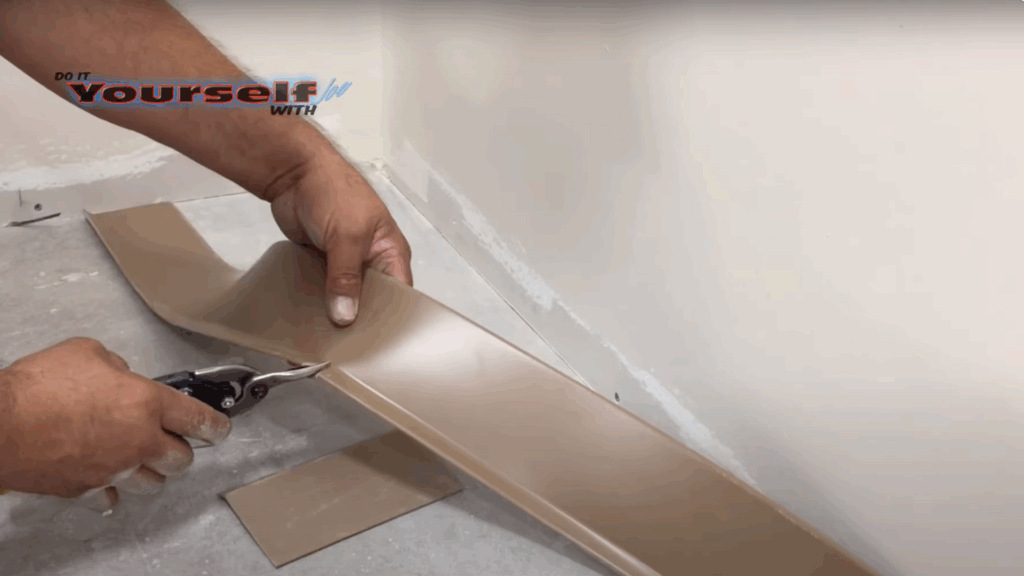
Step 2: Cutting Outside Corners
- Mark the Corner:Press the rubber base against the outside corner and mark the corner on the back.
- Use a Speed Square:Lay the base flat and use a speed square to guide your cut.
- Cut Properly: Use a sharp utility knifeto cut ¾ of the way through, not all the way, to avoid splitting the front face.
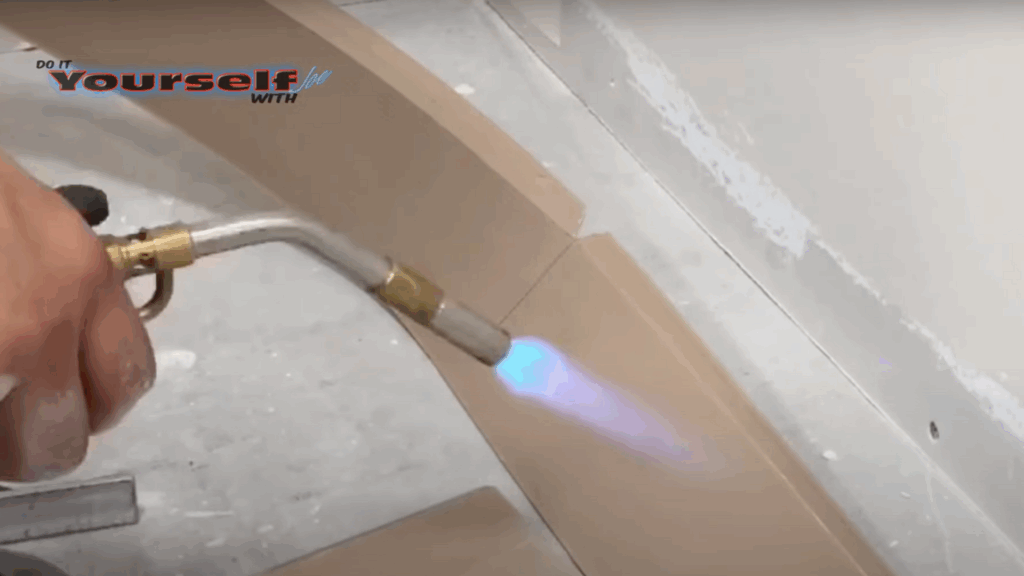
- Back-Cut at an Angle:Flip the base and gently back-cut at a 60° angle to allow it to bend. Don’t cut through the top edge or the bottom “shoe” – the shoe will stretch naturally.
- Apply Heat:Use a heat gun or torch to soften the base. This helps prevent it from pulling away from the wall and stops the joint from turning white when bent.
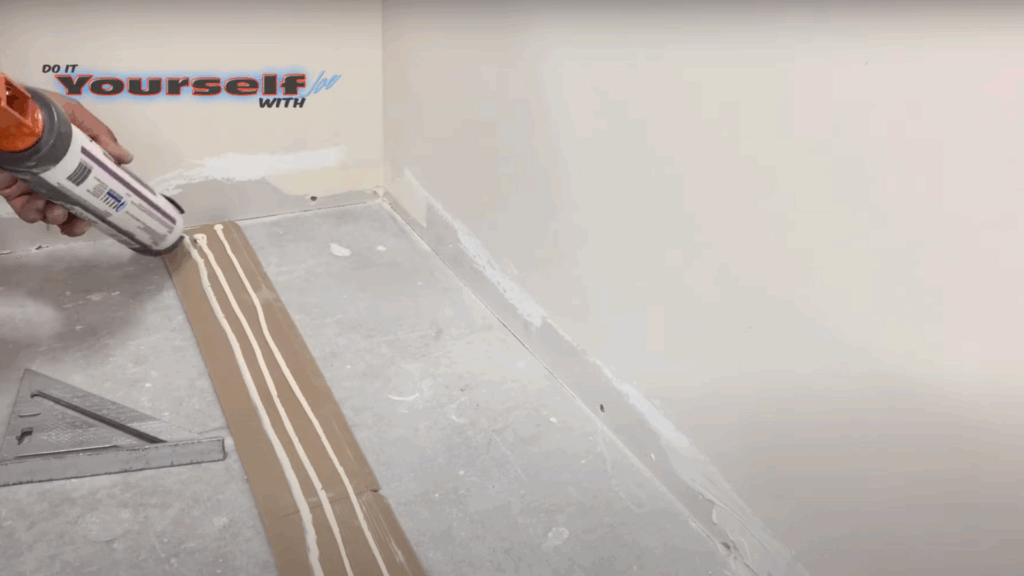
Step 3: Apply Adhesive
Standard Method:
- Apply three ⅛-inch glue beadsto the back of the base.
- To prevent squeeze-out, avoid applying the adhesive too close to the top edge (leave ¾”–1″).
Extra for Corners:
- Add a little extra glue where the corner is cut.
- For tight holds at corners, consider hot melt glueat the joint.
Apply Pressure:Press the base firmly against the wall, pushing outward from the cornerto help stretch and hold shape.
Step 4: Use Painter’s Tape If Needed

If the base starts pulling away, secure it with blue painter’s tape until the glue dries completely. Press the base firmly in place before taping to ensure a strong bond.
Leave the tape on for several hours or as directed by the adhesive instructions for the best results.
Step 5: Cutting Inside Corners
Fold Method:
- Make a partial cut and fold the base backward to create the corner.
- This works best with high-quality, light-colored rubber bases,as cheaper or darker ones may turn white or crack.
Tool Method: Corner-cutting tools are available (though costly) and easier for beginners to use.
Common method:
- Butt the first piece to the wall.
- Use tin snips to clip a 22.5° to 45° angleon the second piece.
- Butt the angled cut into the first piece and adjust as needed for a snug fit.
Alternate method:
- Make a controlled cut on the back like with an outside corner.
- Cut the shoe all the way through (unlike outside corners).
- Heat slightly, test fit, and glue once satisfied.
Step 6: Seaming Two Pieces Together

- Always match factory edgestogether for a clean look.
- Push toward the seamduring installation for a tight, less visible joint.
- Add a bead of glue near the seamto strengthen the joint.
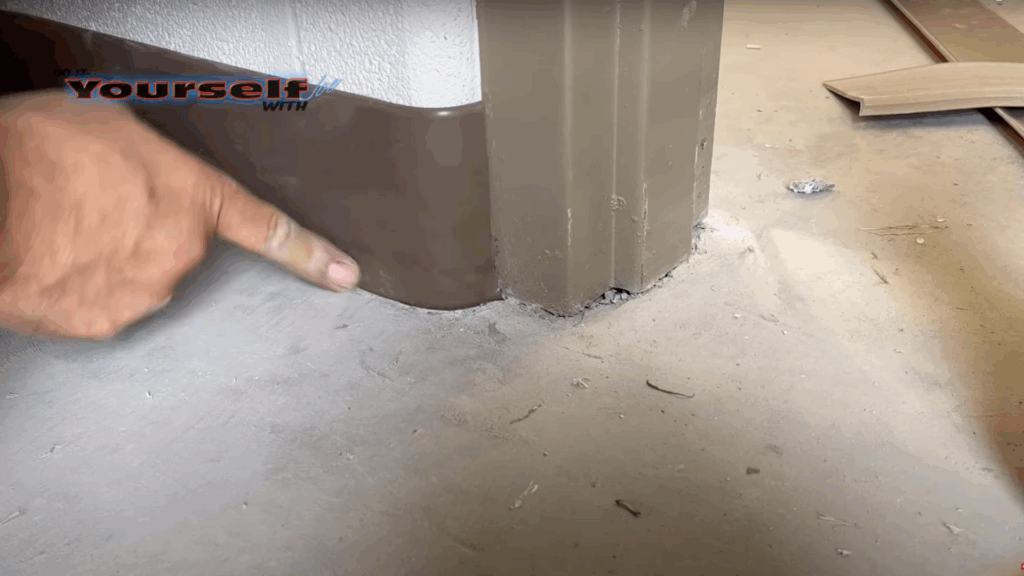
Step 7: Handling Bullnose Corners (Rounded Corners)
Modify the base:
- Cut the bottom to a point.
- Trim the top edge back ⅛” to ¼”.
- Cut the back side of the base at an angle for a better fit.
1. Test Fit and Trim:Keep trimming until the piece fits neatly around the frame.
2. Roll and Heat:Heat the base and roll the endso it molds to the corner.
3. Use Hot Melt Glue:For curved areas, hot glue gives you working time and a secure hold.
Step 8: Final Glue
- Only three glue beads are needed.
- Stay away from the very top edge to avoid messy squeeze-out.
- Add extra glue at seams for stronger joints.
Step 9: Let It Set and Finish Cleanly
- Hold in place if necessary until the glue sets.
- Avoid overheating the base – it will become too soft and the glue may take longer to set.
Optional Tip: Always keep a sharp utility blade. Dull blades require more pressure and lead to poor cuts or jagged edges.
Recommended: If you’re like me and learn better by watching, this YouTube video by @Doityourselfwithjoe is very helpful. It shows exactly how to install rubber baseboard, step by step.
How Long Does Installation Take?
Installing rubber baseboards typically takes 2 to 4 hoursfor an average-sized room.
If you’re new to DIY, plan for extra time to measure, cut, and apply adhesive carefully. The process is simple but requires some patience, especially around corners.
Most adhesives take 24 to 48 hours to cure fully, even if they feel dry to the touch sooner. Avoid cleaning or pushing furniture against the walls during this time to ensure a strong bond.
Before you begin, move furniture away from the walls and ensure the space is easily accessible. Limit foot traffic in the area until the adhesive has completely dried.
With proper preparation, the installation proceeds smoothly and lasts for years.
Can You Remove or Replace Rubber Baseboards?
Yes, rubber baseboards can be removed and replaced if damaged or worn out. To remove them, gently pry the baseboard away from the wall using a putty knife or scraper, starting at one end.
If adhesive was used, expect some resistance. After removal, scrape off any leftover glue with a putty knife or adhesive remover.
Clean the wall thoroughly before installing a new baseboard. Replacing is usually better than repairing if the rubber is cracked, pulling away, or has permanent stains.
Patching small areas is possible, but a full replacement ensures a cleaner and more professional look.
Maintenance and Care
Rubber baseboards are easy to maintain with just a bit of routine care. Wipe them down regularly using a soft cloth and mild soap to keep dust and scuff marks at bay.
Avoid harsh chemicals or abrasive scrubbers, as these can damage the rubber surface over time. In high-traffic areas, it’s a good idea to check once a year for any signs of peeling or loose edges.
If you notice any sections coming away from the wall, simply reapply adhesive to secure them.
With a little attention, your rubber baseboards will stay clean, durable, and long-lasting.
Troubleshooting Tips
- Baseboard not sticking:Make sure the wall is clean and dry. Dust, grease, or old adhesive can prevent bonding. You may need a stronger adhesive or more pressure during installation.
- Gaps in corners: These often happen when the cuts aren’t precise. Try trimming the edges more carefully or warming the rubber slightly to bend it. Use caulk to fill any small gaps.
- Uneven line along the top: A crooked baseboard usually means the top edge wasn’t guided. Use a level or chalk lineto keep things straight in future installations.
Conclusion
I’ve found that installing rubber baseboards is one of those small upgrades that can make a big difference, whether in a garage, basement, or busy hallway.
They’re tough, flexible, and super easy to clean, which makes them a smart, long-term choice for both homes and workspaces.
Take your time with the prep work – clean walls, sharp cuts, and the right glue really do matter. I’ve made mistakes by rushing, and trust me, it’s worth doing right the first time.
If this is your first time trying it, don’t stress. Follow each step and you’ll end up with a neat, professional-looking finish.
Give it a shot and let me know how it goes! I’d love to hear your experience – or see your before-and-after photos.
Drop your questions or share your results in the comments below. I’m always happy to help!