
Staining kitchen cabinets is one of my favorite ways to update a space without spending much. I’ve done it a few times, and it always surprises me how much of a difference it makes.
Cabinets take up a lot of visual space, so a color change can make the entire kitchen feel fresh. Though it might seem intimidating, the process is simple once broken down.
With some prep work, like removing hardware and sanding, I can achieve professional-looking results at home.
Choosing the right stain and applying it properly brings out the wood’s natural beauty and gives cabinets a clean, updated look.
In this guide, I’ll walk you through each step so anyone can confidently refresh their cabinets.
What Is Staining?
Staining adds color to wood while showing its natural grain, unlike painting, which covers the wood.
This process makes cabinets look richer and more natural by highlighting the wood’s pattern.
Stains come in various shades, from light oak to deep walnut, offering a fresh look without hiding texture.
Different types of stains, oil-based, water-based, and gel, have varying drying times and finishes.
Staining is often used to restore older cabinets or match new ones to existing furniture.
Before staining, the surface needs to be clean and smooth for an even color application. Done right, staining can make old cabinets look brand new without the need for replacement.
How to Choose the Right Wood Stain for Your Cabinets
Selecting the right wood stain is key to achieving the look and durability you want for your cabinets. Look at what to consider:
Types of Stains:
- Oil-Based Stains: Provide a deep, rich color and excellent durability, but take longer to dry.
- Water-Based Stains: Dry faster and are easier to clean, but can raise the wood grain.
- Gel Stains: Thicker and ideal for vertical surfaces like cabinet doors, as they don’t drip as much.
Color Selection:
- Lighter stains create a bright, clean feel.
- Darker stains bring warmth and elegance.
Testing:
- Always test the stain on a scrap piece of wood or a hidden spot before applying it to the cabinets.
Choosing the right stain will give your cabinets the perfect finish and ensure they last for years.
Step-by-Step Guide to Staining Kitchen Cabinets
Follow this easy guide to stain kitchen cabinets from prep to final coat using water-based products.
Materials Needed
These are the basic tools and products used throughout the process.
- Water in a spray bottle
- Clean rags (old cotton t-shirts work well)
- Sandpaper (220, 300, 400 grit)
- Wood conditioner (water-based)
- Wood stain (water-based, like Special Walnut)
- Lacquer or polyurethane finish (satin)
- Foam or bristle brushes
- Stir sticks
- Dust cloth or tack cloth
- Gloves, respirator, and protective gear
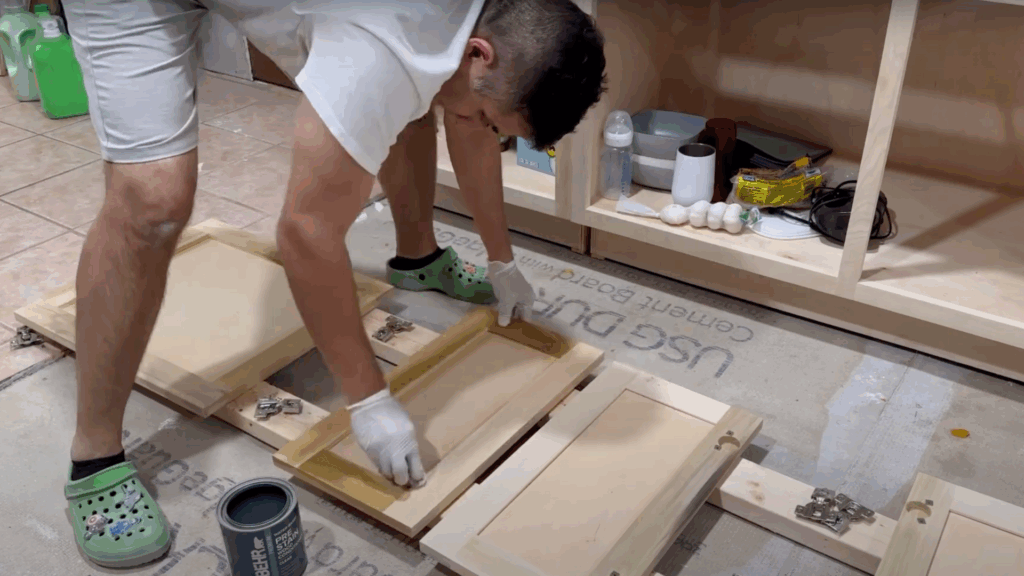
Step 1: Remove Hardware and Clean Surfaces
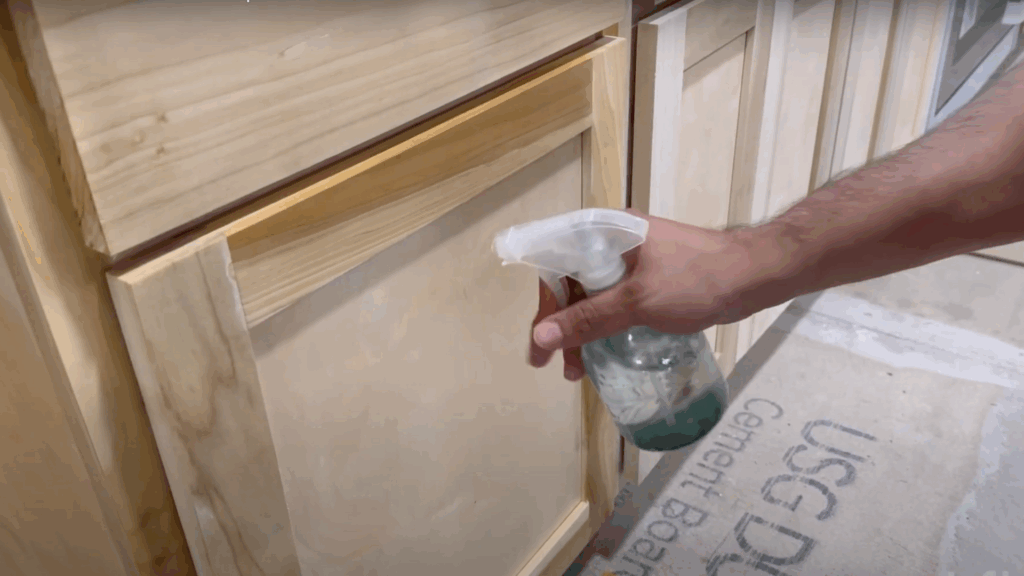
Start by removing all cabinet doors, drawers, knobs, and hinges. Clean every surface using a gentle cleaner or degreaser to remove grease, dirt, or cooking residue.
Dampen the wood with plain water using a spray bottle or cloth. This raises the wood grain, especially in softer woods like poplar, allowing for smoother sanding.
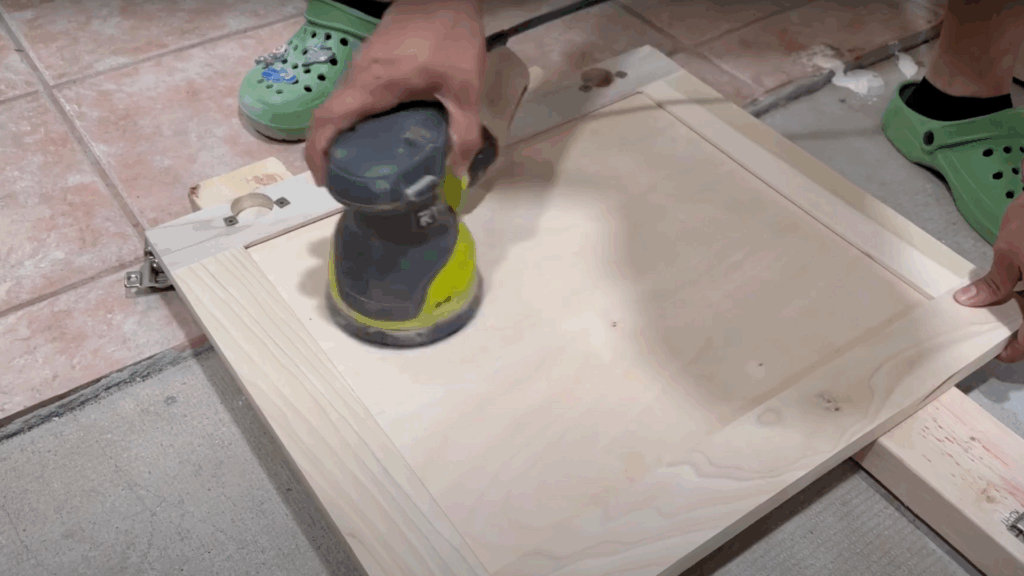
Step 2: Sand All Surfaces
Use 220-grit sandpaper to sand cabinet doors, frames, and drawer fronts. Always sand in the direction of the wood grain for a smooth finish.
Remove old coatings and rough spots. After sanding, use a tack cloth or clean rag to wipe away all dust before moving to the next step.
Step 3: Apply Wood Conditioner
Apply a water-based wood conditioner evenly across all surfaces using a clean cloth. This step helps the stain soak into the wood evenly, avoiding streaks or blotches.
Let it sit for about 20 minutes. After it dries, lightly sand the surface again using a fine sandpaper to smooth any raised grain.
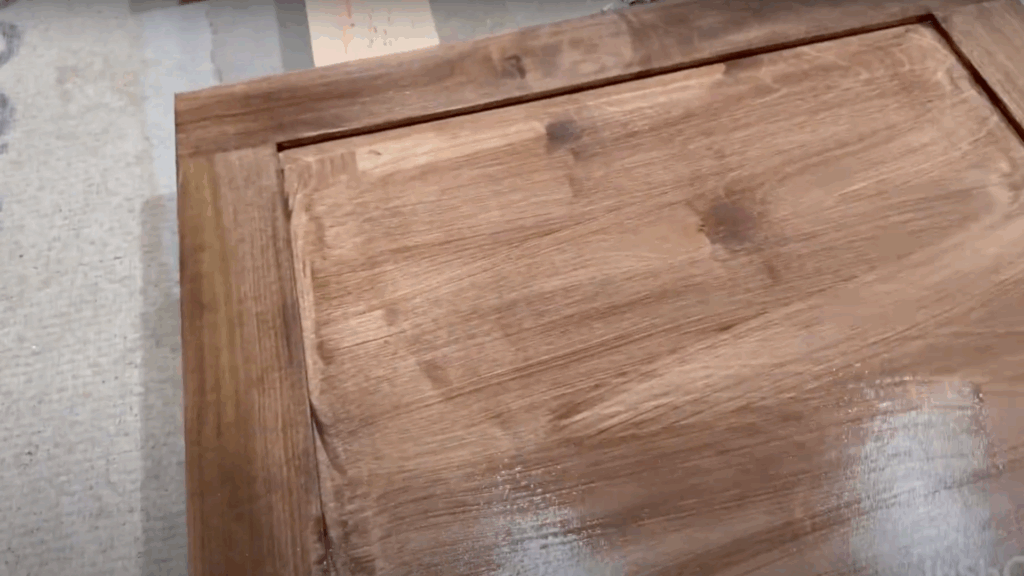
Step 4: Apply the Stain
Stir the stain thoroughly before use. Apply it with a brush using long, even strokes along the wood grain.
Let the stain sit for 2–3 minutes, then wipe off the excess with a clean cloth.
This helps create an even tone and enhances the natural beauty of the wood.
Step 5: Let the Stain Dry
Let the stained cabinets and drawers dry for at least one hour. Dry time may vary depending on the product, temperature, and humidity.
Avoid touching the surface while it dries. A fully dry stain layer is essential before applying any protective finish, so be patient during this waiting period.
Step 6: Sand Again Lightly
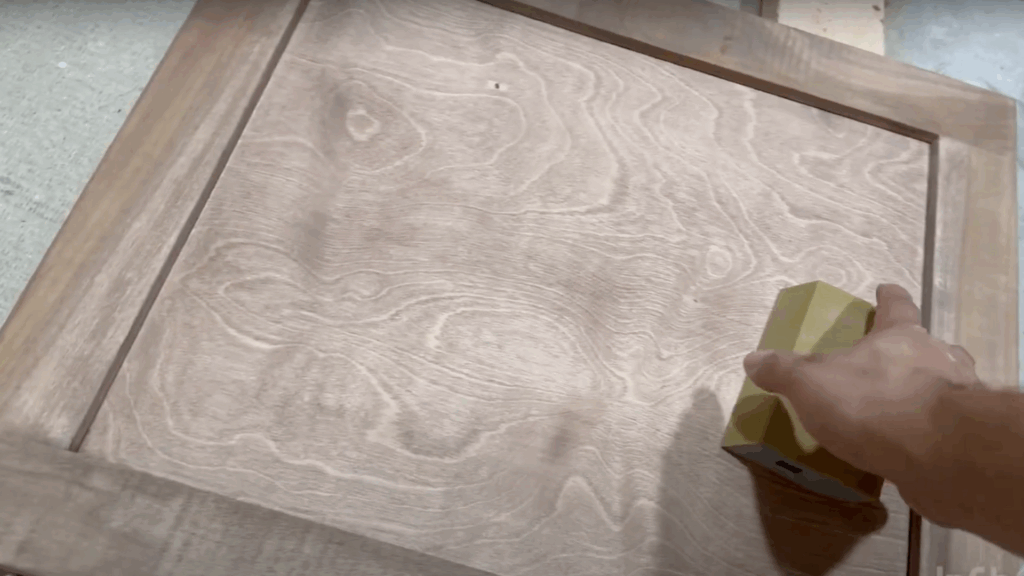
Use 400-grit sandpaper to gently sand the stained surface. This removes any minor bumps or raised wood grain caused by the stain.
Sand lightly without pressing hard, and always follow the wood grain. Wipe away all dust afterward to ensure a clean, smooth surface for the protective topcoat.
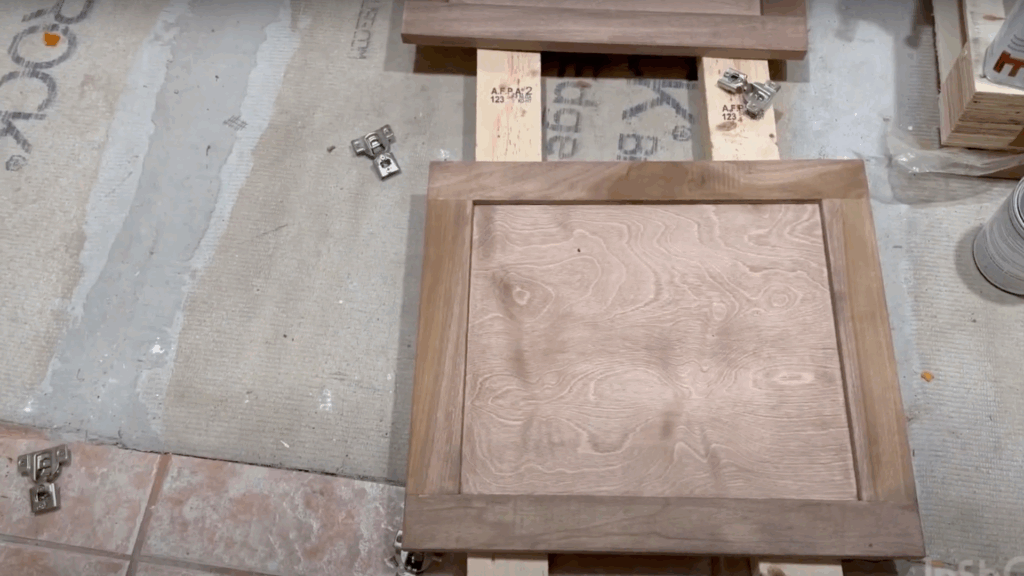
Step 7: Apply Lacquer Finish
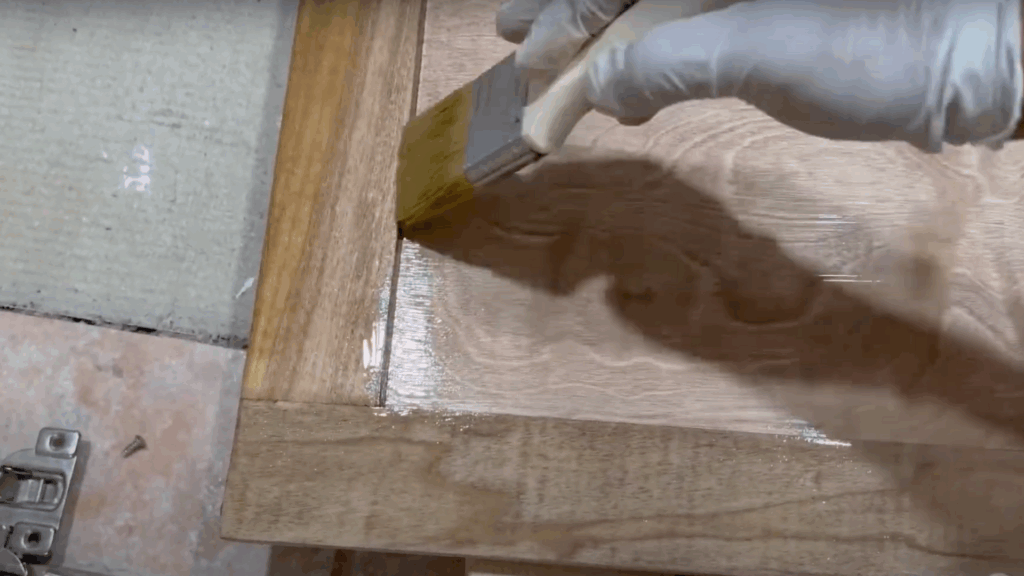
Apply a water-based satin lacquer using a clean brush. Brush in long strokes with the grain. Let it dry for about two hours.
For a smoother finish, lightly sand between coats and apply a second layer. This step protects the stained wood and gives it a soft, polished appearance.
Step 8: Reassemble and Enjoy the Results
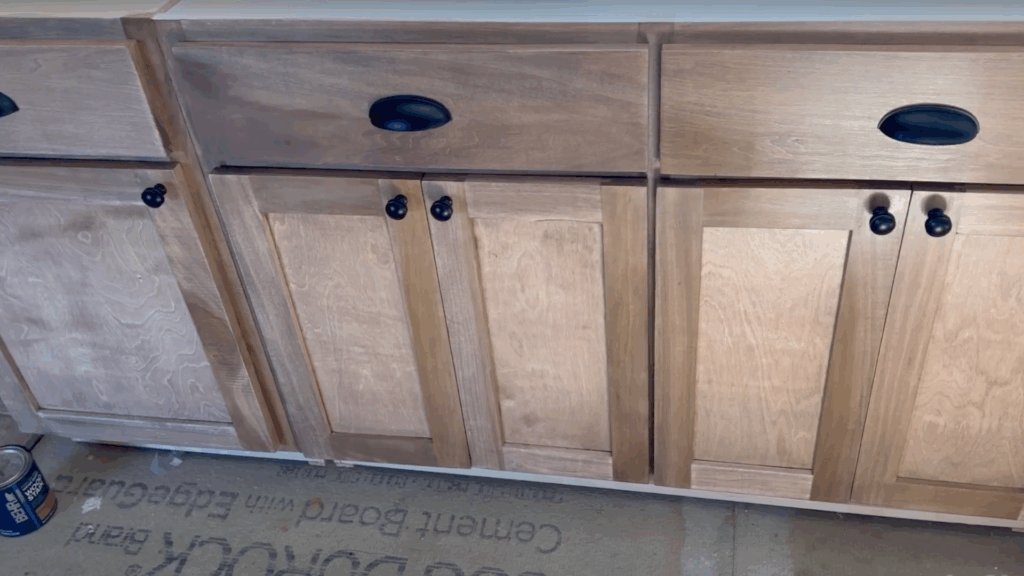
After the finish is completely dry, reattach all doors, drawers, knobs, and hinges. Make sure everything is aligned properly.
Clean up your workspace and admire your refreshed kitchen. The cabinets should look smooth, rich in color, and professionally finished, ready to enjoy for years to come.
For a visual guide, refer to this tutorial by @Gabriel Handy Man Projects on YouTube.
Benefits of Staining Kitchen Cabinets
Staining offers a simple and effective way to refresh cabinets while showing off the natural beauty of the wood.
- Enhances Natural Wood Grain: Stain highlights the beauty of the wood instead of covering it like paint.
- Cost-Effective Update: Gives cabinets a fresh, new look without the cost of full replacement.
- Wide Range of Colors: Available in many shades to match different kitchen styles and moods.
- Easy Maintenance: Stained wood is easier to clean and touch up if scratched or worn.
- Long-Lasting Results: When sealed properly, stain can last for years with minimal upkeep.
- Customizable Finish: Choose from matte, satin, or glossy finishes based on personal preference.
- Less Peeling or Chipping: Stains soak into the wood, so they’re less likely to chip over time.
- Eco-Friendly Options: Water-based stains produce fewer fumes and are safer for indoor use.
- Adds Warmth and Character: Brings a cozy, rich tone to the kitchen, enhancing its overall feel.
Can You Stain Without Sanding?
Staining without sanding is possible, but it often leads to uneven color and poor adhesion.
Sanding removes the old finish, smooths the surface, and opens wood pores, allowing the stain to soak in properly.
Skipping this step can result in patchy or streaky results, as the stain may sit on top of the existing coating instead of bonding with the wood.
Alternatives like gel stains or liquid sandpaper can help, but they don’t offer the same deep, lasting finish as traditional sanding.
For the best results, especially on high-traffic surfaces like kitchen cabinets, light sanding is highly recommended. It adds a little extra time but ensures a better-looking, longer-lasting finish.
Additional Tips
These simple tips can help improve the final result and make the staining process easier.
- Test the Stain First: Always try the stain on a hidden area to see how it looks on the wood.
- Work in a Well-Ventilated Area: Open windows or use fans to reduce fumes and speed up drying.
- Use Light, Even Coats: Applying thin layers gives better control and avoids blotches.
- Sand Between Coats: Light sanding between stain or finish layers helps create a smoother surface.
- Wipe Excess Immediately: Don’t let the stain or finish pool; wipe it off to prevent sticky spots.
- Keep Tools Clean: Wash brushes or change cloths often to avoid streaks or lint marks.
- Follow Product Instructions: Always read and follow the label for best drying times and application steps.
- Protect Surrounding Areas: Use drop cloths or painter’s tape to keep floors and counters clean.
- Don’t Rush the Process: Allow proper drying time between steps to avoid smudges or uneven finishes.
Conclusion
Staining kitchen cabinets is one of the most rewarding DIY projects I’ve done. It takes time and patience, but the transformation is worth every step.
From cleaning and sanding to applying stain and finish, each part of the process adds to the final look.
I love how staining brings out the natural grain of the wood and gives the kitchen a warm, fresh feel without needing a full remodel.
With the right tools and a clear plan, anyone can take on this project and be proud of the results. If you’re thinking about giving your cabinets a new life, don’t skip the prep work; it makes all the difference.
I hope this guide helps make the process simple and doable. Feel free to share your results or ask questions below. I’d love to hear how your project turns out.