
Ready to change your workspace without spending hundreds of dollars? Building a DIY standing desk is easier than you think and takes just a few hours.
Many people sit for eight to ten hours daily, which can lead to poor posture. Creating your standing desk lets you work at a perfect height while staying active the whole day.
This will help you with everything you need to know to make a functional and affordable workspace. Even if you work from home or just want a healthier setup.
You can build something that fits your space perfectly. The best part is you get materials that match your style and budget. Let’s get started on this simple project.
What is a Standing Desk and its Different Types?
A standing desk is a workspace that lets you work while standing rather than sitting. These desks help reduce the health problems associated with prolonged sitting.
Some models adjust to different heights, while others remain fixed at a single level. You can find options ranging from simple desktop converters to full electric systems.
The right type depends on your workspace, how often you will adjust the height.
Many people start with basic models before upgrading to more advanced versions. The different types of standing desks are:
- Fixed height standing desks
- Adjustable manual standing desks
- Electric adjustable standing desks
- Desktop converter standing desks
What to Consider Before Building a Standing Desk
Planning your standing desk project requires careful thought about several important factors that affect functionality.
- Desk Height: Measure from the floor to your elbow when standing with arms bent at 90 degrees.
- Work Surface: Choose a top size that fits your monitor, keyboard, and other equipment comfortably.
- Stability Requirements: Plan for a sturdy base that won’t wobble when you type or write on the desk.
- Available Space: Measure your room to ensure the finished desk fits easily without blocking pathways.
- Weight Capacity: Calculate the total weight of the equipment your desk needs to safely support.
- Budget Constraints: Set a spending limit and stick to materials that fit your financial plan.
Tools and Materials Required
| Tools | Materials |
|---|---|
| Drill | Wooden board for the desktop |
| Measuring tape | Adjustable legs or metal pipes |
| Saw | Screws and corner brackets |
| Screwdriver | Sandpaper for smoothing |
| Paintbrush | Stain or paint for finishing |
| Level | Wood glue for strong joints |
| Safety glasses | Protective sealant for durability |
Step-by-Step Method of Building a DIY Standing Desk
Building your own standing desk saves money and lets you customize every detail to perfectly match your workspace needs.
Step 1: Measure and Cut Your Desktop Surface
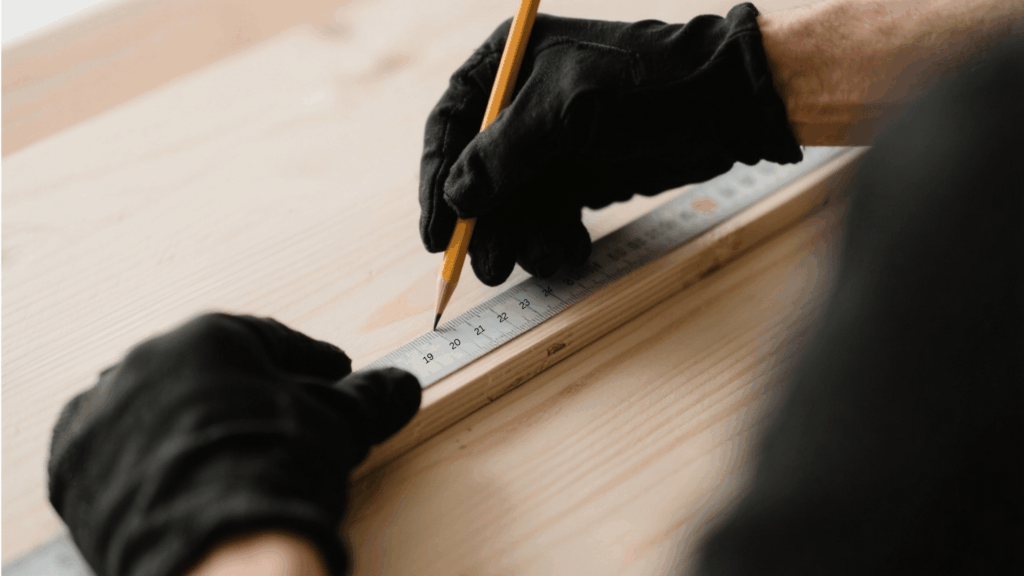
Start by deciding the size of your work surface based on your space. Measure your wooden board to the dimensions you need.
Use a saw to cut the board carefully along your marked lines. Sand all edges and surfaces to a smooth finish to prevent splinters during use.
This lays the foundation for your DIY standing desk, where all your work will be done. Take your time with this step because a level surface makes everything else easier.
Step 2: Attach the Legs to the Desktop
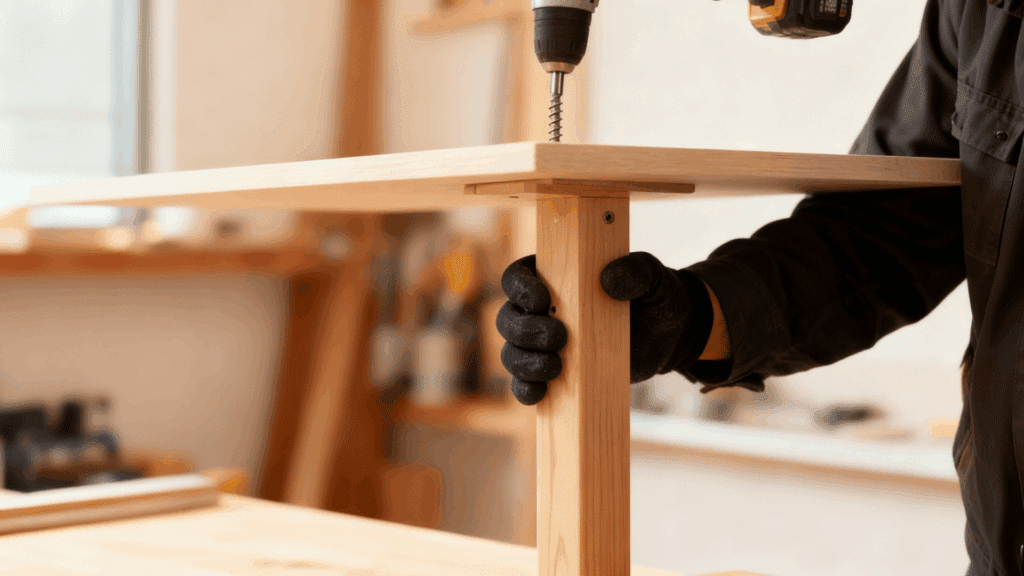
Position one wooden leg at the corner of the light oak desktop, aligning it about two inches from each edge. Pencil marks should be visible to guide your drilling points.
Use a power drill to drive the screws through the leg and into the desktop. Keep a small level nearby to ensure the leg stays straight as you secure it.
Also measure the distance of holes to maintain its stability.
Step 3: Test the Stability of the Desk

Check the stability of the desk by placing the stability checker on it.
Add corner brackets for extra stability with heavier equipment. Use a level tool to check that your desk stands perfectly straight from all angles.
Make any needed adjustments by loosening screws and repositioning legs slightly. Test the stability by pressing down gently on different areas.
Step 4: Sand and Finish the Surface
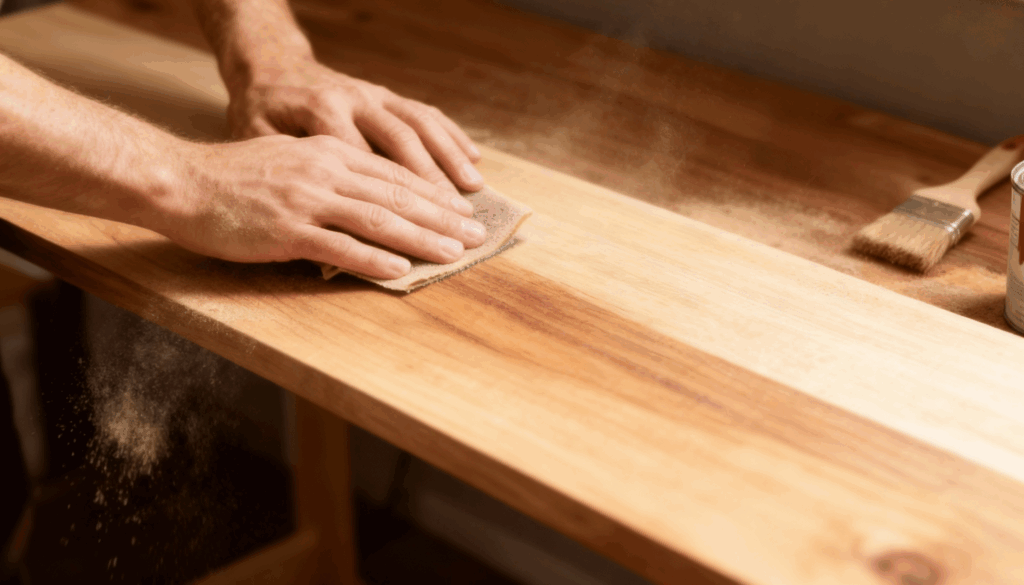
Smooth the entire desk with medium-grit sandpaper, paying special attention to the desktop surface. Wipe away all dust with a damp cloth before applying any finish.
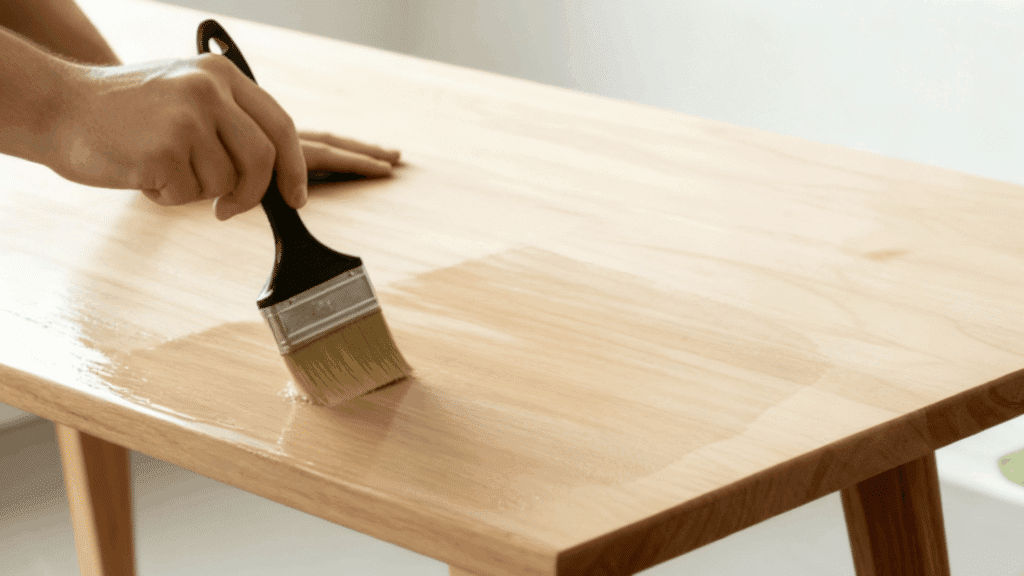
Choose either wood stain for a natural look or paint for more color options. Apply your chosen finish in thin, even coats following the product instructions.
Let each coat dry completely before adding another layer. This protects your desk from spills and daily wear while improving its appearance.
Step 5: Add Final Touches and Test
Apply a protective sealant to protect your flooring from scratches. After the sealant dries out, wipe the surface with a cloth.
Place your monitor, keyboard, and other equipment on the desk to test the setup. Stand at your new workspace and check if the height feels perfect for your arms and neck.
Make small adjustments if needed by adding risers under the legs. Your completed desk should feel sturdy and meet all your working needs.
Common Mistakes to Avoid While Building a Standing Desk
Building your own standing desk requires careful planning to prevent costly mistakes that affect functionality during daily use.
- Incorrect Angle Cuts: Making uneven or slanted cuts creates gaps between joints that weaken the overall structure and look unprofessional.
- Using Wrong Screw Types: Selecting screws that are too short or too long fails to secure pieces properly or damages wood by protruding through surfaces.
- Ignoring Wood Grain Direction: Placing boards without considering grain patterns leads to warping, splitting, and an unattractive final appearance.
- Applying Too Much Glue: Using excessive adhesive creates a mess and makes adjustments impossible once pieces bond together.
- Forgetting Workspace Clearance: Building a desk without checking the surrounding space leads to furniture that blocks doors.
Conclusion
Building a DIY standing desk gives you a healthier way to work. You now have all the knowledge needed to create a functional workspace tailored to your exact needs.
Standing while working improves your energy levels and reduces the aches that come from sitting all day.
Your new desk represents both a smart health choice and a rewarding hands-on accomplishment. The skills you learned here can apply to your home in the future.
Start gathering your materials today and take the first step toward a better workspace. Your back will thank you for making this positive change.