
Finding the right lug nut size is more important than you might think.
Using the wrong size can lead to loose wheels, damaged threads, or—worse—a wheel that could come off while driving.
That’s not a risk worth taking.
Many car owners face this common problem: they need to replace lug nuts but are unsure of the correct measurements.
If you’re in this situation, don’t worry—we’ve got you covered.
In this guide, you’ll learn:
- How to measure lug nuts correctly
- Which tools do you need
- Common size patterns for different car brands
As a certified auto mechanic with 15 years of experience, I’ve helped hundreds of car owners with this exact issue.
Let me show you the simple steps to find the perfect fit for your vehicle and keep your wheels safely attached where they belong.
How to Measure Your Vehicle’s Lug Nut Size?
Let me walk you through the simple steps to measure your lug nuts correctly.
What You’ll Need
- Socket wrench set
- Thread gauge
- Digital caliper or measuring tape
- A clean rag
Step 1: Check the Thread Size
Remove one lug nut from your wheel.
Clean it with the rag to remove dirt and oil.
Count the number of threads per inch.
This gives you the thread pitch.
For example, if you count 20 threads in one inch, your thread pitch is 20.
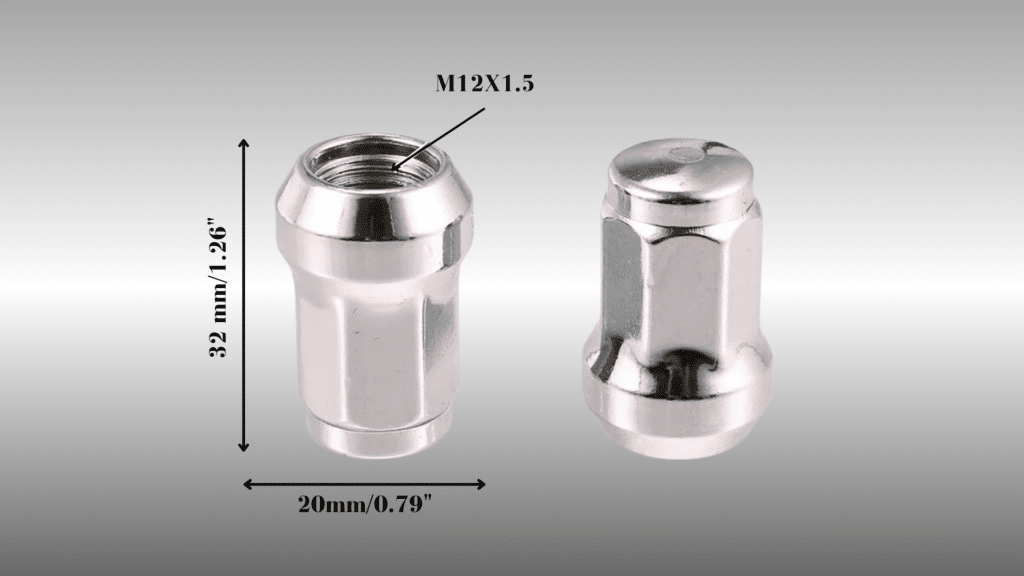
Step 2: Measure the Diameter
Use your digital caliper to measure across the widest part of the threads.
Most cars use common sizes like 12mm, 14mm, or 1/2 inch.
Write this number down – you’ll need it when buying new lug nuts.
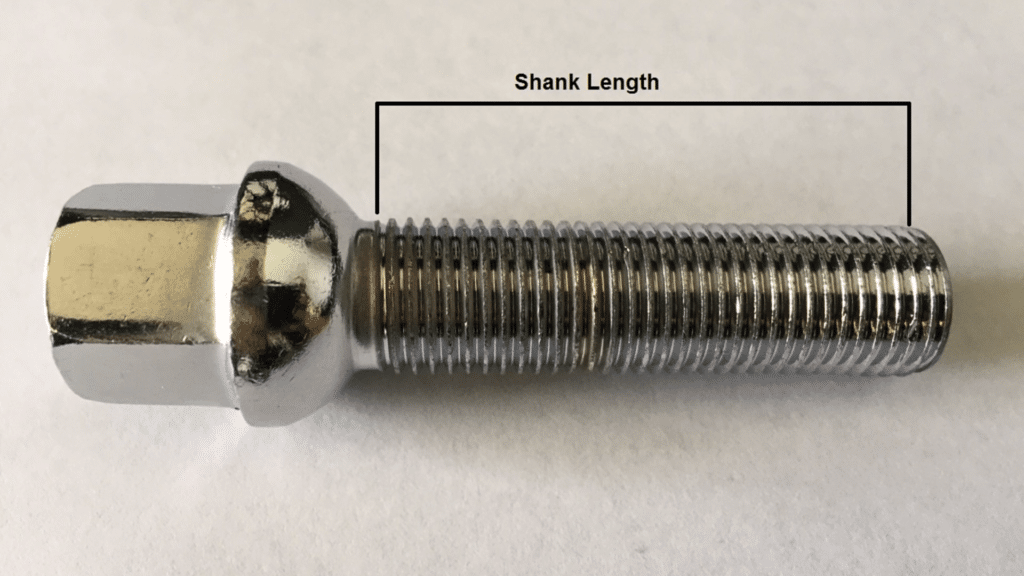
Step 3: Get the Length Right
Measure from the bottom of the lug nut to its top.
This is your length measurement.
Make sure to include any washers that came with the original lug nut.
Pro Tips:
- Always measure at least two lug nuts to double-check your results
- Clean threads make measuring easier and more accurate
- Take photos of your measurements for reference at the store
Important: Getting these measurements wrong can damage or make your wheels unsafe.
If you’re unsure, take your car to a local tire shop.
They can help you find the exact size you need.
Top Tools for Measuring Lug Nut Size
Let me show you the basic tools for measuring lug nuts quickly and accurately.
You won’t need to spend much money, and these tools are worth having in your garage.
1. Digital Caliper
This is your most useful tool.
It measures the width and length of lug nuts with perfect accuracy.
I recommend getting one that shows both metric and standard measurements.
Most cost between $20-30.
2. Thread Pitch Gauge
Think of this as a size matcher for your lug nut threads.
It’s like a pocket-sized card with different thread patterns.
You simply line up your lug nut with the patterns until you find a match.
This tells you the thread count.
3. Socket Set
You’ll need this to remove the lug nuts safely.
Make sure your set includes both metric and standard sizes.
The right socket should fit snugly over your lug nut.
4. Measuring Tape
A simple backup tool for quickly checking length.
While not as precise as a caliper, it works well for basic measurements.
Budget Tip: If you’re on a tight budget, start with just the caliper and thread gauge.
These two tools will handle most measuring tasks.
Common Manufacturer Wheel Bolt Patterns
Let me explain the most common bolt patterns.
I’ve compiled this simple guide to help you match your car’s pattern.
American Cars
| Brand | Common Patterns | Typical Lug Nut Size |
|---|---|---|
| Ford | 5 x 4.5 inches | 1/2-20 or 14mm x 1.5 |
| Chevrolet | 5 x 4.75 inches | 7/16-20 or 12mm x 1.5 |
| Dodge | 5 x 5.5 inches | 9/16-18 or 14mm x 1.5 |
| Jeep | 5 x 5 inches | 1/2-20 or 14mm x 1.5 |
Asian Cars
| Brand | Common Patterns | Typical Lug Nut Size |
|---|---|---|
| Toyota | 5 x 4.5 inches | 12mm x 1.5 |
| Honda | 4 x 100mm | 12mm x 1.5 |
| Nissan | 4 x 114.3mm | 12mm x 1.25 |
| Hyundai | 5 x 114.3mm | 12mm x 1.5 |
European Cars
| Brand | Common Patterns | Typical Lug Nut Size |
|---|---|---|
| BMW | 5 x 120mm | 14mm x 1.25 |
| Mercedes | 5 x 112mm | 14mm x 1.5 |
| Volkswagen | 5 x 100mm | 14mm x 1.5 |
| Volvo | 5 x 108mm | 14mm x 1.5 |
Quick Tips:
- The first number shows how many lug nuts your wheel needs
- The second number tells you the circle diameter they form
- Always check your car’s manual to confirm these sizes
Bonus: How To Measure Backspacing
Let me explain backspacing in simple terms.
It’s the space between your wheel’s mounting surface and the inner edge.
Getting this measurement right keeps your wheels from rubbing against brake parts or suspension.
What You’ll Need
- Straight edge (like a yardstick)
- Measuring tape
- Clean, flat surface
Simple Steps to Measure Backspacing
1. Lay Your Wheel Flat
Put your wheel face-down on a clean, flat surface.
The mounting part should point up toward you.
2. Place Your Straight Edge
Set your straight edge across the back of the wheel.
Make sure it touches both sides evenly.
3. Take the Measurement
Use your measuring tape to find the distance from:
- The mounting surface to your straight edge
- This number is your backspacing
Why This Matters
Too little backspacing means your wheels stick out too far.
Too much means they sit too close to your car’s parts. Both can cause:
- Tire wear
- Steering problems
- Brake issues
Quick Tip: Write down your measurement in both inches and millimeters.
You’ll often need both when shopping for wheels.
Tips for Measuring Lug Nut Size Accurately
1. Clean Your Lug Nuts First
Before measuring, remove all dirt and rust from your lug nuts.
I’ve seen many measurement mistakes from dirty lug nuts.
Use a wire brush and rag to clean them well.
This simple step makes a big difference in getting the right numbers.
2. Check Multiple Lug Nuts
Don’t rely on measuring just one lug nut.
I suggest checking at least three from different spots on your wheel.
Sometimes, lug nuts can wear differently, and measuring multiple ones helps you spot any odd sizes.
3. Use the Right Lighting
Good lighting helps you see the measurements.
I like to use a bright work light or measure outside during daylight.
When you can see better, you’ll measure better.
4. Double-Check Your Numbers
Write down each measurement as you take it.
Then, measure everything again. If your numbers match both times, you know they’re right.
This extra step saves you from buying the wrong size.
5. Keep Your Tools Clean
Clean your measuring tools before each use.
Dirt on your calipers or thread gauge can throw off your measurements.
I wipe my tools with a clean cloth before starting.
6. Work When the Wheel is Cool
Hot wheels can affect your measurements.
Wait until your car has been sitting for at least an hour.
This gives everything time to cool down and return to normal size.
7. Handle One Wheel at a Time
Focus on one wheel before moving to the next.
Take all your measurements, write them down, and put the lug nuts back on before moving on.
This keeps you from mixing up different sizes.
8. Ask for a Second Opinion
If you’re not sure about your measurements, ask someone else to check them, too.
Two sets of eyes are better than one.
Your local tire shop can often verify your measurements for free.
Common Mistakes When Selecting Lug Nuts
1. Skipping Thread Pattern Checks
Many car owners look at the size but forget about thread patterns.
I’ve fixed many wheels where the lug nuts seemed to fit but had wrong thread patterns.
This can strip your wheel studs and cost hundreds to fix.
Always check both the size and thread pattern before buying.
2. Mixing Different Types
Using different types of lug nuts on the same wheel is risky.
I’ve seen wheels with both cone-seat and flat-seat lug nuts.
This creates uneven pressure and can cause the wheel to wobble.
Make sure all your lug nuts match the style and size.
3. Choosing Based on Price Alone
Buying the cheapest lug nuts often leads to problems.
I’ve replaced countless low-quality lug nuts that rusted or broke too soon.
Good lug nuts might cost more upfront but last longer, keeping your wheels safer.
4. Not Checking the Seat Type
Your wheel needs specific seat types for lug nuts.
Using the wrong seat type means poor contact between the nut and wheel.
I recommend checking your car’s manual or asking a pro about the right seat type for your wheels.
5. Overlooking Length Requirements
The right length matters as much as the right width.
It’s too short, and your lug nuts won’t grip enough threads.
It’s too long, and they might hit brake parts.
Measure the length of your current lug nuts before buying new ones.
6. Ignoring Material Compatibility
Steel lug nuts on aluminum wheels can cause problems.
The metals react and can get stuck together.
Use lug nuts made for your wheel type.
This saves you trouble when you need to remove them later.
7. Forgetting About Weather
Some lug nuts rust quickly in wet areas.
If you live where it rains or snows often, pick lug nuts with good rust protection.
Stainless steel or coated options work best in tough weather.
Importance of Using the Right Lug Nut Size
1. Safety First – The Real Risk of Wrong Sizes
When you use the wrong-sized lug nuts, you put yourself and others at risk.
I’ve seen wheels come loose on the highway because of this simple mistake.
Your wheels need the right grip to stay in place.
Think of lug nuts as the only thing keeping your wheels attached to your car.
They must fit perfectly to do their job.
2. Avoiding Wheel Damage
Wrong lug nuts can damage your wheel’s holes and studs, and the repair costs add up fast.
I’ve helped customers who needed new wheels because incorrect lug nuts wore down their wheel holes.
Using the right size keeps your wheels in good shape and saves you money.
3. Better Braking Performance
Your brakes work best when your wheels are properly attached.
Loose or poorly fitted lug nuts can cause your wheels to shift slightly when you brake.
This tiny movement affects how well your brakes work.
Proper lug nut size means better stopping power when you need it most.
4. Preventing Stud Problems
Wheel studs can break if lug nuts don’t fit right.
I’ve fixed many cars with broken studs caused by wrong-sized lug nuts.
Replacing studs takes time and money.
The right-size lug nuts protect your studs and keep them working well.
5. Keeping Your Tires in Good Shape
Bad lug nut fit leads to uneven tire wear.
Your tires might wear out faster on one side.
This means buying new tires sooner than needed.
Correct lug nut size helps your tires last longer and wear evenly.
6. Long-Term Cost Savings
Fixing problems from wrong lug nuts costs much more than buying the right ones.
I’ve seen $20 saved on lug nuts turn into $500 worth of repairs.
Smart car owners know that using the right size saves money over time.
7. Maintaining Vehicle Value
Your car keeps its value better when all parts fit correctly.
Good maintenance history matters when selling your car.
Using the right lug nuts shows you take care of your vehicle properly.
Conclusion
Getting the right lug nut size isn’t just about measurements – it’s about keeping you safe on the road.
I’ve shown you the basic steps and tools to find the perfect fit for your wheels.
Remember these key points:
- Always clean your lug nuts before measuring
- Check both size and thread pattern
- Use the right tools for accurate results
Your wheels carry you and your loved ones every day.
Getting the right lug nuts matters more than you might think.
If you’re unsure about your measurements, stop by your local tire shop.
They’ll help you double-check your work and find the perfect fit.
Frequently Asked Questions
Can I Mix Different Brands of Lug Nuts if They’re the Same Size?
No.
Even with matching sizes, different brands might have slight variations in materials and construction.
Therefore, you should stick to the same brand for all lug nuts on your wheel.
How Often Should I Check My Lug Nuts for Tightness?
Check your lug nuts every 2-3 weeks and after any long trips.
Use a torque wrench to ensure they’re at the right tightness level for your car.
What Should I Do if a Lug Nut Gets Stuck?
Spray penetrating oil on the stuck lug nut and wait 15 minutes.
If necessary, use a breaker bar.
Don’t force it—this could damage your wheel studs.