
I love giving old furniture a fresh life. This china cabinet makeover is one of my favorite projects because it turned something forgotten into something beautiful.
With just a bit of paint, some time, and a little effort, I changed a dark, dated piece into a light and lovely part of my home. I didn’t need fancy tools or a big budget, just patience and creativity.
I’ll walk you through how I did it, from picking colors to adding final touches. I’ll also share what worked, what I might do differently next time, and how simple updates made a big difference.
If you have an old cabinet sitting around, this might be the push you need. I hope my experience helps you feel ready to start your own project and enjoy the results as much as I did.
Why Update a China Cabinet?
Old china cabinets are often handed down or picked up from thrift stores, but many feel too bulky or outdated for modern spaces. Instead of letting them sit unused, a simple makeover can give them new life.
With some paint and updated hardware, even the heaviest-looking cabinet can feel lighter and more stylish. This kind of refresh blends easily with popular styles like farmhouse, cottage, or even clean, modern looks.
It’s not just about appearance- it’s also a smart way to keep using solid furniture that still has plenty of life left. A well-done makeover turns an old piece into a standout part of any room.
Plus, it keeps its storage function while looking much more current. Refreshing a china cabinet adds both charm and purpose, without needing to replace it completely.
Steps to Transform a China Cabinet
Changing a dated china cabinet into a beautiful, sellable piece takes simple steps- cleaning, repairing, painting, and styling with care.
Materials Needed
Gather basic tools, paint, and a few extras, such as primer and wallpaper, to make your china cabinet makeover smooth and successful.
- Chalk paint (color used: Licorice by Behr)
- Bullseye 123 Primer
- Bondo Glazing & Spot Putty
- Simple Green (or dish soap, TSP, or Crud Cutter)
- Microfiber cloth
- Painter’s tape
- 120, 220, and 400 grit sandpaper
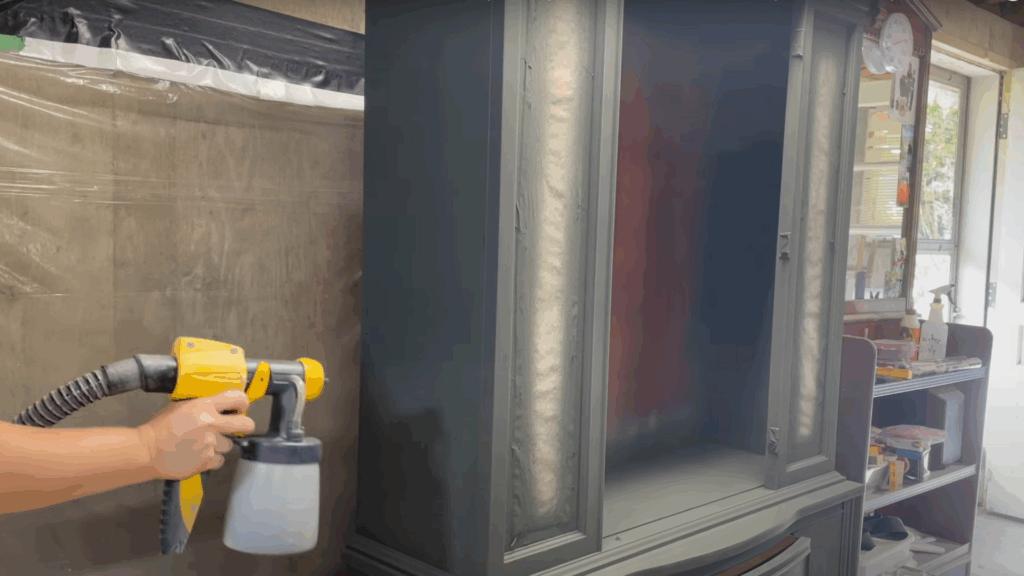
- Wagner Flexio 4000 paint sprayer
- Peel-and-stick wallpaper
- Old toothbrush (for detailed cleaning)
- Bowl (for hardware)
- Water (to thin primer and tint topcoat)
- Respirator mask (for safety while using Bondo)
Step 1: Start with a Smart Buy
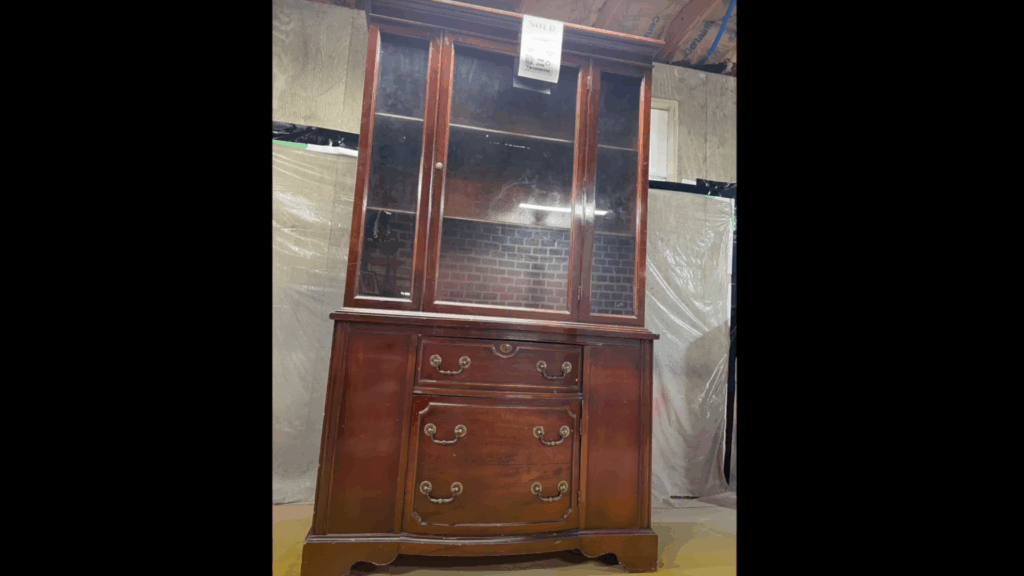
Begin your china cabinet makeover by choosing the right piece. Look for furniture priced under $50 with only minor wear.
It’s best to avoid items that need major repairs or have broken parts, as those can take extra time and money to fix. A solid cabinet with dings and scuffs is ideal- easy to clean up and much easier to flip for a profit.
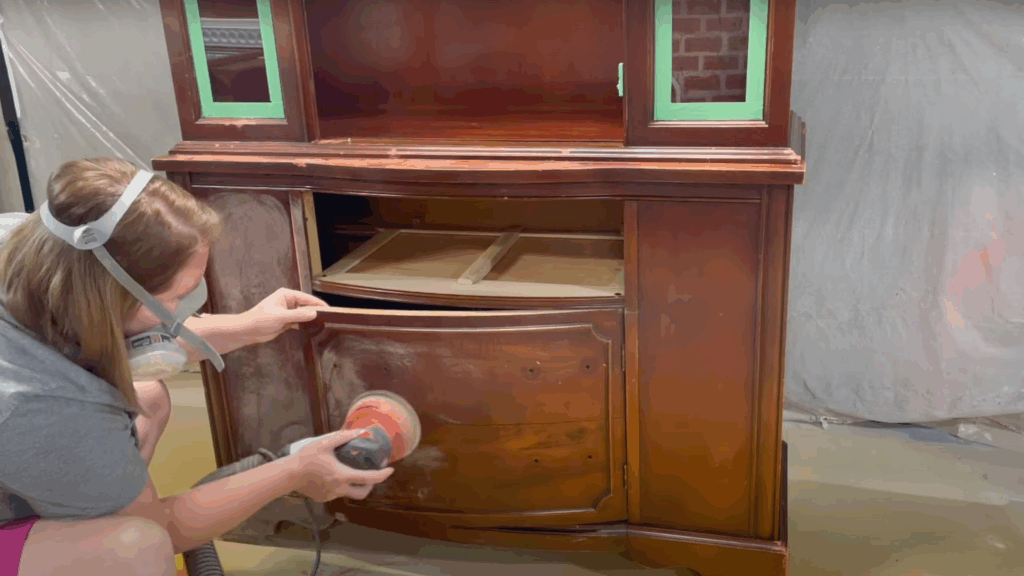
Step 2: Remove Hardware and Clean
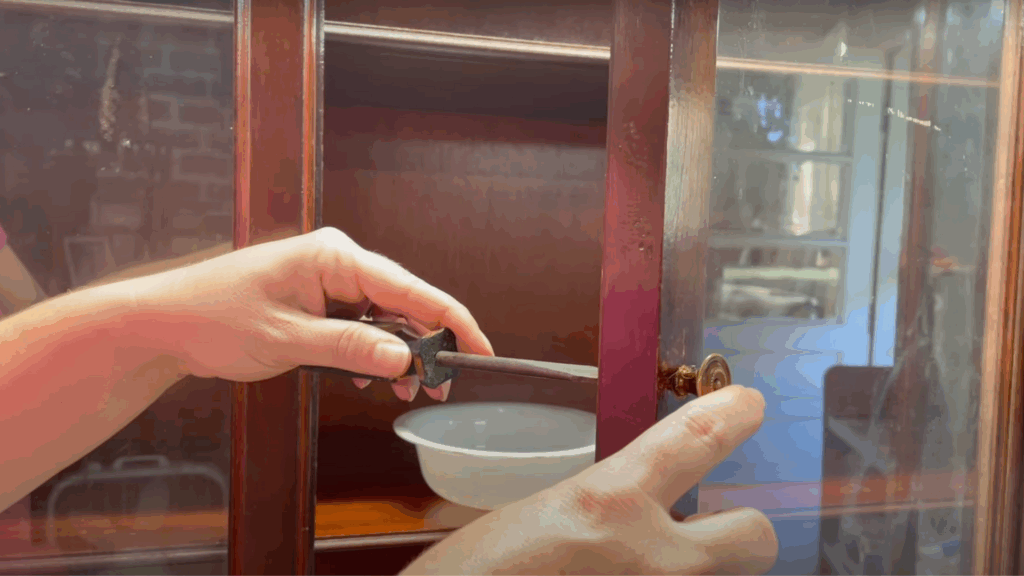
Before doing any painting, take off all knobs, handles, shelves, and glass panels if possible. This makes cleaning and painting much easier.
Use Simple Green or mild dish soap with warm water and a microfiber cloth to remove dirt and grease. For tight corners, use a toothbrush to get into the grooves.
Be sure to clean off any old furniture polish, as it can prevent the paint from sticking properly.
Step 3: Do Small Repairs
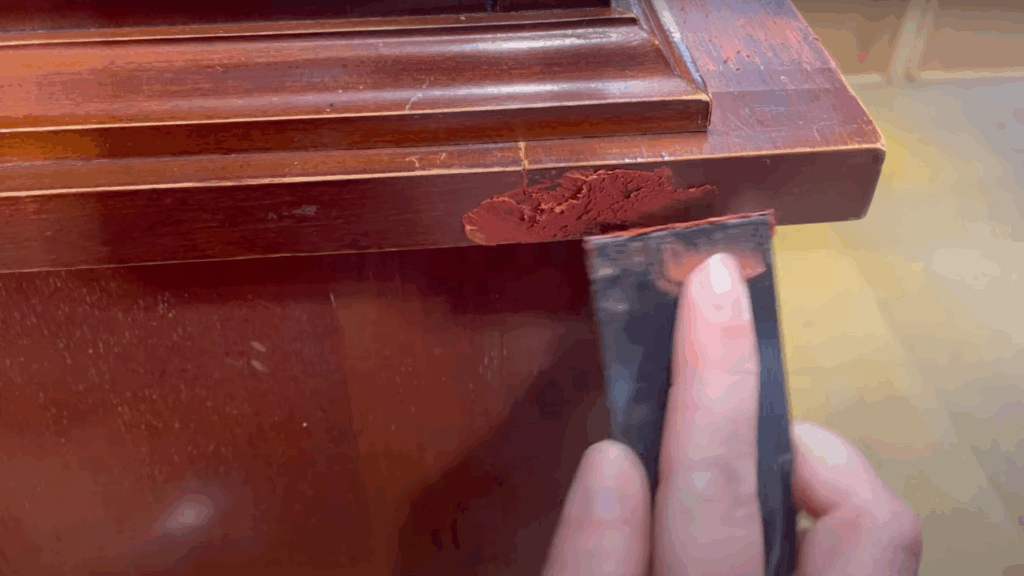
Fix light surface damage using Bondo Glazing & Spot Putty. It’s perfect for filling scratches and small dents. Just be sure not to use it on deep holes- it may crack or shrink.
This product is easier to use than traditional Bondo because it doesn’t require mixing. Use it in a well-ventilated area, and wear a mask for safety. Once dry, sand the area lightly to smooth it out.
Step 4: Tape Off Windows and Hinges
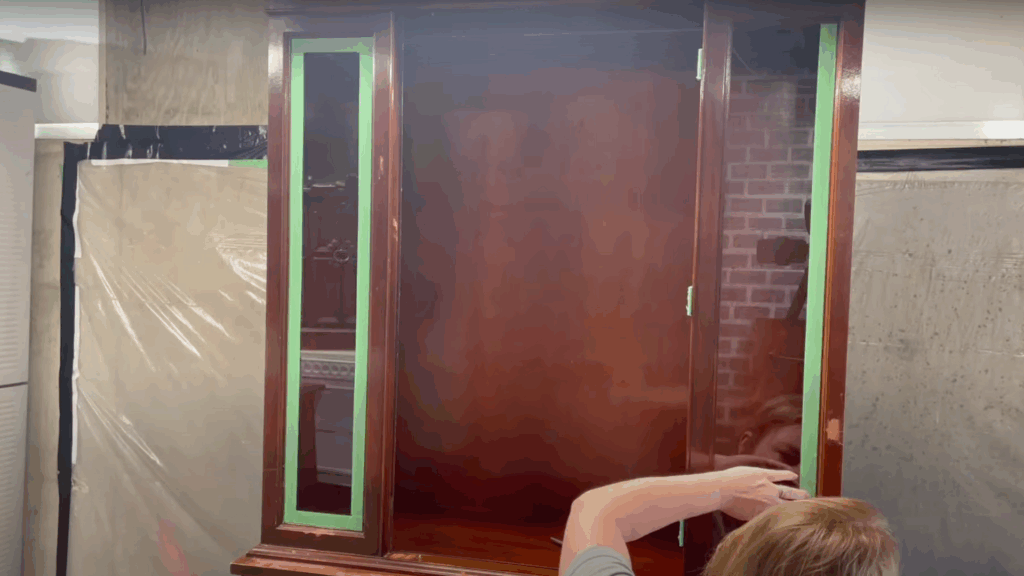
Use painter’s tape to carefully cover the windows, hardware hinges, or any areas you want to keep free of paint.
Taping protects delicate surfaces from scratches during sanding and keeps your paint job looking clean and polished. Take your time here- it saves a lot of cleanups later.
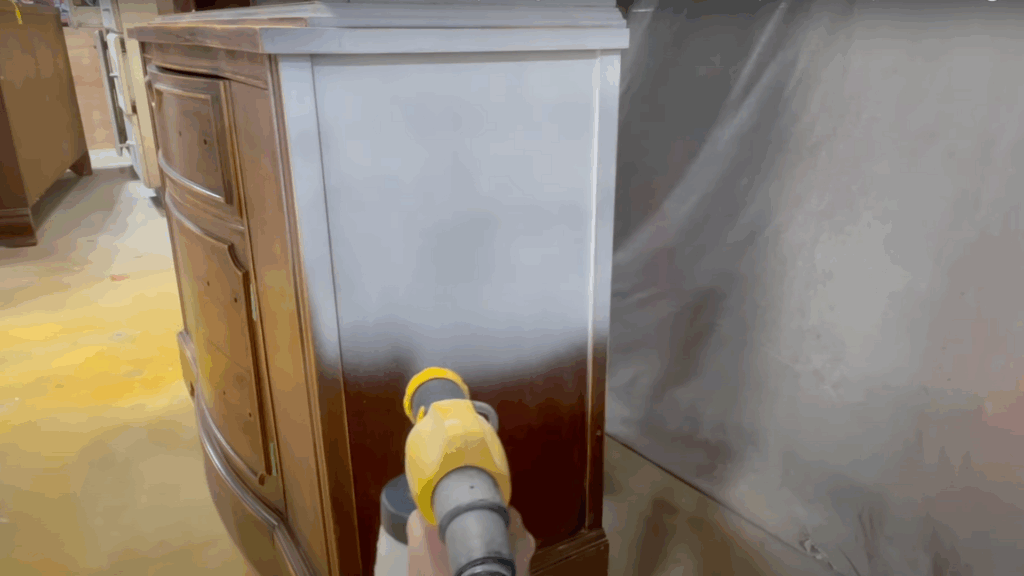
Step 5: Sand and Smooth Surfaces
Start sanding with 120-grit sandpaper to rough up the surface and level any patched areas. Follow up with 220-grit sandpaper to create a smooth finish.
This step helps the paint adhere better and gives a clean surface for priming. Be sure to wipe away all sanding dust with a microfiber cloth before you move on to the next step.
Step 6: Prime the Cabinet
Use Bullseye 123 primer for a strong base coat. Pour the primer into a paint sprayer, such as the Wagner Flexio 4000, and thin it slightly with water until it flows smoothly, with no peaks when you lift the stick.
Always test your spray on cardboard before moving to the cabinet. This helps avoid drips and keeps the surface even.
Step 7: Light Sand After Priming
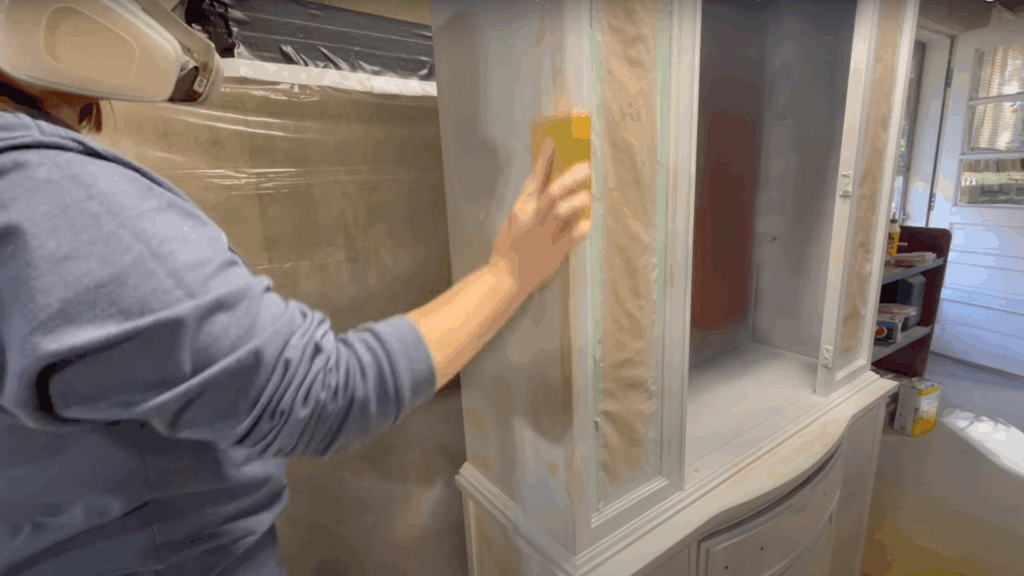
Once the primer is dry, sand the surface again using 400-grit sandpaper. This helps smooth out any rough patches and prepares the cabinet for a perfect topcoat.
If you notice any stain or polish bleeding through, spot-prime those areas again before painting. A smooth base makes a huge difference in the final look.
Step 8: Paint the Cabinet
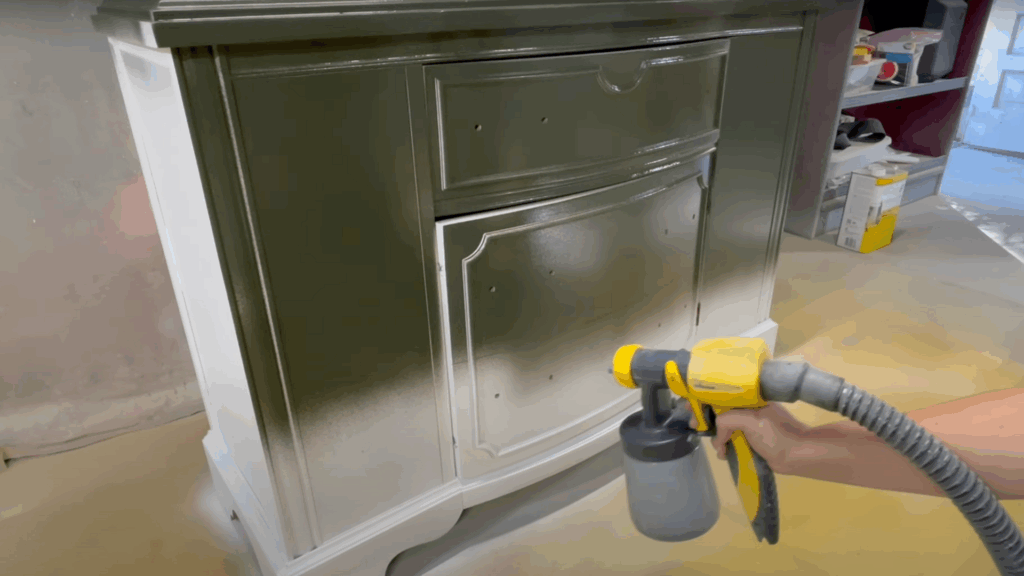
For this project, a deep green shade called Licorice by Behr was used. It’s rich and stylish, perfect for adding a modern feel. Keep in mind that dark paints often look even deeper once they dry or after a topcoat.
Apply the paint evenly with a sprayer or a good brush, depending on your tools. Two light coats are usually enough.
Step 9: Add the Topcoat
To avoid streaks with dark paint, mix a little leftover paint into your clear topcoat to tint it. This trick helps keep the finish smooth and even.
Before applying the topcoat, lightly sand the painted surface again with 400-grit paper to ensure it’s clean and smooth. Then, apply the topcoat for lasting protection and a professional look.
Step 10: Add Wallpaper for a Finishing Touch
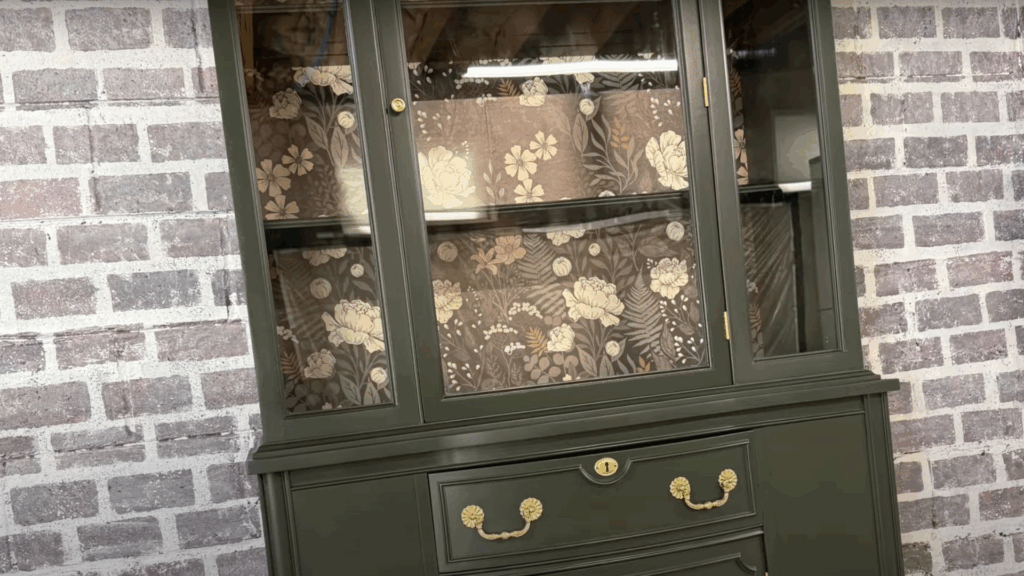
For the final touch, use peel-and-stick wallpaper inside the back panel or drawers. This adds personality and sets your piece apart from others. Choose a pattern that complements your paint color.
Keep in mind that wallpaper is an added cost, but it can increase the value and appeal of your finished cabinet, especially if you plan to sell it.
For a visual guide, you can watch this video by @Brick Wall Furniture Gallery on YouTube.
China Cabinet Makeover Cost and Time Breakdown
A full china cabinet makeover can be done in a weekend for under $150 using budget-friendly tools and beginner techniques.
| Item/Task | Estimated Cost | Notes |
|---|---|---|
| Chalk Paint | $25–$35 | Depending on brand and size |
| Primer | $15–$20 | Bullseye 123 is used in a sprayer |
| New Knobs/Hardware | $10–$25 | Optional, but adds a polished look |
| Peel-and-Stick Wallpaper | $10–$20 | Optional for inside drawers or backing panel |
| Sandpaper | $5–$10 | Various grits are used for smoothing and prepping |
| Cleaner (Simple Green, etc.) | $5–$10 | Needed for proper surface prep |
| Total Estimated Cost | $70–$120 | All costs may vary slightly by location/brand |
| Time Required | 1 Weekend | Spread over 2–3 days with drying time included |
| Skill Level | Beginner-Friendly | No major tools or sanding required |
Creative China Cabinet Design Ideas
Try these fun and stylish design variations to give your china cabinet a custom look that fits your home’s style and personality.
- Monochrome: Use a single color, such as black or white, for a sleek, modern look.
- Two-Tone: Paint the exterior one color and the interior a different shade for contrast.
- Bold Accent: Choose a deep color, such as green or navy, for the outside with a light, neutral interior.
- Wood Stain: Remove the old finish and apply a fresh wood stain to show off the natural grain.
- Distressed Finish: Lightly sand edges after painting for a worn, vintage look.
- Color-Blocked Shelves: Paint each shelf or section in a different color for a playful effect.
- Glass Panel Highlight: Add frosted film or decorative trim to glass for extra detail.
- Matte vs Gloss: Use matte for a soft farmhouse feel or gloss for a sleek, modern finish.
- Wallpapered Interior: Line the inside with bold or floral wallpaper for a surprise pop.
- Chalkboard Backing: Paint the inside with chalkboard paint for labeling or drawing.
- Open Display: Remove cabinet doors entirely for an open-shelf, airy look.
- Ombre Shades: Blend similar tones from dark to light vertically for a stylish fade effect.
- Gold Trim: Add metallic gold to handles or edges for a luxe touch.
Conclusion
This china cabinet makeover proves that with a little time, effort, and creativity, even the most outdated furniture can become something beautiful and useful again.
Done in just a weekend and for under $150, this project completely changed the feel of the space. It’s a great way to add charm to a room without buying new furniture. Simple tools, chalk paint, and a bit of style go a long way.
Try adding wallpaper, swapping hardware, or just freshening up the color. Small changes can make a big difference. Feel free to take on your own project- no need for fancy tools or advanced skills.
Once finished, snap a photo and share it. Seeing other makeovers helps keep the DIY inspiration going, and your piece might inspire someone else, too.