
Making Christmas crafts together is one of my favorite parts of the holiday season. It’s a simple way to slow down, laugh, and create something special with the people you love.
In this post, I’ll share some easy and fun Christmas craft ideas for kids and adults that you can make at home.
You’ll find simple projects for:
- Decorating your home
- Making handmade gifts
- Spending cozy craft time as a family
You don’t need fancy tools or expert skills, just some basic supplies and a little imagination. These ideas work for all ages, so everyone can join in.
If you’re making paper ornaments with the kids or crafting gifts for friends, each project helps you enjoy the true spirit of Christmas: time together, creativity, and a touch of homemade joy.
Why Christmas Crafts are Perfect for Family Fun?
I love making Christmas crafts because it brings everyone together in a simple, happy way.
When you set aside screens and pick up scissors or glue, you get to talk, laugh, and share ideas. It’s a great way for kids and adults to connect and spend real time together.
Crafting also lets everyone show their creativity; you can make things that reflect your own style and ideas.
I enjoy how even small projects, like decorating cards or making ornaments, feel personal and thoughtful.
You can create decorations that match your home or gifts that mean something special to the people you love. It doesn’t have to be perfect, just fun and meaningful.
Making things with your hands always adds more heart to the holidays and makes the season feel truly special.
Fun Christmas Crafts for Kids
These easy and fun Christmas crafts are perfect for keeping kids busy during the holidays. They’re simple to make, use basic supplies, and let little ones get creative while making festive decorations.
1. Paper Plate Santa Faces

This cheerful craft turns plain paper plates into adorable Santa faces that kids love making. You’ll need paper plates, cotton balls, red and pink paper, glue, scissors, and markers.
Kids can decorate their Santas with sparkly hats, rosy cheeks, or funny mustaches for extra fun.
It’s a wonderful way to teach cutting, pasting, and creativity while spending time together. Always use child-safe scissors and non-toxic glue to keep crafting safe.
Steps:
- Cut a red paper triangle for the hat and glue it on the plate.
- Add cotton balls for the hat edge and beard, plus a pink paper nose.
- Draw eyes and a smile, then let it dry before hanging.
2. Handprint Reindeer Cards
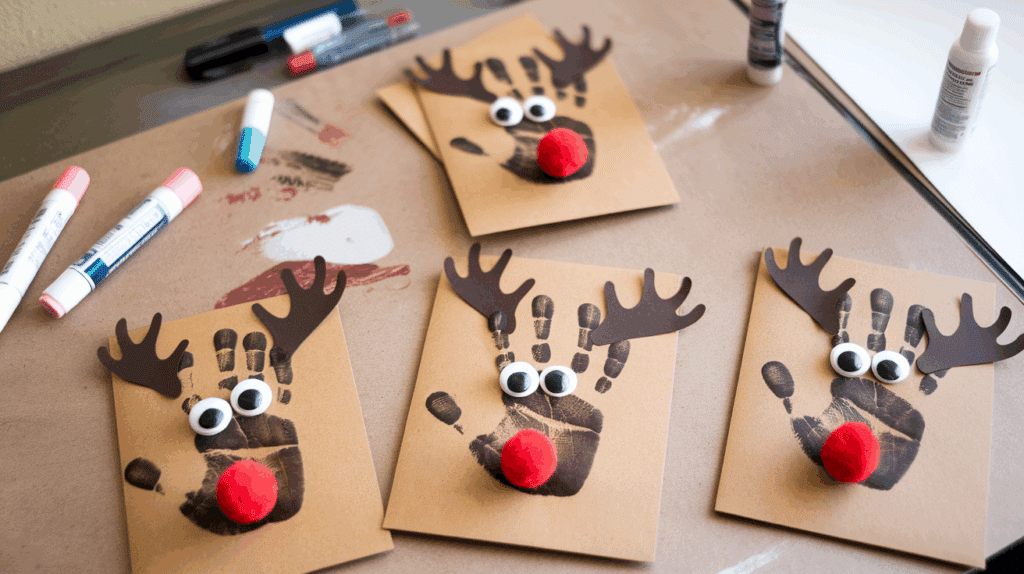
This sweet handprint craft turns your child’s hand into a reindeer that doubles as a keepsake card. You’ll need brown cardstock, washable paint, googly eyes, red pom-poms, glue, and markers.
Kids can add glitter, stickers, or write names to make each one special. It’s great for family gift-giving and helps little ones practice painting and creativity.
Always use washable, non-toxic paint and have wet wipes handy for quick cleanups.
Steps:
- Paint your child’s hand brown and press it onto cardstock.
- Glue on googly eyes and a red pom-pom for the nose.
- Draw antlers, write a message, and let it dry.
3. Popsicle Stick Snowflakes
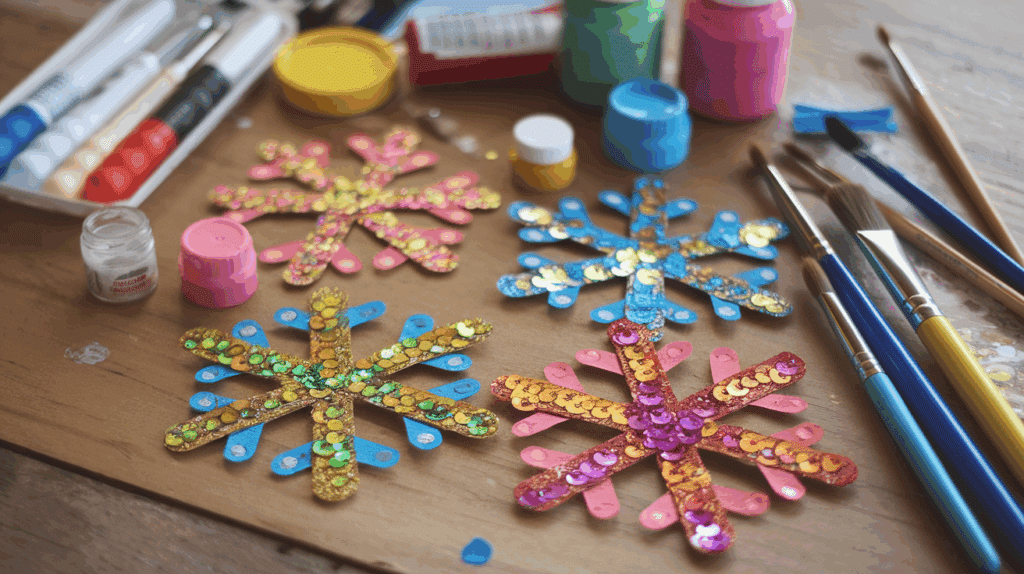
This colorful craft turns simple sticks into sparkling snowflakes that brighten up any room. You’ll need popsicle sticks, glue, paint, glitter, and yarn for hanging.
Kids can decorate them in white, blue, silver, or multicolor themes and even add sequins for shine.
It’s perfect for teaching symmetry and hand coordination. Supervise glue use and stick to washable paints for easy cleanup.
Steps:
- Glue three sticks together in a snowflake shape.
- Paint and add glitter while wet.
- Let it dry, and tie the yarn to hang.
4. Cotton Ball Snowmen
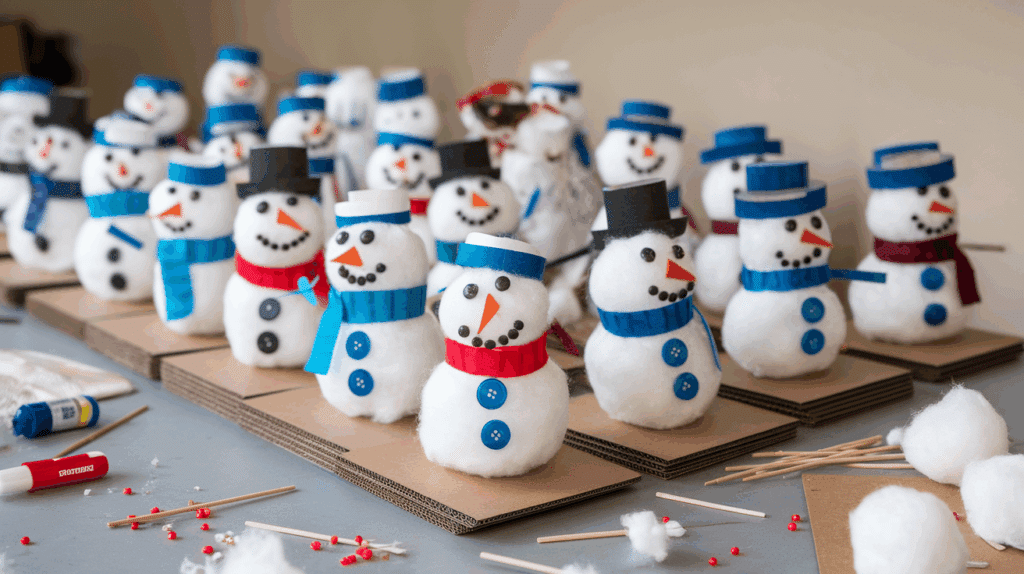
This soft and fluffy craft lets kids build their own snowmen, no snow required! You’ll need cardboard, cotton balls, glue, buttons, paper scraps, and markers.
Children can customize their snowmen with scarves, hats, or earmuffs using fabric or colored paper.
It’s a perfect indoor winter project that builds fine motor skills and creativity. Always use non-toxic glue and supervise small parts like buttons for safety.
Steps:
- Cut a snowman shape from cardboard and add glue.
- Cover with cotton balls, then add eyes, nose, and buttons.
- Draw arms, let dry, and display.
5. Christmas Tree Paper Garland
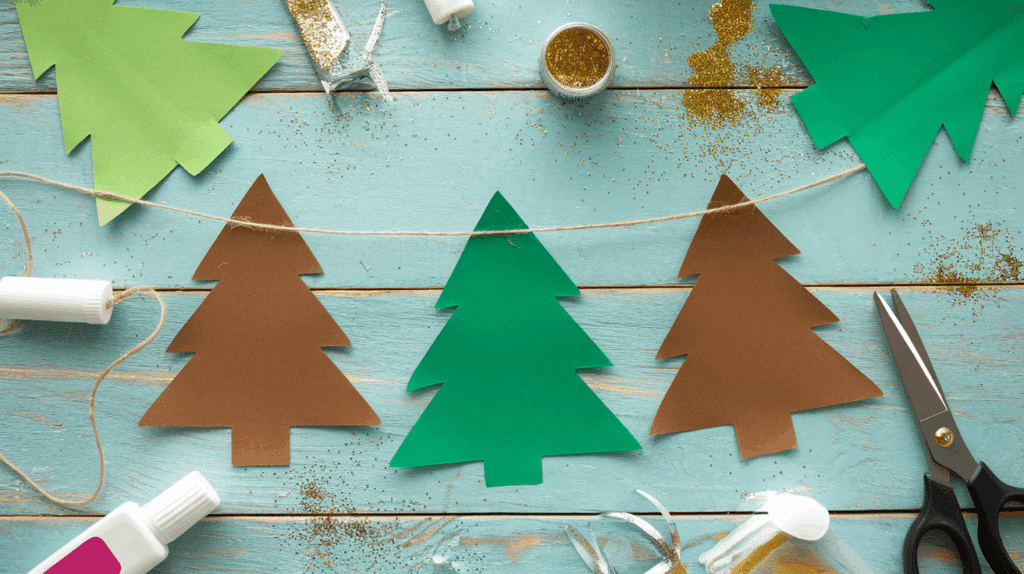
This bright paper garland is a fun way for kids to decorate for Christmas. You’ll need green and brown paper, string, glue, scissors, and some stickers or glitter.
Kids can decorate each paper tree with names, drawings, or small details to make it a fun family project.
It’s a great way to practice cutting, gluing, and pattern-making while keeping kids busy during the holidays. Use safety scissors and supervise cutting to keep things safe and fun.
Steps:
- Cut green triangles and brown trunks from paper.
- Glue trunks, decorate trees, and punch holes at the top.
- Thread a string and hang it across walls or windows.
6. DIY Jingle Bell Bracelets

These fun and musical bracelets make crafting time extra exciting for kids who love sound and sparkle. You’ll need pipe cleaners or elastic string, small jingle bells, and colorful beads.
Kids can pick colors, make patterns, or spell names for a personal touch while building creativity and fine motor skills. Always ensure bells are securely fastened and avoid very small pieces for younger children.
Once finished, these bracelets are great for holiday parties, caroling, or just shaking along to Christmas songs.
Steps:
- Thread bells and beads onto pipe cleaners or elastic.
- Twist or tie ends to make a bracelet loop.
- Shake gently to enjoy the jingle.
7. Toilet Paper Roll Elves
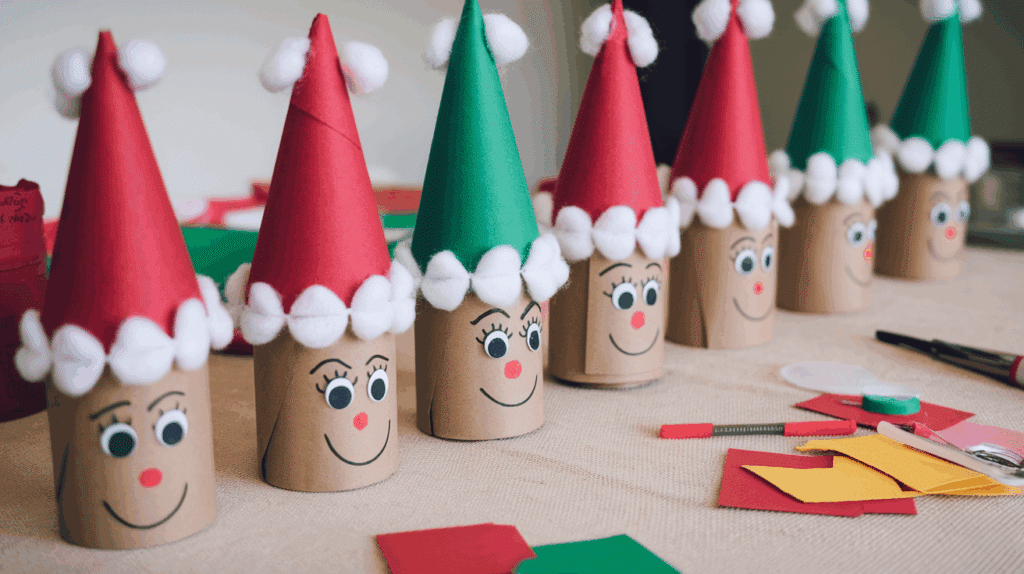
These adorable elves are a creative way to turn recycled toilet paper rolls into festive decorations. You’ll need colored paper, glue, markers, cotton balls, and small craft items like pom-poms or sequins.
Kids can design each elf’s outfit, hat, and face their own way. It’s a fun way to recycle and be creative, using smooth rolls and safe glue.
These elves can decorate shelves, tables, or a handmade Christmas village.
Steps:
- Cover the rolls with colored paper and add a hat, arms, and legs.
- Glue cotton balls for trim and draw faces.
- Let dry and display standing or hanging.
8. Painted Pinecone Ornaments
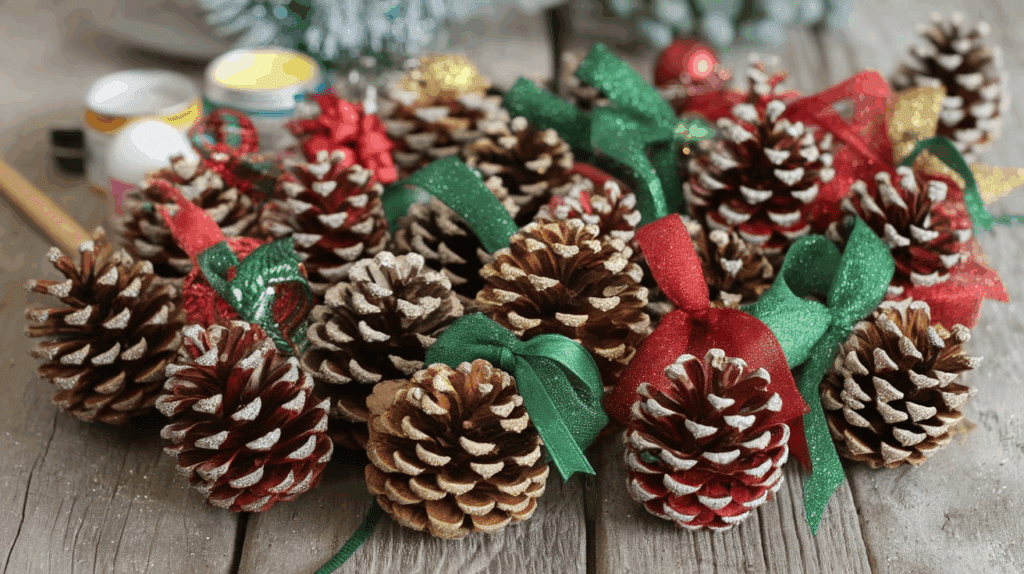
This nature-based craft brings a rustic, cozy feel to your Christmas tree. You’ll need pinecones, acrylic paint, glitter, small brushes, and ribbon.
Kids can paint the pinecones in festive shades like red, green, gold, or silver and add glitter for sparkle. It’s a wonderful mix of outdoor fun and indoor creativity that promotes sensory play.
Use non-toxic paint and let adults handle ribbons or glue. Once dry, they make great gifts or natural tree decorations.
Steps:
- Paint pinecones and sprinkle glitter while wet.
- Let them dry completely.
- Tie a ribbon at the top and hang it on the tree.
Easy Christmas Crafts for Adults
These simple Christmas crafts are great for relaxing, getting creative, and adding a personal touch to your holiday décor. They’re perfect for gifting or decorating your home with a handmade style.
9. Mason Jar Candle Holders

These cozy candle holders are a beautiful way to add a handmade glow to your home during Christmas.
You’ll need clean mason jars, tea light candles, twine or ribbon, faux snow, and optional decorations like pine sprigs or cinnamon sticks. You can customize them with paint, stencils, or glitter to match your holiday theme.
Always use flameless or LED candles for safety. This craft is easy, affordable, and perfect for table centerpieces, gifts, or cozy winter décor.
Steps:
- Fill jars with faux snow or Epsom salt and place a tea light inside.
- Tie twine or ribbon around the jar top for decoration.
- Add pine sprigs or cinnamon sticks and display.
10. Dried Orange Slice Garlands

This natural and fragrant garland adds a rustic holiday charm to your home. You’ll need fresh oranges, a knife, parchment paper, twine, and a needle.
Slice oranges evenly and dry them in the oven until crisp and translucent for a beautiful look. You can mix them with cinnamon sticks, pinecones, or star anise for extra texture.
Bake at a low temperature to avoid burning. These garlands add a citrus scent to mantels, trees, or windows.
Steps:
- Slice oranges thinly and bake at 200°F for 3–4 hours until dry.
- Let slices cool completely, then thread onto twine.
- Hang the garland across a window, wall, or mantel.
11. DIY Holiday Wreath with Pine and Ribbon

A handmade wreath is a timeless craft that brings festive cheer to your front door. You’ll need a wreath base (wire or foam), pine branches, ribbon, floral wire, and optional extras like berries or ornaments.
You can customize the color scheme with golds, reds, or natural tones, depending on your style.
Use floral wire to secure materials tightly so they last through the season. This craft is relaxing and rewarding, giving your home a personal, welcoming touch during the holidays.
Steps:
- Attach pine branches to a wreath base with floral wire.
- Add berries, pinecones, or ornaments for detail.
- Tie a ribbon bow and hang the wreath on your door or wall.
12. Personalized Gift Tags and Wrapping Paper

This craft adds a thoughtful, creative touch to your holiday gifts. You’ll need brown kraft paper, markers, stamps, string, and small embellishments like twine or washi tape.
You can customize each tag with names, doodles, or festive quotes to make gifts more personal.
It’s an eco-friendly alternative to store-bought wrapping, and it’s perfect for adults who enjoy simple, hands-on crafts. Use non-toxic markers and recycled paper for eco-friendly, handmade gifts.
Steps:
- Wrap gifts with brown kraft paper and decorate with stamps or drawings.
- Cut small cardstock tags and write names or messages.
- Tie the tags to gifts with twine or ribbon.
13. Fabric Scrap Christmas Tree Cones
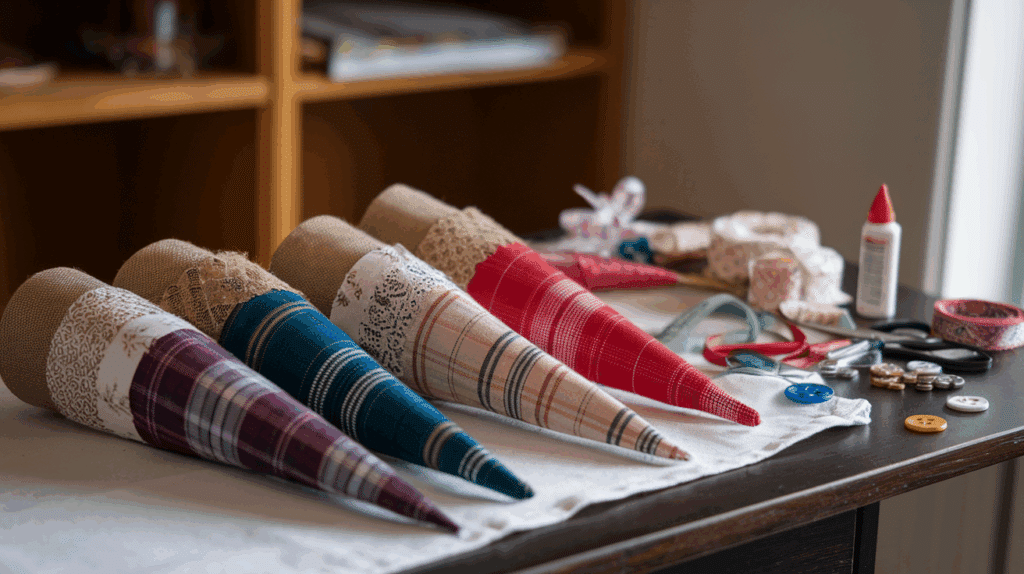
This easy project is perfect for reusing leftover fabric and adding a handmade touch to your decor. You’ll need cardboard or foam cones, fabric scraps, glue, scissors, and small items like ribbon or buttons for decoration.
You can combine different patterns, such as plaid, burlap, or cotton, to give each cone its own look.
It’s a quick, no-sew craft that’s simple to make and great for adults who enjoy creating practical decorations. Use fabric-safe glue for clean results and keep scissors away from kids.
Steps:
- Cut fabric scraps and glue them around a foam or cardboard cone.
- Overlap layers for texture and color.
- Add a bow or button on top and let it dry.
14. Cinnamon Stick Candle Wraps

This project adds a warm look and a pleasant scent to your candles. You’ll need pillar candles, cinnamon sticks, twine or ribbon, and hot glue.
You can cover the candle fully or just create a small wrap, depending on the look you prefer. When lit, the candle releases a soft cinnamon scent. Keep glue and sticks away from the flame.
These make great table decorations or simple handmade gifts for friends and neighbors.
Steps:
- Line cinnamon sticks around a candle and glue lightly.
- Wrap with twine or ribbon to hold them in place.
- Tie a bow and display safely away from flames.
15. Handmade Clay Ornaments

These simple ornaments are a great way to personalize your tree or give homemade gifts. You’ll need air-dry clay, cookie cutters, a rolling pin, paint, and string.
You can shape them into stars, trees, hearts, or initials and decorate them with paint or stamps once dry.
It’s a fun, relaxing craft that lets you be creative with color and design. Always use non-toxic clay and paint to make them safe for kids and pets.
Steps:
- Roll out air-dry clay and cut shapes using cookie cutters.
- Make a small hole for hanging and let it dry fully.
- Paint, decorate, and thread the string through to hang.
16. Rustic Wood Slice Coasters
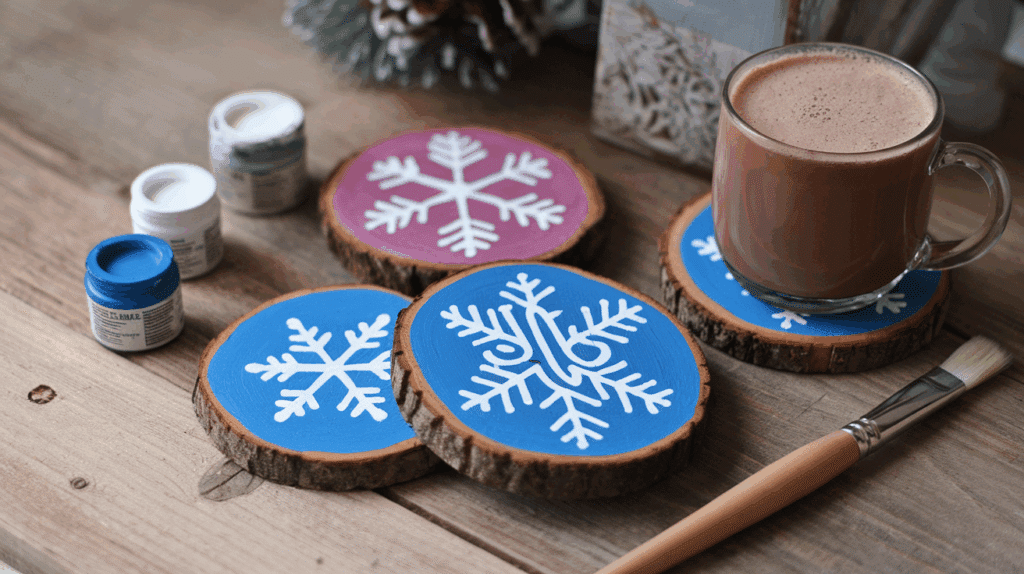
These simple coasters make great gifts and are easy to personalize. You’ll need smooth wood slices, sandpaper, paint or wood stain, and a sealant.
You can decorate them with initials, snowflakes, or simple patterns using paint or a wood-burning tool.
It’s an easy craft that gives a handmade touch to your coffee table or gift basket. Always sand the wood edges smooth and let the paint dry before sealing.
Steps:
- Sand wood slices until smooth and paint or stain them.
- Add simple designs or initials with paint or a wood burner.
- Seal with a clear finish and let it dry before use.
DIY Christmas Crafts for the Home
These easy home décor crafts bring warmth and holiday cheer to every corner of your house. They’re budget-friendly, simple to make, and perfect for creating a cozy Christmas atmosphere.
17. Twine-Wrapped Christmas Trees
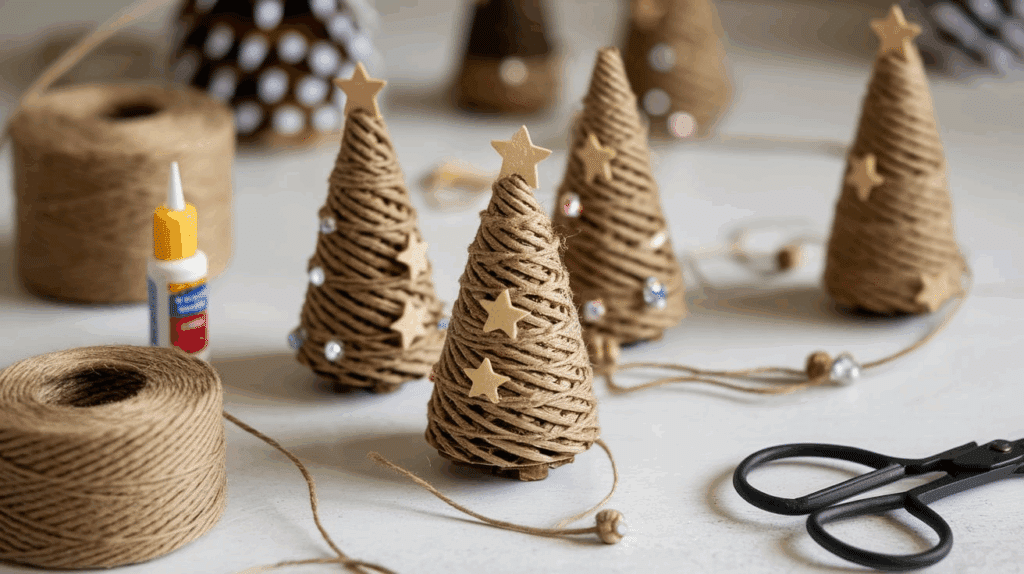
These handmade trees bring a simple and cozy touch to your holiday decor. You’ll need cardboard or foam cones, twine, glue, and small decorations like beads or stars.
You can wrap the cones tightly for a neat look or loosely for a rustic style, depending on your preference. This is a relaxing craft that looks great on mantels, shelves, or tabletops.
Use clear glue, let layers dry, and gift these trees to friends who love handmade decor.
Steps:
- Start at the bottom of a cone, adding glue as you wrap twine upward.
- Keep wrapping until the cone is covered, then cut and secure the end.
- Add a small bow, star, or bead on top and let it dry.
18. Snowy Mason Jar Lanterns
These glowing lanterns create a calm, wintry look indoors. You’ll need mason jars, white paint or Epsom salt, glue, and small LED candles.
You can add twine, lace, or pine sprigs around the top for decoration. The frosty finish gives off a soft light, perfect for cozy evenings. Use LED candles only to keep it safe for indoor use.
These lanterns are great for dining tables, window sills, or as gifts for family and neighbors.
Steps:
- Coat the jar with glue and roll it in Epsom salt for a frosted look.
- Let it dry, then place an LED candle inside.
- Tie twine or lace around the top for decoration.
19. Pinecone and Berry Centerpiece
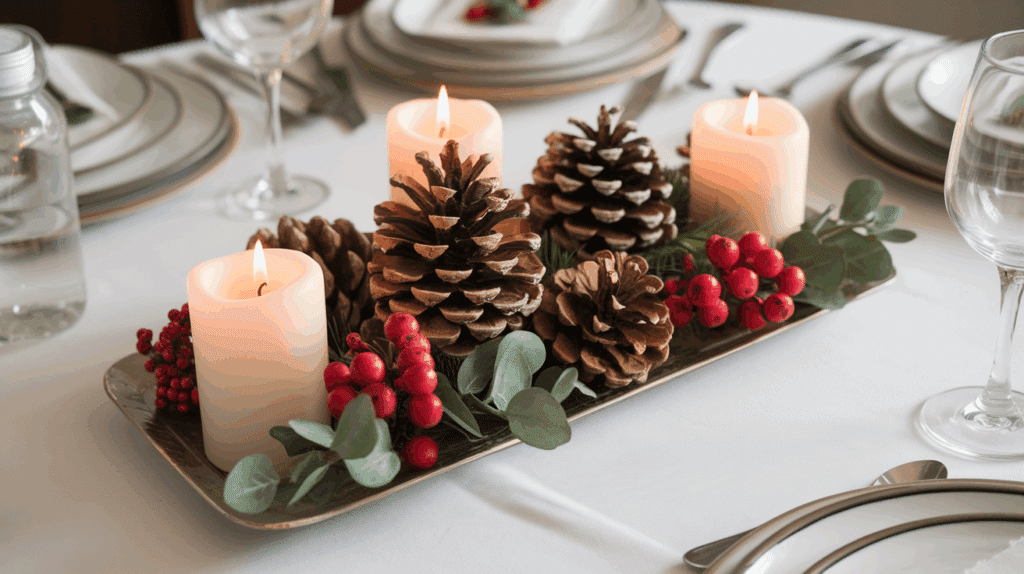
This simple centerpiece adds a natural holiday touch to your dining table. You’ll need pinecones, faux berries, greenery, a shallow bowl or tray, and a few candles.
You can mix in cinnamon sticks, ornaments, or ribbon for color and texture.
It’s quick to make and looks great throughout the season. Always use flameless candles for safety. This craft is an easy way to decorate without spending much while bringing nature indoors.
Steps:
- Arrange greenery, pinecones, and berries in a shallow tray or bowl.
- Add flameless candles in the center.
- Decorate with ribbon, ornaments, or cinnamon sticks.
20. Holiday Pillow Covers with Fabric Paint

This DIY project lets you refresh your home decor for Christmas in a simple way. You’ll need plain pillow covers, fabric paint, stencils, and brushes or sponges.
You can paint words like “Joy” or simple patterns like trees and snowflakes to match your style. It’s a fun craft that adds personality to your living room or bedroom.
Use washable paint, let it dry fully, and gift these covers as budget-friendly decor.
Steps:
- Lay a stencil on a plain pillow cover and secure it flat.
- Dab fabric paint over the stencil with a brush or sponge.
- Let it dry completely before inserting the pillow.
21. DIY String Light Wall Art

This project adds a warm holiday glow and makes any wall feel festive and cozy.
You’ll need a wooden board or sturdy canvas, string lights, small nails or hooks, and optional paint or stencils. You can design holiday shapes like stars, trees, or simple words such as “Joy” or “Merry” to fit your decor.
It’s easy to customize and reuse each year. Always use cool-touch LED lights to keep things safe indoors. This craft adds soft, cheerful holiday light to any room.
Steps:
- Sketch a simple design or word on a wooden board or canvas.
- Place small nails or hooks along the outline.
- Loop string lights around them and plug them in to display.
22. Paper Snowflake Window Decor
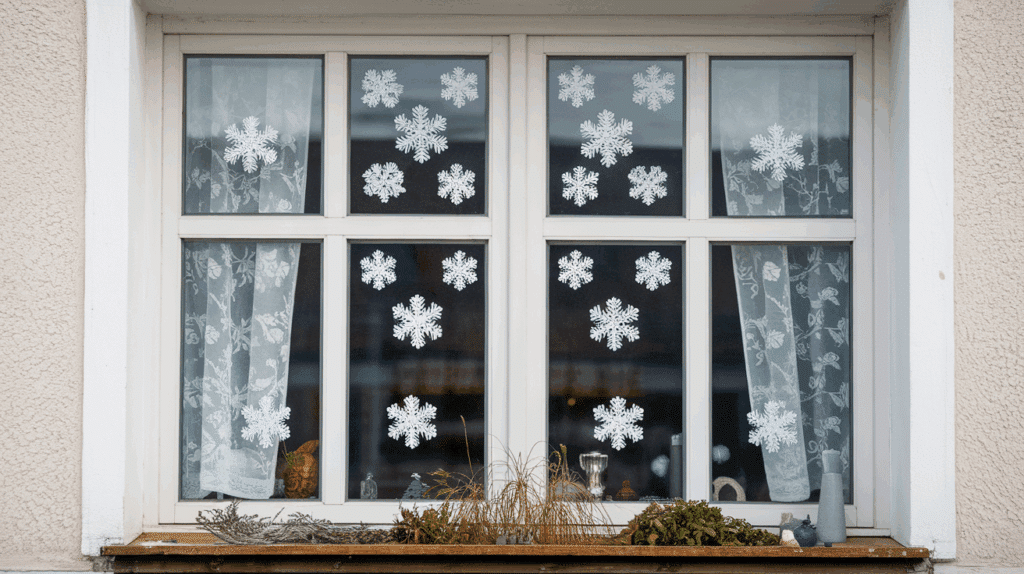
This simple project brings a wintery touch to your windows and is fun for both kids and adults.
You’ll need white or colored paper, scissors, and tape or string for hanging. Cut each snowflake in different patterns or colors for a frosted look; it’s a simple, creative holiday craft.
Use safety scissors for younger children and lightweight paper for easy cutting. When sunlight hits these snowflakes, they give your room a bright, cheerful look perfect for the season.
Steps:
- Fold a square paper several times into a triangle.
- Cut small shapes along the folded edges and unfold carefully.
- Flatten and hang or tape to windows.
23. Mini Wreath Napkin Rings

These mini wreaths are a quick way to make your dinner table look festive and inviting. You’ll need small wire rings, faux greenery, ribbon, berries, and hot glue.
You can personalize each wreath by changing the ribbon color or adding small bells to match your table setup.
This quick craft makes table settings feel handmade. Use low-temp glue for safe decorating. These napkin rings can be reused each year and stored easily with your other holiday supplies.
Steps:
- Wrap faux greenery around a small wire ring and glue securely.
- Add small ribbons, berries, or bells for decoration.
- Slide the wreath over a rolled napkin for a festive look.
24. Wooden Crate Christmas Display

This project turns plain wooden crates into a cozy, reusable holiday display for your home. You’ll need wooden crates, paint, lights, greenery, and ornaments or candles.
Stack or arrange the crates in shapes like a tree or shelf to fit your space. It’s a great way to showcase family photos, books, or handmade decor.
Ensure crates are sturdy before stacking. This display adds a warm, rustic touch and keeps decorations organized.
Steps:
- Paint or stain wooden crates and let them dry.
- Stack or arrange crates securely in your desired layout.
- Fill them with lights, greenery, ornaments, and candles.
Festive Crafts Using Recycled Materials
These eco-friendly Christmas crafts are fun to make and help you reuse everyday items in creative ways. They’re great for both kids and adults who want to decorate sustainably this holiday season.
25. Cardboard Tube Reindeer
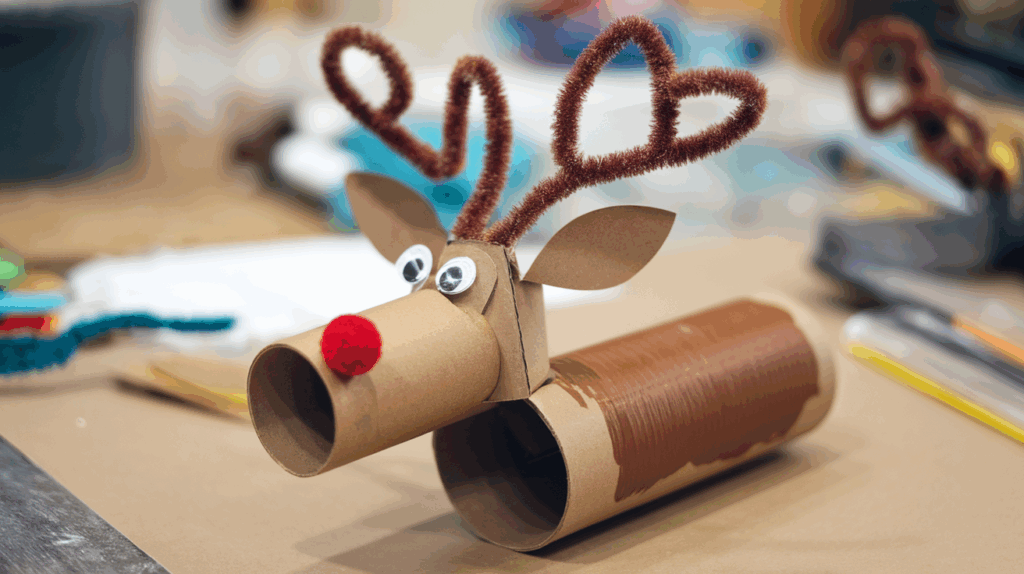
This fun and sustainable craft turns empty toilet paper rolls into cute reindeer decorations.
You’ll need cardboard tubes, brown paint or paper, googly eyes, red pom-poms, glue, and scissors. You can decorate them with antlers made from paper or pipe cleaners and even write names on them as place cards for your dinner table.
It’s a fun way to recycle and craft something festive. Use safe scissors and glue. These reindeer make cute displays or gifts.
Steps:
- Paint or wrap cardboard tubes in brown paper.
- Glue on googly eyes, a red pom-pom nose, and pipe cleaner antlers.
- Let dry and display on shelves or as small gifts.
26. Bottle Cap Snowmen

This cheerful snowman craft gives old bottle caps a new purpose. You’ll need three bottle caps per snowman, white paint, ribbon, glue, and small beads or markers for details.
You can paint each cap and stack them vertically with glue to create the snowman’s body. Add tiny scarves, buttons, or hats for extra charm. Always use non-toxic paint and allow enough drying time.
This easy craft is perfect for kids and can be hung as ornaments or used as fridge magnets during the holiday season.
Steps:
- Paint three bottle caps white and let them dry.
- Glue them together vertically and draw faces and buttons.
- Add a ribbon scarf and a string loop to hang.
27. Newspaper Christmas Trees

This simple project turns old newspapers into pretty tabletop trees. You’ll need newspaper sheets, scissors, glue, tape, and a wooden stick or straw for the base.
You can roll, fold, or cut the paper into layers to form the tree shape. Add a little paint, glitter, or a paper star to finish it. It’s an affordable and creative way to decorate while reusing materials.
Use light glue to prevent tearing. These trees look great grouped together on mantels, desks, or windowsills.
Steps:
- Cut newspaper into strips or cones of different sizes.
- Stack and glue layers from largest to smallest on a stick base.
- Add glitter or a paper star on top.
28. Tin Can Lanterns
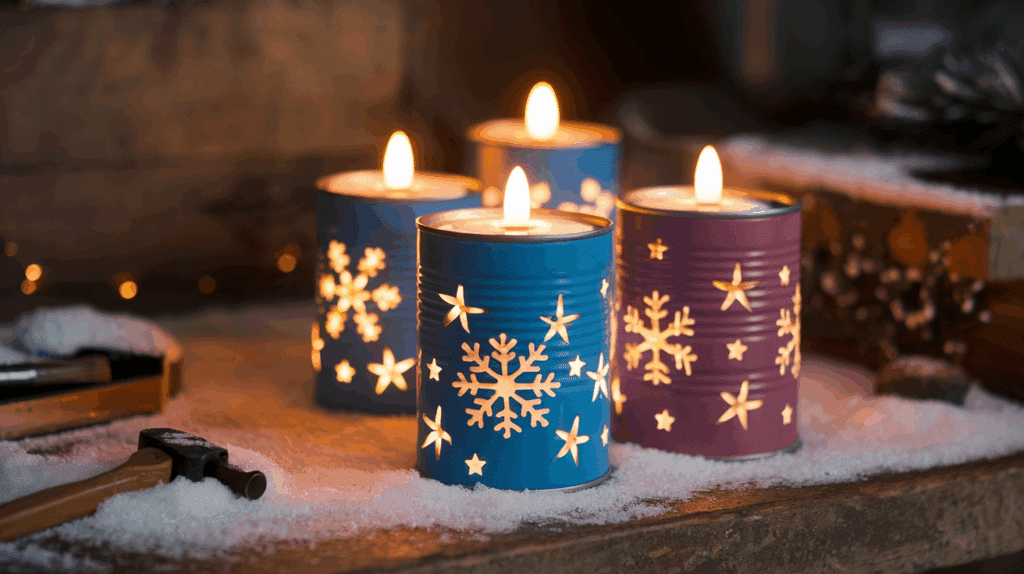
This recycled craft adds a soft, rustic glow to your holiday décor. You’ll need clean tin cans, a hammer, a nail, paint, and small LED candles.
You can punch small holes into the can to form stars, trees, or snowflake patterns before painting them.
Use LED candles only for safety, and handle the candles carefully to avoid sharp edges. These lanterns work well indoors or outdoors, lighting up pathways or dinner tables with a cozy Christmas glow.
Steps:
- Punch small holes in a clean tin can to form patterns.
- Paint and let it dry completely.
- Place an LED candle inside for a soft glow.
29. Jar Lid Ornaments
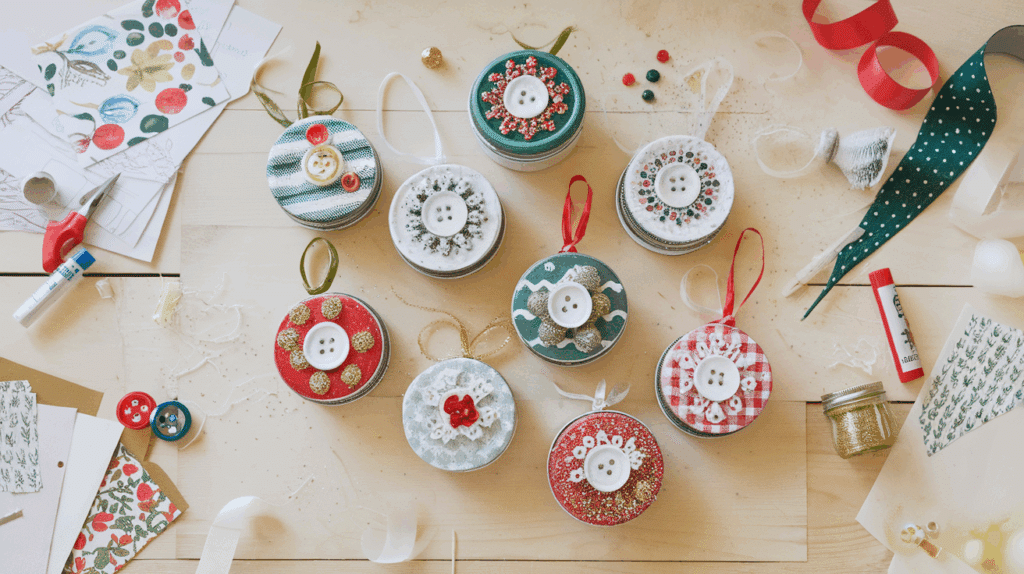
This craft turns leftover jar lids into simple, eye-catching Christmas ornaments. You’ll need metal or plastic jar lids, glue, ribbon, paper, and small decorations like buttons or glitter.
You can glue festive paper or fabric inside each lid and decorate with small embellishments. Add a ribbon loop to hang. It’s an easy, budget-friendly way to reuse and brighten your tree.
Use strong craft glue and let everything dry fully before hanging. These ornaments also make cute gift toppers or keepsakes.
Steps:
- Cut decorative paper or fabric to fit jar lids.
- Glue inside, add small embellishments, and attach a ribbon loop.
- Let dry, then hang on your Christmas tree.
30. Egg Carton Bells
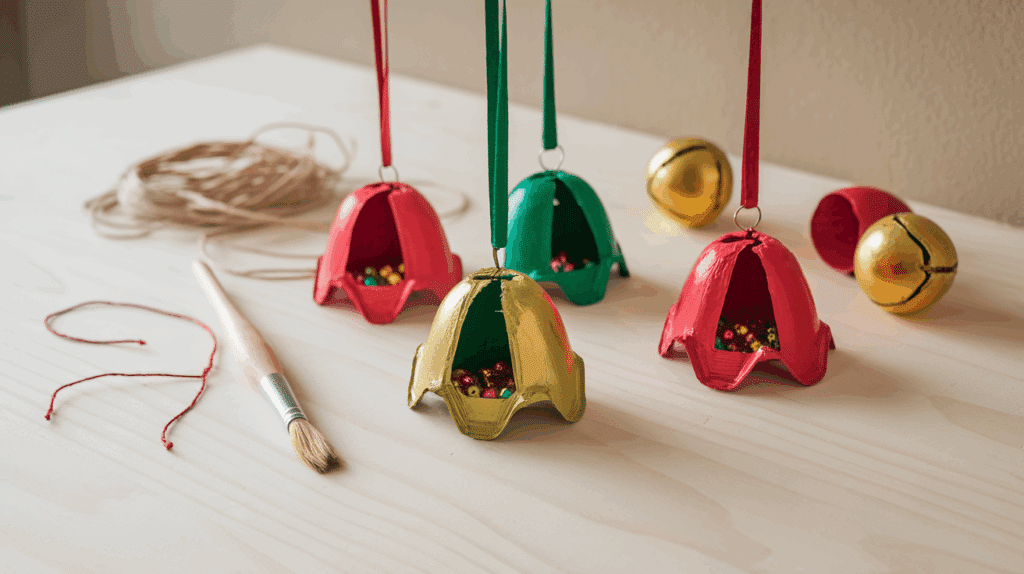
This eco-friendly craft transforms egg cartons into cheerful Christmas bells. You’ll need egg cartons, paint, string, glue, and small beads or bells.
You can paint each carton section in bright colors like red, green, or gold, then hang them on your tree.
Add small beads or jingle bells inside for sound. Always use washable, non-toxic paint if kids are helping. This fun craft teaches creativity while reusing items. The bells look great grouped as a garland.
Steps:
- Cut out egg carton cups and paint them in bright colors.
- Thread the string through the top and tie a bead or bell inside.
- Hang on the tree or use as a garland.
31. Scrap Paper Christmas Cards

This project makes use of leftover paper and old magazines to create handmade Christmas cards. You’ll need folded cardstock, glue, scissors, and paper scraps in various colors.
You can cut shapes like trees, stars, or ornaments and layer them to make creative card designs.
Use recycled paper and non-toxic glue to keep it eco-friendly. These cards are a thoughtful, affordable way to share holiday wishes while reducing waste.
Steps:
- Fold cardstock to form a blank card.
- Glue paper scraps into shapes like trees, stars, or ornaments.
- Add a short message, let it dry, and gift.
32. Plastic Bottle Angel Decorations

This upcycled craft turns empty plastic bottles into delicate angel decorations. You’ll need plastic bottles, scissors, paint, glue, and small embellishments like ribbons or beads.
You can cut the top of the bottle into wing shapes and paint it white or gold for a festive look. Add a bead or ball for the head and decorate with a halo or bow.
Use child-safe scissors when cutting and let adults assist. These angels look lovely on mantels, trees, or tables.
Steps:
- Cut the top of a plastic bottle into wing shapes.
- Paint white or gold and glue on a bead head.
- Decorate with ribbon or lace and display.
Quick and Simple Ornaments to Make
These easy ornament ideas are perfect for when you want to craft something festive without spending too much time or money. They’re fun, quick, and make great additions to your Christmas tree or gifts.
33. Salt Dough Star Ornaments

These simple salt dough ornaments are a fun, affordable way to make lasting Christmas keepsakes.
You’ll need flour, salt, water, cookie cutters, paint, and ribbon. You can shape them into stars, trees, or hearts and paint them after baking. The dough is easy to work with and perfect for kids and adults alike.
It’s also a great activity for family nights or classroom projects. Use non-toxic paint and sealant for lasting ornaments. Once dry, hang them on the tree or tie them to gifts.
Steps:
- Mix flour, salt, and water to make dough, then cut shapes.
- Bake at 200°F until dry and cool completely.
- Paint, seal, and tie with ribbon for hanging.
34. Button Christmas Tree Ornaments
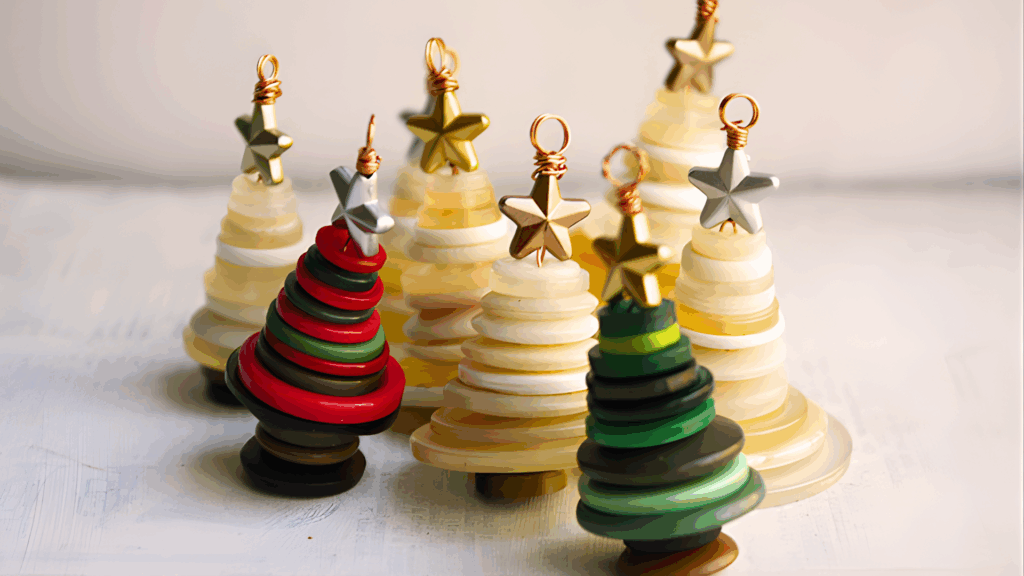
These colorful ornaments are a great way to use extra buttons while adding a playful touch to your tree. You’ll need green buttons in various sizes, thread, glue, and a small star bead or charm.
You can stack buttons from largest to smallest to form a tree, then decorate with tiny ribbons or glitter.
It’s quick to make, kid-friendly, and adds a pop of texture and color to your decor. Use a strong thread or a thin wire to secure buttons. These ornaments make lasting, thoughtful gifts.
Steps:
- Thread buttons from largest to smallest onto a string or wire.
- Add a star bead on top and tie a knot.
- Make a loop and hang it on your tree.
35. Cinnamon Stick Stars
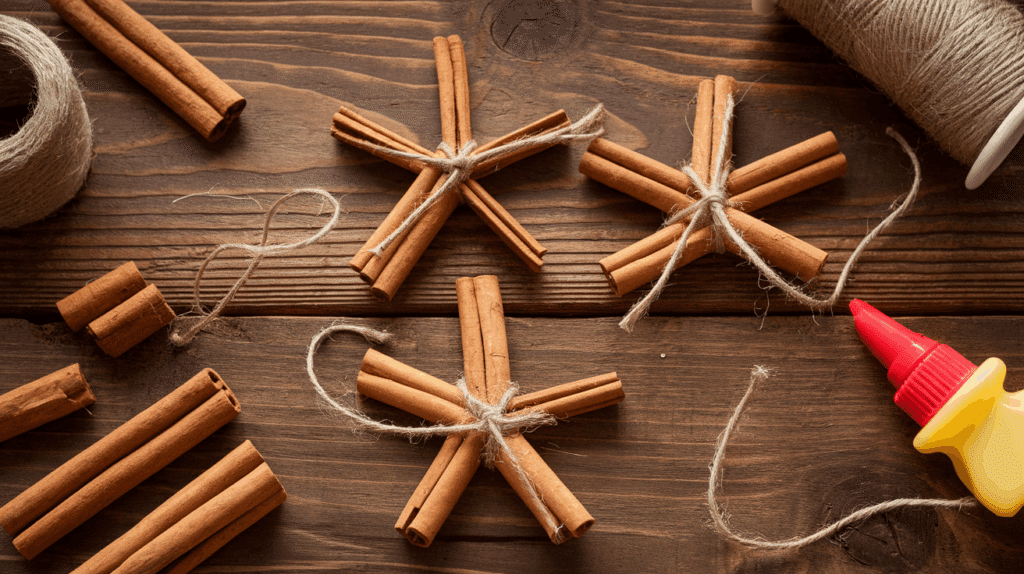
These stars add a warm scent and simple charm to your décor. You’ll need cinnamon sticks, twine, and glue.
You can arrange the sticks into star shapes and tie the joints with twine for strength and style. Each ornament smells amazing and gives your space a warm, seasonal touch.
Use hot glue carefully, and let adults handle assembly for younger kids. These ornaments work well on trees, gifts, or in bowls for a lasting festive scent.
Steps:
- Glue five cinnamon sticks together in a star shape.
- Wrap twine around corners for strength and decoration.
- Add a hanging loop and let it dry.
36. Felt Gingerbread Men

These felt ornaments are cute, soft, and easy to customize for your holiday décor. You’ll need brown felt, scissors, glue or needle and thread, stuffing, and decorations like ribbon, buttons, or fabric paint.
You can cut out two gingerbread shapes, stuff them lightly, and decorate with colorful “icing” using fabric paint.
It’s an easy way to make cozy, handmade ornaments. Use fabric glue if not sewing, great for kids, beginners, or anyone adding a personal touch.
Steps:
- Cut two felt gingerbread shapes and glue or sew edges.
- Stuff lightly with cotton or fabric scraps.
- Add buttons, ribbon, and a loop for hanging.
37. Beaded Candy Cane Ornaments
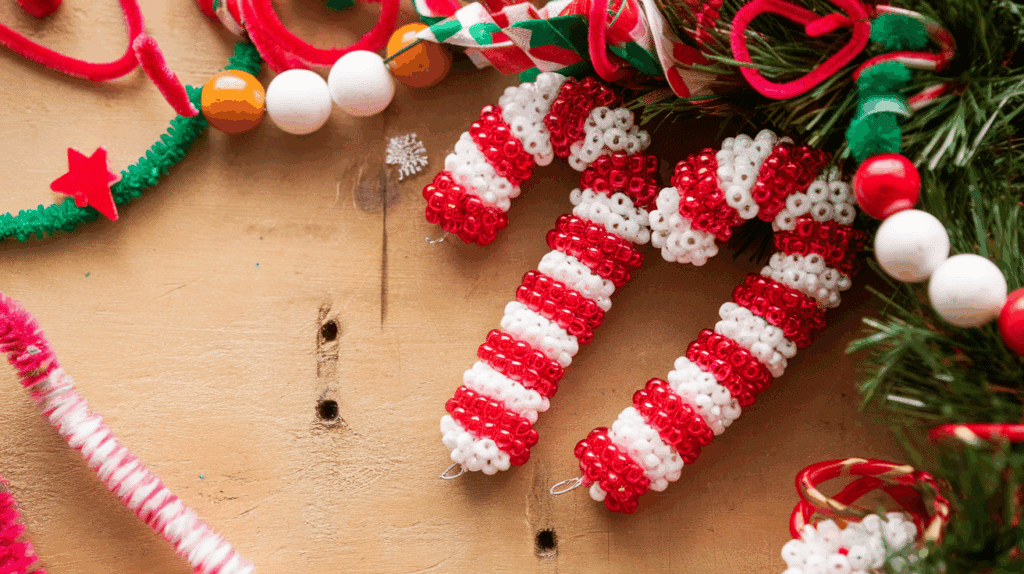
These colorful ornaments are quick to make and perfect for decorating your tree or gifting. You’ll need red and white pony beads, pipe cleaners, and scissors.
You can alternate the bead colors to create the look of a candy cane, or mix in gold and silver beads for a festive twist. This craft helps kids build fine motor skills while adding a handmade charm to their tree.
Use soft pipe cleaners for easy threading and safety. These candy canes are quick, clean, and fun for all ages.
Steps:
- Thread red and white beads onto a pipe cleaner.
- Bend into a candy cane shape.
- Add a small ribbon bow or string to hang.
38. Paper Straw Snowflakes

This easy project turns leftover paper straws into lightweight, colorful snowflakes. You’ll need paper straws, scissors, glue, and string for hanging.
You can cut the straws into different lengths and glue them into star or snowflake shapes for a playful, modern look.
Use patterned straws in festive colors like red, green, or silver for a holiday feel. Always use strong craft glue and let it dry completely before hanging.
Steps:
- Cut paper straws into short pieces.
- Glue in a crisscross pattern to form a snowflake.
- Let dry and hang with a string.
39. Mini Yarn Hat Ornaments

These mini yarn hats are adorable, easy to make, and a great way to use yarn scraps. You’ll need yarn, scissors, and a cardboard ring made from a toilet paper tube.
You can choose any color yarn to match your holiday theme, classic red and white, or bright and fun shades. It’s a relaxing craft that adds warmth and texture to your tree.
Use soft yarn for a neat look, and make a few to group as décor or use as gift toppers.
Steps:
- Cut yarn into short pieces and loop around a cardboard ring.
- Tie the top together to form a pom-pom hat shape.
- Trim evenly and hang with a string.
40. Wooden Bead Angels

These simple angels are lovely for the tree or as handmade gifts. You’ll need wooden beads, ribbon, twine, and glue.
You can use one large bead for the head and smaller ones for the body, then add ribbon wings and a twine loop for hanging. The natural wood gives them a clean, simple look that fits any decor.
Use non-toxic glue and let each part dry before assembling the next. These angels make a peaceful addition to your holiday decorations or Christmas cards.
Steps:
- Thread wooden beads onto twine for the body and head.
- Add ribbon wings and a small bow or halo.
- Tie the top loop for hanging and let it dry.
Safe and Simple Crafting Tips for Kids
Crafting should be fun and safe for everyone. With a few simple steps, you can help your kids enjoy creative time without worry or mess.
- Always supervise younger kids. Stay close to guide them with scissors, glue, or small items.
- Use non-toxic materials. Choose safe paints, glues, and markers made for children.
- Pick age-appropriate tools. Give safety scissors and easy-grip brushes to smaller kids.
- Set up a craft space. Use a tablecloth or tray to catch spills and keep the area tidy.
- Keep supplies organized. Store items in labeled boxes or small containers for easy cleanup.
- Plan short sessions. Young kids focus better with shorter, simpler projects.
- Teach safe habits. Remind them to wash their hands after crafting and to handle tools with care.
Conclusion
I hope these ideas inspire you to spend some time making Christmas crafts with your family.
It’s not about being perfect; it’s about creating moments that matter. When you sit down together to cut, glue, or paint, you’re making more than decorations.
You’re building memories that last long after the holidays end. Each project adds a personal touch to your home and gifts.
So gather your supplies, turn on some holiday music, and start crafting.
You’ll see how simple handmade crafts can bring so much joy to everyone. Don’t wait for the right time; pick one idea today and make it your own.
Let this Christmas be the year you create, laugh, and enjoy the true spirit of the season together.