
Christmas crafts for kids are one of my favorite ways to slow down and enjoy the holiday season with family.
I love how these small projects turn regular afternoons into fun moments, and you do not need special skills to join in.
In this post, I shared fun and easy Christmas crafts you can make with kids at home or in the classroom.
In this blog, you’ll learn what supplies you need, how to pick the right craft for different ages, and how to keep things simple and stress-free.
Christmas crafts are fun for kids because they use their hands, share ideas, and feel proud of what they create.
Most of these projects use basic supplies and clear steps. You will find quick crafts for busy days and a few that take more time together indoors.
What You Need to Get Started?
Getting started with Christmas crafts for kids is easier than it sounds.
Most projects use basic craft supplies you likely already have at home, such as paper, glue, scissors, crayons, markers, and tape.
Items like cardboard, paper plates, and empty toilet paper rolls also work well.
For decorating, you can add optional extras like stickers, cotton balls, ribbon, glitter, buttons, or washable paint, but these are not required. To save time, set everything up before the kids sit down.
Lay out supplies in small trays or bowls, cover the table with newspaper, and keep wipes nearby.
I also like to prep shapes or cut paper ahead of time for younger kids. A simple setup keeps kids focused and helps you enjoy the craft time without feeling rushed or stressed.
Christmas Craft Ideas for Kids with Simple Supplies
These craft ideas focus on easy projects that use items you already have at home or in the classroom. They are simple to set up and fun for kids to finish.
1. Paper Plate Santa Faces

This craft uses simple items like paper plates, red and white paper, cotton balls, glue, markers, and scissors.
Most of these supplies are easy to find at home or in a classroom. Kids can change how Santa looks by drawing different faces, adding yarn for hair, or using felt or glitter paper for the hat.
You can also let kids choose skin tones by painting the plate first. For safety, use child-safe scissors and washable glue.
An adult should help younger kids with cutting and remind them not to put small items like cotton balls in their mouths.
Steps:
- Glue a red paper triangle to the top of the plate to form Santa’s hat
- Add cotton balls along the bottom and hat edge for the beard and trim
- Draw or glue on eyes, a nose, and a mouth using markers or paper shapes
- Let the plate dry fully, then hang it up or display it on a wall or fridge
2. Handprint Christmas Trees

This craft uses green paint, white paper, a paintbrush, and simple decorations like stickers or crayons.
Kids enjoy using their hands, which makes the project feel personal and fun.
You can customize the tree by adding fingerprints as ornaments, drawing a star on top, or using different shades of green.
For safety, use washable, non-toxic paint and keep wipes nearby. Younger kids may need help keeping paint away from their mouths and eyes.
Steps:
- Paint the child’s hand with green paint
- Press the hand onto the paper to form the tree shape
- Let the paint dry before adding details
- Decorate with crayons, stickers, or fingerprints
3. Toilet Paper Roll Reindeer

This craft uses empty toilet paper rolls, brown paint or paper, googly eyes, glue, scissors, and red paper or pom-poms.
Kids can customize their reindeer by changing face expressions, adding names, or using pipe cleaners for antlers.
You can also paint the rolls instead of wrapping them in paper. For safety, supervise cutting and keep small items like eyes and pom-poms away from very young kids.
Steps:
- Cover the toilet paper roll with brown paint or paper
- Glue on googly eyes and a red nose
- Cut and attach paper or pipe cleaner antlers
- Let it dry, then stand the reindeer upright
4. Popsicle Stick Snowflakes
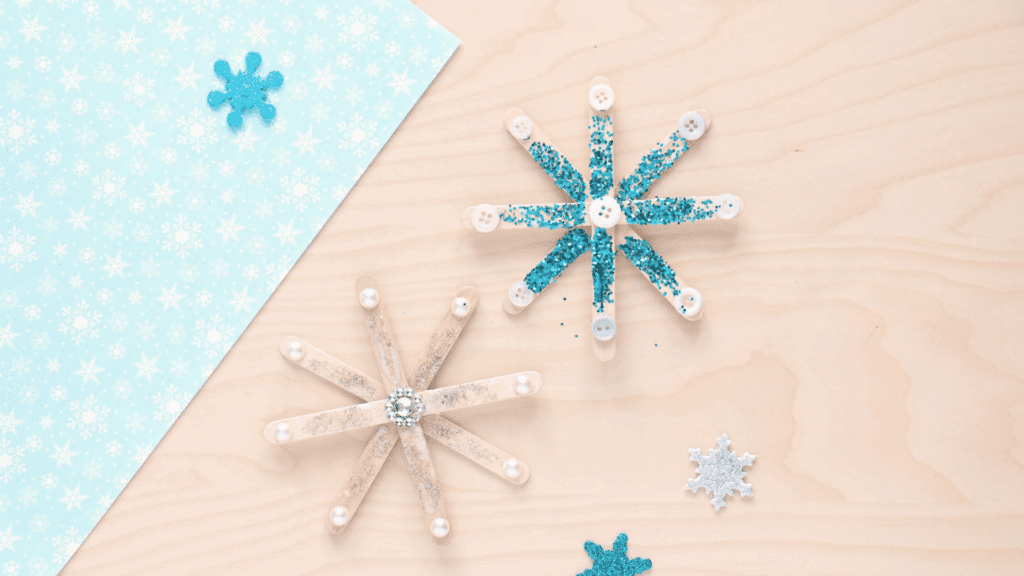
This craft uses popsicle sticks, glue, white or blue paint, and optional glitter or sequins.
Kids can create different snowflake shapes by crossing sticks in new ways. You can also add a string to hang them as decorations.
For safety, remind kids not to put sticks in their mouths and help younger ones with glue control. Use washable paint and glitter sparingly to reduce mess.
Steps:
- Glue popsicle sticks together in a snowflake shape
- Let the glue dry completely
- Paint the snowflake and allow it to dry again
- Add glitter or string for hanging if desired
5. Paper Chain Garlands
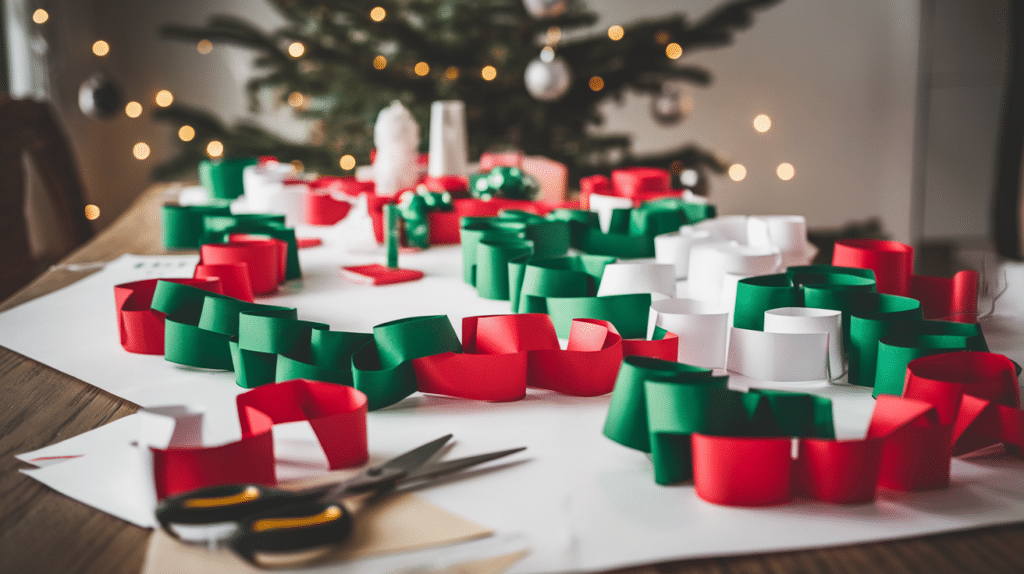
This craft uses colored construction paper, scissors, glue, or tape. It is a simple project that works well for groups and mixed ages.
Kids can choose holiday colors, mix patterns, or write names and messages on each strip before linking them together. You can make short garlands for small spaces or long ones for stair rails and walls.
For safety, use child-safe scissors and show kids how to apply glue lightly to avoid sticky hands and tables.
Younger kids may need help cutting straight strips, but they can still enjoy linking the chains.
Steps:
- Cut paper into long strips of equal size
- Form one strip into a loop and glue or tape it closed
- Slide another strip through the loop and secure it
- Keep adding strips until the garland reaches the desired length
6. Cotton Ball Snowmen
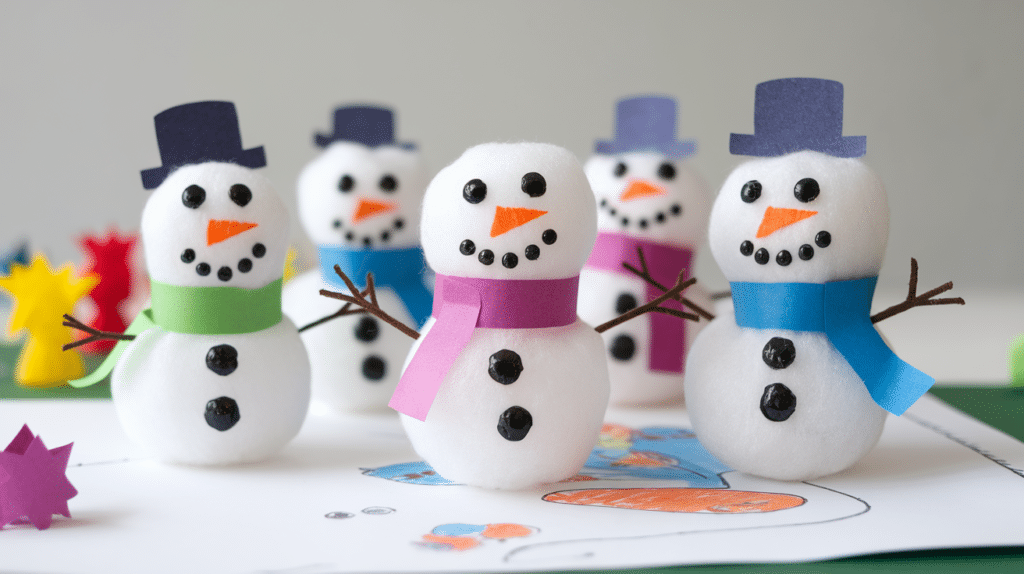
This craft uses cotton balls, white paper or cardboard, glue, markers, and small paper scraps for details. Kids can build snowmen in different sizes or stack cotton balls in creative ways.
They can draw faces, add paper scarves, or use buttons cut from paper.
This project helps with fine motor skills and patience. For safety, remind kids not to put cotton balls in their mouths and to use washable glue.
An adult should assist very young children to keep the materials under control.
Steps:
- Glue cotton balls onto paper to form a snowman shape
- Let the glue set so the cotton balls stay in place
- Draw eyes, a mouth, and buttons with markers
- Add paper pieces for hats or scarves
7. Cardboard Gingerbread Houses
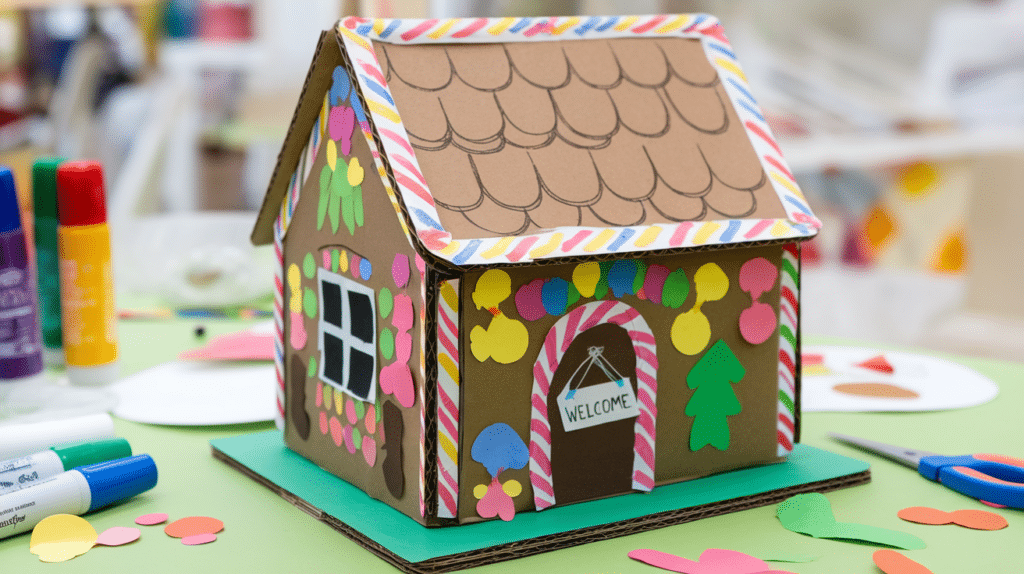
This craft uses cardboard, brown paper, paint, glue, markers, and optional decorations like stickers or paper shapes.
Kids can design their own houses by drawing doors, windows, and roof patterns. You can keep it simple with flat designs or build basic standing houses with adult help.
This craft encourages planning and creativity.
For safety, adults should cut the cardboard pieces ahead of time. Use non-toxic glue and keep small decorations away from younger kids.
Steps:
- Cut the cardboard into house shapes before starting
- Cover the cardboard with brown paper or paint
- Draw or glue on windows, doors, and roof details
- Let everything dry before displaying
8. Fingerprint Christmas Lights Art
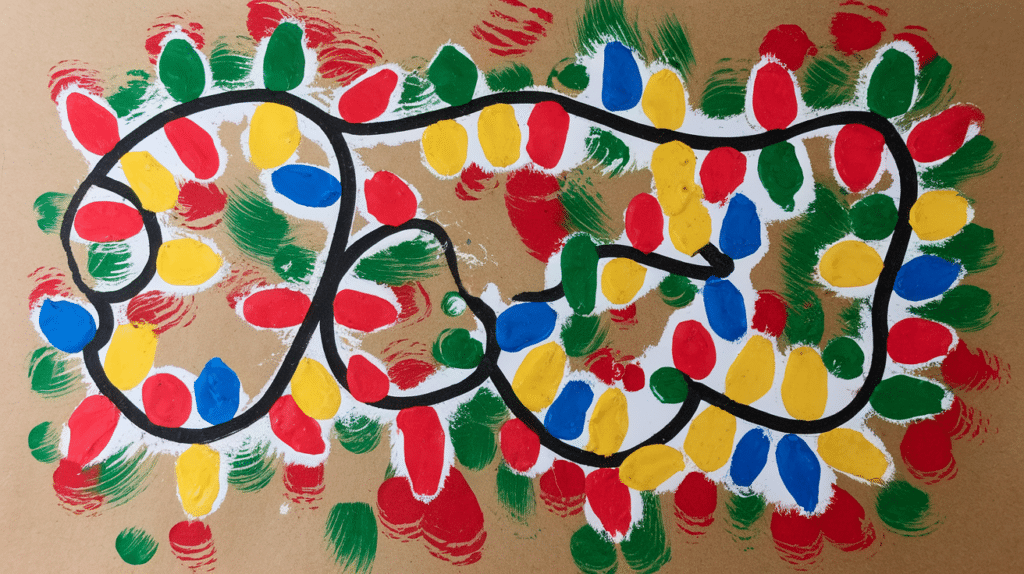
This craft uses white or colored paper, washable paint, and markers. Kids enjoy using their fingers to create bright light shapes across the page.
They can choose different colors or create patterns with their prints.
Once dry, markers are used to draw the light strings.
For safety, use non-toxic paint and keep wipes or a sink nearby. Remind kids to clean their hands before touching their face or clothes.
Steps:
- Dip fingers into paint and press onto paper
- Make rows or lines of colorful fingerprints
- Allow the paint to dry completely
- Draw connecting lines with a marker
9. Paper Stocking Decorations
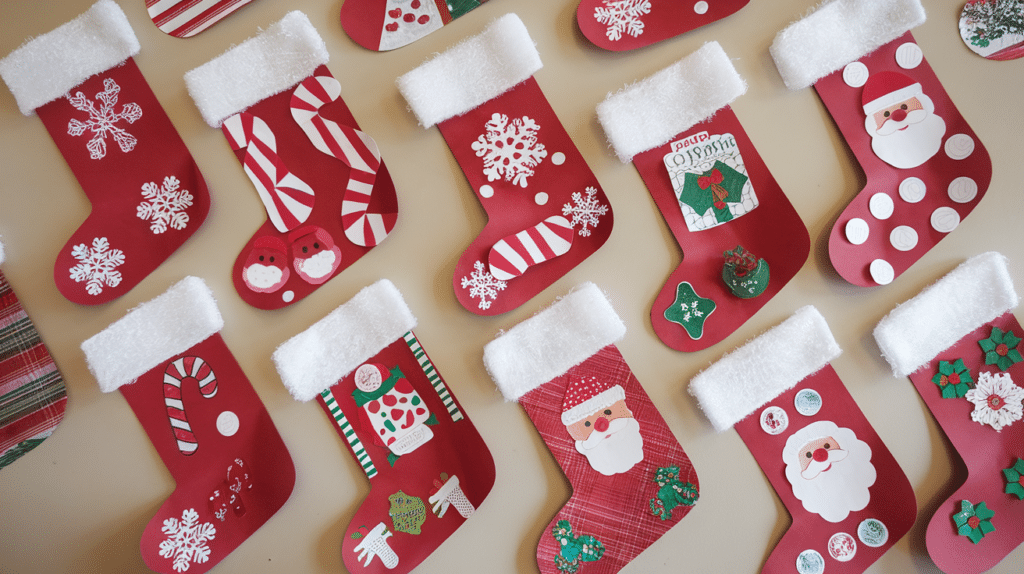
This craft uses red and white paper, scissors, glue, markers, and optional stickers.
Kids can design their stockings with patterns, names, or holiday drawings. You can trace stocking shapes ahead of time to save time.
This project works well for classroom walls or doors.
For safety, use child-safe scissors and supervise younger kids during cutting. Washable glue and markers help keep cleanup simple.
Steps:
- Cut out a stocking shape from red paper
- Glue white paper along the top for the cuff
- Decorate the stocking with drawings or stickers
- Let it dry, then hang it up or display it
10. Pinecone Christmas Trees
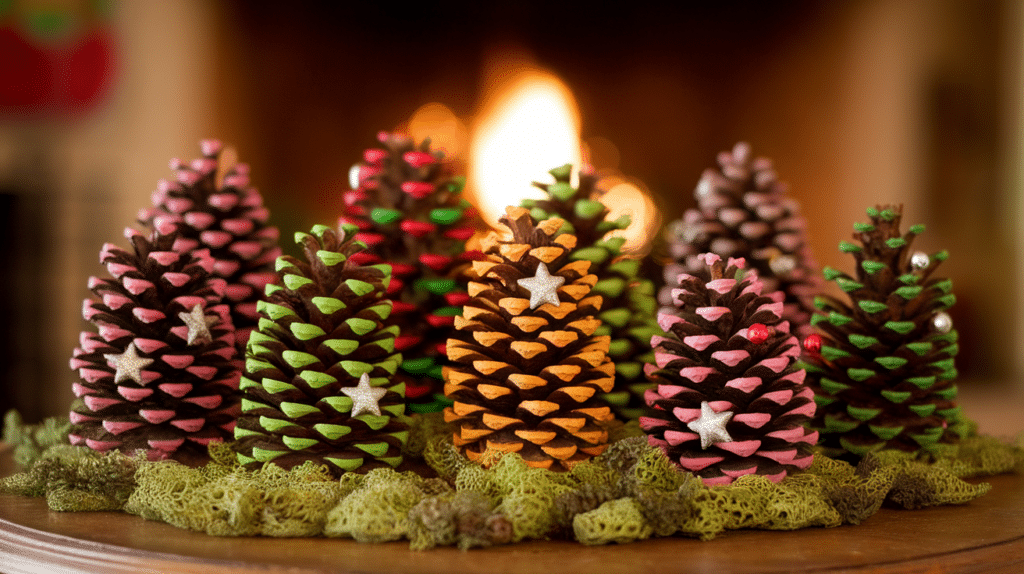
This craft uses pinecones, green paint, a paintbrush, glue, and small decorations like beads or paper dots. Pinecones make a great tree shape and are easy for kids to hold.
Kids can paint them fully or leave some areas natural. Decorations can be glued between the scales to look like ornaments.
For safety, wash and dry pinecones ahead of time.
Use non-toxic paint and help younger kids with glue so small pieces stay in place.
Steps:
- Paint the pinecone green and let it dry
- Glue small decorations between the pinecone layers
- Add a paper star to the top if desired
- Let everything dry before standing it up
11. Christmas Tree Paper Collages
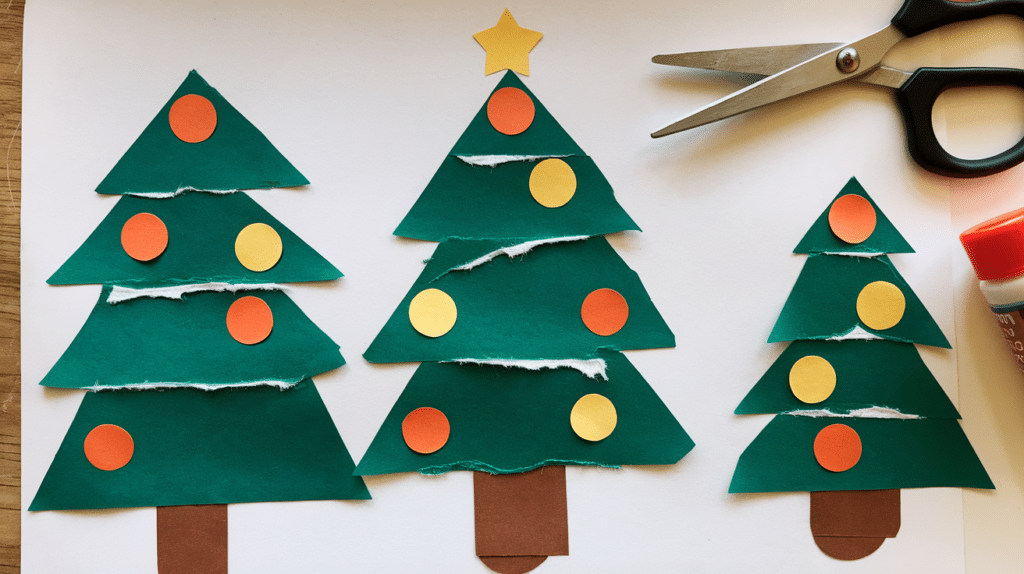
This craft uses green paper scraps, white paper, glue, and crayons or markers.
Kids can tear or cut paper into different shapes to build their tree. This allows freedom and creativity without strict steps.
They can add drawn lights, gifts, or snow around the tree.
For safety, provide child-safe scissors and supervise cutting. Tearing paper is a good option for younger kids who are still learning to use scissors.
Steps:
- Tear or cut green paper into small pieces
- Glue the pieces into a tree shape on paper
- Let the glue dry fully
- Draw decorations and a tree topper
12. Salt Dough Ornaments
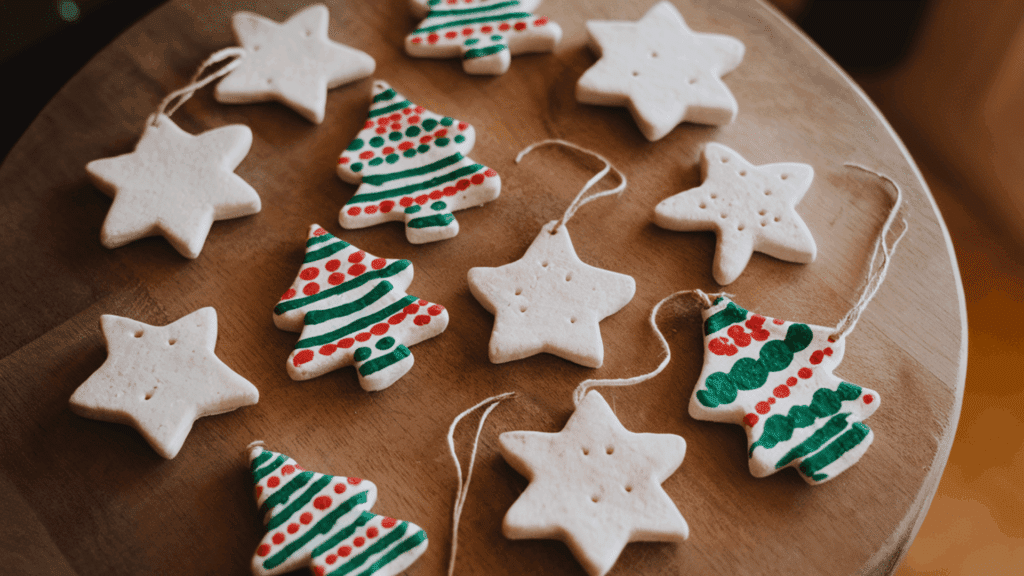
This craft uses flour, salt, water, rolling pins, cookie cutters, and string. Kids can shape ornaments in many ways, making this a favorite keepsake craft.
You can paint the ornaments after they dry or leave them plain.
Adults should handle baking if you choose to harden them in the oven. For safety, remind kids not to eat the dough and to wash their hands after handling it.
Steps:
- Mix flour, salt, and water to form dough
- Roll out the dough and cut shapes
- Poke a hole for a string before drying
- Let ornaments air dry or bake with adult help
13. Recycled Jar Lanterns
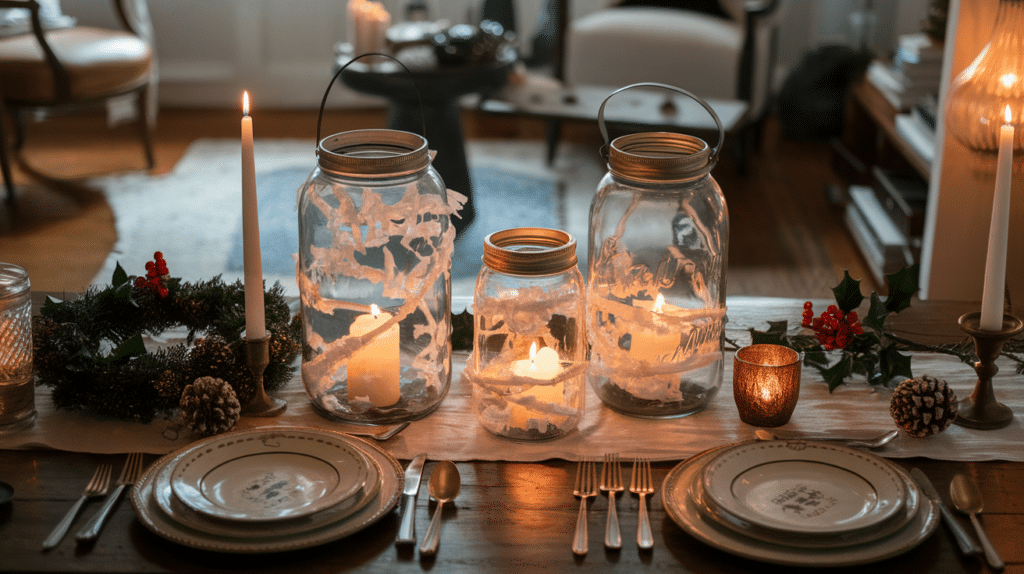
This craft uses clean glass jars, tissue paper or paint, glue, and battery candles.
Kids can layer colors or create simple designs on the jars. When finished, the lanterns give a soft glow and work well as decorations.
For safety, only use plastic or thick glass jars and battery lights.
Adults should handle jars with sharp edges and help with glue placement.
Steps:
- Cover the jar with glue or tissue paper
- Let the jar dry completely
- Place a battery candle inside
- Turn it on and display safely
14. Paper Wreaths with Cut Shapes

This craft uses green paper, scissors, glue, and red paper or stickers. Kids can cut circles, leaves, or simple shapes to build a wreath.
You can also use handprints or fingerprints for a personal touch.
This craft works well for doors or walls. For safety, use child-safe scissors and guide kids on where to place glue so pieces stay secure.
Steps:
- Cut a large circle with the center removed
- Glue green paper shapes around the circle
- Add red paper pieces for decoration
- Let it dry before hanging
15. Crayon Shaving Sun Catchers
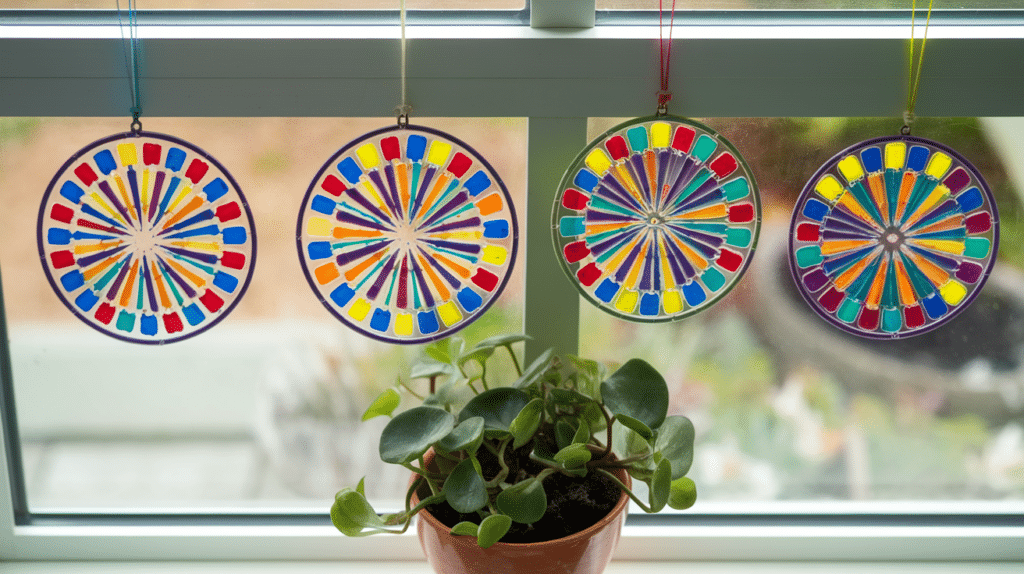
This craft uses old crayons, a pencil sharpener, wax paper, an iron, and string. It is a great way to reuse broken crayons and create bright window decorations.
Kids can choose holiday colors and mix them freely to make each sun catcher look different.
An adult must handle the iron at all times. Keep kids at a safe distance during the melting step and explain why the iron is hot.
Younger kids can help with shaving crayons and arranging colors.
Steps:
- Shave crayons into small pieces onto wax paper
- Place another sheet of wax paper on top
- Have an adult gently melt the crayons with an iron
- Let it cool, punch a hole, add a string, and hang it up
How to Choose the Right Craft for Each Age?
Picking a good craft helps kids stay interested and enjoy the process. Small changes in materials and steps can make a big difference.
- Toddlers (1–3 years): Choose large pieces, soft materials, and simple actions like sticking or coloring. Adult help is needed.
- Preschoolers (4–5 years): Look for crafts with basic steps, bright colors, and room for choice. Cutting help may still be needed.
- Early elementary (6–8 years): Pick projects with a few steps that build fine motor skills. Kids can follow simple directions on their own.
- Older kids (9–12 years): Try crafts with more steps, details, and planning. These work well for longer craft sessions.
- Mixed-age groups: Use one main craft and adjust tools or steps so everyone can join in comfortably.
Conclusion
I hope this list makes it easier for you to enjoy christmas crafts for kids without stress or pressure.
Craft time works best when families slow down, laugh together, and let kids lead.
You do not need perfect results for these moments to matter. Many kids’ christmas crafts also make sweet keepsakes.
You can hang them on the tree, tape them to the fridge, or wrap them as small gifts for family and friends. These simple christmas crafts often mean more than store-bought items because kids made them themselves.
Pick one idea, gather a few supplies, and start crafting today. I would love to hear how it goes for you and your kids.
Share what you made, what worked well, or any tips you learned in the comments below.