
Easy homemade Christmas decoration ideas are a great way to bring warmth and creativity into your home this season. I love how simple materials, paper, pinecones, and ribbons, can turn into something special.
In this blog, I’ll share some easy ideas you can make yourself, along with clear steps for each one.
You’ll find:
- Quick DIY ornaments for your tree
- Handmade wreaths and garlands
- Simple table and wall decorations
Making your own Christmas decor isn’t just about saving money. It’s about adding your own touch, spending time with family, and creating pieces that mean something.
These projects are affordable, beginner-friendly, and fun for both kids and adults.
By the end, you’ll have everything you need to decorate your home with pride and a bit of handmade cheer.
Why Make Your Own Christmas Decorations?
I make my own Christmas decorations because it feels more personal and meaningful.
When you create things yourself, you save money and use what you already have. It’s a simple way to reduce waste and give old items new life.
I’ve found that homemade decor adds a warm, handmade feel that store-bought pieces can’t match.
Making decorations together also brings people closer. You can spend time with your family, laugh, and enjoy the process instead of rushing through shopping.
Each piece you make can show your style, colors, textures, and designs that fit your home.
I like that DIY projects let you create something one-of-a-kind without spending much.
They remind you that Christmas isn’t about perfection; it’s about effort, creativity, and time spent together. That’s what makes homemade decorations truly special.
DIY Christmas Decor Ideas and How to Make Them
These are some easy and affordable DIY Christmas decoration ideas you can make at home. Each one includes simple steps and tips to add handmade warmth to your holiday.
1. Mason Jar Snow Globes
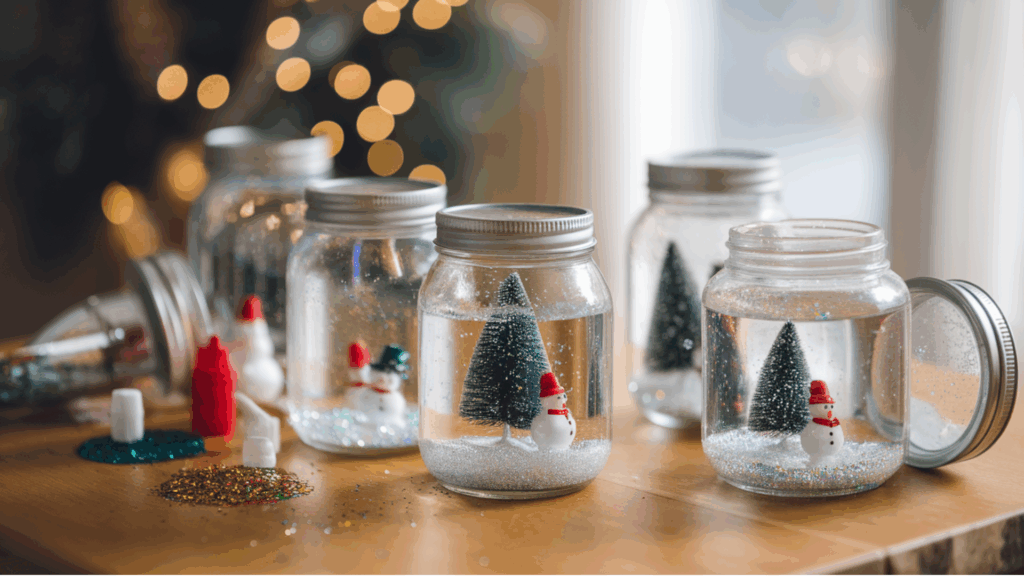
Mason jar snow globes are one of my favorite holiday crafts because they’re quick, fun, and look magical anywhere you place them.
You’ll need mason jars, small figurines, glitter, water, and glycerin to create the swirling snow effect.
The project takes about 20–25 minutes and costs roughly $5–$10 per globe, depending on the figurines you use. It’s a great way to repurpose old jars, and you can make several at once for gifts.
When storing, keep the jars upright and away from heat to prevent leaks or clouding.
Steps to Make It:
- Glue your chosen figurine to the inside of the lid and let it dry completely.
- Fill the jar almost to the top with water, add a few drops of glycerin, and sprinkle glitter.
- Carefully screw the lid back on tightly.
- Shake gently to test the snowfall, then seal the lid with glue if needed.
2. Dried Orange Garland
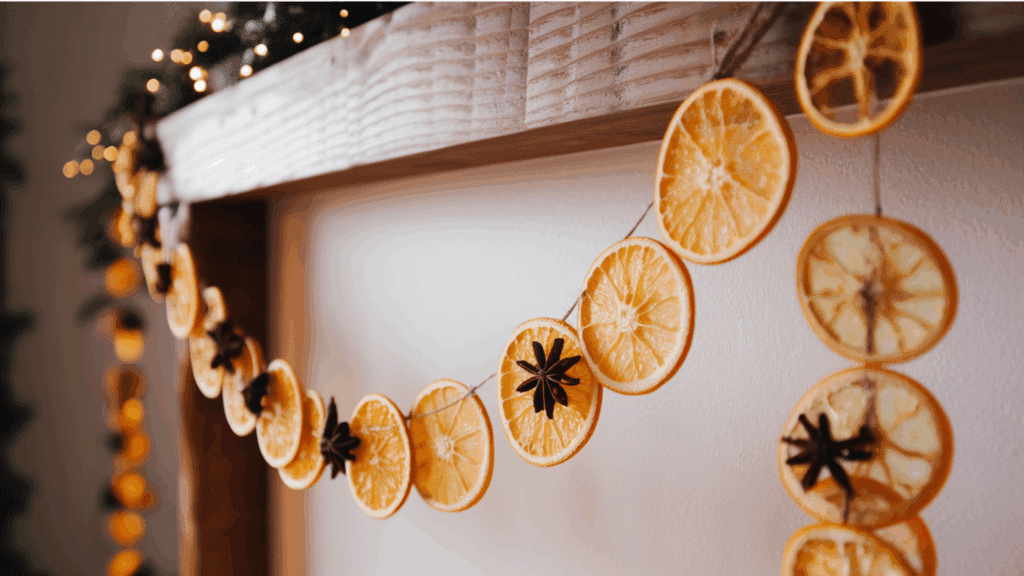
A dried orange garland adds natural color and scent to your Christmas decor. You’ll need fresh oranges, a sharp knife, string or twine, and an oven.
This project takes about 2–3 hours since the slices need time to dry, but costs under $5.
The garland looks great on mantels, windows, or wrapped around a tree. Once made, store it in a paper bag or an airtight container in a dry place to reuse next year.
It’s a low-cost, eco-friendly decoration that keeps your space smelling warm and fresh.
Steps to Make It:
- Slice oranges into thin, even rounds (about ¼ inch thick).
- Pat them dry with paper towels to remove extra moisture.
- Bake the slices at 200°F (90°C) for 2–3 hours, flipping halfway through.
- Let the slices cool completely.
- Thread them onto a string or twine, spacing them evenly.
- Hang them wherever you want a natural holiday accent.
Personal Tip: Add a few dried cinnamon sticks or star anise between the orange slices for a cozy scent.
3. Pinecone Christmas Ornaments

These rustic pinecone ornaments bring the outdoors inside and are perfect for a woodland Christmas theme.
You’ll need pinecones, paint or spray paint, glue, glitter (optional), and string or ribbon. This project takes about 30–40 minutes and costs very little if you collect the pinecones yourself.
They’re easy to customize, whether you like a simple, natural look or a more festive sparkle.
For storage, wrap each ornament in tissue paper and keep them in a small box to protect them from breaking.
Steps to Make It:
- Clean the pinecones and let them dry fully.
- Paint the tips white or silver for a snowy touch.
- Add glitter or small beads if you want extra shine.
- Tie a string or ribbon around the top for hanging.
- Let everything dry before adding it to your tree.
4. Paper Snowflake Window Decor

Paper snowflakes are a classic and budget-friendly way to decorate your home. All you need are white paper sheets, scissors, and tape or string.
This simple craft takes about 15 minutes per batch and costs next to nothing.
It’s a great activity for kids or when you want quick results. You can stick them to windows, hang them from the ceiling, or make garlands.
When storing, lay them flat between sheets of cardboard to prevent creasing.
Steps to Make It:
- Fold a square piece of paper diagonally to form a triangle.
- Fold it again into a smaller triangle.
- Cut small shapes along the edges to create patterns.
- Unfold gently to reveal your snowflake design.
- Tape it to a window or string several together for a hanging decoration.
5. Cinnamon Stick Candle Holders
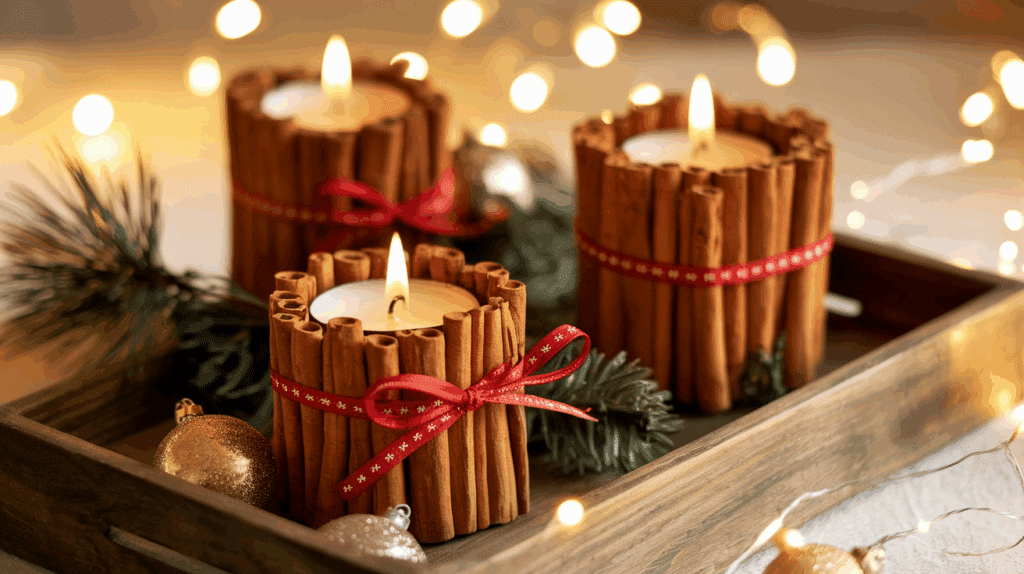
These candle holders fill the room with a warm, festive scent and look elegant on any table. You’ll need cinnamon sticks, small candles or glass jars, ribbon or twine, and hot glue.
The project takes about 20 minutes and costs around $8–$10 for a set of three.
It’s ideal for gifting or adding a natural touch to your centerpiece.
Store them by wrapping the candles separately in paper and keeping them in a cool place to preserve the scent and shape.
Steps to Make It:
- Arrange cinnamon sticks around a candle or jar.
- Use hot glue to secure each stick side by side.
- Tie a ribbon or twine around the middle for decoration.
- Let it cool before lighting the candle.
- Display them on tables, shelves, or as part of a holiday centerpiece.
6. Fabric Scrap Garland
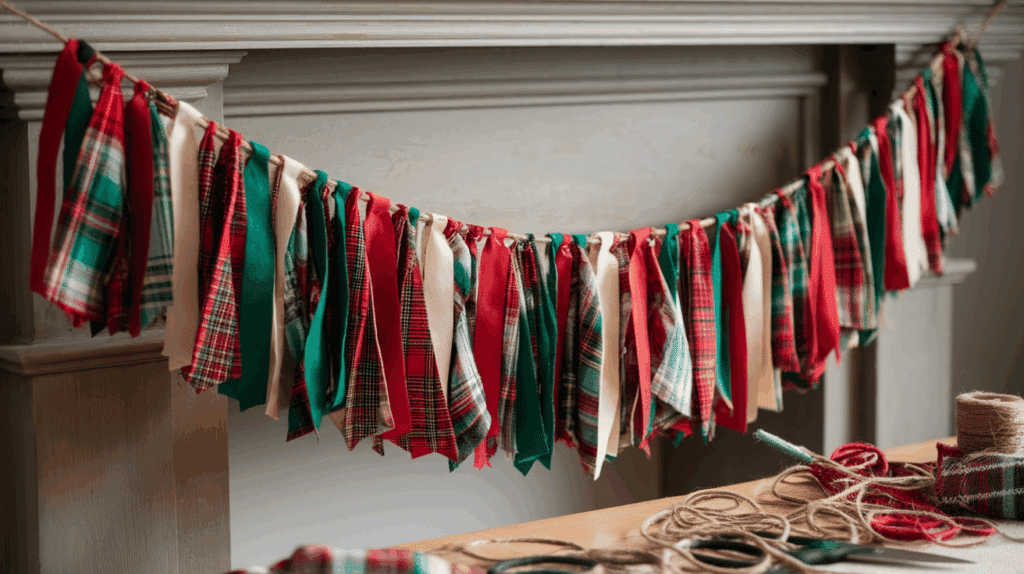
This garland is a great way to reuse leftover fabric and add color to your Christmas decor. You’ll need fabric scraps, scissors, string or twine, and optional beads or ribbons.
It takes about 45 minutes and costs almost nothing if you use materials you already have.
The best part is that every garland looks different depending on the fabrics you choose.
For storage, roll the garland loosely and keep it in a box to prevent tangling. It’s durable and easy to reuse year after year.
Steps to Make It:
- Cut fabric scraps into strips (about 1 inch wide and 6–8 inches long).
- Tie each strip onto the string or twine, alternating colors and textures.
- Slide the knots close together for a fuller look.
- Add beads or small ornaments between some strips if you like.
- Hang the garland on your tree, wall, or mantle.
7. Felt Christmas Tree Ornaments
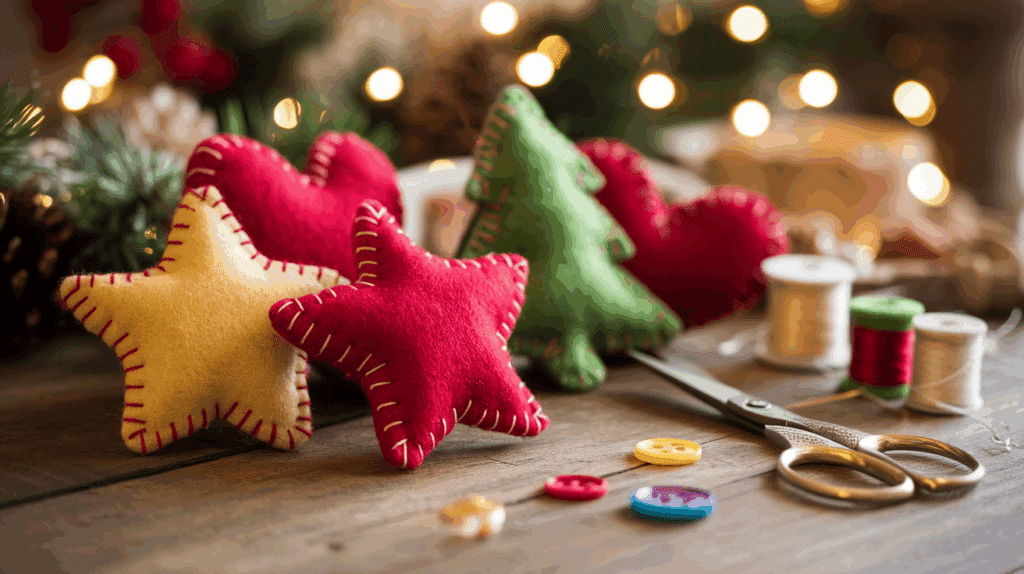
These soft ornaments are fun to make and safe for kids to help with.
You’ll need felt sheets, scissors, thread, a needle, stuffing (optional), and glue. They take about 30–40 minutes each and cost around $2–$3 per ornament.
You can create stars, trees, hearts, or any shape you like. To store, keep them flat in a resealable bag or box to protect the felt from dust. They last for years and never go out of style.
Steps to Make It:
- Draw and cut out your chosen shape from felt (two pieces for each ornament).
- Sew or glue the edges together, leaving a small opening.
- Add a bit of stuffing if you want a puffy look, then close the opening.
- Attach a loop of thread or ribbon for hanging.
- Decorate with small buttons, sequins, or fabric paint.
Personal Tip: I like using pastel-colored felt instead of traditional red and green for a softer, modern touch.
8. Painted Pinecone Table Centerpiece
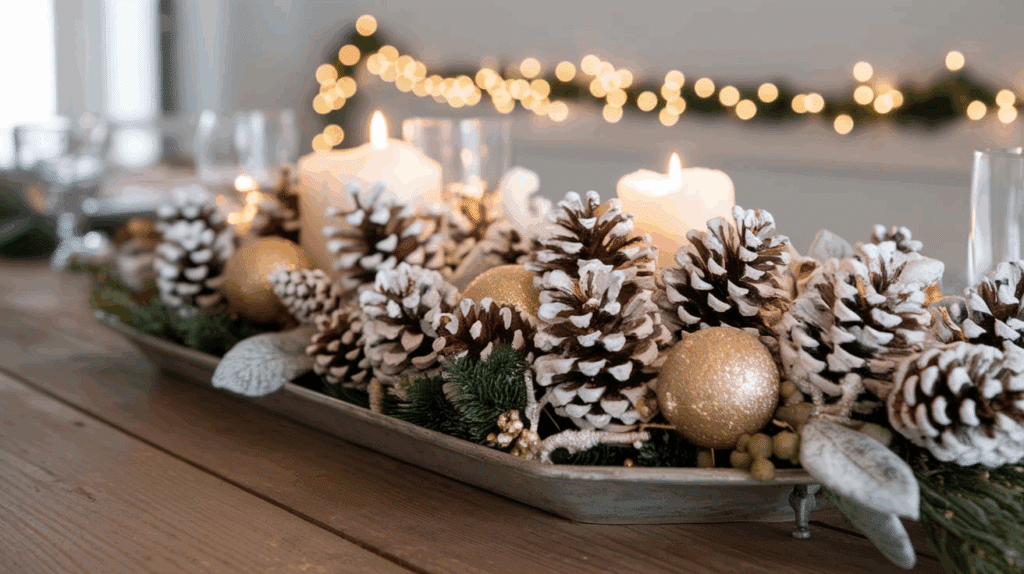
A painted pinecone centerpiece brings a cozy, natural look to your dining table or mantel. It’s easy to make and works with any holiday theme.
You’ll need pinecones, paint, brushes, a tray, candles, and optional greenery or ornaments.
This project takes about 40–50 minutes and costs under $8, especially if you collect the pinecones yourself. It’s a simple way to add a handmade style to your Christmas table without spending much.
When storing, wrap the pinecones in tissue paper and place them in a sturdy box to protect the paint.
Steps to Make It:
- Clean the pinecones and let them dry fully before painting.
- Paint the tips white, gold, or silver for a frosted look, or paint the whole pinecone for bold color.
- Let them dry for 20–30 minutes.
- Arrange the pinecones on a tray or bowl with candles and small ornaments.
- Add sprigs of greenery or ribbon for extra color.
Personal Tip: Try mixing painted and natural pinecones for a balanced, textured look that feels both rustic and festive.
9. Recycled Jar Lid Ornaments
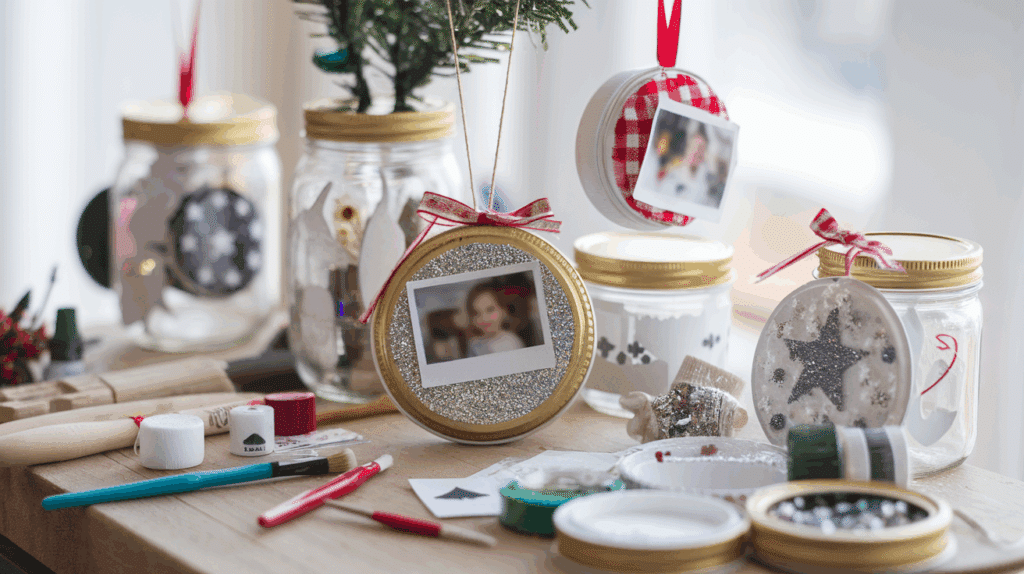
Recycled jar lid ornaments are a creative way to turn old materials into meaningful decor.
You’ll need metal or plastic jar lids, photos or decorative paper, glue, paint, ribbon, and optional glitter or beads.
This project takes about 25–30 minutes and costs almost nothing if you use leftover supplies. It’s a great craft for kids or family activities, and each ornament can be personalized with photos, quotes, or drawings.
To store, wrap each ornament in tissue paper and keep them in a small box to avoid scratching or bending.
Steps to Make It:
- Clean and dry the jar lids completely.
- Cut paper or printed designs to fit neatly inside each lid.
- Glue the paper or photo inside and smooth out any wrinkles.
- Paint the lid’s edge or decorate it with glitter, small beads, or stickers.
- Attach a loop of ribbon or string to the top with glue for hanging.
Personal Tip: I like using small family photos inside the lids; it makes the tree feel personal and full of special memories.
10. Christmas Card Display Board

A Christmas card display board is a creative way to showcase your holiday cards while keeping them organized and visible.
You’ll need a corkboard or wooden frame, clothespins, string or twine, paint, and pushpins. It takes about 45–60 minutes and costs under $10 to make.
You can paint the board for a bright festive look or keep it rustic for a natural style.
It’s an easy craft that adds warmth to your living room or hallway. When Christmas is over, store it upright or flat to prevent bending and reuse it year after year.
Steps to Make It:
- Paint or decorate your board as desired.
- Stretch rows of string or twine across the board using pushpins.
- Clip your Christmas cards to the strings with clothespins.
- Add small accents like fairy lights or paper snowflakes.
- Hang or prop it up in a visible spot.
11. Handmade Burlap Stockings

Handmade burlap stockings bring a rustic, cozy look to any Christmas display. You’ll need burlap fabric, scissors, thread and needle (or hot glue), and decorative trims like lace, felt, or ribbon.
This project takes about 1 hour and costs around $5–$7 per stocking, making it both budget-friendly and personal.
Burlap is sturdy, reusable, and pairs well with farmhouse or vintage themes.
For storage, fold neatly and keep in a fabric bag or box. You can personalize each stocking with initials, names, or small embellishments.
Steps to Make It:
- Cut two identical stocking shapes from the burlap fabric.
- Sew or hot glue along the edges, leaving the top open.
- Turn the stocking right side out and trim any loose threads.
- Decorate with ribbons, buttons, or lace.
- Add a loop at the top for easy hanging.
12. Glitter Jar Lanterns
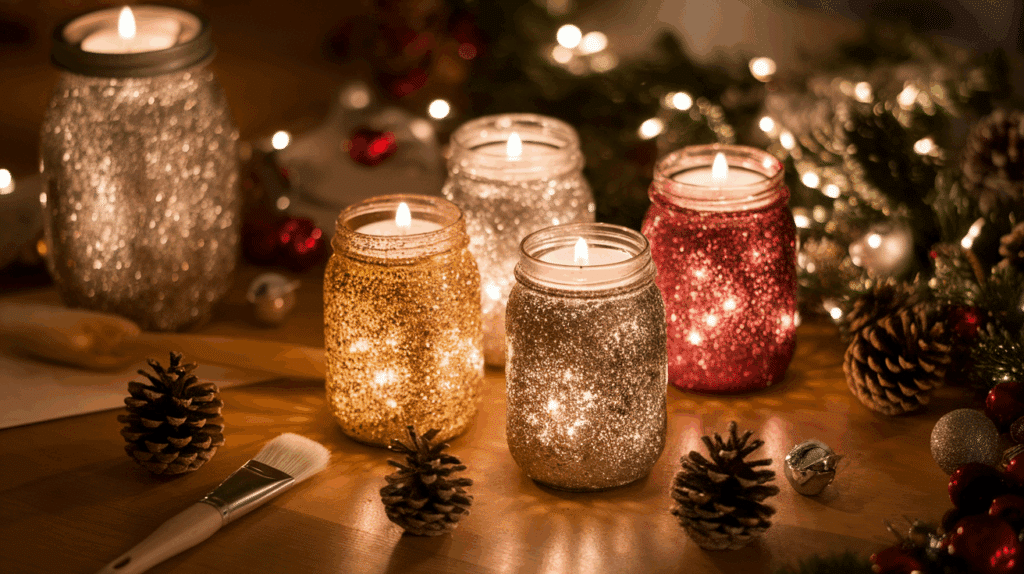
Glitter jar lanterns are perfect for adding sparkle and soft light to your Christmas setup. You’ll need mason jars, glue, glitter, a paintbrush, and tealight candles (real or battery).
This project takes about 30–40 minutes and costs under $5 per jar.
The jars reflect candlelight beautifully, creating a festive glow on tables or windowsills. You can make several in different colors to match your decor.
To store, wrap in tissue or bubble wrap and keep upright to prevent scratches.
Steps to Make It:
- Apply a thin, even layer of glue inside or outside the jar with a brush.
- Sprinkle glitter all over, covering the surface evenly.
- Shake off excess and let the jar dry fully.
- Add a tealight candle inside.
- Decorate the rim with a ribbon or twine for a festive touch.
13. Candy Cane Vase Wrap
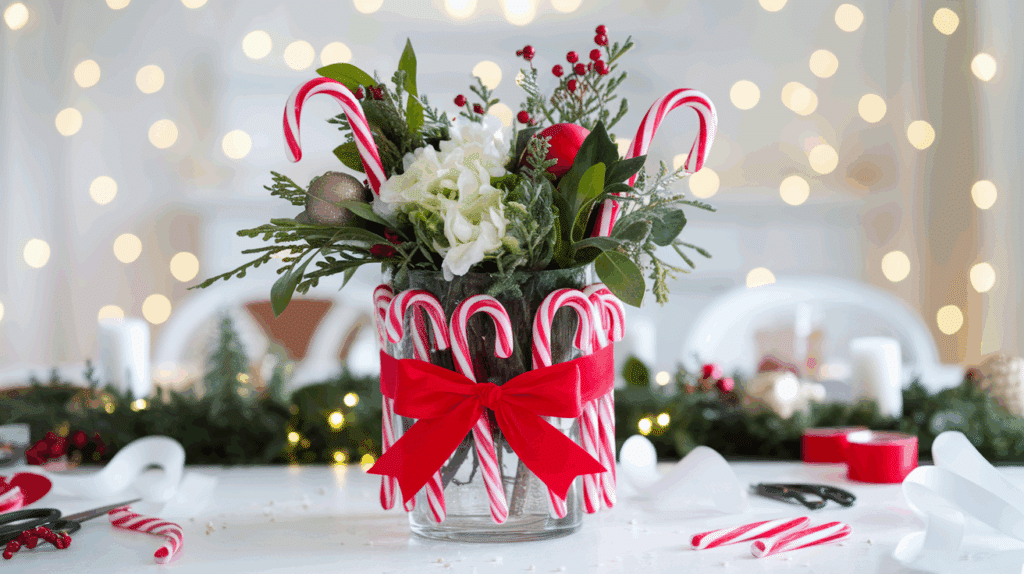
A candy cane vase wrap is a quick, cheerful way to decorate your home for the holidays. You’ll need a clear vase, candy canes, ribbon, tape or glue, and optional greenery or flowers.
This simple project takes 15–20 minutes and costs around $6–$8. It’s a fun craft for kids or a last-minute table centerpiece idea.
You can fill the vase with ornaments, pine branches, or candles.
After the holidays, unwrap the candy canes and wash the vase before storing it. It’s sweet, bright, and instantly festive.
Steps to Make It:
- Line candy canes vertically around the vase, stripes facing outward.
- Use glue dots or tape to secure them in place.
- Tie a festive ribbon around the middle to hold the canes together.
- Fill the vase with flowers, greenery, or ornaments.
- Place it on a dining or coffee table for a pop of holiday color.
14. Rustic Wooden Sign with Holiday Message
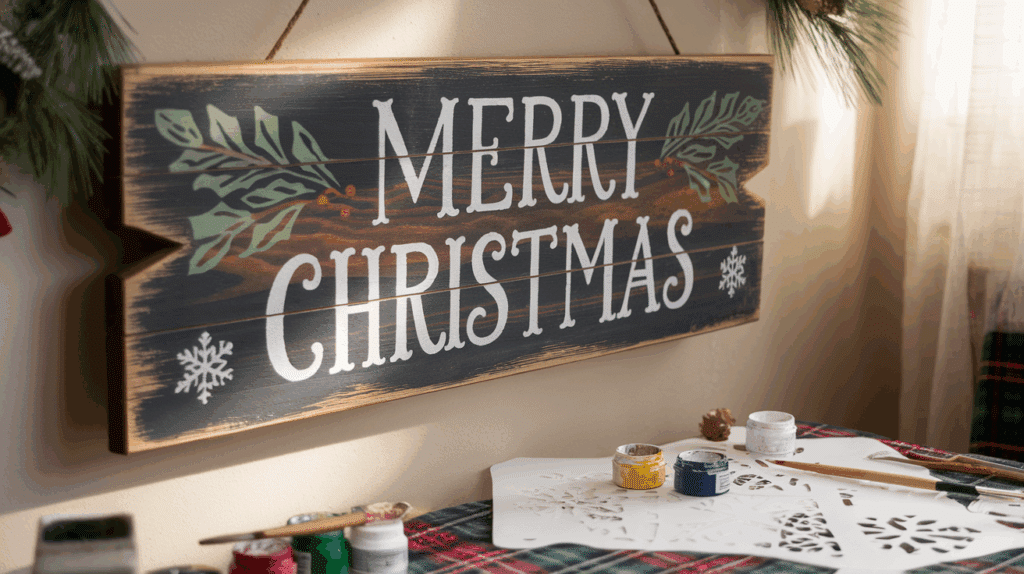
A rustic wooden sign is a timeless decoration that brings handmade charm to any room. You’ll need a wooden board, acrylic paint, stencils or markers, sandpaper, and optional twine or hooks.
This project takes 45–60 minutes and costs under $10, depending on the materials you have.
It’s perfect for adding a personalized touch to your wall, porch, or entryway. You can write messages like “Merry Christmas” or “Joy to the World.”
When storing, wrap it in a towel or cloth to avoid scratches and keep it flat to prevent warping.
Steps to Make It:
- Sand the wooden board until it’s smooth and clean.
- Paint the background and let it dry completely.
- Use stencils or freehand to add your holiday message.
- Decorate with small designs like holly leaves or stars.
- Let it dry, then attach twine or hooks for hanging.
Personal Tip: I like lightly sanding the painted words after drying; it gives the sign a slightly worn, vintage look.
15. Pom-Pom Christmas Garland
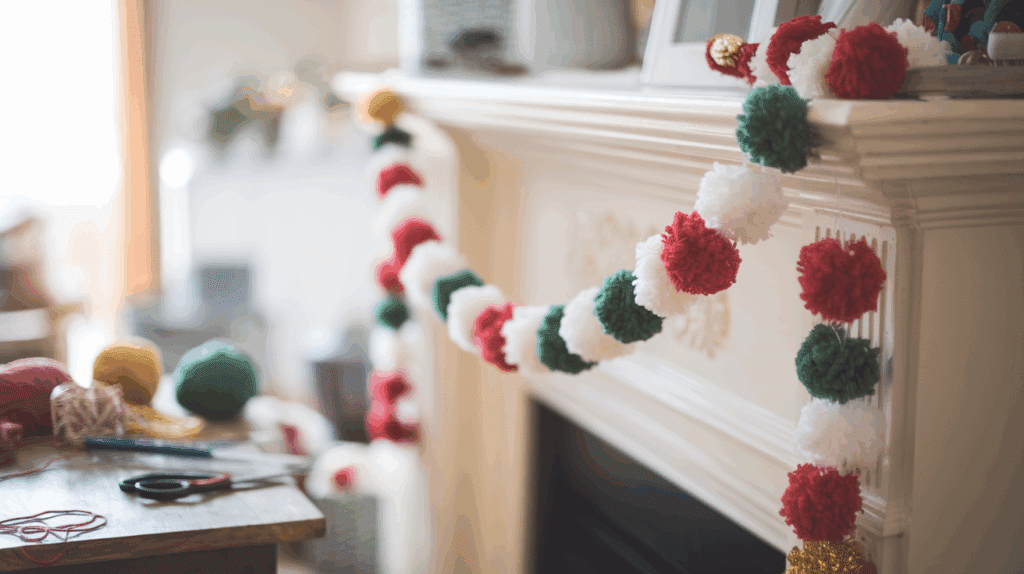
A pom-pom Christmas garland adds a playful and colorful touch to your holiday decor. You’ll need yarn in different colors, scissors, a fork or pom-pom maker, and a long string or twine.
It takes about 45 minutes to an hour and costs under $8 if you already have yarn at home.
You can hang it on your mantel, staircase, or Christmas tree.
When the season’s over, roll it loosely and store it in a plastic bag or box to prevent tangling. It’s soft, durable, and easy to reuse.
Steps to Make It:
- Wrap yarn around a fork or pom-pom maker several times.
- Tie the center tightly with another piece of yarn.
- Cut the loops on both sides and fluff the pom-pom.
- Trim to shape and repeat with different colors.
- String the pom-poms together with twine, spacing them evenly.
16. Button Tree Art Frame
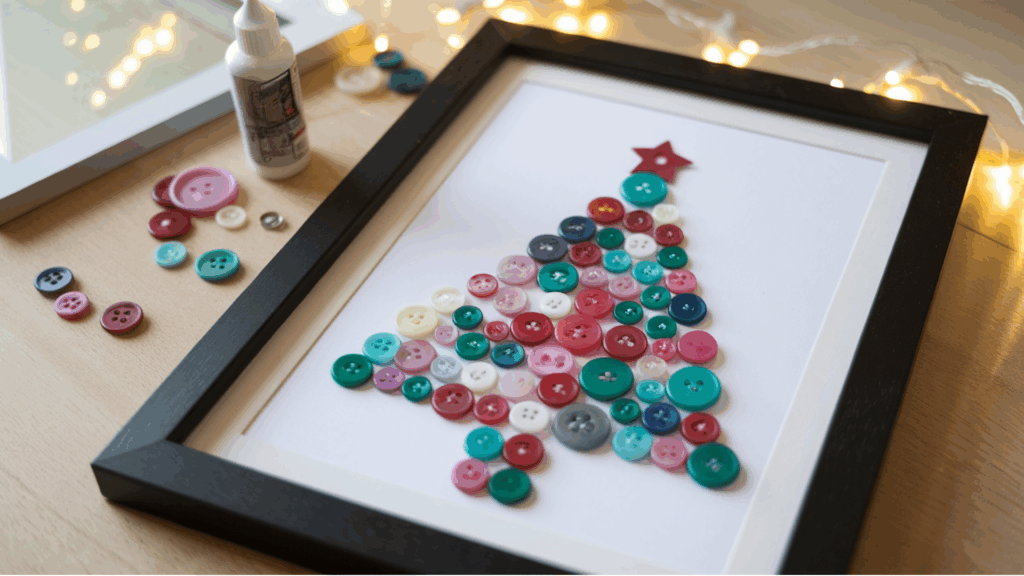
This craft combines creativity and simplicity, turning old buttons into festive wall art.
You’ll need a photo frame, cardstock or canvas, assorted buttons, glue, and optional ribbon or glitter.
It takes about 40 minutes and costs around $5–$7. It’s great for upcycling spare buttons into a cheerful Christmas tree or ornament design.
You can hang it on the wall or place it on a shelf. For storage, wrap the frame in soft paper or cloth to protect the buttons and glass.
Steps to Make It:
- Cut cardstock to fit your frame.
- Arrange buttons in a tree or holiday shape before gluing.
- Glue each button carefully and let it dry completely.
- Add a small bow or star to the top for decoration.
- Frame your artwork and display it proudly.
17. DIY Advent Calendar with Envelopes
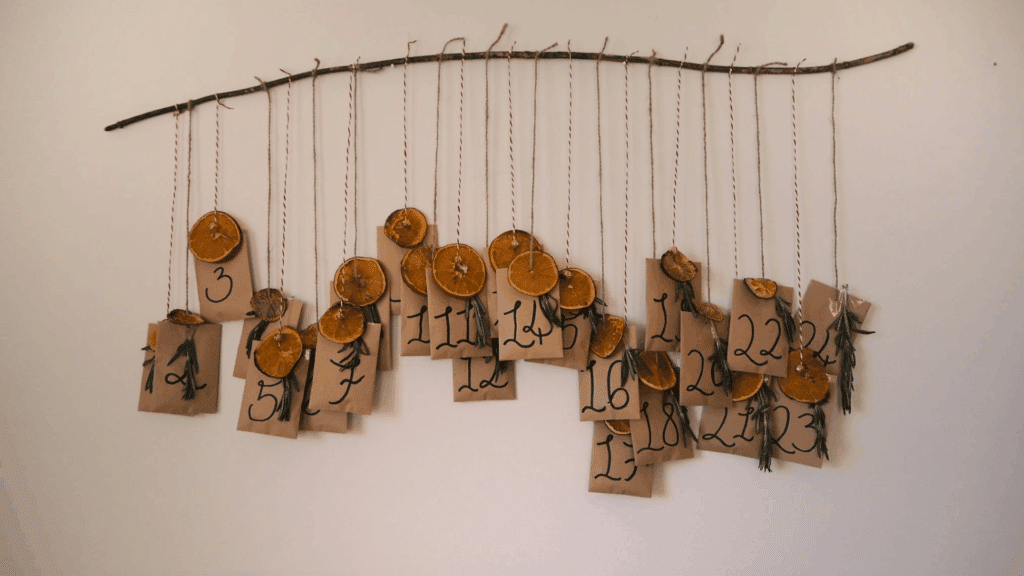
A DIY advent calendar with envelopes is a thoughtful way to count down to Christmas.
You’ll need 25 small envelopes, numbers, string, clothespins, and small notes or treats. It takes about 1 hour and costs $8–$10. You can hang it across a wall or door for a festive display.
It’s easy to customize with your favorite colors and messages. Store the envelopes and clips flat in a small box so they’re ready to use again next year.
Steps to Make It:
- Label each envelope with numbers 1–25.
- Fill them with small gifts, candies, or written notes.
- Attach the envelopes to the string using clothespins.
- Hang the string across a wall or doorway.
- Open one envelope each day until Christmas.
Personal Tip: I like writing simple family activities inside, like “watch a Christmas movie” or “bake cookies together.”
18. Mini Paper Christmas Trees
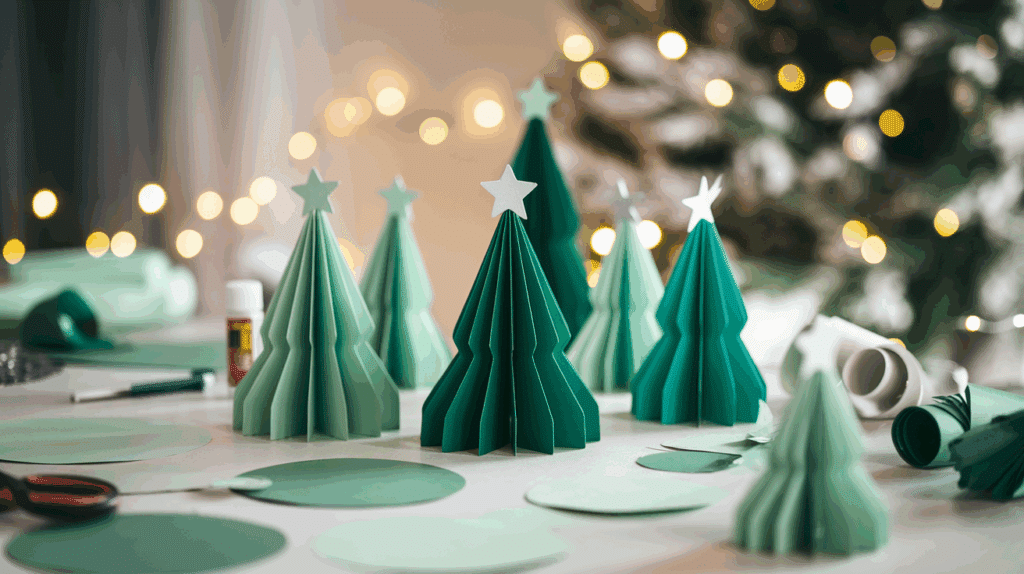
Mini paper Christmas trees are lightweight, charming, and easy to make in batches. You’ll need colored paper, scissors, glue, and a pencil or dowel for shaping.
This project takes 30–40 minutes and costs under $5. They’re great for tabletops, desks, or small shelves.
You can make them in different sizes or colors for variety. To store, stack them gently in a box to prevent bending or tearing. They’re a fun craft for both kids and adults.
Steps to Make It:
- Cut several circles from colored paper in different sizes.
- Fold each circle in half twice, then unfold slightly.
- Layer the circles from largest to smallest and glue at the center.
- Insert a pencil or stick through the middle as the tree trunk.
- Fluff the paper layers to create a full tree shape.
19. Sock Snowmen

Sock snowmen are cute, soft, and made with things you already have at home.
You’ll need white socks, rice or cotton stuffing, rubber bands, buttons, and fabric scraps. They take about 40–50 minutes and cost under $5 each.
These snowmen make great gifts or shelf decorations.
You can even make them with kids since no sewing is required. When storing, keep them in a sealed box or bag to prevent dust and moisture.
Steps to Make It:
- Cut off the top of a white sock and fill the bottom with rice or cotton.
- Tie off the open end with a rubber band.
- Shape a smaller “head” and larger “body” section using another band.
- Glue buttons and a fabric scrap scarf.
- Add eyes, a nose, and a small hat using leftover sock pieces.
Personal Tip: I use cloves inside the stuffing for a subtle holiday scent; it makes the snowmen smell like Christmas.
20. Wine Cork Reindeer Ornaments

Wine cork reindeer ornaments are a clever way to reuse corks while adding rustic charm to your Christmas tree.
You’ll need wine corks, small twigs, googly eyes, red beads or buttons for noses, glue, and string or ribbon for hanging.
This project takes about 45–60 minutes and costs under $8, especially if you already have corks at home. These ornaments are fun to make with kids or friends and look great mixed with traditional decor.
When storing, wrap them individually in tissue paper to protect the small pieces. They last for years and bring a touch of handmade warmth to your tree.
Steps to Make It:
- Gather a few wine corks for the body and head.
- Glue one cork vertically for the body and another horizontally on top for the head.
- Insert small twigs for antlers into the top cork.
- Glue on googly eyes and a red bead for the nose.
- Add a loop of string or ribbon to the top for hanging.
21. Clay Star Ornaments

Clay star ornaments add a simple, timeless beauty to your Christmas decorations. You’ll need air-dry clay, cookie cutters, a rolling pin, paint, and string.
The project takes about 1–2 hours, including drying time, and costs under $10 for a large batch.
These ornaments are durable, lightweight, and easy to personalize with textures or paint.
You can make stars, trees, or hearts depending on your theme. Store flat in a paper-lined box to prevent chips; they’ll last for years.
Steps to Make It:
- Roll out the clay to about ¼ inch thick.
- Use cookie cutters to cut out star shapes.
- Make a small hole near the top for stringing later.
- Let the stars dry completely according to the clay’s instructions.
- Paint them white, gold, or any festive color and let them dry.
- Thread the string through the hole and hang it on your tree.
22. Holiday-Themed Throw Pillow Covers

Holiday-themed pillow covers are an easy way to update your living space without buying new decor.
You’ll need plain pillow covers, fabric paint or markers, stencils, and optional embellishments like buttons or ribbon. The project takes 1–1.5 hours and costs $10–$15, depending on how many you make.
It’s a fun way to add festive color to your couch or bed. You can reuse the covers by washing and storing them flat in a drawer or fabric bag after the holidays.
They’re practical, decorative, and simple to personalize for your style.
Steps to Make It:
- Lay your pillow cover flat on a protected surface.
- Position your stencil and apply fabric paint evenly with a brush or sponge.
- Let the design dry completely before adding any extra details.
- Sew or glue on small accents like buttons or ribbon.
- Insert your pillow and display it on your couch or bed.
Personal Tip: I prefer using neutral covers and gold or red paint—this keeps them festive yet suitable for winter decor beyond Christmas.
23. Recycled Tin Can Candle Holders
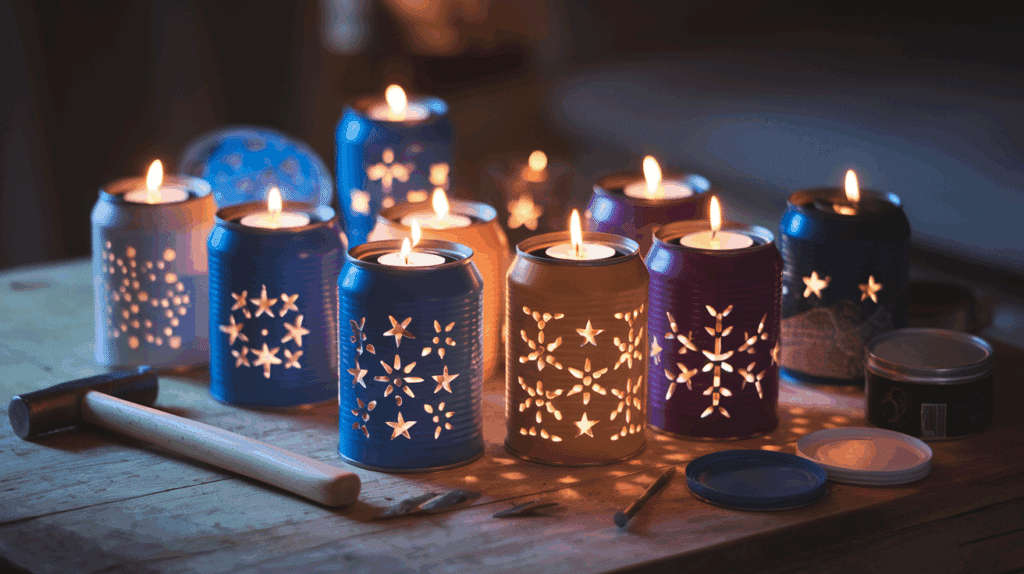
Recycled tin can candle holders are simple, sustainable, and charming. You’ll need empty tin cans, a hammer, a nail, paint, and tealight candles.
This project takes about 45 minutes and costs under $5, making it perfect for eco-friendly decorating.
The punched holes create a beautiful glow when the candle is lit. You can design patterns like stars, trees, or snowflakes. Store them stacked with tissue paper between each to avoid scratches.
They make lovely gifts or table accents for the season.
Steps to Make It:
- Clean and dry the tin cans thoroughly.
- Fill each can halfway with water and freeze it (this helps prevent denting while hammering).
- Once frozen, use a hammer and nail to punch holes in a pattern.
- Let the ice melt, then dry the can.
- Paint it in festive colors and add a tealight inside.
24. Snow-Dusted Pine Branch Centerpiece
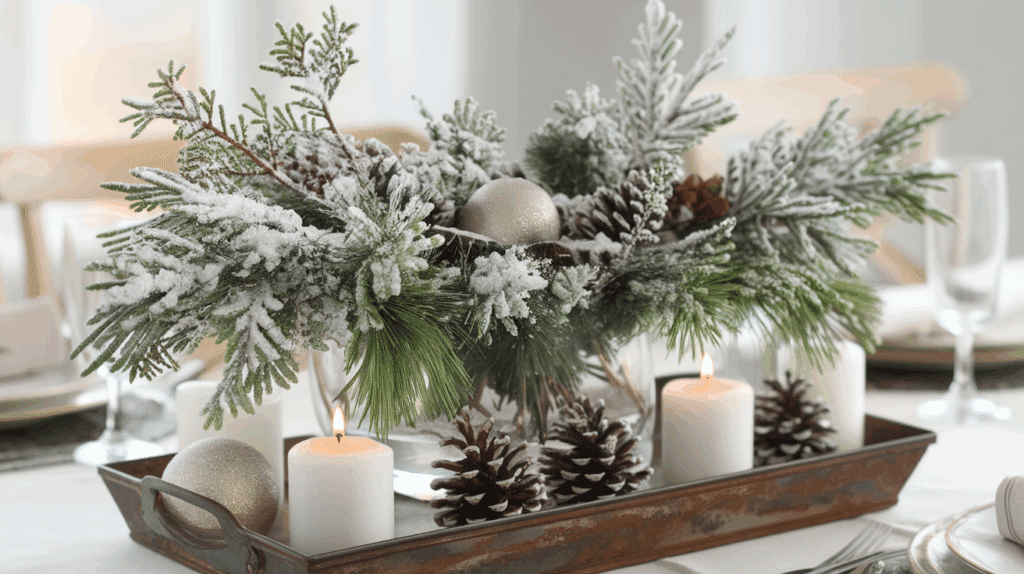
A snow-dusted pine branch centerpiece is a beautiful, natural decoration that looks pretty on any table.
You’ll need fresh or faux pine branches, white spray paint or artificial snow, a vase or tray, and optional pinecones or ornaments. It takes about 30–45 minutes and costs under $10.
This project brings a crisp, wintery feel indoors without much effort.
Store the branches in a cool, dry place or replace them yearly if using real pine. It’s simple yet eye-catching, perfect for dining tables or mantels.
Steps to Make It:
- Gather pine branches and trim them to your preferred length.
- Lightly spray the tips with white paint or dust with artificial snow.
- Arrange them in a vase, jar, or decorative tray.
- Add pinecones, ornaments, or ribbons for color.
- Place the centerpiece on your dining or coffee table for a festive look.
Eco-Friendly Christmas Decoration Tips
I like keeping my holiday decor simple and kind to the planet. These are easy ways you can make your Christmas decorations look festive without creating waste.
- Use natural materials: Collect pinecones, dried oranges, and twigs for wreaths and table decor.
- Repurpose old ornaments: Paint, wrap, or reuse them in garlands instead of buying new ones.
- Choose paper over plastic: Make paper stars, snowflakes, and banners using recycled paper.
- Reuse fabric scraps: Turn old clothes or fabric pieces into ribbons, bows, or stockings.
- Try biodegradable glitter: Replace plastic glitter with eco-safe, compostable options.
- Use LED lights: They last longer and use less energy than regular bulbs.
- Skip plastic wrapping: Wrap gifts in reusable fabric or brown paper tied with a string.
How to Store and Reuse Your DIY Christmas Decorations?
I like keeping my DIY Christmas decorations in good shape so I can use them again each year.
You can do the same with a few simple steps. Start by labeling each box so you know what’s inside. This makes unpacking next Christmas easier and saves time.
Wrap fragile items in tissue paper or bubble wrap to prevent breaking.
Keep soft items, like garlands or fabric decor, in dry containers to avoid dust or moisture. If something breaks, repair it instead of tossing it.
Each year, I check my decorations and refresh old pieces by repainting or adding small touches.
This keeps them looking new without spending extra money. With a little care, your handmade decorations can last for years and still bring joy every holiday season.
Conclusion
Making your own Christmas decorations is something I truly enjoy. It’s a simple way to slow down, get creative, and make the season feel more personal.
When you take the time to craft, you add warmth and meaning to every part of your home.
I hope you feel inspired to start making your own decor, too. You don’t need fancy tools or perfect skills, just a little effort and imagination.
Each piece you make becomes a small memory you can reuse year after year.
DIY decorations bring creativity, warmth, and connection into the holidays. They remind us that Christmas is about the moments we create, not the things we buy.
So grab your supplies, involve your family, and enjoy the joy that comes from making something by hand.