
When I wanted to give my entryway bench a fresh look, I knew the right cushion would make all the difference.
Something soft, stylish, and custom-fit, not a generic pad from the store.
This tutorial walks you through the entire process, cutting the foam, prepping the fabric, sewing a durable cover, and even adding piping for that polished finish.
The tools are straightforward, and with a little patience, even beginners can follow along.
If you’ve got a bench that’s looking a little bare or uncomfortable, this project is a fantastic weekend DIY.
It’s great for window seats, mudroom benches, or even camper cushions.
And the best part? You’ll walk away with a completely custom, high-quality cushion you made yourself.
Why Make Your Own Bench Cushion?
Store-bought cushions rarely fit perfectly, and they often lack style and quality.
Making your own allows you to choose the right foam thickness, fabrics that match your décor, and even add accents like piping for a tailored finish.
With this method, you can customize the size down to the inch. The cover is removable, washable (depending on fabric), and extremely durable.
Plus, there’s satisfaction in crafting something by hand, especially when it looks store-bought (or better).
It’s also cost-effective if you’re outfitting multiple benches or long window seats.
What You’ll Need
- 2″ anti-microbial polyurethane foam
- Fabric for the top and bottom panels
- Decorative piping (optional but recommended)
- Basting tape (double-sided)
- Sewing machine with zipper/roping foot
- Electric kitchen knife
- Straightedge or ruler
- Pencil or fabric chalk
- Scissors or a hot knife (depending on fabric type)
- Template cardboard (for corner curves)
- Silk film (for foam compression and easier insertion)
- Vacuum (for the silk film compression method)
- Thread, pins, and basic sewing supplies
Step-by-Step Guide to Making a Custom Bench Cushion
Follow these detailed steps to create a custom bench cushion with piping. From cutting foam to sewing corners, this guide has got you covered.
Step 1: Measure and Cut the Foam
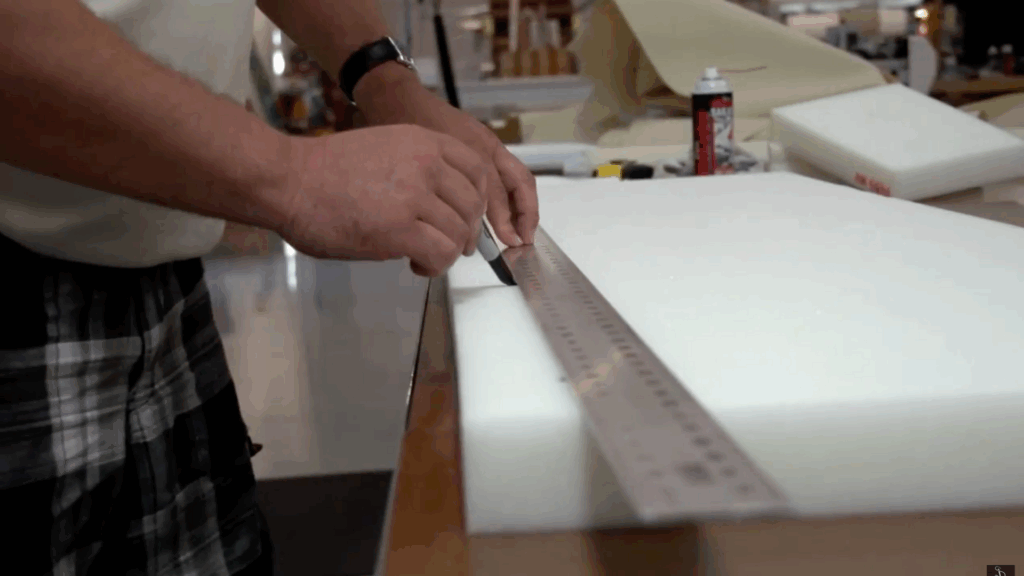
Start by measuring your bench surface. Write down the exact width and length.
Use a straightedge to mark these dimensions on your foam.
A good tip is to add ½” to each side if you want a tighter, more filled look once the cover compresses it.
Place the foam on the edge of a table and use an electric kitchen knife to cut along your lines.
Keep the blade vertical by pressing it against the table’s edge. This ensures a clean, straight cut with minimal slope.
Step 2: Cut the Fabric Panels
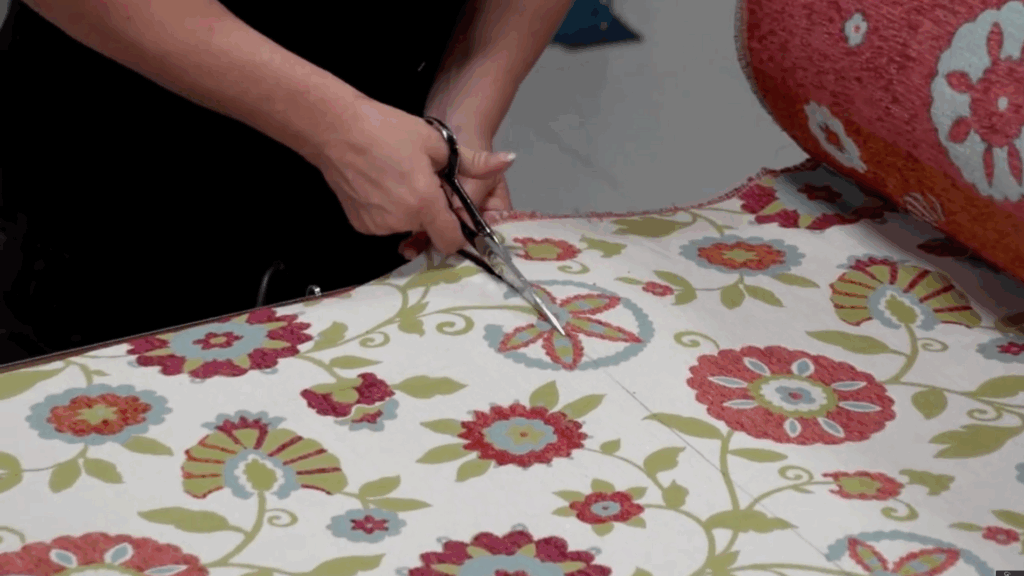
You’ll need a top plate and bottom plate, two identical rectangles of fabric.
Add twice the foam thickness to each dimension of the foam.
For example, for 59″ x 17″ foam and 2″ thickness, cut two pieces of fabric at 61″ x 19″. Trim the selvage edge and use a pencil to mark cutting lines.
If you’re using synthetic fabric (polyester, nylon, acrylic), cut with a hot knife to seal the edges.
But for cotton blends like in the video, use scissors to avoid burning the fabric.
Step 3: Create a Corner Template
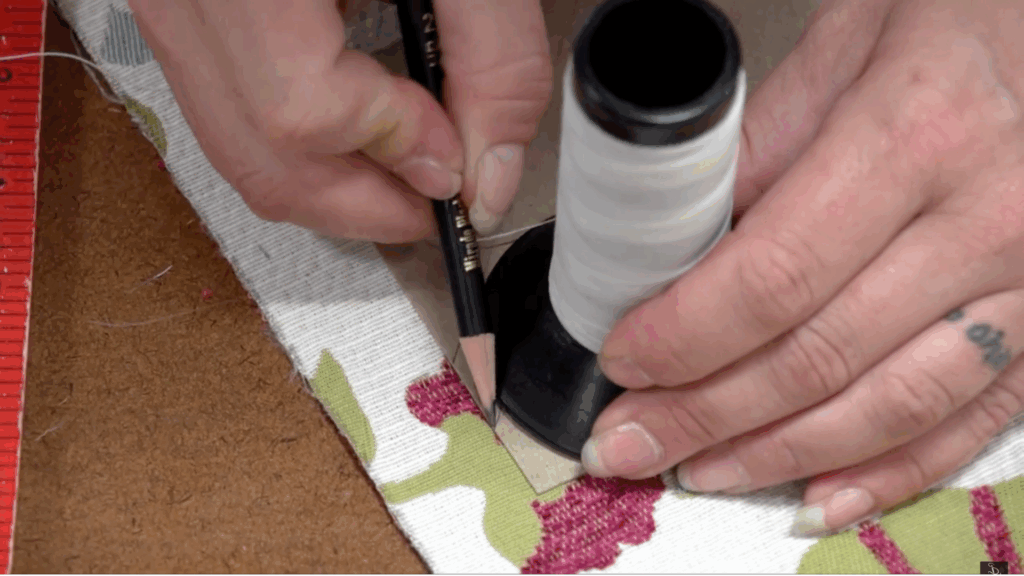
To make rounded corners consistent, create a paper or cardboard template.
Measure out 3⅝” diagonally from a corner, then ½” above that line.
Use a cone or cup to trace a rounded curve between those marks. Cut out the shape.
Use this template to trace all four corners on both fabric plates.
You’ll end up with eight curved corners total. Cut along the lines with scissors.
Step 4: Attach the Piping (Optional but Stylish)
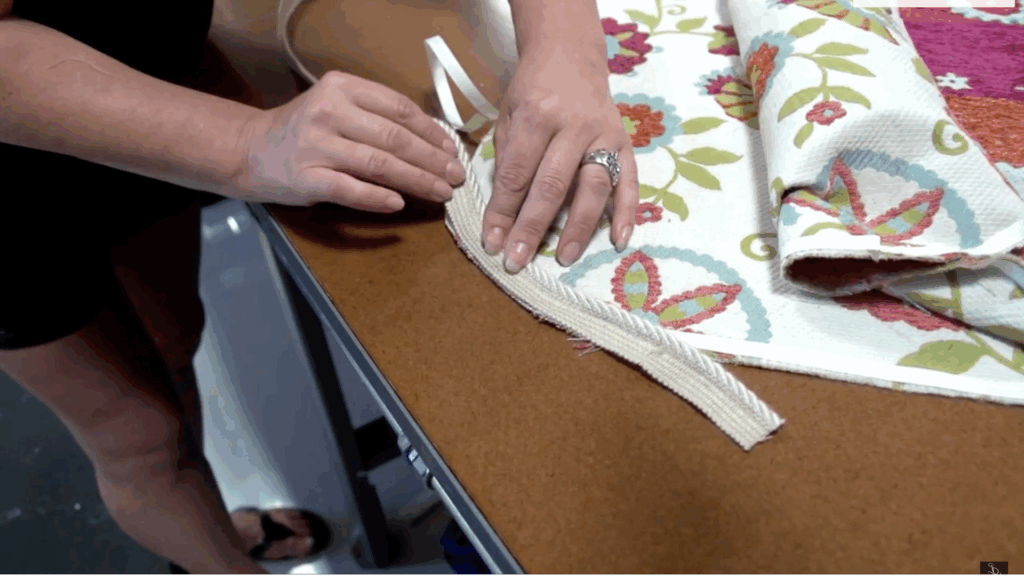
Decorative piping gives your cushion that finished, custom look.
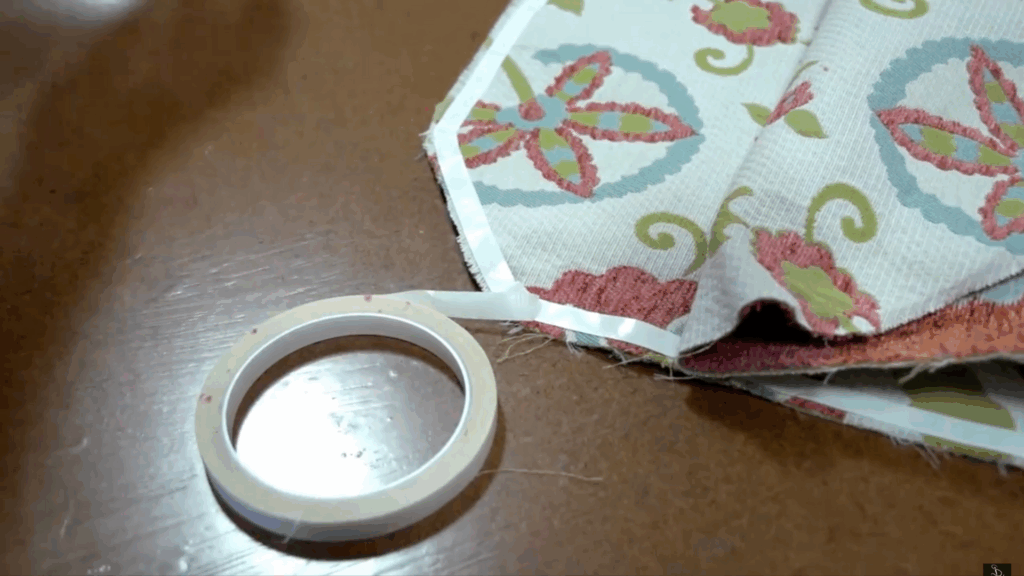
Use basting tape to line the edges of the bottom fabric plate (right side up).
Carefully press the piping into place along the curve. Leave one end open; this will be your foam insert point.
Don’t remove the tape backing in that section yet.
Trim piping ends with a hot knife to avoid fraying. You can overlap or crisscross the ends for a cleaner finish.
Step 5: Paste the Panels Together
Place the top panel over the bottom panel with the right sides facing in.
Line up the edges carefully.
Peel off the basting tape backing around the perimeter and press the layers together, sandwiching the piping in between. Leave the opening section unbasted for now.
This step holds everything in place for sewing, especially helpful if your fabric has a directional pattern to match.
Step 6: Sew the Cushion Cover
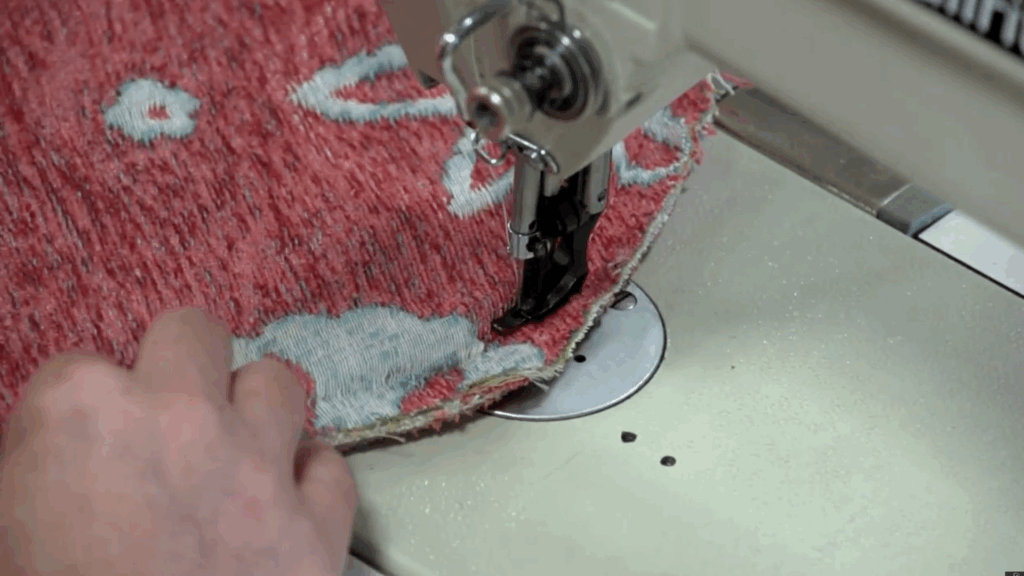
Use a sewing machine with a roping zipper foot to sew around the perimeter.
Sew as close as possible to the piping for a neat seam.
Take your time around curves, and always keep the needle down when adjusting the fabric.
Stop sewing about 5–7 inches from where you started.
This will leave an opening to insert the foam. Backstitch to secure the seam.
Step 7: Insert the Foam with Silk Film
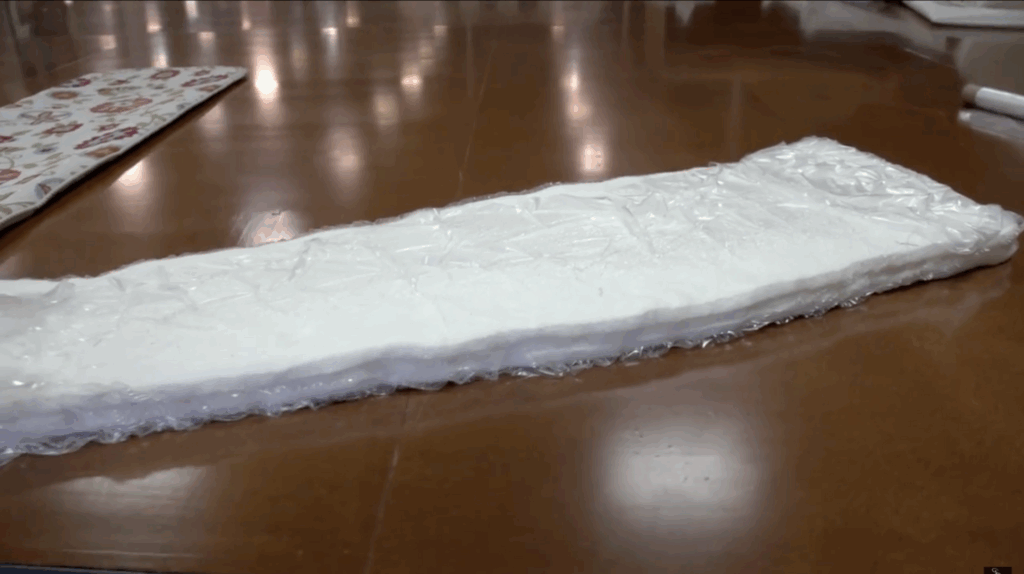
This is where the magic happens.
Wrap your foam in silk film (cut 6–12 inches larger than the foam on all sides).
Insert a vacuum hose into the film and turn it on. Watch the foam shrink to half its size or smaller.
Quickly slide the compressed foam into the cushion cover through the opening. Position it while it’s still soft.
The silk film also acts as a moisture barrier, making it great for both indoor and outdoor use.
Step 8: Close the Open End

Once the foam is inside and partially expanded, peel the backing off the basting tape at the open edge.
Tuck in and align the decorative piping ends. Press everything into place and ensure the folds look clean and symmetrical.
Take it back to the machine and sew this final seam shut.
Again, stitch as close to the piping as possible for a seamless look.
Step 9: Adjust and Finish
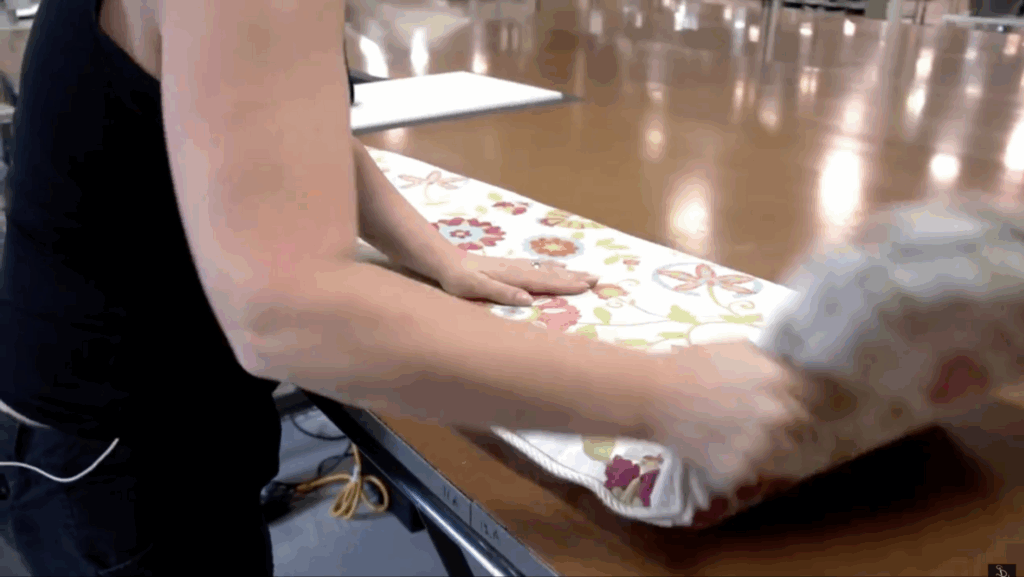
Massage the foam into all corners to help it fully expand and fill the cushion.
Adjust as needed to center the piping and smooth out any wrinkles.
You’re done! The result is a professional-grade bench cushion with perfect corners, crisp seams, and a custom fit, made completely by you.
This blog is inspired by “How to Make a Bench Cushion” by @Sailrite. So, for a more detailed understanding, watch-
Custom Bench Cushion Style Ideas
Want to take your cushion to the next level? Try these design tips to match your home’s look and feel.
| Style | Fabric/Design Choices | Additional Features |
|---|---|---|
| Modern Minimalist | Neutral fabrics like beige, gray, or white | Sleek, clean piping for a contemporary look |
| Farmhouse Cozy | Buffalo plaid or natural-toned canvas | Warm and inviting vibe |
| Boho Chic | Vibrant jewel tones, mixed patterns, fringe | Playful, eclectic touch |
| Outdoor Cushions | UV-resistant fabric, quick-dry foam | Durable for outdoor use |
Tips for a Smooth Project
- Use piping for a tailored, high-end look. It’s worth the extra effort.
- Work with silk film for tight-fitting covers. It compresses foam effortlessly.
- Match patterns by aligning stripes or motifs on both panels before basting.
- Use a hot knife on synthetic fabrics to prevent unraveling.
- Practice curved sewing on scrap fabric if you’re new to rounded corners.
- Always sew slowly around curves and keep the needle down while turning fabric.
- Leave a wide enough opening to insert foam. Too small, and you’ll struggle.
Conclusion
This bench cushion DIY is truly one of the most satisfying home projects I’ve done.
It transformed a plain entryway bench into a cozy, stylish seat that resembles one from a boutique.
Thanks to the helpful Sailrite tutorial and tools, I learned how to work with piping, sew curves, and even use silk film to compress foam.
Whether you’re upgrading your entryway, crafting cushions for a window seat, or outfitting your camper, this method is versatile and completely customizable.
You get to pick your fabric, thickness, shape, and size, making it ideal for any space.
And best of all? It’s easier than it looks.
With a little time and attention to detail, you’ll have a cushion that not only looks amazing but also stands the test of daily use.