Unfinished composite deck edges can make even the nicest outdoor space feel incomplete.
I’ve seen it happen on many projects, but the good news is that it’s easy to fix. There are several simple ways to finish those exposed ends, and each option adds style and protection.
You might opt for a quick fix, such as end caps, or take it further with picture framing or fascia boards for a cleaner, high-end look.
Each method has its benefits. A finished edge doesn’t just look better, it also helps protect your deck from moisture and long-term damage.
In this post, I’ll show you the most popular and practical ways to polish off your deck edges so your space feels complete.
Why Finishing Deck Ends Matter?

Leaving composite deck ends exposed can lead to more than just a rough look.
Unfinished edges may fray, absorb moisture, or warp over time, especially in areas with harsh weather.
Finishing the ends not only adds a clean, polished appearance, but it also seals off the board’s core, helping to prevent long-term damage.
A properly finished edge protects against UV exposure, water infiltration, and daily wear from foot traffic or outdoor furniture.
It also adds value to your deck by making it look professionally installed.
If using trim, fascia, or a picture frame design, the right finish can significantly extend the life of your deck and enhance its overall design.
For a clean look that lasts, finishing the edges should be a must, not an afterthought.
Best Ways to Hide Composite Deck Board Ends
Finishing the composite deck ends enhances both the appearance and durability of your deck. This section covers seven effective methods, complete with the necessary tools, easy steps, and helpful tips.
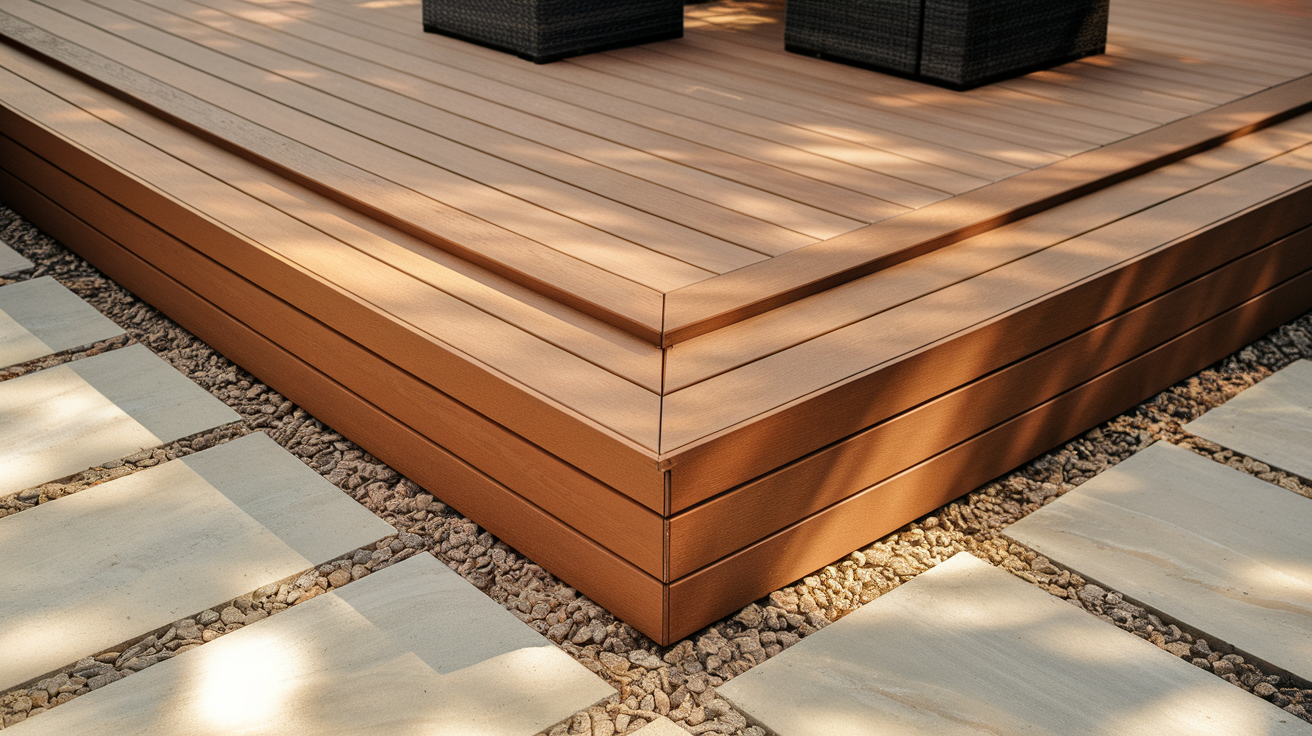
1. Picture Frame Border

A picture frame border adds a clean, professional look by outlining the deck with full boards. It conceals raw ends and visually defines the space.
This method works exceptionally well with contrasting or color-matched boards.
Precise cuts and corner alignment are crucial to achieving a seamless finish that also enhances edge durability.
Tools/Materials: Composite boards, miter saw, drill, deck screws
Steps:
- Measure the deck perimeter
- Cut border boards to size
- Miter the corners at 45 degrees
- Pre-drill screw holes
- Secure border boards to the outer joists
2. Fascia Board Installation

Fascia boards are mounted vertically along the perimeter to cover cut ends and give the deck a tidy, solid look. They add a layer of protection against moisture and wear.
This method works on both ground-level and raised decks and is often used alongside skirting for a completely enclosed base.
Tools/Materials: Fascia boards, circular saw, drill, fascia screws
Steps:
- Measure the deck edge length
- Cut fascia boards to fit
- Align with the outer rim joist
- Pre-drill pilot holes
- Fasten securely with fascia screws
3. End Caps

End caps are quick and easy to install, offering a factory-matched finish with minimal tools. They snap into place to hide hollow ends and reduce moisture infiltration.
Ideal for DIYers and low-maintenance decks, this method is limited to certain brands but provides a neat, polished appearance without complex cutting.
Tools/Materials: Compatible end caps, rubber mallet, sealant (optional)
Steps:
- Clean the cut board ends
- Align end caps with the board core
- Tap gently with a mallet to secure
- Apply sealant if required
- Check all caps for a snug fit
4. Trim Boards (Overhang Style)

Trim boards with a slight overhang create a bold, shadowed edge while covering exposed cuts. This method adds architectural interest and depth to the deck design.
Use color-matched or complementary trim for added style. It’s important to seal the area beneath the trim to keep moisture out of exposed core material.
Tools/Materials: Trim boards, table saw, exterior adhesive, drill, screws
Steps:
- Measure for the desired overhang
- Cut trim boards to size
- Apply adhesive to the back
- Pre-drill screw holes
- Fasten the trim over the cut ends
5. Painting or Sealing Ends

Painting is a budget-friendly option that works best for decks with minimal edge visibility. It blends the ends with the rest of the deck but may require periodic touch-ups.
Use only composite-approved paint and primer for lasting results. While not as durable as trim, it’s fast and ideal for simple builds.
Tools/Materials: Composite-compatible paint, primer, brush or sprayer, sandpaper
Steps:
- Clean and dry the board ends
- Lightly sand for better adhesion
- Apply a primer if needed
- Paint the ends to match the decking
- Let dry completely before exposure
6. Skirting or Deck Lattice

Skirting or lattice hides both the deck’s substructure and the exposed ends of boards. It enhances curb appeal and prevents animals from nesting beneath.
Available in composite, PVC, or wood, it’s a functional and decorative choice. Be sure to maintain adequate ventilation behind the panels to prevent moisture buildup and mold growth.
Tools/Materials: Lattice/skirting panels, saw, measuring tape, drill, screws
Steps:
- Measure and cut skirting panels
- Build a supporting frame
- Position panels under the deck edge
- Screw panels into frame
- Finish off corners or seams
7. Heat Bending for Curved Edges

Heat bending allows for curved finishes, ideal for rounded decks or custom stairs. This advanced method provides a sleek, seamless edge with high visual impact.
It requires special tools and skills but delivers premium results. Often used in high-end projects, it eliminates visible seams and creates a continuous, professional finish.
Tools/Materials: Heat blanket, bending form, clamps, gloves
Steps:
- Lay the board on a heating blanket
- Gradually heat to the correct temperature
- Clamp around a bending form
- Allow to cool and set in shape
- Install a curved board along the edge
Mistakes to Avoid When Finishing Ends
Finishing composite decking ends may seem simple, but small mistakes like uneven cuts or mismatched materials can affect both appearance and performance. It’s worth getting it right.
- Uneven or Rough Cuts: Using dull blades or rushing the cutting process can lead to jagged edges that ruin the clean look of your deck and make it harder to finish properly.
- Clashing Colors or Materials: Using trim or fascia that doesn’t match your decking boards in color or texture can make the edge stand out for all the wrong reasons. Always test and match first.
- Skipping Sealing or End Caps: Leaving cut edges exposed without sealing or covering them can let in moisture, leading to swelling, warping, or mold over time, especially in wet climates.
- Ignoring Manufacturer Guidelines: Each composite brand may have specific recommendations for finishing. Ignoring these can void warranties or result in poor long-term performance.
Maintenance Tips for Deck Edges
Proper maintenance ensures your finished deck edges remain attractive and durable. Once you’ve invested time in completing the look, it’s important to preserve it with some simple care habits.
- Clean Edges Regularly: Use a soft brush and mild soap to remove dirt and mildew from trim, fascia, or caps. Keeping them clean prevents buildup and keeps the finish looking sharp.
- Inspect for Loosened Trim: Over time, expansion and contraction can loosen fasteners. Periodically check trim or caps and tighten or replace screws as needed to keep everything secure.
- Touch Up Fading or Damage: Painted ends or trim may fade. Keep matching paint or touch-up kits on hand for quick fixes that maintain a seamless appearance.
- Avoid Harsh Cleaners or Pressure Washers: Harsh chemicals or high-pressure washing can damage trim or end caps. Stick to manufacturer-approved cleaning methods to preserve finish quality.
Conclusion
Finishing the ends of composite decking is the final touch that takes your deck from good to truly great.
A single trim board, fascia piece, or snap-on cap can make a huge visual difference and give your project that polished, professional look.
Beyond appearance, proper finishing helps protect the board ends from moisture, UV rays, and daily wear, extending the life of your deck.
You might like a simple picture frame design or go for something more custom; there’s a method to match every style and skill level.
Find a few options, mix and match techniques, and don’t be afraid to get creative with your edge details.
Ready to give your deck a clean, finished look? You can scroll back through the methods and select the one that best suits your space.
And if you’ve questions or want to share your results, please leave a comment below. I’d love to see it.
Frequently Asked Questions
Do I need to finish the ends of composite decking?
Yes, finishing the ends improves appearance and helps protect against moisture, fraying, and long-term wear. It also gives your deck a more professional and polished look.
What’s the easiest way to finish deck ends?
Using fascia boards or end caps is one of the simplest options. These methods are quick to install, low-maintenance, and often compatible with most composite decking brands.
Can I paint the ends of composite decking?
Yes, you can use high-quality, exterior-grade paint that’s made for composites. However, paint may require occasional touch-ups and isn’t as long-lasting as trim or caps.
Will finishing the ends affect the deck warranty?
It can, mainly if non-approved materials or techniques are used. Always follow your composite brand’s guidelines to avoid voiding the product warranty.