Frameless cabinets grabbed my attention when I was looking for a way to give my kitchen a cleaner, more modern feel.
I kept noticing them in design videos and loved how they offered extra storage space with a sleek look.
The minimal lines and smooth doors really stood out compared to traditional framed cabinets. After watching a few installation clips, I realized they’re not just stylish, they’re practical too.
They bring a European flair that works beautifully in both small and large spaces.
In this blog, I’ll share everything I’ve learned about frameless cabinets, from what sets them apart to how they can change the way your kitchen functions and feels.
If you’re drawn to simplicity and smart design, you might find these cabinets are exactly what your home needs.
What Are Frameless Cabinets?
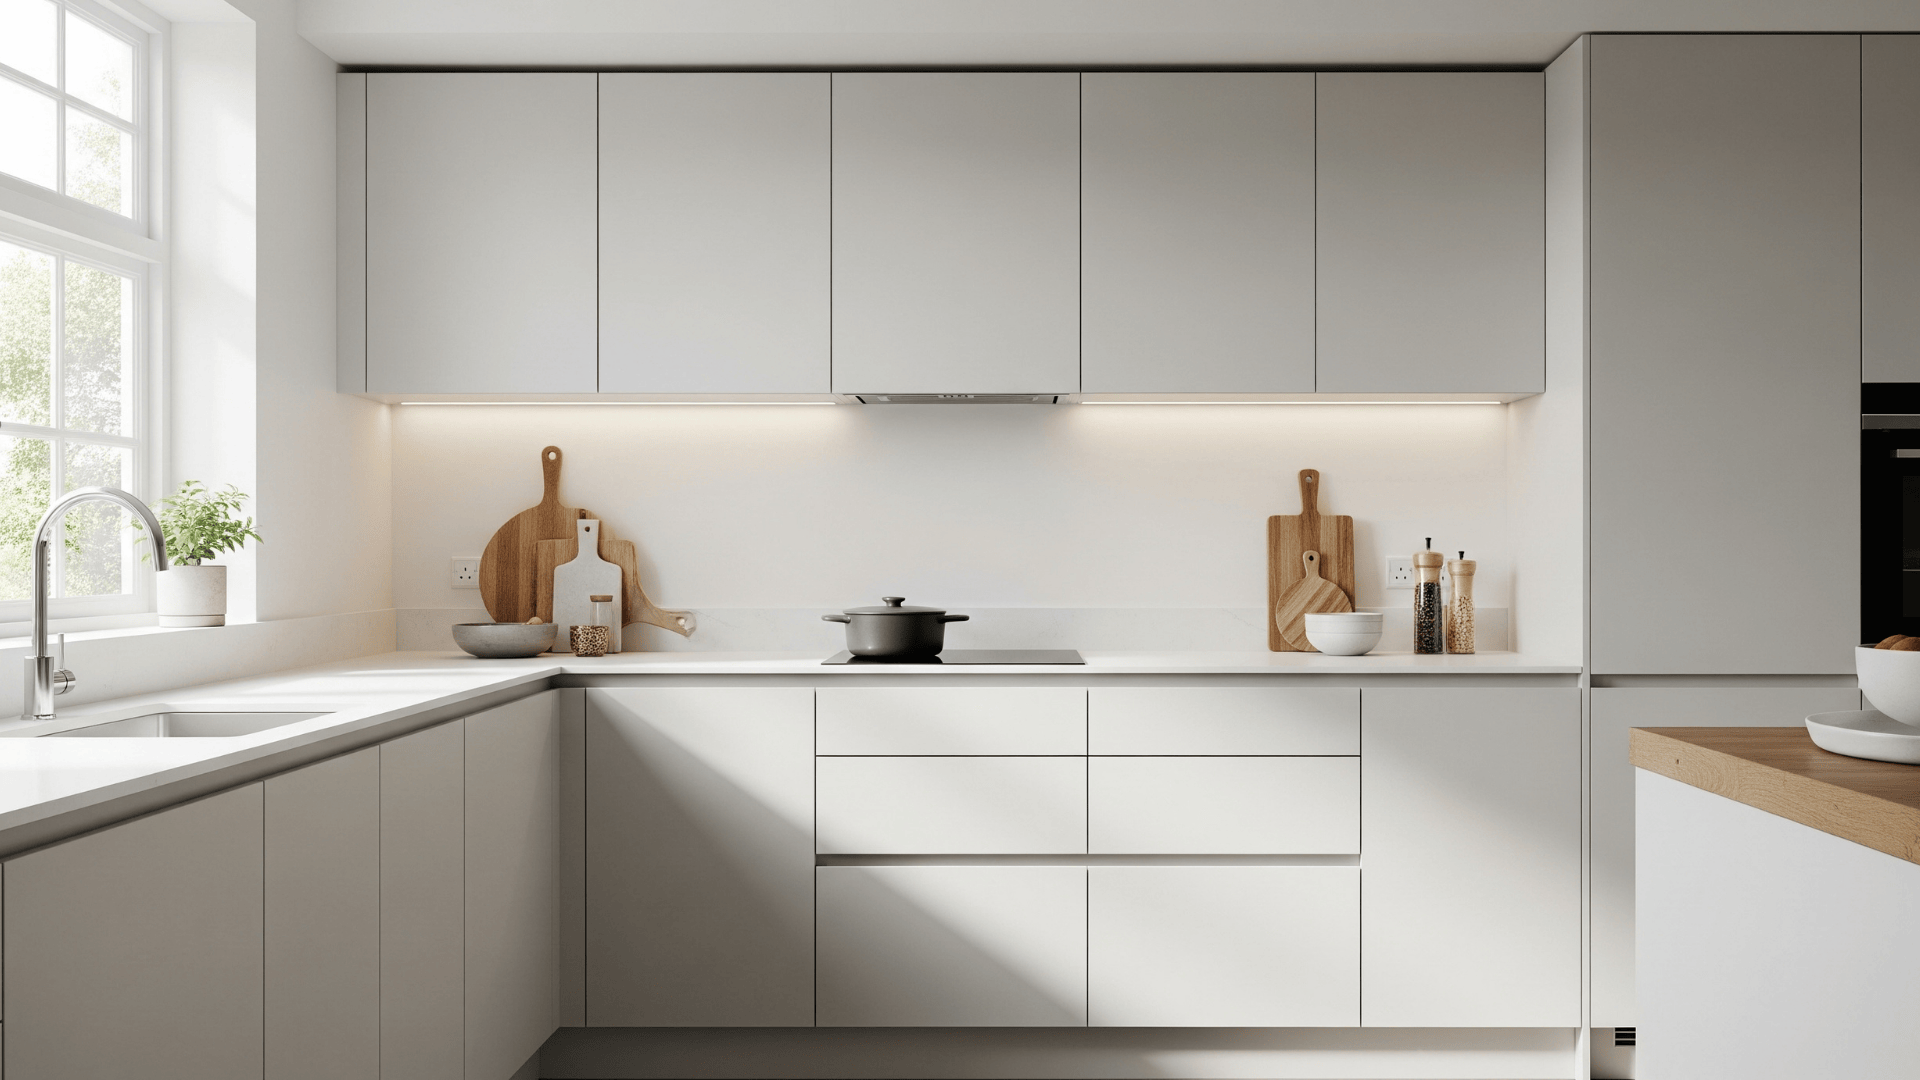
Frameless cabinets are modern storage units designed without a front face frame. Instead of a traditional frame, the doors attach directly to the cabinet box, creating a smooth, clean look.
This style is often seen in European kitchens and has become popular in minimalist, industrial, and Scandinavian interiors.
Because there’s no face frame, frameless cabinets offer more usable storage space and easier access to shelves and drawers.
They’re built with full-overlay doors, meaning the door covers the entire front of the cabinet box, resulting in a seamless finish with tight lines.
Benefits of Frameless Cabinets
- Maximized Storage Space: No face frame means wider openings and more room for large items.
- Clean, Modern Look: Flush fronts give a sleek, updated appearance that suits contemporary spaces.
- Flexible Customization: Available in various finishes and hardware styles, making them great for unique layouts.
- Easy Hardware Integration: Compatible with soft-close and push-to-open features for smooth functionality.
Framed vs Frameless Cabinets

Choosing cabinets involves a debate between framed and frameless styles, each with a unique structure and look. Comparing helps determine which suits your needs, be it for classic charm or modern simplicity.
| FEATURE | FRAMED CABINETS | FRAMELESS CABINETS |
|---|---|---|
| Structure | The face frame supports the box | No frame; just cabinet box |
| Storage Space | Slightly less due to the frame | More usable interior space |
| Door Attachment | Hinges on the face frame | Hinges on the cabinet box |
| Design Style | Traditional, classic | Modern, sleek |
| Installation Difficulty | More forgiving | Needs precision |
| Cost | Often lower | Slightly higher |
Tools and Materials Required for Building a Frameless Cabinet
To build a frameless cabinet efficiently and accurately, gather all your essential tools and materials before starting. This helps avoid delays and ensures a smooth workflow from cutting to assembly and door installation.
| CATEGORY | ITEM | PURPOSE |
|---|---|---|
| Measuring Tools | Tape Measure, Setup Blocks, Marking Gauge | For accurate cuts, spacing, and hinge placement |
| Cutting Tools | Table Saw, Miter Saw, Jigsaw | For panels, grooves, shelves, and clean cuts |
| Drilling Tools | Drill, Drill Press, Forstner Bit (35mm), Self-Centering Bit | For shelf pins, hinge cups, and screw holes |
| Fastening Tools | Narrow Crown Stapler, Screwdriver | For holding and securing cabinet joints |
| Hardware | Screws (1¾”), Euro Hinges, Hinge Plates | For sturdy assembly and door installation |
| Assembly Aids | Pocket Hole Jig, Square, Reference Lines | Ensure precise angles and alignment |
| Finishing Materials | Plywood Panels, Shelf Pins, Back Panel | Main materials for structure and flexibility |
Step-by-Step Frameless Cabinet DIY Installation Guide
Building a frameless cabinet with a full overlay door requires careful planning, precise cutting, and meticulous assembly. Follow this guide for a clean, modern cabinet that works well and looks great in any room.
Step 1: Cut and Label Cabinet Parts

Start by cutting the cabinet sides, top, bottom, shelf, nailers, back panel, and door. Identify the interior-facing surfaces by selecting the cleaner side of the plywood for a polished look inside.
Label each part to avoid mix-ups. Pay close attention to the orientation grooves and finishes, ensuring they align consistently.
Step 2: Cut Grooves for the Back Panel

Mark the inside back edges of your side, top, and bottom panels. Use a table saw to cut an 8mm-deep groove to house the 6mm plywood back panel.
Ensure the grooves are cut on the interior-facing side of the panels for proper alignment and appearance. This groove secures the back panel and adds strength to the cabinet box.
Step 3: Drill Shelf Pin Holes

Determine the center of your side panels and mark locations for adjustable shelf holes. Use a measuring jig or template spaced at 32mm intervals.
Drill 5mm holes using a self-centering bit to ensure consistent depth and spacing: Mark both the front and rear to provide even support.
Step 4: Cut and Size the Back Panel

To size the back panel, measure the cabinet’s inside dimensions and add the groove depth (typically 16mm total). Subtract 1mm to avoid a tight fit.
For example, a 728mm interior height and 423mm interior width means the back panel should be cut to 743mm x 438mm. This ensures it fits cleanly into the grooves during assembly.
Step 5: Assemble the Cabinet Box

Lay out the cabinet sides and attach the bottom panel first using a crown stapler or brad nailer along your centerline, then reinforce with 1¾” self-tapping screws.
Add the back panel into its groove, followed by the top. Ensure everything is square and flush before fully fastening. The screws and staples hold the carcass firmly in place, while the back panel helps maintain squareness.
Step 6: Install Nailers for Wall Mounting

Cut nailers to fit between the side panels, then install them at the top and bottom of the cabinet. Use pocket holes if you want a cleaner side finish, especially if one end of the cabinet will remain visible.
The nailers provide structure and secure mounting points to anchor the cabinet to the wall studs. Flush-fitting nailers ensure the back panel remains undisturbed.
Step 7: Determine Door Size

Measure the final height and width of your cabinet. Then subtract 2mm from each edge to allow for a 2mm reveal on all sides. That means subtract 4mm total from both height and width.
Double-check these numbers before cutting the door panel. This method ensures a uniform reveal around all edges, key to achieving the clean, modern look frameless cabinets are known for.
Step 8: Install Hinge Plates in the Cabinet

Measure 100mm from the top and bottom inside edges of the cabinet and draw a vertical reference line. Use a hinge plate drilling jig (e.g., Rockler’s) to drill mounting holes 37mm from the front edge.
Install the hinge plates using self-centering screws, starting with one screw, then adjusting and securing the second. Accurate hinge placement is crucial to smooth operation and visual symmetry.
Step 9: Drill Hinge Cups in the Door

Measure 98mm from both door ends to mark hinge positions (adjusted from 100mm for a 2mm reveal). Use a drill press or jig with a 35mm Forstner bit and 5mm tab spacer to drill hinge cup holes at about 13mm depth.
Insert the hinges and secure them with screws, tightening evenly for a flush fit. Proper hinge installation ensures your door opens and closes smoothly and aligns well with the cabinet face.
Step 10: Mount and Adjust the Door

Clip the door onto the installed hinge plates. Use the built-in adjustment screws to center and level the door, both side-to-side and up/down, as well as in and out.
Aim for even reveals on all edges. Test the door to ensure it opens and closes without rubbing. Once set, snap the hinges in place and tighten everything down. Your cabinet is now ready for shelves, hardware, and final installation.
For more information, check out this video tutorial by Bent’s Woodworking.
Stylish Frameless Cabinet Design Ideas
Frameless cabinets can look sleek or cozy, depending on the finish and layout. These design ideas are popular in modern homes and work well in various spaces, including kitchens, bathrooms, and more.
- Matte White with No Handles: This ultra-clean design gives your space a fresh, open feel, especially in minimalist homes. Push-to-open hardware keeps surfaces smooth, eliminating knobs and pulls for a clutter-free look.
- Woodgrain Slab Doors: Flat-front woodgrain cabinets bring warmth and texture to contemporary interiors. They offer a natural, organic vibe that softens the modern lines of frameless construction.
- Two-Tone Combinations: Mixing dark base cabinets with lighter uppers creates visual balance and breaks up the space. This combo works well in small kitchens to add height and dimension.
- Glossy Finish for a Modern Edge: High-gloss lacquered cabinets reflect light, making the room feel larger. Pair with chrome accents or a bold backsplash for a sleek, high-end touch.
- Muted Neutrals for a Soft Look: Shades like dove gray, sand, or greige offer a timeless, calming backdrop. These neutral tones suit Scandinavian or transitional styles and adapt well over time.
Tips to Get the Best Results
To make the most of your frameless cabinet project, a little preparation goes a long way. These tips will help you avoid mistakes and get a cleaner, more professional outcome.
- Use the Right Tools: Equip yourself with a level, stud finder, clamps, and a power drill. Frameless cabinets require precise alignment, so don’t skip quality tools to keep everything straight and secure.
- Pre-Drill Holes for Clean Mounting: Pre-drilling prevents splitting and ensures smooth screw placement. It’s crucial to avoid chipping on laminated or painted surfaces and keep finishes intact.
- Choose Quality Materials: Strong cabinet boxes made of plywood or high-grade particleboard last longer. Pair them with soft-close hinges and solid slides for daily use that hold up over time.
- Avoid Low-Grade MDF: Cheap MDF can sag or chip, especially in humid environments such as kitchens or bathrooms. Opt for moisture-resistant, higher-quality materials to ensure cabinets that age well.
- Plan Ahead Before Starting: Double-check all measurements and sketch your layout in advance to ensure accuracy. Label and sort cabinet parts so assembly flows faster and you’re not guessing mid-installation.
The Bottom Line
I’ve found frameless cabinets to be one of the most worthwhile upgrades for achieving a modern, streamlined space.
They offer more usable storage, easier access, and a clean look that fits beautifully in kitchens, bathrooms, and even laundry areas.
What really helped me was watching installation videos; they gave me the confidence to approach the project with the right tools and mindset.
Frameless cabinets may require more precision, but the result is worth it.
If you’re looking for a layout that feels open, efficient, and stylish, I strongly recommend giving them a try.
Thoughtful planning and careful installation make all the difference.