
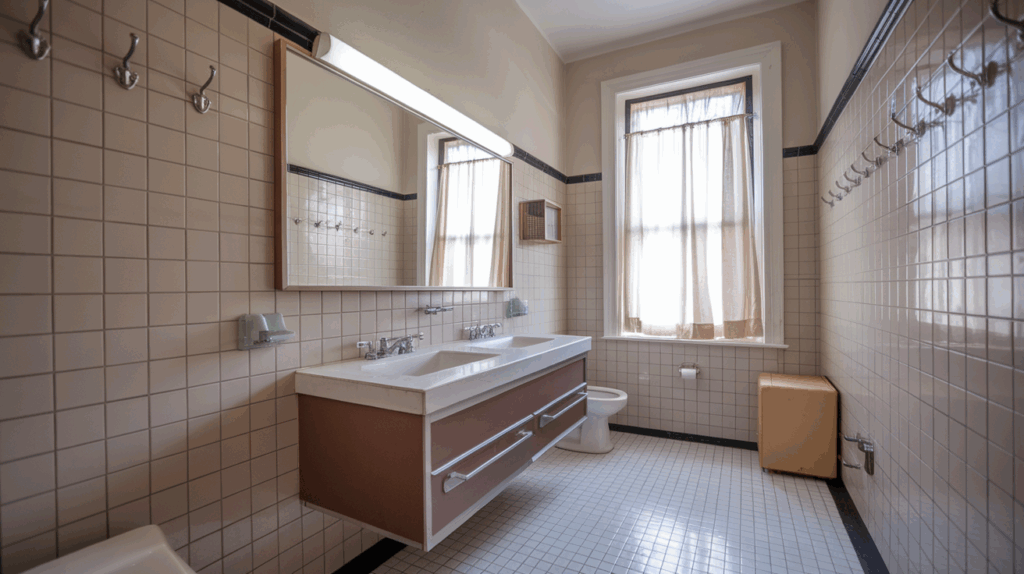
I’ve always loved the charm of old homes, but the 1960s bathroom in my house needed help.
The colors were bold, the tiles were chipped, and the space didn’t work for everyday life.
At first, I didn’t know where to start. Should I keep the retro look or go for a full update? What would it cost? And what problems might I find behind the walls?
If you’re thinking about giving your own 1960s bathroom a makeover, I’ve been there.
This post shares what I learned, what worked, what didn’t, and what I wish I knew before starting.
From design choices to hidden costs, it’s all here in plain words. A 1960s bathroom can be tricky, but with the right plan, it can turn into a space you’ll love. Let’s get into it!
What Is a 1960s Bathroom Style?
Before making any changes, it’s helpful to understand what makes a 1960s bathroom look the way it does. This helps you decide what to keep, what to update, and how to mix old with new.
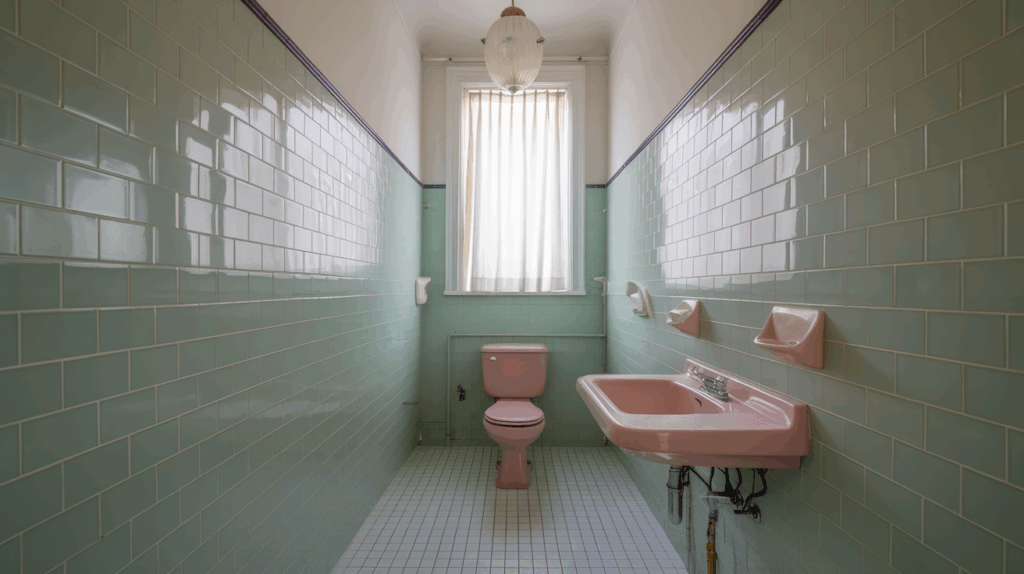
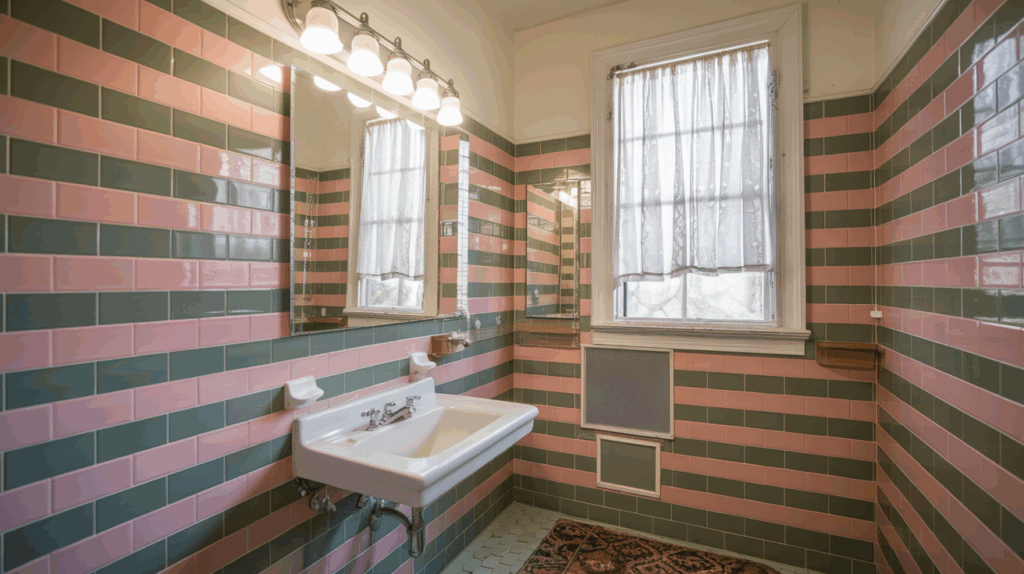
- Bold colors: Many 1960s bathrooms used bright tiles like pink, green, blue, or mustard yellow.
- Small square tiles: You’ll see a lot of 4×4 wall tiles and small floor tiles in repeating patterns.
- Built-in features: Old vanities, recessed soap holders, and tile countertops are common.
- Low shower heads: Many homes had showers made for shorter people.
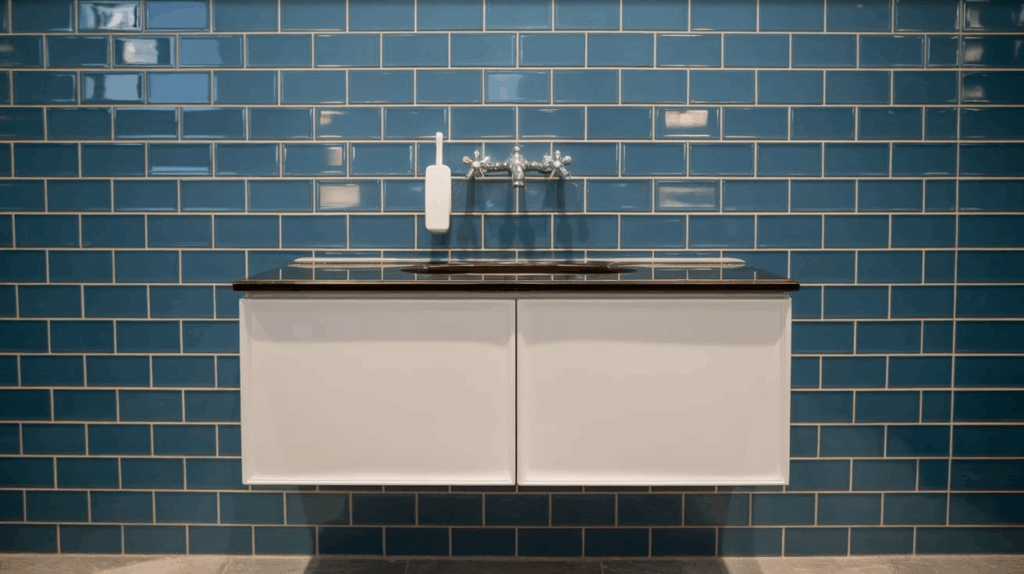
- Wall-hung sinks or toilets: Some bathrooms use floating styles to save space.
Once you spot these, you can decide whether to keep the retro look or opt for something more modern.
Should You Keep or Change the Retro Look of a 60s Bathroom?
When it comes to redoing a 1960s bathroom, one big question arises early: Should you retain the retro look or completely change it? The answer depends on your preferences, the condition of your bathroom, and the amount of money you’re willing to spend.
Keeping the Retro Look
Many people enjoy the fun and charm of a 1960s bathroom. The bright tiles and old-style features can make the space feel warm and full of personality.
If the tile is still in good condition and the layout suits you, you may only need to address minor issues.
New lighting, a fresh coat of paint, or updated faucets can make a big difference while keeping the vintage style.
Why do people keep it?
- It costs less than a full remodel.
- The colors and style feel playful and unique.
- It fits the age and feel of the home.
- It’s better for the environment, less waste.
Changing the Retro Look
Some 1960s bathrooms look worn out or feel too small. Perhaps the colors seem too bright, or the layout doesn’t meet your needs.
If the tub leaks, the sink is low, or the plumbing is old, a full update may be the best choice.
A modern remodel can enhance both the appearance and functionality of the bathroom.
Why do people change it?
- They want a clean, fresh look with soft, modern colors.
- New layouts can make the space feel bigger.
- Old plumbing or wiring may need to be replaced.
- A full update can increase home value.
Try a Mix of Old and New
You don’t have to choose just one path. A blended style works too. For example, you can:
- Keep the pink tile but add a new white vanity.
- Keep the tub but replace the toilet and flooring.
- Use vintage-style lights with modern mirrors.
Mixing old and new keeps the space fun but adds comfort and updates that matter most.
Bottom line: Choose what feels right for your space, your taste, and your budget. You can keep the past alive or build something brand new. Either way, your bathroom should feel like home.
How to Prepare for a 1960s Bathroom Update?

Before you swing a hammer or pull out old tile, take some time to plan. A 1960s bathroom makeover can be exciting, but it’s easy to feel lost without a clear path. Planning helps you stay on budget, avoid mistakes, and make sure the space turns out just how you want.
1. Make a List of Must-Haves
Think about what you really want from your new bathroom. Do you need more storage? A walk-in shower instead of a tub?
Better lighting? Make a list of the most important things. These are your “must-haves.” They help you focus and make smart choices.
Try writing down three to five things you can’t live without. Then make a second list for “nice-to-haves.”
That way, if the budget is tight, you’ll know what to skip.
2. Set a Budget
Remodeling can get expensive fast. That’s why setting a budget early is so important. Think about how much you can spend in total.
Then break it down: how much for tile, how much for a new vanity, how much for labor if you’re hiring help.
Always leave extra money for surprises. A good rule is to save 10% to 20% of your budget for unexpected costs, like fixing hidden water damage or replacing old pipes.
3. Check the Condition
Old bathrooms often hide problems behind the walls or under the floor. Before you start making big changes, look around closely.
Do you see signs of water damage? Does the sink drain slowly? Is the wiring safe and up to date?
If you’re not sure, it’s worth asking a pro to take a look. Catching these issues early can save you a lot of stress and money later on.
4. Think About the Order of Work
Some steps must come before others. For example, plumbing updates should happen before tile goes in.
Painting should wait until after the messiest jobs are done. Write out the order of the work so nothing gets skipped or done out of turn.
This also helps if you’re hiring someone. You’ll know when they should come and what they should do.
1960s Bathroom Makeover Budget: What Things Might Cost
Below is a look at some common costs. These can go up or down depending on the size of your bathroom, your location, and what you choose:
| Item | Average Cost (USD) |
|---|---|
| Demo/Removal | $500–$2,000 |
| New Tile | $1,500–$4,000 |
| Vanity and Sink | $500–$2,000 |
| Toilet | $100–$500 |
| Bathtub or Shower | $400–$3,000 |
| Plumbing and Electrical | $1,000–$3,000+ |
| Paint | $100–$300 |
| Labor | $2,000–$5,000+ |
Remember: Always plan for 10–20% more than you think you’ll spend. There’s almost always a surprise cost.
Common Issues to Check Before You Remodel
When redoing a 1960s bathroom, some problems are easy to miss but can cause big trouble later. Here’s what to look for:
- Old Plumbing: Many bathrooms from the 60s used galvanized pipes, which can rust and block water flow. If you’re opening walls, this is a good time to replace them.
- Weak Electrical Wiring: Homes from the 1960s may not handle modern lighting and outlets. You may need to add GFCI outlets or upgrade wiring for safety.
- Water Damage: Behind tile or under floors, water damage is common. Look for soft walls, cracked grout, or a musty smell.
- Mold: Old walls, wet spots, and bad airflow can cause mold. It can grow in hidden places like behind tiles or under tubs.
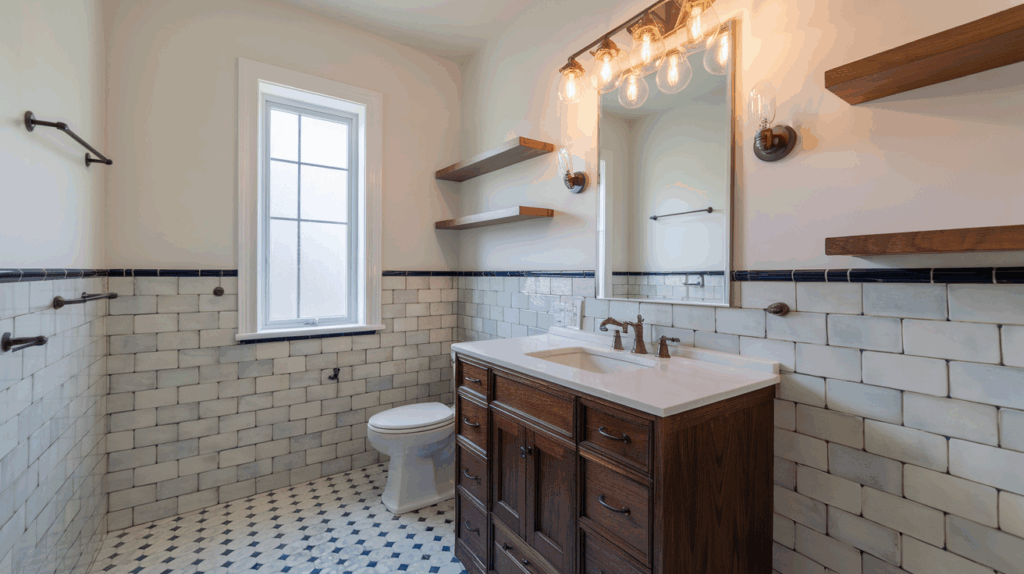
Ideas to Modernize While Keeping the Retro Look of a 60s Bathroom
Some easy ways to mix old and new for a bathroom that feels both classic and updated are:
1. Keep the Tile, But Refresh the Grout
Old tile is one of the best parts of a 1960s bathroom. If the tile isn’t broken or falling off, you can keep it. Just give it a deep clean and re-grout it.
Dirty or cracked grout can make the whole room feel outdated. Cleaning it up, or even painting it with grout stain, can make the tile pop again.
If you want to take it further, re-grouting in a bold color, such as black or soft gray, can give your bathroom a fresh, stylish edge.
You save money, keep the retro look, and make the whole space feel newer.
2. Paint the Vanity a Modern Color
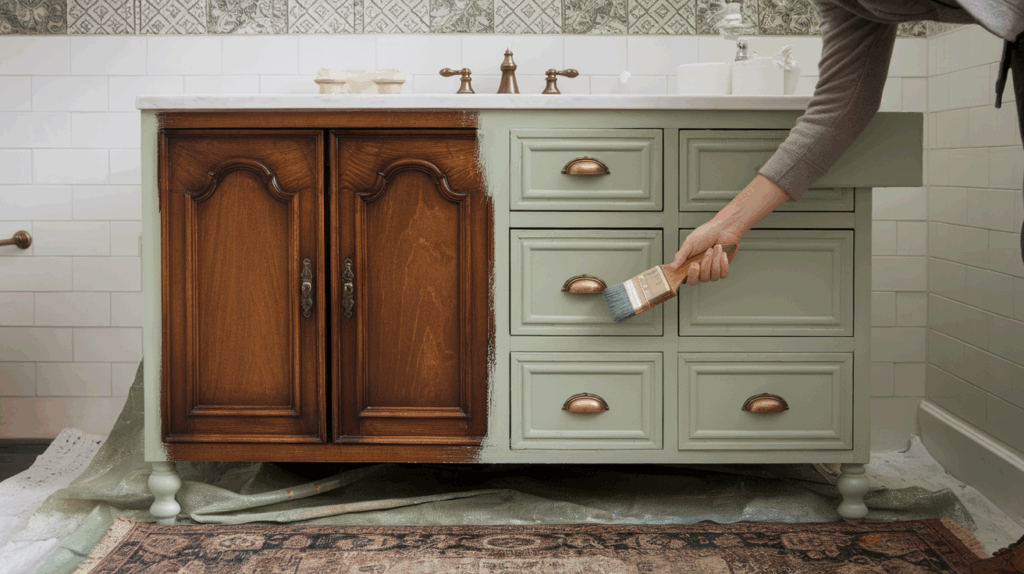
Instead of buying a brand-new vanity, try painting the one you already have. Many 1960s vanities are well built, but the colors may look old.
A few coats of paint in a soft modern color like white, light gray, navy, or sage green can change the whole look.
Add new hardware like brushed gold knobs or matte black handles to make it feel brand new.
This simple change gives your bathroom a cleaner look while keeping the original structure. It’s a smart way to save money and still update the space.
3. Add Fun Lighting That Feels Retro and New
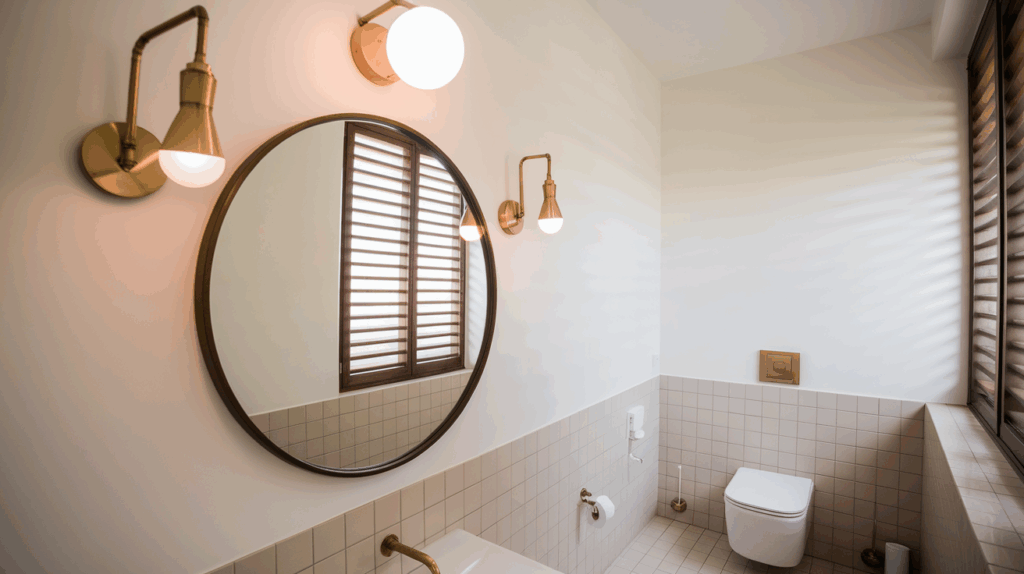
Lighting can change the feel of the whole bathroom. Many old bathrooms just have one basic light.
You can fix that easily. Try adding wall lights beside the mirror or a small ceiling light that looks like a globe or cone.
Choose shapes and materials that evoke the 60s, such as brass, chrome, or milk glass, but with modern wiring and a bright finish.
Opt for warm white bulbs, which create a cozy and soft ambiance in the room. The right lighting makes the bathroom safer, brighter, and more stylish.
4. Mix Old Tile with Modern Fixtures
Even if you keep the tile, you can make the bathroom feel new by changing the fixtures. This means the faucet, showerhead, and handles.
Choose simple, clean styles in finishes like matte black, chrome, or brushed gold.
These new fixtures stand out against old tile in a good way. They help balance the vintage charm with today’s smooth, shiny looks.
It’s an easy update that brings function and style without removing what makes the room special.
5. Swap the Mirror for Something Clean and Bright
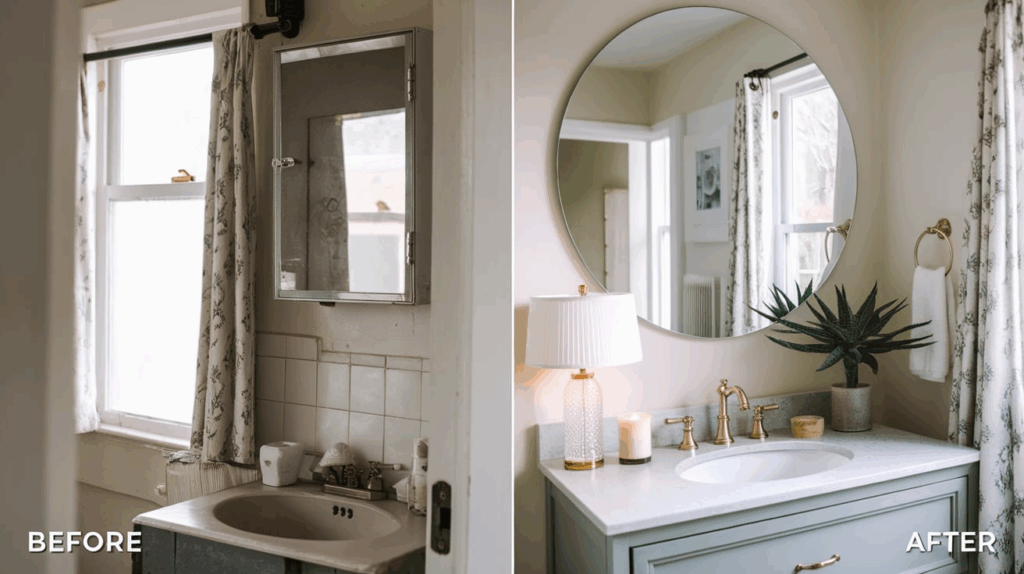
Old medicine cabinets are useful, but they often look bulky or outdated. Swapping it out for a large mirror can open up the space.
A round or square mirror with a thin metal frame looks simple and modern.
This change reflects more light and makes small bathrooms feel bigger.
If you still need storage, look for mirrors that open like a cabinet but have a cleaner shape. It’s a small change that makes a big difference.
6. Keep the Tub, Update the Shower
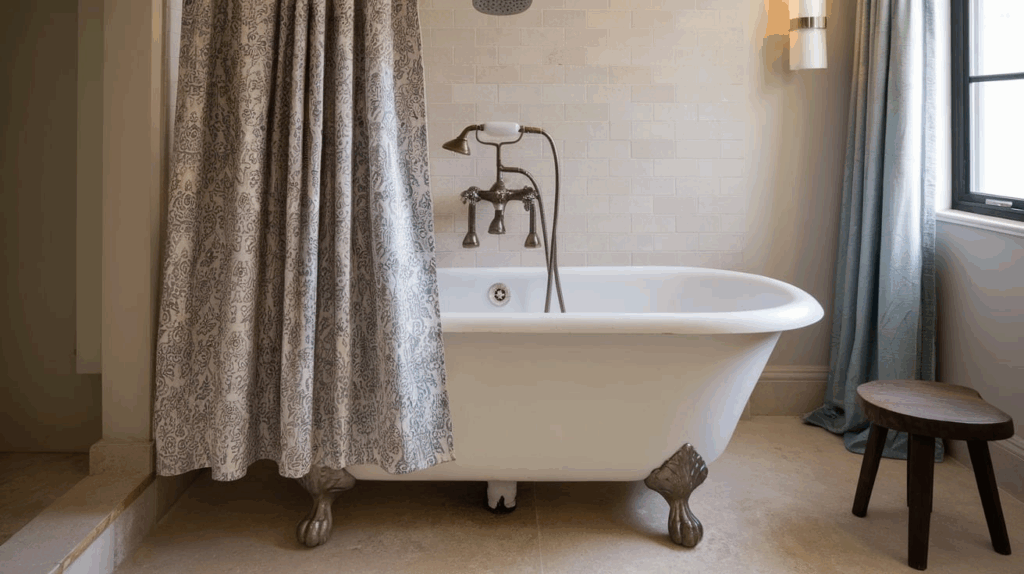
Old tubs are strong and deep, but the color or finish may look worn.
Instead of replacing it, you can refinish it with a glaze or tub paint. This makes it look new again without the cost of a new tub.
If you have a separate shower, think about replacing the door or curtain. A clear glass shower door makes the space feel bigger.
Or you can add a new tile around the shower to mix old and new styles. These updates help maintain the room’s shape while improving its functionality.
7. Use Simple Colors to Balance Bold Tile
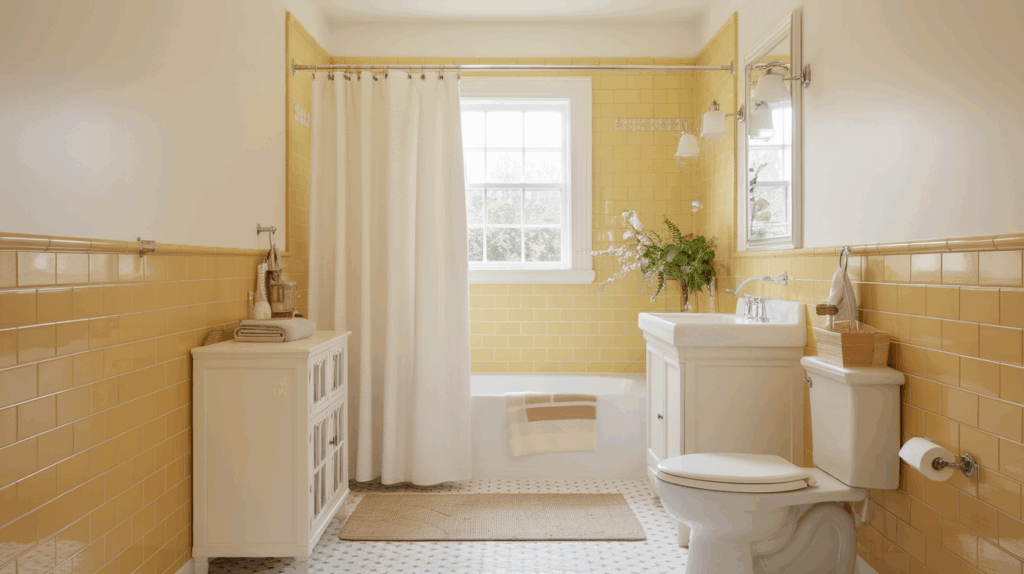
If your bathroom has bright tile, like pink, mint, or yellow, you don’t need to remove it.
Just tone it down with simple wall colors. Try white, soft gray, or light beige on the walls to balance the look.
Simple colors help the tile stand out in a good way. They also make the bathroom feel brighter and cleaner.
You can add color in other ways, like with towels or art, without clashing with the tile.
8. Bring in Wood or Natural Touches
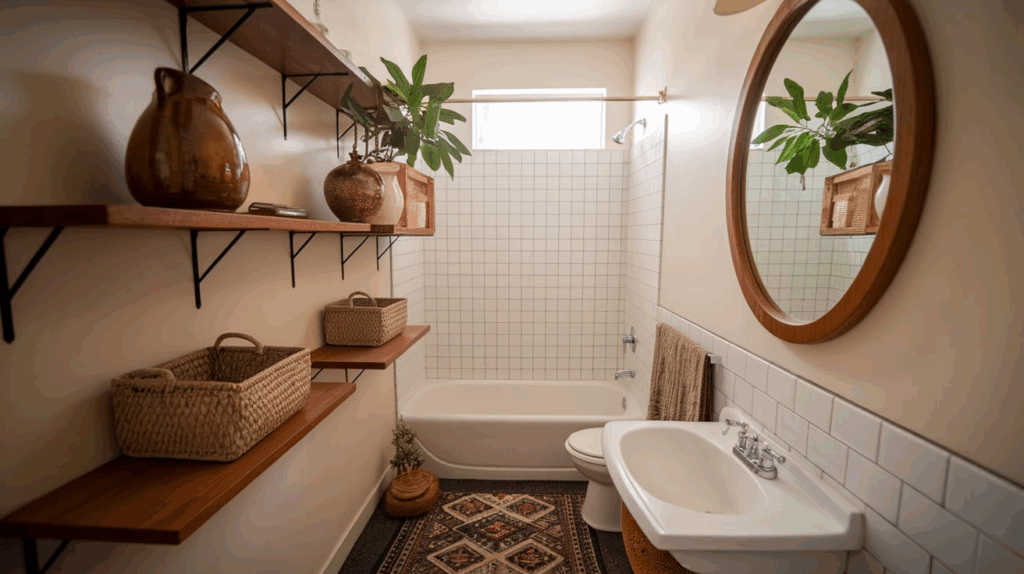
Adding wood or natural materials helps warm up a cold or shiny bathroom.
It also works well with tile colors from the 1960s. Try wood shelves, a small wooden stool, or a wood-framed mirror.
You can also add baskets for storage, bamboo trays, or a plant in a pot.
These touches make the bathroom feel softer, calmer, and more balanced. They bring life into a space that might otherwise feel too hard or flat.
9. Add Retro Art or Decor
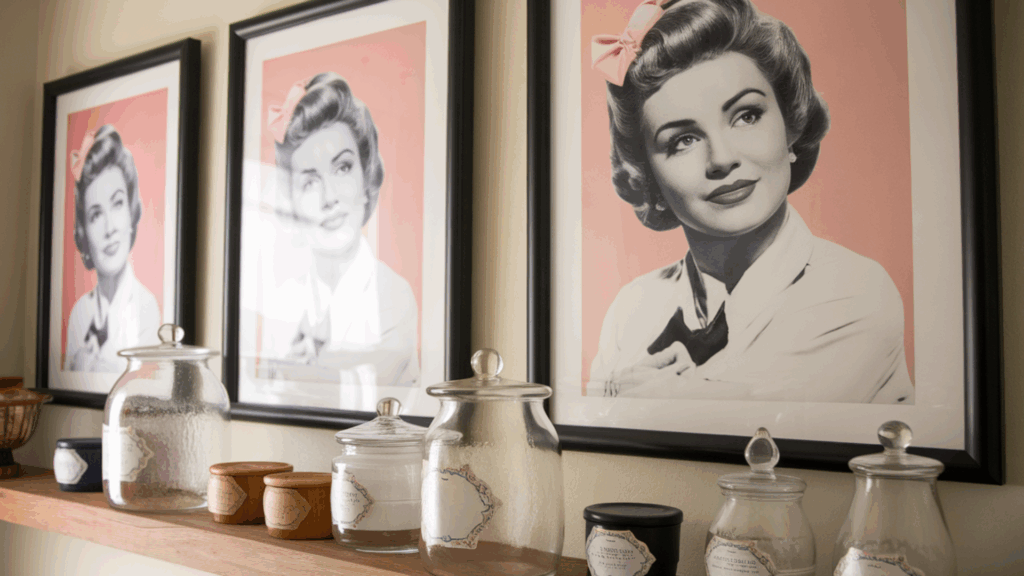
Retro art is a fun and cheap way to tie the whole look together.
You can find vintage prints, old ads, or framed patterns from the 60s at thrift stores or online. Stick to one or two pieces so the space doesn’t feel crowded.
Other ideas include using a vintage-style soap dish, glass jars for cotton balls, or retro fonts for labels.
These little details make your bathroom feel playful and personal without being overly extravagant.
10. Keep the Layout, Make It Work Better
Many 1960s bathrooms are small. Instead of moving walls or pipes, look for ways to utilize the space more effectively.
A smaller vanity can create more space to walk. Wall shelves can hold towels without taking up floor space.
You can also add hooks behind the door, hang baskets, or use a tall cabinet in one corner.
These changes are simple but make the bathroom easier to use every day, without losing its old-school feel.
11. Use New Technology That Blends In

Modern tech can make your bathroom more comfortable.
You can get a mirror that lights up or a toilet with a soft-close lid. Even things like towel warmers or heated floors are possible.
The key is to choose tech that doesn’t stand out too much. Keep the shapes simple and the colors neutral.
That way, your bathroom still looks classic, but works like it’s brand new.
12. Don’t Be Afraid to Blend Styles
Your bathroom doesn’t have to look like it came from just one year. It’s okay to mix things. A little retro, a little modern, it all comes together to fit your style.
The trick is to pick two or three things to keep (like tile or lighting) and match the rest to those.
Use your own taste to guide the mix. A bathroom that feels like you will always feel better than one that’s just trendy.
In the end, it’s your space, make it something you enjoy every day.
Best Colors to Use in a 1960s Bathroom Makeover
Color is a big part of 1960s style. A list of colors that work well is:
- Classic 1960s colors: teal, avocado green, mustard, pastel pink, powder blue
- Neutral pairings: white, light gray, beige
- Bold accents: black trim, brass hardware, dark wood
Try pairing a soft mint tile with white walls and brass handles. Or match bold tile with simple fixtures to balance the look.
My Personal Tips from Doing It Myself
I learned a great deal by doing my own 1960s bathroom makeover. A few things I wish I knew earlier are:
- Start with the plumbing check. It saves time later.
- Tile takes longer than you think. Budget for it.
- Don’t go too trendy. Pick styles you won’t get tired of.
- Use samples for paint and tile before you commit.
- Spend more on faucets and lighting; they make a big difference.
When to Call a Pro
You can handle plenty of updates on your own, like painting walls, swapping hardware, or putting up shelves. These small changes can make a big difference without much cost.
But certain tasks are best left to a professional – things like moving plumbing or electrical lines, fixing mold or water damage, or installing heavy tile and large vanities.
These jobs require skill and the right tools to avoid serious problems. If you’re unsure about a project, it’s always smart to ask for help.
Getting expert advice can save you time, money, and stress down the line, and it helps make sure the job is done safely and correctly.
1960s Bathroom Decor Ideas for That Final Touch
Once the hard work is done, add a few things to finish the look:
- Add retro art prints or framed records for personality
- Place a simple rug or mat in a soft, calming color
- Use potted plants to bring in a fresh, natural touch
- Hang a bold, printed shower curtain to liven up the space
- Include baskets or bins to organize and store essentials
These little items make your bathroom feel warm and complete.
Conclusion
Redoing a 1960s bathroom can feel like a big job, but it’s also a fun one. I learned a lot while working on mine, and I’m glad I took the time to plan things out.
There were old pipes, small spaces, and a few surprises behind the walls. Still, it was worth it.
I kept some of the original parts I loved and updated the things that didn’t work. Now the space feels fresh, yet it still retains its classic style.
If you’re considering doing the same, start with something simple. Look at what you already have. Then make a list, set a budget, and take your time.
You don’t have to do it all at once. Little changes go a long way. And when it’s done, you’ll have a bathroom that feels just right for you.