Close Menu
    What's Hot

    The Impact of Lighting on Retail Customer Experience

    March 16, 2026

    5 Best AI Tools Like Canva for Creating High-Converting Ad Creatives

    March 14, 2026

    How Regular Plumbing Maintenance Transforms Home Efficiency?

    March 14, 2026

    Homeowners: Key Considerations When Selecting Cumaru Decking

    March 14, 2026

    Key Factors That Influence the Cost of a Kitchen Remodel in Modern Homes

    March 14, 2026

    How Humid Climates Affect Home Maintenance

    March 14, 2026
    Facebook Instagram
    Facebook Instagram
    Opple House
    • Home Decor
    • Interior Design
    • Home Improvement
    • DIY & Crafts
    • Gardening
    • Real Estate
    Opple House
    Home » Blog » DIY Pothole Repair: A Step-by-Step Guide for Private Property
    Guides

    DIY Pothole Repair: A Step-by-Step Guide for Private Property

    Jordan EllisBy Jordan EllisMarch 11, 20264 Mins Read
    Facebook Twitter Pinterest LinkedIn WhatsApp Reddit Tumblr Email
    DIY Pothole Repair: A Step-by-Step Guide for Private Property
    Share
    Facebook Twitter LinkedIn Pinterest Email

    Potholes are one of those things that seem to appear overnight—often in the most inconvenient spots. Whether it’s your driveway, a private road, or a business yard, these craters can damage vehicles, create tripping hazards, and get worse over time if not dealt with properly.

    While major roads and highways must be maintained by local authorities, if a pothole appears on your private property, you can legally fix it yourself. And with the right tools and materials, it’s more straightforward than you might think.

    Important Note Before You Start

    It’s crucial to point out that DIY pothole repair is only permitted on private land. Public roads, pavements, and highways are the responsibility of your local council or Highways Agency, and it is illegal for individuals to attempt repairs on public land. Always check if the surface you’re repairing falls under your ownership or lease before getting started.

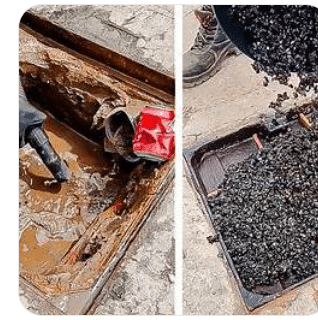
    Step 1: Clear Out the Pothole

    Start by removing all debris from the pothole. That includes loose tarmac, stones, dust, weeds, and standing water. You want a clean, dry surface so the materials you apply later will adhere properly. Using a stiff brush or even a blower can help get rid of stubborn bits. If the hole is damp, try drying it out with old rags or leave it to air dry for a few hours before continuing.

    Step 2: Cut a Clean Edge (If Possible)

    While not always essential, cutting a neat square or rectangle around the pothole can help your repair last longer. Jagged edges are more likely to fail over time, so creating a tidy border gives the cold lay tarmac something solid to bind to.

    See also  7 The Best 3D Exterior Rendering Services for Architects & Designers

    You can do this with a bolster chisel and hammer or an angle grinder if you’re experienced and have the right PPE. The idea is to create vertical edges that hold the new material firmly in place.

    Step 3: Apply Cold Joint Sealer

    Before filling in the hole, run a bead of bitumen cold joint sealer around the edges of the prepared hole. This acts like a glue between the existing road surface and your new tarmac. It helps prevent water ingress and stops the patch from working loose over time. You can use a brush or nozzle depending on the type of sealer you’ve bought—just make sure the entire edge is coated evenly.

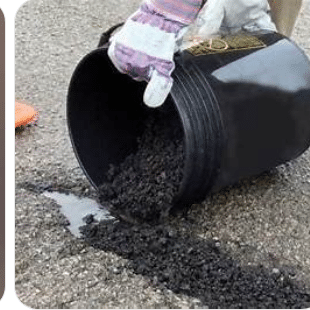
    Step 4: Fill with Cold Lay Tarmac

    Now it’s time to fill the hole. Pour in your cold lay tarmac, slightly overfilling the hole so you can level it off. Use a rake or shovel to spread the material evenly so it matches the height of the surrounding surface.

    Take your time with this step—an uneven patch not only looks messy but can also affect vehicle movement or encourage water pooling, which leads to future damage.

    Step 5: Compact the Surface

    Once your tarmac is level, it’s time to compact it. You can use a punner (tamper) for small patches, applying firm, even pressure across the surface. For larger jobs, a vibrating compaction plate will give better results and a longer-lasting finish.

    Make sure the surface is flush with the surrounding area. After compacting, give it a few hours (or follow the product instructions) before driving over it to allow everything to settle properly.

    See also  How Volleyball Odds Are Set and What You Need to Know

    Where to Find the Right Materials

    For a job like this, having the right gear makes all the difference. From cold lay tarmac to joint sealers and compaction tools, Ready Set Supplied offers a range of products that can help you get the job done efficiently and professionally. Whether you’re patching up a private driveway or sorting a neglected car park, they’ve got the essentials to make the process smoother.

    DIY pothole repair might sound intimidating, but with a bit of preparation and the right materials, it’s a highly achievable weekend project. It’s not just about fixing a hole—it’s about protecting your vehicles, improving safety, and taking pride in maintaining your property.

    Related posts:

    1. Signs You Need a Plumber: DIY vs Professional Guide
    2. A Landlord’s Guide to Effective Property Management
    3. Common Eviction Triggers and How Property Managers Work to Resolve Them
    4. The Long-Term Benefits of Pursuing a Plumbing Career
    pp
    Share. Facebook Twitter Pinterest LinkedIn WhatsApp Reddit Tumblr Email
    Jordan Ellis
    Jordan Ellis
    • Website

    Jordan Ellis combines a decade of experience with a BS in Environmental Science from UC Berkeley, specializing in outdoor adventures and DIY projects. A contributor to well-known publications and a speaker at environmental workshops, Jordan's expertise is recognized and trusted. Their work, deeply rooted in practical knowledge and a passion for sustainability, empowers readers to explore and create with confidence.

    Related Posts

    Interior Design March 16, 2026

    The Impact of Lighting on Retail Customer Experience

    Tech March 14, 2026

    5 Best AI Tools Like Canva for Creating High-Converting Ad Creatives

    Home Maintenance March 14, 2026

    How Regular Plumbing Maintenance Transforms Home Efficiency?

    Home Improvement March 14, 2026

    Homeowners: Key Considerations When Selecting Cumaru Decking

    Lifestyle March 14, 2026

    Costly Landlord Mistakes – And How Outsourcing to a Property Management Saves You Money

    Home Improvement March 14, 2026

    How Modern Replacement Windows Can Lower Your Utility Bills

    Leave A Reply Cancel Reply

    Don't Miss
    Interior Design March 16, 2026

    The Impact of Lighting on Retail Customer Experience

    Walk into any retail store and the first thing that greets you is not always…

    5 Best AI Tools Like Canva for Creating High-Converting Ad Creatives

    March 14, 2026

    How Regular Plumbing Maintenance Transforms Home Efficiency?

    March 14, 2026

    Homeowners: Key Considerations When Selecting Cumaru Decking

    March 14, 2026
    Stay In Touch
    • Facebook
    • Instagram
    About Us
    About Us

    We strive to provide high-quality, stylish home decor pieces to help you create the perfect look for your unique space. Our blog offers helpful tips and tricks to bring your dream home to life!

    Email Us: sophia@opplehouse.com

    Our Picks

    The Impact of Lighting on Retail Customer Experience

    March 16, 2026

    5 Best AI Tools Like Canva for Creating High-Converting Ad Creatives

    March 14, 2026

    How Regular Plumbing Maintenance Transforms Home Efficiency?

    March 14, 2026

    Design Secrets Delivered to Your Inbox!

    Join 10,000+ home enthusiasts who receive weekly inspiration, DIY guides, and exclusive decor tips. Plus, get a free e-book

    Facebook Instagram
    • About Us
    • Contact Us
    • Privacy Policy
    © 2026 OppleHouse.

    Type above and press Enter to search. Press Esc to cancel.