
I remember standing in the tool aisle, staring at rows of saws, totally confused.
Miter or circular? What’s better to start with? I had a small budget and some big DIY plans. But no clue what saw actually fit my needs.
If that sounds like you, you’re in the right place.
This guide walks through what each saw does, what projects they’re good for, how much they cost, and how safe they are to use.
I also include real stories from other beginners and DIYers, plus tips on what tools to grab first depending on your goals. By the end, you’ll know exactly which one fits your style, space, and plans.
What Is a Miter Saw?
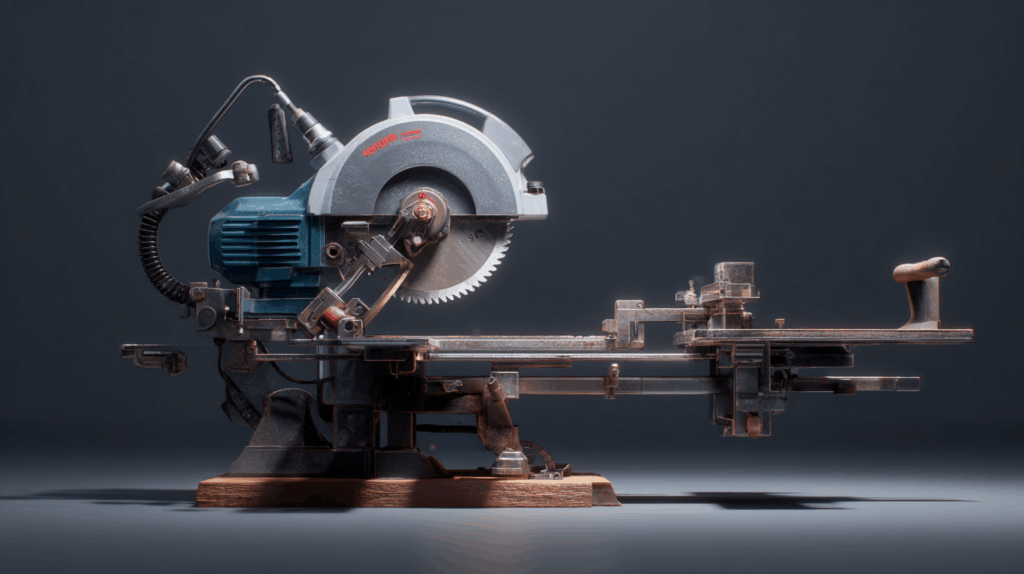
A miter saw is a stationary tool with a circular blade that swings down to cut wood from above. You set it on a bench or table, place your board against the fence, and pull the blade down to slice through.
There are three main types: basic miter saws for simple angle cuts, compound miter saws that tilt for bevels, and sliding models that cut wider boards by moving forward and back.
It’s perfect for trim, baseboards, picture frames, and furniture joints anytime you need clean, repeated angle cuts.
I like it for its accuracy. Even as a beginner, you can get pro-looking results without much fuss. Just line it up, hold steady, and let the saw do the work.
What Is a Circular Saw?

A circular saw is a handheld power tool with a fast-spinning round blade that cuts wood and other materials in straight lines. You guide it across the board, pushing forward as it cuts.
There are corded versions for steady power and cordless ones for better mobility.
Sidewinder models are compact and common, while worm drive saws offer more torque for tougher cuts.
They’re ideal for plywood, framing lumber, and large panels, perfect for general carpentry or outdoor builds. I often use mine for quick cuts when breaking down big boards.
It’s lightweight and easy to store, but since you guide it manually, getting perfectly straight cuts takes a bit of practice and a steady hand.
Miter Saw vs Circular Saw: What Sets Them Apart

Before choosing between a miter saw and a circular saw, it helps to know how they differ. Each one has its strengths depending on what you’re building and where you’re working. Let’s understand the differences between the two in more detail.
1. Type of Cuts
A miter saw is built for precise angle cuts. You pull the blade down onto the board, which gives you more control and cleaner edges.
If you’re working on trim, frames, or furniture, the miter saw gives neater and more repeatable cuts.
A circular saw, on the other hand, is best for long, straight cuts like trimming plywood or slicing through 2x4s. You guide it by hand, so it can cut in different directions if needed.
For general DIY work and larger panels, the circular saw handles a greater variety.
2. Portability and Space
A miter saw is larger and stays fixed on a bench or stand. It takes up more room and usually needs a bit of prep before you start cutting.
It’s not the best for moving around unless you’ve got a truck or a solid workshop space. But if you do have the room, a miter saw is worth it.
A circular saw is handheld and super easy to carry. It’s great for tight spaces, small sheds, or anywhere you need to move around while working.
I’ve used mine right on the ground or on top of stacked boards. You don’t need a fancy setup to get started.
3. Ideal Projects
When you’re picking a saw, the right choice depends on what kind of projects you’re tackling. Each one has its strengths depending on the job.
Go with a miter saw if you’re focused on:
- Trim and molding
- Picture frames and angled joints
- Furniture building that needs clean edges
- Any project where precise, repeatable cuts matter
I use my miter saw when I want precise edges on visible parts of a build.
Choose a circular saw if you’re working on:
- Basic shelves
- Cutting plywood or large panels
- Outdoor framing and deck work
- General DIY projects where flexibility matters
It’s a solid all-purpose tool when you’re just getting started.
No matter what you’re building, matching the tool to the task makes everything easier. Pick the saw that fits your projects now, as you can always add the other one later.
4. Price and Budget
If you’re like me when I started out, budget plays a big role. Tools aren’t just about the sticker price, as you’ve got to think about blades, stands, and all the extras that sneak in. This is how the two saws usually compare:
| Blade Type | Circular Saw Blades | Miter Saw Blades |
|---|---|---|
| Entry-Level | $10–$15 | $15–$25 |
| Mid-Range | $20–$30 | $25–$40 |
| High-End | $35–$60+ | $40–$70+ |
Circular saw blades tend to run cheaper, especially for general cuts. Miter saw blades usually cost more since they’re designed for clean, detailed work like trim and molding.
5. Safety for Beginners
Miter saws are generally safer for beginners. The blade stays still until you pull it down, and your hands are usually far from the cutting path. Most models come with solid blade guards that cover the blade when not in use.
Circular saws require more attention. You’re holding the tool while it spins, and the blade stays exposed underneath. It’s easier to slip or veer off if you’re not careful.
I always stand slightly to the side and wait for the blade to stop spinning before I set it down. A cutting guide also helps a lot with control and safety.
Whichever saw you pick, read the manual, wear safety glasses, and take your time. With power tools, safety isn’t optional.
6. Learning Curve and Growth
Circular saws take a little more time to learn. You’re steering the blade by hand, and it’s easy to go off track without a guide. But once you get the hang of it, it becomes one of the most flexible tools you’ll own.
Miter saws are easier for beginners to use right away. You just set your angle, line up the board, and pull the blade down. It’s simple and gives clean, repeatable cuts without much practice.
Many DIYers, including me, started with a circular saw, then added a miter saw as their projects got more detailed.
If you’re planning to build regularly, you’ll probably end up using both, but your first pick should match your current goals.
Now that you’ve seen how miter saws and circular saws stack up, it’s easier to choose what fits your needs. Think about your space, budget, and the kind of work you plan to do.
Start with the one that makes sense now, as you can always grow from there.
Miter Saw vs Circular Saw: At a Glance
Now that you’ve seen all of these differences in depth, let’s put it all in one place to help you compare quickly. This table sums up the key features side by side so you can decide what fits your needs best.
| Feature | Miter Saw | Circular Saw |
|---|---|---|
| Primary Use | Precise angle cuts | Versatile straight cuts |
| Portability | Stationary | Highly portable |
| Ideal For | Trim, framing, furniture | Plywood, general tasks |
| Learning Curve | Easier to master | Slightly steeper |
| Price Range | $100–$400+ | $50–$150 |
| Safety | Safer (fixed blade) | Needs more caution |
No saw is perfect for everything, but this side-by-side look should make your decision easier. Just match the tool to your space, budget, and the kind of work you’ll actually be doing.
Why Having Both Saws Can Help?
Eventually, owning both saws makes a lot of sense. They handle different parts of a project, and together, they cover almost everything a DIYer might need. This is how I use mine now:
- Miter saw: This one’s for trim work, small furniture builds, and any time I need clean, repeated angle cuts that line up perfectly.
- Circular saw: I use it to break down plywood sheets, cut rough lengths, and handle big, awkward boards that won’t fit on the workbench.
If your budget allows, having both gives you flexibility and saves time on most home projects. They make a great team.
Must-Have Add-Ons for Your Saw Setup
You don’t need a fancy setup to get started, but a few basic accessories can make a big difference in how smoothly and safely you work. These are some items worth having on hand:
- Sawhorses or a workbench: Helps support longer boards and keeps your material steady
- Clamps: Useful for holding wood in place, especially when measuring or making precise cuts
- Cutting guides or jigs: A must-have for circular saws to keep cuts straight and accurate
- Laser guides: Some miter saws include these for lining up cuts with more confidence
- Dust collection: A shop vac or even a simple bag can help keep your workspace cleaner
Start with the basics, then add more as you figure out what makes your workflow easier.
Conclusion
If you’ve been stuck trying to decide between a miter saw and a circular saw, I get it, as I wrestled with the same choice when I started.
If you’re working on general DIY tasks like shelves, framing, or cutting plywood, go with the circular saw. It’s versatile, affordable, and doesn’t take up much space.
But if you’re after clean, repeatable cuts for trim or furniture, the miter saw is the better fit. It costs more and needs a proper setup, but the results are worth it.
Now that you’ve seen the real differences, cutting style, safety, cost, and learning curve, you can make a choice that actually fits your needs.
Start with the one that suits your projects now, and add the other later when you’re ready.