
Fitted sheets used to frustrate me every single time I tried to fold them. The corners would bunch up, the elastic would twist, and I’d end up with a messy pile instead of a neat fold.
If you’ve felt the same way, trust me, you’re not the only one.
The good news is, I found a simple way that actually works. Once I learned the right steps, folding fitted sheets became quick and much less stressful.
In this blog, I’ll show you exactly how I do it, step by step, in an easy-to-follow way. I’ll also share a few helpful tips that made a big difference for me, plus common mistakes you can avoid.
By the end, you’ll be able to neatly fold your fitted sheets and keep your linen closet clean and organized.
How Do You Fold a Fitted Sheet Easily
Folding a fitted sheet gets easier once you stop fighting the elastic and follow a simple method. Start by placing the sheet on a flat surface so you can see all the corners clearly. This gives you better control right away.
Focus on the corners first. Slide your hands into two corners and bring them together. Then add the other two corners on top. This is the key step that makes everything else simple.
Don’t rush. Take a second to smooth out bumps before each fold. It helps the sheet stay neat instead of turning into a bundle.
Keep your folds even and straight as you go. Fold into a rectangle, then into a smaller shape that fits your shelf.
With a little practice, you’ll get faster, and your sheets will finally look tidy.
Step-by-Step for Folding a Fitted Sheet Neatly
Folding a fitted sheet can feel confusing, but these simple steps help you turn it into a smooth, tidy shape that’s easy to store.
Step 1: Lay the Sheet Flat

Start by placing your fitted sheet on a flat surface, such as a bed or a large table, with the wrong side facing up.
This position helps you clearly see the seams and elastic edges, which makes the folding process much easier to manage.
Take a moment to smooth out any wrinkles or bunching so the sheet lies as flat as possible. A clean, even surface gives you better control and sets the foundation for a neat fold later.
Step 2: Find the Long Side
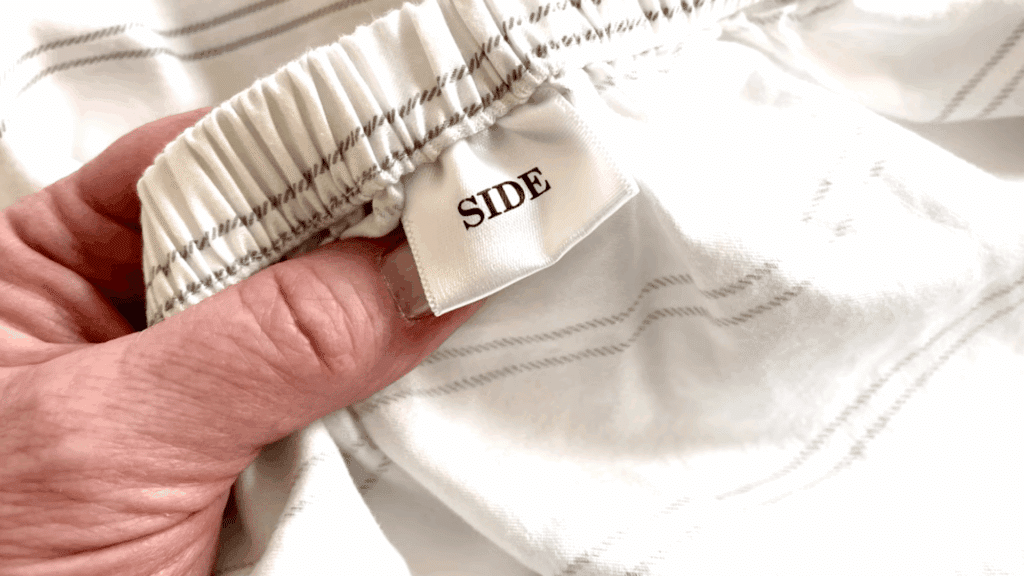
Next, locate the long edge of the sheet, which typically runs along the length of the mattress. Some sheets have a tag or label that can help you identify this side, but if not, you can estimate by comparing the edges.
Once you’ve found it, look for the corner seams along that side.
These seams are key because they guide how the sheet will fold evenly and help keep everything aligned as you move forward.
Step 3: Join the First Two Corners

Insert your hands into the two corner pockets on the long side of the sheet. Carefully bring these corners together so the seams line up neatly.
Once aligned, flip one corner over the other so they sit snugly together.
This creates the first structured fold and begins shaping the sheet into a more manageable form. Keeping your hands inside the corners helps maintain control and prevents the fabric from slipping or twisting.
Step 4: Bring All Four Corners Together
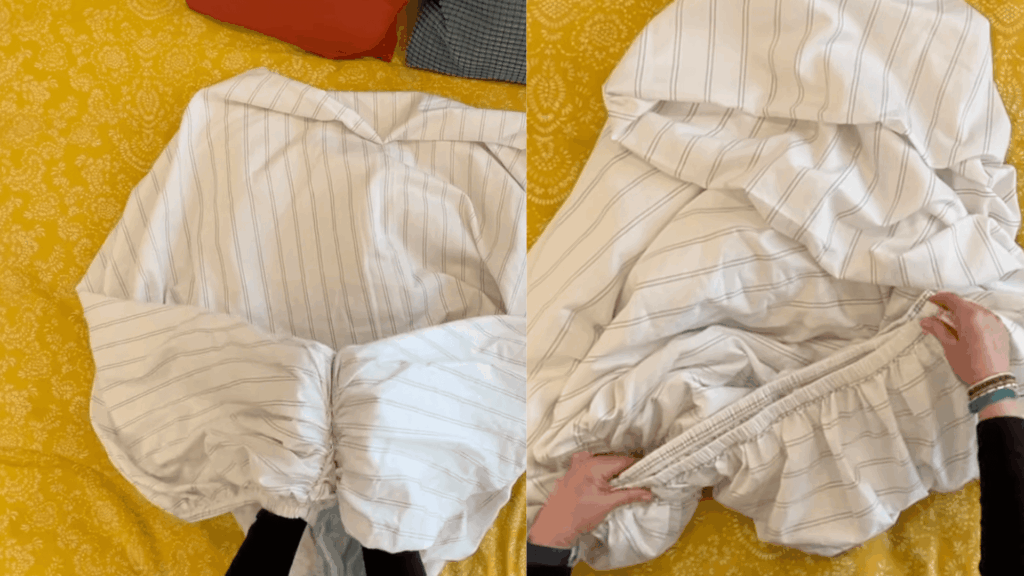
With your hands still holding the first two corners, locate the remaining corner pockets and repeat the same process.
Tuck those corners over the first pair so all four are now stacked together. This step may feel tricky at first, but it quickly becomes easier with practice.
Once all corners are aligned, give the sheet a gentle shake to let the fabric fall into place and remove any uneven bunching.
Step 5: Shape and Smooth the Sheet
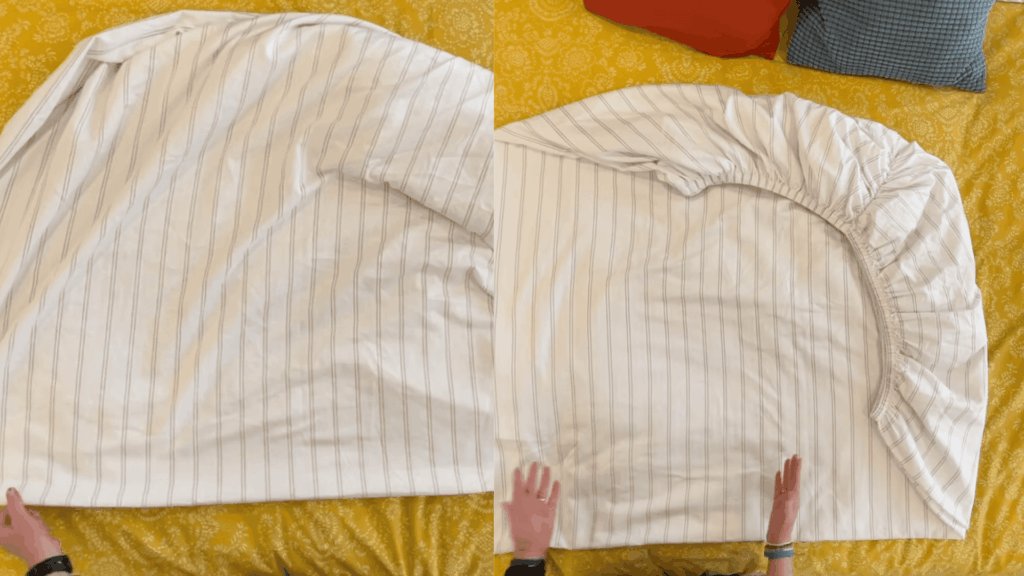
Place the folded sheet down on your flat surface and begin shaping it into a clean square. Adjust the edges to form straight lines, and tuck in any loose or bunched fabric.
Smooth the surface with your hands to remove wrinkles and keep the corners stacked neatly.
This step is important because it transforms the sheet from a loose bundle into a structured shape, making the final folding steps much cleaner and easier.
Step 6: Fold Into a Neat Rectangle
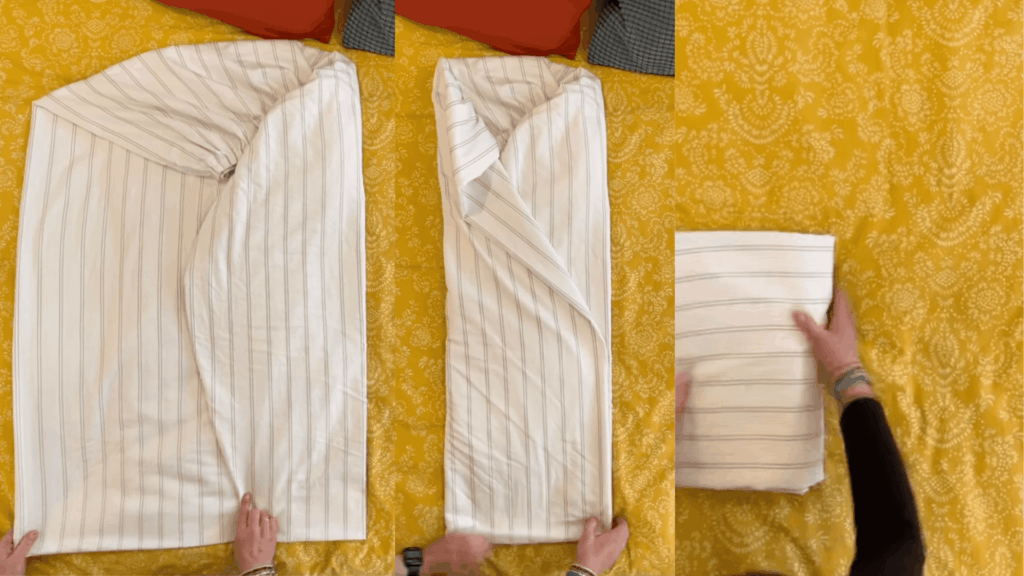
Finally, fold one side of the sheet inward about a third of the way, then bring the opposite side over it to create a long rectangle.
Continue folding the sheet into smaller sections until it forms a compact, tidy bundle. Smooth it out after each fold to keep the edges crisp and even.
The finished result is a flat, organized sheet that fits neatly on your shelf and looks just as tidy as your flat sheets.
This tutorial is based on a helpful video by Jan Howell. You can check out the original video on their YouTube channel here or watch it below.
Pro Tips for Neat Storage
Keeping your sheets neat doesn’t stop at folding; a few simple storage habits can make a big difference in how organized and easy your linen closet feels.
- Fold sheets right after drying to keep them smooth and easy to handle
- Don’t wait too long, wrinkles set quickly
- Store each set together by placing sheets and pillowcases inside one pillowcase
- Avoid overstuffing storage spaces so sheets keep their shape
- Stack heavier sheets at the bottom and lighter ones on top
- Label shelves by bed size to keep everything organized and easy to find
Common Mistakes to Avoid When Folding Fitted Sheets
Most people struggle with fitted sheets because of a few simple mistakes. The good news is they’re easy to fix once you know what to watch for.
| Mistake | What Happens | Easy Fix |
|---|---|---|
| Skipping a flat surface | The sheet becomes uneven and messy | Use a bed or table for better control |
| Rushing the corner step | Corners don’t align, fold falls apart | Take a moment to stack corners neatly |
| Not smoothing the sheet | Wrinkles build up quickly | Smooth with your hands after each fold |
| Overstuffing shelves | The sheet loses its shape | Store with enough space to keep it neat |
Wrapping Up
Folding a fitted sheet doesn’t have to feel frustrating anymore. With the right steps and a little patience, you can turn even the messiest sheet into a clean, tidy bundle that fits perfectly on your shelf.
The more you practice, the quicker and easier it becomes, saving you time and effort every week. Keep these tips in mind, stay consistent, and your linen closet will start to look more organized than ever.
Now it’s your turn, give this method a try and see the difference for yourself. Did it work for you, or do you have your own trick?
Share your experience in the comments below and help others make sheet folding simple, too. Small changes like this can make everyday tasks feel lighter and less stressful.
Frequently Asked Questions
How Often Should Fitted Sheets Be Replaced?
Fitted sheets should be replaced every 2 to 3 years, depending on fabric quality and usage. Signs like thinning fabric, fading, or loose elastic indicate it is time for a replacement.
Can fitted sheets be folded without a flat surface?
Folding without a flat surface is possible, but harder to manage. A bed or table helps keep edges straight and prevents bunching, making the final shape cleaner and easier to store.
What fabric type is easiest to fold?
Cotton and microfiber sheets are easier to fold because they hold shape well. Slippery materials like satin or silk can shift more and require extra care during folding.
How can elastic edges be kept in good condition?
Avoid high heat while drying and do not overstretch corners. Proper care helps the elastic stay strong, making folding easier and extending the life of the fitted sheet.
Is ironing fitted sheets necessary before folding?
Ironing is not required for most fitted sheets. Smoothing by hand after drying is usually enough. Ironing can be used if a crisp, wrinkle-free look is preferred.