
You found the perfect stain color, brushed it onto your pine, and somehow ended up with orange blotches or a washed-out ghost of the shade on the can.
Pine does that. Its soft, thirsty grain and pale tone pull in stain unevenly, shifting color results in ways that can completely change the finish you expect from the same product.
The fix is not luck; it is knowing how pine behaves before opening the can. Get that right, and it becomes one of the most rewarding woods to finish.
Find here a detailed pine wood stain color chart, real results shade by shade, and the prep steps that help you get the look you actually want.
How to Prep Pine so Stain Colors Show up True
Before you pick a color, know this: how you prep the wood decides whether that color shows up as the chart promised.
Pine’s soft, uneven grain is why the same stain can look rich in one spot and blotchy in the next.
The cause is absorption. Soft “earlywood” cells drink up stain fast; harder bands barely take it, and the the color lands unevenly. Two prep methods fix this.
Apply Wood Conditioner Before Oil-Based Stain
Pre-stain conditioner gets there first, soaking into the thirsty cells before any color goes on:
- It soaks into the softer grain first and reduces how much stain those areas can absorb, which helps the whole board take color more evenly.
- The timing matters because you need to stain within about 2 hours so the surface is still active and ready to bond with color.
Used correctly, it levels out pine’s natural absorption differences and gives you a more consistent, predictable stain finish across the entire surface.
Use Gel Stain as a Bypass
Gel stain skips the problem by sitting on top instead of soaking in:
- It prevents uneven grain density from pulling different amounts of pigment, which reduces streaks and blotches.
- It limits color options compared to traditional stains, so you get less variety but more predictable results.
Pick your prep method first, and the color chart becomes a real preview rather than a gamble.
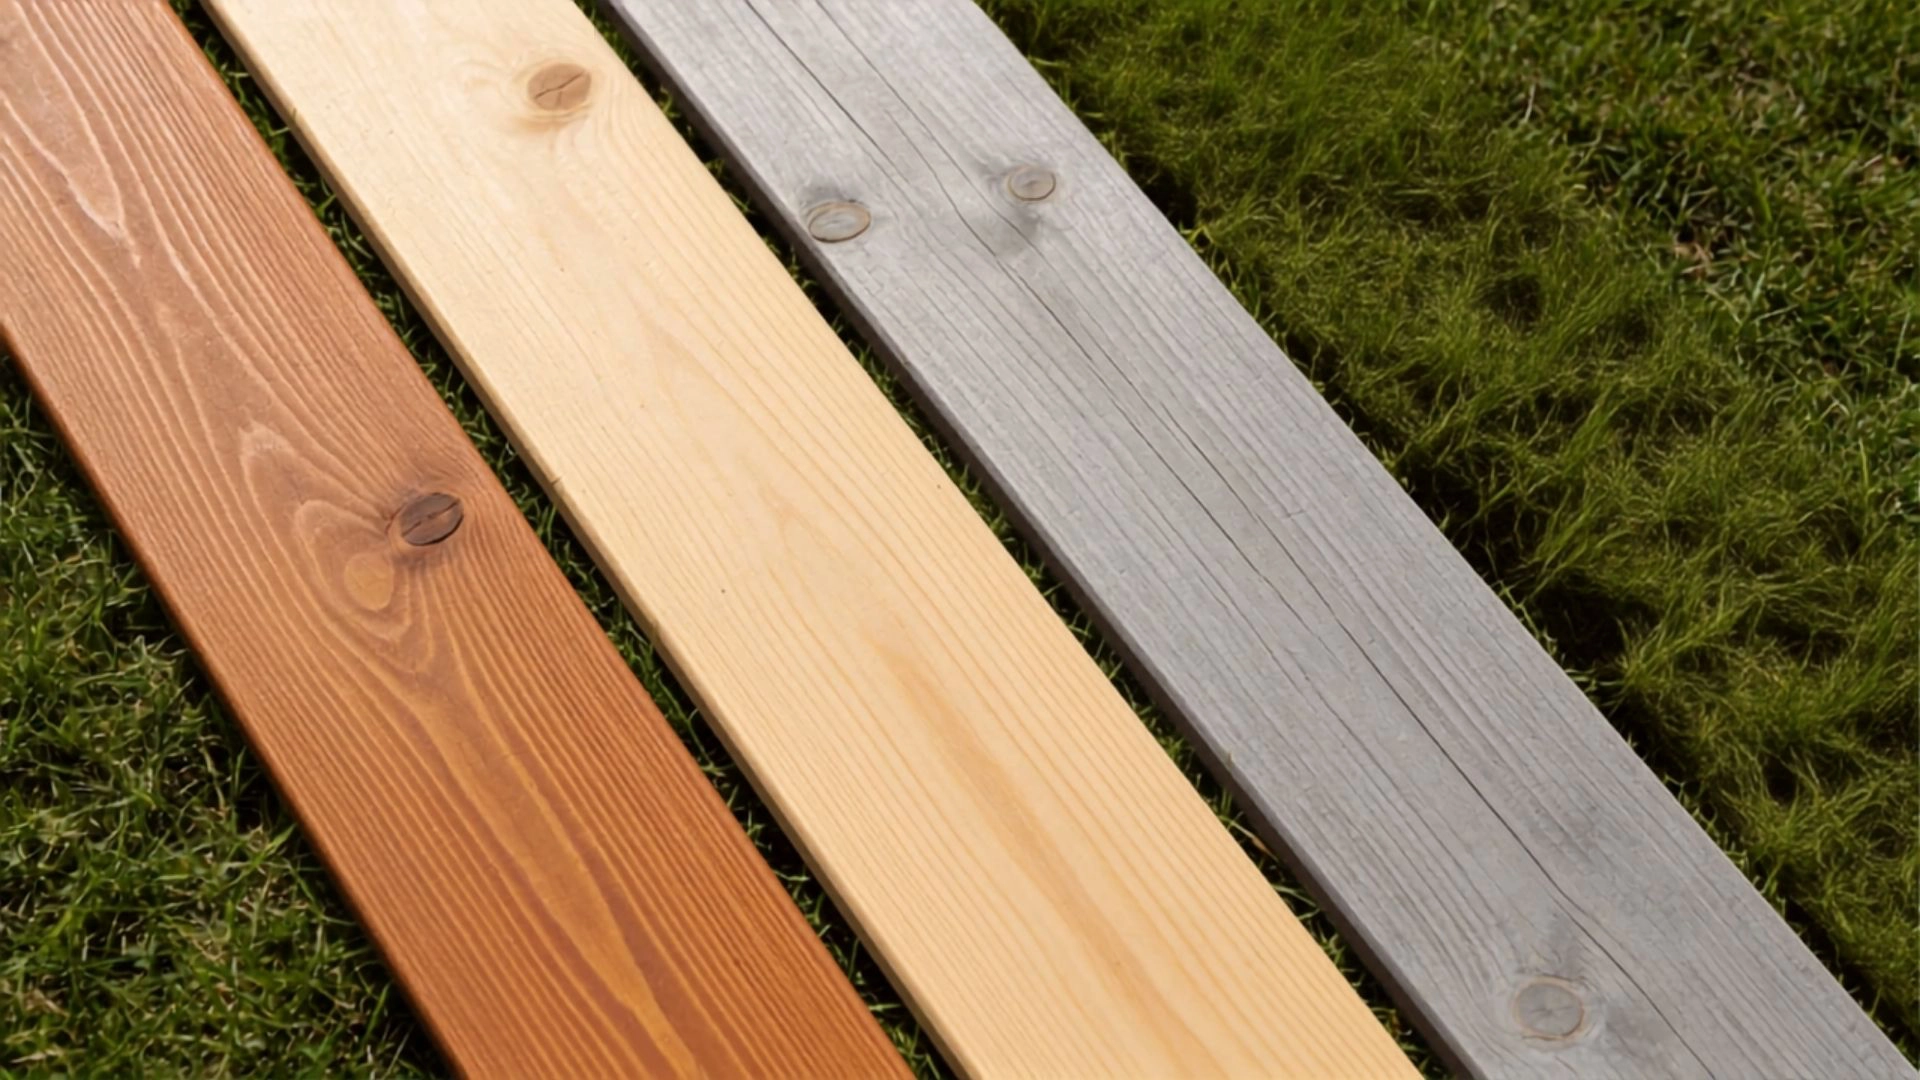
Pine Wood Stain Color Chart: How Popular Colors Actually Look
Stain colors behave differently on pine than on oak or poplar. Pine absorbs stain unevenly because of its soft and hard grain patterns, so the same stain color often appears lighter, less saturated, or blotchier than color charts suggest.
Light Stains on Pine
Light stains are the trickiest on pine, and not for the reason most people expect. Because pine is already pale and yellow, the palest colors barely register and can tip toward orange.
1. Golden Oak
Golden Oak reacts strongly with pine’s yellow base, often pushing the wood into a warmer, more orange-leaning tone than expected. Soft grain areas absorb more pigment, increasing unevenness.
This stain works best on conditioned wood where absorption is controlled. Without preparation, color variation appears quickly, especially across knots and softer earlywood sections.
2. Natural
Natural stain barely alters pine’s base color and often appears too light or inconsistent after drying. It can look unfinished on highly absorbent areas of the wood.
Multiple thin coats are required to build visibility. Even then, pine’s natural tone often dominates, making it better suited to subtle enhancement rather than a strong color change.
3. Weathered Oak
Weathered Oak balances pine’s warmth by adding a soft gray tone that reduces yellow undertones without hiding grain detail. It produces a more muted, modern finish.
It performs more consistently than lighter stains because it controls contrast better. This makes it suitable for users wanting a toned-down, natural wood appearance.
Medium Brown Stains on Pine
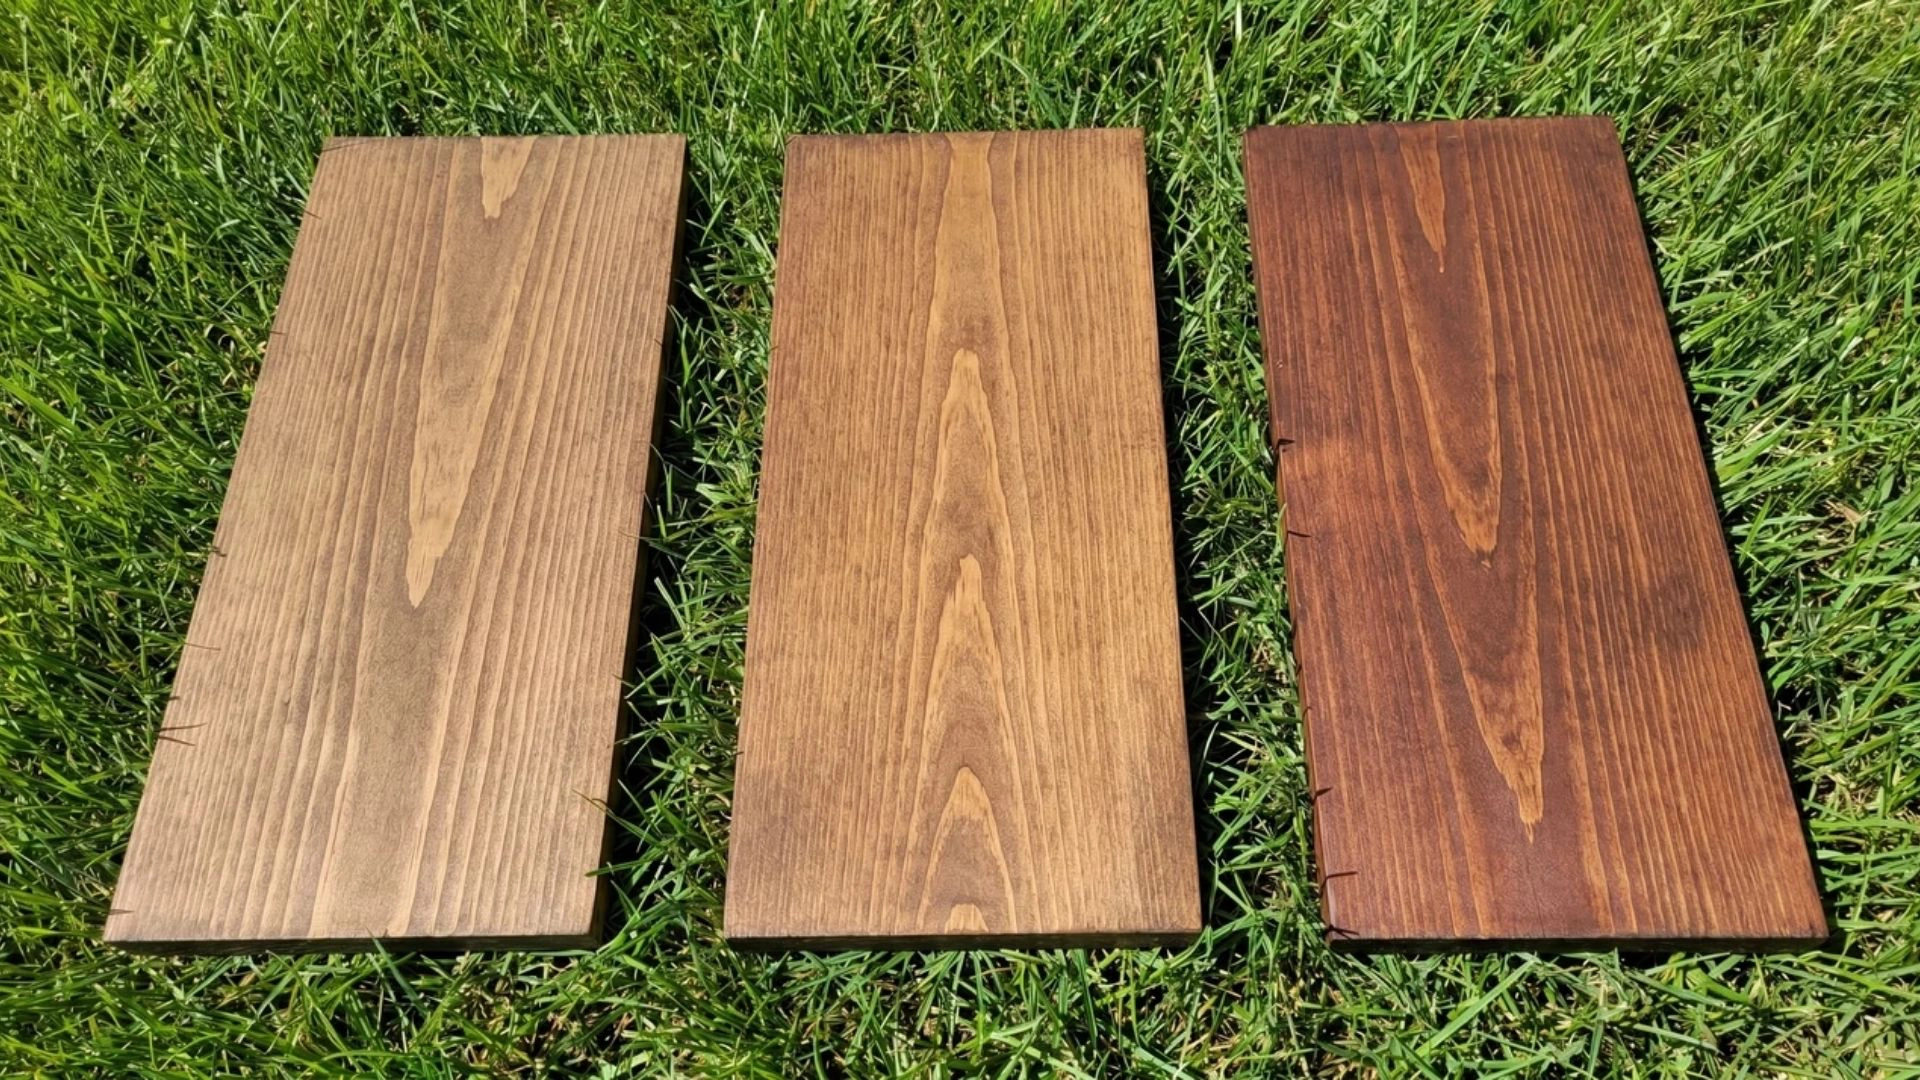
Medium browns are where pine finally looks intentional. The safe, crowd-pleasing zone and the colors here rarely disappoint.
4. Special Walnut
Special Walnut delivers a balanced medium brown that blends smoothly with pine’s natural grain. It reduces harsh yellow tones while maintaining a warm, even appearance across surfaces.
This stain is forgiving on uneven wood and typically produces stable results in one coat. It’s commonly used for furniture requiring a classic, natural wood tone.
5. Provincial
Provincial leans warmer and can shift toward orange on untreated pine due to high absorption in softer grain areas. This makes preparation an important step.
Using a wood conditioner helps regulate absorption and keeps color more controlled. Without it, tone variation becomes more visible, especially across knots and porous sections.
6. English Chestnut
English Chestnut creates a deeper, richer brown with noticeable warmth and depth. It builds quickly, giving pine a more finished, solid-wood appearance overall.
It works well for furniture where a traditional look is preferred. However, uneven grain can still affect the final tone if the application is not properly controlled.
Dark Stains on Pine
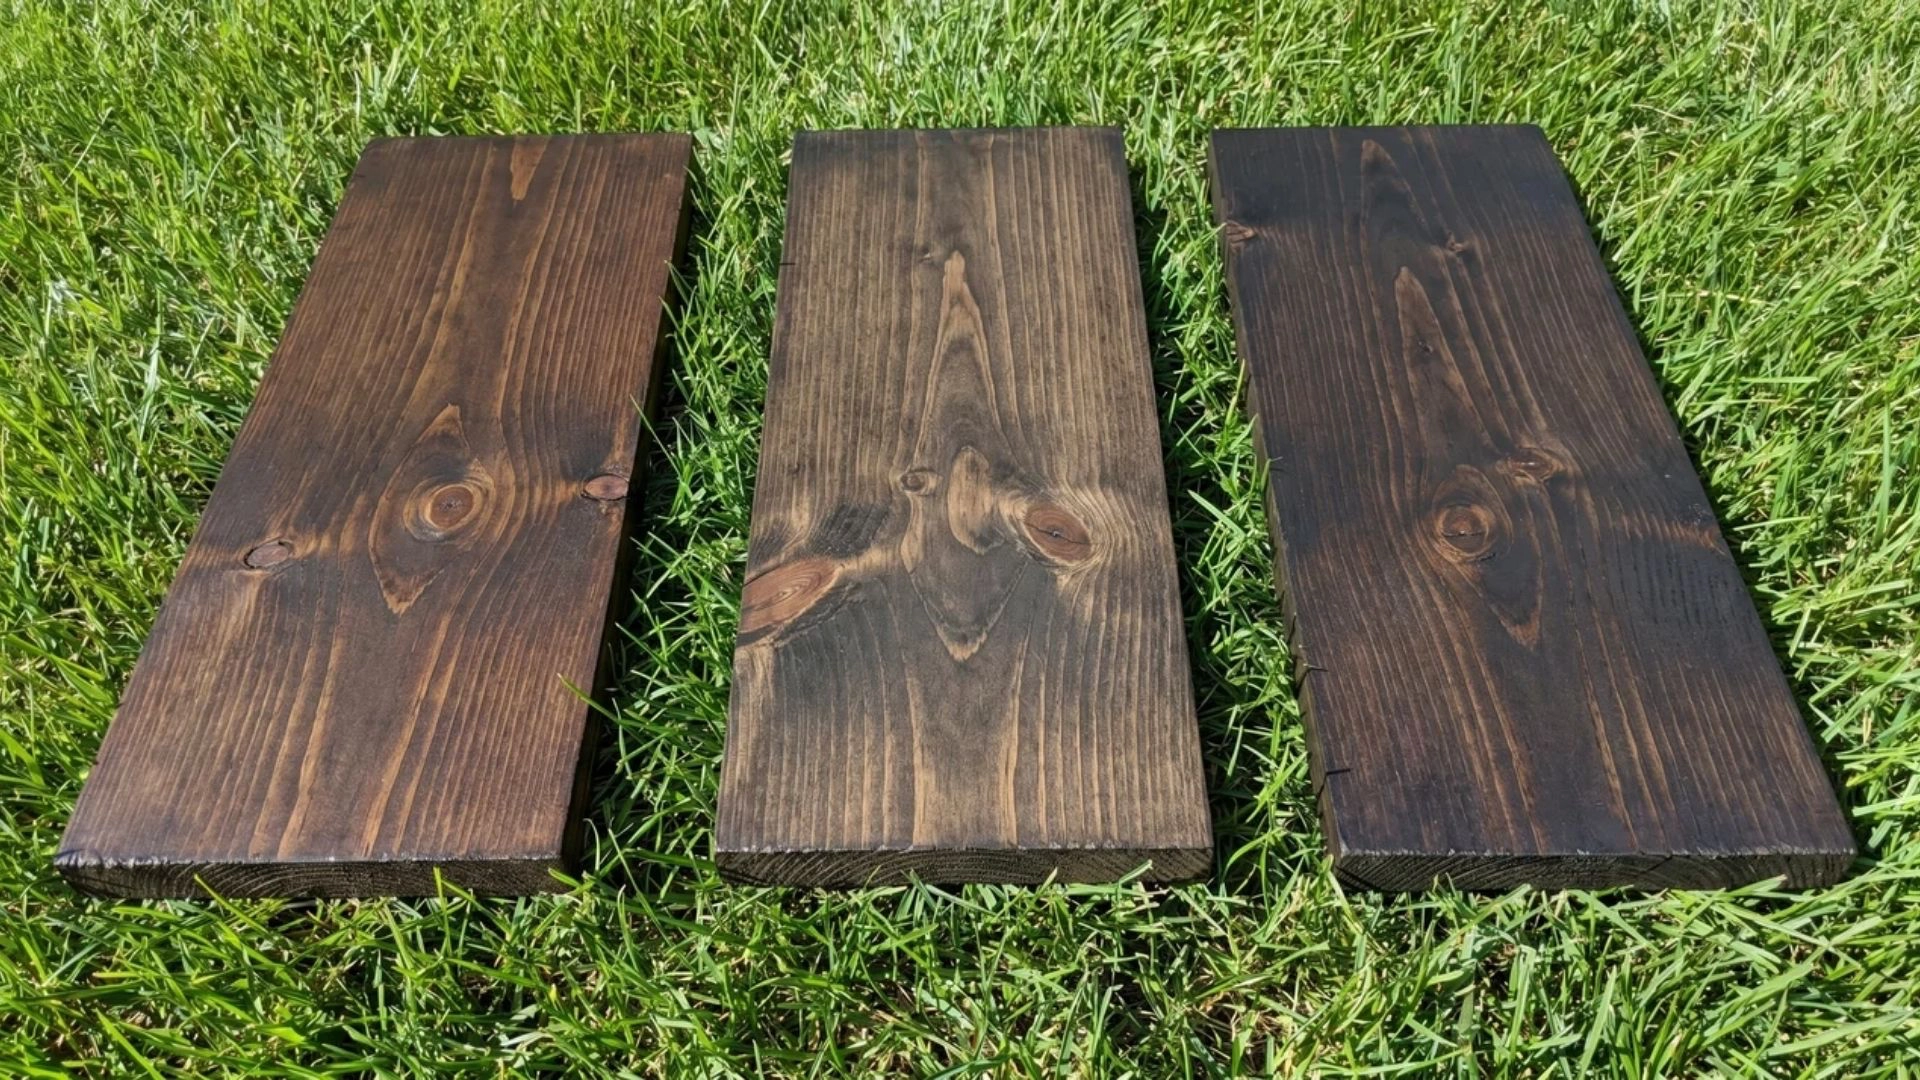
Dark stains deliver the biggest transformation, turning a cheap board into something that looks high-end.
7. Dark Walnut
Dark Walnut enhances grain contrast and gives pine a more premium furniture-grade appearance. It deepens color while still allowing natural wood texture to remain visible.
Because pine absorbs unevenly, darker pigments can exaggerate variation. Proper sanding and thin application help reduce patchiness and create a more uniform finish.
8. Jacobean
Jacobean produces a cooler, muted brown tone that softens pine’s natural warmth. It creates an aged, slightly smoky appearance across most wood surfaces.
It is useful for rustic or vintage styles where uniformity is less important. However, uneven absorption can still affect consistency in softer grain regions.
9. Espresso
Espresso pushes pine toward a very dark brown, nearly black finish while still showing subtle grain detail. It delivers strong contrast and a modern appearance.
The application must be controlled in thin layers to avoid blotches. Pine’s uneven density often causes variation, so gradual buildup is necessary for best results.
Black Stains on Pine
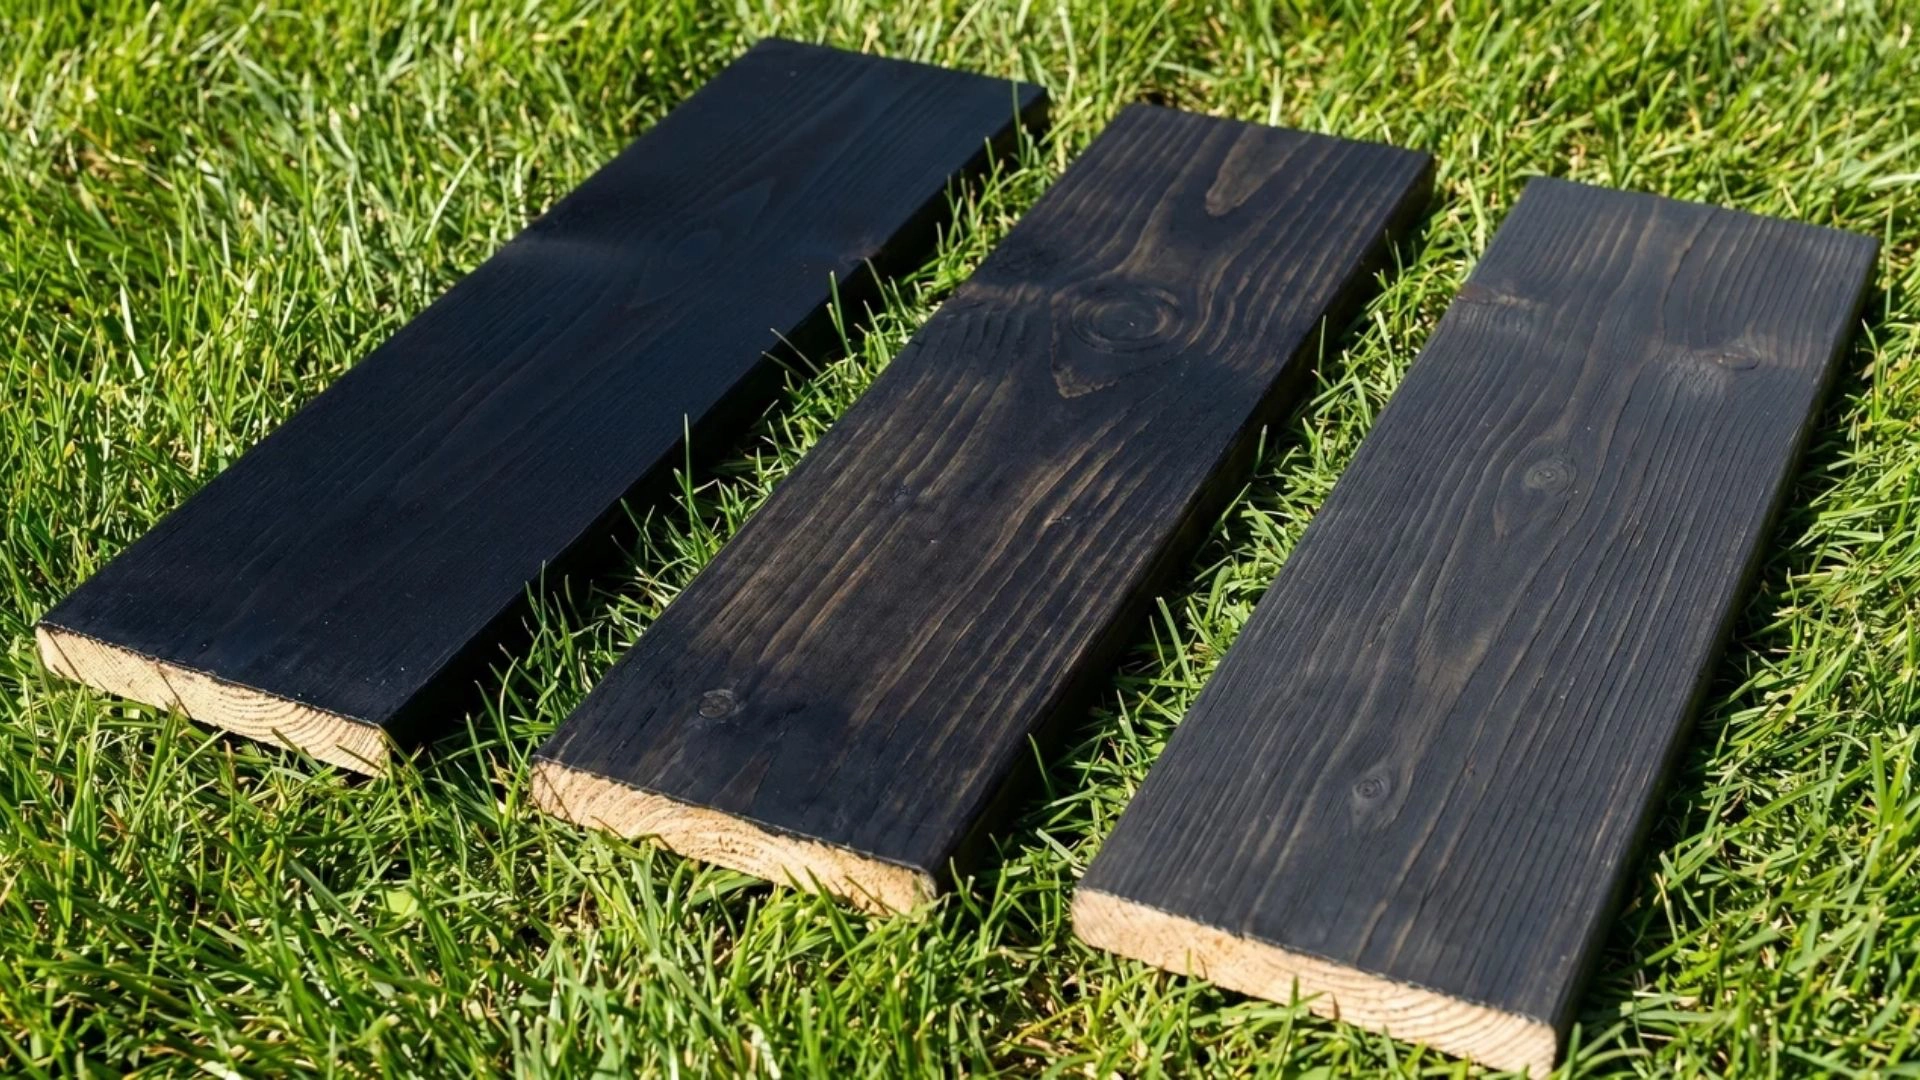
Black is the most surprising shade on pine. You might expect instant drama, but a single coat of True Black or Ebony often grays the wood, since pine drinks the pigment in unevenly rather than sitting bold on top.
10. True Black
True Black often appears gray or uneven on the first coat because pine absorbs pigment inconsistently across soft and hard grain areas.
Achieving full depth requires multiple thin coats. This helps build consistent darkness while still allowing subtle wood texture to remain visible underneath.
11. Ebony
Ebony creates a slightly warmer black tone that still shows natural grain patterns through the finish. It offers more depth than flat black stains.
It applies best in controlled layers to avoid lap marks. Uneven absorption can cause visible streaks if application speed or coverage is inconsistent.
12. Carbon Black
Carbon Black produces a deep neutral black finish with strong contrast against pine grain. It delivers one of the most modern and bold results.
Thin, even layering is essential because heavy coats increase blotching. Pine’s absorbency makes consistency challenging without gradual application and careful blending between passes.
Gray and Whitewashed Stain on Pine
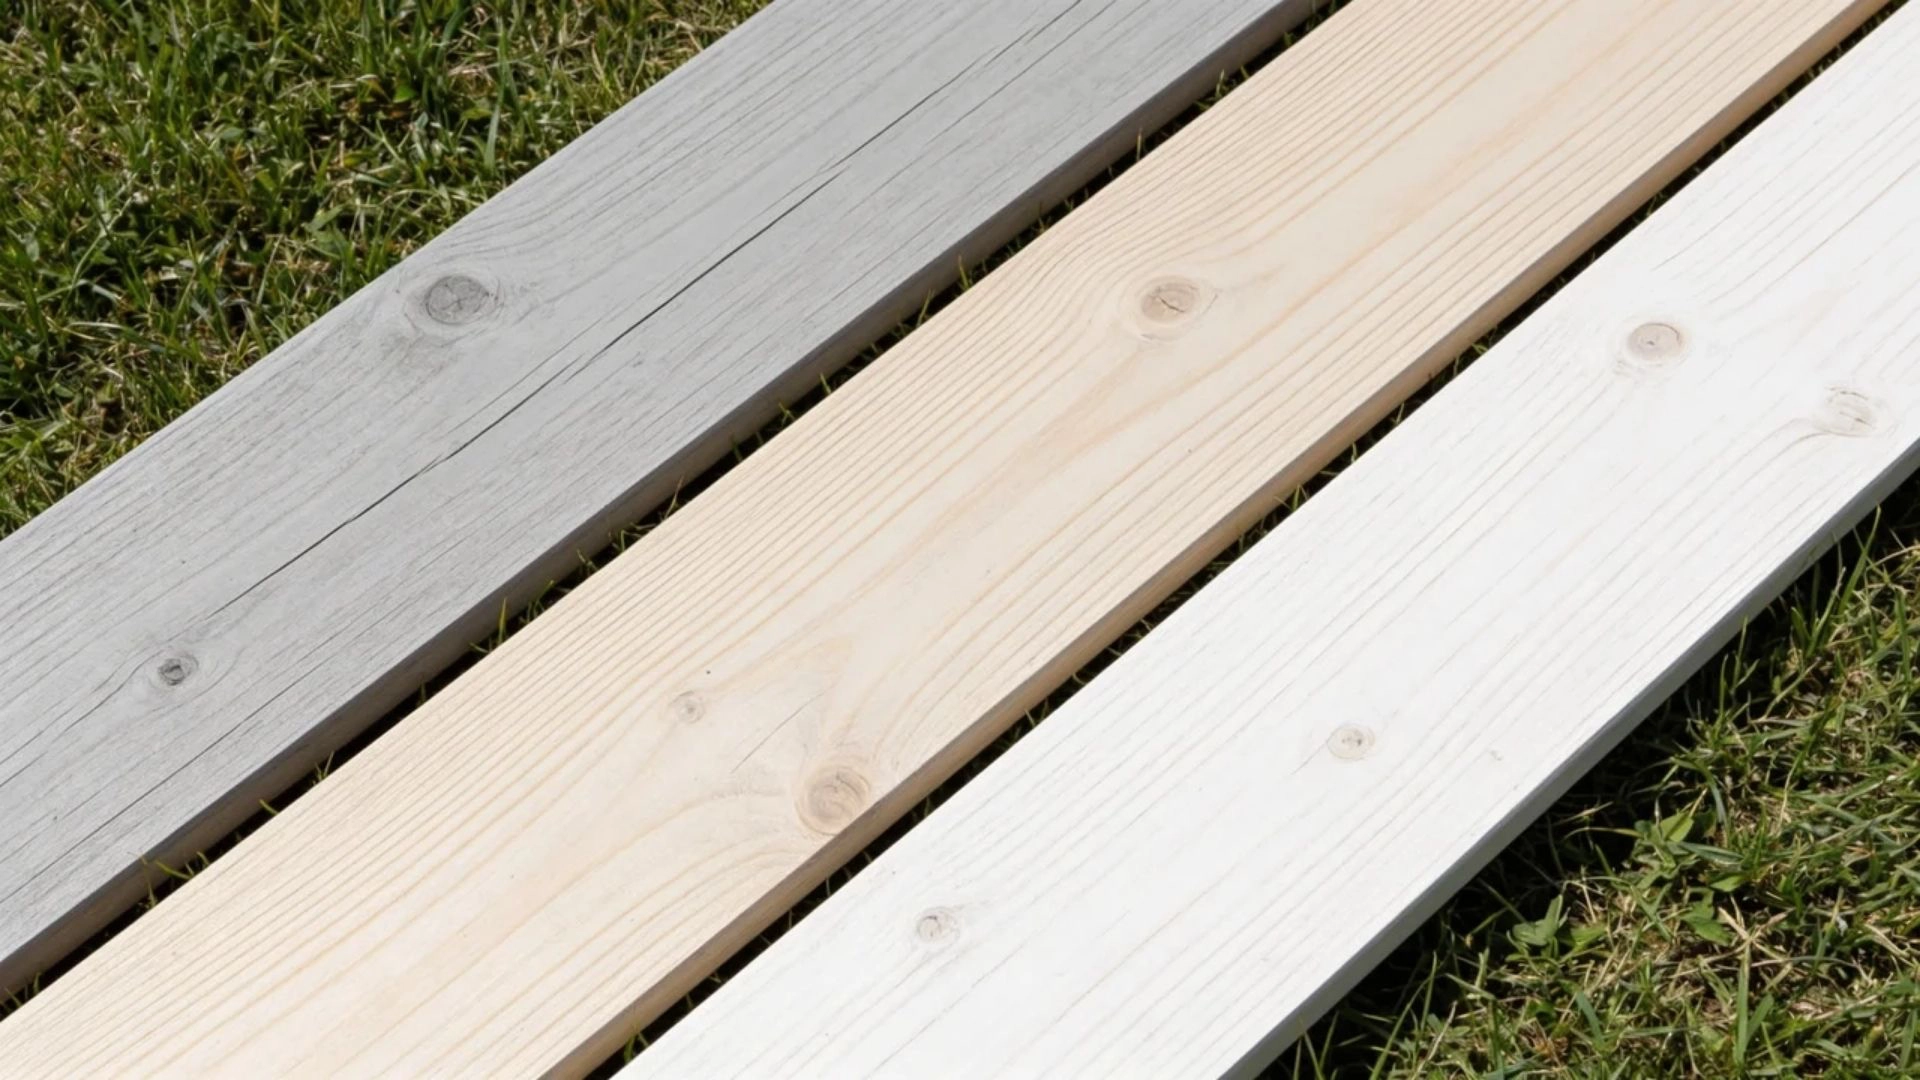
Gray and whitewashed colors push against pine’s natural warmth, which makes them both powerful and risky. Done right, you get a clean farmhouse or coastal look. Done wrong, they turn muddy or even slightly blue-green where pine’s yellow clashes with the gray.
13. Classic Gray
Classic Gray delivers a neutral, modern gray tone when applied in thin, controlled layers. It reduces pine’s warmth while still allowing natural grain structure to remain visible underneath.
It requires careful application because heavy coats can turn uneven or muddy. Pine’s yellow undertone can also influence the final shade if absorption is inconsistent across the surface.
14. Sun Bleached
Sun Bleached creates a soft, faded driftwood effect that mimics natural weathering over time. It lightens pine while muting strong yellow tones for a coastal-style finish.
It works best when applied evenly and wiped quickly to prevent patchiness. Uneven absorption can lead to streaks or slightly inconsistent pale-gray variations across the surface.
15. White Wash
White Wash produces a light, airy finish that softens pine while still preserving visible grain detail. It is commonly used for farmhouse or rustic interior styles.
Application control is critical because excess product can accumulate in softer-grain areas. Thin coats and quick wiping prevent chalky buildup or uneven opacity.
Minwax vs. Varathane on Pine
Picking a stain brand for pine can feel like a gamble. Two names rule the DIY shelves, Minwax and Varathane, and they behave very differently on the same board.
The difference comes down to pigment, and here’s how the two compare:
| Factor | Minwax | Varathane |
|---|---|---|
| Pigment | Heavier, bolder | Lighter, more transparent |
| Color payoff | Rich, deep tones | Soft, see-through finish |
| Best shades | Dark browns, blacks, Special Walnut | Grays, washes, layered color |
| Grain visibility | Covers more | Let’s grain show through |
| Best for | Dramatic, deep finishes | Subtle, natural looks |
A quick rule of thumb: reach for Minwax when you want depth and Varathane when you want a softer, see-through finish. Either way, condition the wood and test on a scrap first, since the same shade name can look worlds apart between the two brands.
How to Get the Color You Want?
Getting the right color on pine takes more than picking a shade from the shelf. Prep, testing, and timing make all the difference.
- Always Use Pre-Stain Wood Conditioner: Pre-stain conditioner evens out how pine absorbs stain by reducing dark patches in soft-grain areas and helping the surface take color more consistently across the board before staining.
- Test on Scrap First: A scrap piece shows how the stain reacts with your specific pine, since grain variation can heavily shift color, and testing prevents unwanted surprises on the final surface.
- Control Darkness With Coats and Timing: One coat gives a lighter finish, while extra coats deepen the color, and leaving the stain on longer increases darkness. So, wiping off uneven absorption keeps the finish consistent and controlled.
- Seal to Lock in the Look: A clear topcoat protects the stained surface from moisture, wear, and fading while helping preserve the final color, so the finish stays stable and long-lasting over time.
These take most of the guesswork out of staining pine. What’s left is choosing the right formula for the job.
Oil vs. Water vs. Gel Stain on Pine
Same color, different formula, completely different result on pine: the type you pick matters as much as the shade. Here’s how the three stack up on soft, blotchy pine:
| Stain Type | How It Behaves on Pine | Key Benefit | Main Drawback | Best Use |
|---|---|---|---|---|
| Oil-Based | Sinks deep into the grain and enriches natural wood tones | Rich, warm finish that highlights grain depth | High risk of blotching on soft pine | Classic furniture and natural wood looks |
| Water-Based | Sits more evenly and dries quickly with lighter penetration | Fast drying and easy cleanup with soap and water | Can raise grain, needs light sanding between coats | Clean, modern, even-color finishes |
| Gel Stain | Sits on top of the surface instead of soaking in deeply | Best control over blotchiness and uneven grain | Less natural grain penetration and fewer color options | Beginner projects and knotty or uneven pine |
Each type can work well on pine, but results depend on how much control you want versus how natural you want the grain to show through.
Wrapping Up
Pine is a budget-friendly wood with one big quirk: its yellow undertone and soft grain change every color you put on it. The shade on the can is rarely the shade you get.
That’s why the right approach matters more than the right color. Condition the wood to fight blotchiness, lean toward warm medium browns that flatter pine, and always test on a scrap board before you commit.
Keep the pine wood stain color chart handy while shopping, and you’ll skip the guesswork that wastes time and money.
Grab an offcut, try your top two shades, and let the wood show you the truth before your project ever begins. The right finish is well within reach.
Frequently Asked Questions
Do you need to sand pine before staining?
Yes, always sand first. Work up to 120 or 220 grit for a smooth surface, then wipe off the dust so the stain absorbs evenly across the wood.
How long does it take for a stain to dry on pine?
Pine dries more slowly than hardwoods because it absorbs more. Most stains feel dry within a few hours, but pine can stay tacky for up to 18 hours in high humidity.
Do you have to seal pine after staining?
Yes, sealing is strongly recommended. A clear topcoat like polyurethane or polycrylic locks in the color and protects against fading, scratches, and moisture for years to come.
Can you stain pressure-treated pine?
Yes, but wait until it dries fully, often several weeks to a few months. Staining damp pressure-treated pine traps moisture and keeps the color from absorbing properly.