
Quilling is a paper craft where thin strips of paper get rolled into coils, shaped, and glued together to build decorative designs. It sounds basic. It isn’t.
The same core moves that make a simple flower on a greeting card also build detailed wall panels and wearable jewelry. The techniques stay the same. Only the scale and patience change.
This article covers how the process works, what people make with it, and how hard it is to pick up from scratch.
The Art of Quilling: Paper Rolled Into Something Remarkable
Quilling, also called paper filigree, is the art of rolling thin paper strips into coils, then shaping and gluing those coils into decorative designs. The two names mean the same thing. You’ll see both used.
What sets it apart from other paper crafts: the strip itself is the building unit. You don’t cut paper into a shape or fold it. You roll it, pinch it, and build it piece by piece.
The name comes from the original tool, a bird’s quill or feather shaft. Early craftspeople wound paper strips around quills to form coils. The tool changed, but the name didn’t.
How Quilling Works and Holds Together
This is the thing most folks miss: quilling isn’t about cutting or printing on paper. The paper does all the structural work through how it’s rolled and shaped. That’s what makes a finished piece look so different from anything flat.
If you’ve looked at a quilled design and wondered how it holds together, each coil is its own small unit, glued at the edge to its neighbors. The design builds from the inside out.
Where Did Quilling Come From?
Quilling isn’t a recent crafting trend. It goes back to Renaissance Europe, and the origin explains everything about how it works and why it looks the way it does.
The craft started in France and Italy. Nuns and monks rolled the gilded edges of paper from holy books around feather quills. Those coils decorated religious objects like:
- reliquaries
- book covers
- altarpieces.
The gilded paper gave the coils a metallic look that mimicked real gold filigree metalwork. Only trained goldsmiths could make the real thing. Quilling was the affordable version.
The name, the technique, and the look all come from the same place: copying expensive craftsmanship with cheap materials. That’s still what makes quilling impressive to people who don’t know how it’s done.
How Quilling Spread From Monasteries to Home Craft
By the 18th and 19th centuries, the craft had moved out of monasteries. It became a popular leisure activity for women across Europe, used to decorate picture frames, tea caddies, and work boxes.
The North American Quilling Guild identifies this Victorian period as when quilling spread most widely as a home art.
How It Evolved Over Time
I find this part worth sitting with: the rolling and pinching that Renaissance monks used on gilded manuscript edges is the exact same technique you’d use today on pre-cut paper strips. The materials got cheaper. The moves stayed identical.
You’re learning something that has looked essentially the same for five hundred years. That’s worth knowing before you start.
Rolling, Shaping, and Assembling: The Three-Stage Process
Quilling runs in three stages: rolling, shaping, and assembling. Each one builds on the last. What you do in stage one decides what’s possible in stage two, so the order matters more than it first looks.
1. Rolling the Paper
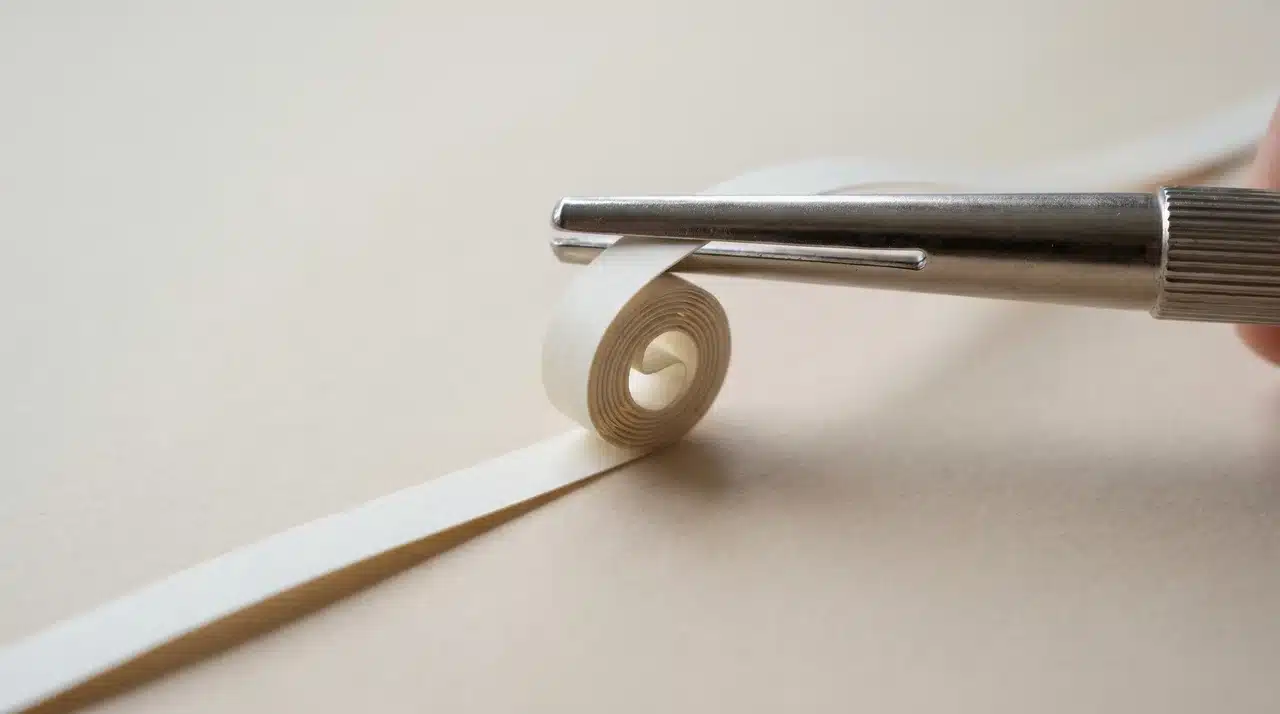
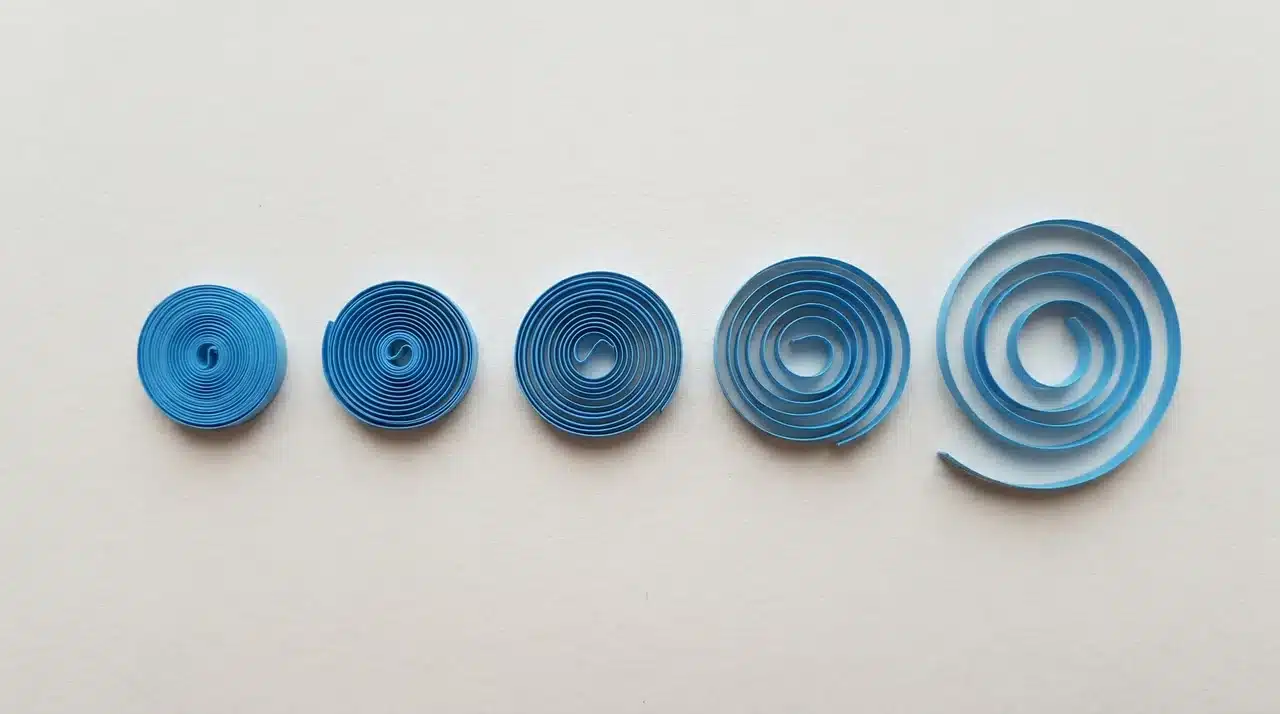
You feed a paper strip into the slot of a slotted tool and turn it. The strip winds into a coil. Straightforward, but here’s the part that matters: how tight you roll it.
A tight coil holds a firm, compact shape when you let go. A loose coil spreads out and gives you something softer and more open. Once you glue the end down, that tension is set. You can’t loosen a tight coil after the fact.
I’ve watched beginners skip past this and then wonder why their teardrops look lumpy. Tension is the one variable that carries into every shape you make. Get a feel for it before anything else.
2. Shaping the Coils
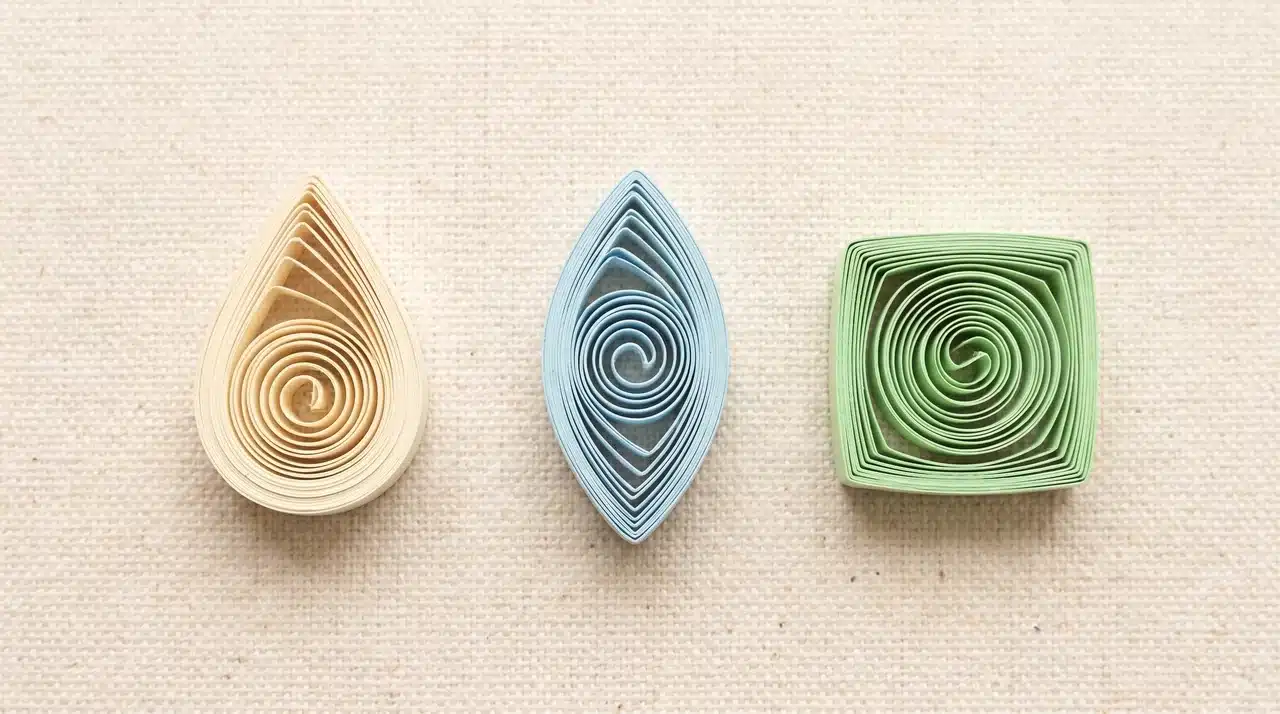
Once you have a coil, you shape it by pinching, pressing, or curving. Pinch one end, and you get a teardrop. Pinch both ends, and you get a marquise, also called an eye shape. Press two sides flat, and you get a square.
The shapes build on each other. A marquise starts as a teardrop; you just pinch the second end. That sequence matters when you’re working through a design with multiple shape types.
Shaping is where most of the practice goes. A sharp pinch gives a clean point. A gentle one gives a soft curve. Small differences are very visible across a finished piece, and that’s what makes consistency the skill to build here.
3. Assembling the Design
Shaped coils get glued to a backing or directly to each other. The design comes together through how you arrange and layer them.
There’s no single right method. Some quillers sketch first; others build as they go. The one decision that changes everything is how you orient each coil: flat face up gives you a 2D design; edge up gives you height and depth. That choice is what separates flat paper art from raised, sculptural work.
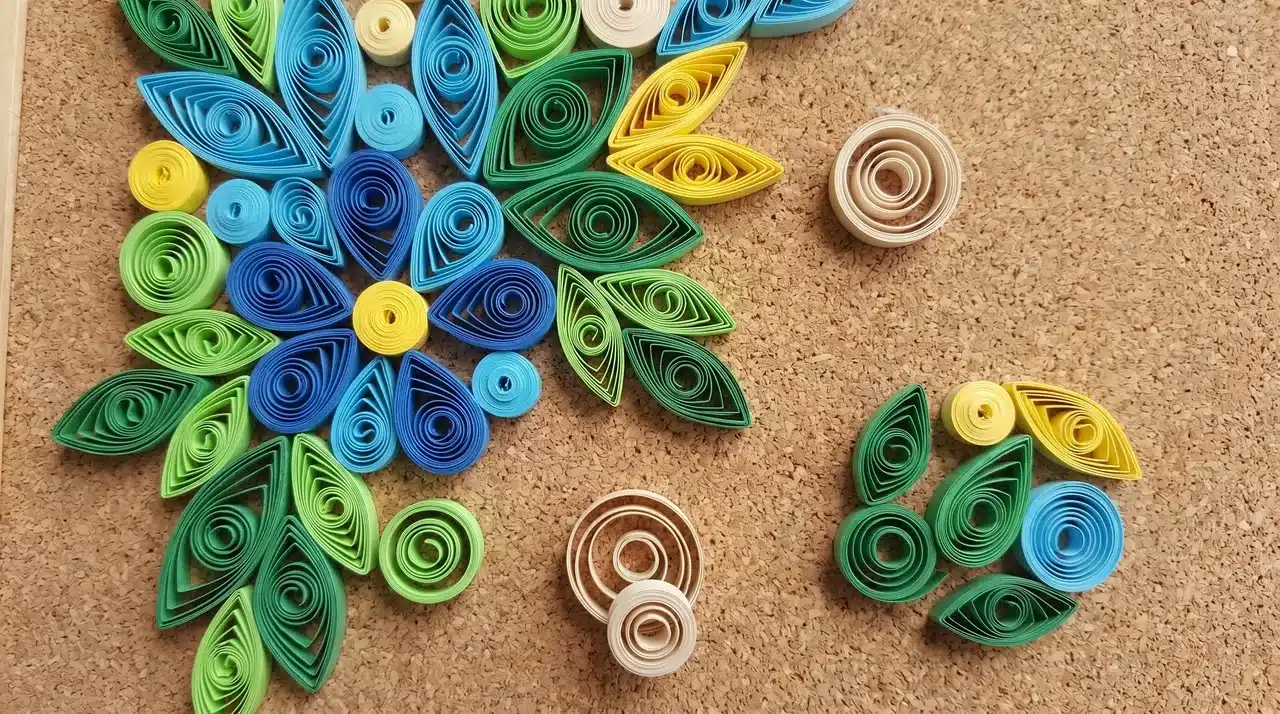
Things You Can Make with Quilling

Quilling produces everything from a quick card embellishment to a wall panel that takes days. The core shapes coils, teardrops, marquises show up across all of it. Complexity comes from how many you make and how you arrange them, not from learning new techniques.
Here’s the range of what people make:
- Simple embellishments: greeting cards, gift tags, scrapbook pages. Quick, forgiving, and the right place to start.
- Wall art: shadow boxes and framed pieces built from many coils with deliberate layout. These take longer and show off control of consistency.
- Jewelry: lightweight earrings and pendants that hold up well once properly sealed against moisture.
- Decorative objects like trinket boxes, ornaments, and quilled eggs, where coils go onto curved or three-dimensional surfaces instead of a flat backing.
The skills that make a beginner’s flower card are the same ones that make an advanced wall panel. The difference is time and patience, not technique.
Is Quilling Hard to Learn?
Quilling has a short learning curve at the start and a high ceiling if you keep going. Most beginners can roll clean coils and shape teardrops in their first session. The slotted tool handles consistency for you. Your job is just to keep the tension steady.
To start, you need three things:
- pre-cut paper strips (3mm wide, text-weight)
- slotted tool,
- white craft glue.
That’s the whole kit. No specialty supplies, no prior experience needed.
Conclusion
Quilling has been the same craft for five hundred years. You roll thin paper strips, shape the coils, and build something from them. The technique that decorated Renaissance reliquaries is the same one that goes into a modern greeting card or wall panel.
The history gives it weight. The low barrier to entry makes it real. Three tools and one afternoon is all it takes to find out if this is for you.
Some crafts look impressive but feel hollow once you learn them. Quilling tends to go the other way the more control you develop over those small moves, the more interesting it gets.
Frequently Asked Questions
What paper do I need for quilling?
Use pre-cut quilling strips, typically 3mm wide and made from text-weight paper. This weight rolls cleanly without cracking and holds its shape well once glued. Strips come in packs of mixed or single colors. Standard quilling strips from a craft store work fine to start, no specialty paper needed.
What is quilling used for?
Quilling is used to make greeting cards, wall art, jewelry, and decorative objects. The same basic shapes, coils, teardrops, and marquises appear in all of these. Simple embellishments take under an hour. Detailed wall panels or portraits can run for many hours across multiple sessions, depending on size and complexity.
How long does it take to learn quilling?
Most beginners can roll clean coils and shape basic forms like teardrops within a few hours. Keeping consistent tension across many coils takes a few more sessions to get right. Advanced work, realistic portraits, and tight 3D pieces take months of regular practice to develop.
Why is quilling called quilling?
The name comes from the quill a bird’s feather shaft which was the original rolling tool. Craftspeople in Renaissance Europe wound gilded paper edges around these quills to decorate religious objects. The tools changed over the centuries. The name stayed.