
Adding crown molding can make a room look way fancier, but figuring out the cost isn’t as simple as just picking a style.
The total price depends on a few things: the material you choose, how high your ceilings are, and how tricky the room layout is. Labor is also a big part of the bill, often half the cost or more.
Today, I’ll break down what really affects the price, show you different materials and what they cost, and explain the difference between doing it yourself and hiring a pro.
Let’s start by looking at what sets the base price.
What Does Crown Molding Installation Actually Cost?
Crown molding installation costs $4 to $23 per linear foot, including materials and labor. For most rooms, the total project cost ranges from $600 to $2,100.
That range is wide, and it’s wide for a reason. The final number isn’t just about how many feet of molding your room needs. Three things drive it: the material you choose, your ceiling height, and how complex the room is to work in.
One thing worth knowing upfront: labor consistently accounts for 50% or more of the total installed price, regardless of which material you choose. The difference between a $7 and a $16 per-foot job is mostly room complexity and ceiling height, not whether you chose pine over MDF.
For a standard rectangular room with 8-foot ceilings and basic materials, the $7 to $16 per linear foot range is where most crown molding installation costs land.
What Material You Choose Drives the Baseline
Your material choice sets the floor for the entire project. Every other cost builds on top of it.
Material Options and Their Price Ranges
The four materials you’ll encounter most cover a wide price range. Each one suits different rooms and different budgets.
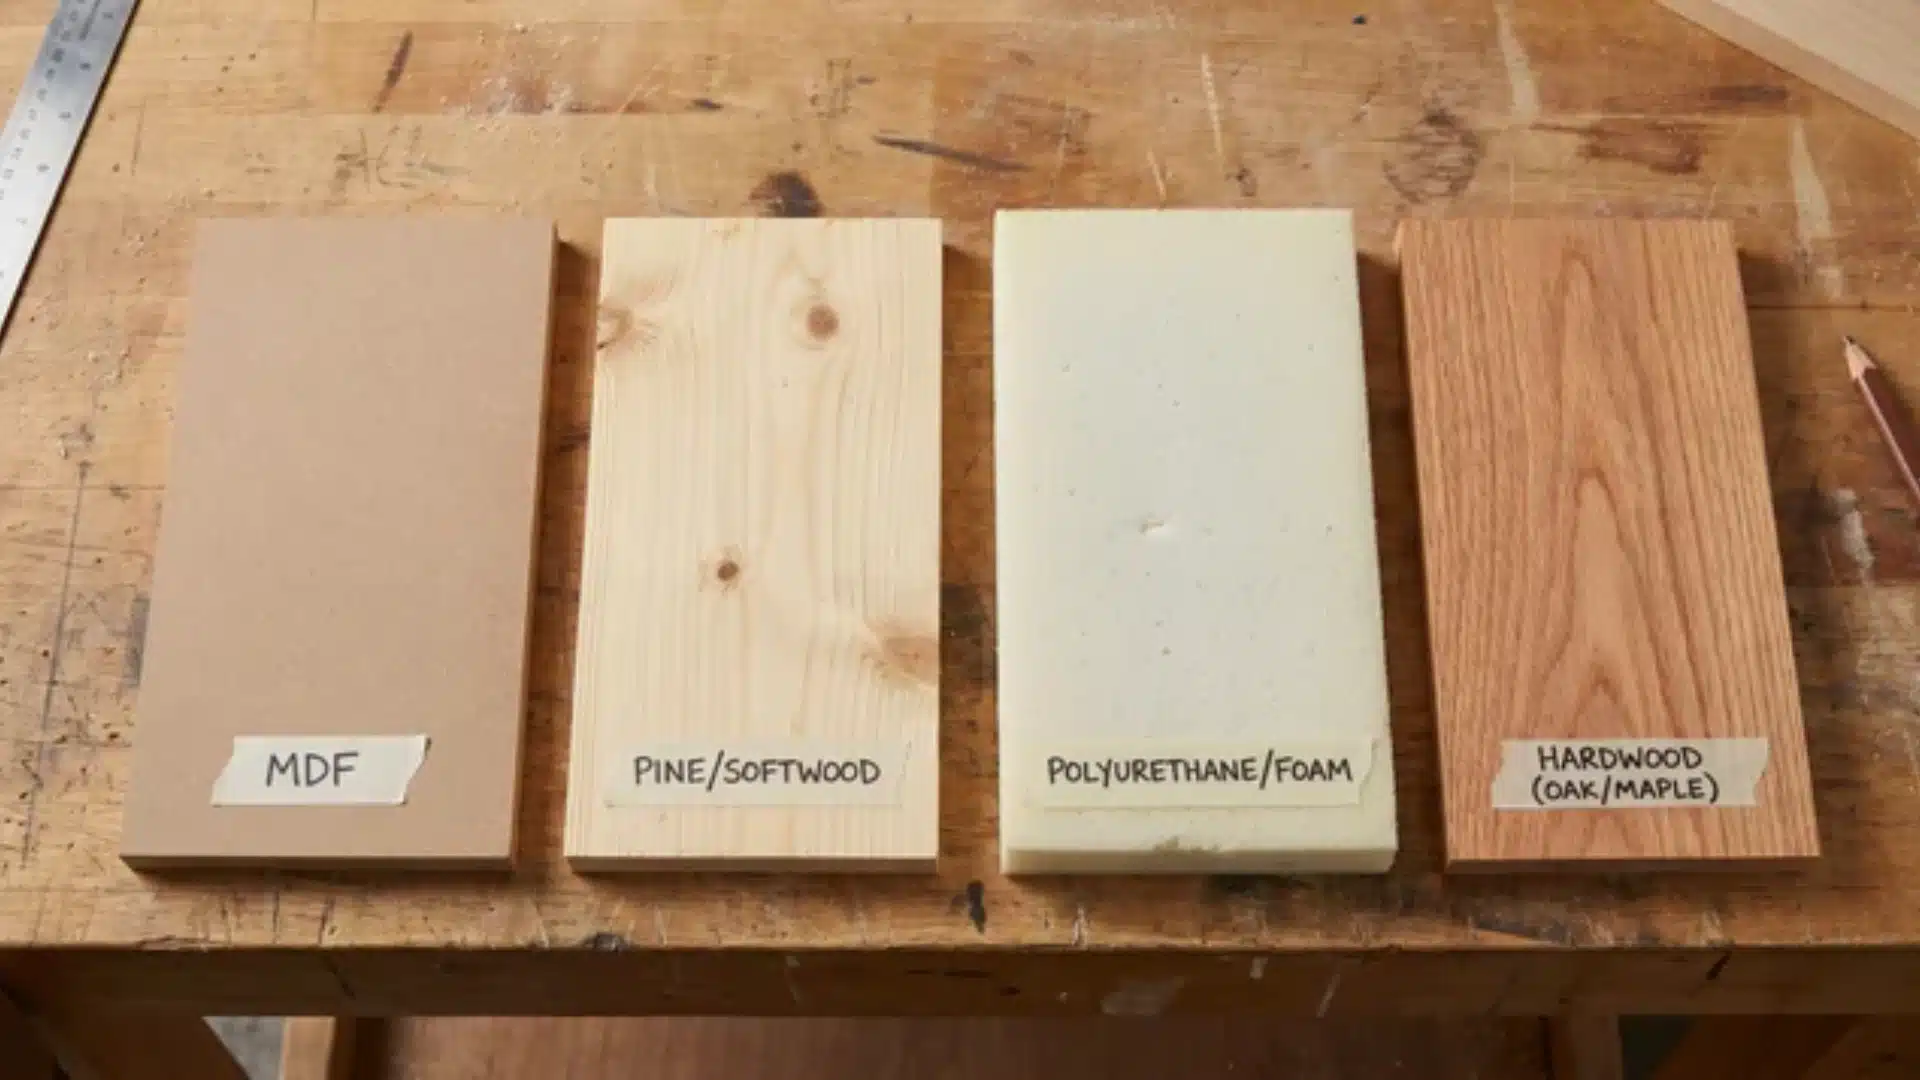
| Material | Price per Linear Foot | Notes |
|---|---|---|
| MDF (Medium-Density Fiberboard) | $1–$3 | Standard choice; easy to cut and paint; swells near moisture, avoid in bathrooms/kitchens |
| Pine/Softwood | $2–$5 | Slightly more durable than MDF; accepts paint/stain; good for most rooms |
| Polyurethane/Foam | $3–$8 | Lightweight; moisture-resistant; suitable for high-humidity areas |
| Hardwood (Oak, Maple) | $5–$10+ | Premium option; long-lasting; higher cost to buy and install |
Most contractors default to MDF unless you ask otherwise. If you have a bathroom or laundry room on the list, bring up polyurethane before they order materials.
How Material Choice Affects Labor, Not Just Material Cost
Hardwood doesn’t just cost more at the lumber yard. It takes longer to cut, fit, and finish, which means the labor rate on a hardwood job runs higher, too.
A material upgrade at $5 more per foot can add $8 to $10 per foot to the all-in cost once installation time is factored in.
Hardwood requires slower, more careful cuts; a mis-cut on an $8-per-foot oak profile costs more to replace than the same mistake on MDF, so experienced carpenters work more deliberately and charge accordingly.
The Three Variables that Move Your Quote

Labor is priced per linear foot, which makes it easy to assume cost scales with room size. These three variables break that assumption, and they don’t all push the number in the same direction.
Ceiling Height
Taller ceilings require wider molding profiles to look proportional. Wider profiles cost more per foot and take longer to hang.
At 10 feet or above, the job often requires scaffolding or a pump jack. That adds rental cost and setup time to the bill. An 8-foot ceiling rarely triggers either.
If your ceilings run high, expect the per-foot rate to climb on both the material and labor line.
Room Complexity and Corner Count
A room with more corners doesn’t cost a little more. It can cost significantly more, and the reason is in how long each joint takes.
Every corner that isn’t a standard 90° angle, like a bay window return, an archway, or an octagonal room, requires a compound miter cut. That’s a cut made at two angles simultaneously. It takes real skill and time to get right.
Beyond the miter, inside corners require a coped joint. One piece runs flat into the corner; the second is back-cut along its profile so it wraps tightly over the first.
A coped joint done well is invisible. Done poorly, it’s the first thing anyone notices. It’s the skill that separates a clean finish from a first-timer’s job.
A straight run of molding moves quickly. A tricky corner can take 3 to 5 times as long as the same footage on a flat wall. Add eight of those corners to a room, and the labor hours stack up regardless of total linear footage.
This is the part of a quote worth asking about directly. Corner count matters more than most homeowners realize.
Painting and Finishing
The base installation quote often doesn’t include finishing. Priming, caulking, and painting or staining add $1 to $3.50 per linear foot, and because it’s a separate line item, many homeowners don’t catch the omission until the final invoice.
Ask before you sign whether finishing is included, and get it in writing if it is.
How to Estimate Your Total Project Cost
Before you call a contractor, it helps to have a rough number in your head. Here’s how to build one:
Start with your room’s perimeter. Add all four walls together, then subtract roughly 3 feet for each door or window opening.
Add 10–15% for waste, offcuts and mistakes that are part of every install. That’s your working linear footage.
From there, multiply by the per-foot rate that fits your situation. Use the low end of the $7–$16 range for a simple rectangular room with standard material. Use the high-end if you have a complex layout, high ceilings, or are upgrading to hardwood.
Here’s how that math plays out across three common project sizes:
Small room (12×12 ft): ~48 LF perimeter, minus openings, plus waste = roughly 50–52 usable feet. At $7–$16/LF: $350–$830 for installation. Add finishing and you’re closer to $500–$950.
Medium room (15×20 ft): ~70 LF perimeter, adjusted = roughly 72–78 usable feet. At $7–$16/LF: $500–$1,250. With finishing: $650–$1,500.
Larger or more complex room: Once you add bay windows, multiple doorways, or vaulted sections, corner count drives the number more than footage does. Budget toward the $16–$23/LF range and treat anything below it as a bonus.
Three things most commonly push a final invoice above the original estimate: finishing wasn’t included in the base quote, corner complexity added more labor hours than expected, and material waste exceeded the 10% buffer. Ask about all three before signing off.
DIY vs. Professional Installation: What the Cost Difference Actually Reflects
The decision comes down to one honest question: can you cut a coped joint? Everything else in the table below is secondary to that.
| DIY | Professional | |
|---|---|---|
| Labor cost | $0 (your time) | $3–$15 per linear foot |
| Material cost | Same | Same |
| Skill required | Intermediate | Trained finish carpenter |
| Corner work | Self-taught, first room shows | Experienced, clean finish |
| Time investment | Several hours + learning curve | Half to full day |
| Risk | Wasted cuts, visible gaps | Low |
DIY is most defensible on simple rectangular rooms with 8-foot ceilings and forgiving materials like MDF or polyurethane. The math works when the labor savings, typically $200–$700 on an average room, outweigh the cost of any mis-cut material and the time spent learning the joints.
Who to Hire When You Go Pro
Not every carpenter works with trim. For crown molding, look specifically for a finish carpenter or trim carpenter; they specialize in the precise cuts and tight fits this work requires.
A general handyperson can handle simple installs in basic rectangular rooms. Any job with high ceilings, complex angles, or hardwood should go to a dedicated trim pro.
When getting quotes, ask “do you specialize in finish carpentry?” takes ten seconds and filters out mismatches before they become problems.
Conclusion
Figuring out the cost to install crown molding doesn’t have to be confusing. The main things that drive the price are your material choice, ceiling height, and how tricky your room’s corners are.
Labor and finishing, like painting, also add to the total. Whether you do it yourself or hire a pro, knowing these details helps you avoid surprises and get a clean, professional-looking finish.
Even small changes, like a fancy wood or a complicated corner can make a big difference in cost. Use these tips to plan ahead, estimate your project, and make your space look polished without overspending.
Frequently Asked Questions
What is the average labor cost to install crown molding?
Labor for crown molding installation typically runs $3 to $12 per linear foot, representing roughly half or more of the total installed cost. The lower end applies to simple rectangular rooms with 8-foot ceilings; higher rates reflect ceiling complexity, numerous corners, large-profile molding, or contractor markets in higher-cost metro areas.
Can I install crown molding myself?
Yes, but the difficulty is higher than most trim work because inside corners require coped joints, a technique involving a backcut freehand along the molding’s profile, rather than simple miters. Homeowners with miter saw experience and patience for test cuts can succeed on simple rooms; anyone without prior trim experience should expect at least one run of material waste learning the process.
Why is crown molding so expensive?
The cost reflects skilled labor more than materials. Cutting accurate compound miters and fitting coped joints requires precision, and a single mis-cut on an 8-foot run wastes both material and time. Rooms with vaulted ceilings, curved walls, or many corners multiply the labor hours non-linearly, which is why complexity raises the price faster than room size alone.
How much does it cost to crown mold an entire house?
Whole-home crown molding installation typically runs $2,000 to $5,000 or more depending on total linear footage, material grade, and room complexity. A 2,000-square-foot home with standard rectangular rooms and MDF molding will land toward the lower end; hardwood molding, open-plan spaces with angled ceilings, or high-end finishing push toward and beyond the upper bound