
I know how quickly a bathroom can start to look worn, especially when cabinets lose their finish. If you’re thinking about painting bathroom cabinets, you’re in the right place.
It’s a simple way to refresh your space without spending too much or taking on a full remodel.
In this guide, we will walk through what actually works, step by step. You’ll learn how to prep, paint, and avoid common mistakes that can ruin the finish.
I’ll share easy tips to help your cabinets last longer.
You don’t need to be an expert to get good results. With the right approach and a little patience, you can give your bathroom a clean, updated look that feels brand new.
Why Paint Bathroom Cabinets?
Painting bathroom cabinets is a quick and cost-effective way to update your bathroom. It gives old cabinets a fresh, modern look without the need for a full remodel.
Painting bathroom cabinets refreshes your space while staying within budget.
Instead of replacing cabinets, you can transform their appearance with color that fits your style, whether you prefer a bright, clean look or a deeper, richer tone.
It also helps cover scratches, stains, and signs of wear that build up over time.
Another reason people choose painting bathroom cabinets is the speed of the project. With proper prep and drying time, you can complete it in just a few days.
This simple upgrade can make your bathroom feel cleaner and more inviting. It’s a practical choice for anyone who wants a noticeable change without major construction or high costs.
How to Paint Bathroom Cabinets
Follow these simple steps to get a smooth, long-lasting finish when painting bathroom cabinets.
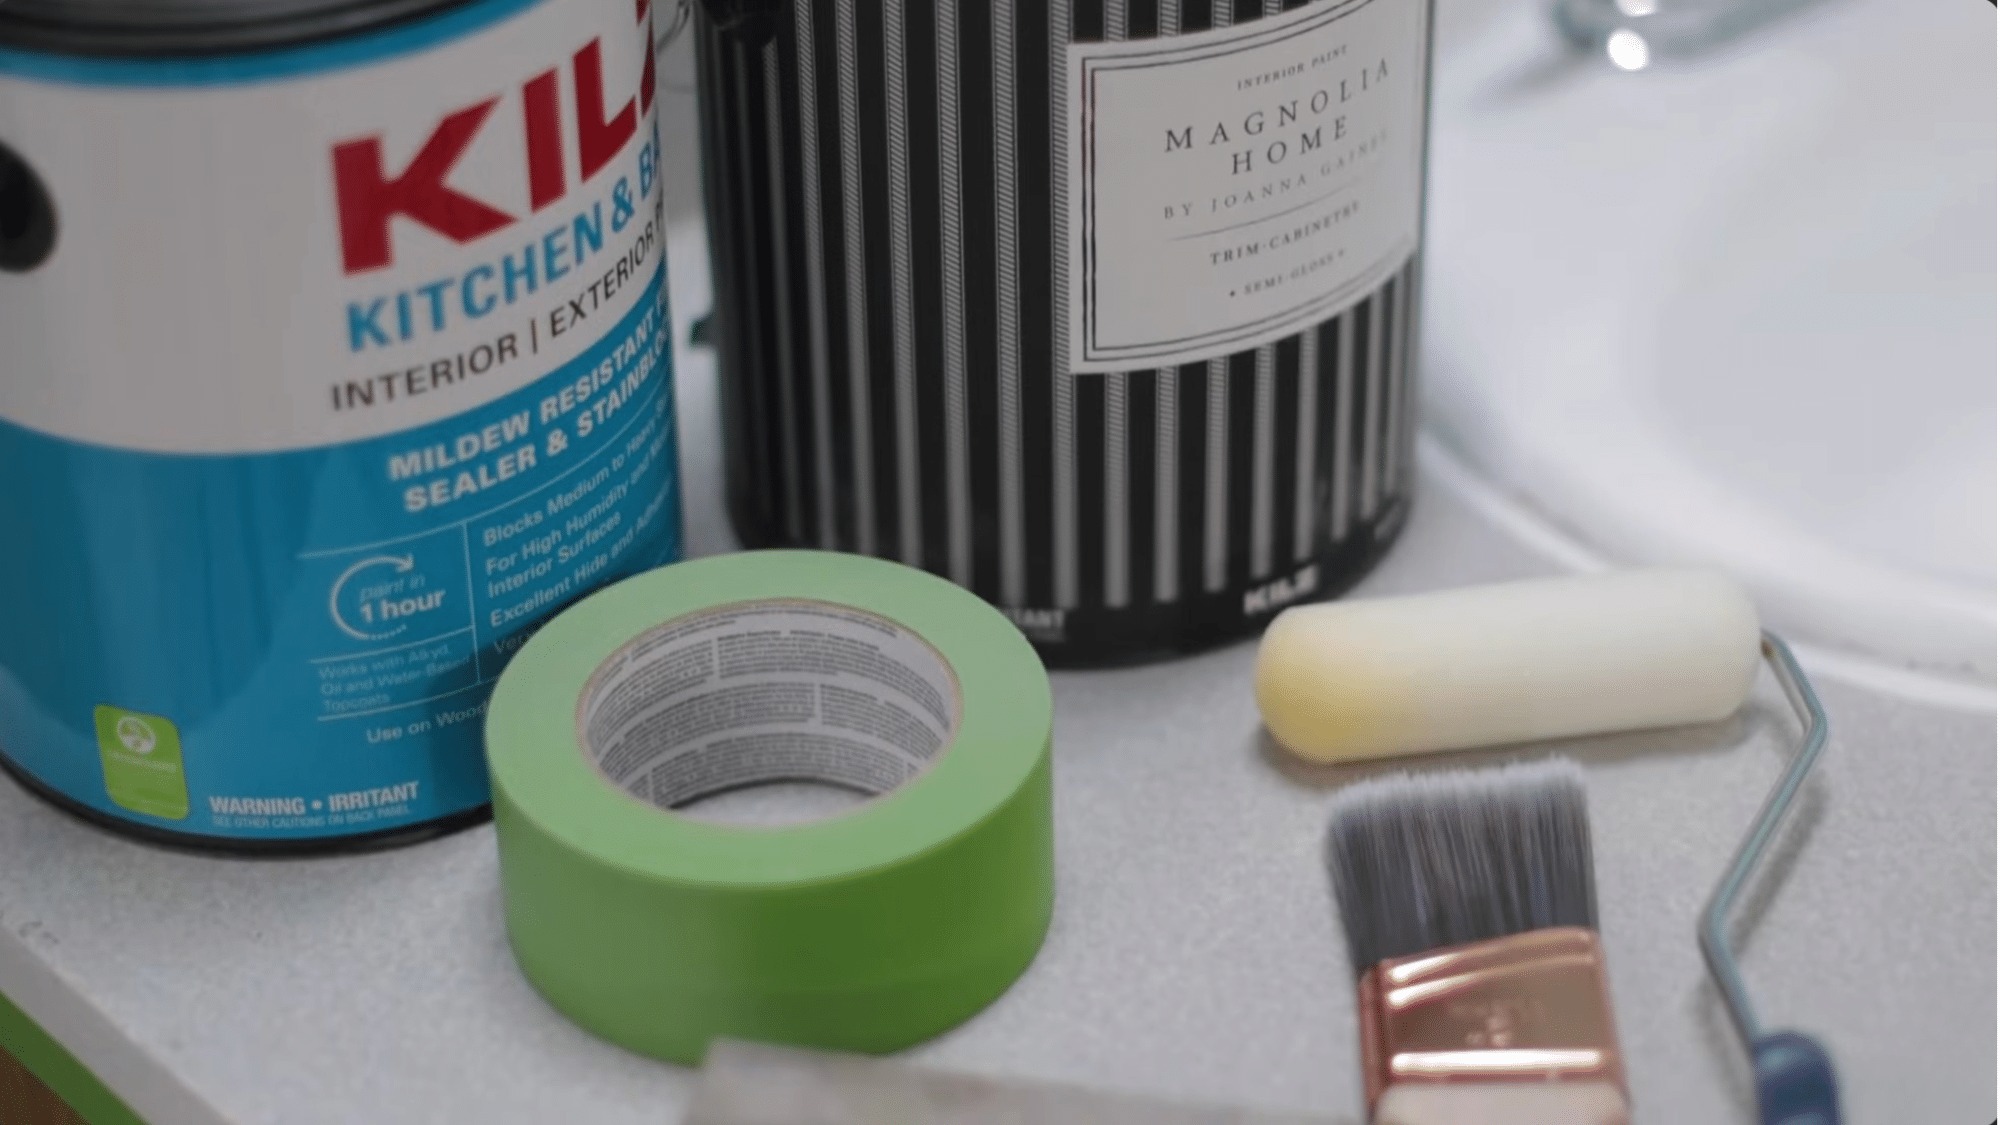
Tools and Materials You’ll Need Before You Start
Having the right tools and materials makes painting bathroom cabinets easier and helps you get a smooth, long-lasting finish.
- Screwdriver
- Sandpaper or sanding block
- Degreaser or mild cleaner
- Painter’s tape
- Drop cloth or plastic sheets
- Primer
- Paint
- Paintbrushes
- Foam roller
- Tack cloth
Step 1: Gather Supplies and Remove Hardware
Before painting bathroom cabinets, gather all tools like sandpaper, primer, paint, brushes, rollers, cleaner, and tape. Having everything ready helps you work without delays.
Next, remove cabinet doors, drawers, and hardware such as handles and hinges. This allows you to paint evenly and avoid messy edges.
Store screws safely so nothing gets lost. Proper preparation at this stage makes painting bathroom cabinets easier, faster, and more organized from start to finish.
Step 2: Clean the Cabinets Thoroughly

Cleaning is a must when painting bathroom cabinets. Use a degreaser or mild cleaner to remove dirt, oil, and buildup from surfaces.
Bathrooms collect moisture and residue, which can stop paint from sticking properly. After cleaning, rinse with clean water and dry fully.
If cabinets are not clean, paint may peel or look uneven. Taking time to clean well ensures better adhesion and helps your painted cabinets look smooth, fresh, and long-lasting.
Step 3: Sand the Surface Properly
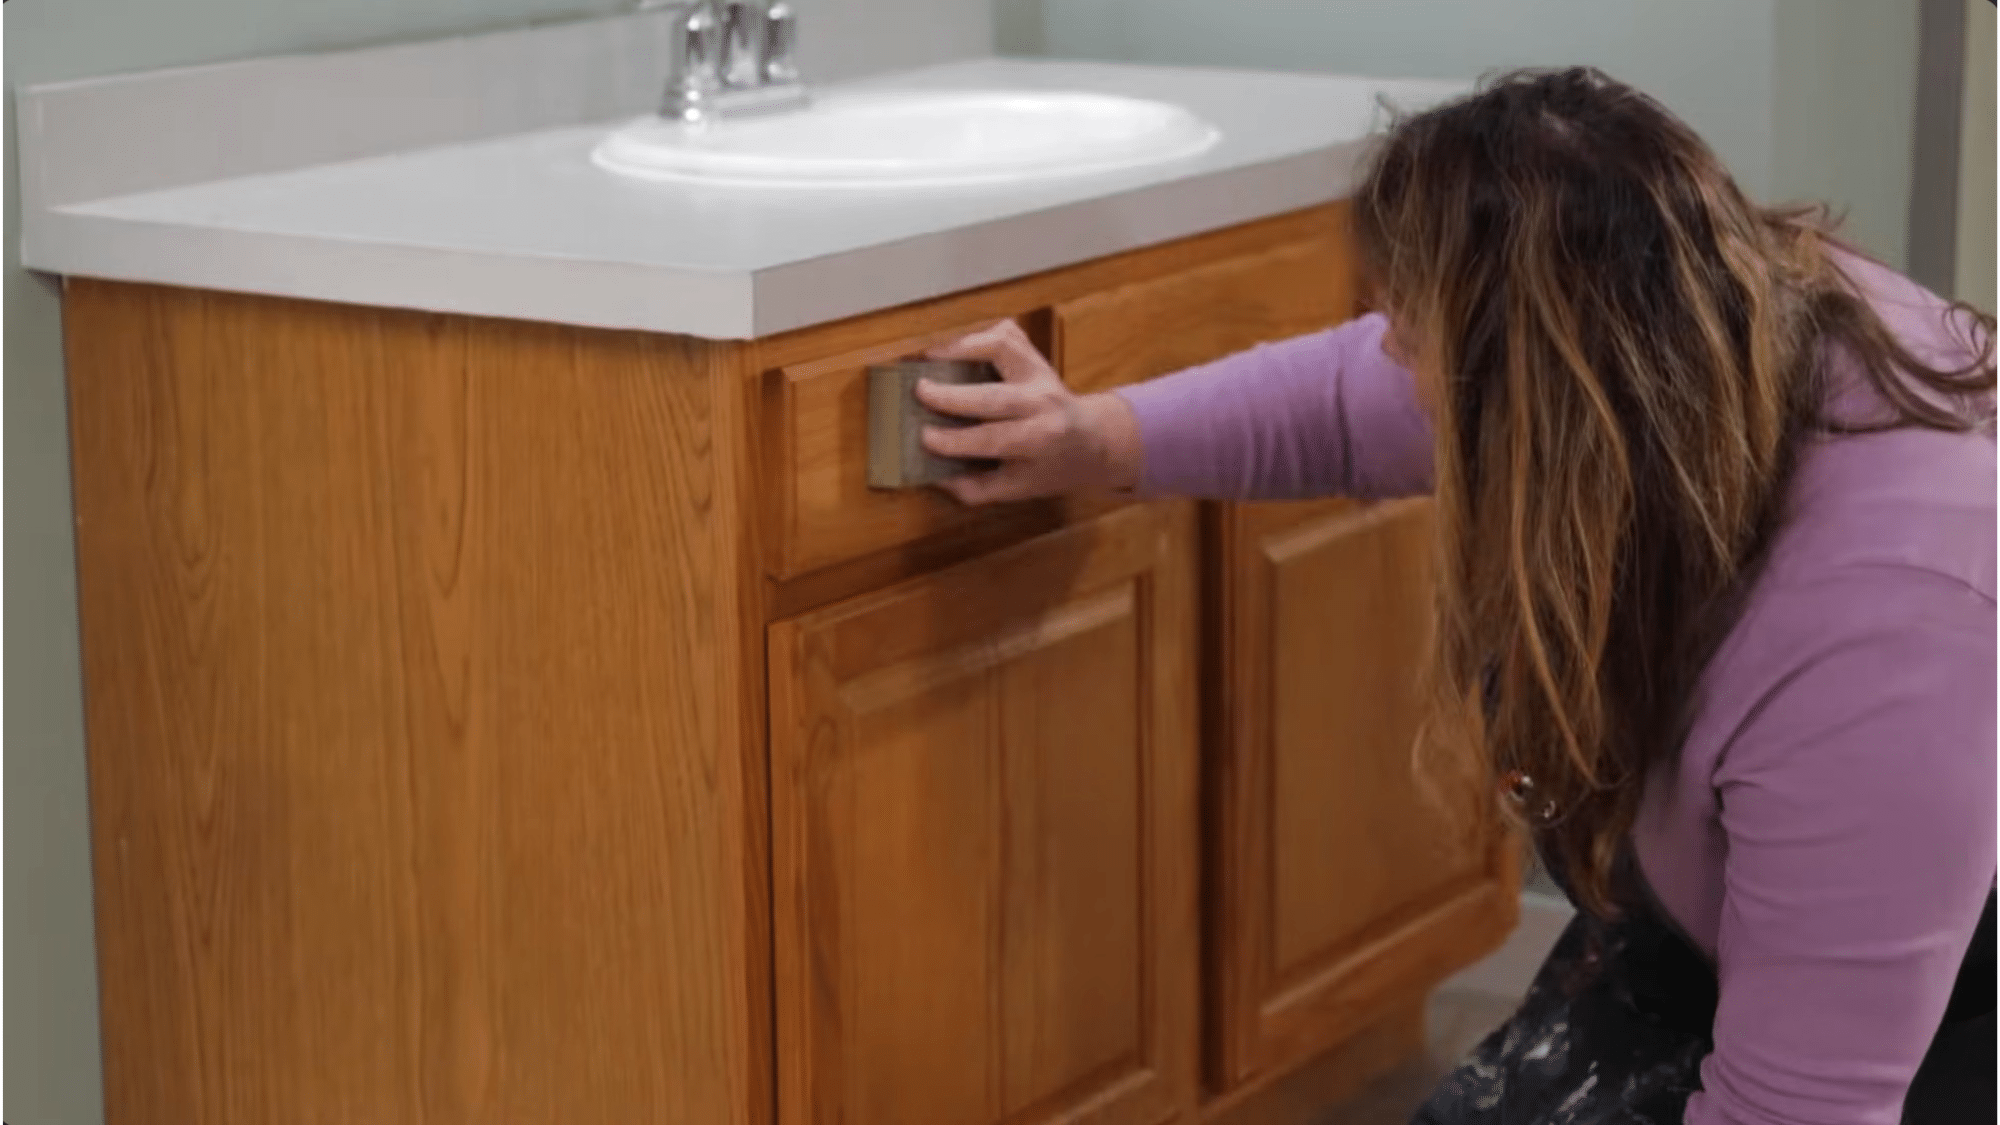
Sanding prepares the surface so the paint can stick well. When painting bathroom cabinets, use 220-grit sandpaper to remove any glossy finish and create a dull surface.
This improves paint grip and reduces future chipping. Use a sanding block for detailed areas and edges. Sand evenly without overdoing it.
A well-sanded surface helps achieve a smoother finish and ensures your cabinets hold paint evenly, resulting in a neat, durable finish.
Step 4: Remove Dust and Apply Painter’s Tape
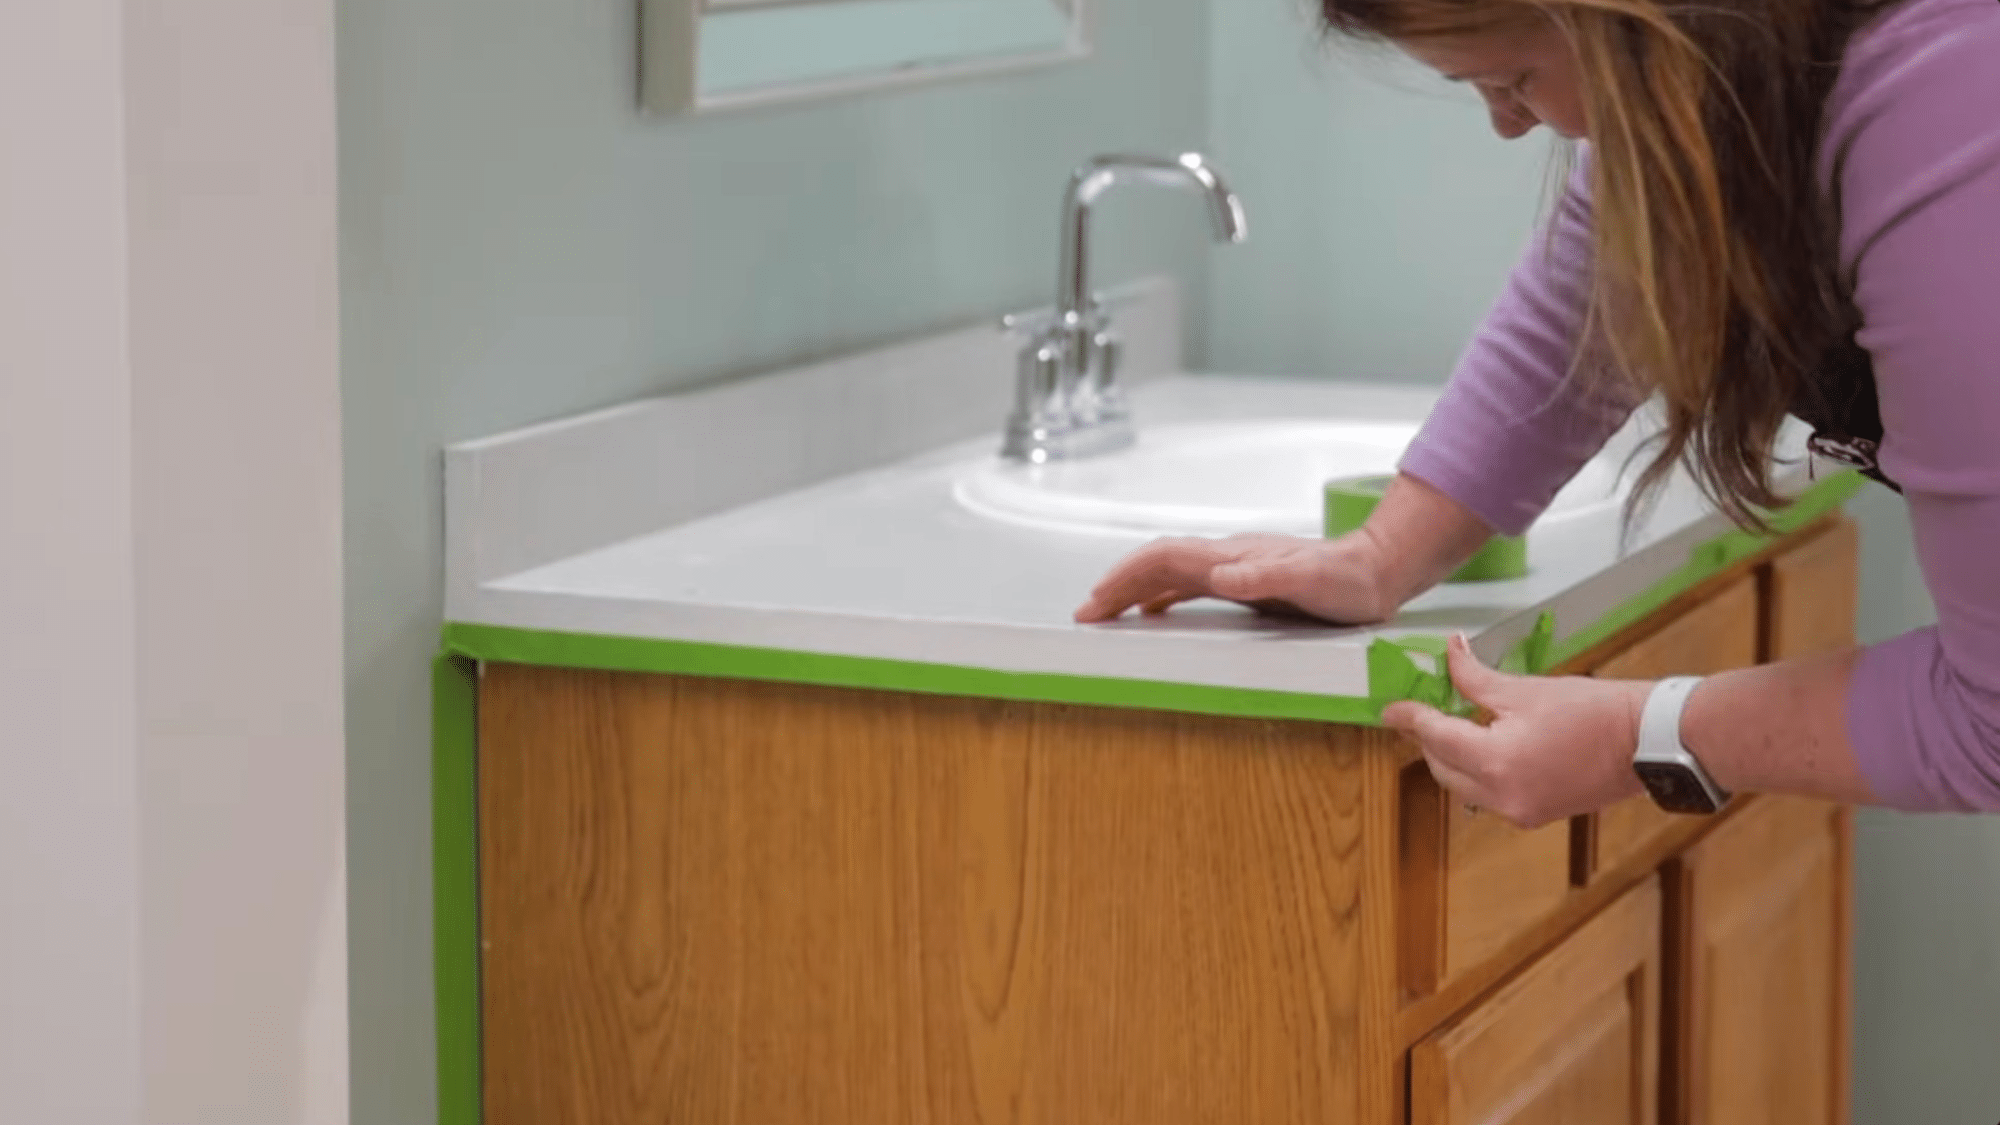
After sanding, wipe all surfaces with a tack cloth or clean rag to remove dust. Even small particles can affect the finish when painting bathroom cabinets.
Next, apply painter’s tape to areas like walls, countertops, and floors. Press the tape firmly so the paint does not bleed underneath.
Careful taping helps create clean, sharp edges and protects nearby surfaces. This step keeps your workspace neat and reduces cleanup later.
Step 5: Apply Primer for Better Adhesion

Primer is important when painting bathroom cabinets, especially in humid areas. Use a brush for corners and a foam roller for flat surfaces.
Primer helps paint stick better and improves durability. It also blocks stains and creates a smooth base for color. Let the primer dry completely before moving forward.
Skipping the primer can lead to uneven color and a weak paint hold, so it’s worth taking the time to apply it properly.
Step 6: Light Sand After Priming
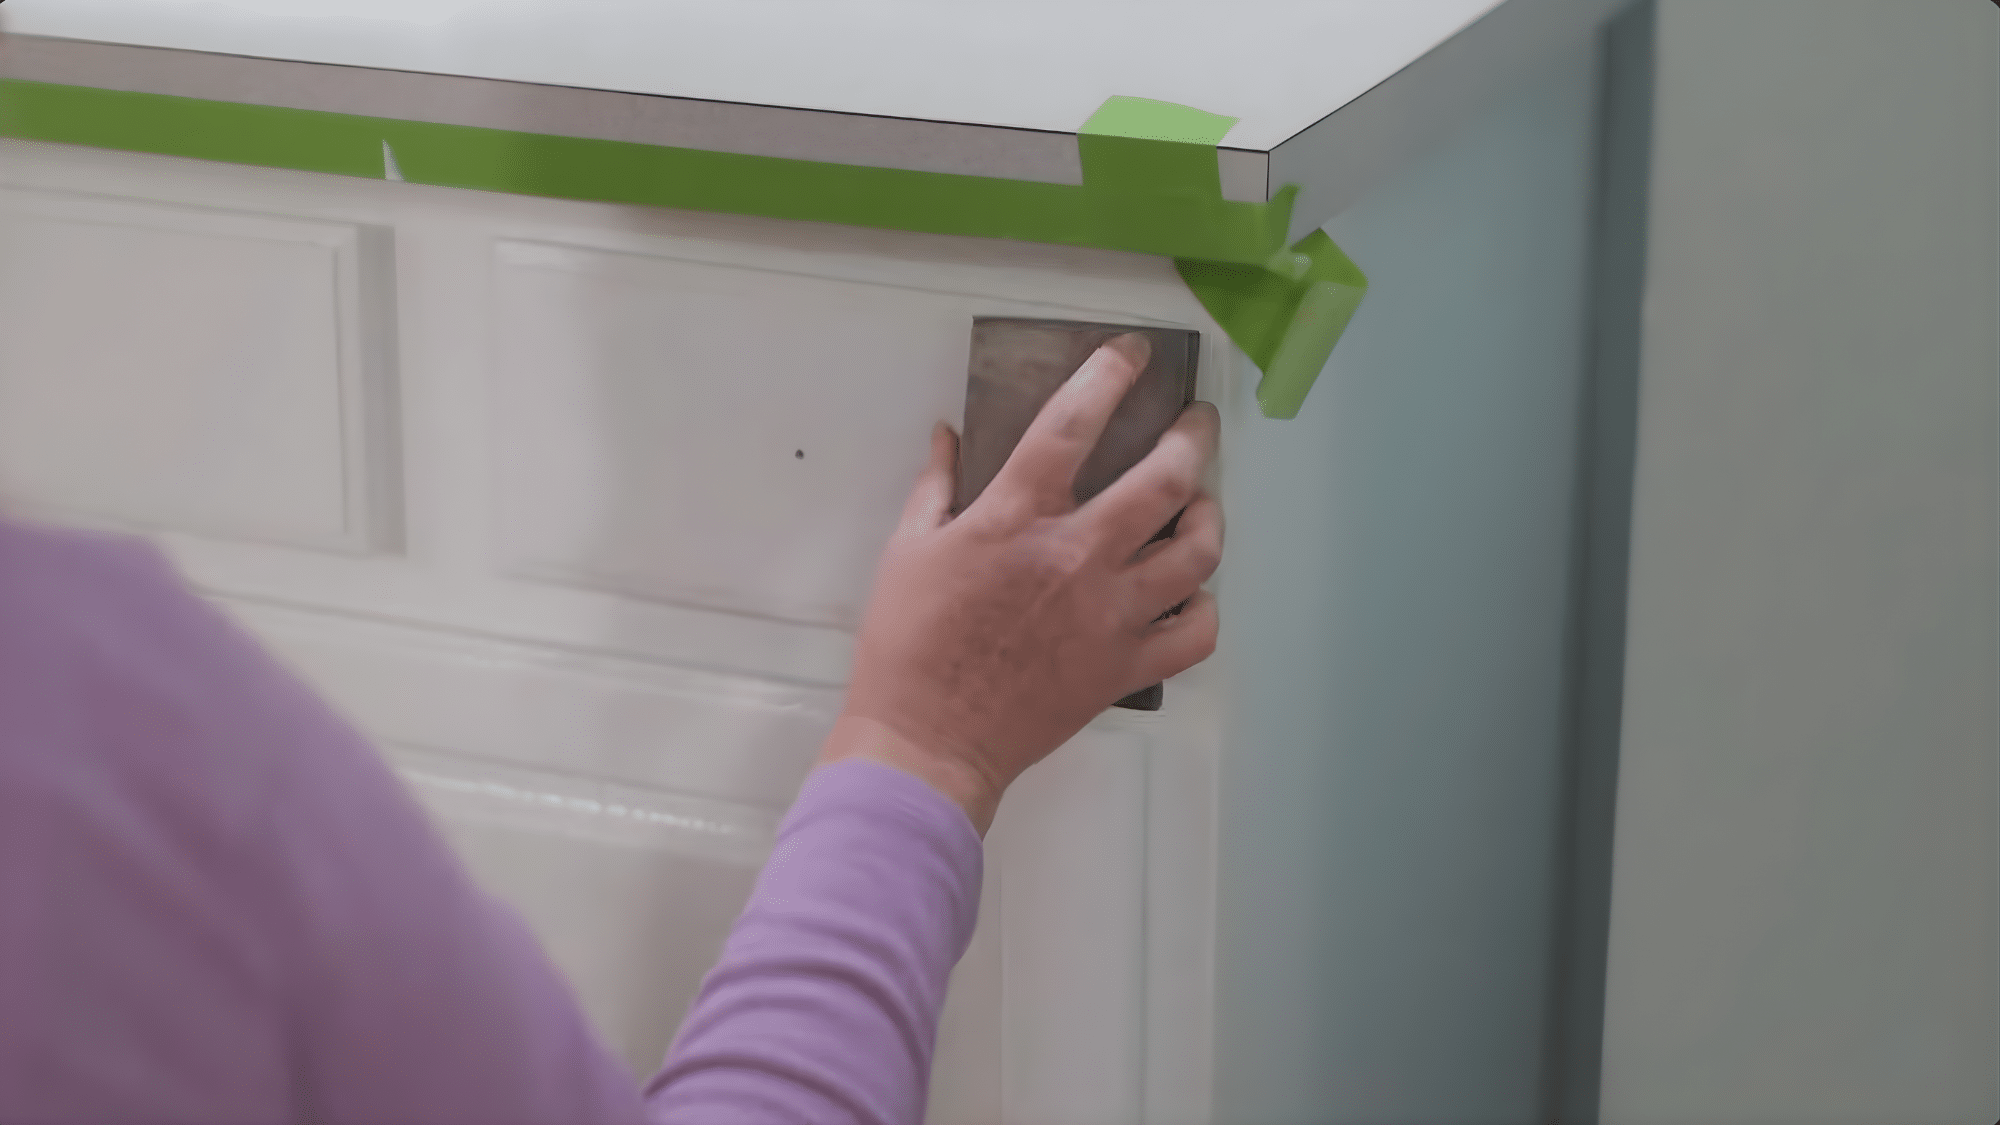
Once the primer dries, lightly sand the surface again using fine sandpaper. This step in painting bathroom cabinets smooths out brush strokes, bumps, or uneven spots.
It helps create a flat surface for the paint. After sanding, clean off dust again with a tack cloth.
This step may seem small, but it makes a big difference in how smooth and professional your cabinets look after painting.
Step 7: Apply two coats of paint
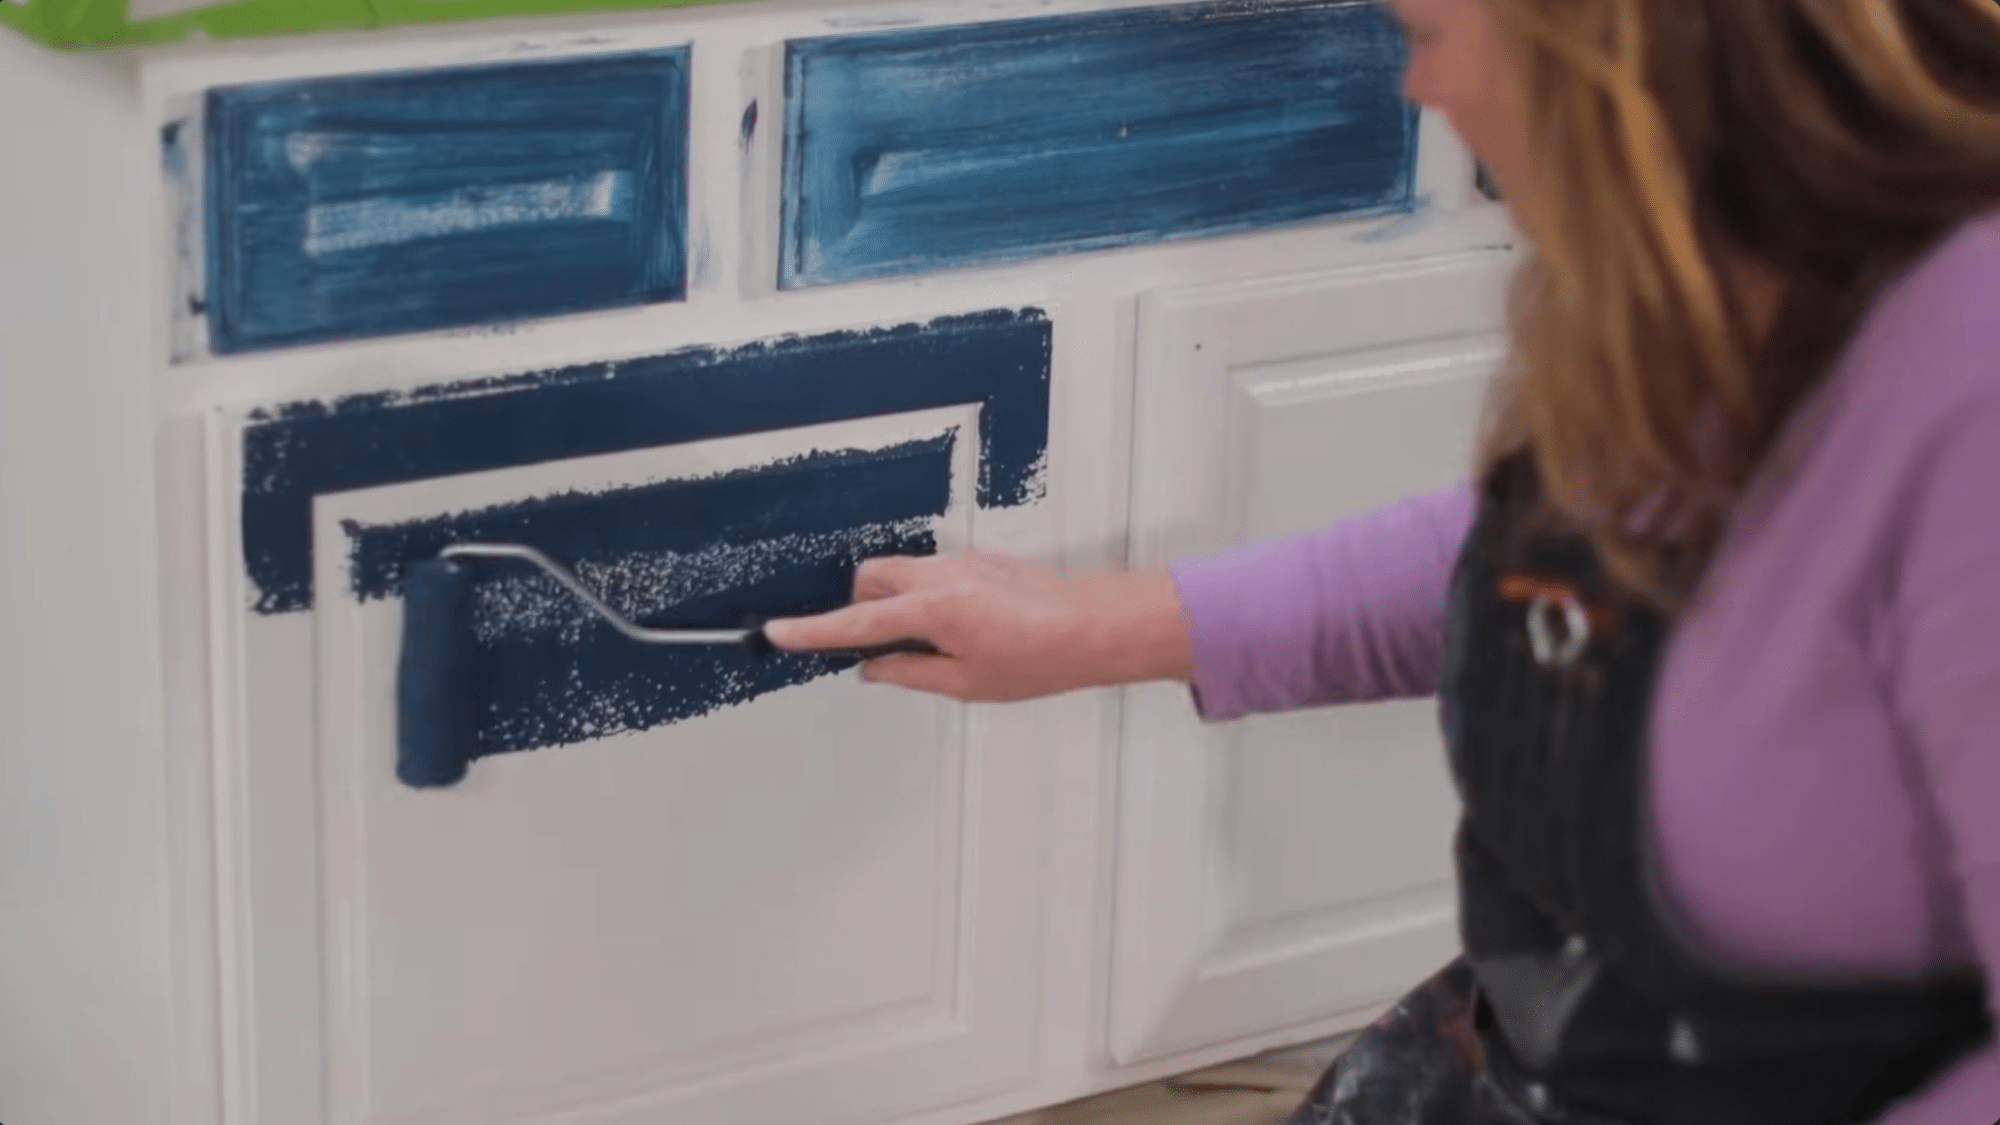
Start painting the bathroom cabinets with a brush for edges and detailed areas. Then use a roller for flat sections to keep the finish even.
Apply thin, smooth coats to avoid drips and streaks. Let the first coat dry fully before applying the second coat. Two coats give better color depth and coverage.
Take your time while painting to ensure a clean, even finish that enhances the look of your cabinets.
Step 8: Remove Tape and Let Cabinets Cure
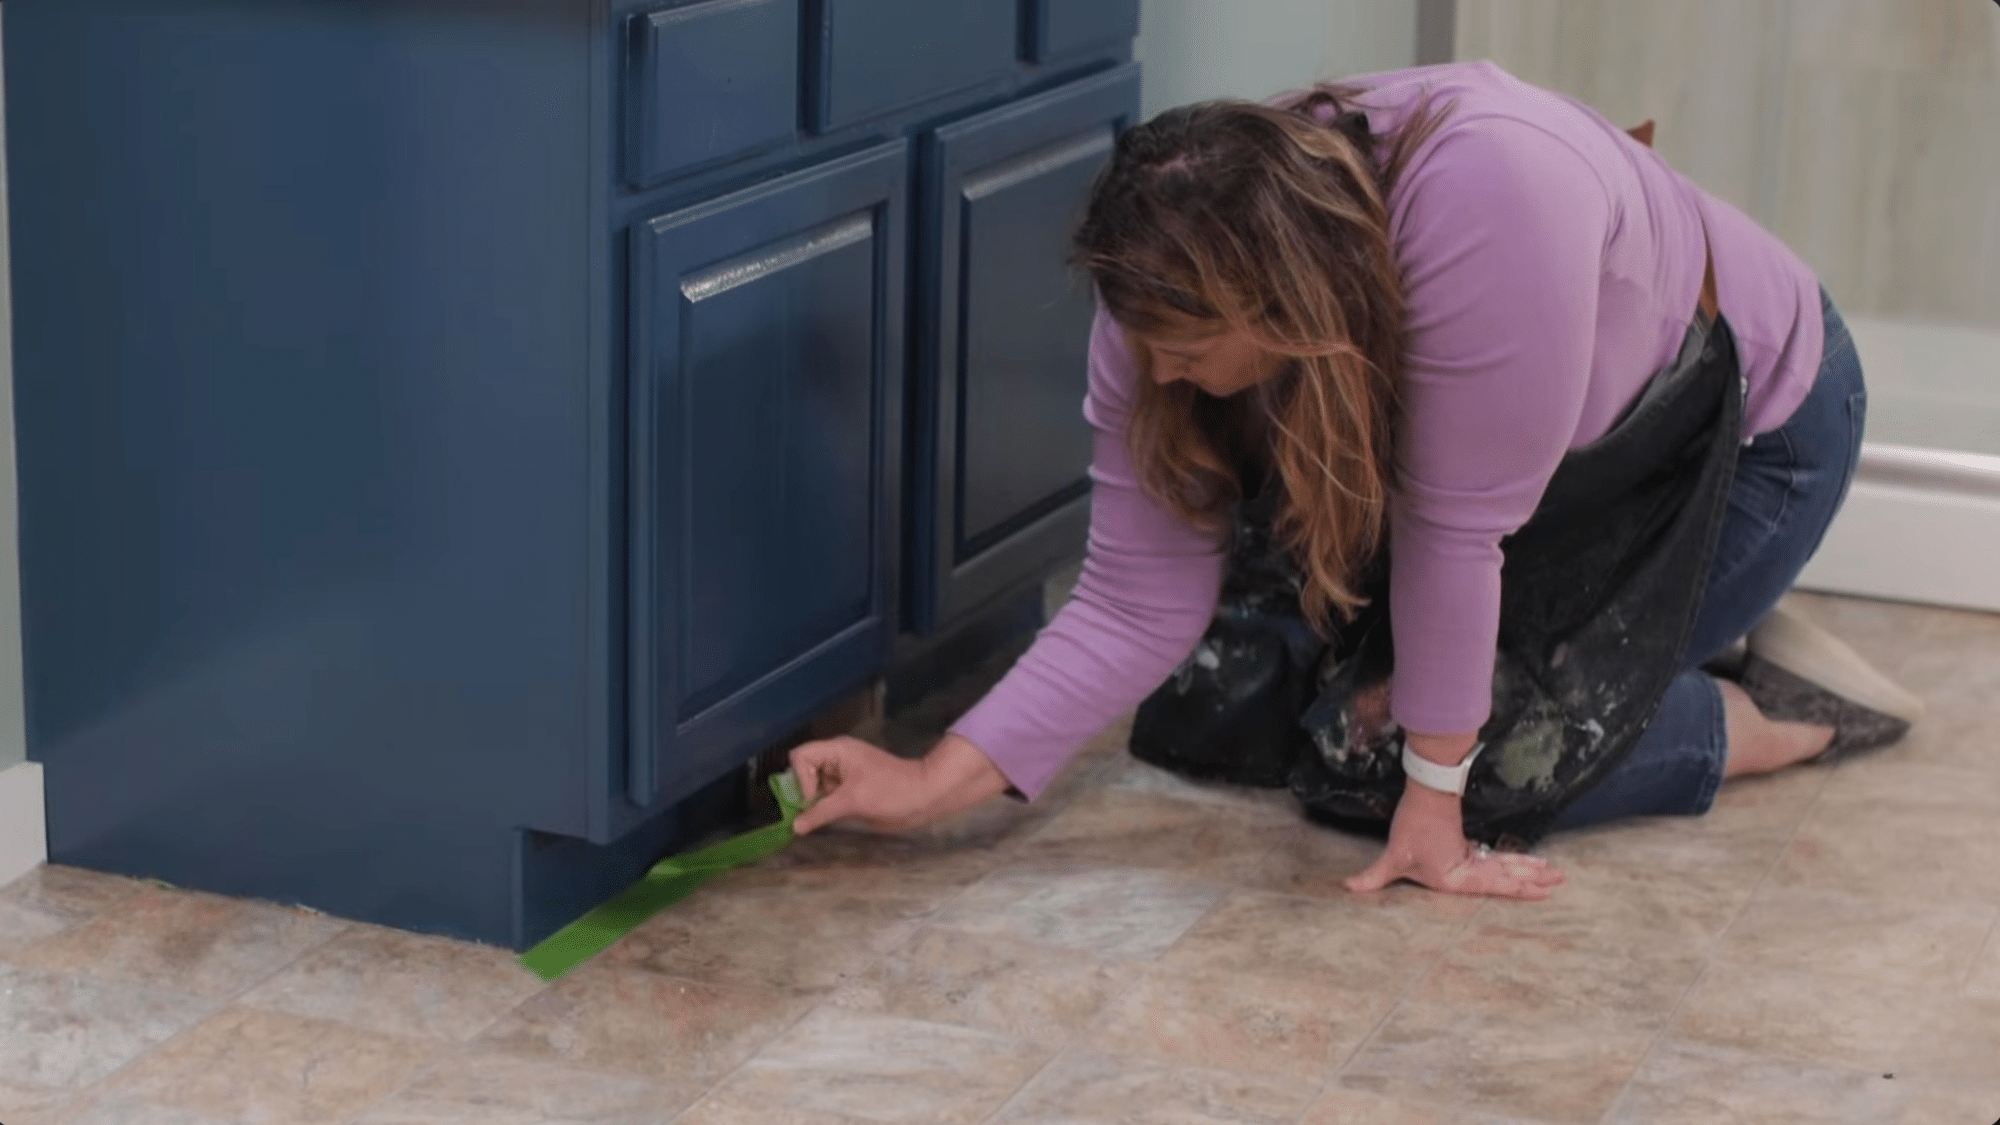
Carefully remove painter’s tape while the paint is still slightly dry to prevent peeling. After painting bathroom cabinets, allow enough time for curing.
While the surface may feel dry within hours, full curing can take up to seven days. Avoid using the cabinets heavily during this time.
Waiting for proper curing helps the paint harden fully, making your cabinets more durable and keeping the finish looking fresh for longer.
This tutorial is based on a helpful video by Ace Hardware . You can check out the original video on their YouTube channel here or watch it below.
What Reddit Users Share Painting Bathroom Cabinets?
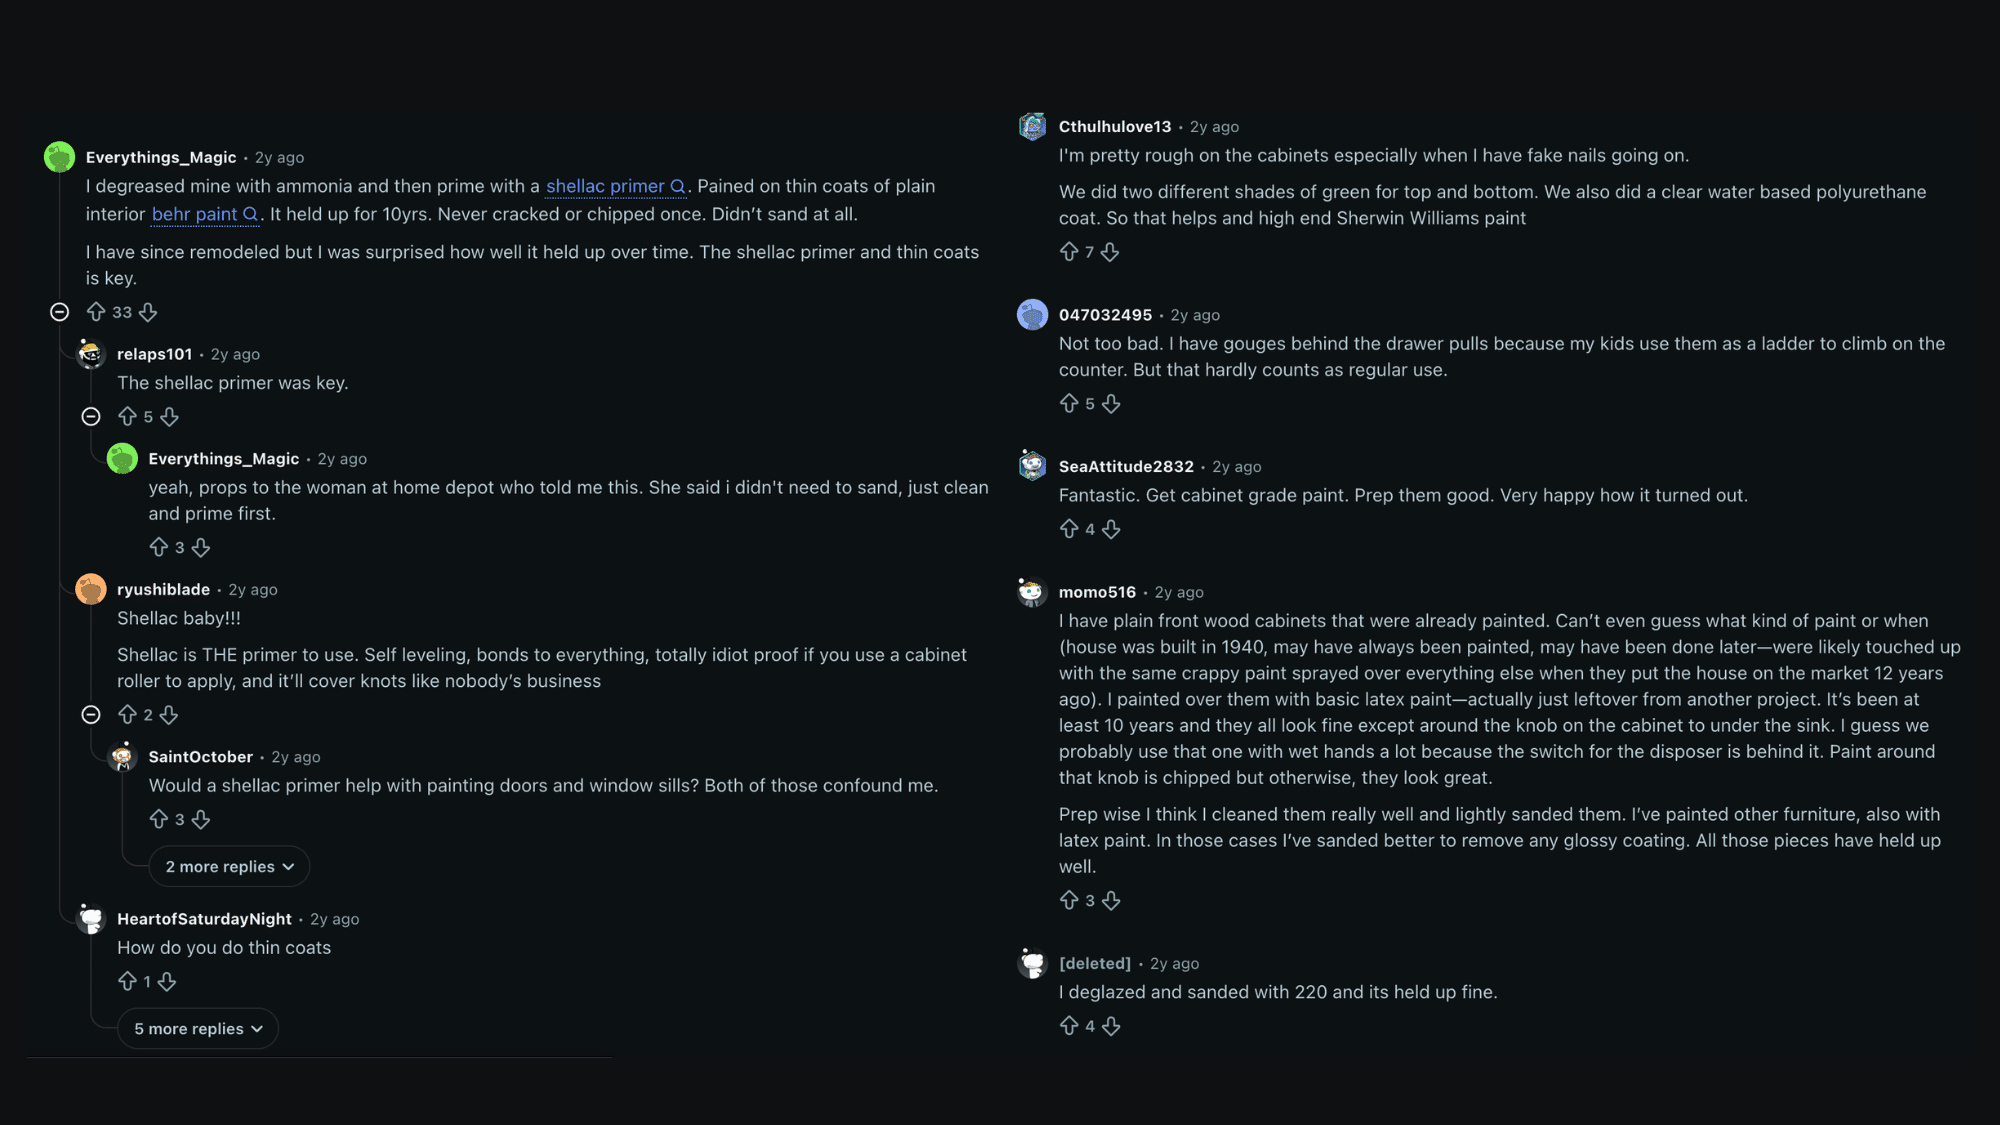
Reddit users say painting bathroom cabinets works well when you focus on prep and use the right materials. Most agree that thin coats and good primer make a big difference.
From shared experiences, many users highlight that cleaning and sanding are key before painting bathroom cabinets. Some prefer shellac-based primers because they stick well and block stains.
Others mention that even without heavy sanding, proper cleaning and priming can still give long-lasting results.
Many also suggest using cabinet-grade or high-quality paint for better durability, especially in humid bathrooms. A few users shared that their cabinets lasted years without chipping when they applied thin, even coats.
Another common tip is to finish with a protective top coat for added strength. Overall, Reddit users stress patience, prep work, and quality products as the main factors for success.
Tips to Maintain Your Painted Bathroom Cabinets
A little regular care can keep your cabinets looking smooth and fresh for years. These simple habits help protect the finish and reduce the need for touch-ups.
- Clean Gently: Use a soft cloth with mild soap and water to wipe surfaces. Avoid harsh cleaners, as they can damage the paint over time.
- Dry After Use: Always wipe away moisture after cleaning or splashes. Excess water can weaken the paint and cause it to peel.
- Handle with Care: Open and close doors gently to prevent chips and cracks. Rough use can quickly wear down the painted surface.
- Avoid Heavy Scrubbing: Do not use abrasive pads or brushes. They can scratch the finish and make cabinets look dull.
- Fix Small Chips Early: Touch up small scratches or chips as soon as you notice them. This keeps damage from spreading.
- Keep Ventilation Good: Use an exhaust fan to reduce humidity in the bathroom. Less moisture helps protect the paint.
- Limit Chemical Exposure: Avoid strong sprays like bleach or ammonia near cabinets. These can cause the paint finish to break down.
- Check Hardware Regularly: Tighten loose handles or hinges to prevent stress on the cabinet surface and paint.
Common Mistakes to Avoid When Painting Cabinets
Small mistakes can affect how your cabinets look and how long the paint lasts. Avoiding these issues will help you achieve a smoother, more durable finish.
1. Skipping Proper Cleaning
Many people rush into painting without cleaning the cabinets first. Dirt, grease, and moisture build up over time, especially in bathrooms.
If you skip this step, the paint will not stick well and may peel or bubble later. Always use a mild cleaner or degreaser and let the surface dry fully.
Taking a few extra minutes to clean properly can make a big difference in how smooth and long-lasting your final finish looks.
2. Not Sanding the Surface
Skipping sanding is another common mistake when painting cabinets. Even if the surface looks smooth, it often has a glossy finish that prevents paint from sticking.
Light sanding helps create a dull surface that improves paint adhesion. Without it, the paint may chip or wear off quickly. Use fine sandpaper and cover all areas evenly.
Proper sanding ensures your cabinets hold paint better and look more even once the job is complete.
3. Using the Wrong Paint Type
Choosing the wrong paint can lead to poor results. Regular wall paint is not strong enough for cabinets, especially in bathrooms with high moisture levels.
Cabinets need durable, moisture-resistant paint designed for trim or furniture. Using the right paint helps prevent peeling, stains, and fading over time.
It also gives a smoother and more polished look. Always check the label and pick a paint that is made for high-use surfaces like cabinets.
4. Applying Thick Paint Coats
Applying thick coats of paint might seem like a way to finish faster, but it often causes drips, streaks, and uneven drying. Thick layers take longer to dry and can leave a rough texture.
Instead, apply thin and even coats, allowing each layer to dry before adding another. This method provides a smoother, more professional finish.
Taking your time with multiple light coats leads to better coverage and a longer-lasting result.
5. Skipping Primer
Primer is often overlooked, but it plays a key role in painting cabinets. Without primer, paint may not stick well, especially on glossy or previously finished surfaces.
Primer also helps block stains and creates a smooth base for the paint. Skipping this step can lead to uneven color and faster wear.
Using a good primer improves durability and ensures your cabinets look clean and even after painting.
6. Not Allowing Proper Dry Time
Rushing through drying times can ruin your hard work. If you apply another coat too soon, the paint can smudge or peel.
Cabinets may feel dry to the touch, but they still need time to set properly. Always follow the recommended drying time between coats and before reassembling.
Giving enough time for drying and curing helps the paint harden fully, making your cabinets more durable and resistant to damage.
7. Removing Tape Too Late
Waiting too long to remove painter’s tape can cause the paint to peel along the edges. When the paint fully dries, it can stick to the tape and pull away when the tape is removed.
It’s best to remove the tape while the paint is still slightly soft.
Pull it off slowly at an angle for clean lines. This simple step helps keep edges sharp and prevents damage to your freshly painted cabinets.
8. Reattaching Hardware Too Soon
Putting hardware back too early is a common mistake. Even if the cabinets feel dry, the paint may not be fully cured.
Reattaching handles or hinges too soon can leave marks or cause dents. It’s best to wait several days before reinstalling hardware. This allows the paint to harden properly.
Being patient at this stage helps protect the finish and keeps your cabinets looking neat and well done.
At the End
Painting bathroom cabinets is one of those projects that can truly change how your space feels without a huge cost or long timeline.
If you take your time, follow the right steps, and avoid common mistakes, you can get results that look clean and last for years.
I hope this guide gives you the confidence to start your own project and do it the right way from the beginning. Even small efforts in prep and care can make a big difference in the final look.
Now I’d love to hear from you. Have you tried painting bathroom cabinets before, or are you planning to start soon? Share your experience, tips, or questions in the comments below. Your input can help others, too!
Frequently Asked Questions
Is Painting Bathroom Cabinets a Good Idea?
Painting bathroom cabinets is a fairly easy way to breathe new life into your space.
Is it Cheaper to Paint or Replace Cabinets?
Painting is almost always more affordable than replacing. Cabinet boxes are reused, demolition is avoided, and material costs stay lower while still achieving a fresh, modern look.
How Long Will Painted Cabinets Last?
On average, professionally painted cabinets last 8 to 15 years before needing a full repaint.