

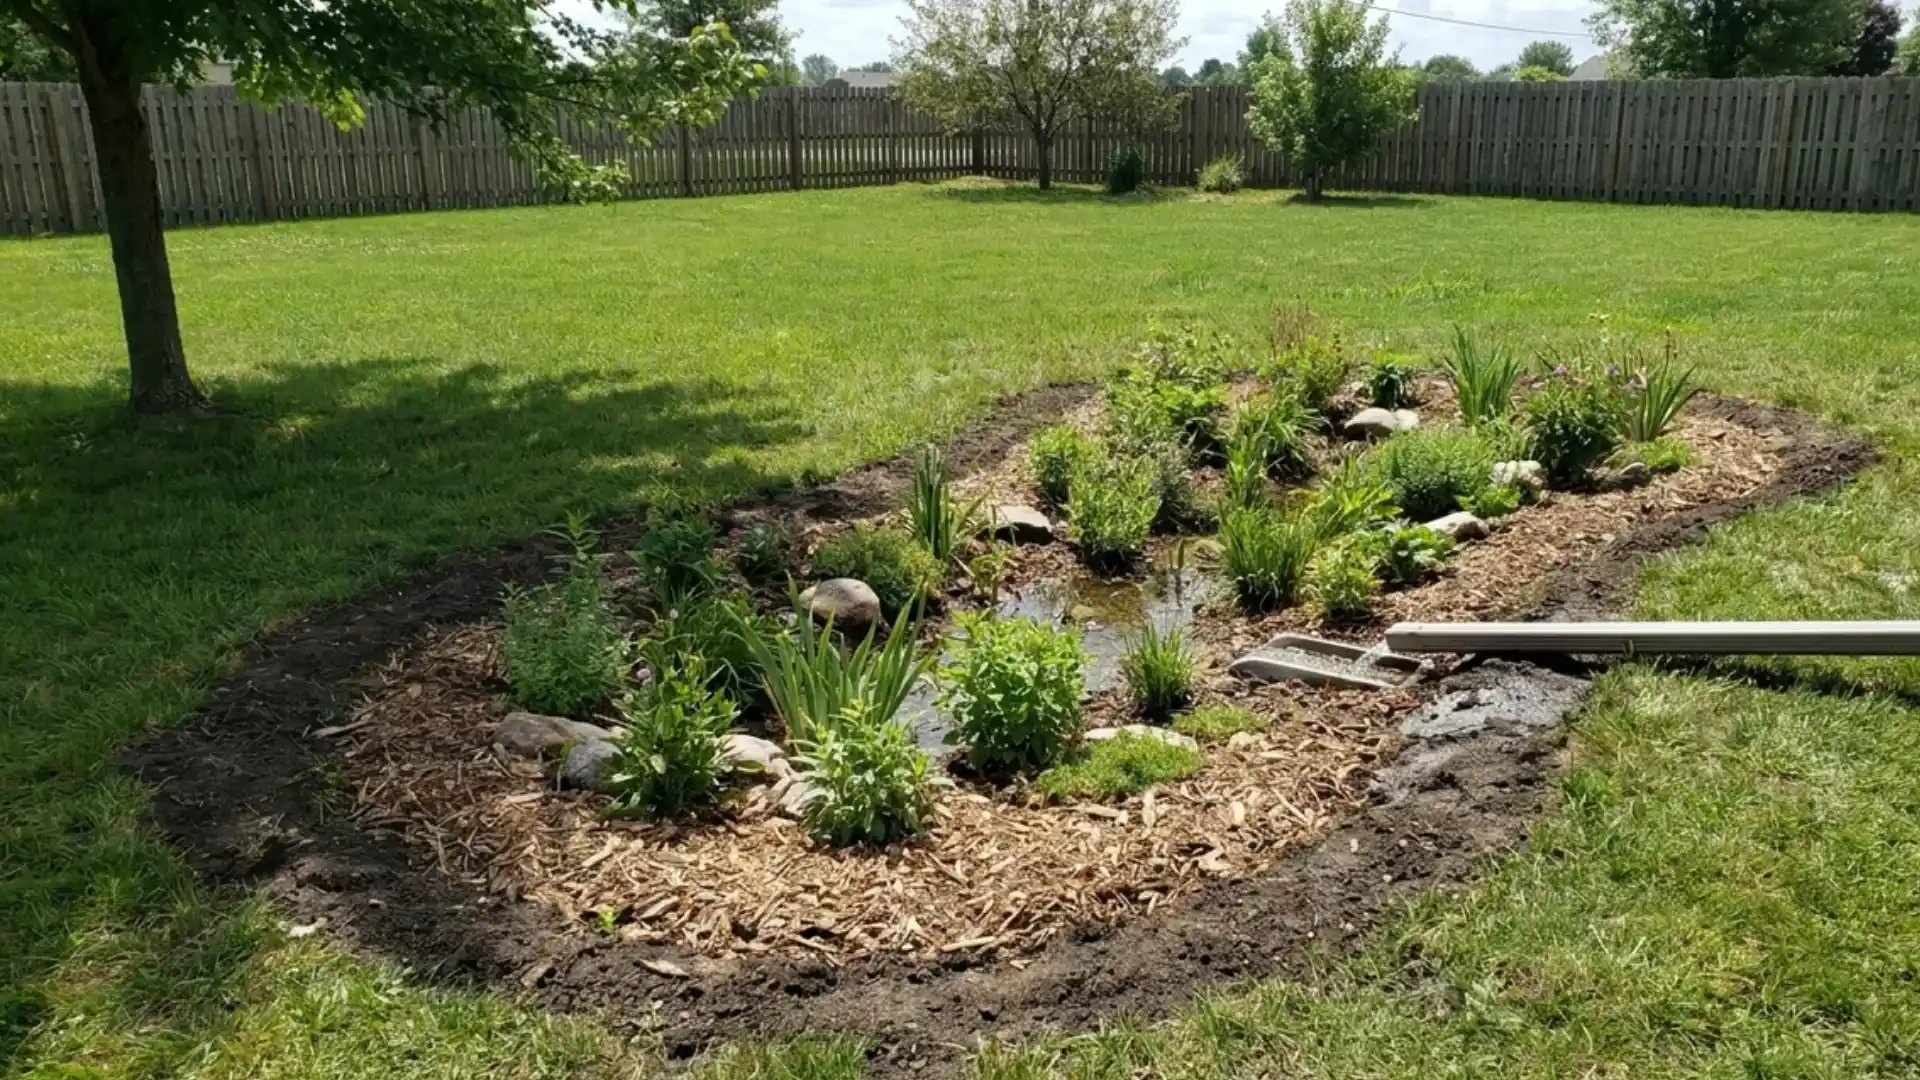
Rainwater collecting near a downspout can quickly turn a useful corner of your yard into mud. I know how frustrating that feels when every storm leaves the same mess behind.
A well-planned rain garden can solve the problem by slowing runoff and helping water soak into the soil. This Rain Garden Design Guide shows you how to choose a safe location, test drainage, calculate basin size, shape the inlet and overflow, and select plants for each moisture zone.
You will also learn which mistakes cause erosion, standing water, and plant loss. By the end, you will have a practical plan for creating a rain garden that works with your landscape.
What Rain Garden Design Really Involves
Rain garden design is the planning process that determines whether the finished basin manages runoff or becomes another drainage problem.
A rain garden is a shallow planted depression that temporarily collects water from roofs, driveways, patios, walkways, and sloped lawns. Unlike a pond, it should not hold water permanently. The stored runoff gradually filters through the soil, where plant roots help slow and absorb it.
Design involves selecting a safe location, testing the soil, measuring the contributing drainage area, and calculating the garden’s width and depth. It also includes creating a stable inlet, providing an overflow route, and placing plants according to the moisture each part of the basin receives.
These choices cannot be made separately. A garden in slow-draining soil may need to be wider and shallower, while plants placed in the wrong moisture zone may rot or dry out within one growing season.
How a Rain Garden Manages Runoff
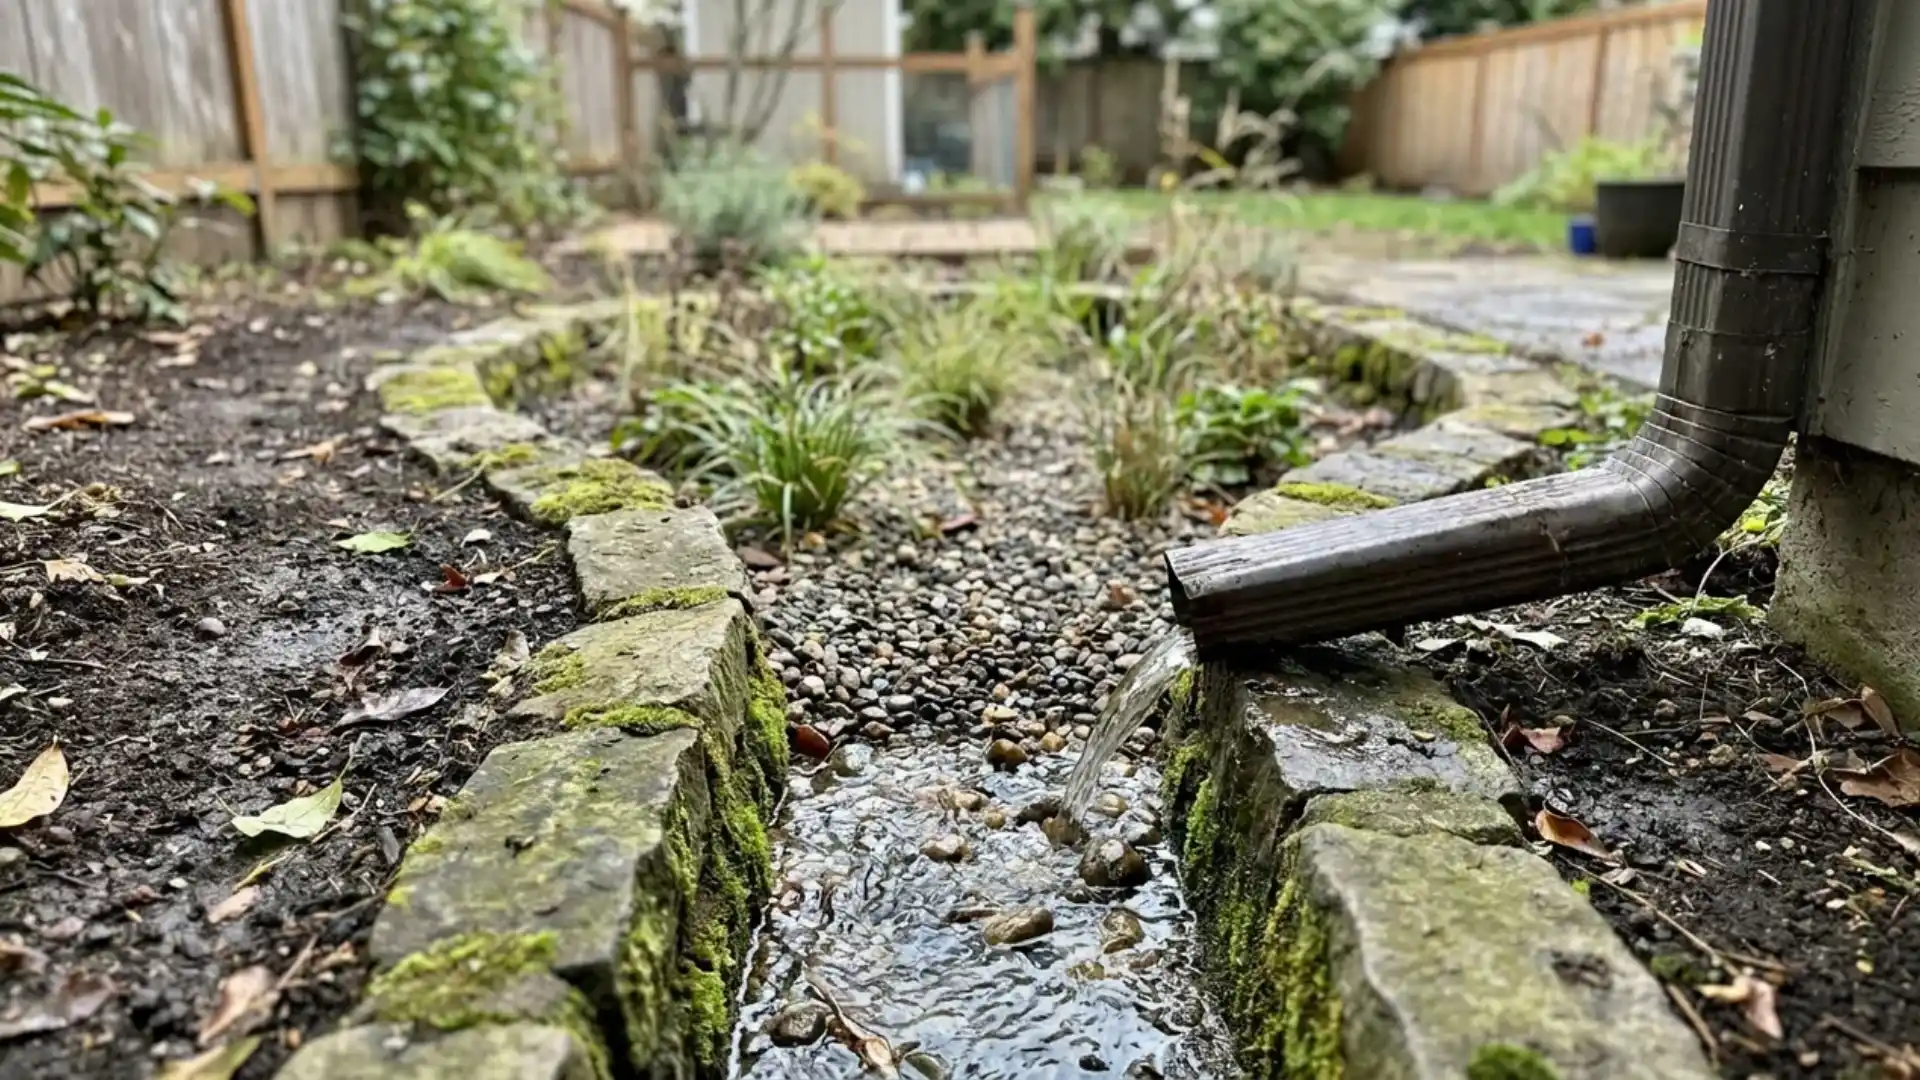
A properly designed rain garden controls water through four connected stages.
1. Runoff Enters Through a Defined Inlet
Water often reaches the garden after extending a downspout run, though a shallow swale, solid pipe, driveway opening, or stone-lined channel works just as well.
The inlet should slow the water before it reaches exposed soil. Decorative stones, gravel, or erosion-control rock can spread the flow and prevent fast-moving runoff from cutting channels through the basin.
2. The Basin Temporarily Holds Water
The shallow depression stores runoff during and immediately after rainfall. The level bottom allows water to spread across the garden rather than collect in one deep corner.
The garden should hold only as much water as the soil can absorb within approximately 24 to 48 hours.
3. Soil and Plant Roots Absorb Water
Loose, well-prepared soil allows water to move downward. Deep-rooted grasses, sedges, flowers, and shrubs create additional pathways for infiltration.
These roots also stabilize the soil and reduce erosion.
4. Excess Water Leaves Through an Overflow
Heavy storms may deliver more runoff than the basin can hold. A slightly lowered section of the rim allows excess water to leave in a controlled direction.
Overflow should move toward a safe lawn area, approved drainage system, or street outlet rather than a foundation, septic area, sidewalk, or neighboring property.
Benefits of a Well-Planned Rain Garden
A rain garden can provide several practical and environmental benefits when it is correctly sized and positioned.
It can:
- Reduce puddling and standing water
- Slow runoff from roofs and paved surfaces
- Limit erosion across sloped yards
- Filter sediment carried by stormwater
- Reduce pressure on storm drains
- Support bees, butterflies, and birds
- Add color and structure to the landscape
- Help water soak into the ground naturally
- Replace difficult-to-maintain wet lawn areas
A rain garden cannot solve every drainage problem. Persistent foundation moisture, sewer backups, high groundwater, severe flooding, and unstable slopes may require professional assessment.
Where to Put Your Rain Garden
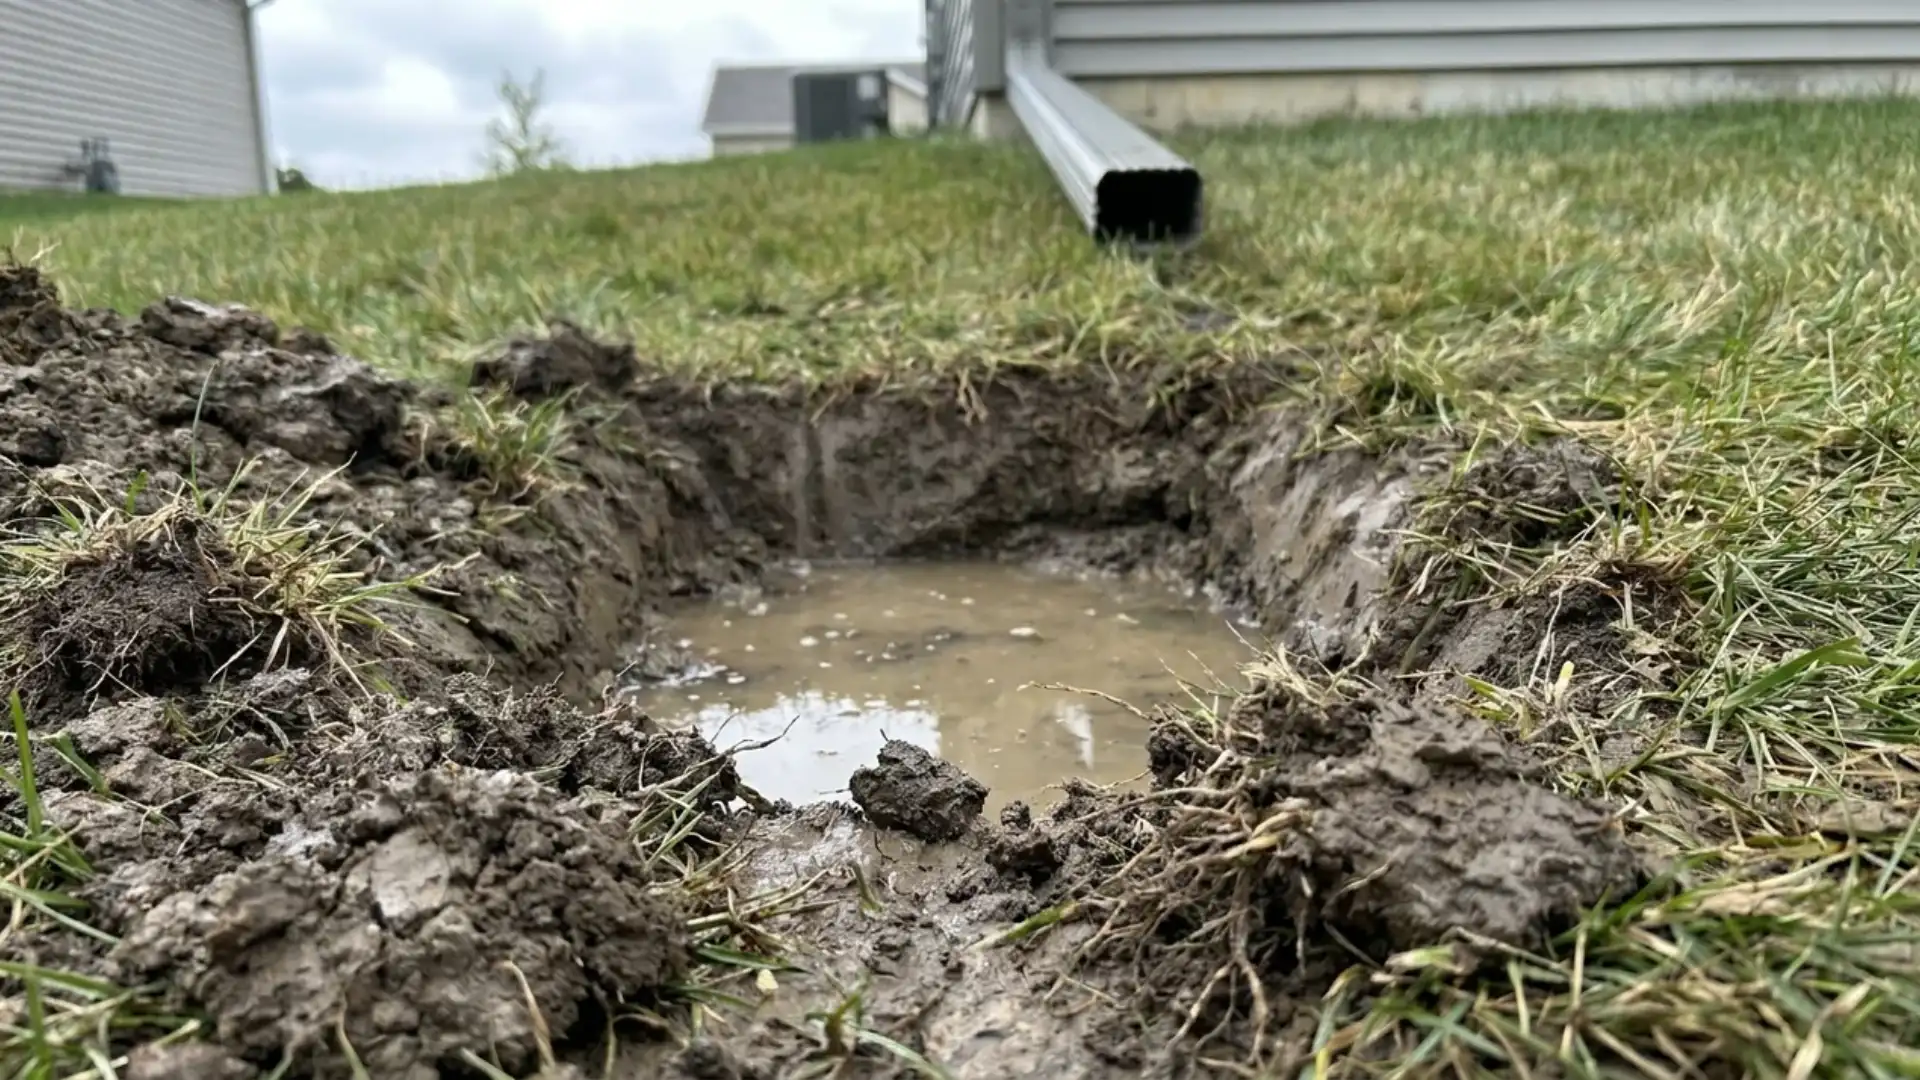
The right location gives your rain garden the best chance to drain properly and receive runoff naturally. Before choosing a spot, check its distance from the house, position below the water source, sunlight, and soil drainage.
Choosing the Right Location
Place the rain garden at least 10 feet from your home’s foundation to keep pooled water away from basements and crawl spaces.
Choose a spot downhill from a downspout or other runoff source, so water flows naturally into the basin. Good sunlight helps, but reliable drainage matters more, and keeping gutters clear upstream keeps that runoff arriving the way you planned for.
Running a Percolation Test
Dig a hole about 1 foot deep and wide, fill it with water, and check how long it takes to drain. A suitable site should empty within 24 to 48 hours.
Water that remains longer signals slow drainage, but you can still use the area by adjusting the garden’s size and depth.
Once the site meets these basic conditions, you can size and shape the basin around its actual drainage rate.
Test Soil Drainage Before Building
A percolation test helps determine whether the soil can absorb the collected water safely.
How to Run a Percolation Test
- Dig a hole approximately 6 to 12 inches deep and about 12 inches wide.
- Fill the hole with water.
- Allow the surrounding soil to become saturated.
- Refill the hole.
- Measure how quickly the water level falls.
- Continue checking until the hole drains.
A suitable site should generally empty within 24 to 48 hours. Test more than one location when the planned garden is large because drainage conditions can vary across the yard.
Understand Your Soil Type
| Soil type | Typical drainage behavior | Design consideration |
|---|---|---|
| Sandy soil | Drains quickly | Add organic matter when better moisture retention is needed |
| Loamy soil | Balances drainage and moisture | Often requires limited amendment |
| Clay soil | Drains slowly | Use a wider, shallower basin and carefully prepared soil |
| Compacted soil | Restricts water movement | Loosen deeply or replace unsuitable material |
| Fill soil | May drain unpredictably | Test several locations before construction |
Slow drainage does not always make the location unusable. The basin may need to be wider, shallower, or connected to a professionally installed perforated drain pipe, sometimes called an underdrain.
How to Size Your Rain Garden
Rain garden size depends on the runoff area and how quickly the soil absorbs water. Start with the hard surface feeding the basin, then adjust the final dimensions using your percolation test.
- Measure the roof, driveway, patio, or other hard surface that drains toward the garden.
- Multiply that total area by 10% to calculate the smallest recommended garden footprint.
- Multiply the same area by 20% to calculate the larger end of the sizing range.
- Choose a size within that range based on available yard space, expected runoff, and local rainfall.
- Move closer to the upper estimate when the soil drains slowly, or the area receives frequent heavy runoff.
- Use the percolation result to decide whether the basin should be wider and shallower or smaller and deeper.
These steps turn a general percentage into a practical garden size based on your yard’s conditions.
Planting by Moisture Zone
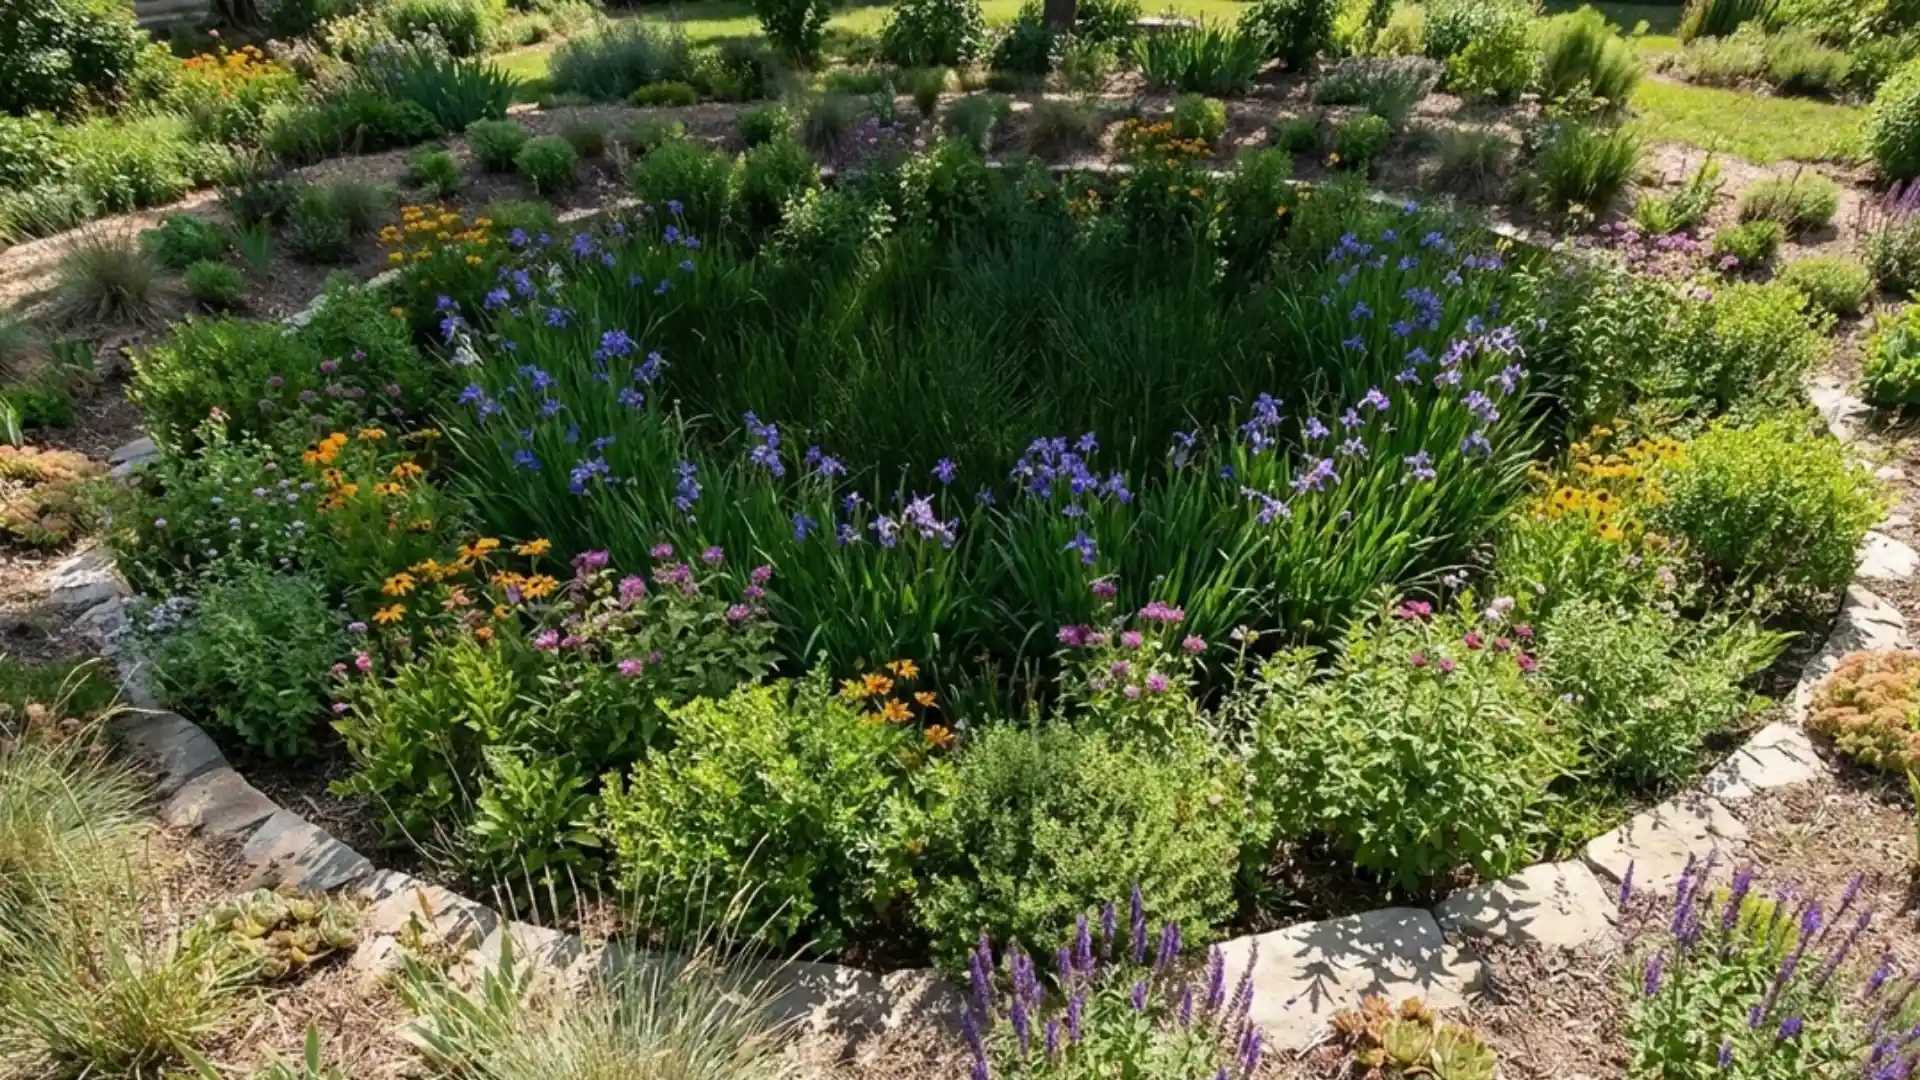
Each part of the basin holds moisture differently, so plant placement should follow the center, middle slope, and outer edge zones.
Lowest Zone (Center)
The center stays wet longest and may hold shallow water after heavy rain. Choose plants that tolerate saturated soil and occasional wet roots without developing rot.
Sedges, rushes, and moisture-tolerant iris usually perform well here because their root systems can handle repeated cycles of flooding and drainage.
Middle Slope Zone
The middle slope receives regular moisture but drains sooner than the center. Plants placed here should tolerate both damp soil after storms and moderate dryness between rainfall.
Many perennials, ornamental grasses, and medium shrubs suit this area, making it the zone with the widest range of planting choices.
Highest Edge Zone
The outer edge drains first and receives the least moisture from collected runoff. Deep-rooted, drought-tolerant plants work best once established.
Avoid placing moisture-loving varieties here, since the soil may dry too quickly between storms, causing weak growth, wilting, or dead patches around the garden’s border.
Match every plant to your soil type, sunlight, and hardiness zone so each moisture area remains healthy throughout the growing season.
Improve the Soil for Better Drainage
The soil should hold enough moisture for plants while allowing stored runoff to infiltrate.
Begin by loosening compacted soil beneath the basin. Remove construction debris, large stones, and unsuitable fill.
Depending on the existing soil, the planting mixture may include:
- Suitable topsoil
- Loam
- Limited compost
- Coarse mineral material where locally recommended
- Engineered rain garden soil for larger projects
Avoid adding excessive compost because it can release nutrients into runoff.
Do not place a simple gravel layer beneath clay soil without a professionally designed drainage system. Water may collect above the gravel instead of moving downward, creating a perched saturated zone.
Step-by-Step Rain Garden Installation
Homeowners can manage roof runoff by disconnecting downspouts, creating a shallow basin, directing water safely, and choosing plants suited to different moisture levels.
Tools: Landscape marking paint, Shovel and spade, Garden rake, Wheelbarrow, Tape measure, Long board and level, Hand trowel, Work gloves, Utility knife or pipe cutter
Materials: Solid plastic drainage pipe, Splash block, Gravel or river stone, Large decorative rocks or boulders, Suitable topsoil or rain garden soil, Native moisture-tolerant plants, Drought-tolerant edge plants, Shredded hardwood mulch, Stakes and string
Choosing suitable materials helps control erosion, guide runoff, support healthy plants, and keep the inlet and overflow working properly.
- A roof measuring 1,700 to 1,800 square feet can produce about 40,000 gallons of stormwater annually, especially in areas with heavy seasonal rainfall.
- Older downspouts may send roof runoff into combined sewer pipes, increasing overflow risks when heavy rain enters the system with household wastewater.
- Disconnect the downspout using an elbow, extension, and splash block. Relocate or re-pitch it when the existing outlet releases water near the foundation.
- Use a garden hose to mark a soft, curved shape, then trace the outline with landscape paint before removing soil.
- Excavate the center about 12 inches deep, keep the basin floor level, and shape gradual sides that resist erosion and collapse.
- Add gravel through the water channel and place larger stones near the inlet to slow runoff, protect soil, and create a natural appearance.
- Connect a pitched solid pipe to the downspout so roof water flows directly into the rain garden without pooling beside the house.
- Place moisture-tolerant plants, such as iris and rushes, in the lowest area. Use plants that prefer drier soil along the upper edges.
- Apply gravel or mulch around the plants to limit weeds and protect exposed soil, while keeping the inlet and water path clear.
- Test the finished garden during rainfall or with a hose to confirm water enters evenly, drains safely, and does not escape toward the foundation.
A finished rain garden controls stormwater, limits erosion, supports suitable plants, and replaces difficult lawn areas with an attractive, functional landscape feature.
Once the design is complete, install the garden in a sequence that protects the soil and maintains accurate dimensions.
Common Design Mistakes That Cause Failure
Most rain garden failures begin with planning or construction mistakes rather than a lack of maintenance.
| Mistake | Possible result | Correction |
|---|---|---|
| Building too close to the foundation | Increased moisture near the house | Relocate the basin and follow local setbacks |
| Skipping the drainage test | Water remains too long | Test first and adjust the site, size, or soil |
| Undersizing the basin | Frequent overflow | Recalculate the contributing drainage area |
| Making the garden too deep | Prolonged ponding | Create a wider, shallower basin |
| Forgetting the overflow route | Berm damage and uncontrolled runoff | Add a protected, lowered overflow point |
| Leaving the inlet unlined | Soil erosion | Install stone or another erosion-control surface |
| Digging steep walls | Collapsed edges | Shape gradual side slopes |
| Compacting the basin | Reduced infiltration | Loosen the soil and limit foot traffic |
| Mismatching plants to zones | Rot, wilting, or plant loss | Replant according to moisture conditions |
| Blocking the inlet with mulch | Water bypasses the basin | Keep the entry point open |
| Sending water toward a neighbor | Property damage or disputes | Redirect overflow to an approved location |
Correcting these problems during planning is easier and less expensive than rebuilding the garden after installation.
Maintain the Rain Garden After Installation
Most maintenance occurs during the first two growing seasons while plants establish their root systems.
- Water New Plants: Rainfall may not provide enough moisture during establishment. Water new plants as needed, especially during hot or dry periods. The goal is to encourage strong roots without keeping the basin continuously saturated.
- Remove Weeds Early: Inspect the garden frequently during the first year. Remove weeds before they flower or develop deep roots. Dense planting and mulch usually reduce weed pressure as the garden matures.
- Replenish Mulch: Replace displaced or decomposed mulch when necessary. Maintain an even layer without burying stems or blocking drainage paths.
- Inspect After Heavy Rain: Check the garden after major storms for: Eroded soil, Washed-out mulch, Sediment buildup, Damaged plants, A blocked inlet, Berm leaks, and standing water lasting longer than 48 hours
- Divide and Replace Plants: As plants mature, divide crowded clumps, trim damaged growth, and replace species that do not perform well in their assigned zone. Keep the inlet and overflow visible and accessible.
When to Hire a Drainage Professional
A drainage professional should assess the site when runoff collects near the foundation, the yard has a steep slope, or water remains in a percolation test hole for more than 48 hours.
Expert help is also useful when the rain garden will receive water from a large roof, driveway, or parking area. High groundwater, shallow bedrock, septic systems, wells, retaining walls, and property-boundary drainage can make the design more complex.
A professional can calculate storage capacity, confirm safe setbacks, determine whether an underdrain is needed, and check local permit requirements. Repeated flooding is another warning sign that a rain garden alone may not solve the problem.
In these situations, professional guidance helps prevent foundation damage, erosion, overflow, and costly installation mistakes while identifying the safest drainage solution for the property.
Conclusion
A reliable rain garden starts with careful planning, not just digging a low spot and adding plants. I recommend testing the soil first, then using the results to guide the location, basin size, depth, and shape.
The Rain Garden Design Guide also shows why a stable inlet, level floor, protected overflow, and moisture-based planting zones must work together. These choices help you control runoff, reduce erosion, prevent prolonged standing water, and support healthier plants.
Once the garden matches your yard, maintenance becomes much easier. Check it after heavy storms, clear blocked flow paths, replace damaged plants, and refresh mulch when needed. Try these steps, then share your results or questions in the comments.
Frequently Asked Questions
How deep should a rain garden be?
Most rain gardens are excavated 6 to 12 inches deep at the center, with the outer edges sloping gradually back up to ground level. The exact depth should account for the site’s percolation rate; slower-draining soil calls for a shallower, wider basin rather than a deep one.
How long does it take a rain garden to drain?
A properly designed rain garden should drain completely within 24 to 48 hours after a storm. This is confirmed during site selection with a percolation test: dig a 1-foot hole, fill it with water, and time how long it takes to empty before committing to that location.
What size should a rain garden be?
A rain garden’s footprint should be roughly 10% to 20% of the impervious surface area draining into it, such as the section of roof connected to a given downspout. For example, a 500-square-foot roof section would need a garden of roughly 50 to 100 square feet.
Can I put a rain garden anywhere in my yard?
No, it needs to sit at least 10 feet from the home’s foundation, in a spot downhill from a runoff source like a downspout, and in an area that passes a percolation test. A spot that fails the drainage test can sometimes still work with an adjusted, shallower design.