
DIY closet ideas help turn basic storage spaces into organized systems that match how clothing and daily items are actually used. Small changes often unlock more usable space than expected.
Closets behave differently based on size, layout, and what gets stored inside. Understanding rods, shelves, and zones makes planning more practical and less guesswork-based.
Simple upgrades like better shelving, double rods, and smarter door use improve how functional a closet feels. Most solutions come from using space that is usually overlooked.
Before You Start: Plan Your DIY Closet
Ten minutes of planning saves you a weekend of do-overs. Before you buy a single board, sort out two things: your space and your budget.
Know What You Own Before You Measure
Before the tape measure comes out, do a quick inventory of what actually lives in your closet.
Count your long-hang items, dresses, coats, and jumpsuits separately from your short-hang items like shirts, folded pants, and jackets.
That split determines how your rod zones are divided, which in turn sets your shelf heights. Get this backward, and you’ll build a closet that fits the dimensions but not the clothes.
Measure and Map the Space
Grab a tape measure and write down three numbers: width, depth, and height. Those measurements decide what actually fits.
- Standard reach-in closets run about 24 inches deep.
- Walk-ins typically run 60 to 72 inches.
Depth matters because it controls whether double-hang rods, drawers, and full shelving are even viable in your space.
Mark your shelf and rod layout right on the wall with painter’s tape before buying anything. Set your rod heights based on clothing length, not gut feel.
Long-hanging items need 68 to 72 inches of clear vertical space below the shelf.
Short double-hang works with a top rod at around 80 inches and a lower rod at 40 inches, leaving room underneath for shoes or a small shelf.
You’ll spot problems instantly, like a drawer that won’t clear the door or a shelf too deep to reach.
Pick Your Materials and Budget
Your material sets both the look and the cost. Each option has a clear sweet spot.
- Plywood or MDF: Sturdy and custom-looking, great for DIY closet shelves. Around $30 to $50 a sheet.
- Wire shelving: Cheap and renter-friendly, but tricky for small or heeled shoes.
- Melamine: Pre-finished and wipes clean, perfect if you’d rather skip painting.
Choosing plywood, MDF, wire, or melamine depends on budget, durability, and style needs, so match your material to how the closet will actually be used.
Choose Your Build Approach First
- Scratch-build uses plywood or MDF cut to size, cheapest at scale, but needs saw skills, measuring accuracy, and time; best for wide closets over 8 feet.
- Modular systems like IKEA PAX or ClosetMaid cost more per foot but install quickly with a drill and level, ideal for renters who want no cutting.
- Hybrid builds combine modular bases with custom shelving or trim, giving a built-in look with flexibility, and work best for users with basic tool experience.
Match the material to your goal and your budget, and the rest of the build gets easy. Now let’s get to the ideas.
Best DIY Ideas for Your Closets
A better closet is usually about layout, not size. These DIY ideas help you use wasted space more efficiently and make everyday storage easier to manage.
Small and Reach-In Closets
The standard reach-in closet, one rod and one shelf, wastes more space than it uses. These eight ideas fix that fast.
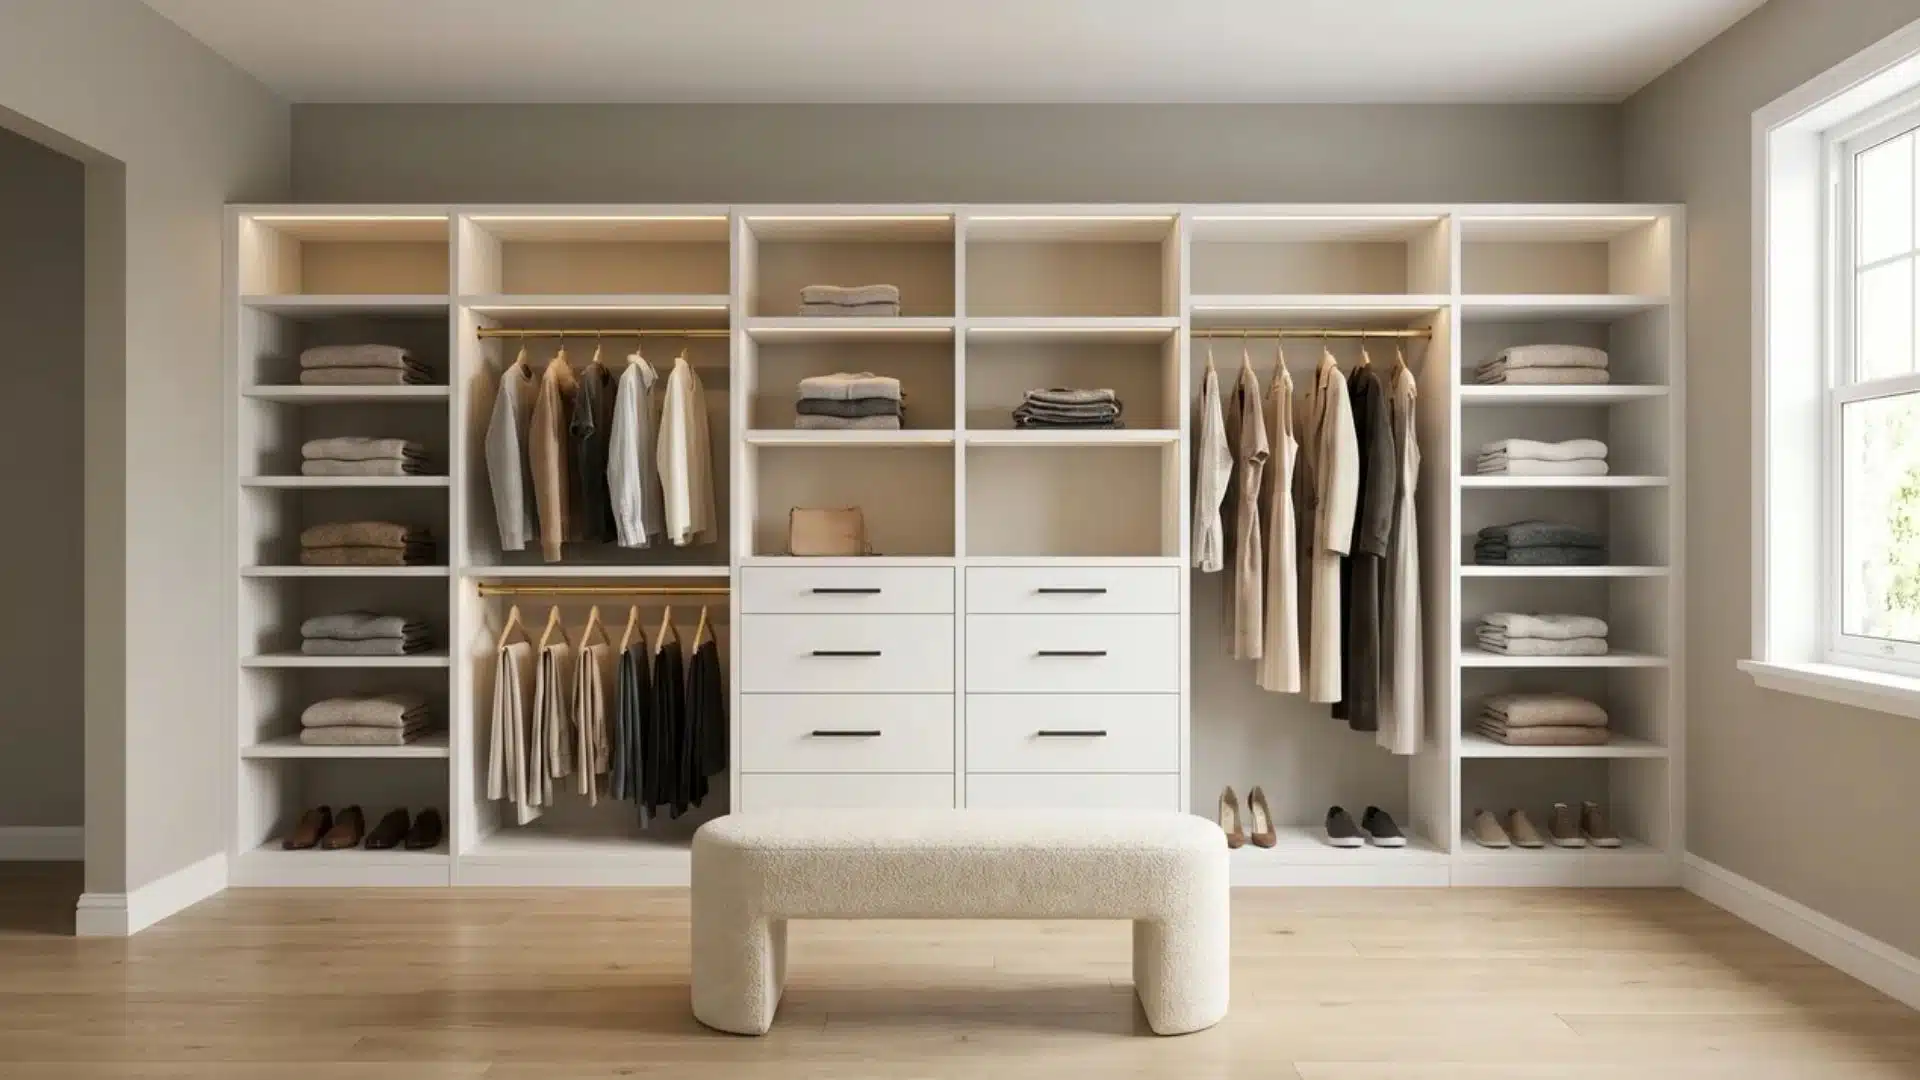
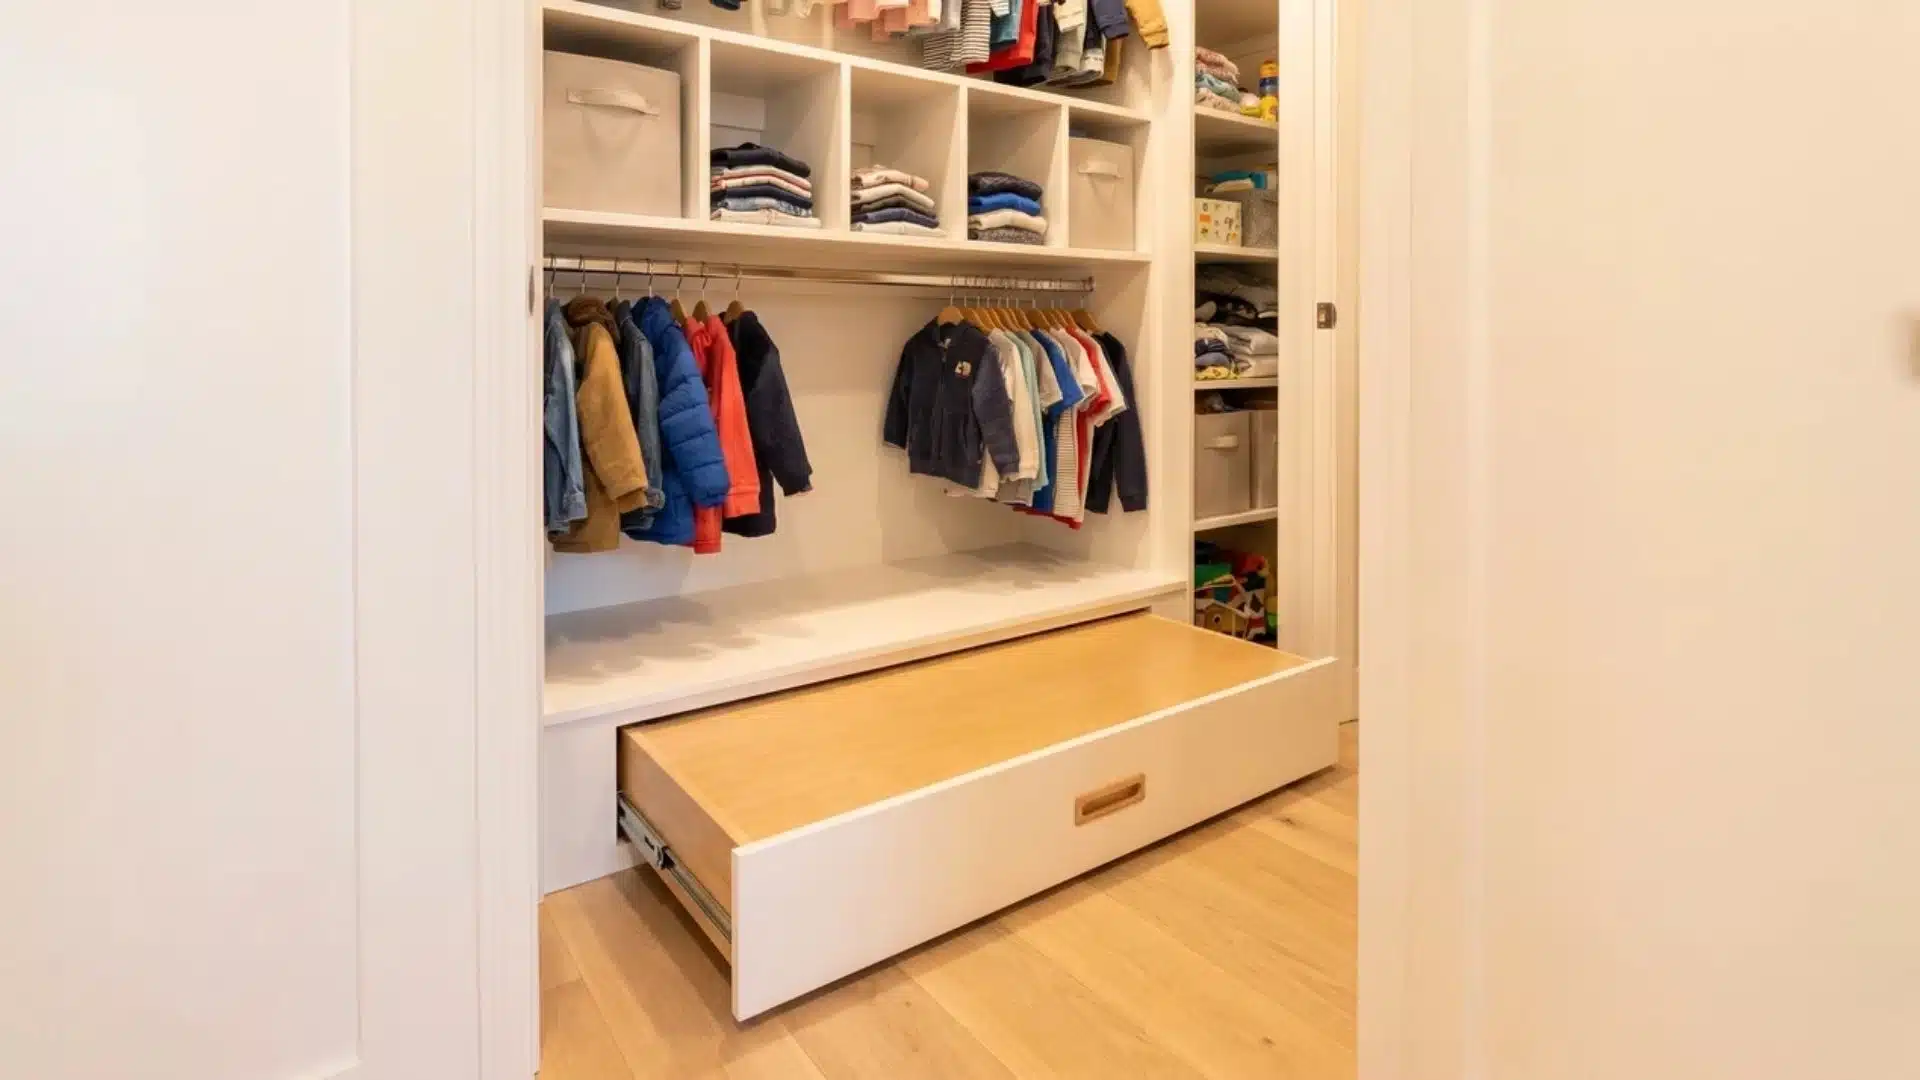
1. Build a Built-In Drawer Stack
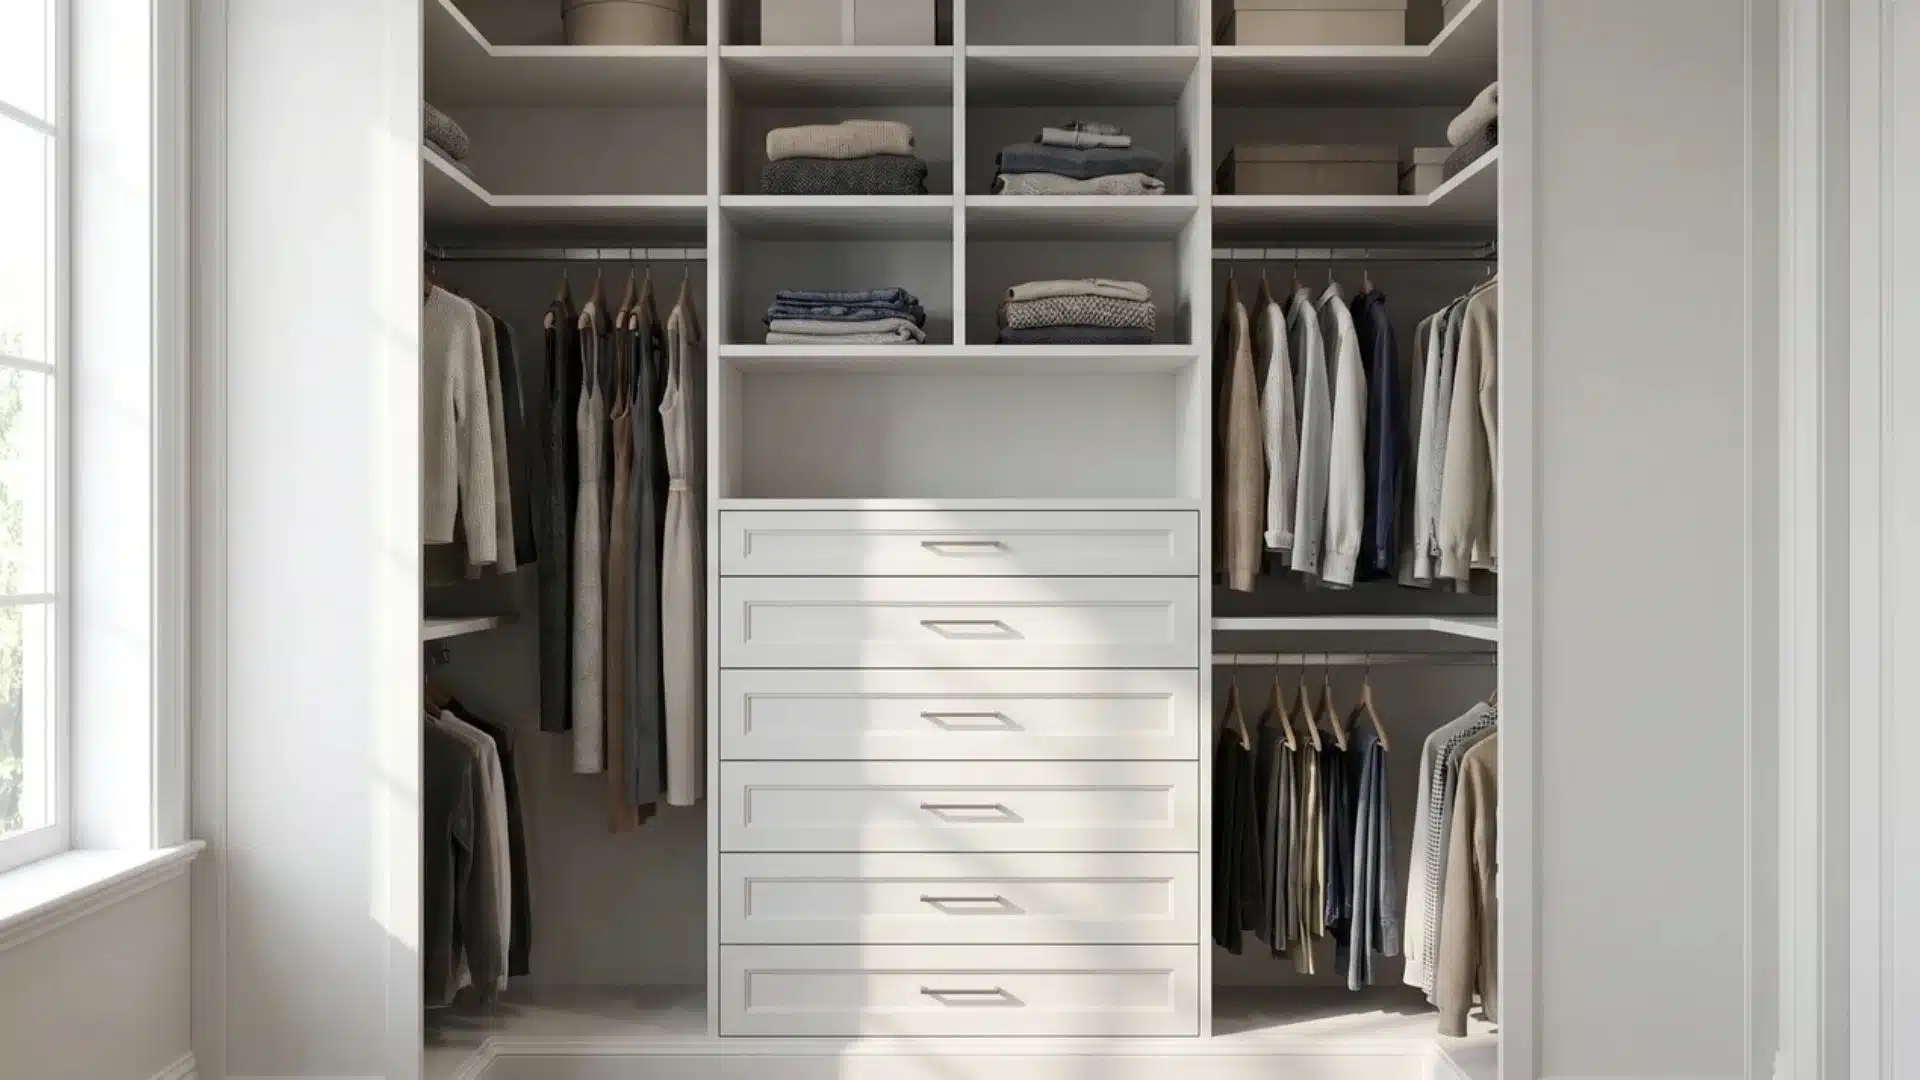
Folded items piled on a single shelf slide and topple every time you pull one out. A stack of built-in drawers gives each layer its own pull, so nothing gets disturbed.
Size the drawer boxes to your closet depth, usually 12 to 14 inches, and leave a finger gap above each one so it glides freely. Use them for jeans, knits, and underlayers, and keep the most-used drawer at waist height to avoid bending.
2. Add a Double Hanging Rod
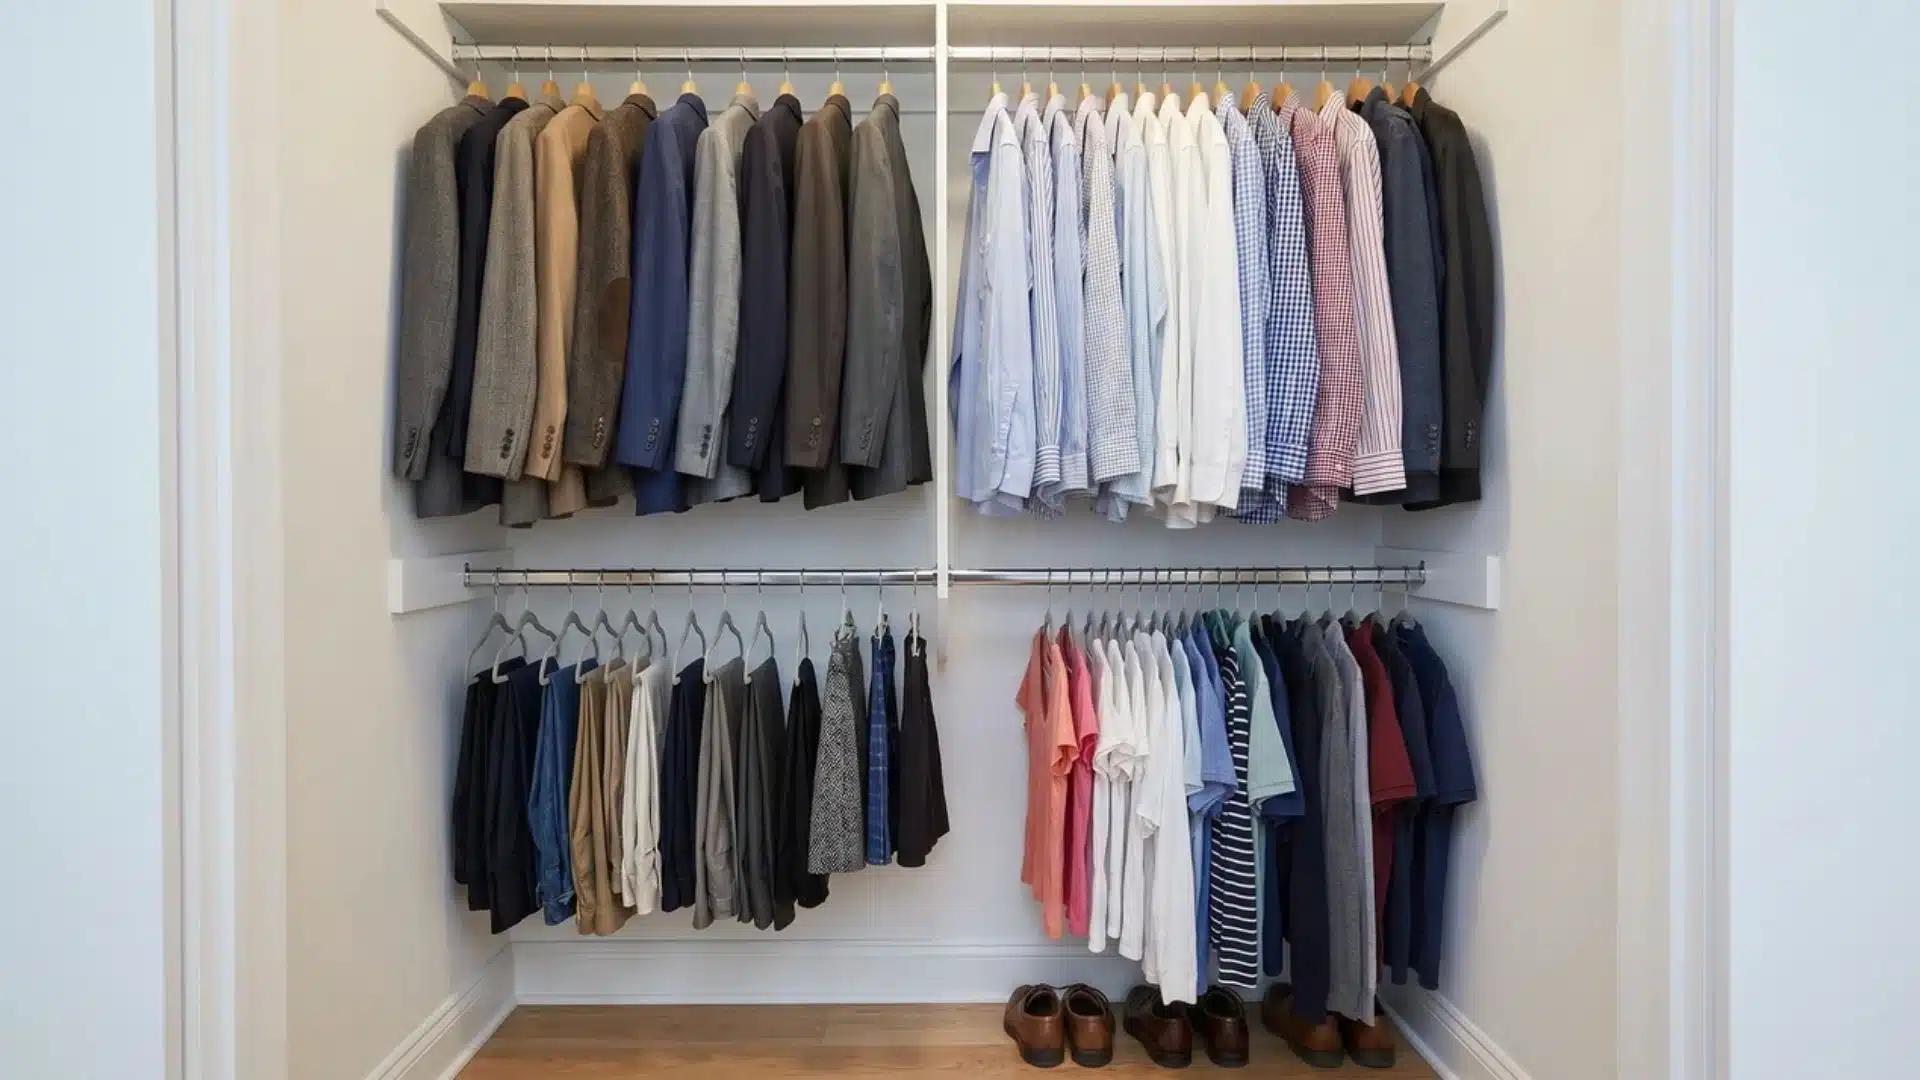
One rod leaves a huge gap of dead air underneath. A second rod below it instantly doubles your hanging space.
Rod heights are based on clothing length needs. Short items need about 40 inches of space, while long items require 68–72 inches, so spacing is planned accordingly.
3. Add a Pull-Out Wire Basket Tower

Loose items on open shelves get pushed to the back and forgotten. A vertical tower of pull-out wire baskets brings everything forward with a single tug.
Size the tower to your closet depth and stack three to five baskets on runners so each slides independently. Use them for gym clothes, socks, or accessories, and keep the airflow of wire baskets in mind for items that need to breathe.
4. Attach a Fold-Down Wall Desk
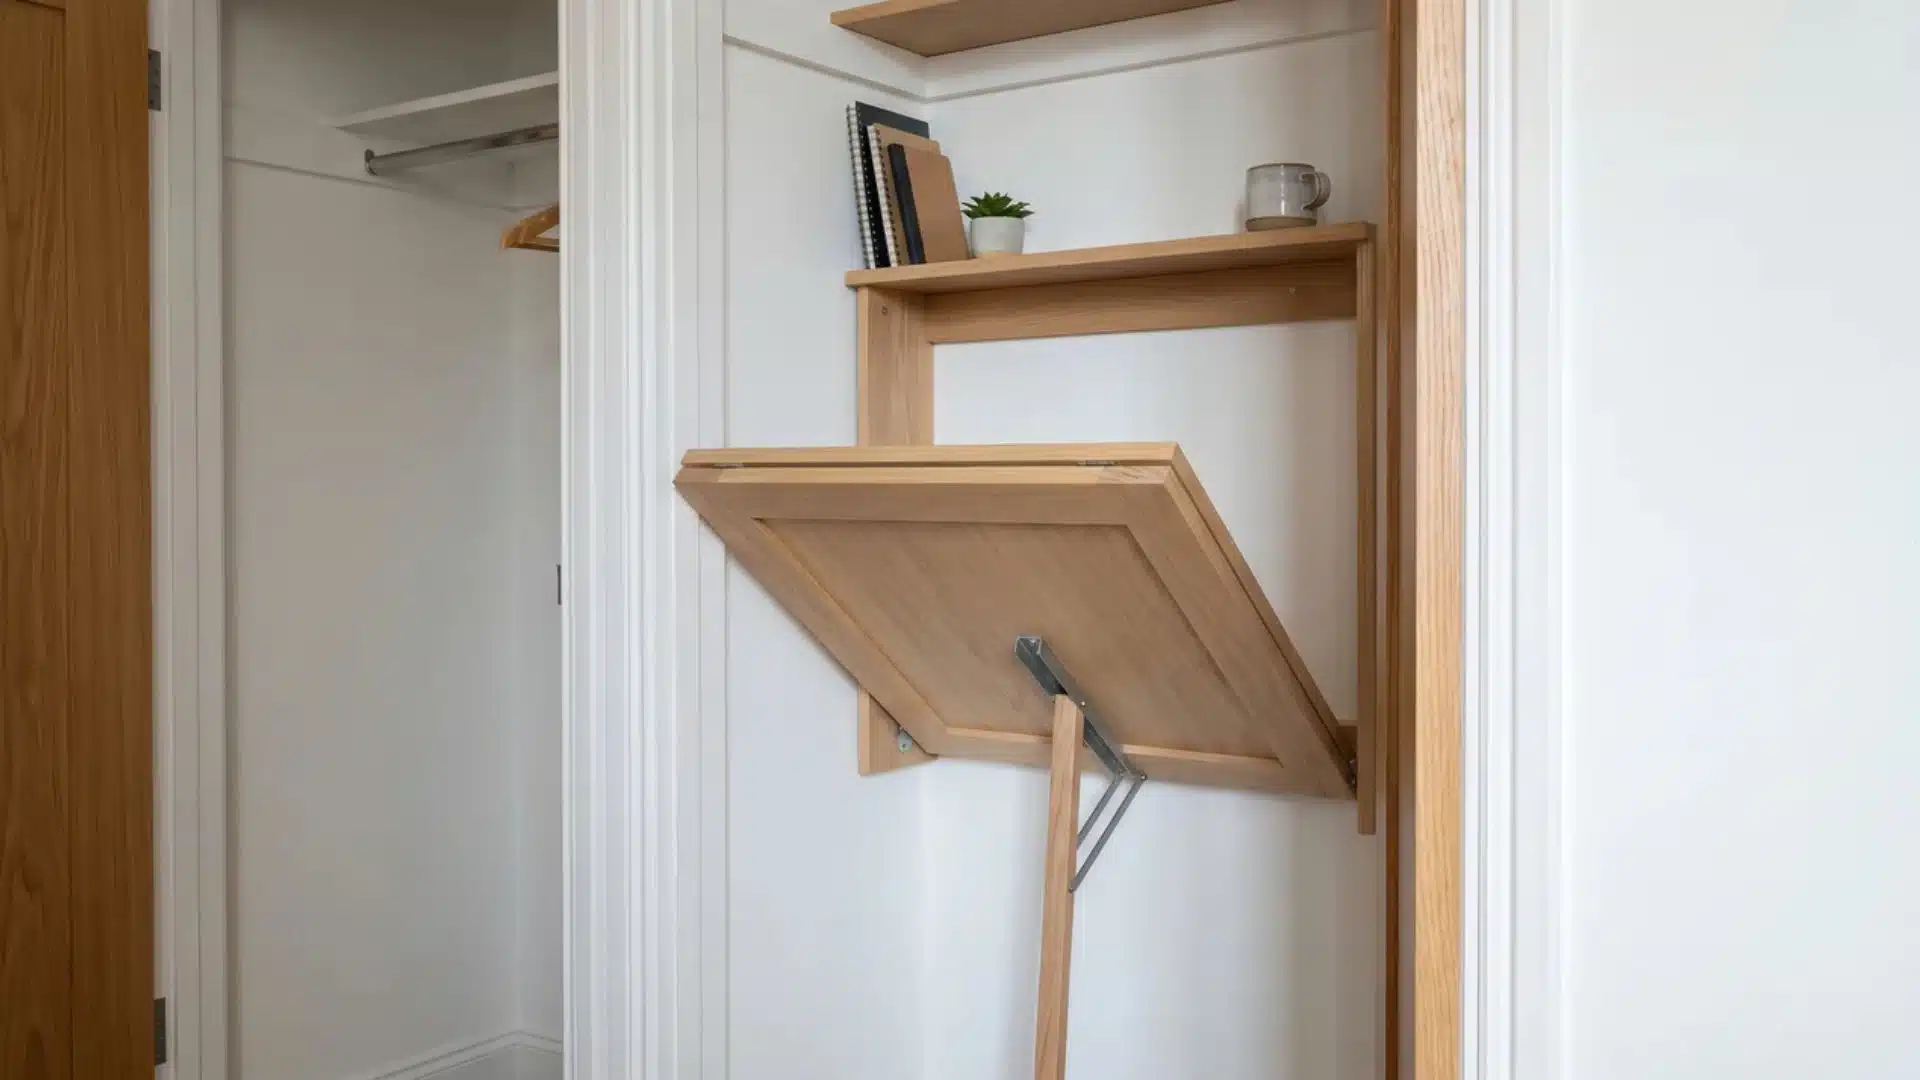
A reach-in closet can do more than hold clothes when part of it sits underused or half empty. A fold-down wall desk creates a work surface that disappears when you are done, which is useful in bedrooms and small apartments.
Mount the desk panel securely to wall studs and keep the depth shallow enough that it folds up without crowding the room. Use the space above it for a shelf or corkboard, and leave legroom clear below.
5. Use the Back of the Door
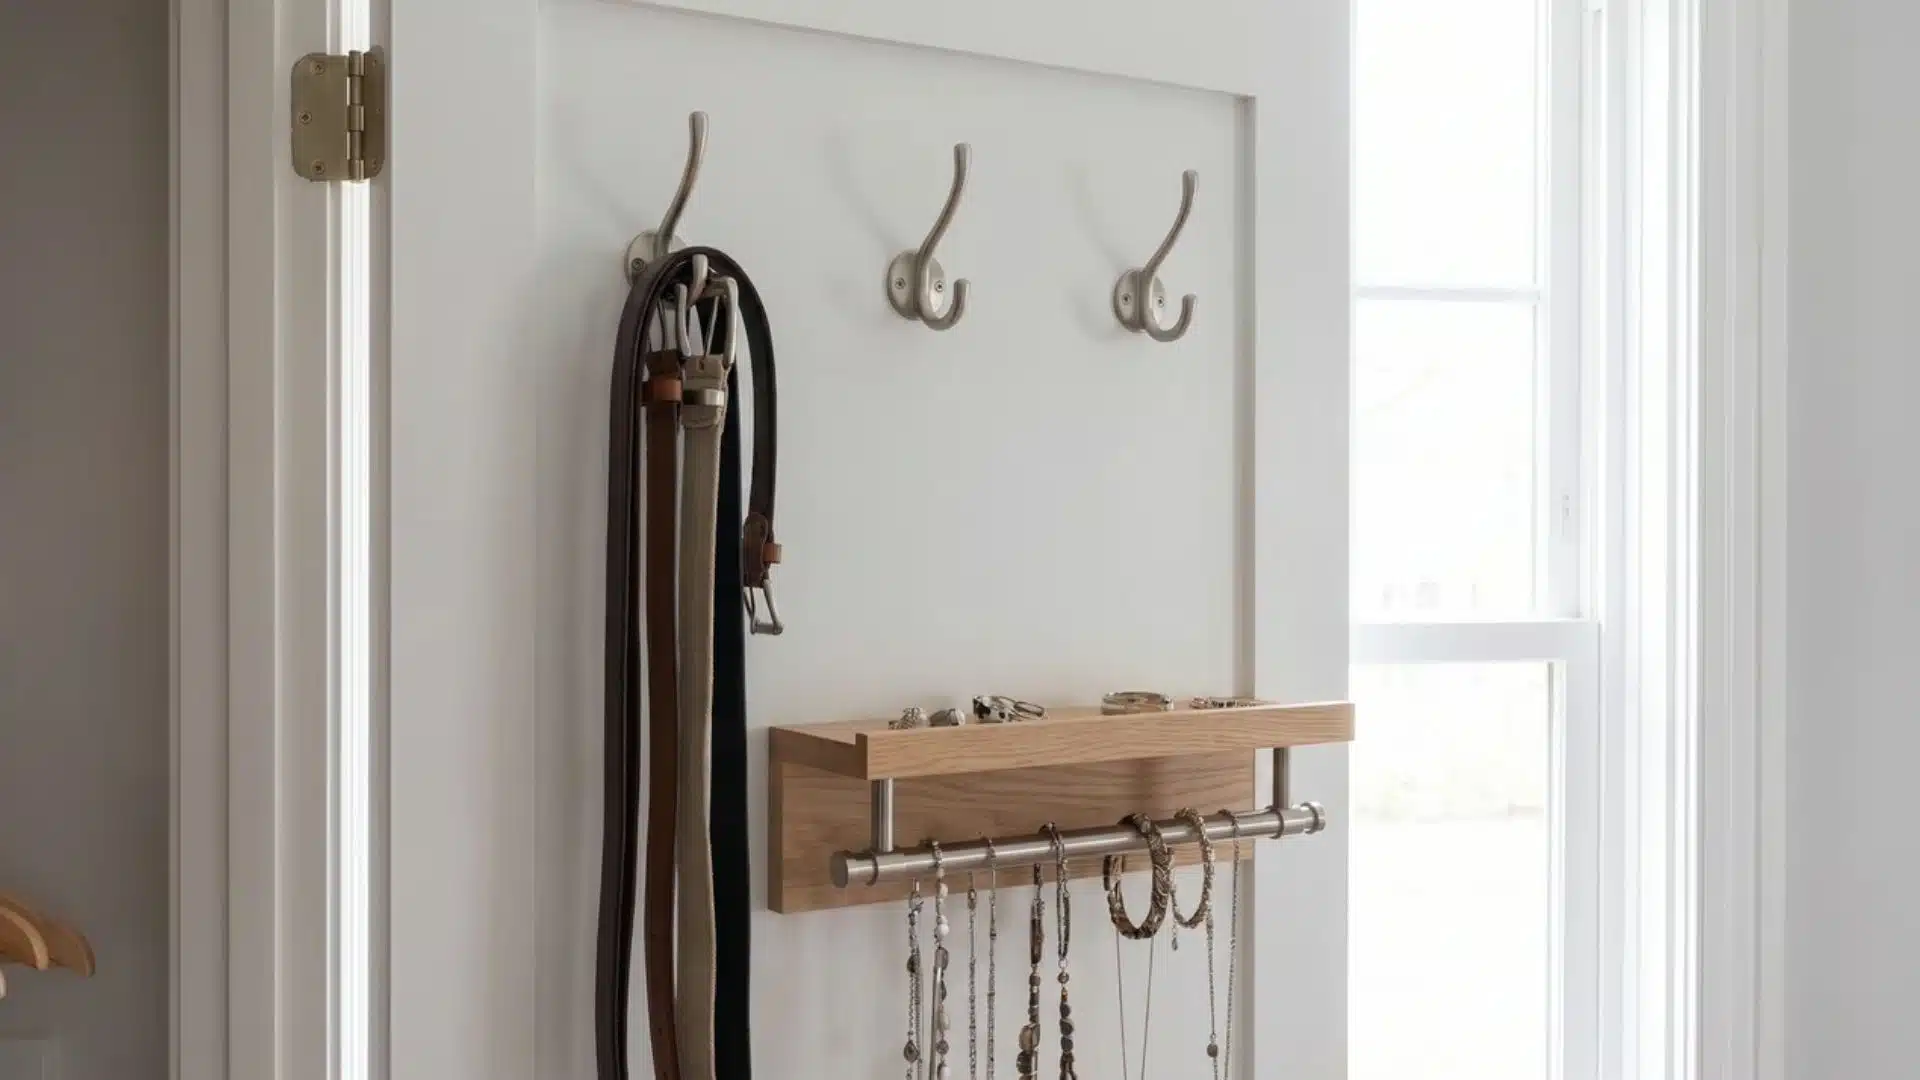
The door surface is wasted storage in most closets. Hooks, slim racks, or hanging organizers turn it into a high-value vertical zone.
Install lightweight storage for accessories such as belts, scarves, and caps. Keep the weight low so the door moves smoothly and does not sag over time.
6. Add a Velvet Drawer Divider Insert
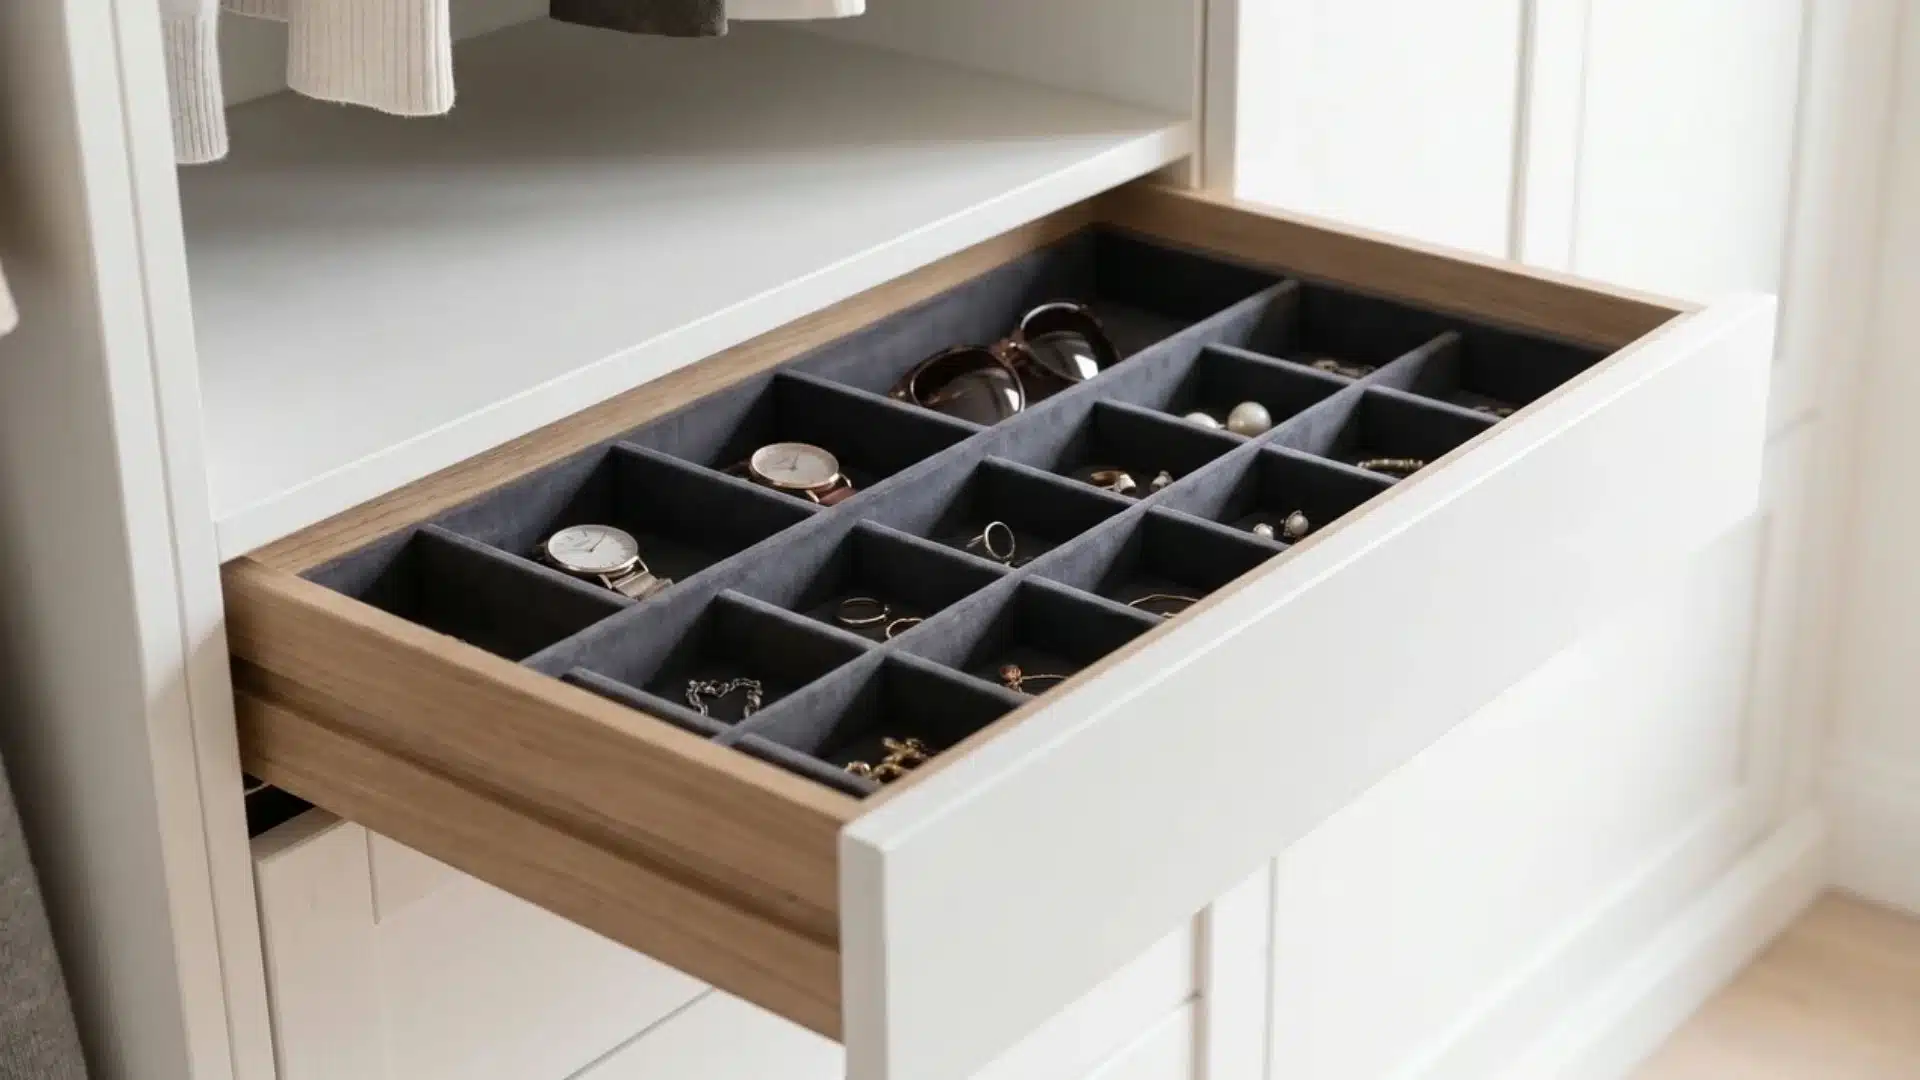
Small items get messy fast when they share one open drawer without any structure. A velvet divider insert separates jewelry, watches, sunglasses, and accessories into fixed sections, keeping everything visible and easy to grab.
Fit the insert inside a shallow drawer where small daily items usually collect. Choose a layout with varying compartment sizes so each item has a proper place rather than sliding together.
7. Floor-to-Ceiling Shoe Shelves
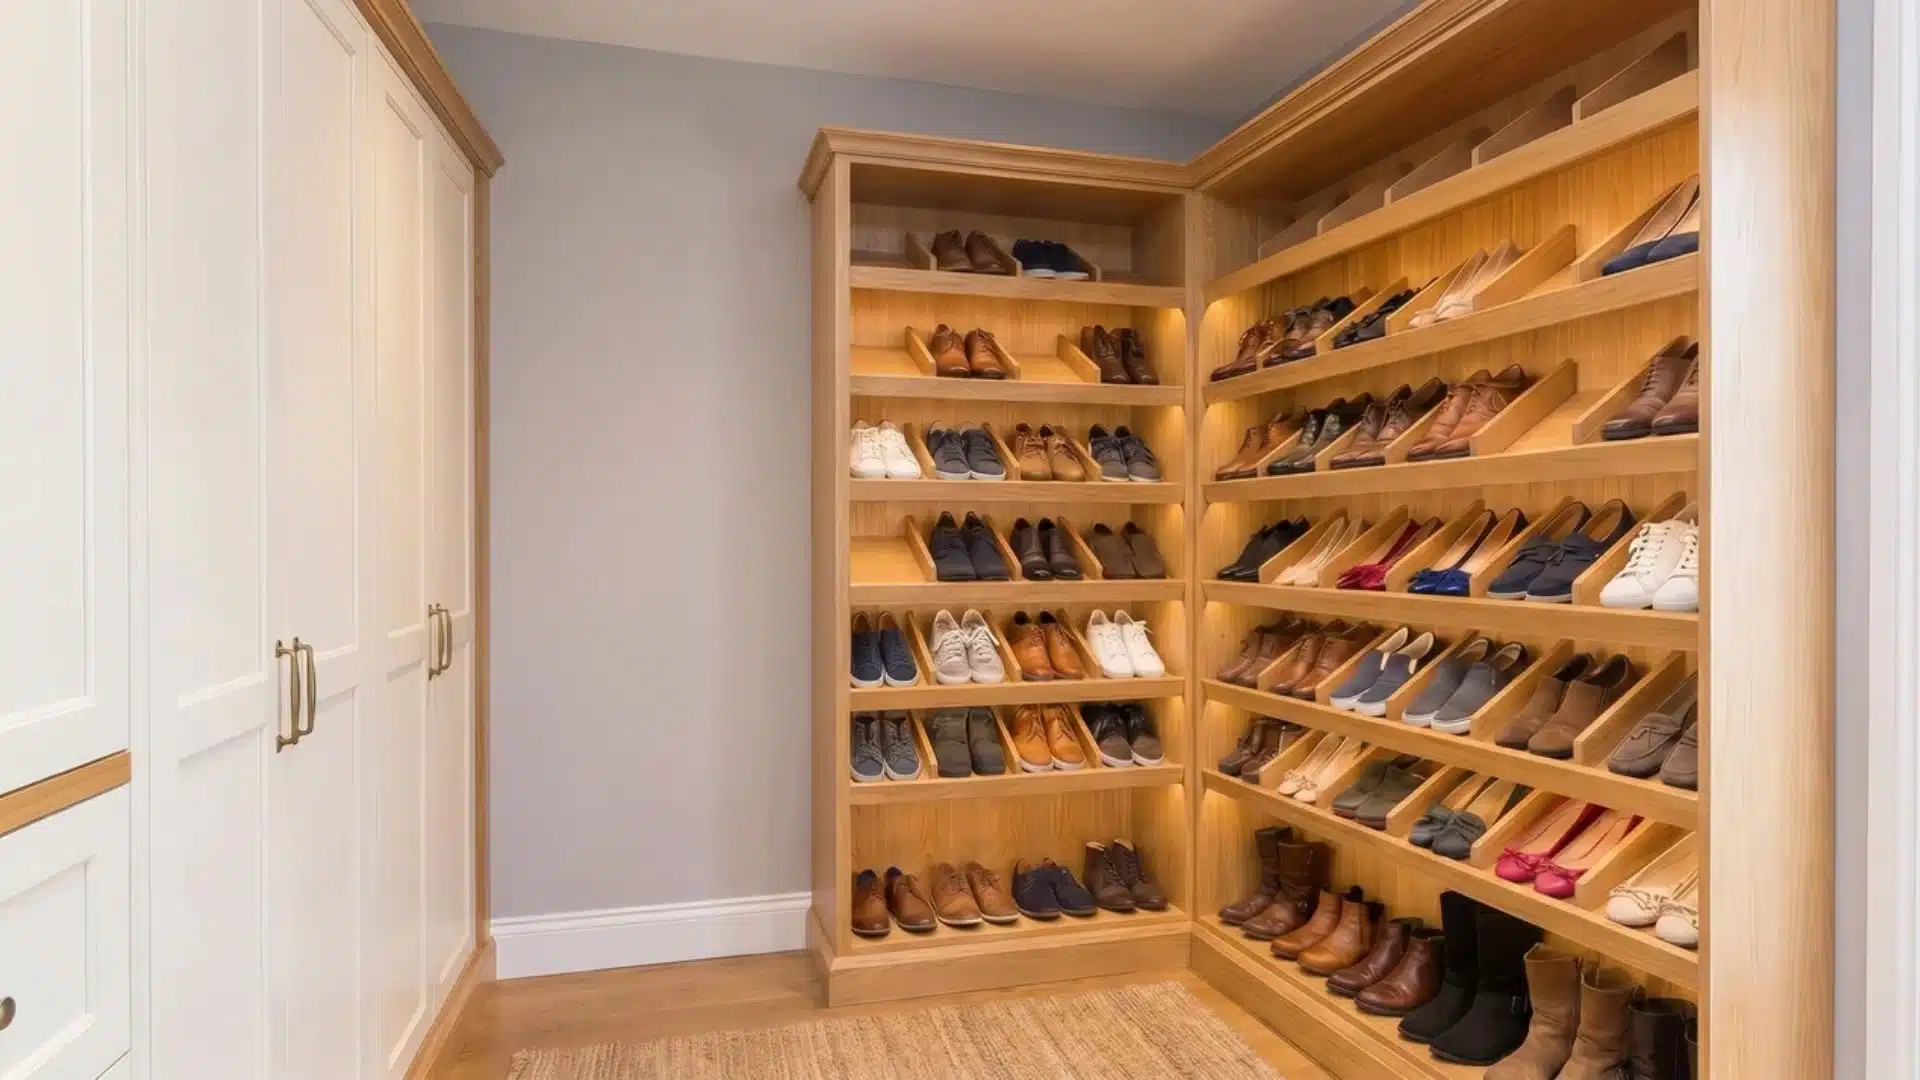
Shoes stacked on the floor waste vertical potential. Full-height shelving gives every pair a fixed slot and keeps the closet visually organized.
Space shelves about 6-7 inches apart for most footwear. Place frequently worn shoes at eye level and seasonal pairs higher or lower.
8. Add a Tilt-Out Laundry Hamper
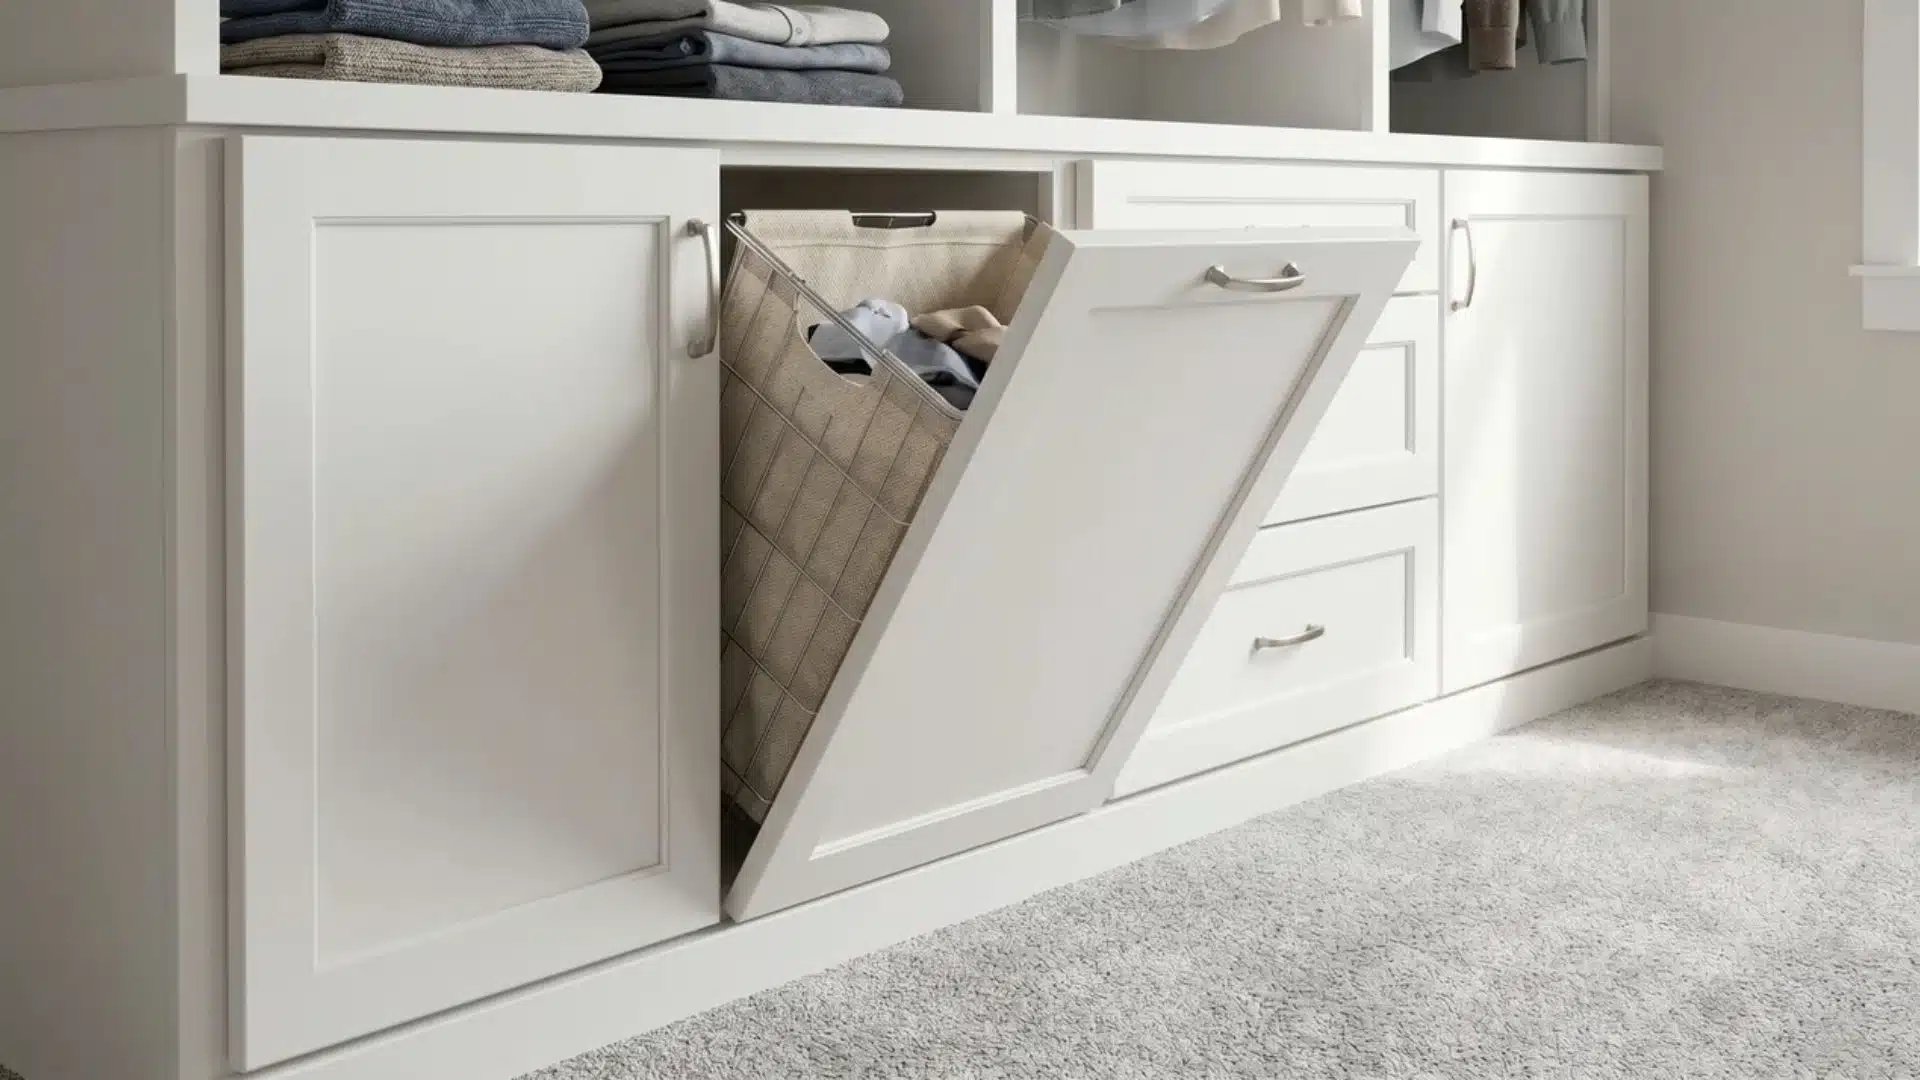
Laundry baskets take up more room than they should because they sit on the floor and force everything else around them. A tilt-out hamper hides dirty clothes inside a cabinet front and keeps the closet looking more orderly.
Install the hamper near the lower section of the closet where it is easy to load and unload. Leave enough clearance for the tilt-out motion, and add a removable liner to keep carrying laundry simple.
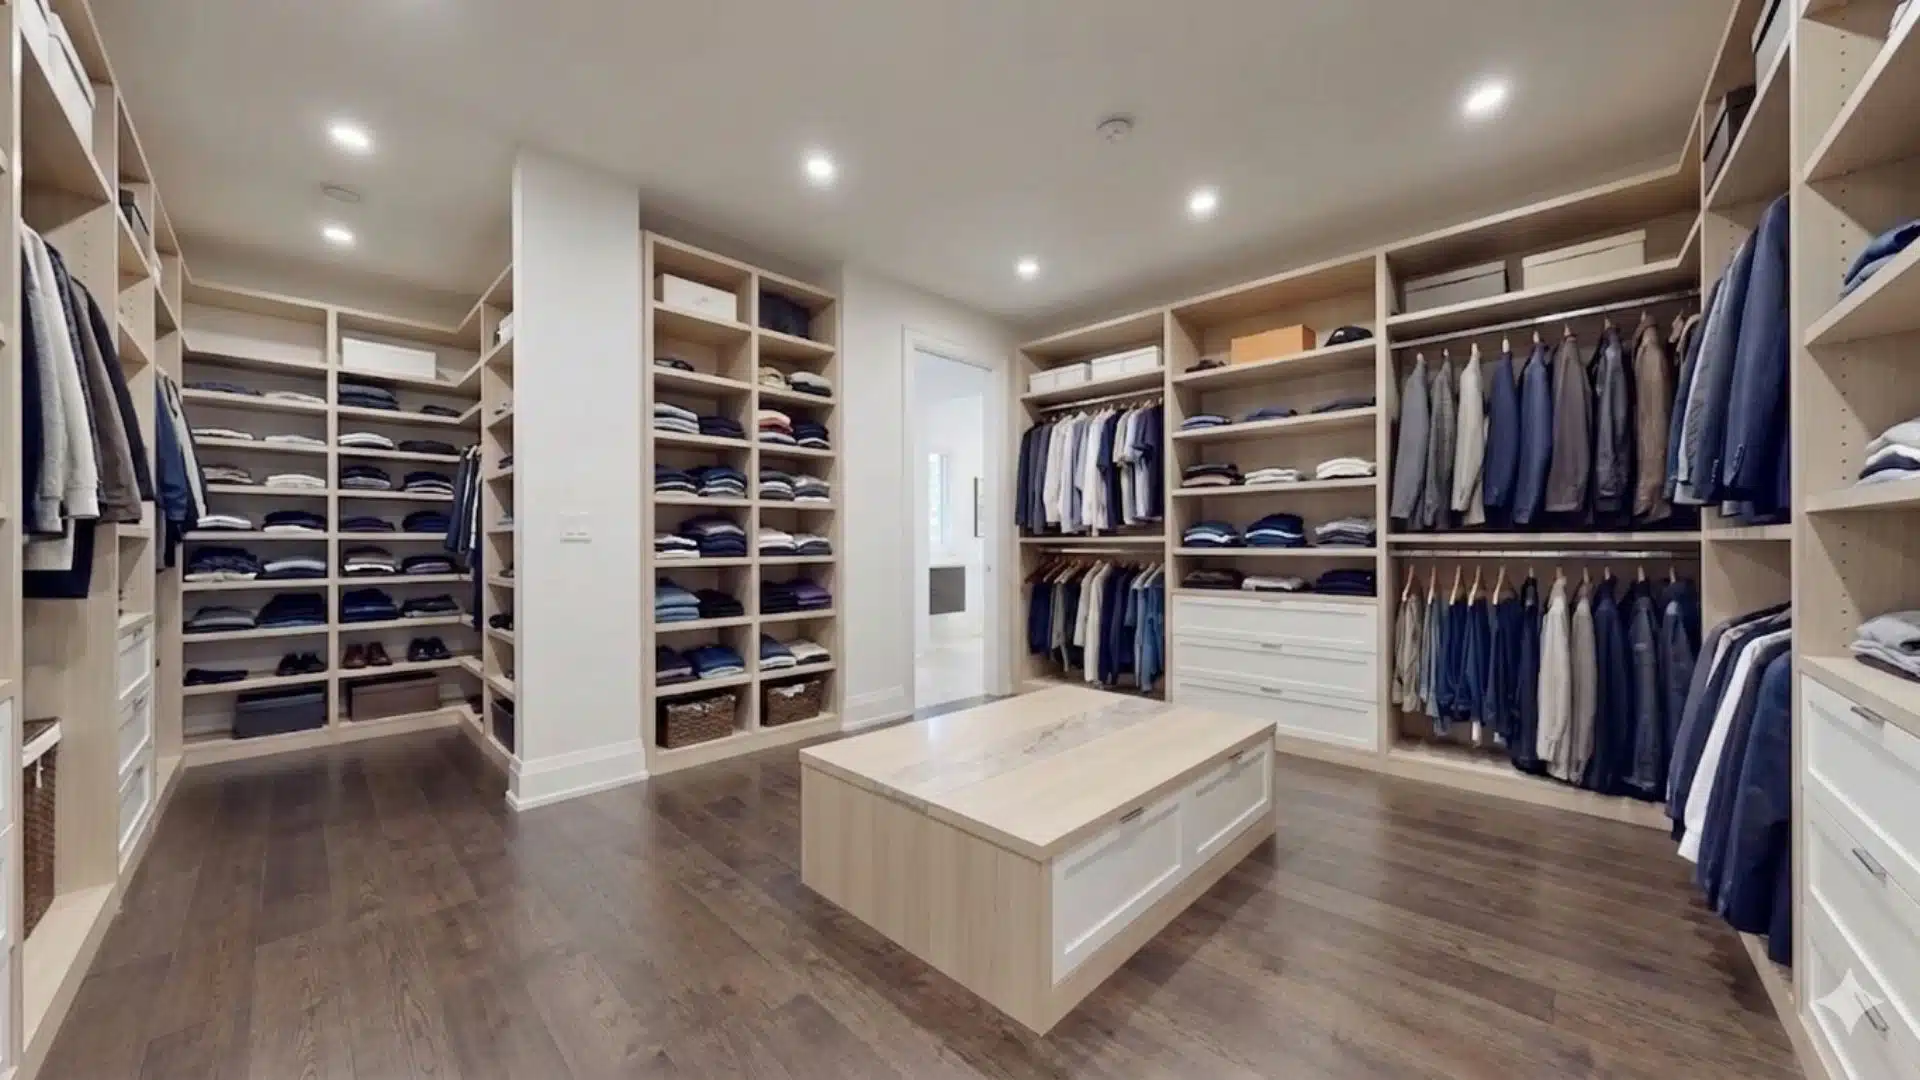
Walk-In Closet Ideas
A walk-in gives you room to get creative, not just store more. These seven ideas turn square footage into a space that works as well as it looks.
9. Build a Center Shelf Tower
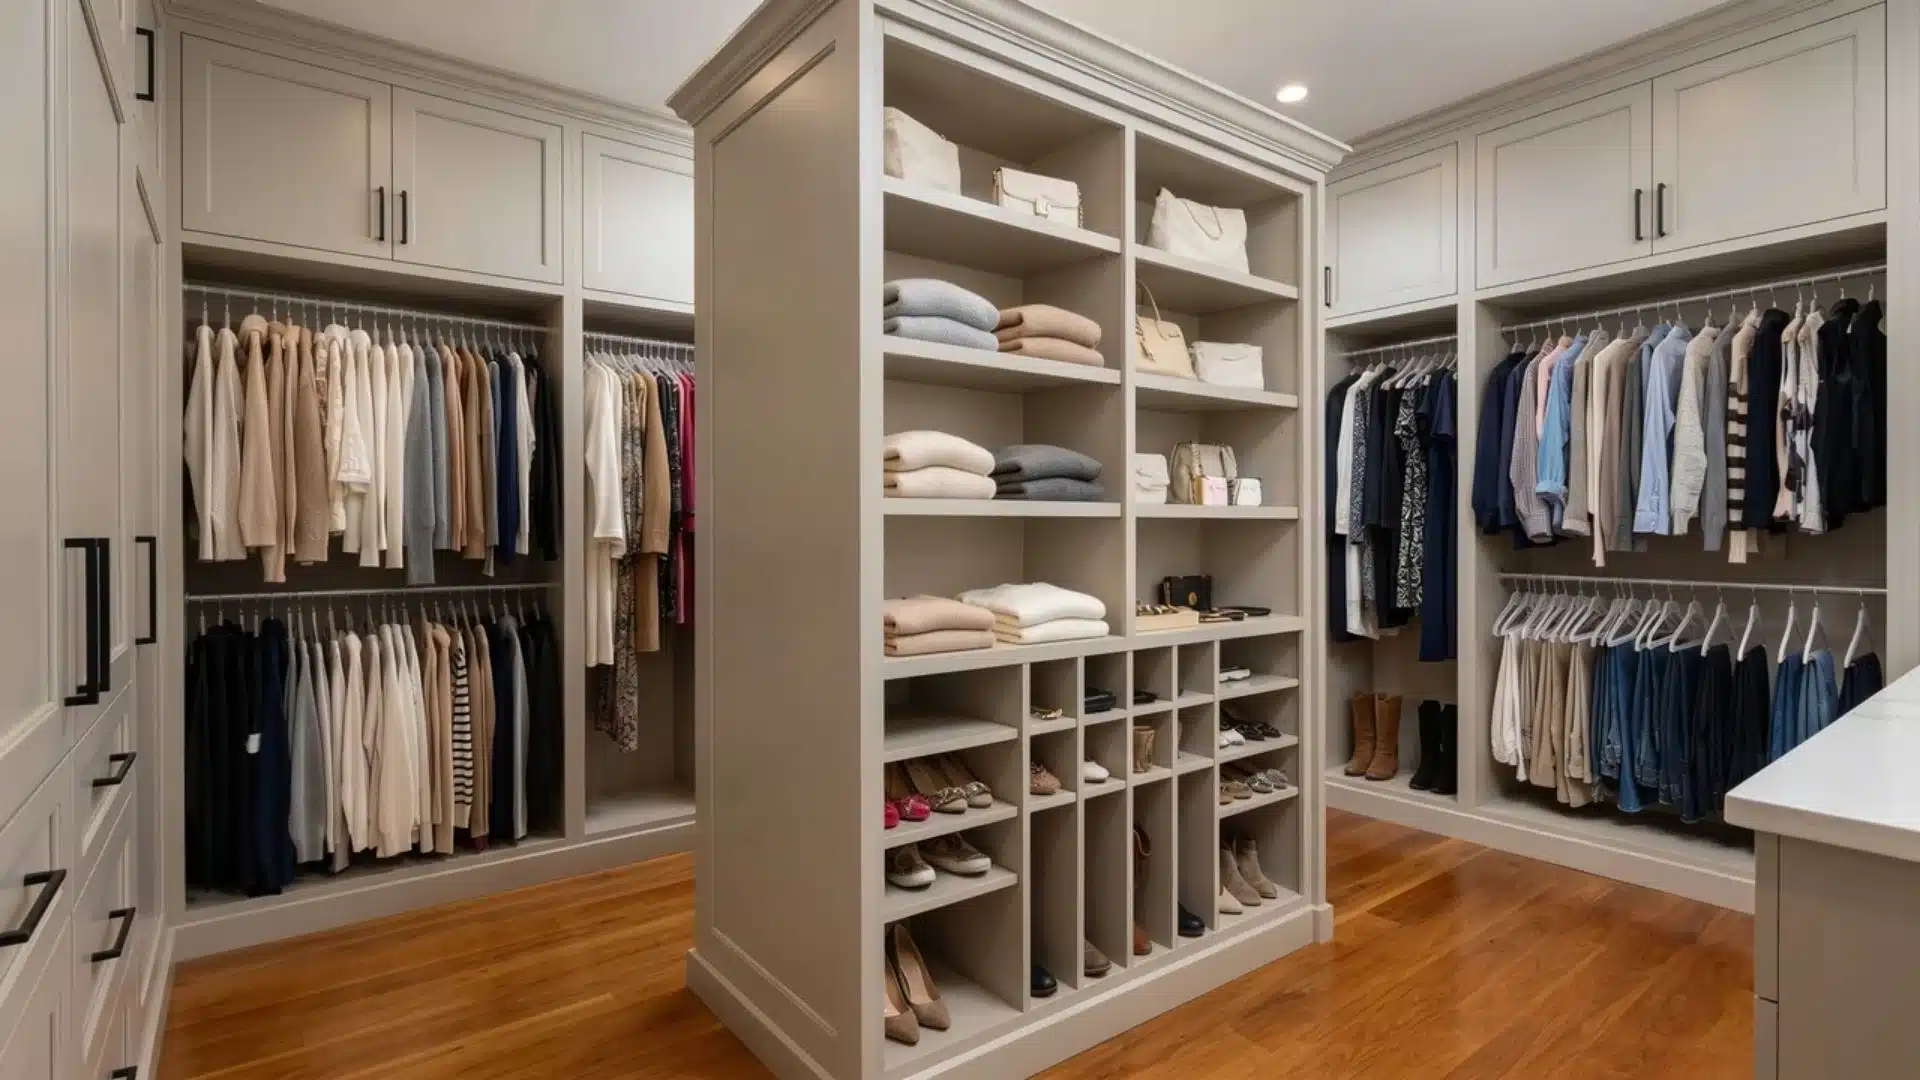
The middle of a walk-in often sits empty. A freestanding tower of shelves fills it, splitting your hanging zones into left and right.
Build it from MDF with a mix of open shelves and cubbies. The top makes a perfect landing spot for folded sweaters or weekend bags.
10. Create an IKEA Pax Custom Build
IKEA Pax units give you a built-in look without the full cost of custom cabinetry. They are flexible and can be arranged along any wall.
Anchor units to wall studs for safety and add drawers or rods based on your storage needs. Keep the layout symmetrical for a cleaner visual flow.
11. Mount a Pegboard Accessory Panel
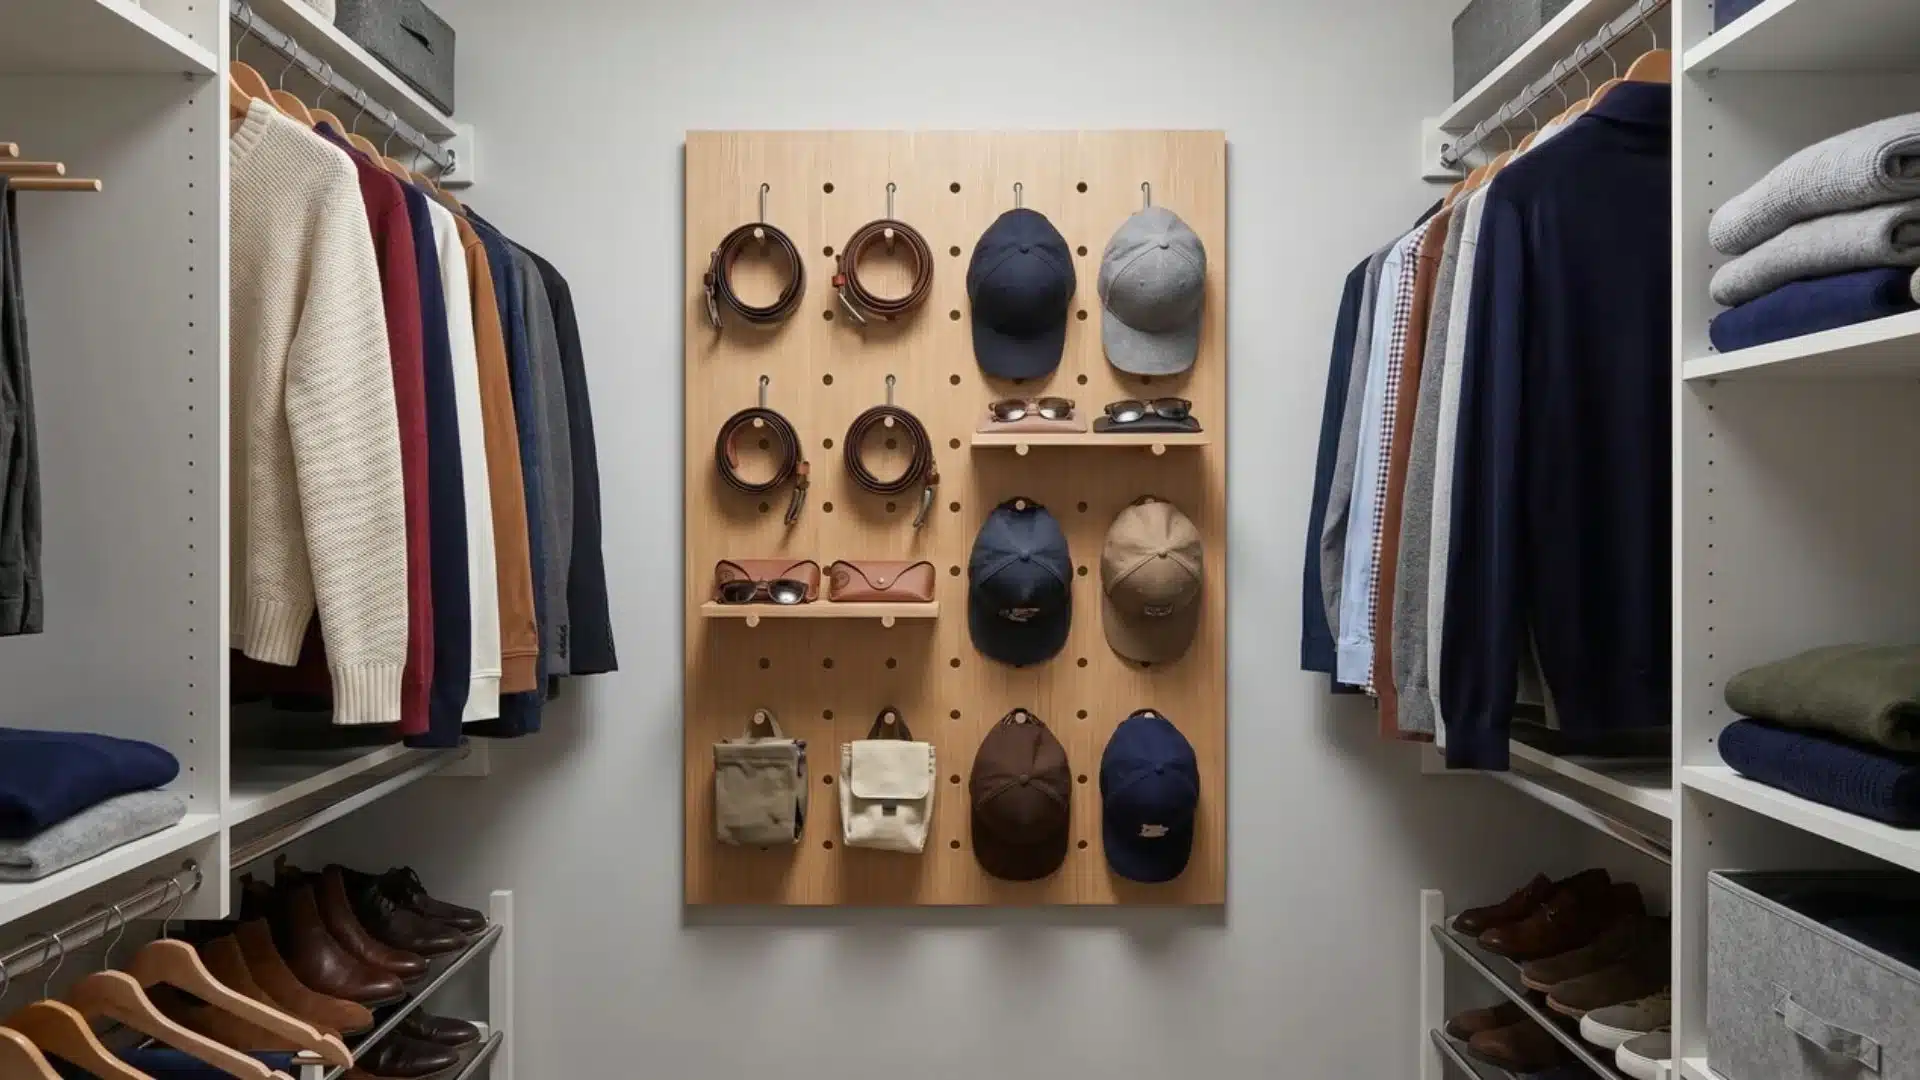
Small accessories disappear quickly when scattered across drawers, trays, and shelf corners. A pegboard panel keeps those items visible, flexible, and easy to rearrange as your storage needs change.
Mount the pegboard on an open wall section and use hooks, cups, or small shelves for belts, caps, sunglasses, or bags. Group similar items together so getting dressed feels faster and less chaotic.
12. Install Task Lighting
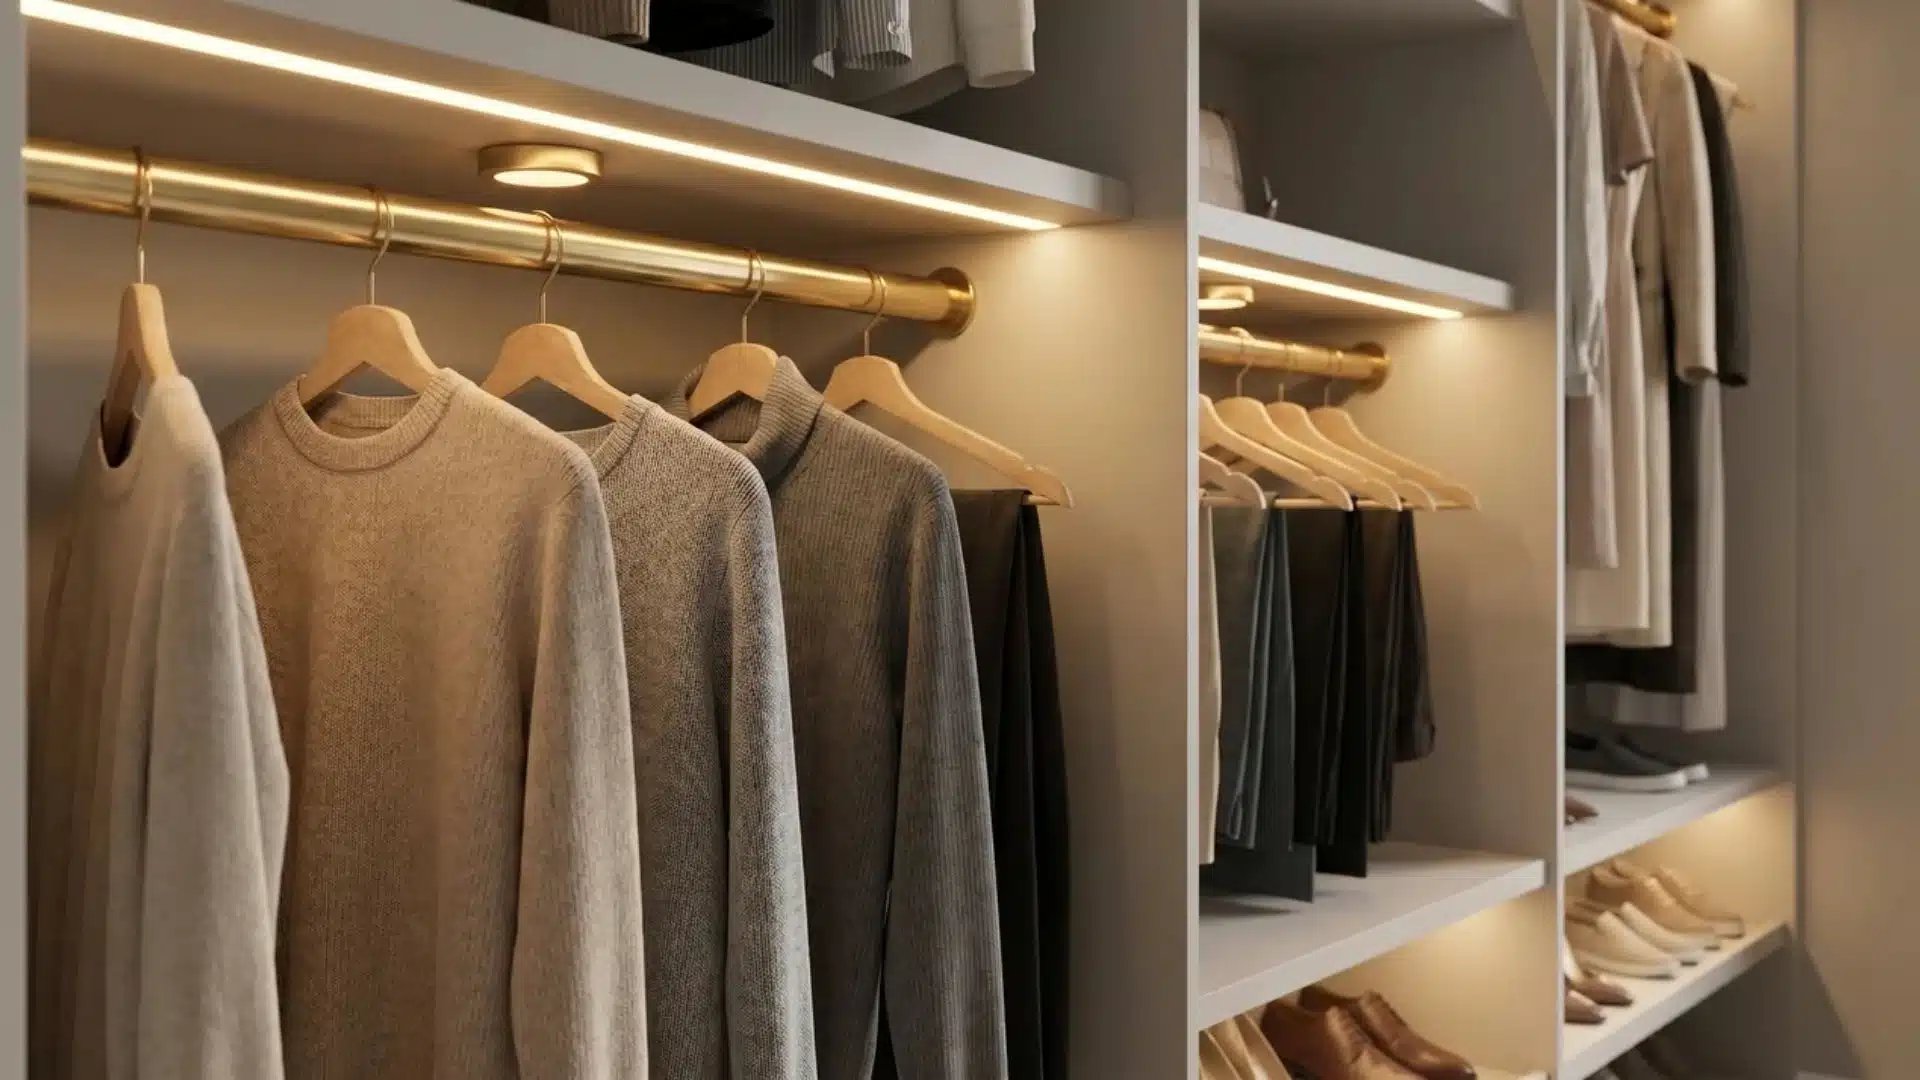
Dark corners reduce usability, even in large closets. Task lighting fixes this by improving visibility in every storage zone.
Place LED strips under shelves or use motion sensors for convenience. Focus light on shelves and hanging areas instead of general ceiling glow.
13. Add Mirrored or Glass-Front Panels
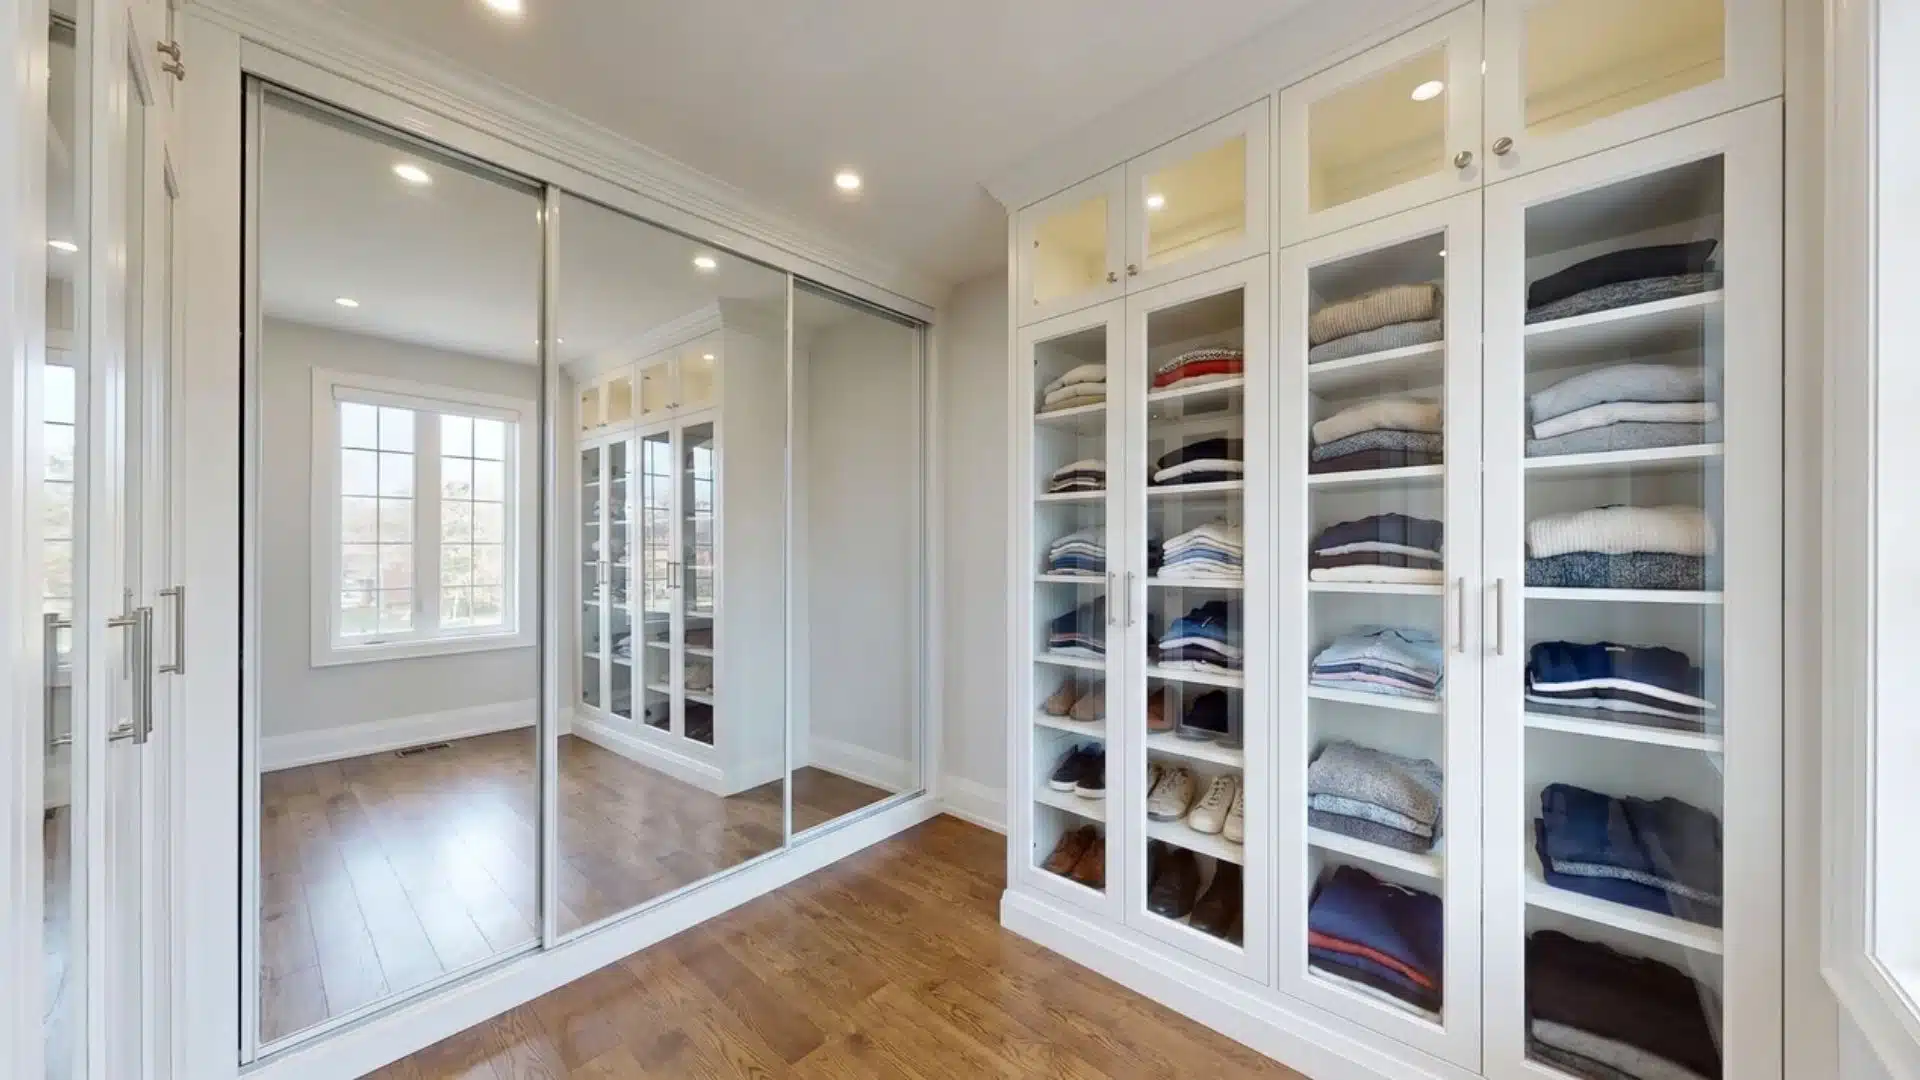
Mirrors expand visual space and reflect light, making closets feel larger. Glass-front panels add structure while still showing stored items.
Use mirrors on doors or walls to improve brightness. Keep visible storage organized since everything behind glass becomes part of the design.
14. Add a Closet Island or Bench
A central island or bench improves function and adds a folding or seating area. It works best in larger walk-in closets.
Place it so movement paths remain open on all sides. Use drawers for small items and keep the surface clear to avoid clutter buildup.
15. Build a Dedicated Accessory Wall
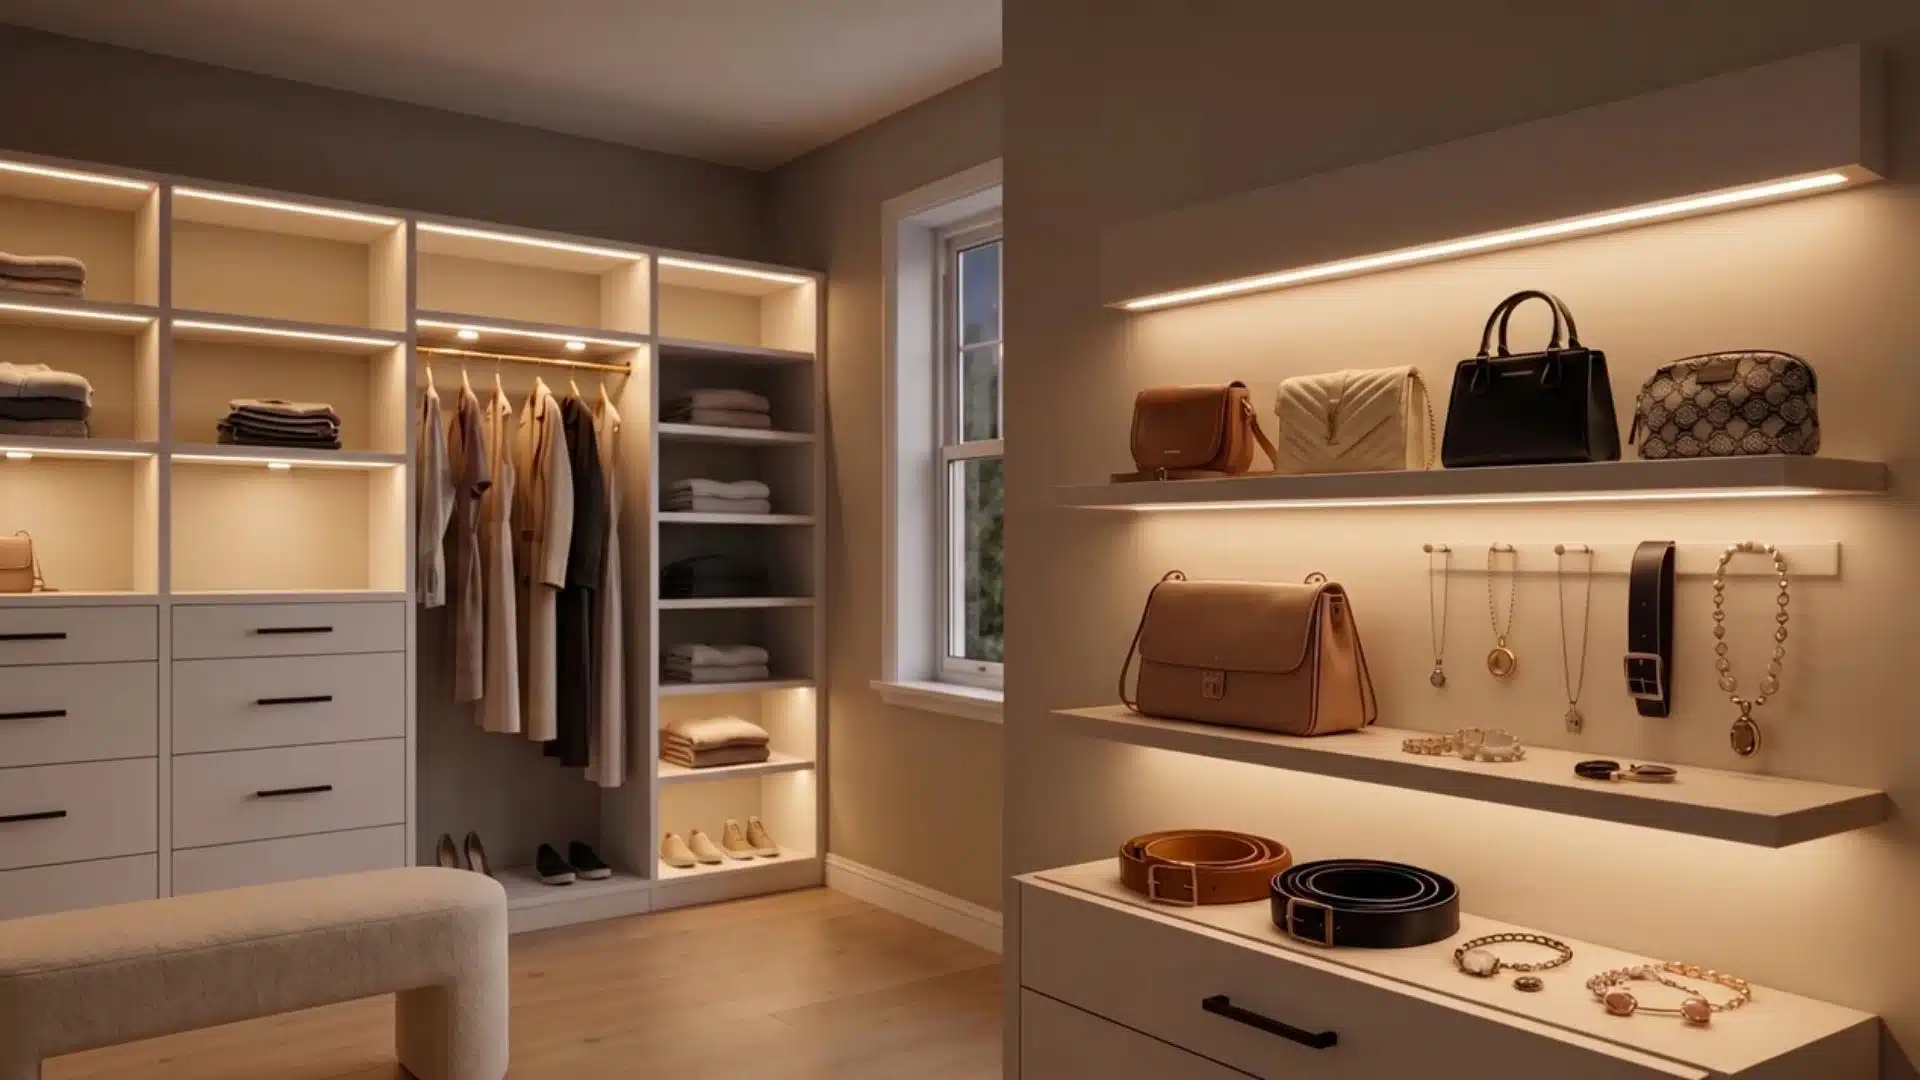
Accessories often get lost in drawers or bins. A dedicated wall system keeps them visible and easy to access.
Use hooks, pegboards, or slim shelving for bags, belts, and jewelry. Arrange by category so grabbing items becomes quick and consistent.
Kids’ and Nursery Closets
Kids’ closets have one rule grown-up closets don’t: the child has to be able to reach the stuff. These five ideas build storage that works now and grows later.
16. Hang a Curtain Instead of Closet Doors
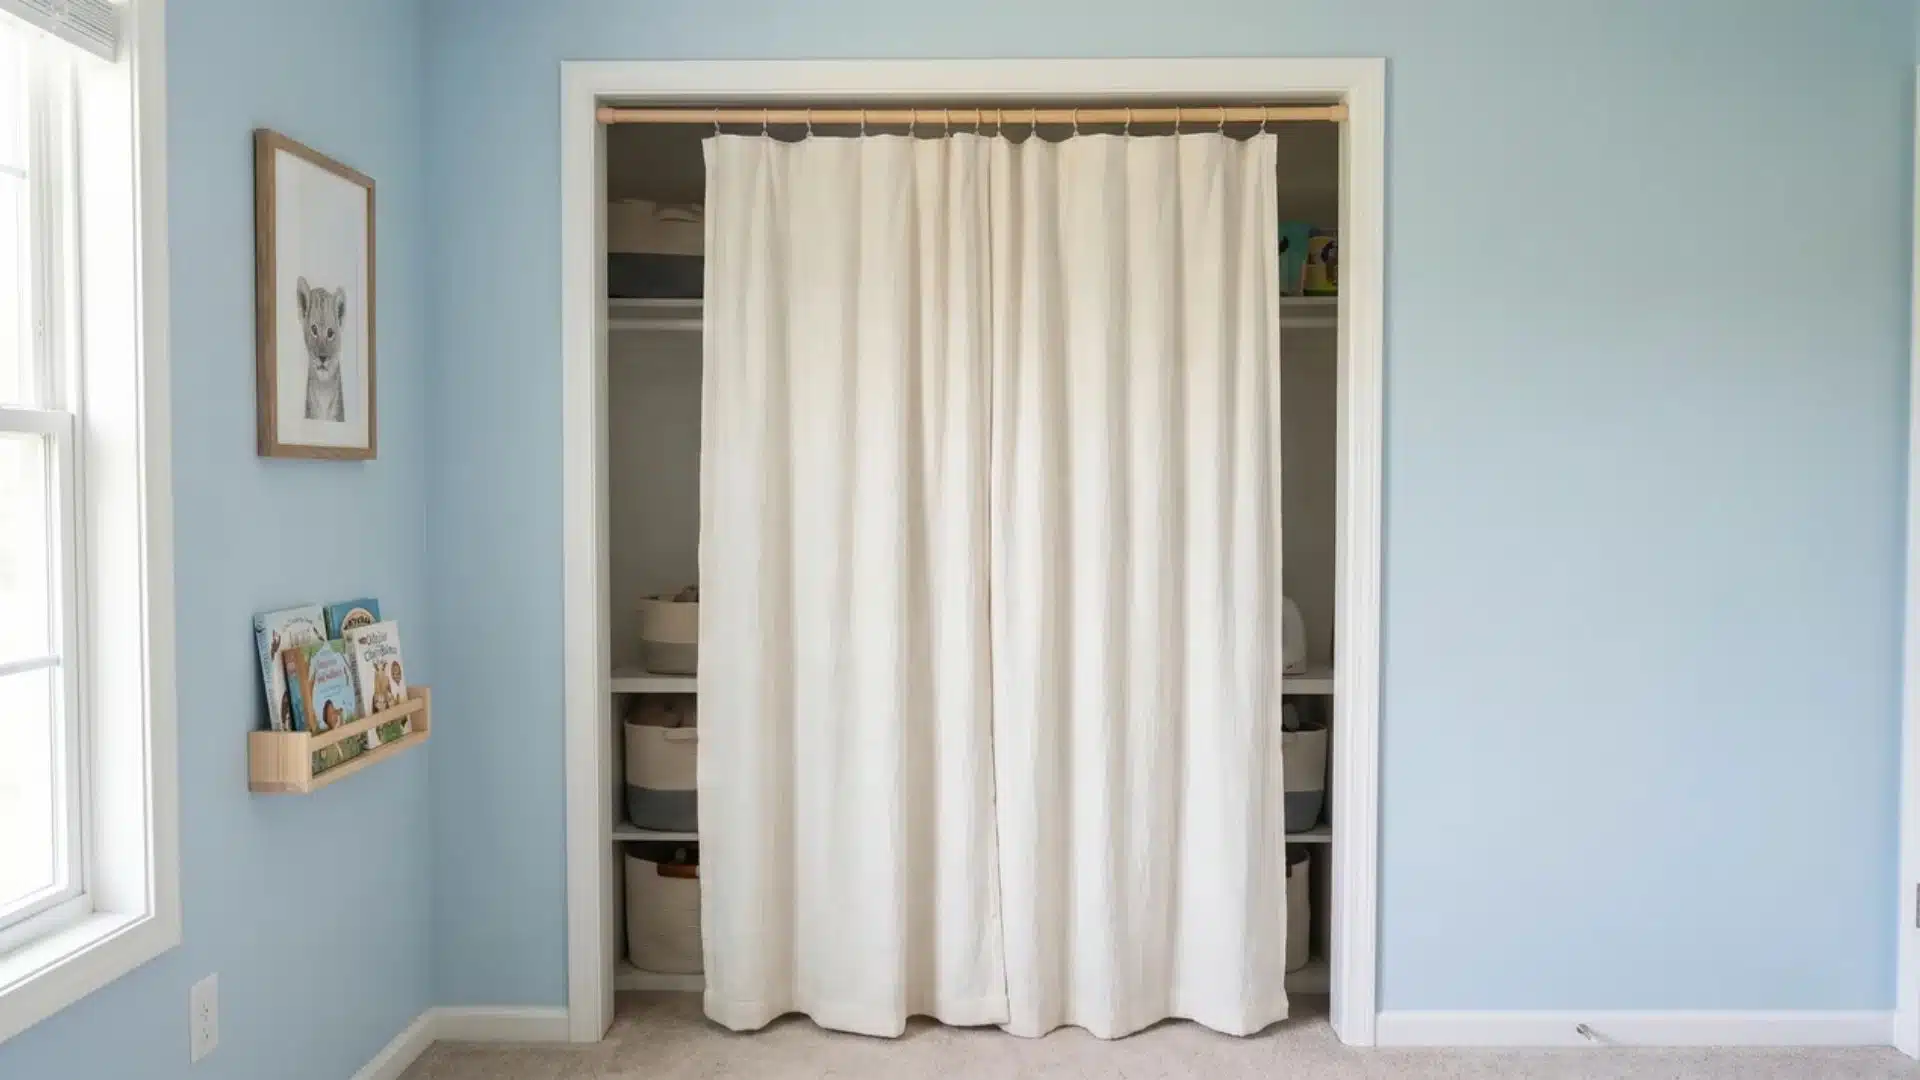
Closet doors swing out, slide awkwardly, or eat into usable wall space in smaller rooms. A curtain softens the opening, takes up almost no clearance, and makes the closet easier to access.
Mount a rod just above the closet opening and choose a curtain that reaches low enough to cover the contents cleanly. Use a washable fabric so it stays practical in a nursery or child’s room.
17. Add Labeled Bins and Cubbies
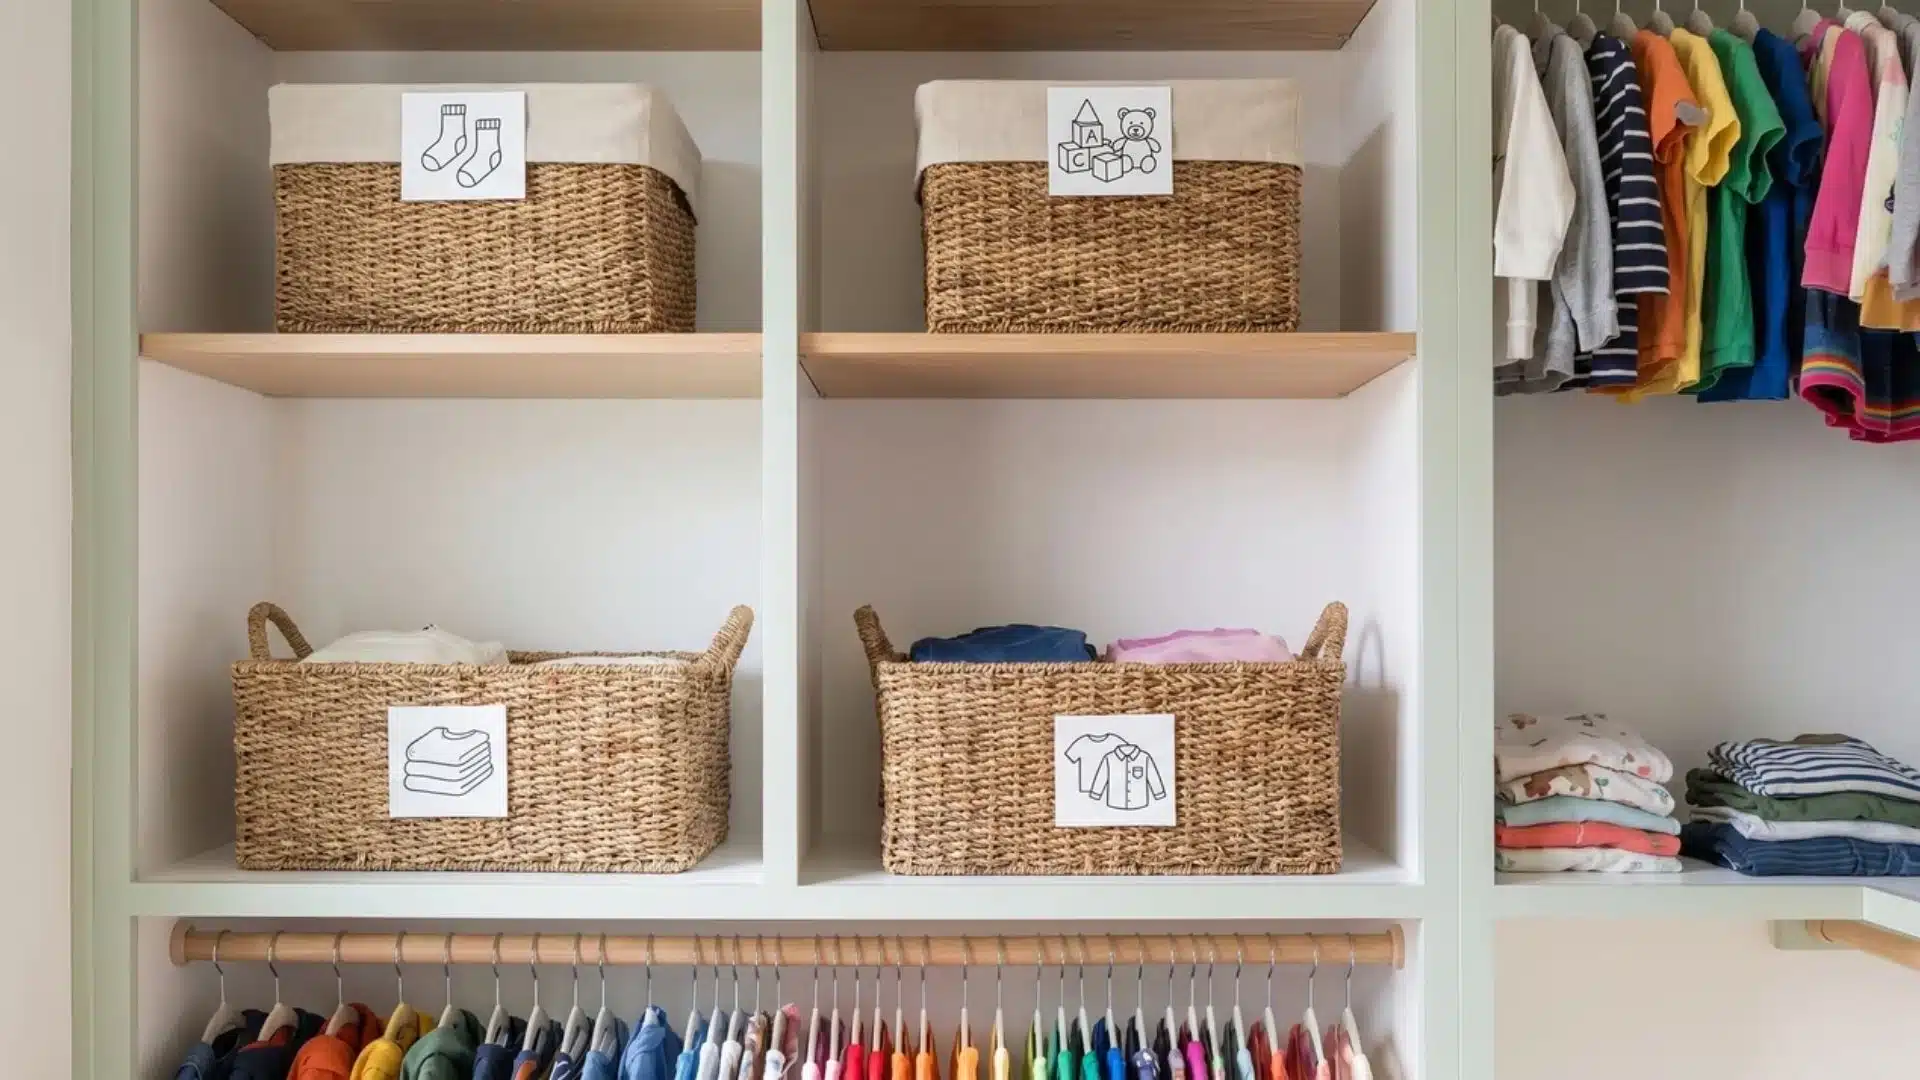
Kids respond better to visuals than text, especially before reading age. Labeled bins turn cleanup into a simple matching routine.
Use pictures or icons on each bin and keep categories consistent. Place frequently used items at lower levels so kids can reach and return things without help.
18. Add a Pull-Out Step for Easy Reach
Kids’ closets often waste upper storage because children cannot safely reach it on their own. A pull-out step gives them height when needed, then tucks away so the floor stays open.
Build or install the step into the lower closet base where it slides out smoothly and locks in place when used. Keep the surface grippy and sturdy so daily use stays safe.
19. Convert a Closet to a Reading Nook
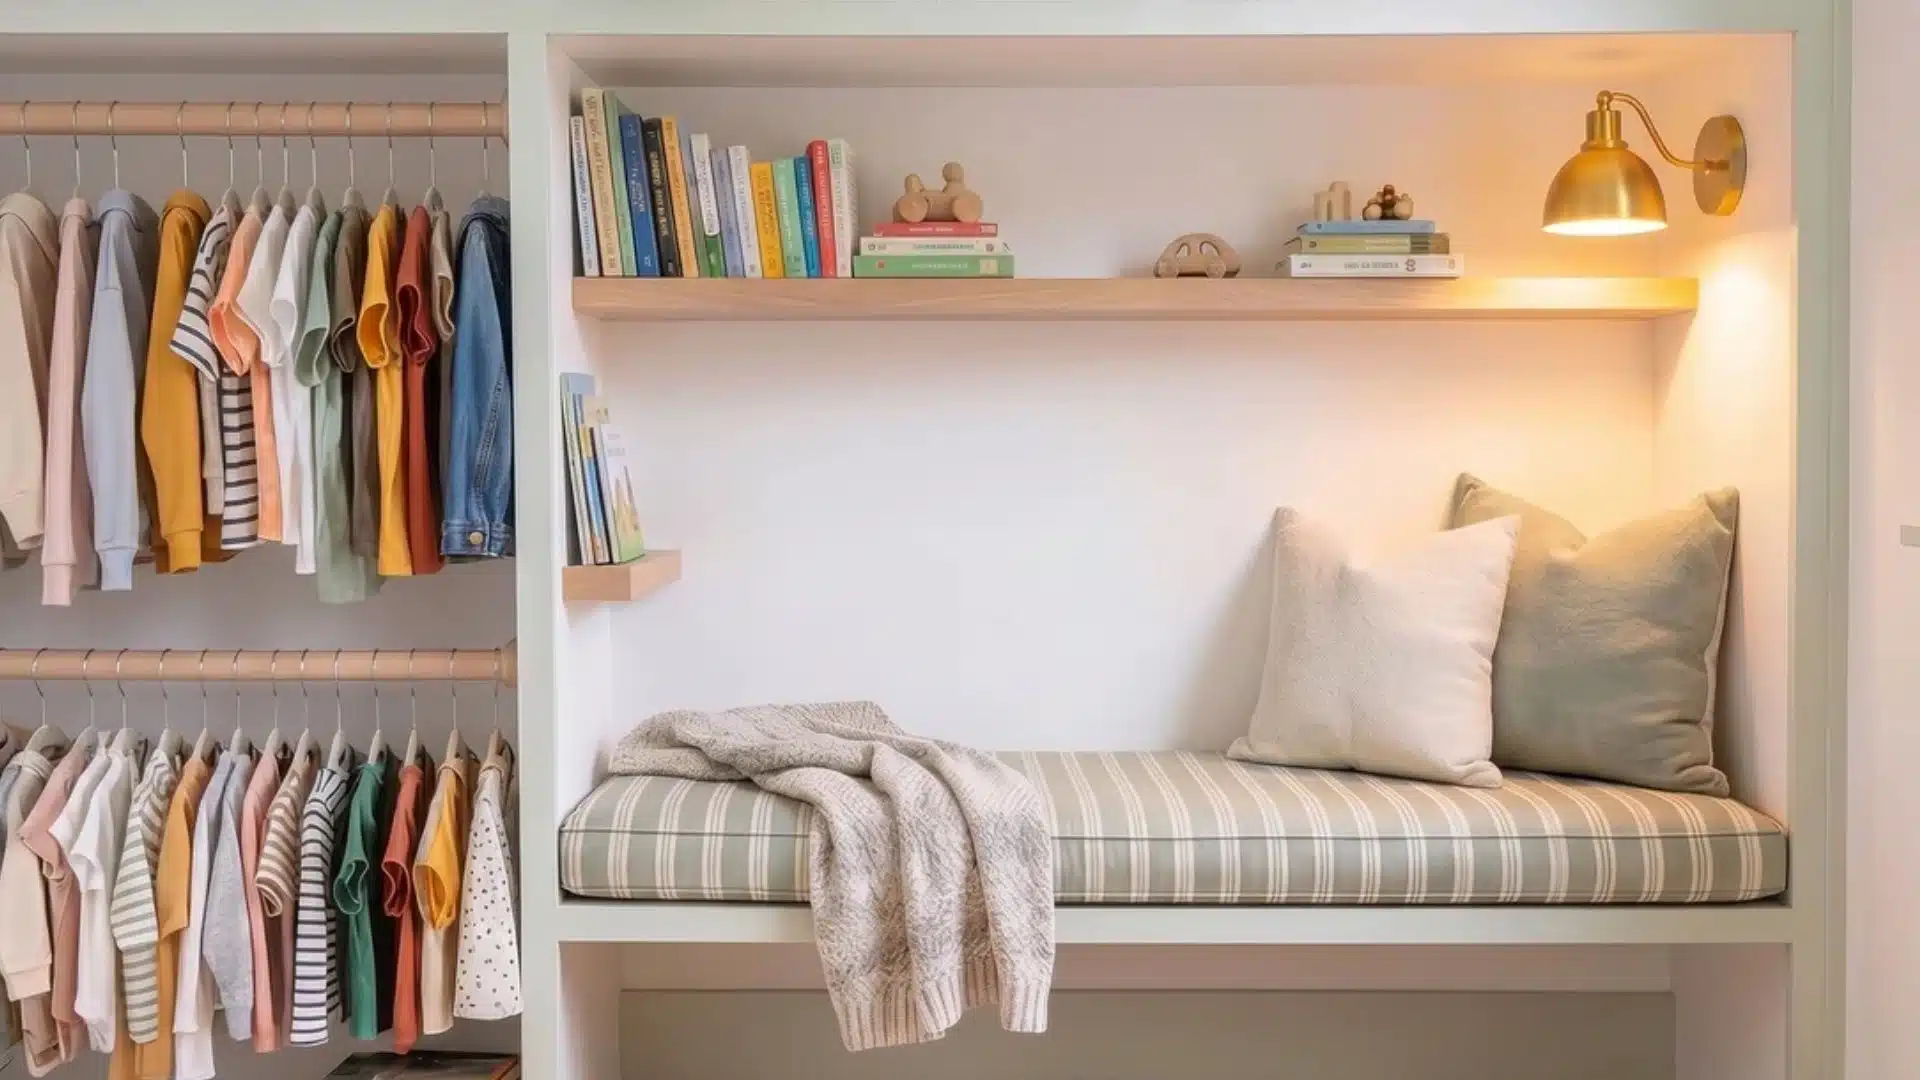
Not every closet needs to store clothing. Turning it into a reading nook creates usable space and reduces clutter elsewhere in the room.
Add a bench, soft lighting, and wall shelving for books. Keep a small section for hanging items so the space still serves multiple needs.
20. Hang a Corner Toy Hammock

Stuffed animals and soft toys take over shelves fast because they are bulky, light, and hard to stack neatly. A corner toy hammock lifts them out of the way and uses space that would otherwise go unused.
Anchor the hammock high in an open closet corner where it will not block rods or bins below. Use it for lightweight toys only, and keep heavier storage lower where kids can reach it safely.
Coat and Linen Closets
The hardworking closets get zero attention until they overflow. These ideas bring order to coats, entryways, and linens.
21. Segmented Coat Cubbies
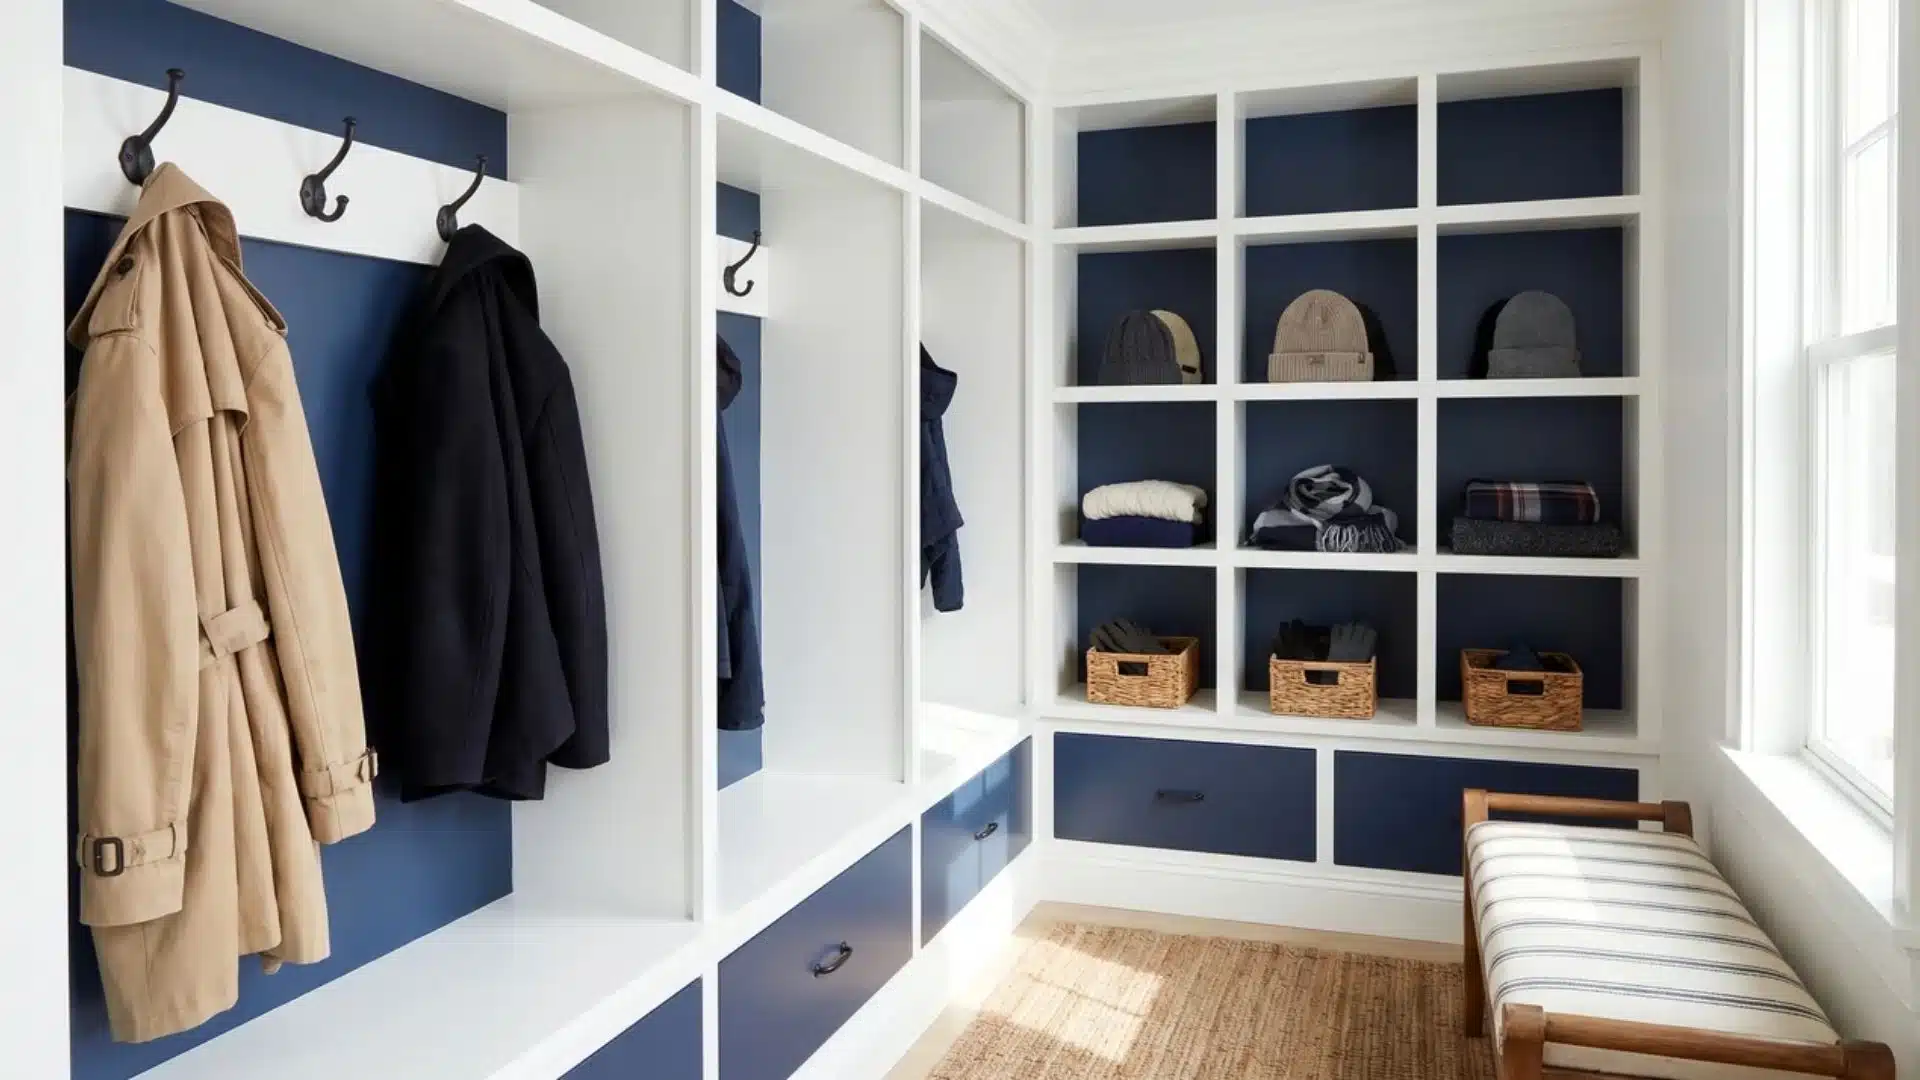
A single shared rod turns into clutter fast during colder months. Dividing the space into cubbies gives each person a defined section.
Assign one section per family member and separate hanging from folded storage. Keep gloves, hats, and scarves in labeled bins within each cubby.
22. Install a Shoe Tray Shelf
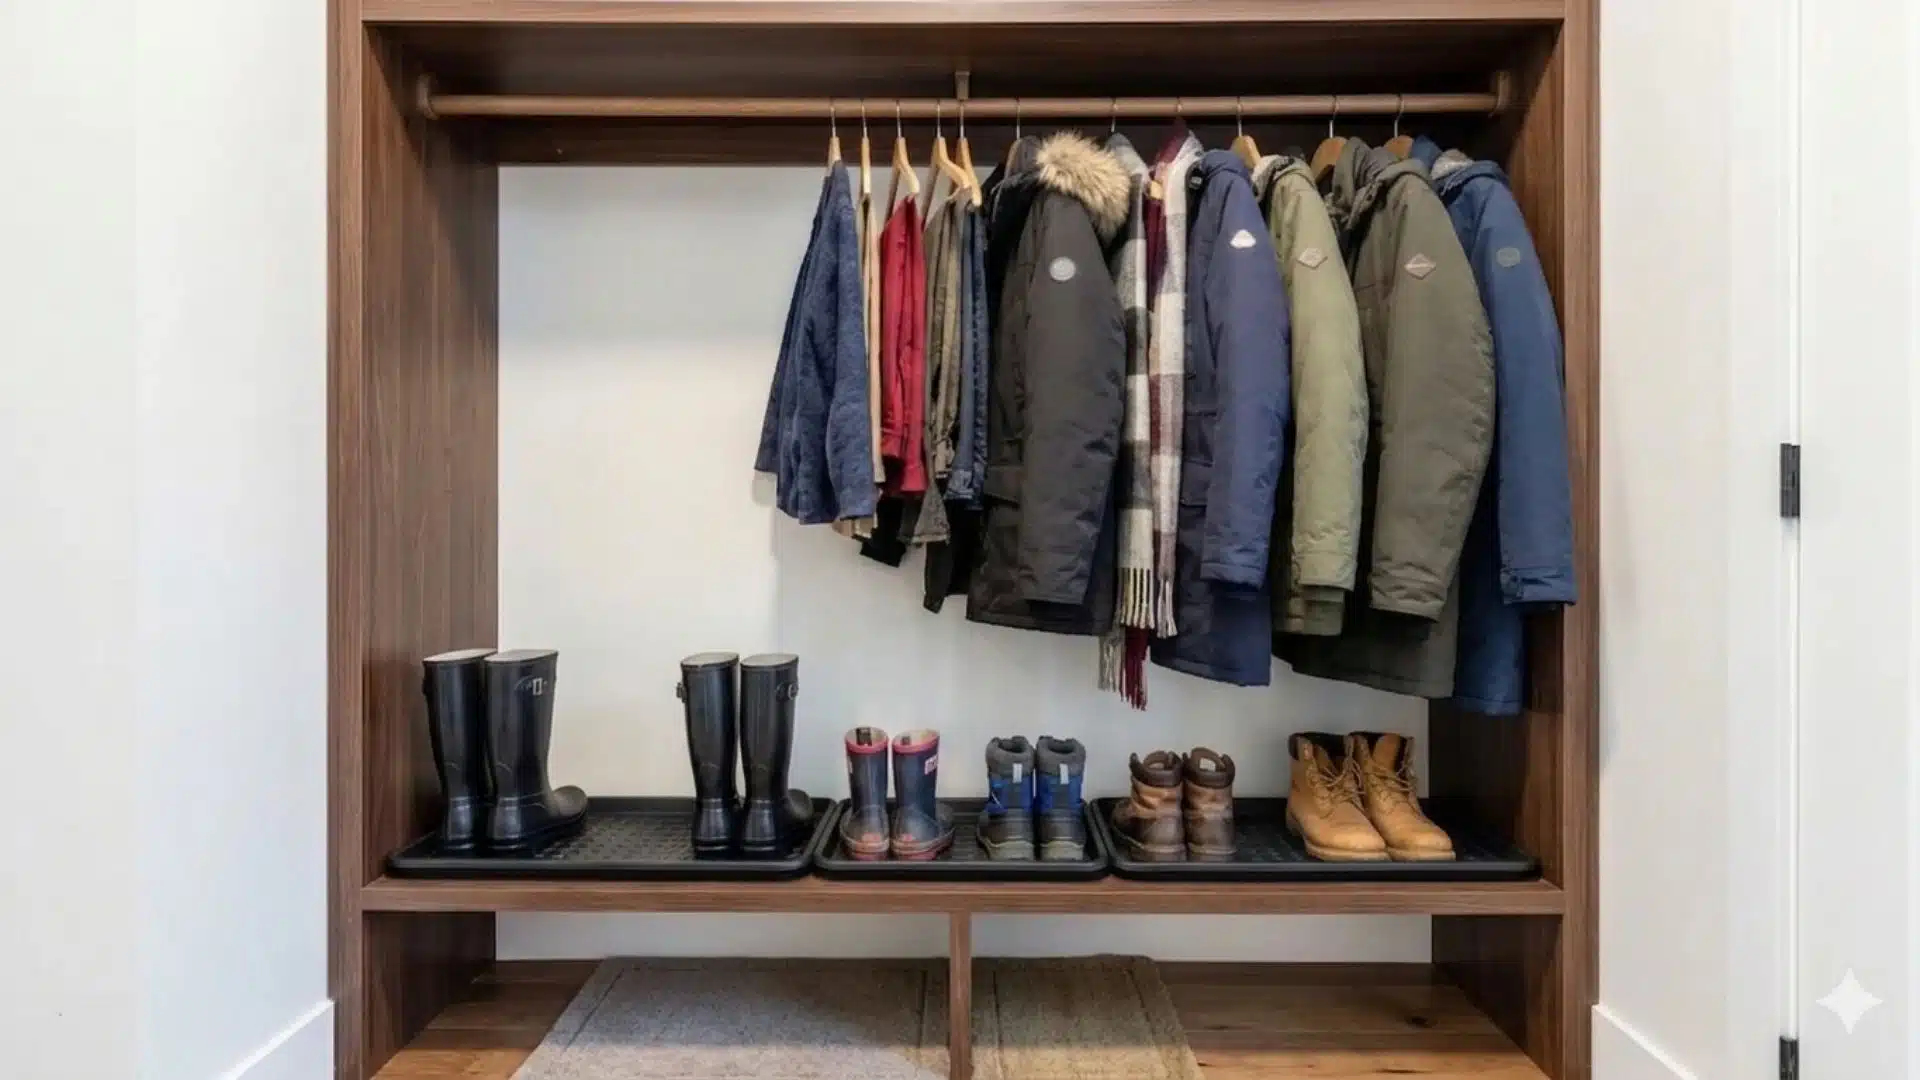
Shoes dropped at the base of a coat closet drag in dirt, moisture, and slush that spread across the floor. A shoe tray shelf gives them one controlled landing spot and makes cleanup easier.
Install it low in the closet, directly under the hanging coats, where shoes naturally end up anyway. Use a wipeable tray or shelf liner to keep mud and water contained.
23. Add Vertical Linen Dividers

Linen shelves look neat for about a day before stacks slump into each other and everything turns into one soft pile. Vertical dividers keep towels, sheets, and pillowcases standing in separate sections.
Place the dividers inside a deep shelf so each category has its own slot and stays upright. Store sheet sets together or sort by use so you do not have to pull apart the whole shelf each time.
24. Mount a Broom and Mop Grip Rail
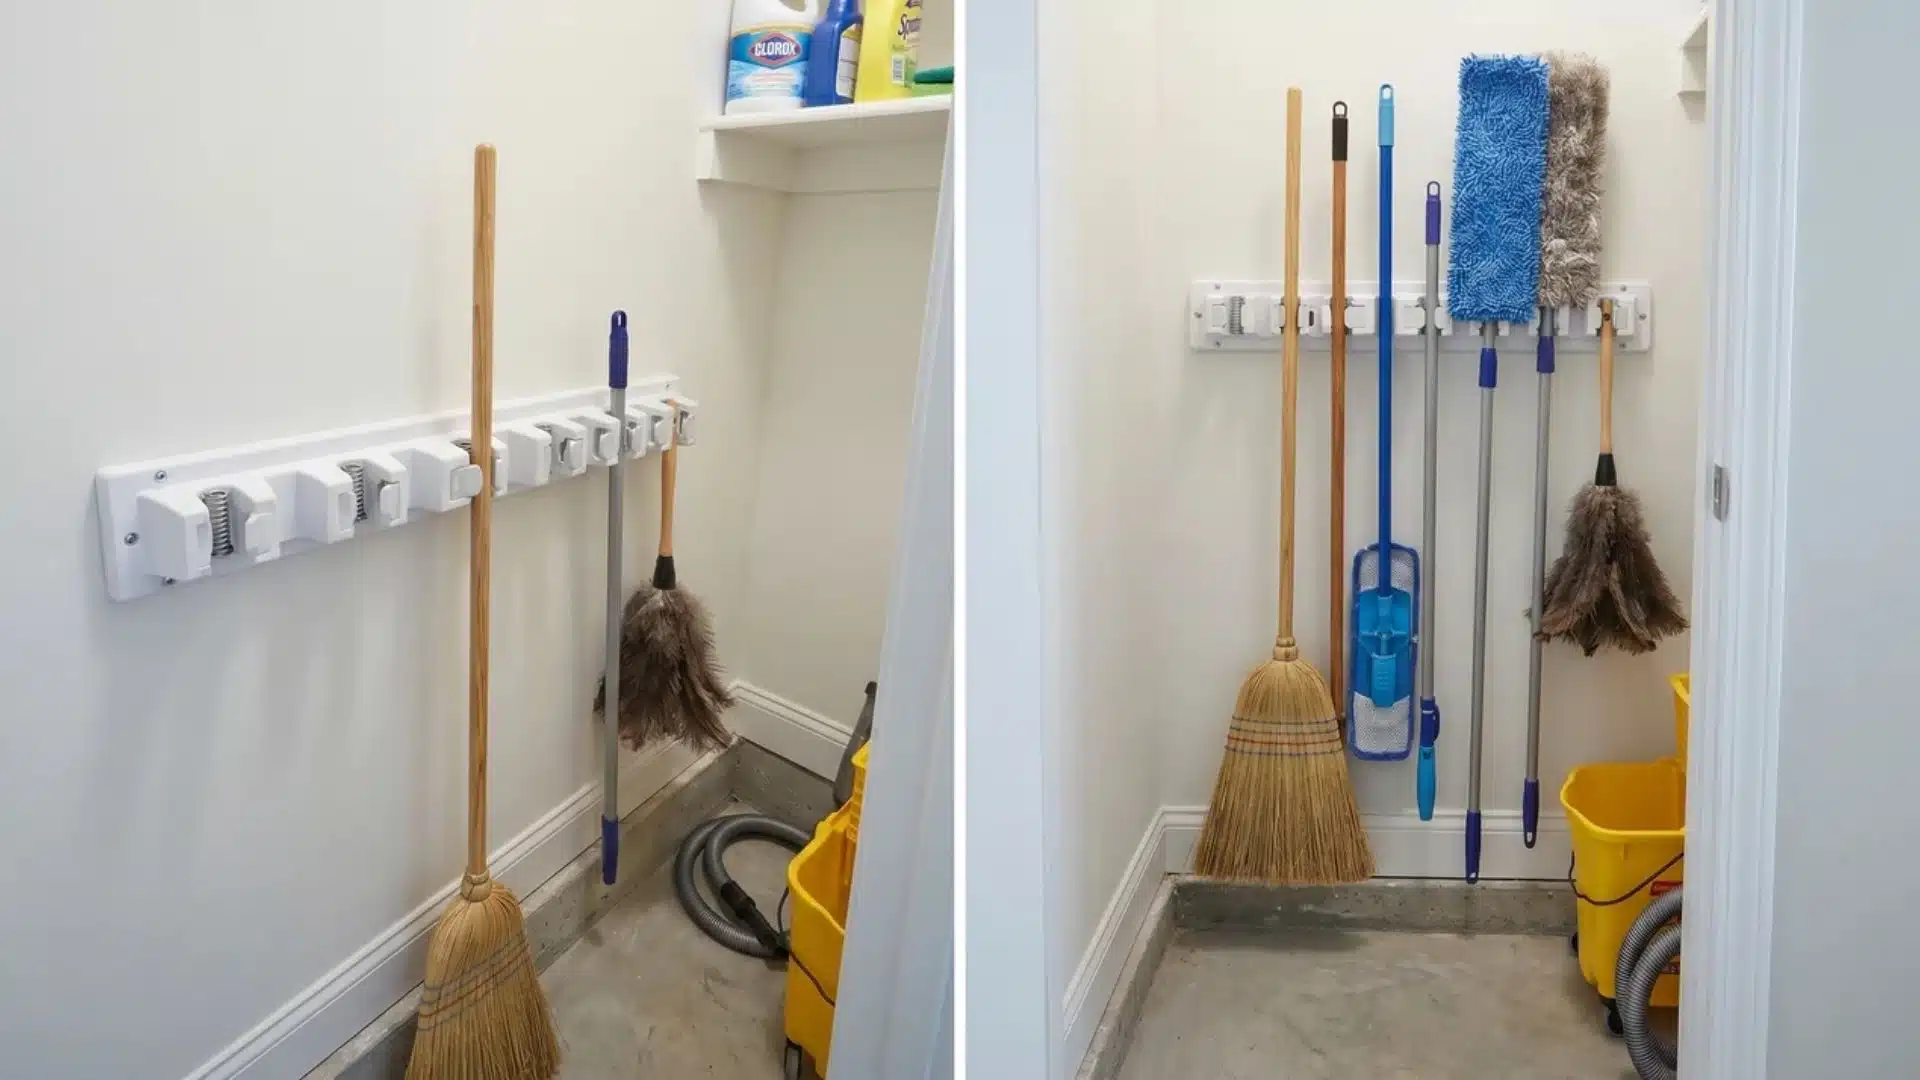
Brooms and mops slide down the wall and clatter to the floor whenever something brushes past them. A grip rail clamps each handle in place, holding tools upright and off the ground.
Mount the rail to a wall stud at shoulder height and space the grips so handles do not knock together. Hang brooms, mops, and dusters by the handle, leaving the floor clear for a vacuum or bucket below.
Where Do Most DIY Closet Builds Go Wrong?
Most closet builds fail in the same three spots. Getting these right upfront prevents rebuilds and keeps the structure solid long term.
- Shelf sagging: Shelves wider than 36 inches need a center support or vertical divider. Without support, MDF, melamine, and wire shelving will all bend under the weight of folded clothing over time.
- Rod deflection: A single long rod across a 6-foot span will eventually sag. Add a center support hook or split the run into shorter sections using a vertical divider.
- Poor upright fit: Baseboards push panels forward at the bottom if not accounted for. Measure baseboard depth and either notch the panel or use a filler strip for a flush installation.
Fixing these three points early keeps the rest of the closet build stable and properly aligned.
Wrapping Up
DIY closet ideas help turn unused or poorly planned storage areas into practical, organized systems that fit real daily needs and habits.
From reach-in fixes to walk-in upgrades, each idea focuses on better use of space, smarter layouts, and the avoidance of common build mistakes.
Simple changes like better rods, smarter shelves, and improved layouts can make a closet more usable and efficient in everyday use.
Start applying these ideas and build a setup that works day to day, not just on paper.
Frequently Asked Questions
What is the easiest DIY closet upgrade for a small reach-in closet?
The easiest upgrade for a small reach-in closet is adding a double hanging rod. A second rod mounted below the existing one instantly doubles your hanging capacity without cutting or complex installation. Set the lower rod at around 40 inches from the floor for short items like shirts and jackets, and keep the top rod at roughly 80 inches. This single change eliminates the dead air space that most single-rod closets waste and costs less than $30 in hardware.
How do I plan a DIY closet build before buying materials?
Start by measuring your closet’s width, depth, and height, then inventory your clothing by type before touching a single shelf. Separate long-hang items (dresses, coats) from short-hang items (shirts, folded pants) so you can plan rod zones accurately. Mark your layout directly on the wall with painter’s tape before purchasing anything. This reveals clearance problems, like a drawer that won’t clear the door, before they become expensive mistakes.
What materials are best for DIY closet shelves?
The best material depends on budget and use. Plywood and MDF are durable and paintable, running $30–$50 per sheet, best for custom built-in looks. Melamine is pre-finished and easy to clean, ideal for those who want to skip painting. Wire shelving is the most affordable and renter-friendly option, though it’s less practical for small or heeled shoes. For any shelf wider than 36 inches, add a center support regardless of material to prevent sagging under the weight of folded clothing.
How do I organize a walk-in closet on a budget?
The most budget-effective approach for a walk-in closet is a hybrid build: IKEA PAX units anchored to wall studs form the base, supplemented with custom-cut MDF shelving for a built-in look at lower cost. Fill the center of the walk-in with a freestanding shelf tower to divide hanging zones left and right. Add a pegboard panel on an open wall for accessories. Prioritize task lighting under shelves, LED strip lights are inexpensive and dramatically improve usability in every storage zone.