
Making DIY wind chimes from old keys is one of the easiest weekend projects you can do at home. All you need is a wooden round, some cord, a drill, and a handful of old keys.
In under two hours, you can have a finished, hanging wind chime that costs next to nothing.
I’ve built several of these over the years, and the key-based version consistently produces the best metallic tone out of any recycled material I’ve tried.
And one of my favorites is making homemade DIY wind chimes from old bottle caps. They are super easy, budget-friendly, and a great way to reuse things you already have at home.
Plus, the soft clinking sound adds a peaceful touch to any porch, balcony, or garden space.
In this guide, you’ll learn how to turn simple bottle caps and a tin can into a charming DIY wind chime.
Why Handmade Wind Chimes Make Great Decor?
Handmade wind chimes add beauty, personality, and relaxing sounds to both indoor and outdoor spaces. They also turn everyday materials into creative, meaningful home décor pieces.
Handmade wind chimes are more than just decorative items because they bring movement, sound, and creativity into your home.
If you hang them on a porch, balcony, patio, or garden, they create a peaceful atmosphere with their gentle clinking.
Many people love DIY wind chimes because they can be customized using old keys, shells, beads, bottle caps, or wooden pieces to match different décor styles.
Unlike store-bought decorations, handmade wind chimes feel more personal and unique. They also encourage recycling by turning unused household items into beautiful, functional pieces.
With their calming sounds and creative designs, DIY wind chimes add warmth, charm, and a handmade touch that makes any space feel more welcoming and relaxing.
What You Need to Know Before Starting?
Before picking up a drill or a hole punch, a few decisions like choosing the right base material, string type, and hanging location will save you time and improve your results
- How Material Affects Sound: The material you choose changes the tone and volume of your wind chime. Heavier materials usually create deeper tones that carry farther outdoors.
- Sound Tuning Basics: Wind chime sound depends on material size, thickness, and spacing. Longer and heavier pieces create deeper, slower tones, while shorter pieces make higher sounds.
- Choosing the Right String: Strong, weather-resistant string helps wind chimes last longer outdoors. Nylon cord and fishing line are popular as they resist moisture, sunlight, and fraying.
- Safety Tips Before You Begin: Drilling into tin cans or wooden rounds creates sharp edges and flying debris. File or tape any sharp metal edges before handling finished pieces, especially if making this project with kids.
Supplies You Will Need to Build DIY Wind Chimes
Most of the supplies used for this diy wind chime are simple, everyday items mixed with a few basic craft materials.
- Old keys
- Wooden round
- Drill and Drill bit
- String
- Hemp cord
- Safety Glasses
- Hanging hook
- Measuring Tape
How to Make Your Own DIY Wind Chime?
One of the best things about wind chimes is how simple materials can come together to create something relaxing, decorative, and full of personality for an outdoor space.
Step 1: Sort Your Keys by Size
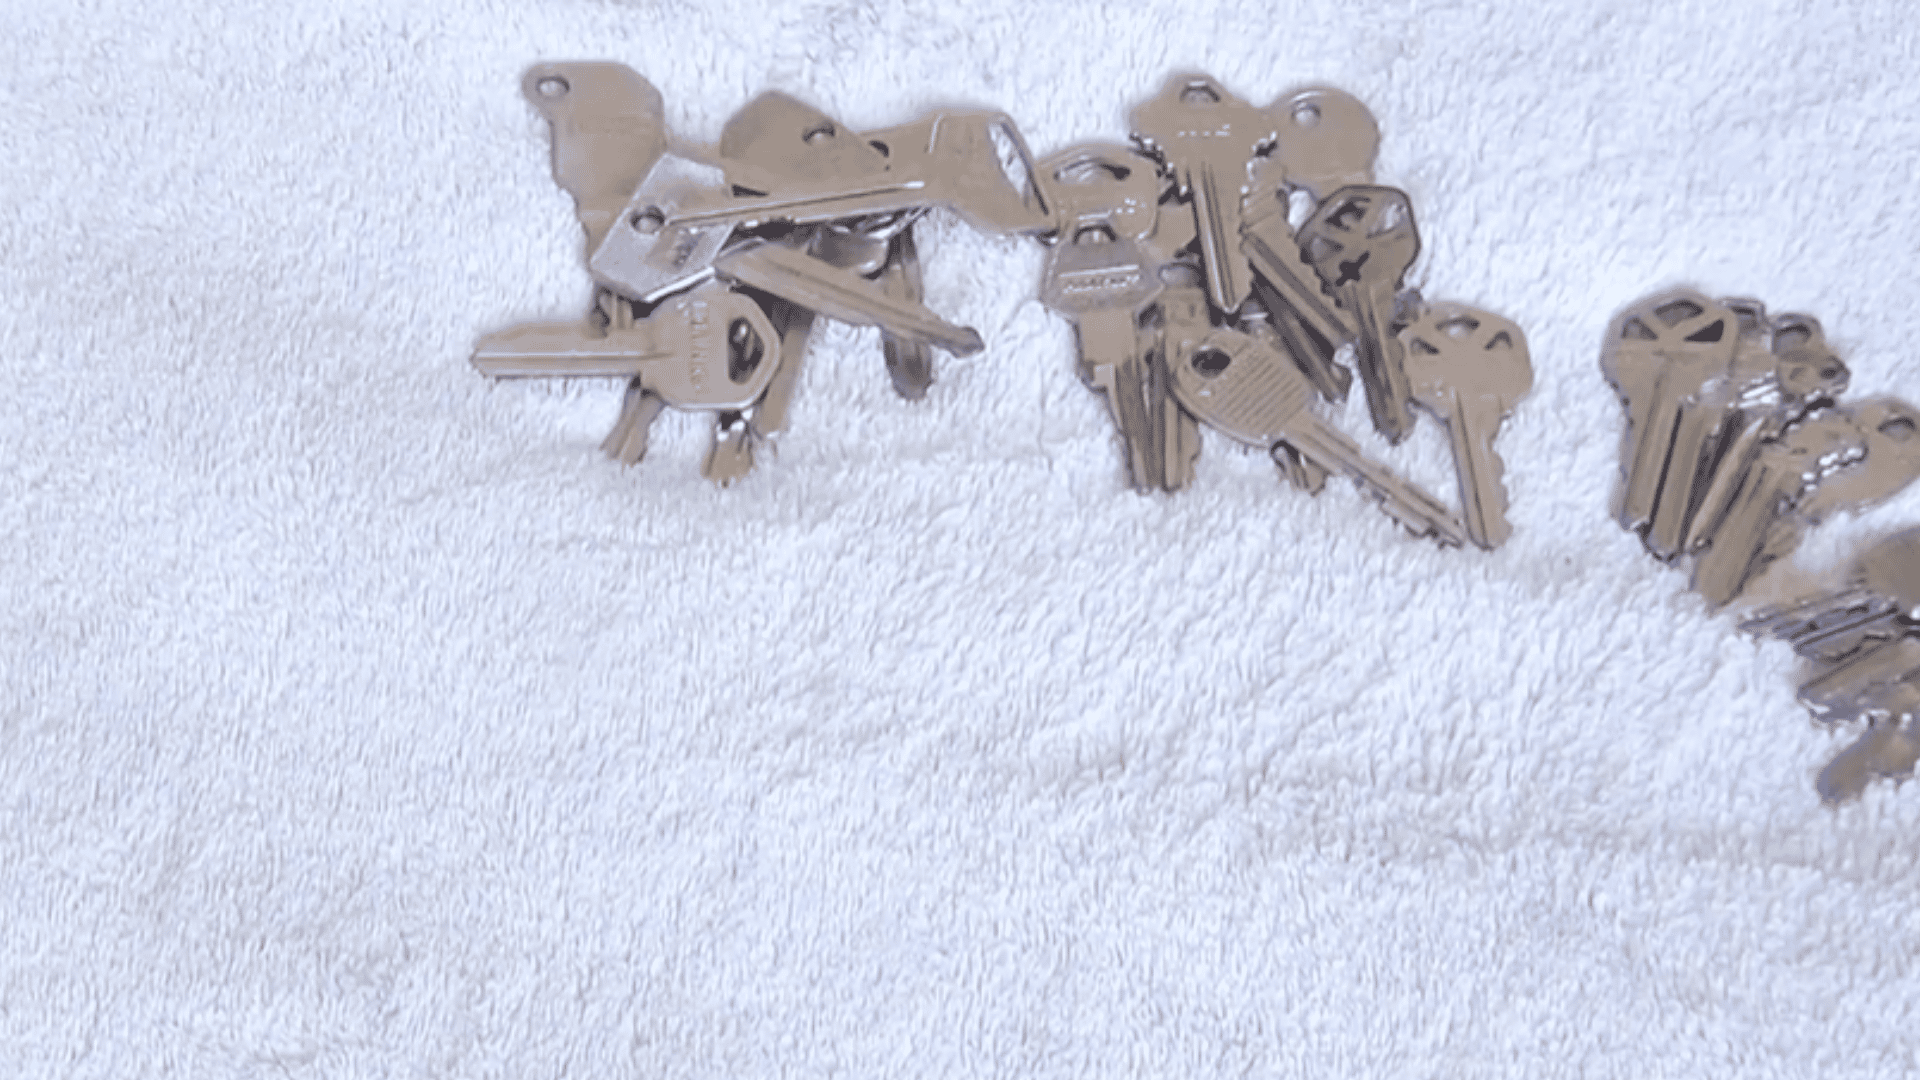
Start by organizing your keys from the smallest to the largest before attaching them to the wind chime.
Sorting them first makes the design look more balanced and helps create a smoother layered effect once everything is hanging together.
It also makes the assembly process easier because you can quickly choose the next key while working.
Mixing different key shapes and colors gives the finished wind chime a more decorative, unique appearance while helping each strand stand out visually as it begins to move in the breeze.
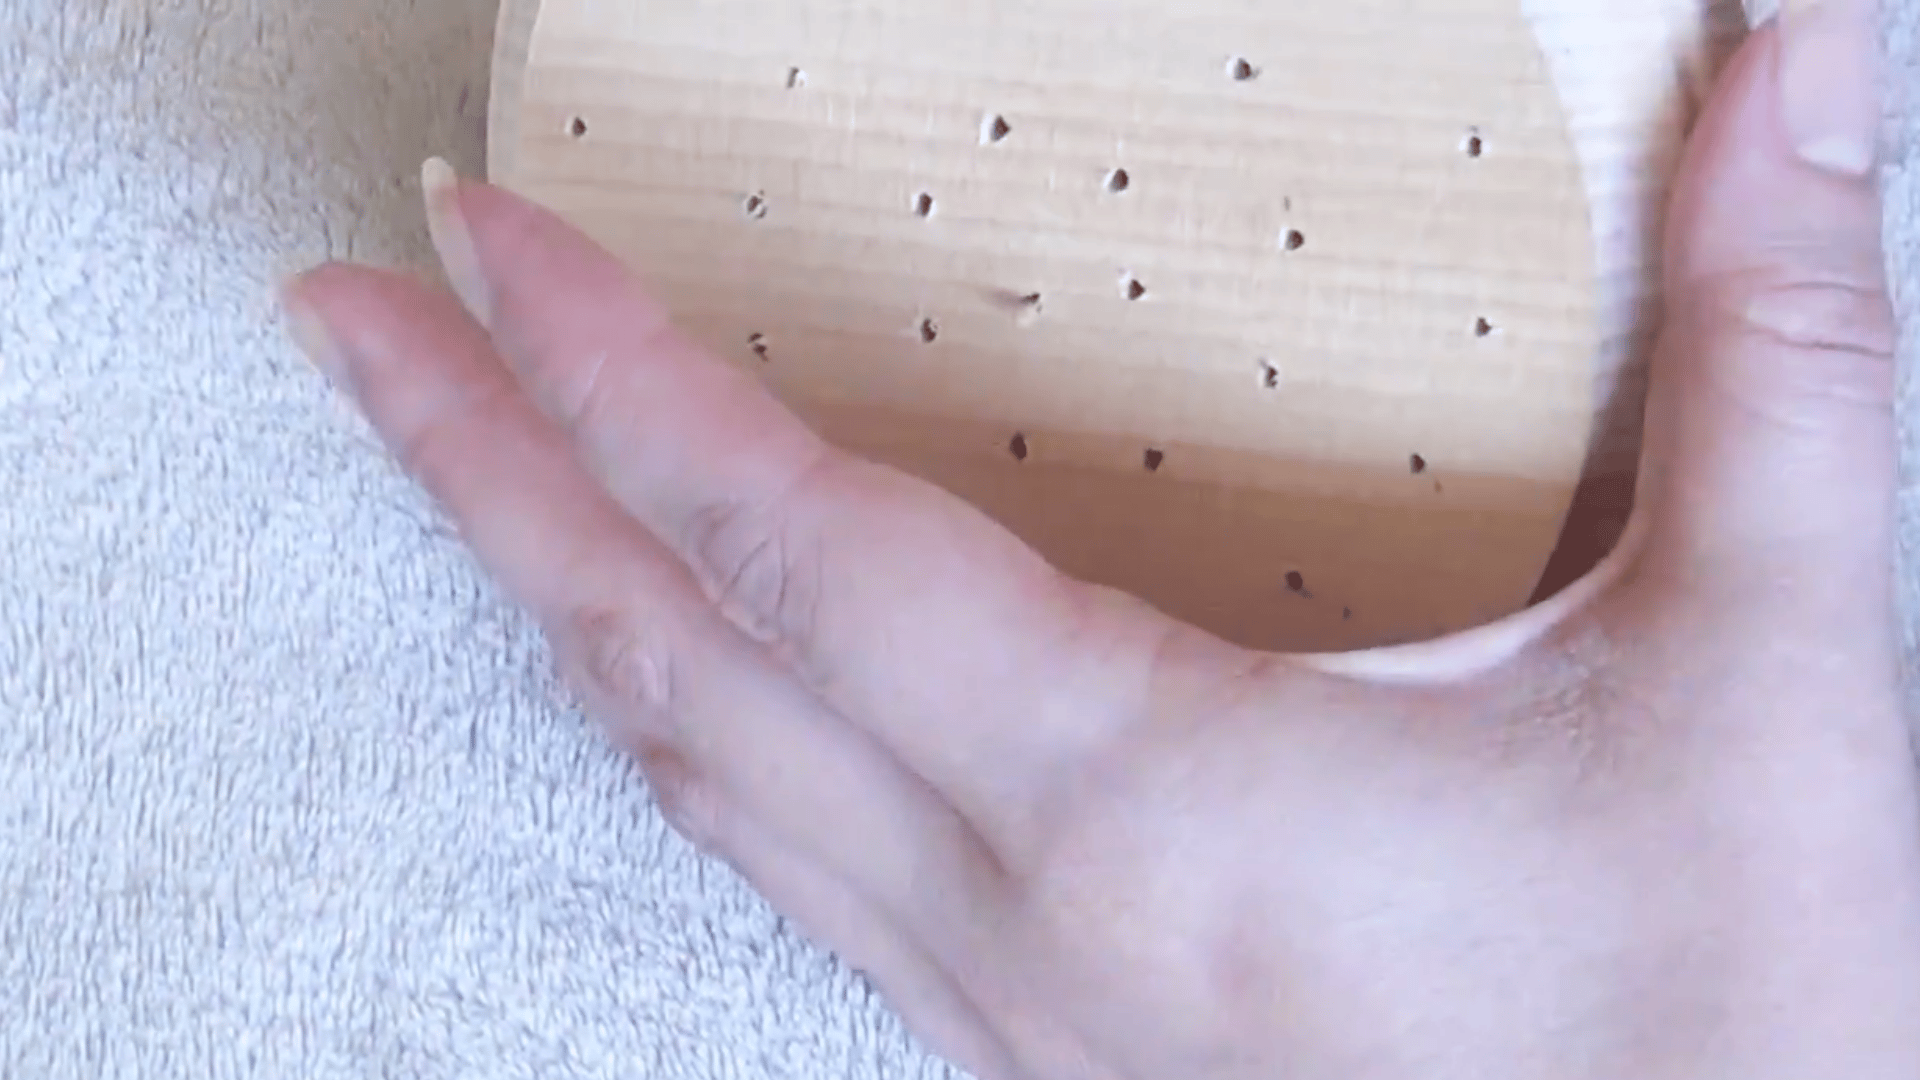
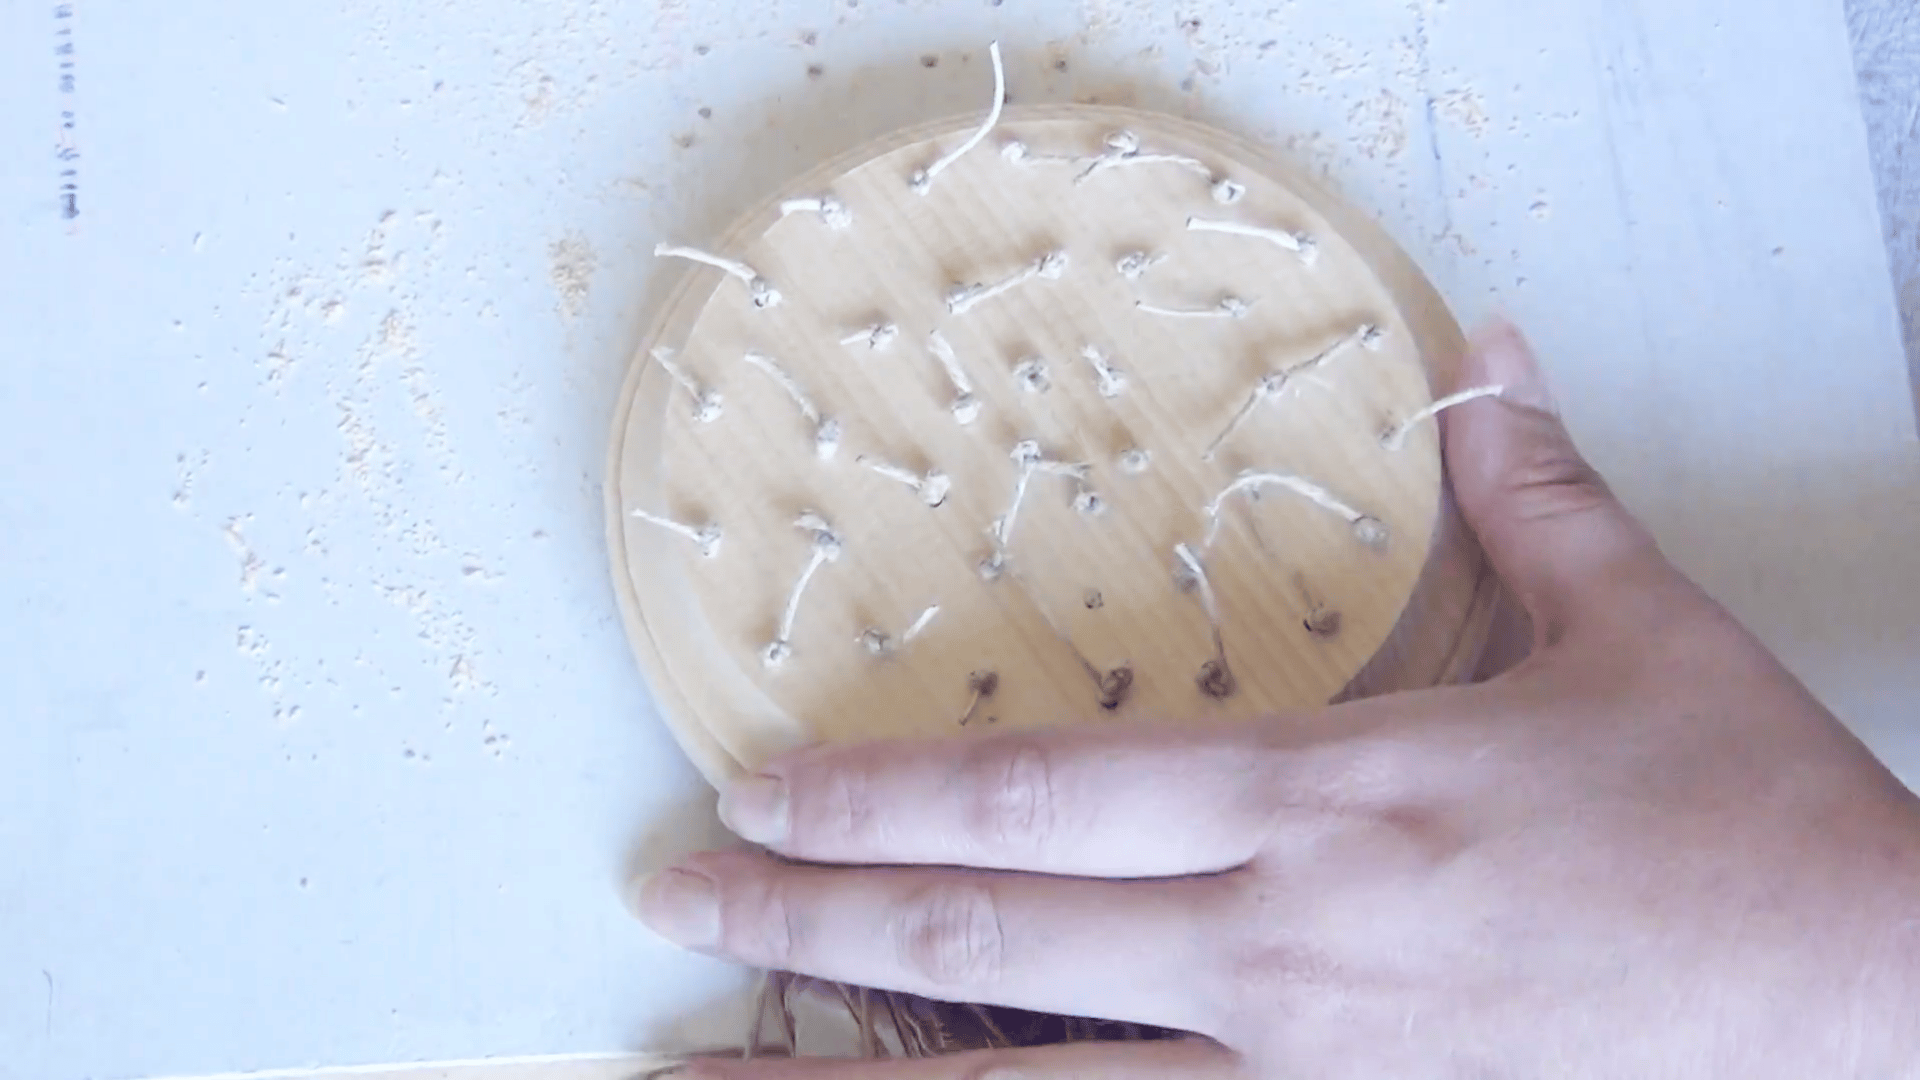
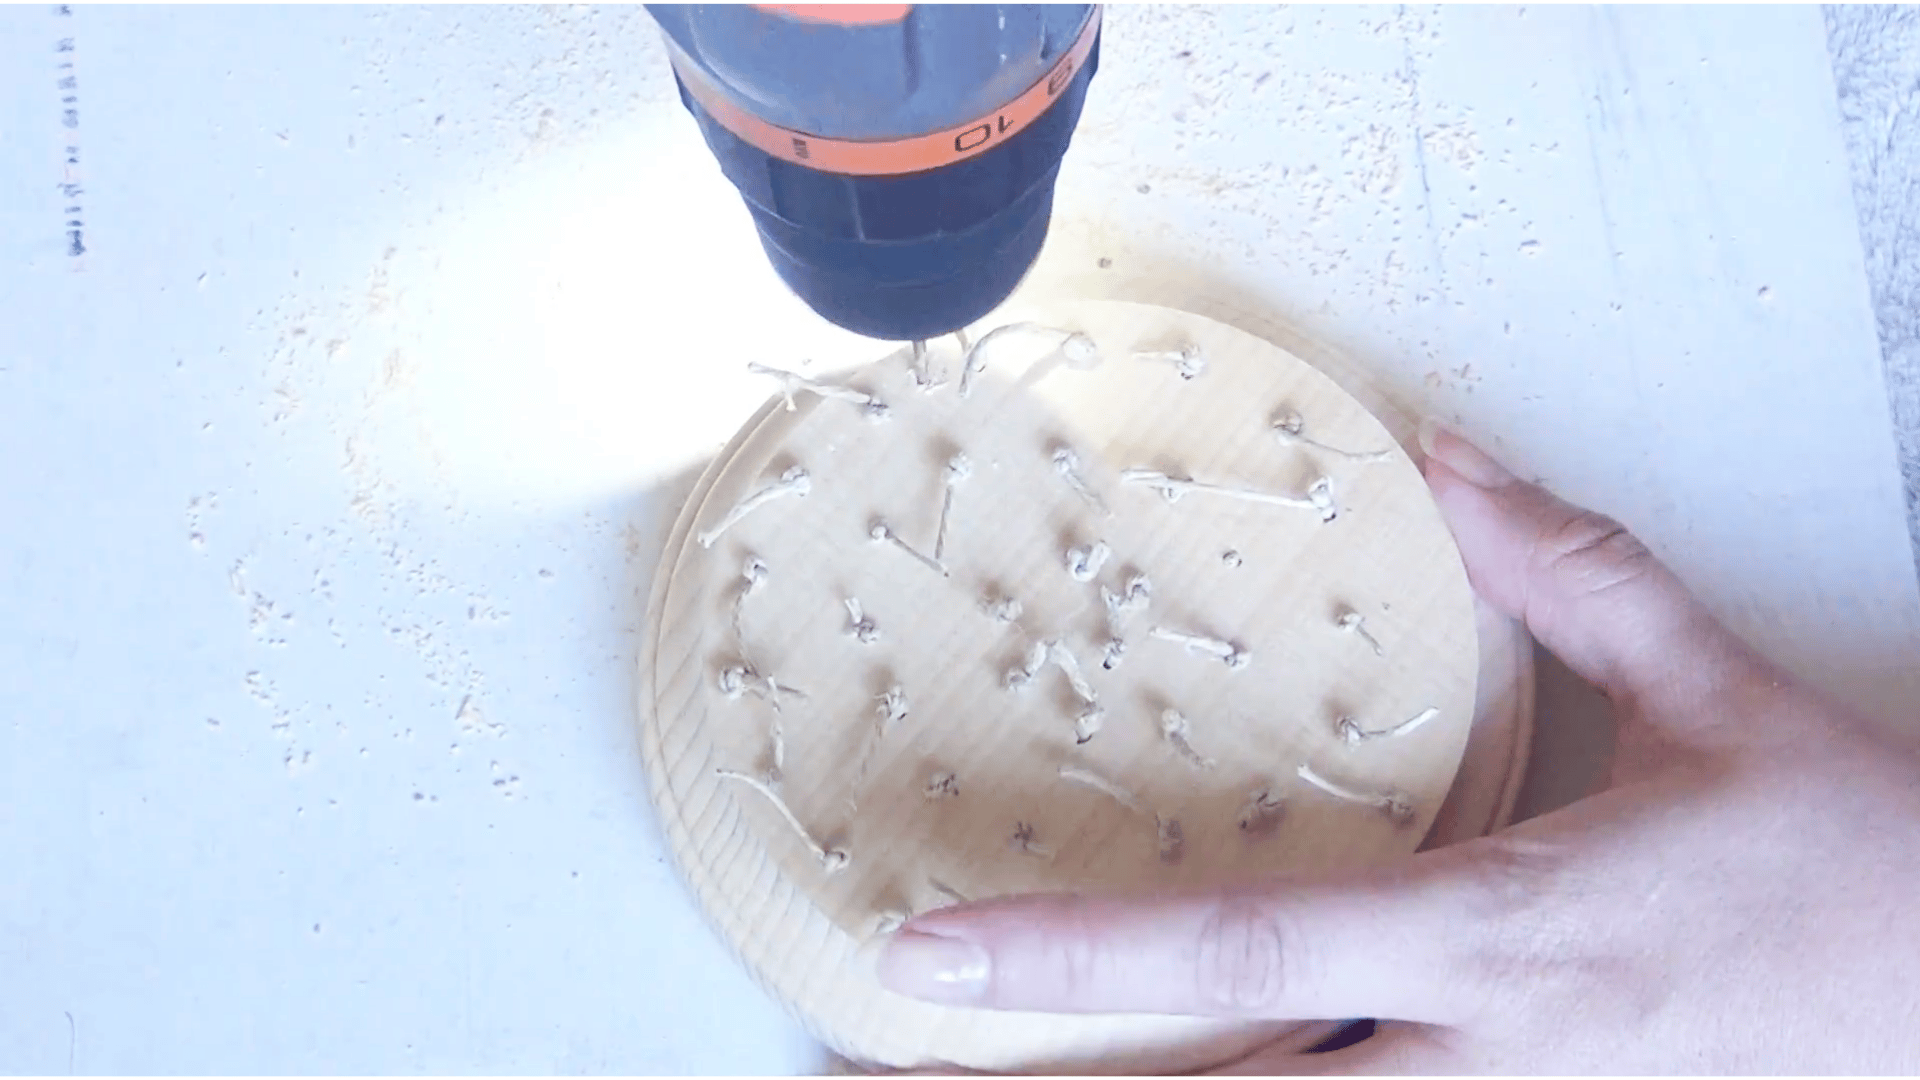
Step 2: Drill Holes Into the Wooden Round
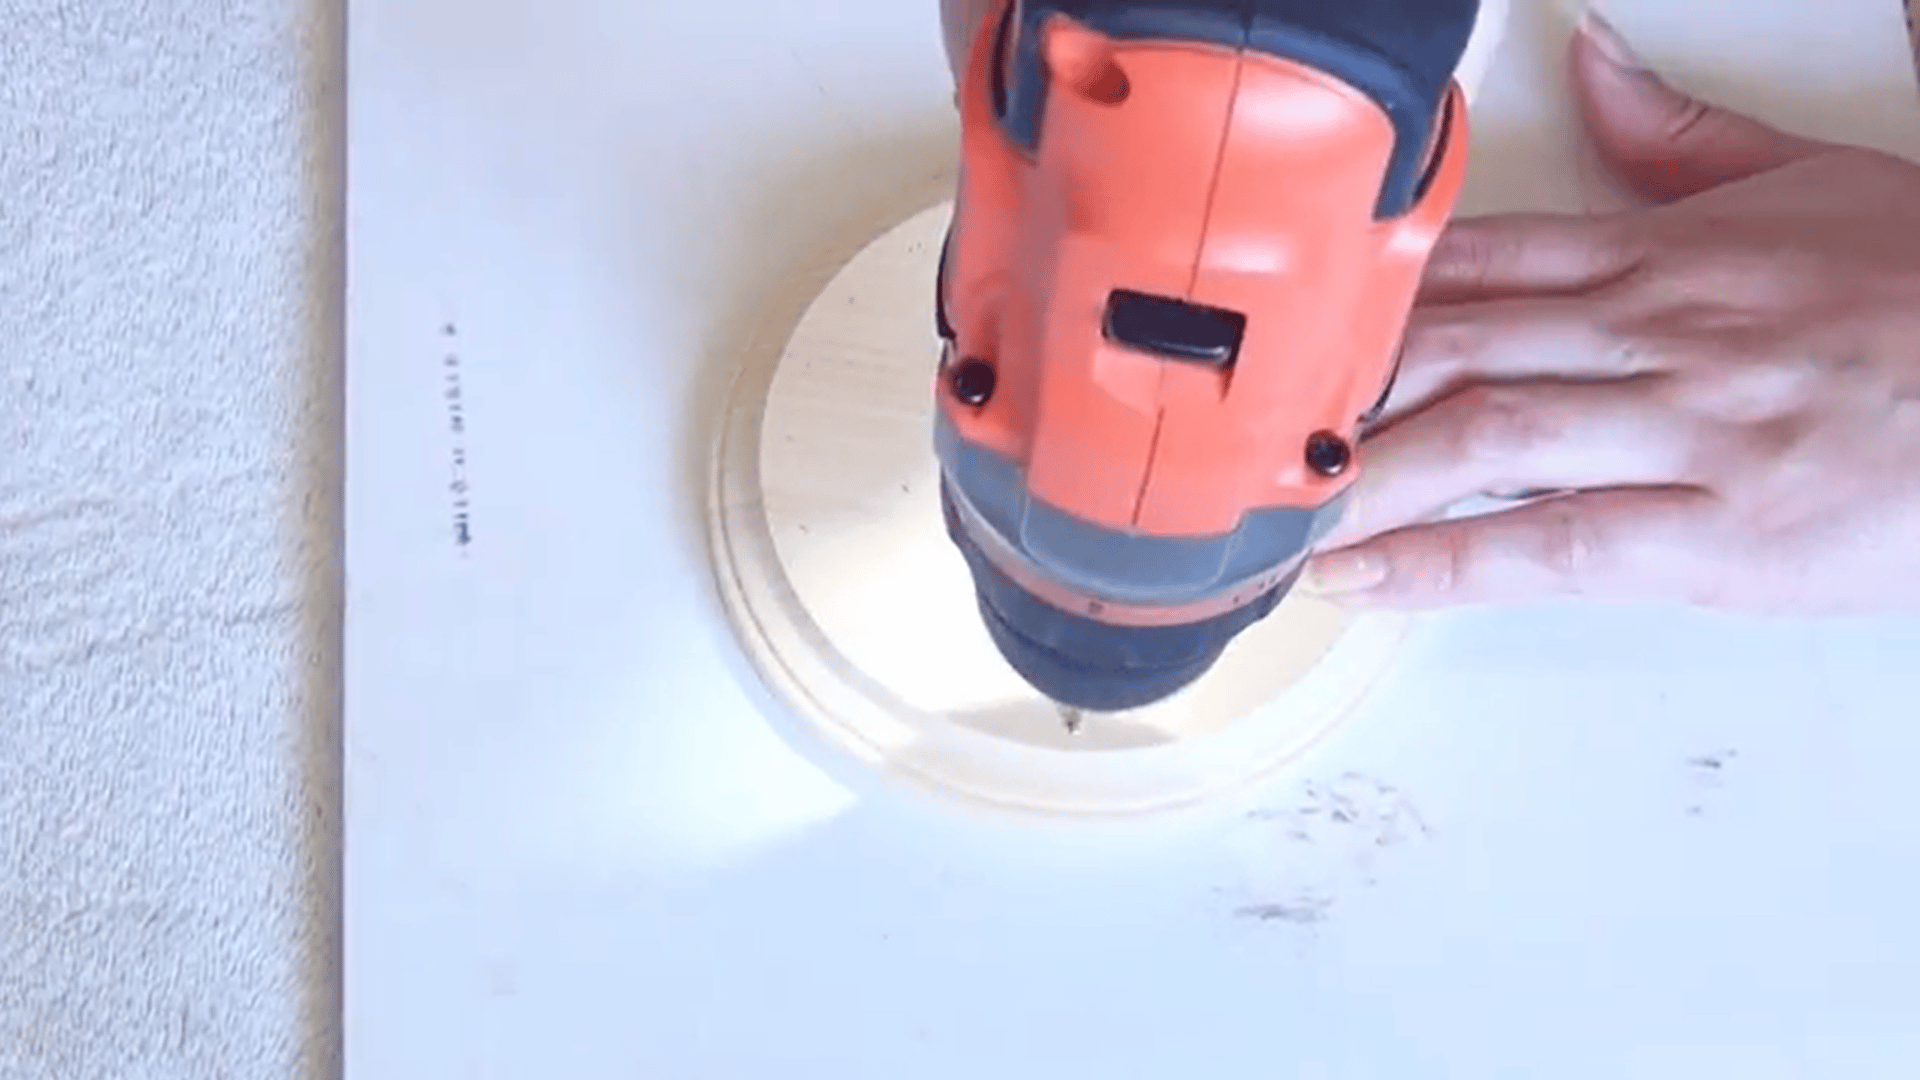
Take your wooden round and carefully drill holes where each string will hang.
The holes can be arranged in a spiral pattern because many keys are being used, which helps spread the strands out more evenly.
If you are working with fewer keys, you can simply drill the holes in a circle around the outer edge of the wooden base.
When using a beveled wooden round, place the smaller side facing upward for a cleaner look. Also, check that every hole is large enough for the string or hemp cord to pass through smoothly.
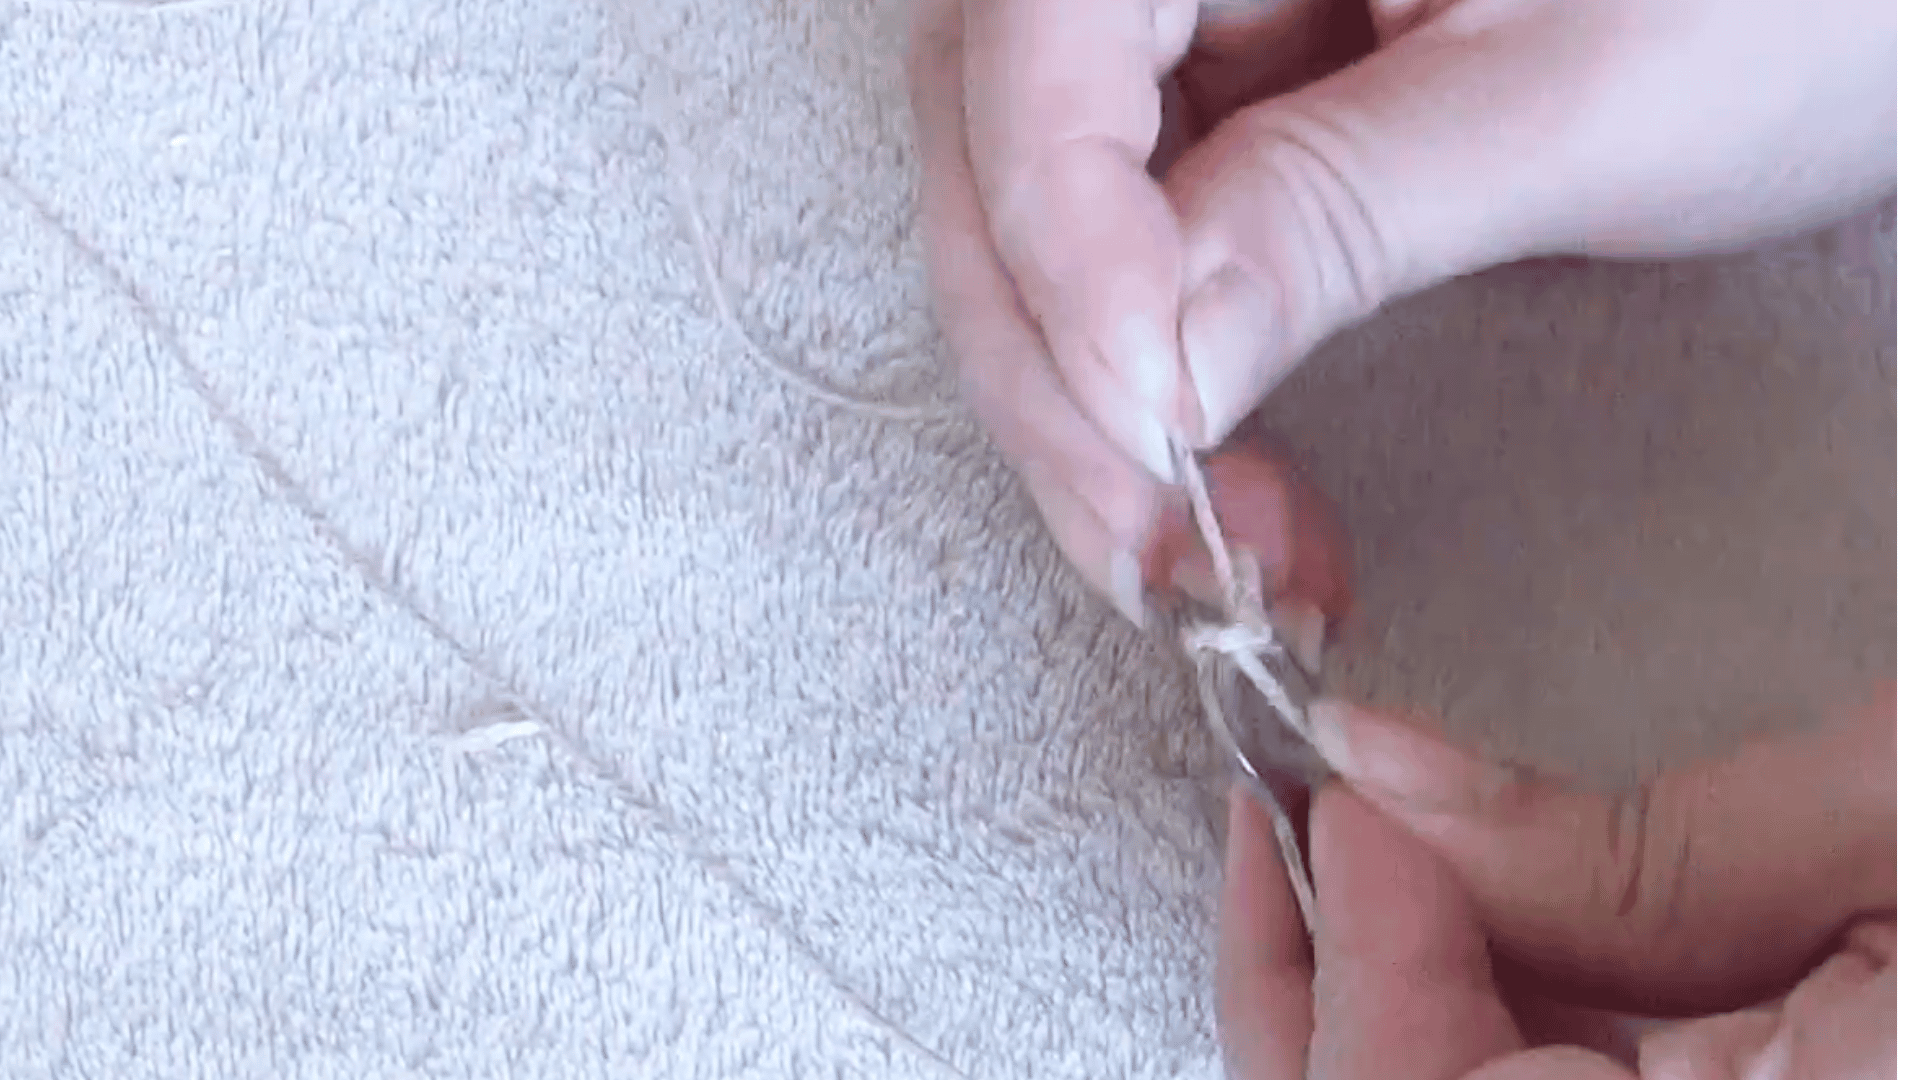
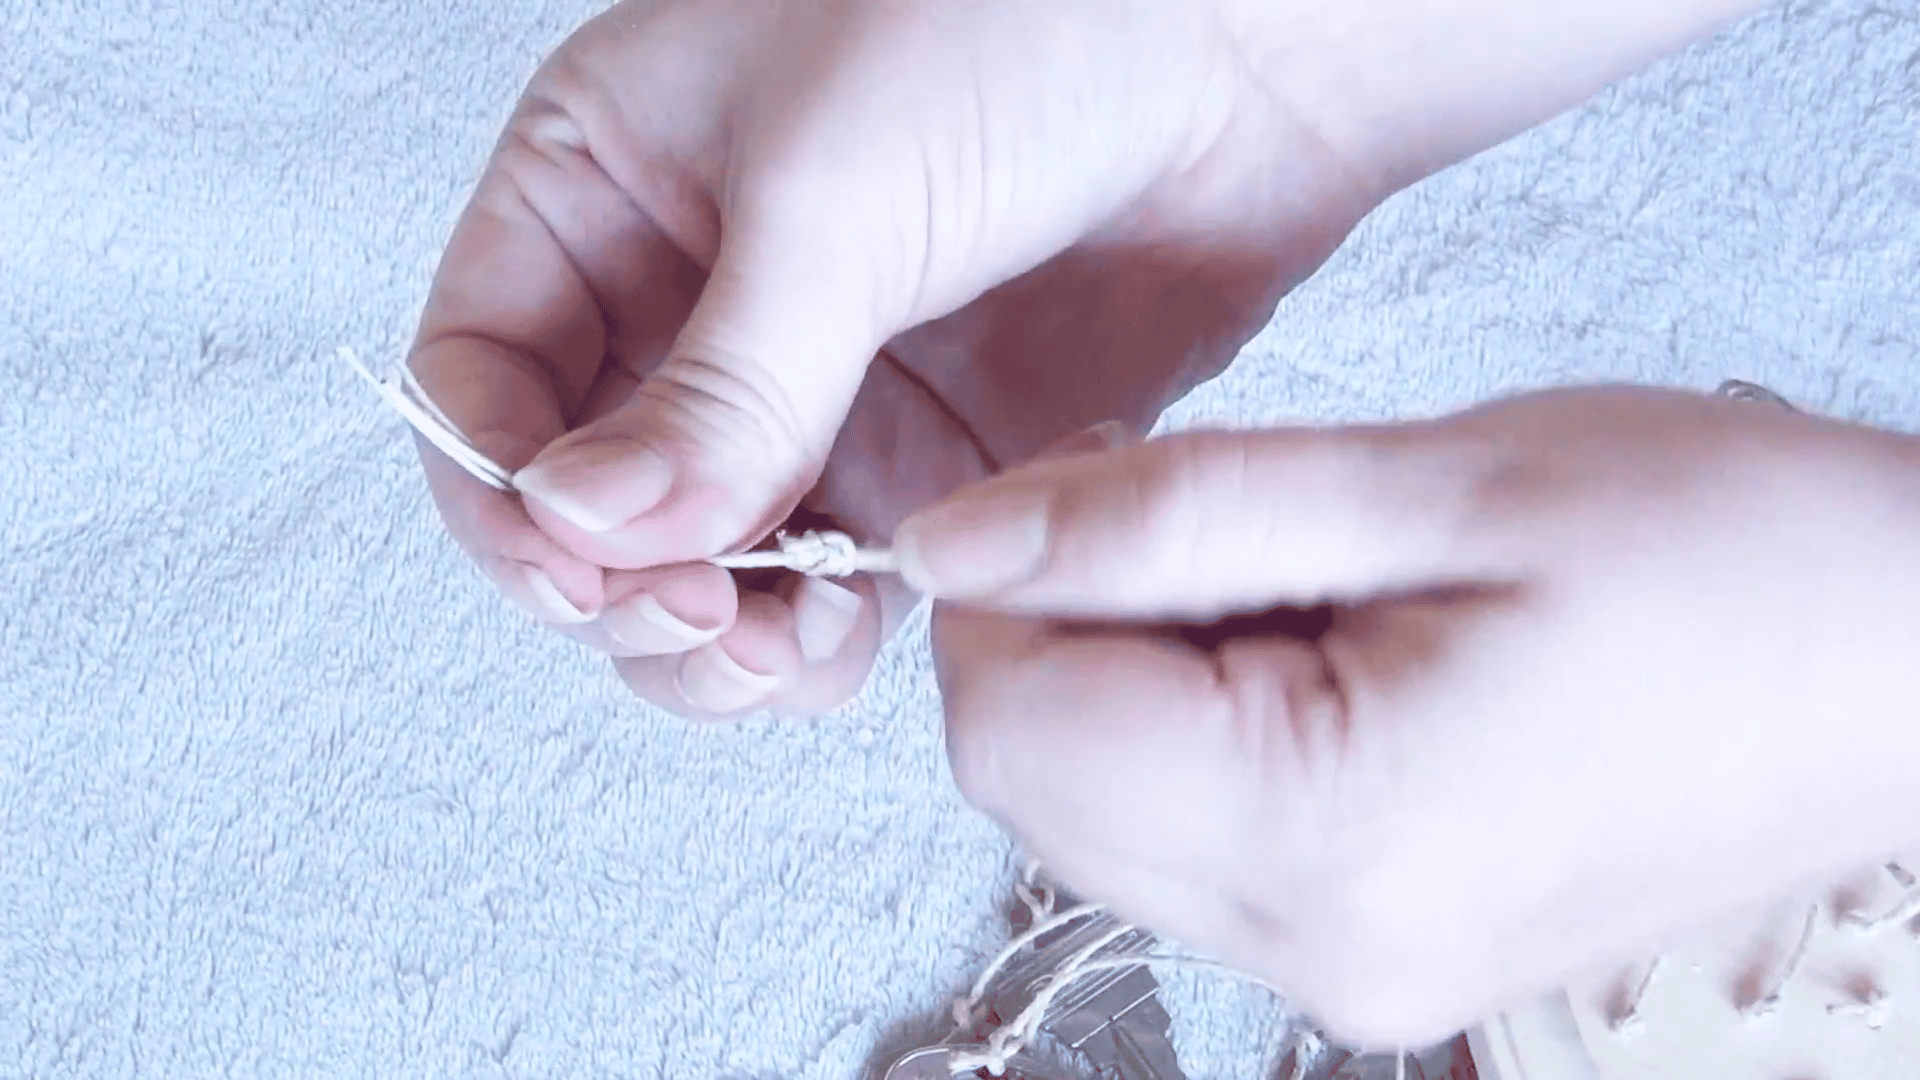
Step 3: Thread the String Through the First Hole
Cut a piece of string or hemp cord and carefully push it through one drilled hole from the bottom side of the wooden round to the top.
Once the string passes through, tie a secure knot at the top to prevent it from slipping back through the hole.
Pull the string firmly to keep it tight and stable before moving to the next strand. This first cord becomes one hanging section of your diy wind chime.
Continue repeating the same process for every drilled hole until all the hanging strands are attached securely to the wooden base
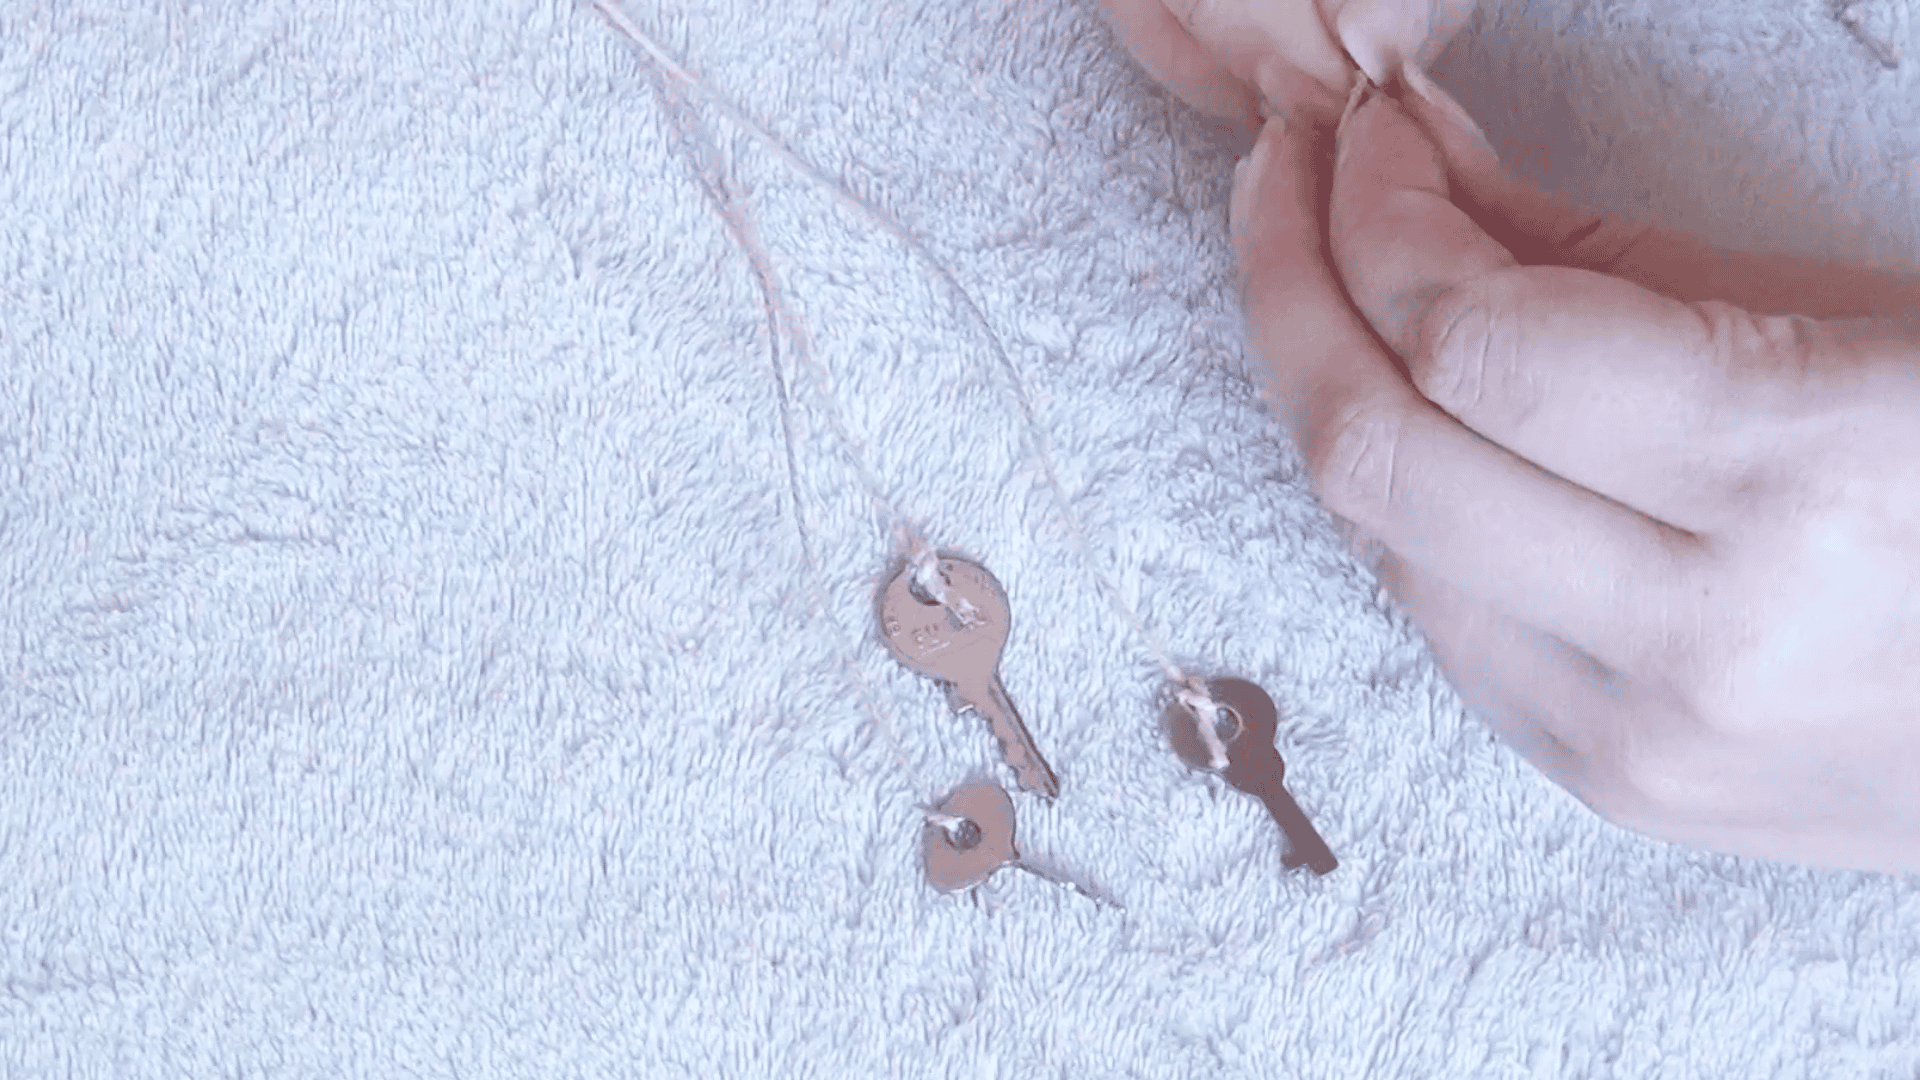
Step 4: Attach the Smallest Key
Measure the first string carefully before cutting it because this strand will guide the length of the rest of your wind chime.
Leave enough space for the key to hang freely and move when the breeze passes through.
Tie the smallest key securely to the bottom of the string using a tight knot. Starting with the smallest key helps create a neat layered design.
Once it is attached, check that the key swings easily without touching the wooden base.
Step 5: Add More Strings and Keys
Move to the next drilled hole and repeat the same process by threading the string through the wooden base and tying a secure knot at the top.
Pull the cord tight before attaching the next key to the bottom.
Each new string should be trimmed about a quarter inch shorter than the previous one to create a gradual layered effect.
This small difference in length helps the wind chime look more balanced and decorative. Continue attaching keys from the smallest size to the largest until the entire wooden base is filled.
Step 6: Space the Keys Properly
As you continue adding more keys, make sure there is enough space between each hanging strand. The keys need room to move freely and gently tap against one another when the wind blows.
If the strands are placed too close together, they may tangle and stop moving properly.
On the other hand, if they are spaced too far apart, the wind chime may not create much sound.
Take a moment to adjust the string lengths and placement until the overall design looks balanced and hangs evenly from the wooden base.
Step 7: Drill Holes for the Hanging Strings
After the key strands are attached, drill three extra holes near the top edge of the wooden round. These holes will hold the support strings used to hang the wind chime.
Thread the string through each hole and tie knots underneath the base.
The loose ends should come up through the top. Three support strings help the wind chime hang evenly and stay balanced
Step 8: Balance the Wind Chime
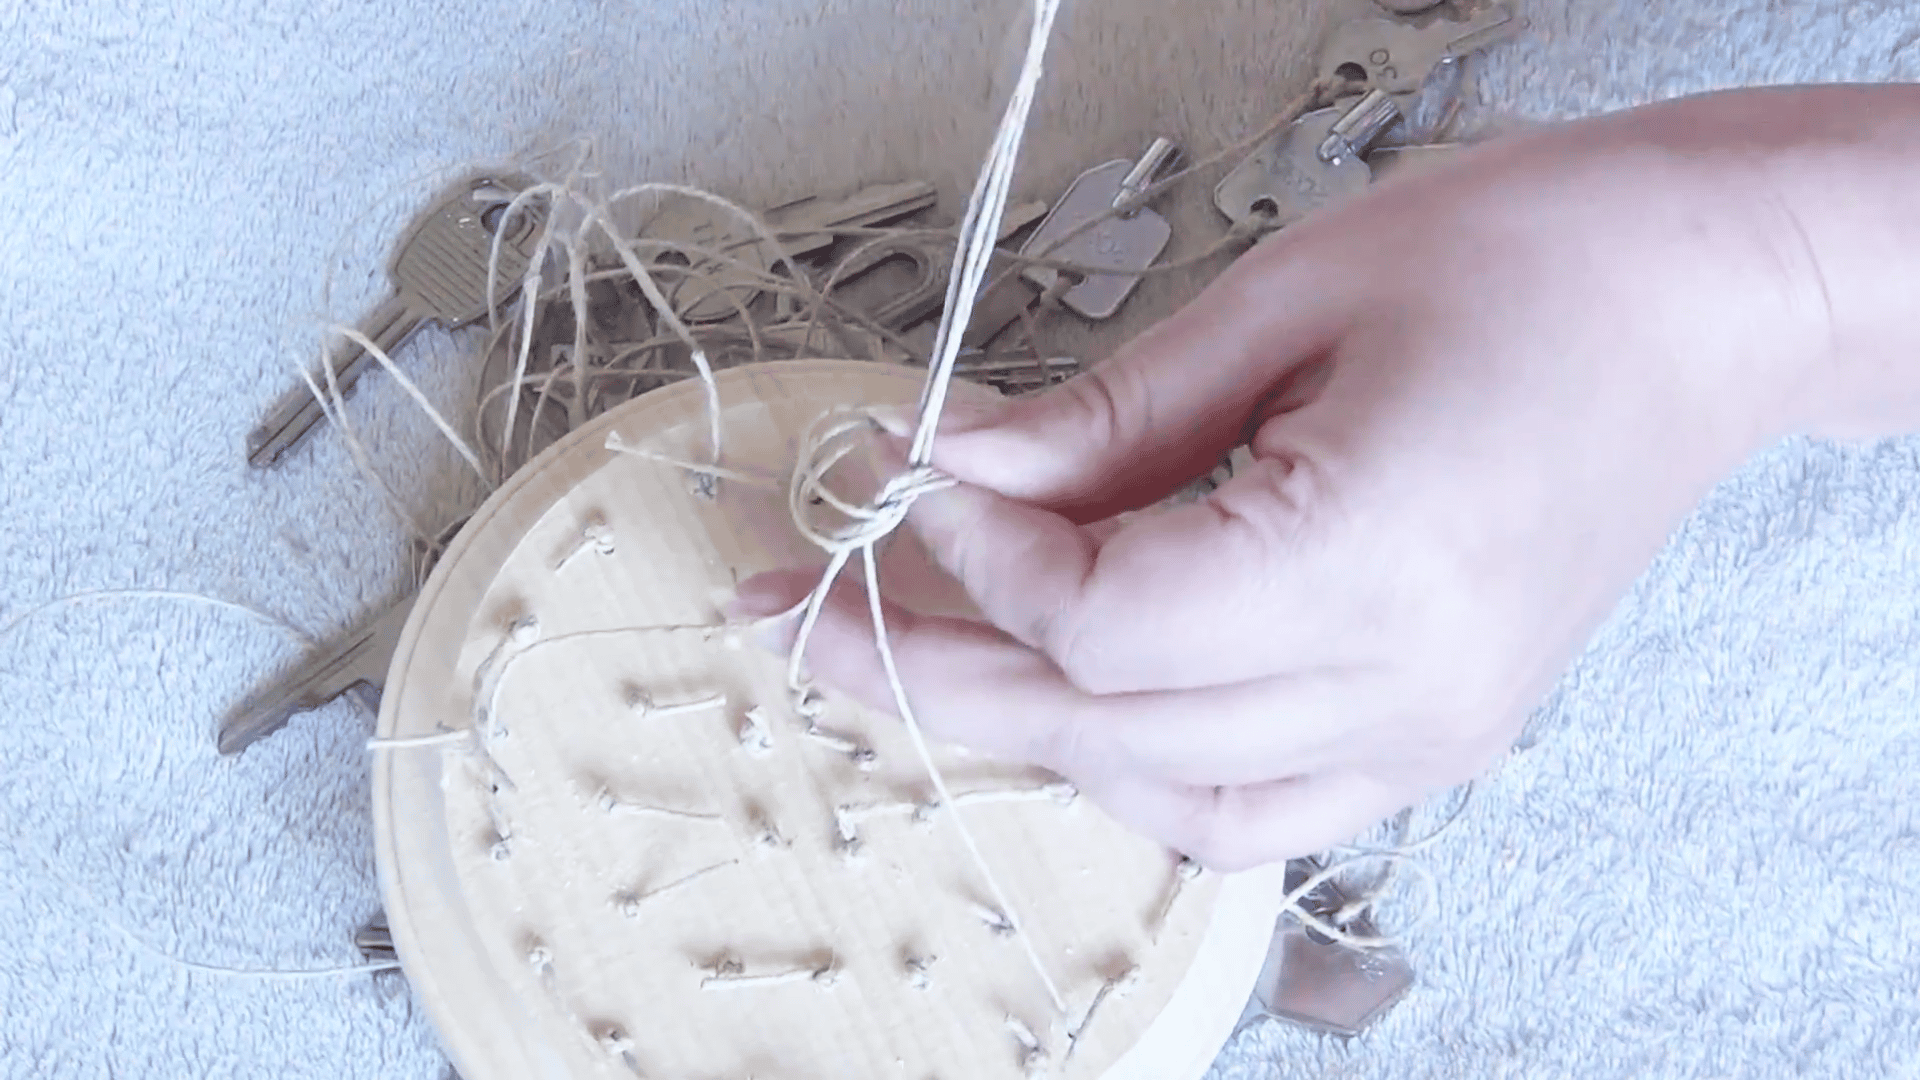
Gather the three support strings together and tie them into an overhand knot. Before tightening it all the way, hang the wind chime to check if it sits evenly.
If one side hangs lower than the others, adjust the string lengths until the wind chime looks balanced.
Once everything hangs straight, pull the knot tight to secure it in place.
This step matters because a wind chime that hangs unevenly may not move properly or stay steady when placed outdoors in windy weather conditions.
Step 9: Create the Final Hanging Loop
Once the wind chime feels balanced and hangs evenly, tie another secure knot near the end of the support strings to create the main hanging loop.
For extra strength and stability, add a second knot close to the first one so the strings stay tightly connected.
These knots help prevent the loop from slipping loose when the wind chime moves outdoors.
Your finished loop should be strong enough to hang safely from a hook, nail, tree branch, or porch hanger while supporting the full weight of the wind chime comfortably.
(Keep the strings close together so they do not slip off easily in windy weather.)
Step 10: Hang and Enjoy Your DIY Wind Chime

Your homemade DIY wind chime is now complete and ready to hang in your favorite outdoor space. Place it somewhere that catches a gentle breeze, such as a porch, patio, balcony, garden, hook, or even near an open window.
As the keys move and softly clink together, they create a relaxing sound, adding a creative, handmade touch to your home decor.
This tutorial is based on a helpful video by Katrinaosity. You can check out the original video on their YouTube channel here or watch it below.
Other Homemade DIY Wind Chimes
These wind chime ideas use simple items that are easy to find at home or in thrift stores. Each one creates a different sound and style, making it fun to try different materials.
| DIY Wind Chime Idea | Materials Used | What Makes It Special |
| Spoon Wind Chime | Old metal spoons, string, wood ring | Makes soft metal sounds and works well in gardens. |
| Seashell Wind Chime | Seashells, fishing line, driftwood | Gives a beach-style look with light clicking sounds. |
| Beaded Wind Chime | Colorful beads, wire, metal hoop | Adds bright colors and shines nicely in sunlight. |
| Bamboo Wind Chime | Bamboo sticks, string | Creates calm hollow sounds that work well outdoors. |
| Mason Jar Lid Wind Chime | Mason jar lids, chain, twine | A simple recycled craft with a rustic look. |
| CD Wind Chime | Old CDs, ribbon, beads | Reflects sunlight and adds sparkle to patios or balconies. |
| Terracotta Pot Wind Chime | Small clay pots, string, beads | Gives a natural look and makes soft tapping sounds. |
| Button Wind Chime | Large buttons, thread, wooden stick | Lightweight and great for kids’ craft projects. |
| Driftwood Wind Chime | Driftwood pieces, rope, shells | Works well for coastal or natural outdoor decor. |
| Silverware Wind Chime | Forks, knives, spoons, chain | Strong metal sound and a creative, recycled design. |
Why Old Keys Make Great Wind Chimes?
Old keys make great wind chimes because they are easy to reuse and already have a nice metal sound. When the keys hit each other, they produce soft, pleasant tones that work well outdoors.
You can use old house keys, locker keys, or even small decorative keys from thrift stores.
They also give your project a personal touch, as many keys come in different shapes and colors.
Another reason people like key wind chimes is that they are low-cost and simple to make at home. You only need a few basic supplies to turn unused keys into something useful.
Using old keys for crafts also helps reduce waste by giving unwanted items a second use.
This makes the project both creative and practical for outdoor spaces like patios, balconies, or gardens.
Tips to Make Your Wind Chime Look Better
A few small design choices can make your diy wind chime look more balanced, decorative, and visually appealing in both indoor and outdoor spaces.
- Use Different Key Shapes: Mixing vintage, house, and decorative keys adds texture and style. Different key sizes also help create varied tones and a more layered sound when the wind chime moves.
- Try Different String Types: Hemp gives a rustic look, while fishing line creates a floating effect. Nylon cord is another durable option that works well for outdoor homemade wind chimes exposed to weather.
- Paint the Wooden Round: You can stain or paint the wooden base to match your outdoor decor. Soft natural colors work well for gardens, while bright shades can make DIY wind chimes stand out on patios or balconies.
- Add Beads or Charms: Decorative beads between keys can make the wind chime more colorful and unique. Glass beads, metal charms, or wooden accents can also reflect sunlight beautifully as the chime moves.
- Test the Sound Before Hanging: Tap the pieces together before final assembly to check the sound quality. Adjust the spacing or string lengths if the keys sound too quiet or do not gently touch in the breeze
How to Weatherproof Your DIY Wind Chime?
A wind chime built without proper weatherproofing can begin showing signs of damage after just one outdoor season.
The biggest threats to outdoor wind chimes are UV exposure, moisture, and oxidation, which can weaken materials over time.
Wooden bases should be protected with one or two coats of exterior polyurethane or a weather-resistant spray sealant before hanging outdoors.
This helps prevent cracking, fading, and warping caused by changing weather conditions.
Tin cans should also be sprayed with a rust inhibitor after all holes are punched, since exposed metal edges rust faster.
Hemp and cotton strings are more likely to absorb moisture in humid or rainy climates, so replacing them once a year helps maintain durability, strength, and the overall appearance of the wind chime.
Best Places to Hang Wind Chimes
A gentle breeze and the right location can turn a simple wind chime into a calming part of your home. Choosing the perfect spot also helps the chime create better sound while adding beauty to your indoor or outdoor space.
- Porch, Balcony, or Patio: Even a light breeze can easily move the chimes, creating soft sounds that make the space feel calm and welcoming.
- Garden or Backyard Seating Area: Hanging a wind chime near flowers, trees, or a sitting spot adds a peaceful touch to outdoor spaces. It can make quiet mornings or evenings feel even more relaxing.
- Near Windows or Entryways: By placing wind chimes near a window or front door, you will enjoy gentle sounds from inside the house as well. They also add a charming decorative detail to the entrance of your home.
- Trees, Pergolas, or Gazebos: Strong branches and covered outdoor structures are great for hanging wind chimes safely. These spots often catch the breeze well while adding beauty to the surrounding area.
- Near Garden Paths or Walkways: Wind chimes placed along pathways create a relaxing sound as people walk by, helping the garden feel more inviting.
- Outdoor Meditation or Reading Corners: Hanging wind chimes near quiet seating areas can create a peaceful atmosphere that feels calm, cozy, and relaxing.
Common Mistakes to Avoid
A few small mistakes can affect how your DIY wind chime looks, sounds, and lasts outdoors. Proper spacing, balance, and weather protection can help your wind chime stay beautiful and functional for a long time.
| Mistake | Why It’s a Problem | How to Fix It |
| Using heavy materials | Heavy pieces may not move well in light wind. | Stick to thin metal or pieces that catch the breeze. |
| Weak knots or a thin string | These may break during strong winds. | Use double-overhand knots and nylon line for outdoor builds. |
| Forgetting weather protection | Rain and sunlight quickly damage outdoor materials. | Apply clear outdoor sealant before hanging. |
| Poor balance | Chime may tilt badly outdoors. | Test the balance before tightening the knot. |
| Making the sail too small | Small sails cannot catch enough wind properly. |
Use a sail piece wider than the hanging strands |
| Hanging in the wrong spot | Areas without airflow keep wind chimes silent. | Choose an open spot, away from any flat wall surface. |
Conclusion
Making your own DIY wind chime is more than just a simple craft project because it gives you a chance to turn everyday materials into something personal and meaningful.
The best part is that you do not need costly supplies or special crafting skills to make one for your home or garden.
I personally love how homemade wind chimes add a calming touch to outdoor spaces while also bringing back memories with their gentle sounds.
Once you finish your chime, hang it somewhere breezy and enjoy the relaxing movement and soft clinking tones.
If you try any of these DIY wind chime ideas, share your experience, favorite materials, or creative designs in the comments below.
Frequently Asked Questions
What Is the Best Material for Wind Chimes?
Aluminum is one of the best materials for wind chimes because it is lightweight, rust-resistant, durable, and produces soft, pleasant, long-lasting sounds outdoors.
Can Wind Chimes Attract Spirits?
Some cultural beliefs connect wind chimes with spiritual energy, but there is no scientific evidence showing that wind chimes attract spirits or supernatural beings.
Where Not to Hang Wind Chimes?
Some cultural beliefs connect wind chimes with spiritual energy, but there is no scientific evidence showing that wind chimes attract spirits or supernatural beings.
What Is an Alternative to Wind Chimes?
Popular alternatives to wind chimes include garden bells, hanging crystals, decorative mobiles, bird feeders, bamboo décor, and small water fountains for relaxing outdoor sounds.