
Planning a bathroom setup can feel overwhelming, especially when you start thinking about pipes, drains, and water lines.
I remember the first time I looked into how to plumb a bathroom, I had no idea where to begin, and everything seemed complicated.
But once I broke it down into simple steps, it started to make sense.
If you’re trying to figure out how to plumb a bathroom, this guide will help you understand the process in a clear and practical way.
From basic tools to step-by-step instructions, you’ll learn what you need to get started.
For a small project or a full setup, having the right approach can save time, money, and stress along the way
What Does Plumbing a Bathroom Involve?
Understanding the full system helps you avoid costly mistakes later, and having a clear idea of how everything connects makes the process easier.
Bathroom plumbing includes installing water supply, drainage, and vent systems that work together.
The water supply brings clean water to fixtures like sinks, toilets, and showers, while the drainage system removes wastewater safely.
The vent system helps maintain proper air pressure and prevents bad odors. Proper planning is important, as it ensures a smooth installation and reduces the chances of issues later.
How To Plumb a Bathroom Step by Step
Breaking the process into steps makes it easier to follow. Each stage builds on the previous one for a complete setup.
Tools and Materials Needed for Bathroom Plumbing
Having the right setup makes the job faster and more accurate. Good tools and materials also improve long-term results.
Step 1: Planning the Layout
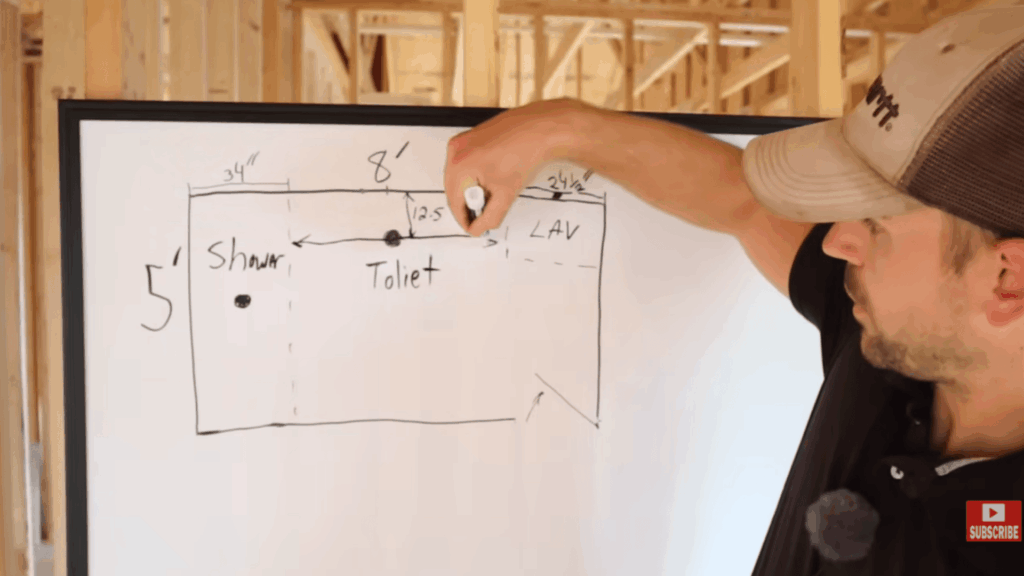
Plumbing begins with a clear plan of a standard 5×8 bathroom layout.
The toilet should be placed about 12 to 12.5 inches from the wall, while the sink and shower must maintain proper spacing, usually at least 15 inches apart.
Mark the center points for each fixture and decide where drains and supply lines will go. This planning step helps avoid mistakes and ensures everything fits correctly before any drilling starts.
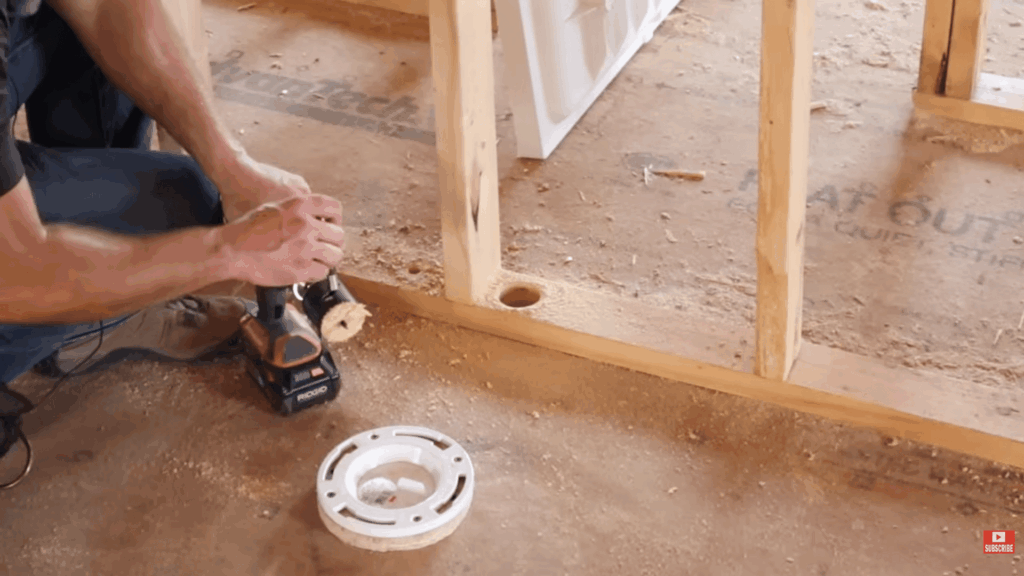
Step 2: Drilling the Toilet Drain
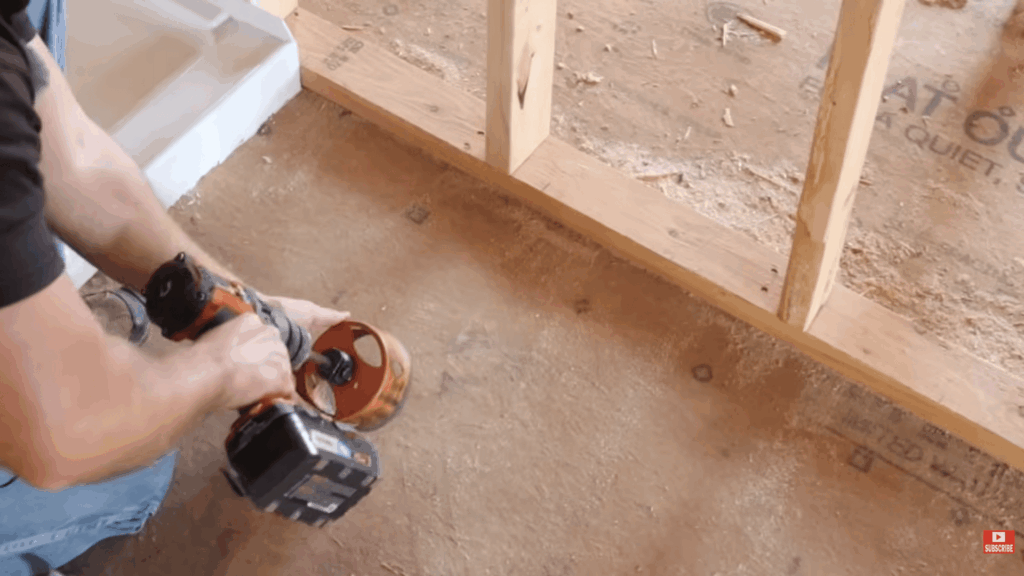
Once measurements are marked, use a framing square to keep everything straight and accurate.
Drill a 4½-inch hole for the toilet flange at the center point. It’s important to double-check measurements before drilling to avoid errors. This hole will hold the main toilet drain pipe, so accuracy is key.
Taking your time here prevents the need for repairs or repositioning later in the process.
Step 3: Installing the Sink Drain
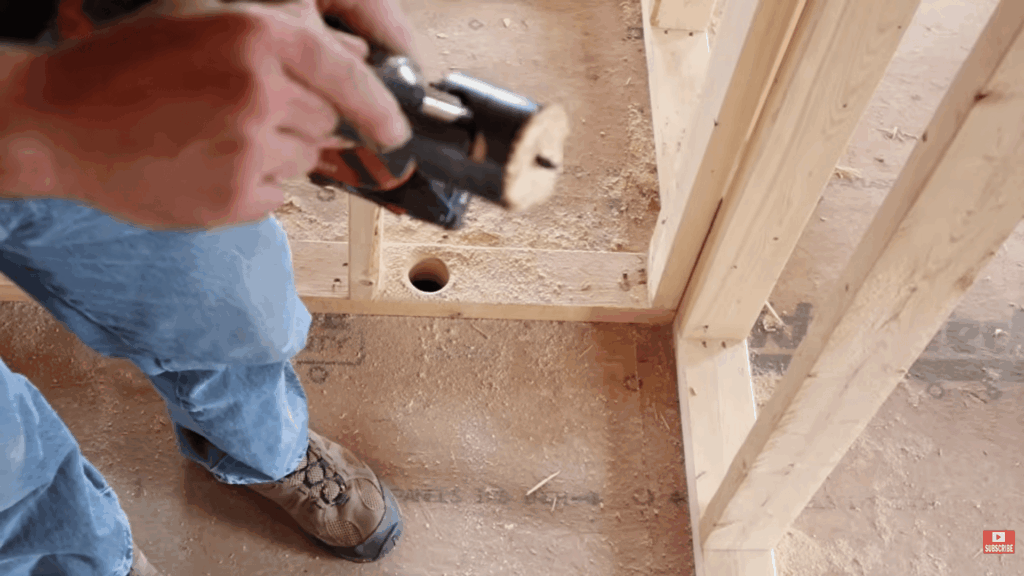
For the sink, measure about 12 to 12.5 inches from the wall and drill a 2⅛-inch hole using a hole saw.
This opening will support a 1½-inch drain pipe, which is standard for most sinks. After drilling, remove any wood debris and smooth out rough edges.
Cleaning burrs is important because it helps ensure a tight seal when connecting pipes and prevents future leaks or clogs.
Step 4: Setting the Shower Drain
Place the shower base in position first to locate the exact drain point. Trace the drain opening and drill a 4½-inch hole. This allows space for a 2-inch pipe, which is commonly used for shower drainage.
Make sure the hole is centered and not too close to structural supports.
Proper placement ensures the shower base fits correctly and the drain connects smoothly without stress on the plumbing.
Step 5: Drilling Water Supply Lines

Next, drill holes for water supply lines. For the sink, place hot and cold lines about 4 inches from the drain center, with hot on the left and cold on the right.
The toilet supply line should be about 6 inches from the center and 6 inches above the floor. For the shower, measure around 16 inches from the wall center. Adjust slightly if floor joists are in the way.
Step 6: Installing the Toilet Flange
Position a spacer first so the flange sits at the correct finished floor height. Place the toilet flange into the hole and rotate it slightly so it sits diagonally rather than square with the wall.
This helps secure the toilet bolts later. Use decking screws to fasten it, but avoid overtightening to prevent cracking.
A properly installed flange ensures the toilet remains stable and leak-free.
Step 7: Installing Drain and Vent Pipes
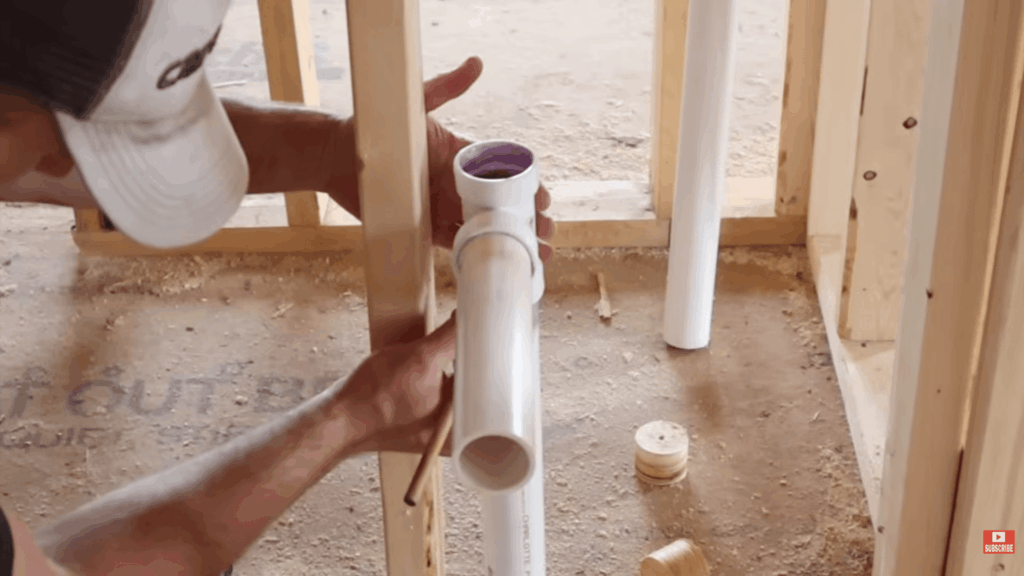
Install a T-fitting for the sink drain about 18½ inches above the floor. Before joining pipes, apply primer and PVC cement to create a strong seal.
Insert the pipe with a slight quarter turn for better bonding. Then extend vent pipes upward through the wall and connect them to the main vent stack.
Proper venting allows air flow, preventing slow drains and maintaining pressure balance.
Step 8: Final Connections
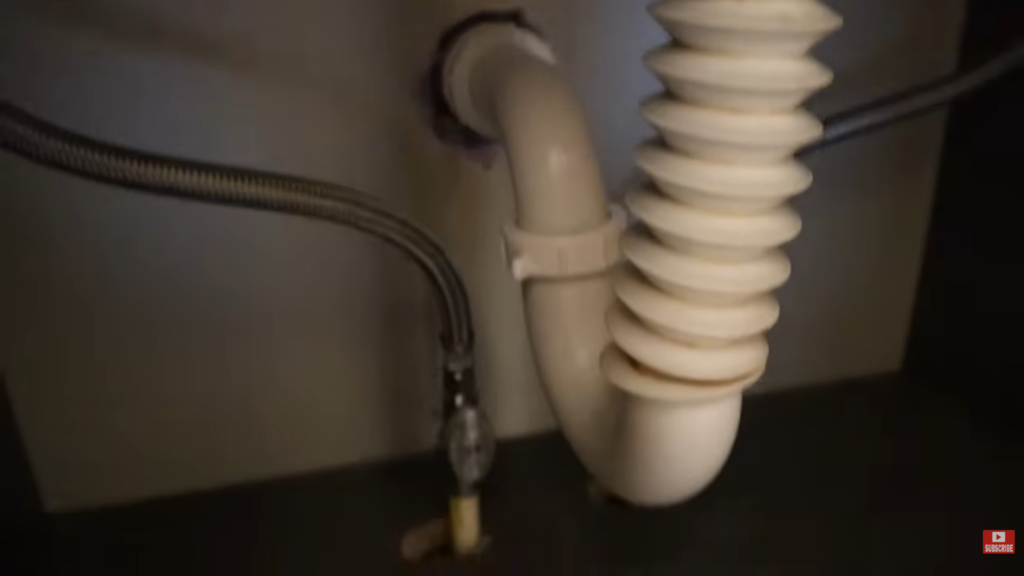
Complete the setup by connecting fixtures. Install a P-trap under the sink and attach it to the drain pipe using an adapter.
Connect water supply lines with shutoff valves for both sink and toilet. For the shower, place the base over the drain pipe and secure it properly.
Check all connections for alignment and tightness to ensure smooth water flow and prevent leaks once the system is in use.
Check out this detailed tutorial video for more in-depth steps:
Cost to Plumb a Bathroom: What to Expect
Costs can vary depending on choices and project size. Planning your budget early helps avoid surprises.
- Low/Basic Setup: $1,000–$5,000
Suitable for half-baths or simple rough-ins near main stacks, covering basic pipes for sink and toilet. Realistic minimum is often $1,500+ in most US areas due to labor. - Typical Simple Bathroom: $2,000–$6,000
Includes full three-fixture rough-in (toilet, sink, shower) with standard PVC/CPVC piping in accessible spots. Matches national averages for existing homes without major rerouting. - Average Standard Install: ~$5,000
Covers mid-range full bath plumbing with permits, basic fixtures, and 10–20 feet of runs. Factors in $75–$150/hour labor dominating 60–75% of total. - Basic New Bathroom Starter Range: $1,000–$5,000
Applies when stacking near existing plumbing to minimize trenching; optimistic low-end assumes DIY materials. Professional installs rarely dip below $1,500 for compliance.
Common Mistakes to Avoid When Plumbing a Bathroom
Avoiding common errors saves time and repair costs. Simple checks can prevent major issues later.
- Using the wrong pipe size can reduce water flow and affect overall system performance.
- Missing or improper venting can lead to drainage issues and unpleasant odors in the bathroom.
- Loose or poorly sealed connections often cause leaks that can worsen over time.
- Skipping a pressure test can leave hidden problems unnoticed until they become serious issues later.
Tips For a Smooth Bathroom Plumbing Project
A little preparation can make a big difference. Staying organized helps the project run smoothly.
| Tip | Description |
|---|---|
| Plan Ahead | Prepare the layout and gather all materials before starting the project. |
| Measure Carefully | Double-check all measurements and fittings to avoid costly mistakes. |
| Quality Materials | Use durable, high-quality materials to ensure long-lasting results. |
| Know Limits | Call a professional if the work becomes too complex or beyond your skills. |
Final Thoughts
Plumbing a bathroom might seem like a big job at first, but once you understand the basics, it becomes much more manageable.
I remember feeling unsure when I first looked into it, but taking it step by step made a huge difference.
With the right tools, a clear plan, and a bit of patience, you can set up a system that works well and lasts for years.
The key is to go slowly, double-check your work, and not rush the process.
Every step you complete builds your confidence. If you’ve tried plumbing a bathroom or are planning to start, I’d love to hear about your experience.
Share your tips, challenges, or questions in the comments below!
Frequently Asked Questions
What Is the Standard Size for a Bathroom Layout?
The standard bathroom size is typically 5×8 feet. This layout provides enough space for a toilet, sink, and shower or tub, while also meeting common spacing guidelines for comfort and functionality.
How Far Should a Toilet be from the Wall?
A toilet should be placed about 12 to 12.5 inches from the finished wall to the center of the flange. This spacing ensures proper fit, comfort, and compliance with standard plumbing guidelines.
What Size Pipes are Used in Bathroom Plumbing?
Bathroom plumbing uses different pipe sizes for each fixture. Toilets typically require 3-inch pipes, showers use 2-inch pipes, and sinks usually need 1.5-inch pipes for proper drainage and flow.
Why is Venting Important in Plumbing?
Venting is important in plumbing because it allows air to enter the system, which helps water flow smoothly through pipes. It prevents slow drainage, gurgling sounds, and keeps sewer gases from entering your home.