
I’ve dealt with shower mold in my bathroom, and I know how annoying it can be. Those dark spots often show up on tiles, grout, and corners where water sits for too long.
At first, I tried ignoring it, but it kept spreading and made the space look dirty.
Mold grows quickly in warm and damp areas, especially when there is little airflow in the bathroom.
That is why it becomes a common problem in many homes. In this guide, I will share simple steps that helped me clean shower mold fast without much hassle.
These methods are easy to follow and do not need special tools.
I will also share a few helpful tips that can help you clean better and keep mold from coming back.
Things to Do Before You Clean Shower Mold
Before you begin cleaning, take a few simple steps to stay safe. These steps also make the cleaning process easier and more effective.
- Open windows or turn on the exhaust fan: This improves airflow and removes strong cleaner fumes. It also reduces moisture, helping slow down mold growth while you clean.
- Wear gloves to protect your hands: Gloves protect your skin from mold, dirt, and strong cleaners. They help prevent irritation and keep your hands safe while scrubbing.
- Remove bottles, soap, and items from the shower: Clearing out all items gives you full access to the surface. It also prevents products from getting wet or damaged during cleaning.
- Check how much mold is present: Take a close look at the affected areas to see how serious the mold is. This helps you choose the right method and amount of cleaner needed.
- Keep old clothes on to avoid stains: Cleaning products, especially bleach, can stain or damage clothes. Wearing old clothes keeps your better outfits safe from accidental splashes.
- Avoid mixing different cleaners together: Mixing certain cleaners can create harmful fumes. Always use one product at a time to stay safe while cleaning.
How to Clean Molds from Shower Fast and Easy?
Follow these simple steps to clean shower mold safely and effectively at home. Each step helps remove buildup and makes the cleaning process easier and more effective.
Materials Used
These are the items you will need before starting the cleaning process. Having these ready will make the job easier and more effective.
- Bleach-based toilet bowl cleaner (gel formula)
- Paper towels
- Rubber gloves
- Tile cleaning brush (firm bristles)
Step 1: Apply Toilet Bowl Cleaner on Grout
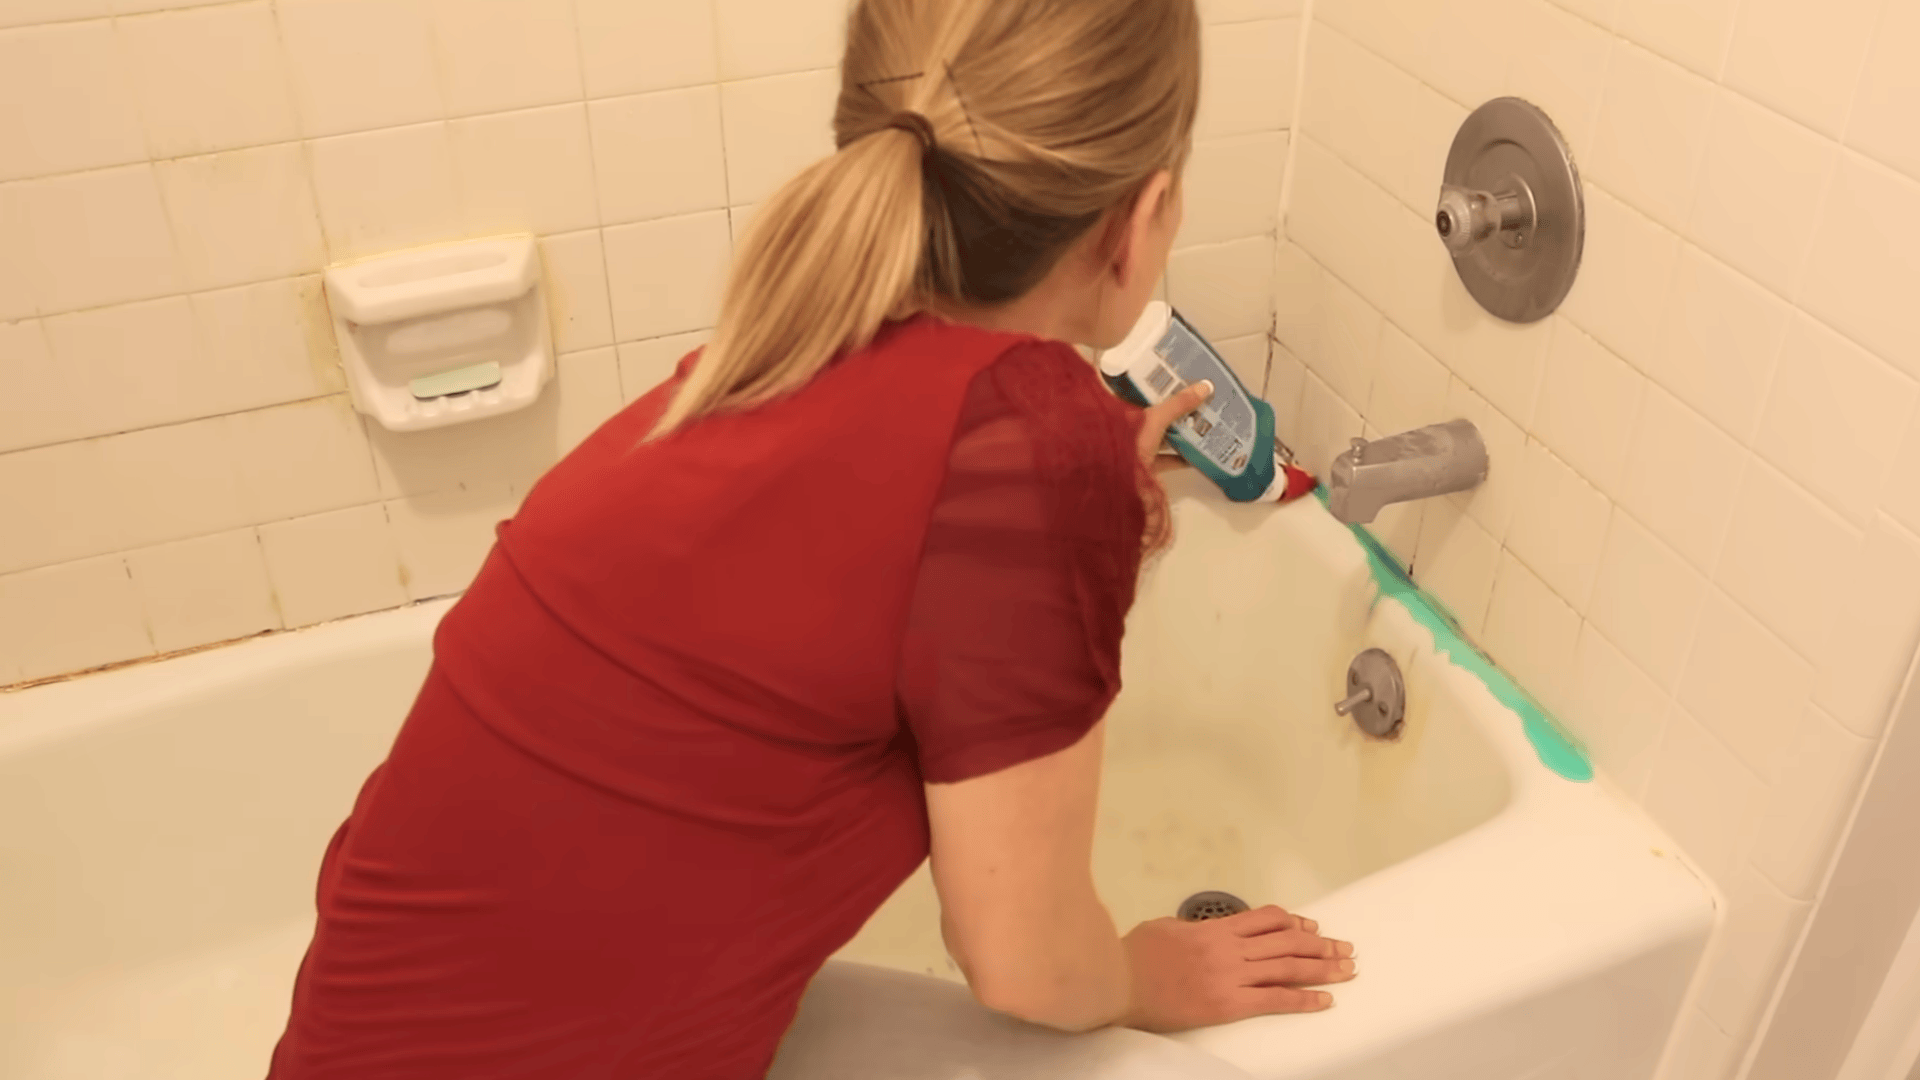
Take a bleach-based toilet bowl cleaner with a clinging gel formula. Apply it directly along all the grout lines in your shower.
Slowly squeeze the bottle so the gel stays thick and covers the mold well.
Let it run along the edges and the base of the tub, too.
The gel sticks better than liquid cleaners, so it works deeper into the mold. Do not worry if it drips down the wall. The goal is to cover all the moldy spots fully.
Step 2: Use Paper Towels to Hold Cleaner
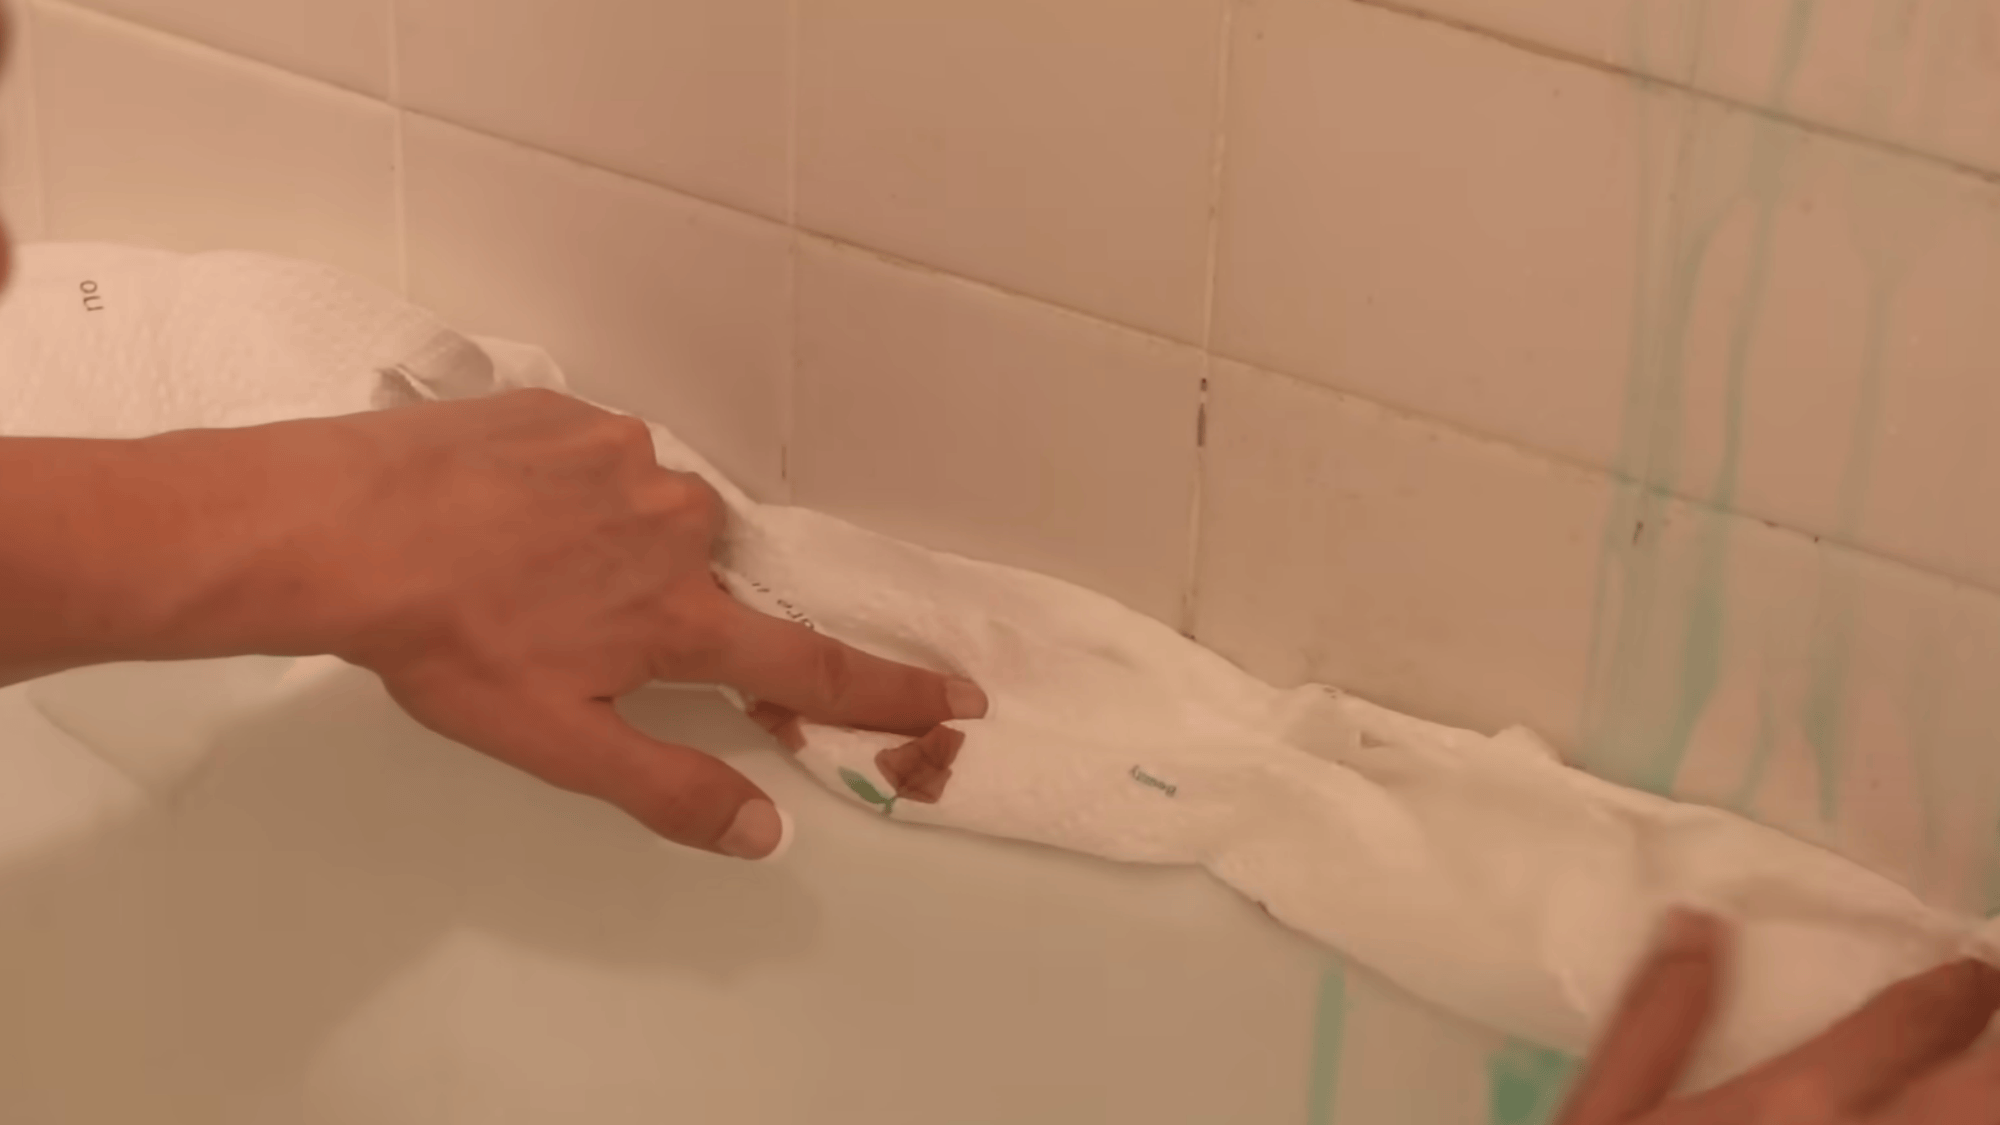
Place paper towels over the areas where you applied the cleaner.
Press them gently so they stick to the gel. This helps keep the cleaner in place, especially on sloped or vertical surfaces.
The paper towels stop the product from sliding down too quickly. Focus more on the darkest mold spots.
This step helps the bleach stay longer on the mold, which improves results and reduces the need for heavy scrubbing later.
Step 3: Let It Sit for Deep Cleaning
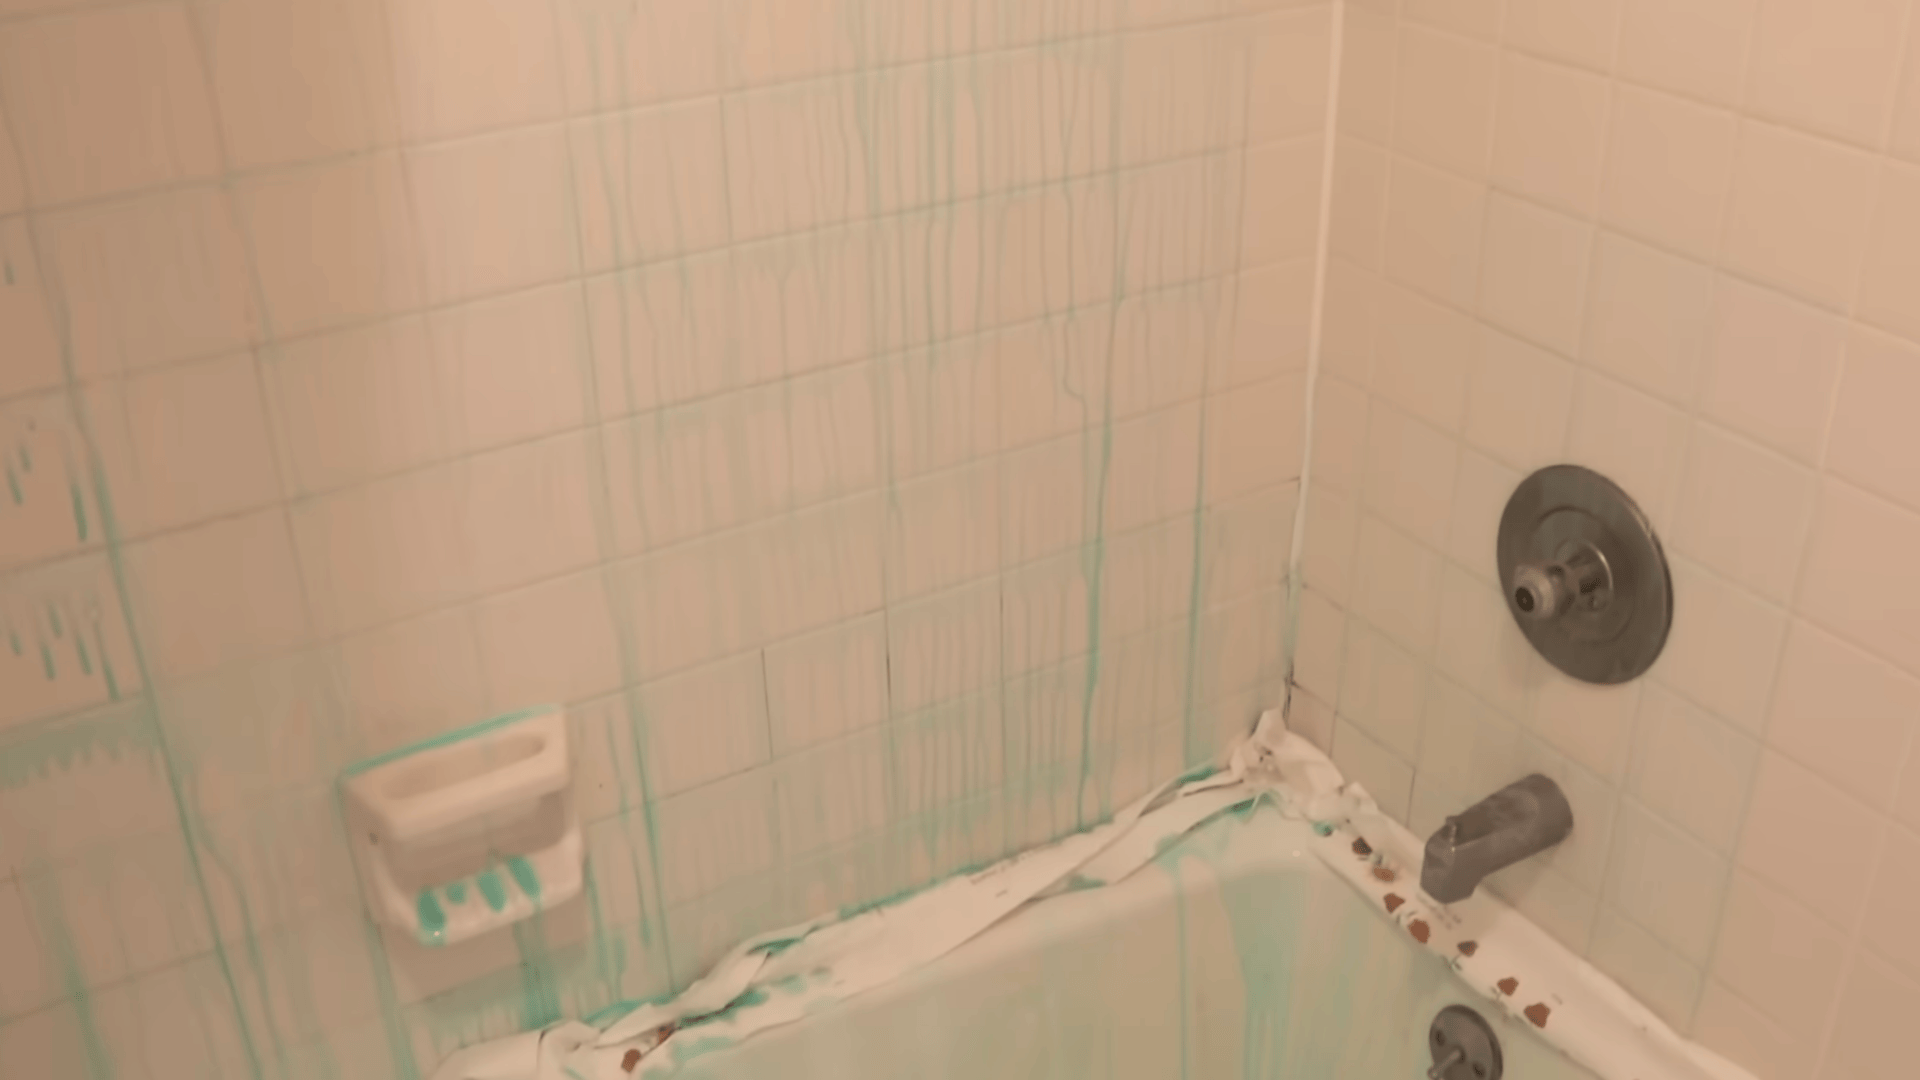
Leave the cleaner on the surface for 30 minutes to 1 hour. For tough mold, you can leave it longer or even overnight.
During this time, the bleach works to break down mold and mildew, and you may see stains start to fade. Do not rush this step, as the waiting time does most of the work.
Keep the bathroom well ventilated while the cleaner sits to avoid strong fumes building up inside the space.
This helps keep the air safe and easier to breathe.
Step 4: Scrub with a Firm Brush
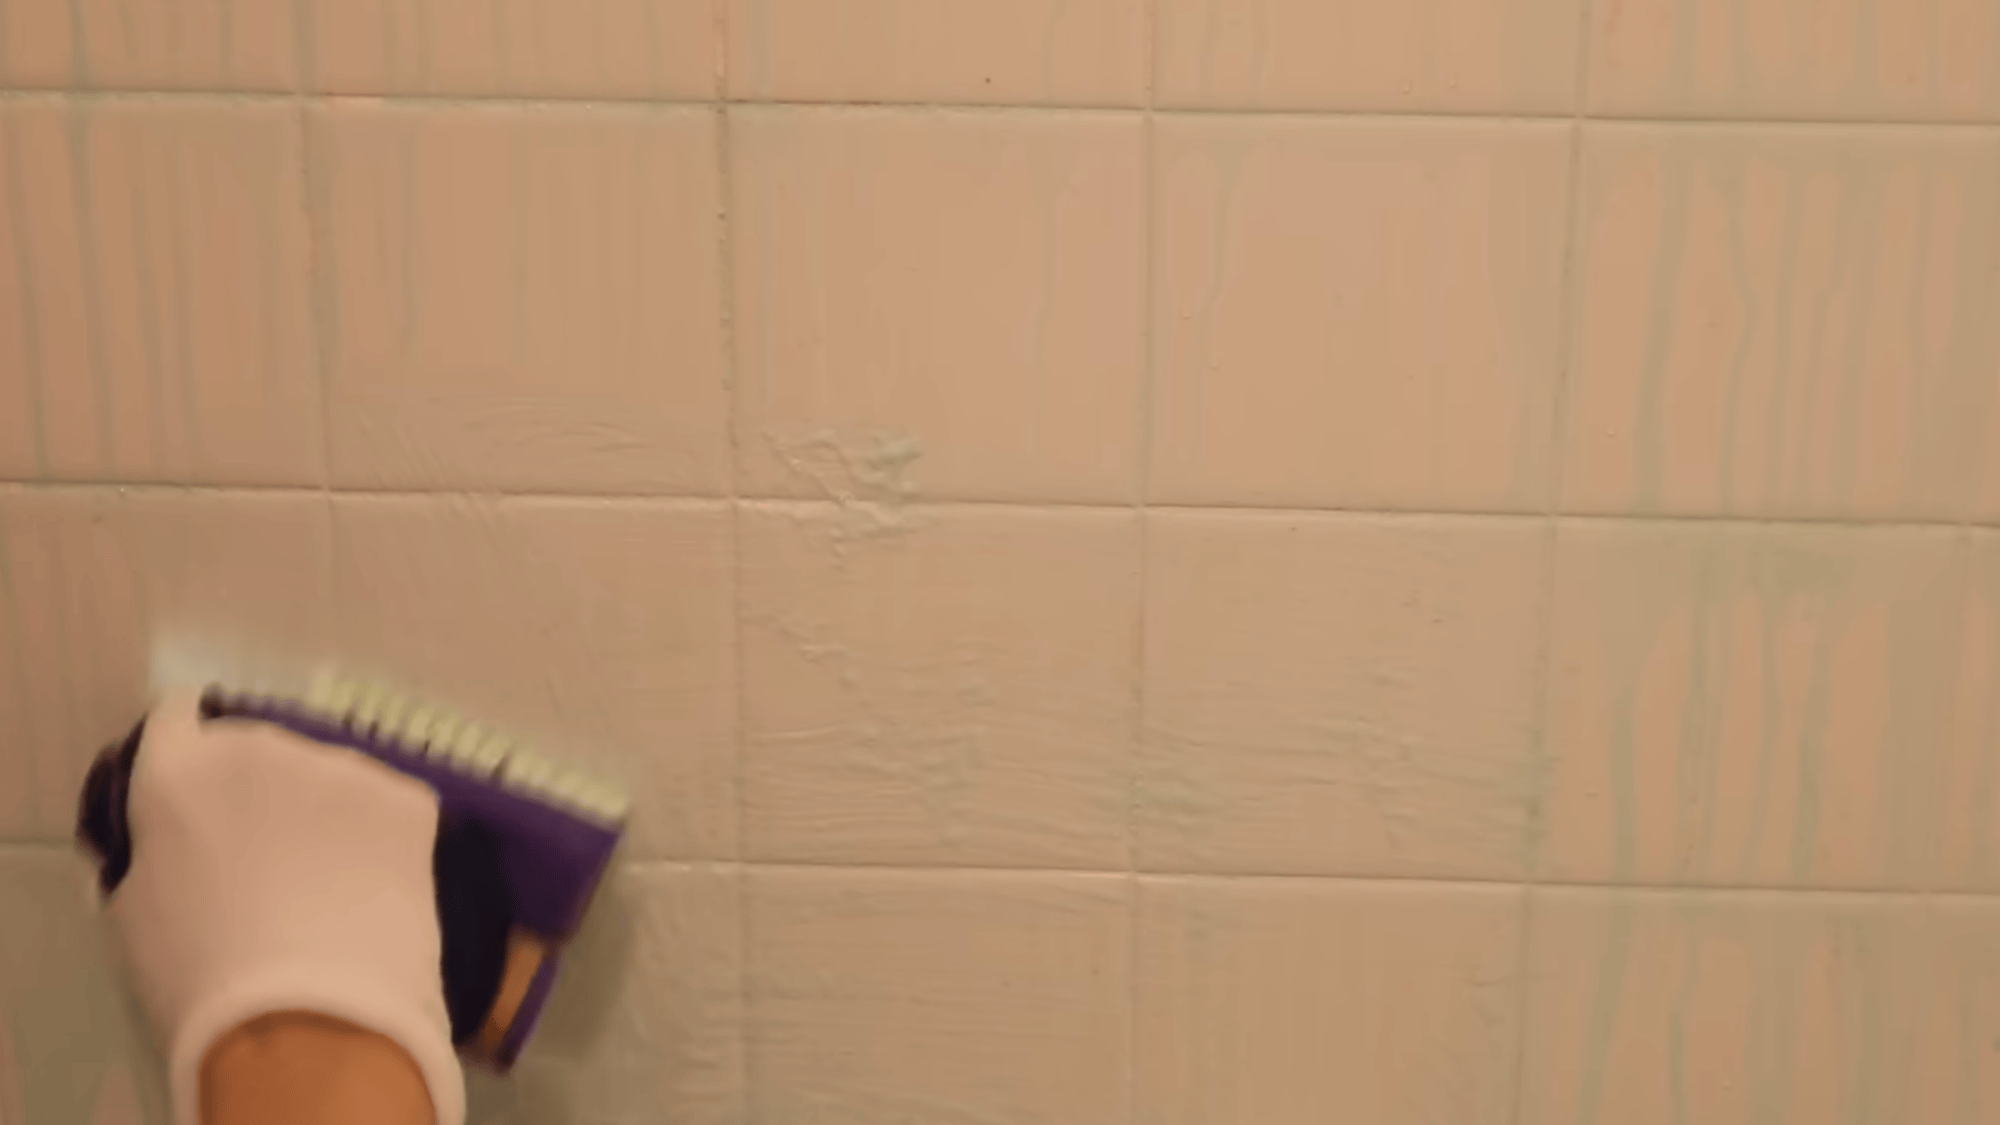
After the waiting time, remove the paper towels and grab a tile cleaning brush with firm bristles. Scrub along the grout lines and moldy areas.
Make sure the brush is not soft, or it will not remove deep grime.
As you scrub, the loosened mold will come off easily. Wear gloves during this step and avoid touching the cleaner directly.
This step clears away any leftover buildup and brings back the clean look of the tiles.
Step 5: Rinse Everything Well
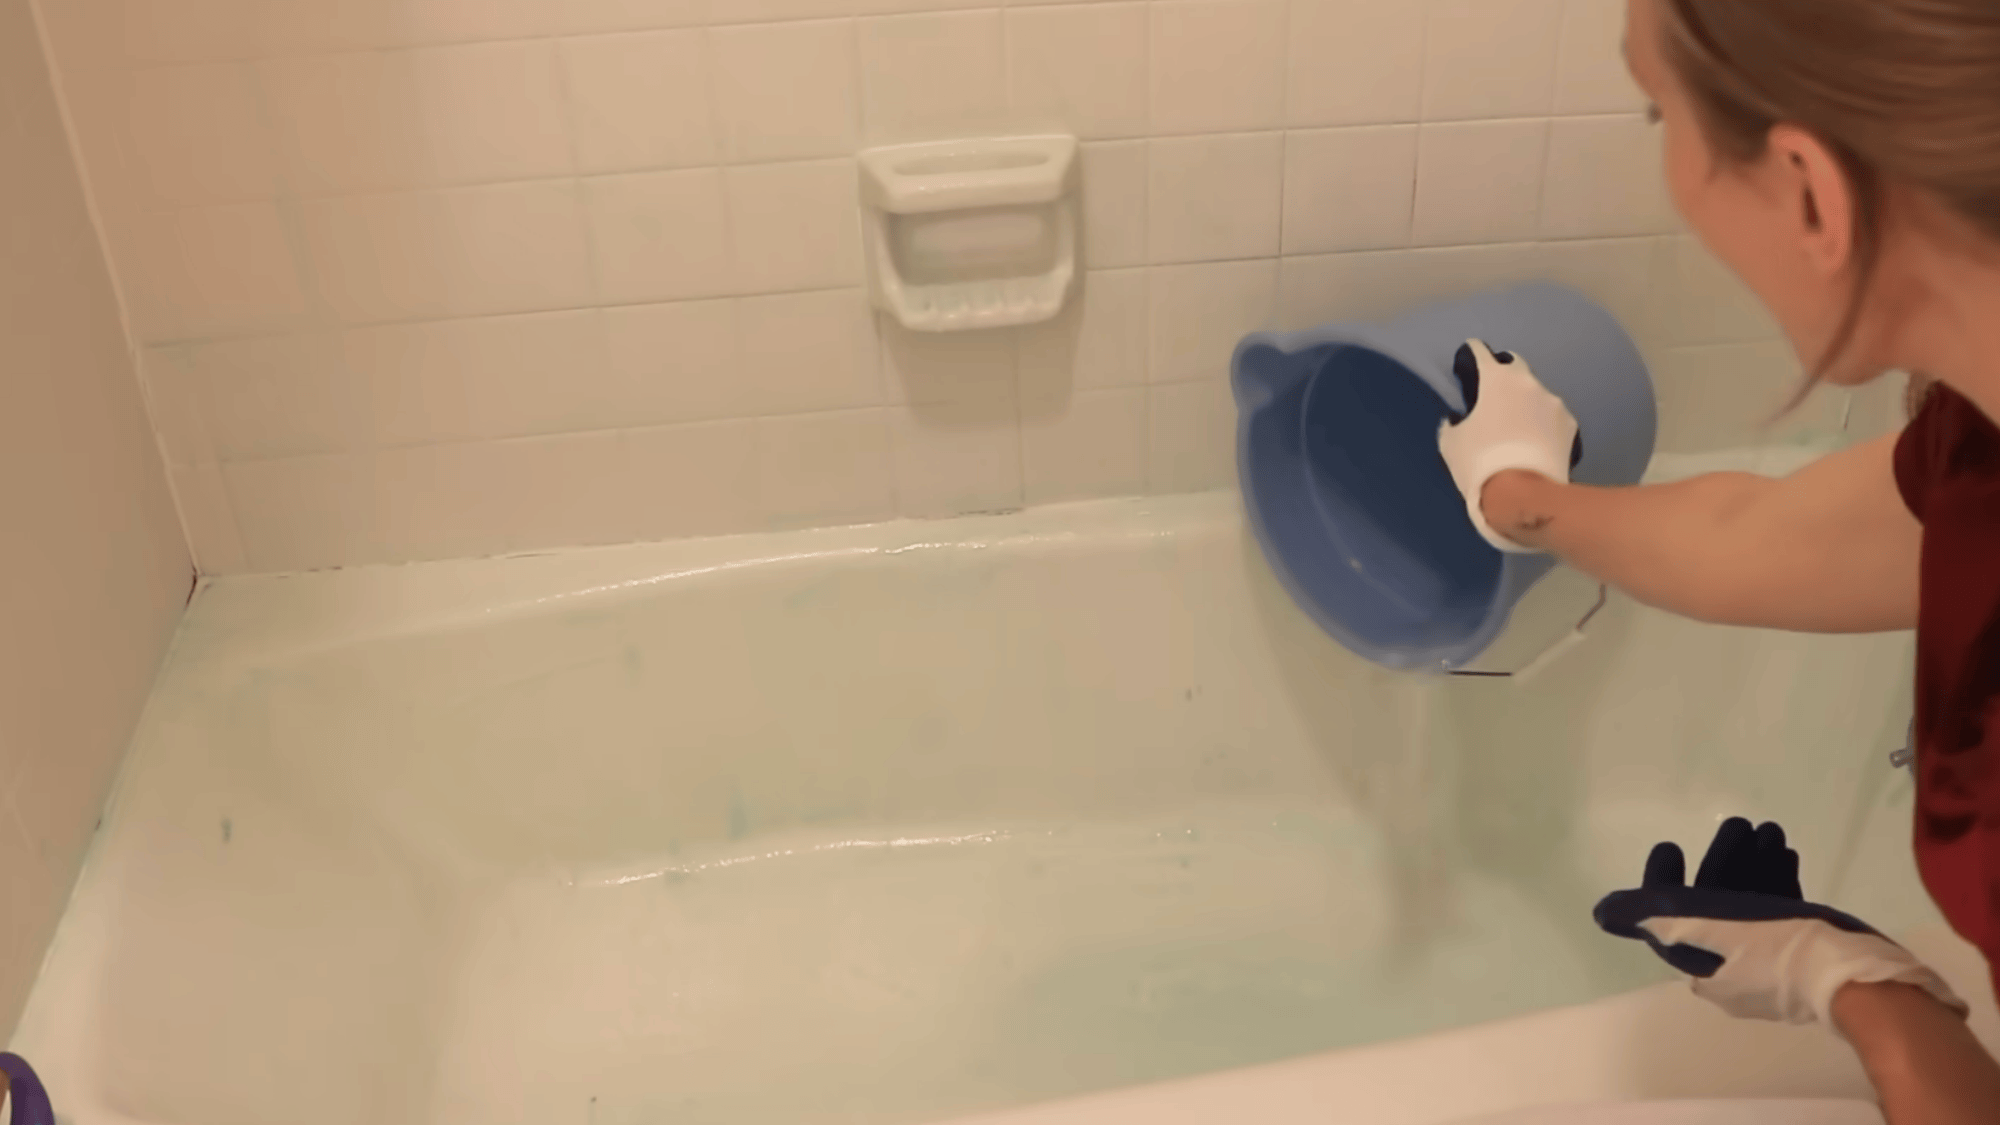
Finally, rinse the shower walls with warm water. You can pour a bucket of water or just run the shower for a few minutes.
Make sure all the cleaner is washed away completely.
This removes any bleach residue and leftover dirt. Once done, you will see a big difference in how clean the shower looks.
Let the area dry with proper airflow to prevent mold from coming back quickly.
This tutorial is based on a helpful video by Do It On A Dime. You can check out the original video on their YouTube channel here or watch it below.
Common Areas Where Shower Mold Builds Up
Mold usually shows up in the same spots again and again, especially where water stays longer. These areas need extra attention during cleaning to stop mold from spreading.
- Tile Grout: Tile grout holds moisture for a long time, which makes it a common place for mold. These small lines between tiles stay damp and are harder to clean regularly.
- Silicone Seals: Silicone seals around the shower edges trap water and stay wet for hours. This creates the right conditions for mold to grow and spread quickly.
- Shower Curtains: Shower curtains collect water after every use and do not dry fast. Mold often forms on the lower part where water stays the longest.
- Corners and Edges: Corners and edges collect water, soap, and dirt over time. These areas are often missed during cleaning, which leads to mold buildup.
Tips on How to Clean Shower Mold Naturally
I use natural methods often because they feel safe and easy. They clean light mold well, protect tiles and grout, and keep my shower fresh with regular cleaning.
1. Use White Vinegar Spray
White vinegar is one of the easiest ways to clean shower mold at home.
Pour it into a spray bottle and apply it directly on grout, tiles, and corners where mold appears.
Let it sit for about 30 minutes so it can break down the mold properly. Do not rinse it right away, as this helps it work deeper.
After that, wipe or scrub the area lightly, then rinse with water to leave the surface clean and fresh.
2. Try Baking Soda Paste
Baking soda works well for tougher mold spots that need scrubbing. Mix baking soda with a small amount of water to form a thick paste.
Apply the paste directly to moldy areas like grout and corners.
Gently scrub using a brush or sponge to lift mold and dirt without damaging the surface.
After scrubbing, rinse the area with water and wipe it dry. This method also helps remove bad smells and keeps the shower area fresh.
3. Use Hydrogen Peroxide
Hydrogen peroxide is a simple way to break down shower mold with less effort.
Spray it directly onto the affected areas like grout, tiles, and corners.
Let it sit for about 10 to 15 minutes so it can work properly. You may notice bubbling, which shows it is breaking down the mold.
After that, scrub lightly if needed, then rinse everything well with water to leave the surface clean and fresh.
4. Lemon for Light Mold
Lemon is a simple option for light shower mold and also helps leave a fresh smell.
Squeeze fresh lemon juice and apply it directly to the affected spots, like tiles or corners.
Let it sit for a few minutes so the natural acid can break down the mold. After that, scrub gently using a brush or sponge, then rinse with water.
This method works best for small areas and helps keep the shower clean and fresh after use.
Mistakes to Avoid While Cleaning Mold
These are some common mistakes people make while cleaning shower mold. Avoiding these can help you clean better and stop mold from coming back.
| Mistakes | Why It’s a Problem |
| Skipping drying after cleaning | Leaving the area wet helps mold grow again quickly |
| Using too much water | Extra moisture spreads mold instead of removing it |
| Not letting the cleaner sit long enough | The cleaner needs time to break down the mold properly |
| Rushing the process | Mold may not come off fully, leading to regrowth |
How to Prevent Shower Mold After Cleaning?
Taking these simple steps after cleaning can help keep your shower dry and stop mold from coming back.
- Keep the shower dry after use: Wipe down tiles, glass, and corners after every shower. Dry surfaces stop moisture from building up and reduce mold growth.
- Run the exhaust fan: Turn on the exhaust fan during and after showers. This helps remove moisture and keeps the air dry inside the bathroom.
- Clean once a Week: Regular weekly cleaning helps remove dirt and early mold spots. This keeps the buildup low and makes deep cleaning easier later.
- Fix Leaks Quickly: Repair any leaking taps or pipes as soon as possible. Leaks keep areas wet, which creates the perfect place for mold to grow.
When Mold Needs Professional Help?
Sometimes, cleaning at home is not enough to remove shower mold completely.
If you notice large dark patches that cover a big area, it may be a sign that the mold has spread deeper.
In such cases, basic cleaning methods may not work well. Another sign is when mold keeps coming back even after regular cleaning.
This usually means there is hidden moisture or a bigger problem behind the surface.
A strong smell that does not go away is also a warning sign. It can mean mold is growing in places you cannot see.
In these situations, it is better to call a professional. They have the right tools and methods to remove mold safely and fully.
Conclusion
Cleaning shower mold becomes much easier when you follow the right steps and stay consistent with your routine.
A simple or good cleaner can remove mold from tiles and grout without much trouble. The key is to let the cleaner sit, scrub properly, and rinse everything well.
Drying the area after cleaning also plays a big role in stopping mold from coming back.
I have found that small habits make the biggest difference over time. Keeping the shower dry, using proper airflow, and cleaning weekly helps control moisture.
If mold keeps returning or spreads too much, getting professional help is the safer choice to fix the issue fully.
Start using these simple tips today to keep your shower clean and mold-free.
Frequently Asked Questions
How Often Should Shower Mold Be Cleaned?
Clean shower mold once a week to control growth, prevent buildup, and keep surfaces safe, fresh, and hygienic.
Is It Possible to Remove Mold without Chemicals?
Yes, you can remove mold without chemicals using natural items like vinegar or baking soda, which help kill mold and clean surfaces safely.
Why Does Mold Come Back in Showers?
Mold comes back in showers due to constant moisture, humidity, and poor airflow, which create the perfect environment for mold to grow again quickly.