
A bad plaster job does not announce itself straight away. It waits. Then the cracks show up, the surface bubbles, and the paint starts peeling off a wall you spent a whole weekend fixing. Almost every time, the problem starts before a single trowel of plaster went on.
Learning how to replaster a wall is less about skill and more about sequence. Get the prep right, mix correctly, apply in thin controlled coats, and the finish looks after itself.
Today, I’ll guide you through every stage, from reading the wall to a paint-ready surface.
Patch Repair or Full Replaster: Which Job Do You Actually Have?
The right repair depends on what the existing plaster is actually doing. You find that out with the tap test, not by looking at the surface.
Knock your knuckle firmly across the wall. A sharp, solid sound means the plaster is bonded and fine. A hollow or dull thud means it has lost its grip on the wall underneath.
I’ve seen people skim coat straight over hollow sections because the surface looked fine. The new coat cracks along that same boundary within weeks. The tap test is the one step you cannot skip.
A single hollow spot means a patch repair. Widespread hollow areas mean a full strip. Here is how to read the common situations.
| Situation | What It Means | What to Do |
|---|---|---|
| Hairline cracks or small surface damage | Normal wall movement over time | Apply scrim tape and skim coat over |
| Single or multiple hollow patches when tapped | Bond failure behind the plaster, localized or widespread | Patch single spots; strip full wall if hollow areas are widespread |
| Rough or uneven surface, but sounds solid | Cosmetic issue only; plaster is structurally sound | Skim coat directly over existing plaster |
| Damp staining, soft patches, or crumbling edges | Moisture damage or plaster losing its integrity | Fix the damp source first, then strip and replaster |
| Lath and plaster wall with widespread damage | Old system failing beyond a simple skim fix | Replace with plasterboard or call a professional |
Once you know the wall’s condition, you can also decide whether you need a full replaster or just a skim coat.
| Skim Coating | Full Replastering | |
|---|---|---|
| What it is | Thin finish layer over existing plaster | Strip back to bare wall and start fresh |
| When you need it | Surface is sound but rough, patchy, or tired | Plaster is badly cracked, hollow, or damp-damaged |
| How disruptive | Low no demolition involved | High full removal of existing plaster |
| Skill level | Achievable for a careful DIYer | Better suited to experienced hands |
| Most common for | Room refreshes and cosmetic fixes | Severe damage or widespread failure |
Most DIY jobs only need a skim coat. When in doubt, tap the full wall before you buy a single bag of plaster. What you hear tells you exactly how big the job is.
One more thing worth knowing before you start: a standard modern wall with intact plaster underneath is fine territory for a first-timer. Lath-and-plaster systems and damp-damaged walls are not. Know which one you have.
How to Prepare the Wall So the Plaster Bonds and Stays
PVA bonding agent controls how fast the wall pulls moisture from fresh plaster. Getting its dry state wrong is the single most common cause of cracking on a first attempt.
Work through these steps in order. Do not skip ahead.
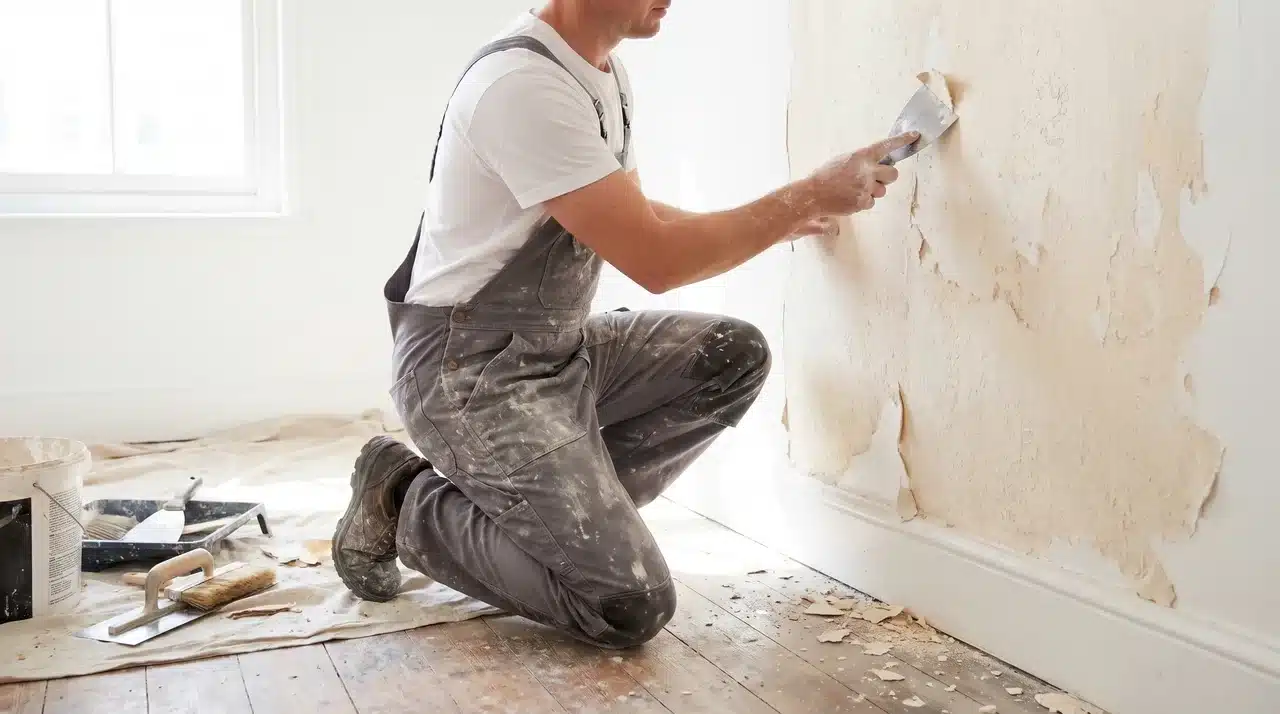
- Tap the wall with your knuckles: A hollow, dull thud means the plaster behind is loose and needs to come out. A sharp, solid knock means it is sound. Cut back every loose section to a firm edge; plastering over hollow spots causes the new coat to crack along that boundary.
- Scrape off flaking paint, old wallpaper, and debris: The surface needs to be clean and solid. Anything sitting loose will break the bond between the old wall and the new plaster.
- Press scrim tape firmly over every crack: The tape bridges the gap and stops wall movement from splitting your new finish. It must sit completely flat; any gap under the tape is a weak point where the finish coat will crack.
- Mix PVA at a 5:1 water-to-PVA ratio and coat the entire surface: Highly absorbent wall, bare plaster, or new plasterboard may need a second PVA coat once the first has dried. One coat alone will not bring suction under control.
- Wait until the PVA goes tacky, not wet: Press a finger gently to the wall. Slightly sticky with no residue on your skin is the ready signal. Plaster adheres poorly to wet PVA slides. Plaster onto fully dry PVA finds no grip, and the wall pulls moisture from the fresh coat within seconds; cracking follows every time.
I’d argue prep matters more than any other part when plastering walls. A patchy trowel technique you can work around, but plaster that cracked because the prep was rushed? You are doing the whole thing again.
How to Replaster a Wall: Step-by-Step
Each coat depends on the state of the one before it. Do these steps in order and do not rush the timing between them. That is the whole job.
Tools and Materials You’ll Need
| Tool / Material | What It’s For | Approx. Cost (USD) |
|---|---|---|
| Plasterer’s Hawk and Steel Trowel | Core application tools: one holds the plaster, one puts it on the wall | $40 – $90 |
| Paddle Mixer Attachment and Buckets | Fits a standard drill; mixes plaster evenly. Keep one bucket clean for water only | $18 – $30 |
| Finish Plaster (25 lb bag) | The skim coat material is applied directly to the wall surface | $28 – $45 |
| PVA Bonding Agent / Drywall Primer (1 gal) | Diluted and rolled onto the wall to control suction before plastering | $17 – $25 |
| Scrim Tape and Scraper | Tape covers cracks before plastering; a scraper removes loose or blown plaster | $7 – $15 |
| Dust Sheets and Spray Bottle | Sheets protect floors and fixtures; a spray bottle mists the wall during polishing | $5 – $15 |
Step 1: Mix the Plaster
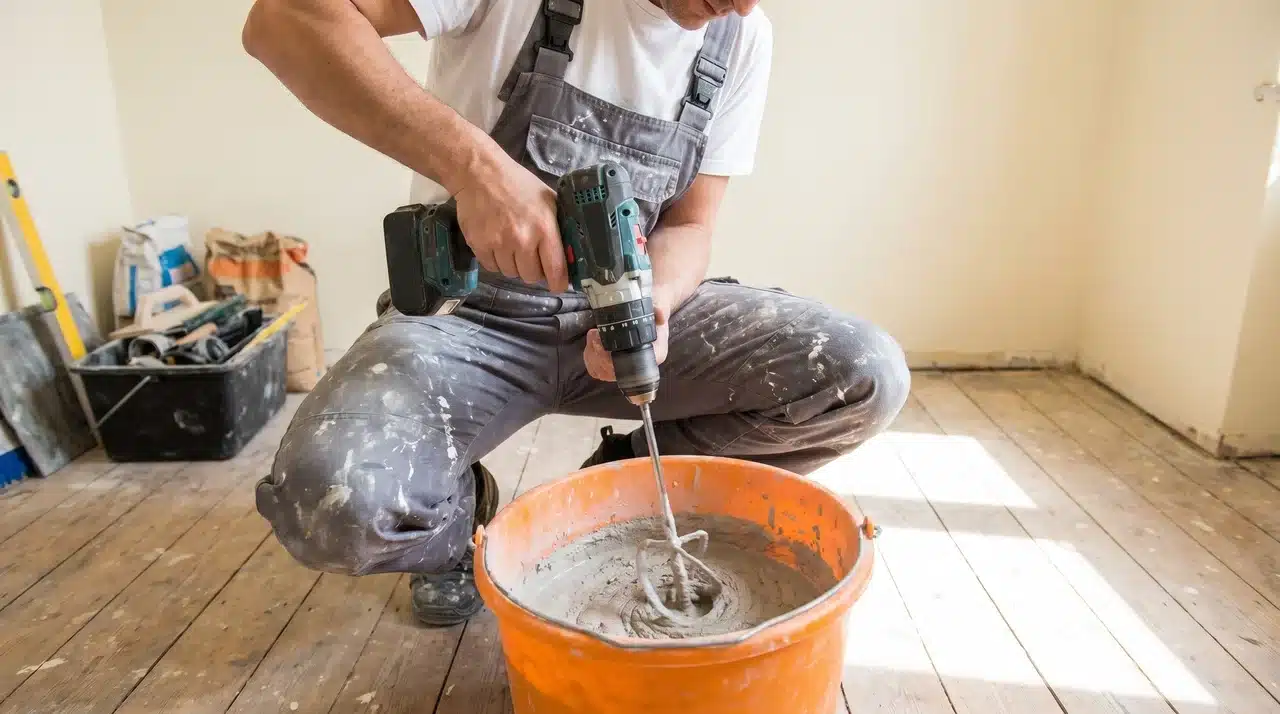
Pour the water into the bucket first, then add plaster powder gradually while the paddle mixer runs. Do it the other way around, and you get dry clumps that will not break down no matter how long you mix.
Mix until you reach thick yogurt, smooth, lump-free, holding its shape on the hawk without sliding. Let it sit for 60 seconds, then one final stir before you use it.
Any lumps left in the mix will drag across the wall and leave marks you cannot fix once the coat firms up.
Step 2: Apply the First Coat
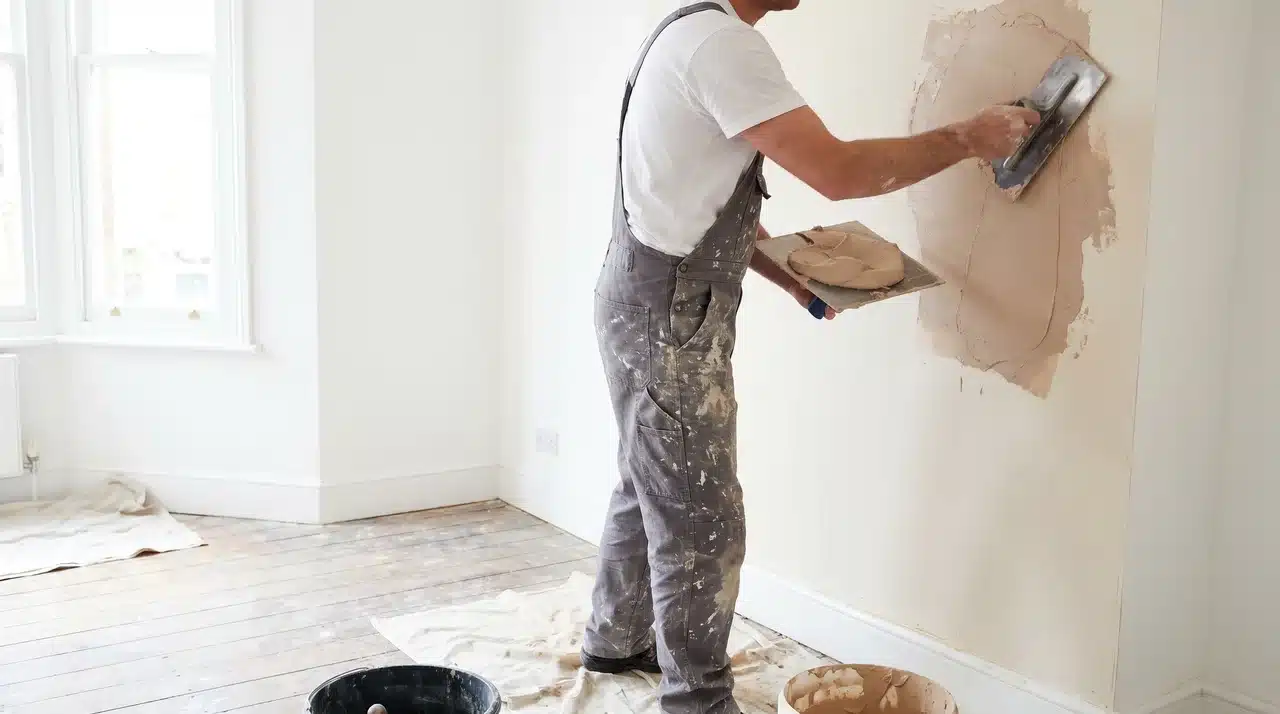
- Loading plaster onto hawk: Start with a good scoop of plaster on the hawk and hold it in the non-dominant hand at chest level. Keep a slight tilt toward the body so the mix stays in place without sliding off.
- Moving plaster to trowel: Take a smaller amount from the hawk onto the trowel. Smaller loads give better control and help avoid messy, uneven patches on the wall.
- Trowel position and application: Hold the trowel at roughly a 30-degree angle to the wall. Start from the top left and move upward in one steady motion, then come back down using overlapping strokes for coverage.
- Consistent pressure control: Keep pressure steady throughout each stroke. Changing pressure mid-stroke can create ridges that are difficult to smooth out later.
- Layer thickness guidance: Aim for a thin, even coat around 2–3 mm thick, roughly like a matchstick. Too thick can cause sliding before it sets, while too thin won’t give enough material to finish properly.
- Knowing the right timing (green stage): Watch for the green stage before applying the next coat. The surface should feel firmer, look slightly darker, and leave only a light mark when pressed gently. Going in too early causes slumping, while waiting too long reduces bonding.
Step 3: Apply the Second Coat
Mix this batch with a little more water than the first. It should still hold on the hawk but spread more freely. Apply it using the same stroke direction as the first coat.
As you work across the wall, you will start to see where the first coat left hollows or high spots. Press a little harder over low areas to build them up. Run the trowel lightly over any ridges before the coat firms.
Keep this coat to 1 to 1.5mm. Its job is to refine the surface, not add bulk. Too much material here makes the polish phase harder and raises the risk of cracking as the plaster dries. Once it is on and looking even, leave it alone until it firms up.
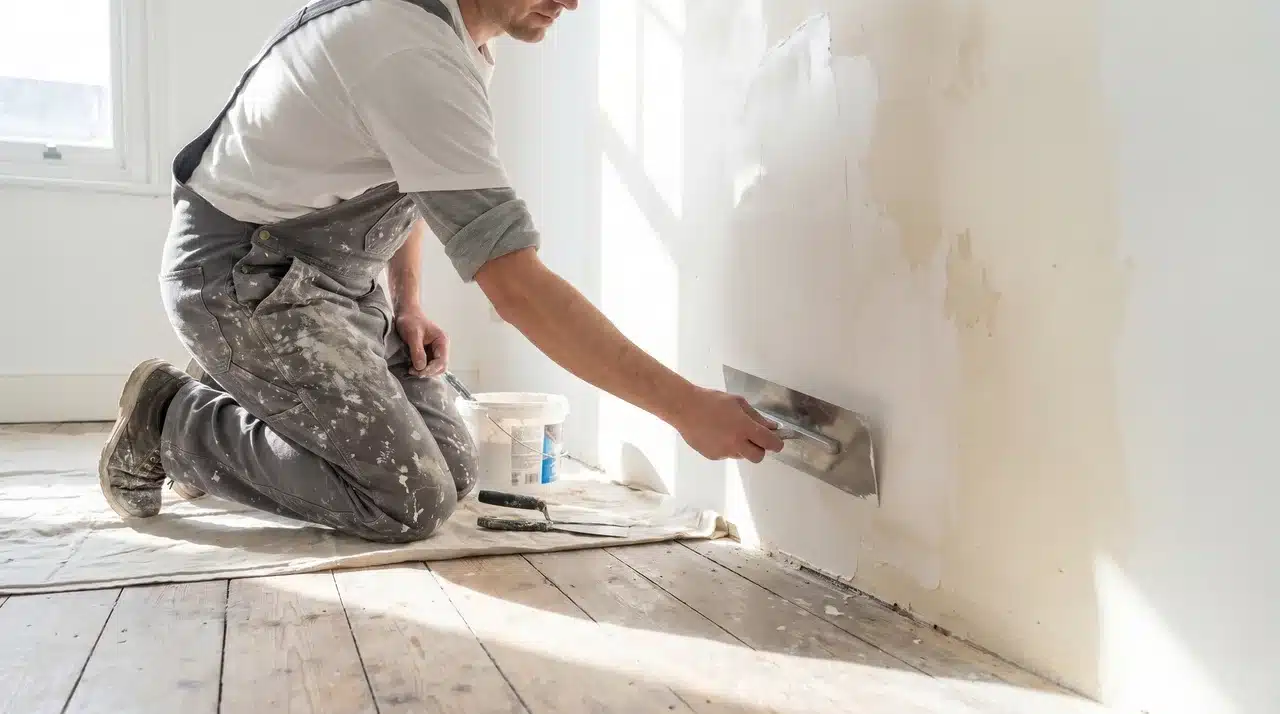
Step 4: Polish the Surface

This is the stage most beginners underestimate. The plaster is on the wall, but the real work is just starting.
Hold the trowel almost flat and glide it across the surface with light, even pressure to knock down any ridges. You are not scraping. Press too hard here, and you dig in and create new problems.
As the plaster firms and starts to push back against the trowel, mist the wall lightly with the spray bottle, hold it about 30cm back, and give the lightest possible coat.
The mist reactivates the surface layer so you can keep working it. It does not thin the plaster. Too much water dissolves that surface layer and leaves it soft once dry.
Work the trowel in different directions: horizontal, then diagonal, then vertical. Each pass tightens the surface a little more. Keep the blade clean between passes. Any dried plaster on it scratches instead of smoothing.
Achieving the Fat Surface
You will know you have hit the fat surface when the wall takes on a slight sheen and the trowel glides with almost no resistance.
That thin glossy film is fine wet plaster pulled across the surface, filling every last pore. Do two or three final passes and stop. Work it any further, and you drag the surface and undo the finish.
Step 5: Let It Dry and Cure
Fresh plaster needs at least 3 to 5 days before a mist coat of diluted emulsion, one part water to four parts emulsion.
For oil-based paint, give it 4 to 6 weeks for a full cure. The wall is ready when it has turned a consistent pale pink or off-white with no darker patches left.
Dark spots that stay after several days mean trapped moisture. Soft or powdery areas when pressed mean the plaster did not bond and will need to be cut back and done again.
Never put full-strength emulsion onto fresh plaster. The mist coat seals the surface gradually without trapping air underneath.
If you are wallpapering, apply a coat of diluted PVA first. It slows the paste absorption and gives you time to position the paper correctly.
Common Mistakes That Ruin a First Attempt
These four errors account for most failed first jobs. If you know what causes them before you start, you will not make them.
- Skipping the PVA: An untreated wall pulls moisture from fresh plaster within 60 to 90 seconds. The surface layer stiffens and cracks before you can work it. Every crack and bond failure on an unprimed wall comes back to this.
- First coat too thick: Go over 3mm and the plaster sags before it sets. Keep it to the thickness of a matchstick and build from there.
- Moving too slowly: Finish plaster sets in roughly 30 to 45 minutes from mixing. Stop to rest, and the edges of your first coat will be firm before you finish the wall. You cannot blend into set plaster.
- Polishing before the plaster is ready: Trowelling into plaster that has not firmed up yet tears the surface open. Wait until the wall resists light finger pressure before you start your polish passes.
The first mistake is the one I see catch people out most often. Apply the PVA, wait for the right tacky state, and you have already fixed the biggest single cause of a job that needs doing twice.
Conclusion
Getting a good result when you replaster a wall comes down to three things: proper surface prep, patient coat application, and giving the plaster the time it needs to cure.
Skip any one of those and the job will show it. Follow them in order, and you will end up with a wall that looks professionally finished, even on a first attempt.
The sequence is what matters. Get that right, and the rest of the skill builds itself.
Ready to get started? Gather your tools, test your wall, and tackle one section at a time to build confidence and achieve a flawless finish.
Frequently Asked Questions
Can I replaster a wall myself?
Yes, small patches and full-room skim coats are well within reach for a careful DIYer. The key skills are timing the coats and keeping the trowel clean, both of which click into place quickly with a single wall’s practice. Large areas, damp-damaged walls, or lath-and-plaster systems in older homes are harder and better left to a professional.
Can you plaster over old plaster?
Yes, as long as the existing plaster is sound. Tap the wall: a solid knock means you can skim coat straight over it after a PVA prime. A hollow or dull thud means the old plaster has lost its bond and needs to come off first. Plastering over loose plaster guarantees the new coat cracks along the same boundary.
How long does it take for new plaster to dry before painting?
New plaster needs at least 3 to 5 days before a mist coat of diluted emulsion, and 4 to 6 weeks before oil-based paint. The surface is ready when it has turned a uniform pale pink or off-white with no darker damp patches left. Full-strength emulsion on fresh plaster traps moisture and causes the paint to flake.
How much does it cost to replaster a wall?
Professional replastering varies a lot by region, wall size, and condition; local quotes are the only reliable figures. DIY brings the cost down to materials only: plaster, PVA, scrim tape, and a basic tool set. Most tools are reusable, so the second job costs considerably less than the first.