
Looking at those thriving indoor plants, have you ever wondered what makes them climb so gracefully? The secret often lies in a simple support structure that many plant lovers swear by.
Store-bought options can be pricey, and they don’t always fit specific needs.
But creating a custom support doesn’t require fancy skills or expensive materials. Just a few basic supplies and some simple steps.
This guide breaks down the process into five manageable stages. Each one builds on the last, making it easy to follow along. By the end, there’ll be a sturdy, functional support ready to help plants reach new heights.
What is a Moss Pole Used For?
A moss pole serves as a vertical support system for climbing houseplants. It mimics the natural environment where plants like pothos, monstera, and philodendrons grow up trees in the wild.
The pole provides two key benefits. First, it gives aerial roots something to grip onto, encouraging stronger, healthier growth. Second, it helps plants develop larger, more mature leaves as they climb upward.
The moss covering retains moisture, which aerial roots can absorb. This extra hydration promotes better overall plant health.
Without proper support, climbing plants tend to trail downward, producing smaller leaves and weaker stems. A moss pole keeps them growing in their preferred direction.
DIY Moss Pole Materials You Can Find at Home
| Tools & Material | Purpose |
|---|---|
| Plastic-coated wire mesh (medium holes) | Forms the structure of the moss pole and allows aerial roots to attach |
| Sphagnum moss (pre-soaked) | Holds moisture and supports aerial root growth |
| Cable ties | Secures the mesh and keeps moss in place |
| Wire cutters or strong scissors | Used to cut mesh and trim cable ties |
| Plant pot (reference size) | Helps determine where moss should stop on the pole |
| Water container | For soaking and moistening sphagnum moss |
How to Make a DIY Moss Pole
Creating a moss pole at home is straightforward with the right materials and a clear plan. Here’s how to get started.
Step 1: Measure and Prepare the Wire Mesh Using Your Pot
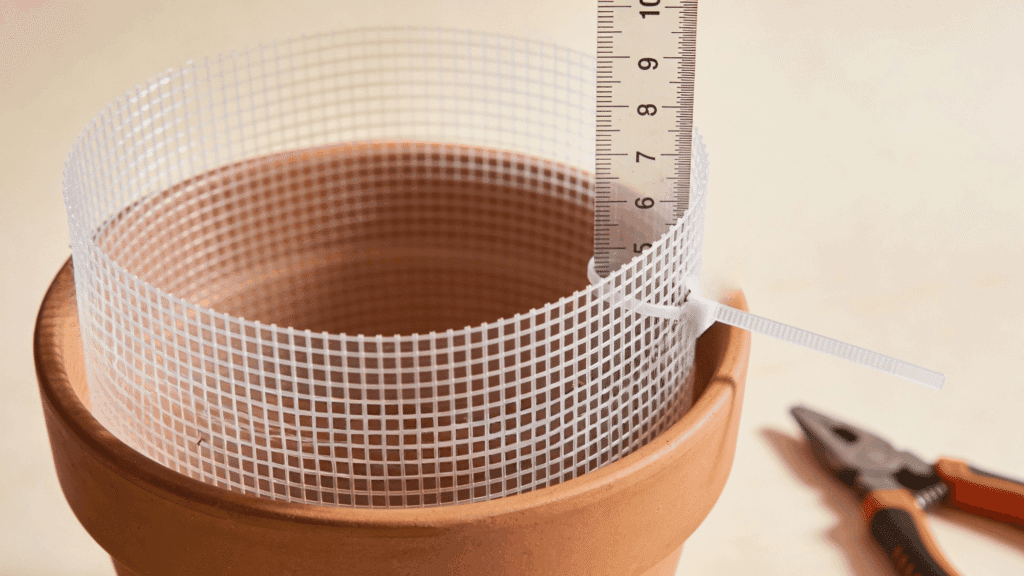
Start by cutting your wire mesh to the desired height of your moss pole. The creator uses mesh with 1 cm x 1 cm squares, making it easy to measure length accurately.
Before adding any moss, place the mesh inside the plant pot you plan to use. This step is critical because it helps you mark where the moss should stop.
Leaving the bottom section moss-free prevents constant moisture inside the pot, which could otherwise lead to root rot over time.
Step 2: Shape the Wire Mesh into a Cylindrical Pole
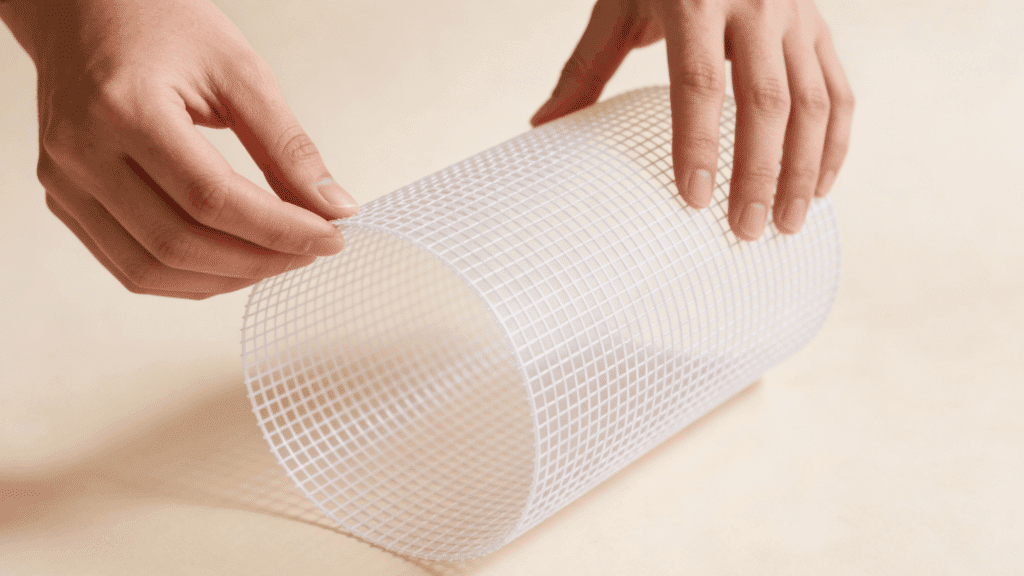
Once you’ve identified the correct moss-free section, gently curve the wire mesh into a cylindrical shape. The plastic-coated mesh is flexible enough to be shaped by hand without tools.
Take your time forming a neat, round pole, as this affects both appearance and stability. You can use a bottle or cylindrical object to help shape it, but manual shaping works well.
Keep the mesh slightly open so it’s easy to fill with moss in the next step.
Step 3: Prepare and Loosely Pack the Sphagnum Moss
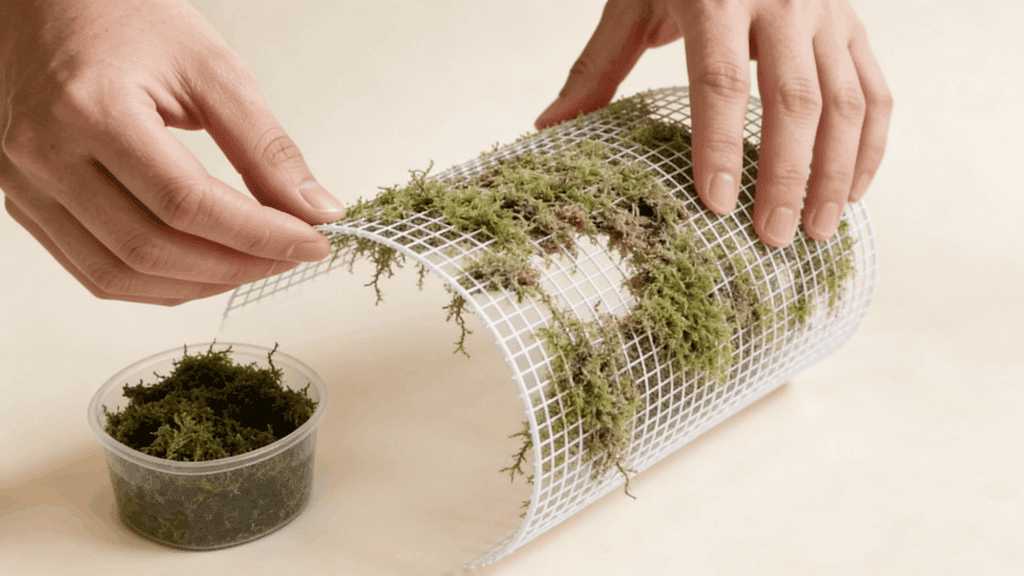
Before filling the pole, soak your sphagnum moss in water until it becomes soft and workable.
The moss should be moist but not dripping wet; squeeze out excess water if needed. Begin loosely packing the moss into the mesh from the top down, stopping at your previously marked line.
Avoid compacting the moss tightly; airy spacing is essential for healthy aerial root growth. Loose packing also improves airflow and moisture distribution inside the moss pole.
Step 4: Secure the Moss Pole with Cable Ties
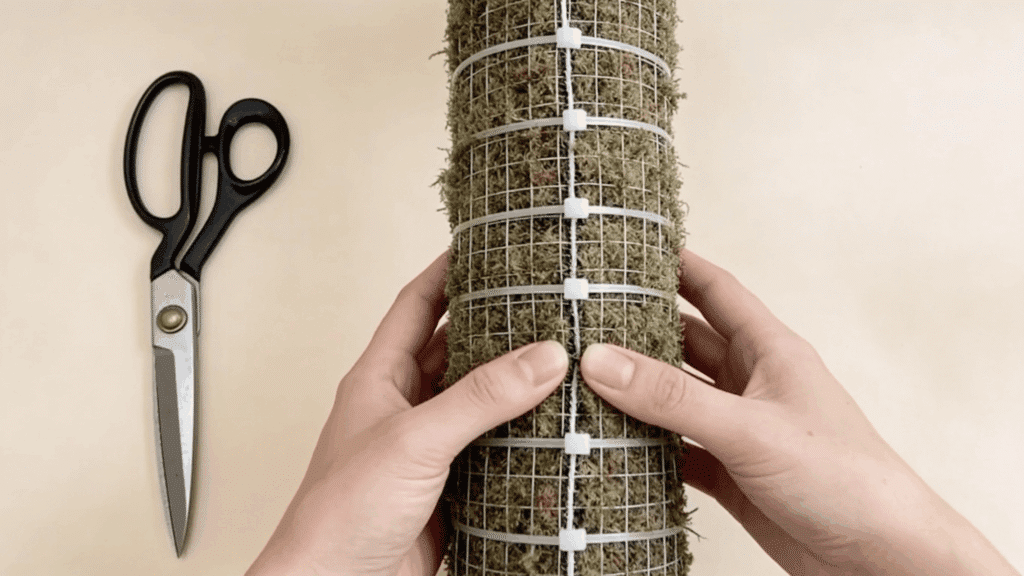
Once the moss is evenly packed, gently close the mesh edges together. You can either overlap the mesh slightly or align the edges side by side; both methods work well.
Secure the mesh using cable ties placed every 5–6 squares along the pole.
There’s no strict pattern required; start in the middle for stability, then work your way up and down. Tighten the ties enough to hold everything firmly without compressing the moss inside.
Step 5: Trim, Smooth, and Test the Moss Pole Fit
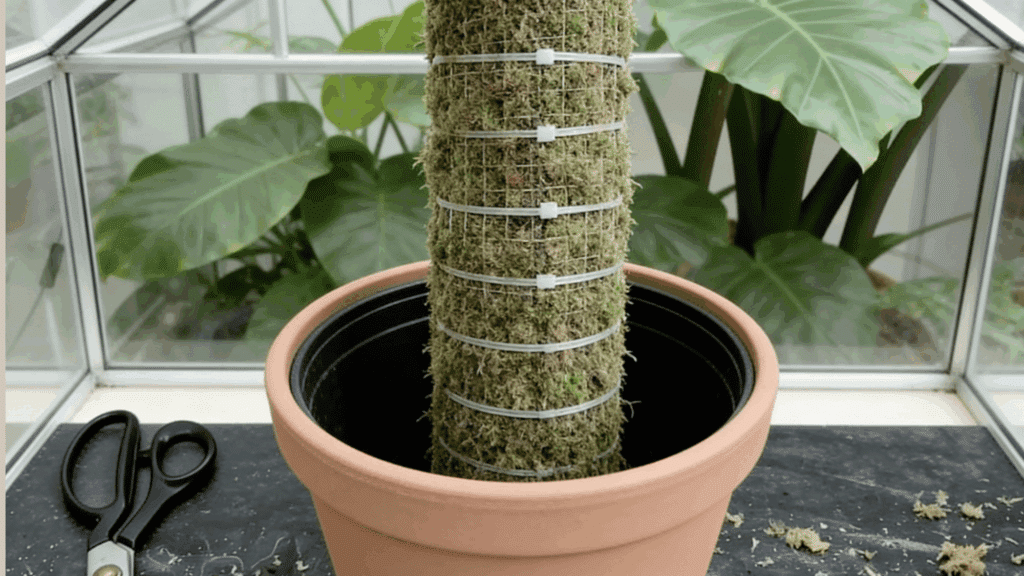
After securing the mesh, use wire cutters or scissors to trim off excess cable tie ends. These cut ends can be sharp, so rotate the locking heads inward toward the moss to avoid damaging plant leaves later.
Check that all ties are snug and the pole feels sturdy.
Finally, place the moss pole into your pot to confirm the fit. The moss-free section should sit cleanly inside the pot, keeping moisture where it belongs.
At this stage, you’ll have a classic DIY moss pole that is affordable, customizable, and suitable for a wide range of climbing plants.
Different Types of DIY Moss Poles You Can Make
There are several moss pole variations to suit different plants and budgets. Each type offers unique advantages depending on specific needs and available materials.
1. PVC Pipe Moss Pole A PVC pipe serves as the core structure, wrapped with sphagnum moss and secured with twine. This option is durable, waterproof, and perfect for heavy climbing plants that need sturdy support.
2. Wooden Stake Moss Pole Using a wooden dowel or bamboo stake as the base creates a natural-looking support. It’s cost-effective and works well for lighter plants, though wood may eventually rot with constant moisture exposure.
3. Wire Mesh Moss Pole Hardware cloth or chicken wire rolled into a cylinder and stuffed with moss creates a hollow pole. This design allows roots to grow inside the structure, promoting better attachment and growth.
4. Coir Pole Alternative While not technically moss, coconut coir fiber wrapped around a support offers similar benefits. It’s more sustainable, longer-lasting, and easier to find than sphagnum moss in some regions.
How to Keep a Moss Pole Moist
Maintaining consistent moisture in a moss pole ensures aerial roots stay hydrated and plants thrive. Here are effective methods to keep it properly dampened.
- Mist the moss pole with a spray bottle every few days, focusing on all exposed surfaces.
- Pour water directly onto the top of the pole, allowing it to trickle down through the moss.
- Use a watering can with a narrow spout to target the moss without overwatering the soil.
- Install a drip irrigation system for automated, consistent moisture delivery to larger poles.
- Soak the entire pole in water for 10-15 minutes monthly to ensure deep hydration.
- Monitor moisture levels by touching the moss; it should feel damp but not dripping wet.
Conclusion
Creating a moss pole transforms how climbing plants grow indoors. The process takes minimal time but delivers lasting results that both plants and plant owners will appreciate.
With just five straightforward steps, anyone can build a support structure that rivals store-bought versions. The materials are affordable and easy to source from local hardware or garden stores.
Remember to keep the moss consistently moist for best results. Regular misting or watering helps aerial roots attach and absorb nutrients effectively.
Now it’s time to put this knowledge into action. Grab those supplies, follow the steps, and watch climbing plants flourish like never before. They’ll reward the effort with lush, vibrant growth.