
Installing a ceiling fan takes most DIYers between one and two hours, and the result is worth it: better airflow, lower cooling bills, and a more functional room.
The process includes turning off the power, removing the old fixture, checking the fan box, and connecting the wires.
If your box is fan-rated and your wiring is standard, this is a manageable weekend project with basic tools. The biggest mistakes I see are skipping the electrical box check and rushing the wiring.
In this guide, you will find the full ceiling fan installation process in simple steps.
From removing the old fixture to testing the finished fan, you will learn how to complete the job safely and correctly, even if it is your first time.
Tools and Materials Needed for Ceiling Installation
Before installing a ceiling fan, it is important to gather all the needed tools and materials so the process goes smoothly. Most ceiling fan kits include mounting brackets, screws, and fan blades.
How to Install a Ceiling Fan?
Installing a ceiling fan might seem intimidating, but with the right steps, it is completely manageable for a confident DIYer.
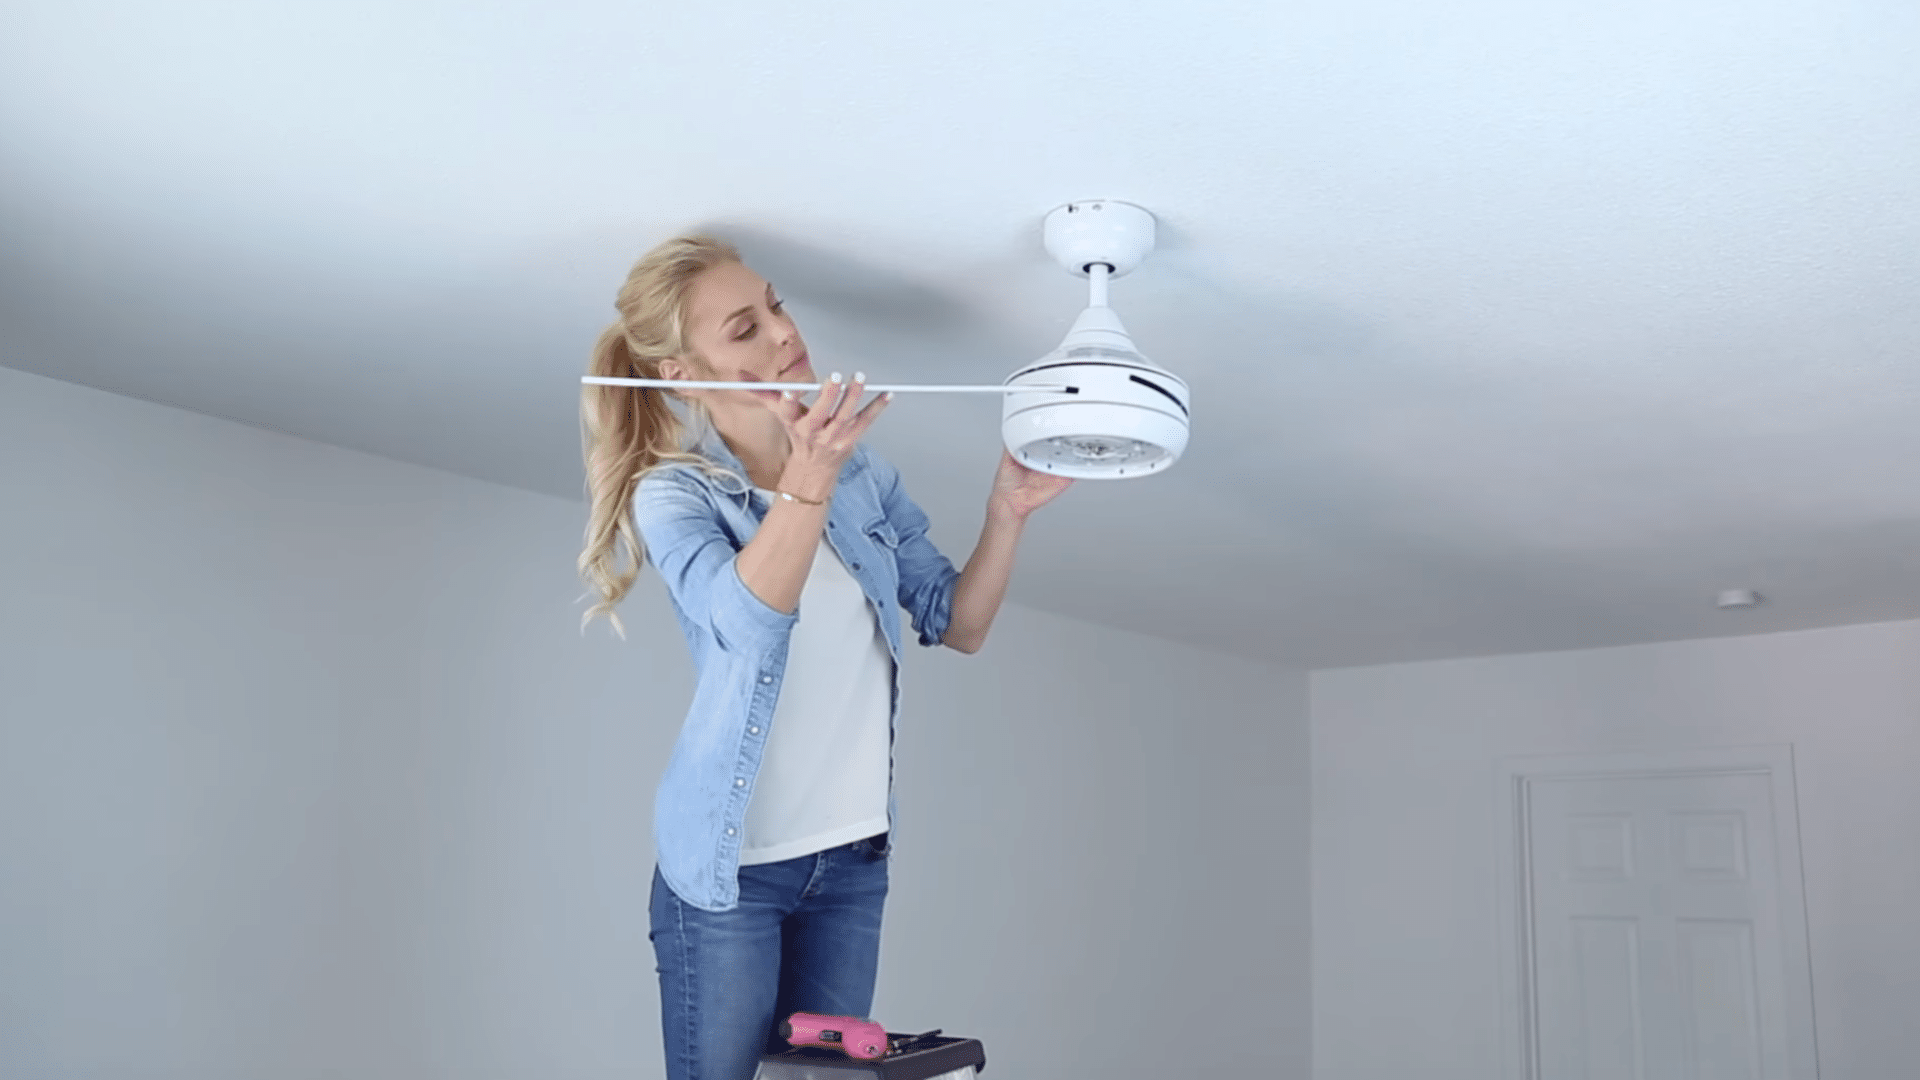
Step 1: Assemble the Downrod
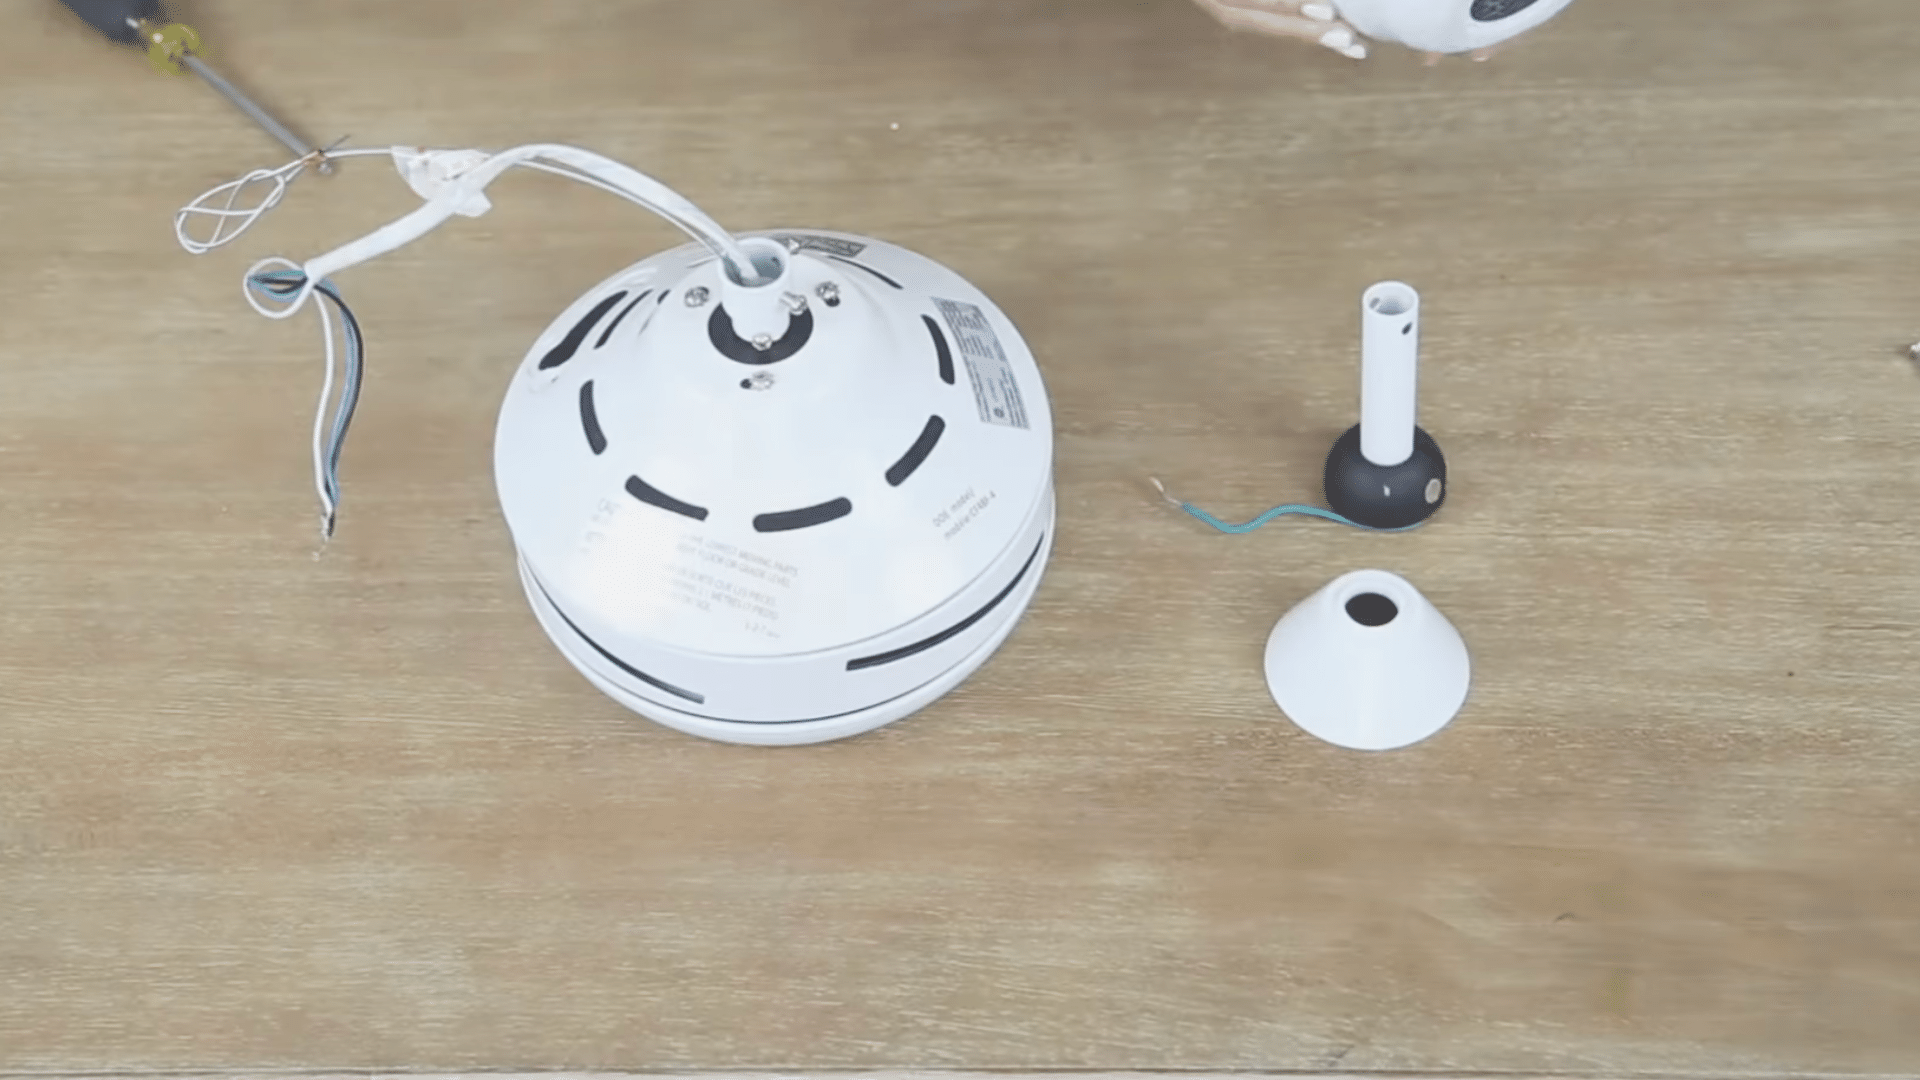
Slide the downrod into the opening at the top of the canopy cover. Once positioned, feed all the wires, including the remote receiver wires, down through the hollow center of the downrod from top to bottom.
Pull them fully through so you have enough slack to make comfortable connections later.
Once the wires are through, secure the bottom end of the downrod firmly to the fan motor housing using the locking pin or set screw provided in your kit.
Step 2: Mount the Bracket on the Ceiling Box
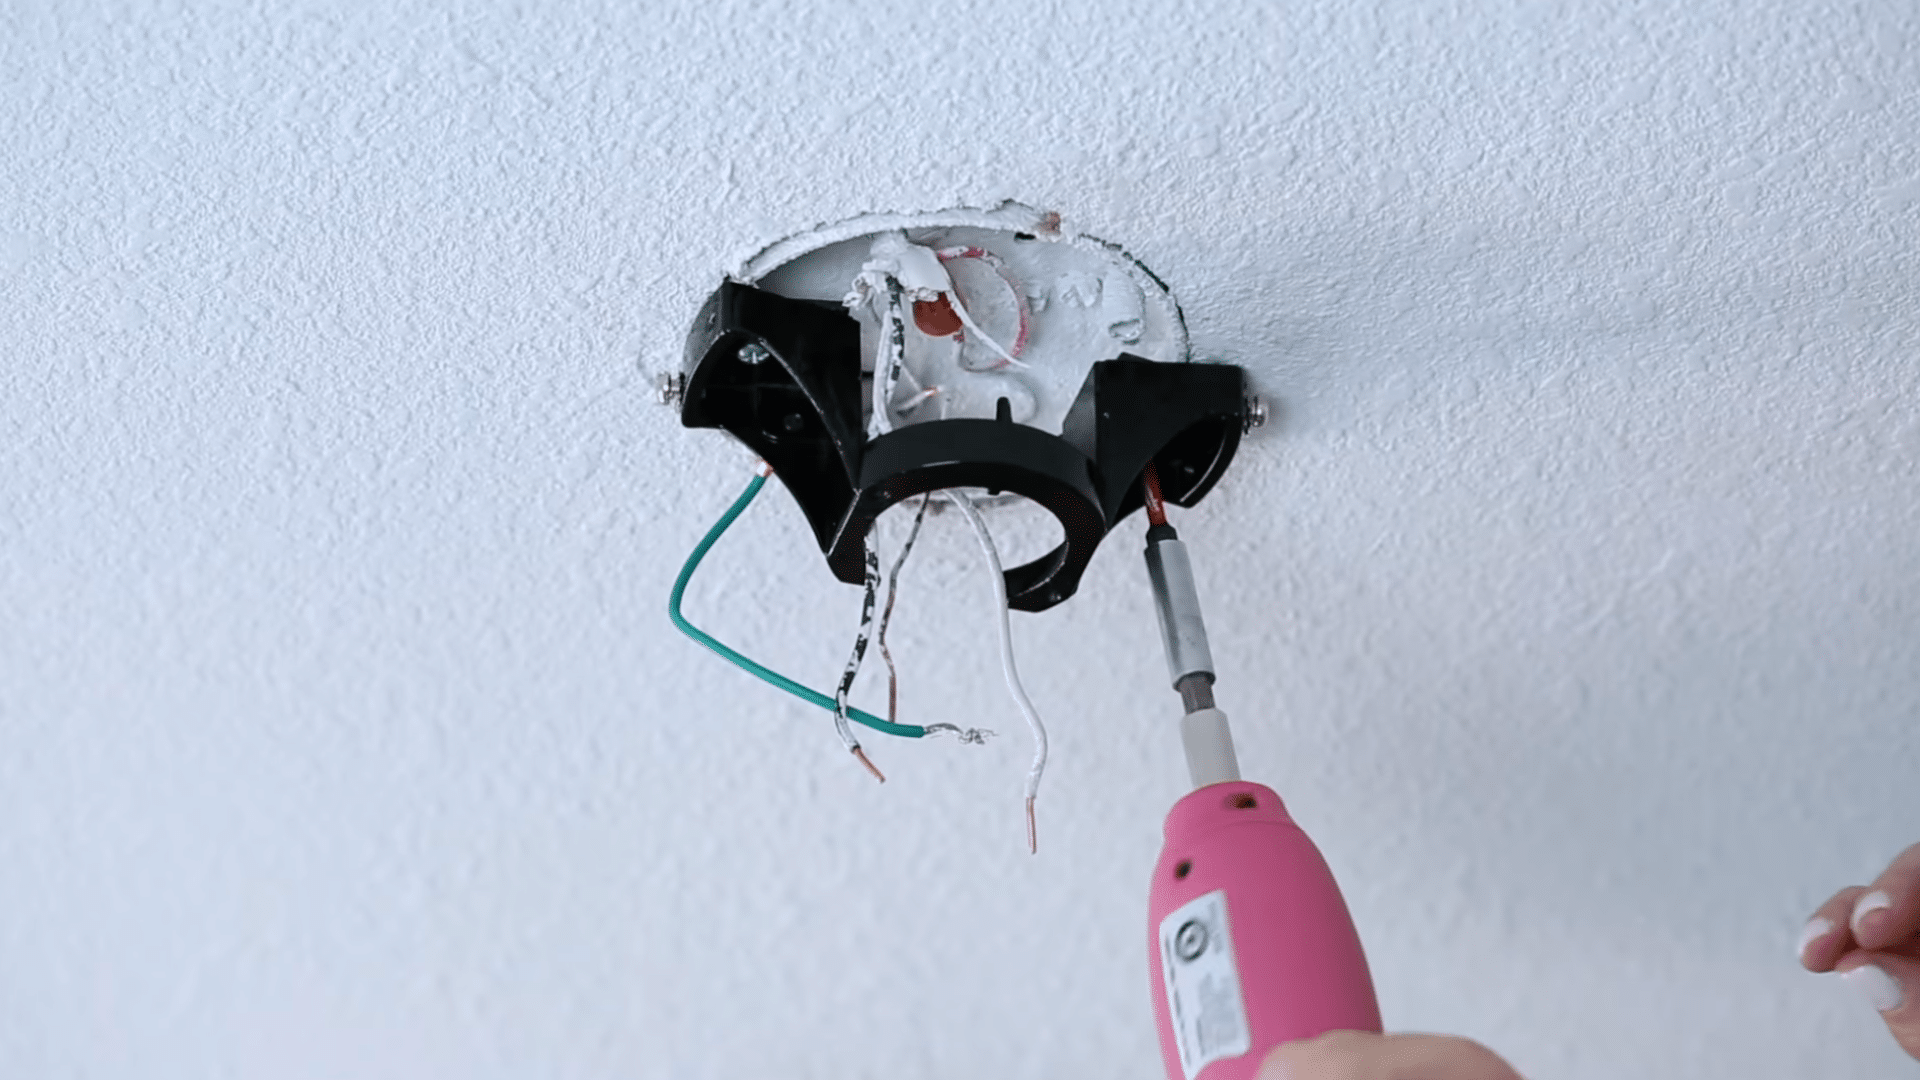
Take the mounting bracket from the fan kit and attach it to the ceiling electrical box with the provided screws. Hold it flat against the ceiling and tighten each screw fully so it stays secure.
This bracket supports the full weight of the ceiling fan, so it must not move or feel loose at all.
If the bracket is not tight enough, the fan can wobble, shake, or make noise while running. A strong and steady bracket helps the fan work safely and smoothly for a long time.
Step 3: Match Remote and Receiver Codes

Before you start wiring, locate the remote receiver unit and the remote handset. Both have a frequency code setting, usually a set of small dip switches or a dial.
Make sure both are set to exactly the same code. Many fixtures come with these pre-matched from the factory, but always verify by checking your instruction manual.
Skipping this step means your remote will not control the fan after everything is installed and closed up.
Step 4: Position the Hemisphere and Bracket
Slide the decorative canopy up over the downrod and let it rest loosely near the mounting bracket. This cover hides the wiring and ceiling box after the installation is complete.
Keep the canopy loose for now so you can easily reach the wiring area above it while connecting the wires.
Once all the wiring is done and checked, you can slide the canopy into place and secure it properly against the ceiling for a clean finished look.
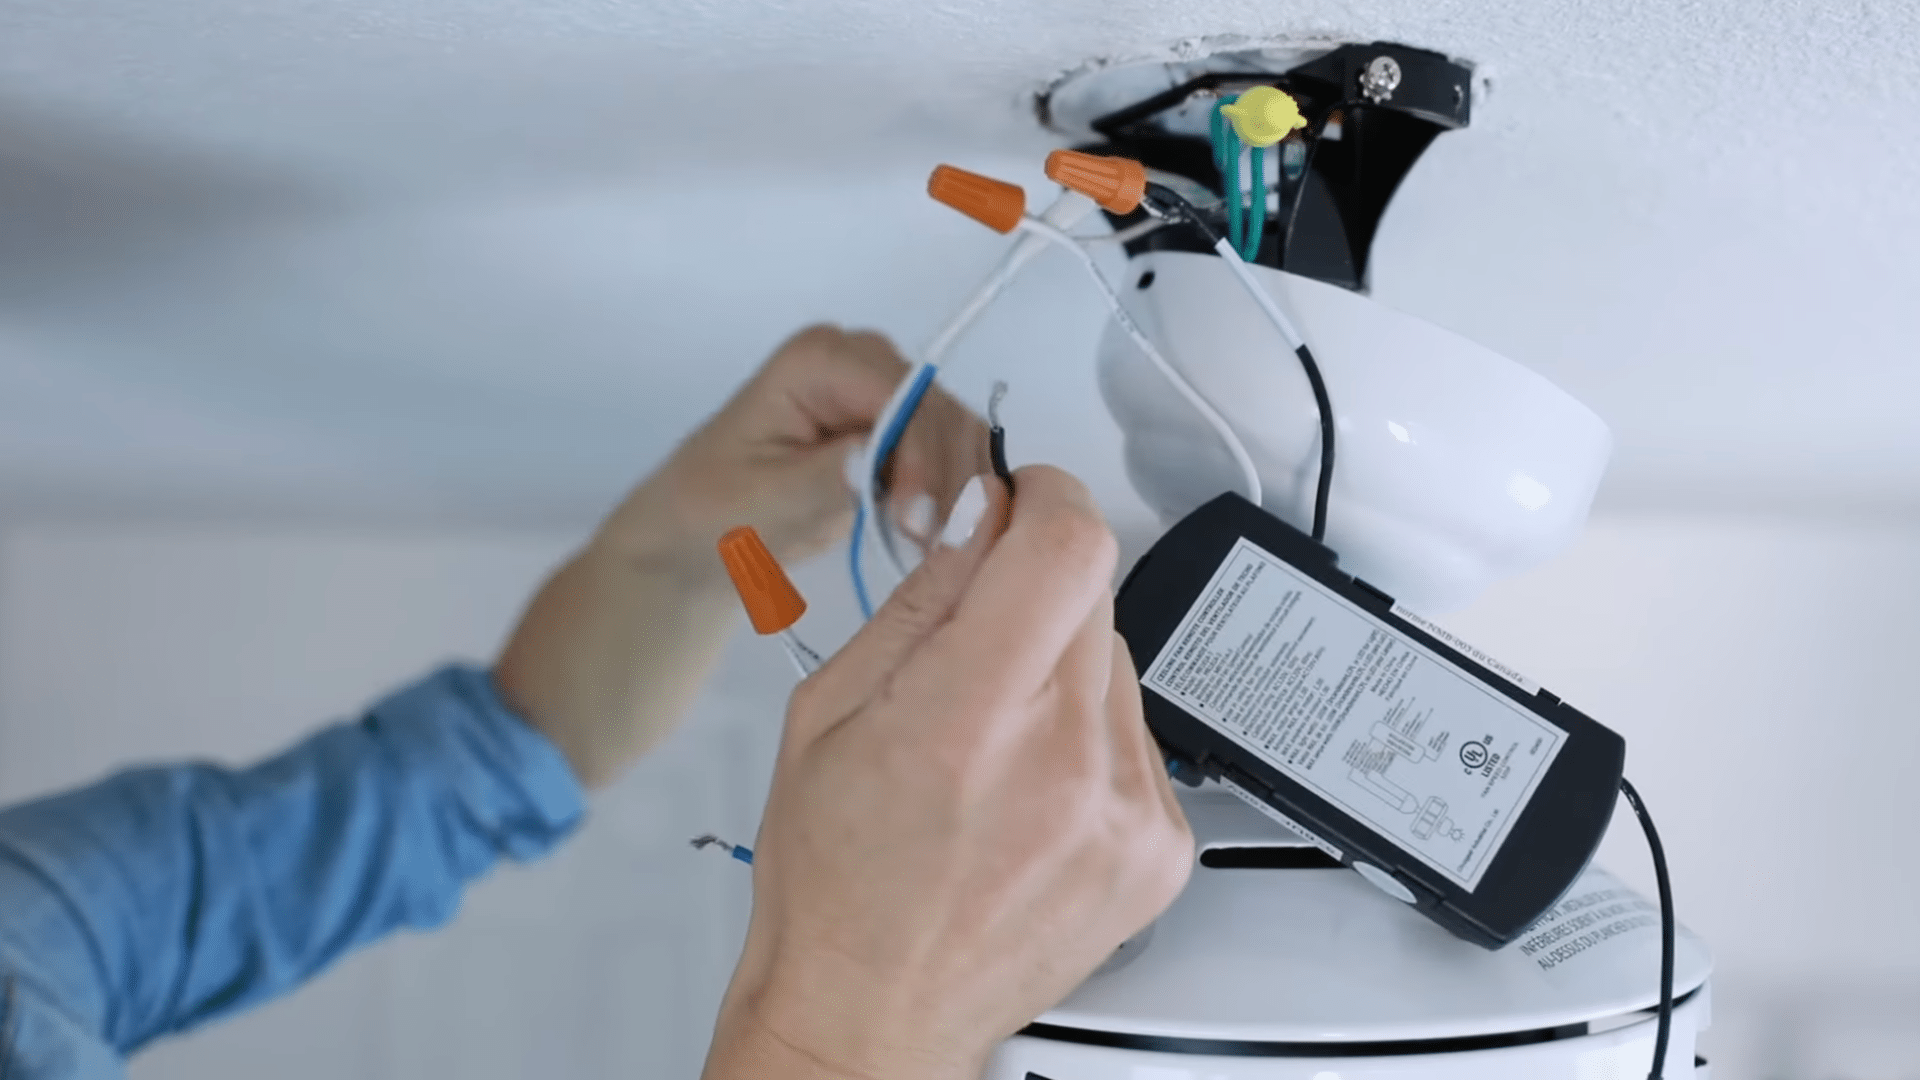
Step 5: Make All Electrical Connections
Connect each wire pair using wire nuts. To use a wire nut, hold both wire ends together at the same length, place the wire nut over the tips, and twist clockwise until it is tight and no bare copper is visible.
After twisting, tug each wire firmly to confirm it will not pull free. Make connections in this order:
- Green fan wire:- bare copper ground wire from the ceiling supply.
- Black receiver unit wire:- black supply wire from the ceiling.
- White receiver unit wire:- white supply wire from the ceiling.
The blue wire is dedicated to the light kit. Connecting it separately from the black fan wire allows the remote to control the light and fan independently.
Wire color quick reference: Black = hot (power), White = neutral, Green or bare copper = ground, Blue = light kit.
If your ceiling has only two wires (black and white with no ground), connect black to black, white to white, and cap the green fan wire with a wire nut.
Do not skip the ground connection if one is available.
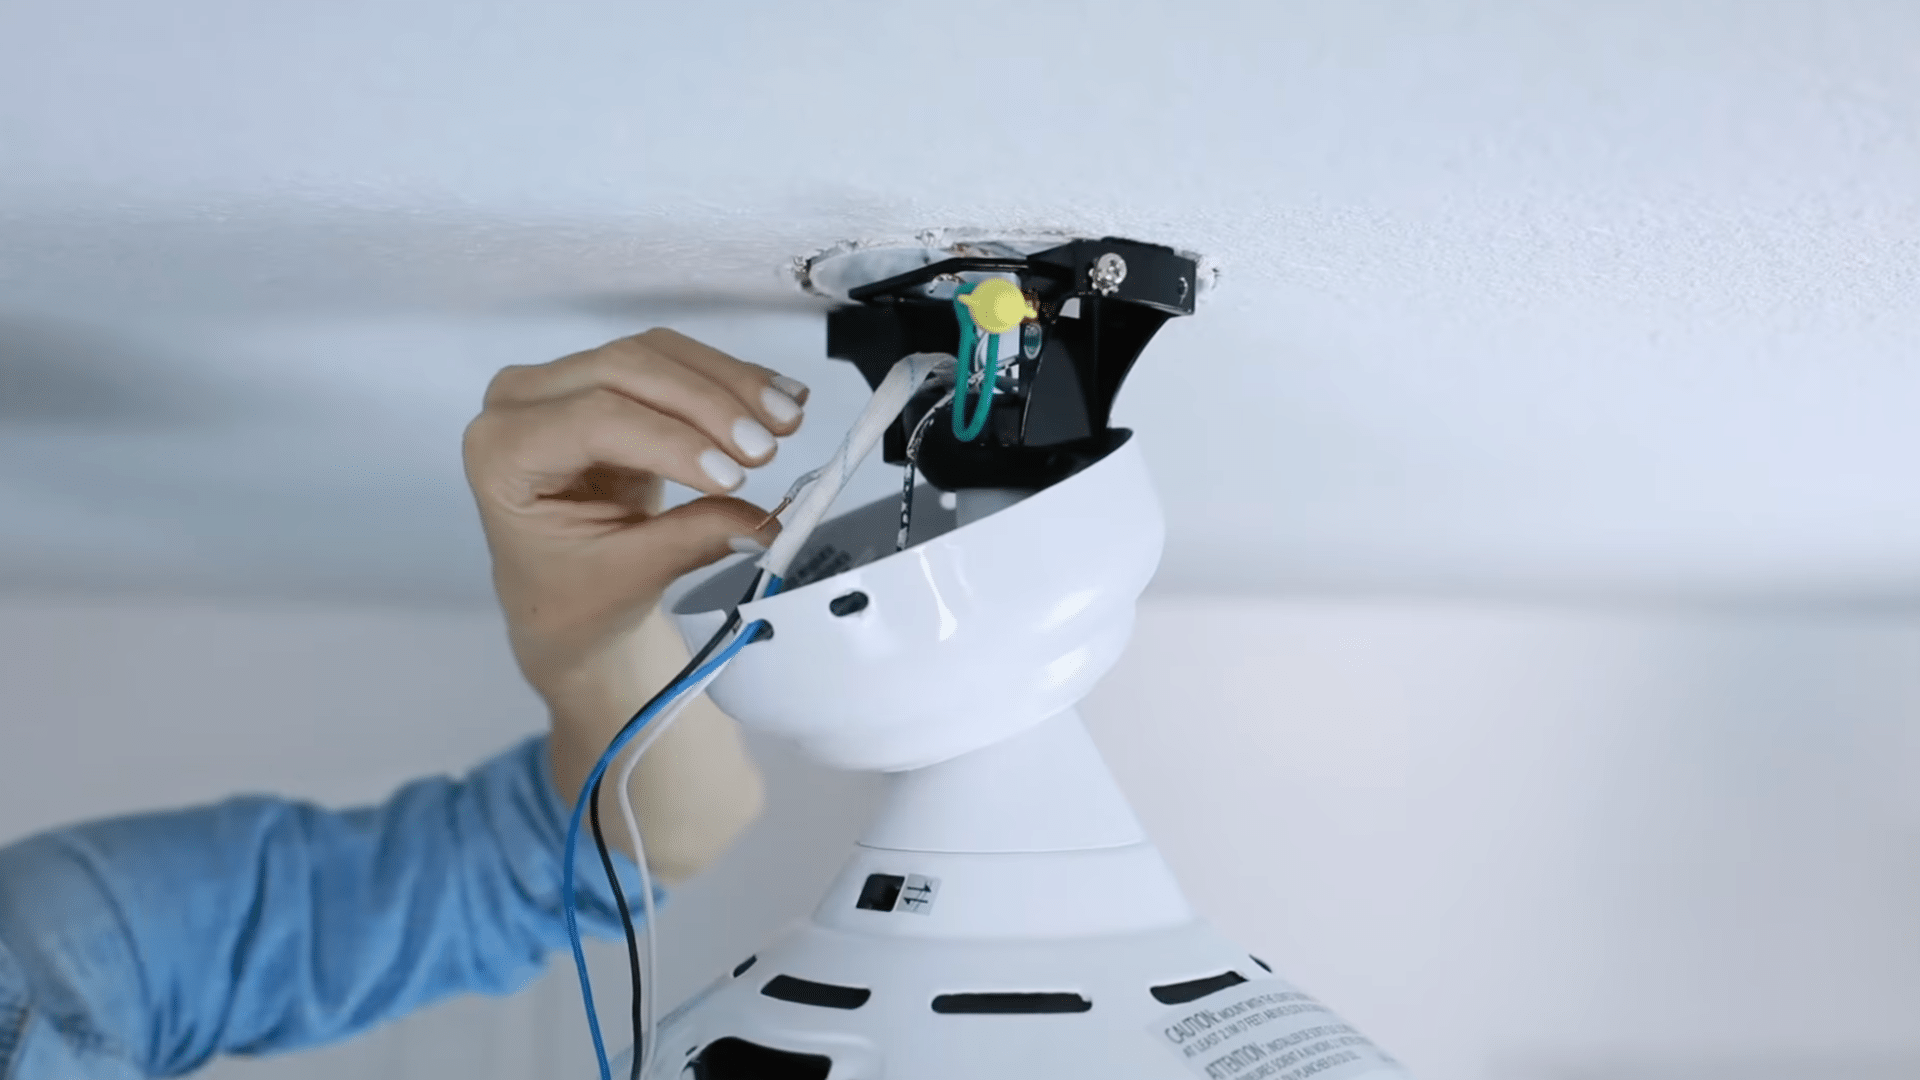
Step 6: Tuck Wires and Seat the Receiver
Once all connections are made, carefully fold the wires and wire nuts upward into the ceiling electrical box. Do not cram or force them; fold them neatly so nothing gets pinched when the canopy is closed.
Slide the remote receiver unit into its slot on the mounting bracket. It typically clicks or slides into place. Make sure it is fully seated and not blocking any wires.
This tutorial is based on a helpful video by Canarm Ltd. You can check out the original video on their YouTube channel here or watch it below.
How Can You Test a Ceiling Fan After Installation?
After installing the ceiling fan, turn the power back on at the breaker box and test the fan carefully. Start by checking the light and fan controls to make sure everything responds properly.
Run the fan at different speed settings to see if the blades spin smoothly without wobbling or shaking.
Listen for unusual noises like clicking or humming, which may mean loose screws or wiring problems.
Check that the fan stays firmly attached to the ceiling while running. If the fan includes a remote control, test all its functions as well.
A properly installed ceiling fan should run quietly, stay balanced, and provide steady airflow throughout the room.
Wobble fix: If the fan wobbles after testing, use a blade balancing kit (a small weighted clip that comes with most fans). Attach the clip to the trailing edge of each blade one at a time and run the fan.
When the wobble stops or reduces, you have found the unbalanced blade. Move the clip closer to the blade tip or center to fine-tune it.
Should You Install a Ceiling Fan Yourself: Pros and Cons
Ceiling fan installation improves airflow, adds comfort, and can help lower cooling costs. However, installation may need electrical work, and a poor setup can cause noise or wobbling. Regular cleaning is also needed.
| Pros | Cons |
| Saves money | May need new wiring |
| Easy DIY project | Ladder safety risk |
| Fast installation | Wiring mistakes possible |
| Better airflow | The ceiling box may need replacement |
| Includes hardware | Limited switch control |
Common Ceiling Fan Installation Mistakes to Avoid
Small setup mistakes can lead to wobbling, noise, or electrical problems later. Paying attention during installation helps the fan run safely and smoothly for years.
- Loose mounting bracket: A weak or loose bracket can make the fan shake, wobble, or create loud noises while running.
- Using the wrong electrical box: Standard light boxes may not support the fan’s weight and can become unsafe over time.
- Forgetting to turn off power: Working with live wires increases the risk of electric shock and serious injury.
- Incorrect wire connections: Mixing up wires can stop the fan from working properly or damage the motor.
- Uneven blade installation: Blades installed at different angles often cause wobbling and poor balance.
- Skipping the balance kit: Ignoring balancing adjustments may leave the fan shaky even after installation.
- Tightening screws poorly: Loose screws can create rattling sounds and reduce the fan’s stability.
- Installing the fan too low: A fan placed too close to the floor can become a safety hazard in smaller rooms.
- Ignoring manufacturer instructions: Every fan model is slightly different, so skipping instructions can lead to setup problems.
- Testing before full assembly: Turning on the fan before everything is secured may damage parts or loosen connections.
Conclusion
Replacing a light fixture with a ceiling fan is a simple DIY project if you take your time and follow the steps carefully.
Before you start, turn off the power at the circuit breaker and use a voltage tester to make sure
no electricity is flowing to the wires. Safety should always come first when working with electrical parts. Start by removing the old light fixture and checking the electrical box.
A regular light box may not be strong enough to hold the weight and movement of a ceiling fan, so you may need to install a fan-rated electrical box.
After that, attach the mounting bracket that comes with the ceiling fan and connect the wires by matching the correct colors.
Secure the fan motor, attach the blades, and install the light kit if your fan includes one.
Frequently Asked Questions.
How Long Does Ceiling Fan Installation Take?
Most ceiling fan installations take around 1 to 2 hours to complete.
Can a Light Fixture Be Replaced with a Ceiling Fan?
Yes, a light fixture can be replaced if the electrical box is rated to support a ceiling fan.
Should the Power Be Turned Off Before Installation?
Yes, the power should always be turned off before starting any electrical work.
What Is the Best Ceiling Height for a Ceiling Fan?
A ceiling fan should stay at least 7 feet above the floor for safe and proper use.