
Making your own wreath is a fun and creative way to add a personal touch to your home decor.
From seasonal designs to everyday front door decorations, a handmade wreath lets you choose the colors, materials, and style that fit your space.
The good news is that you do not need special skills or expensive supplies to get started.
In this guide, you will learn how to make a wreath step by step with pictures, using simple tools and easy-to-follow instructions.
If you’re new to wreath making, this easy tutorial will guide you through each step. Follow along to create a beautiful wreath and enjoy making a custom design for your home.
What Are the Types of Wreaths You Can Make?
Wreaths come in many styles, making it easy to find one that matches your home and the season. From simple greenery designs to festive holiday decorations, each type offers a different look and feel.
| Type of Wreath | Description | Best For |
|---|---|---|
| Floral Wreaths | Made with fresh or artificial flowers to create a colorful display. | Spring, summer, weddings, and special occasions |
| Greenery Wreaths | Use leaves, eucalyptus, ferns, or other plants for a natural look. | Year-round decor, modern and farmhouse styles |
| Mesh Wreaths | Created with decorative mesh ribbon arranged into full, fluffy loops. | Holidays and themed decorations |
| Grapevine Wreaths | Made from woven twigs that add texture and a rustic feel. | Seasonal decor, rustic and farmhouse homes |
| Holiday Wreaths | Designed for celebrations like Christmas, Easter, Halloween, or Thanksgiving. | Seasonal and holiday decorating |
| Ribbon Wreaths | Made with ribbon loops, bows, or strips attached to a wreath frame. | Custom color themes, parties, and home decor |
What Materials Do You Need to Make a Wreath?
Before you start making a wreath, it helps to gather all the necessary supplies in one place. Having the right materials ready will make the process easier and help you create a wreath that looks neat and professional.
- Wreath Frame or Wreath Form: This serves as the foundation of your wreath and holds all the decorations in place. Common options include wire frames, grapevine wreaths, foam rings, and twig forms.
- Artificial or Fresh Greenery: Greenery creates the base layer and gives the wreath a full appearance. You can use artificial stems for long-lasting results or fresh greenery for a natural look.
- Artificial Flowers: Flowers add color, texture, and visual interest to the wreath design. Choose flowers that match your chosen theme, season, or color palette.
- Ribbon: Ribbon is often used to create bows or decorative accents on the wreath. It can also be used as a hanging loop for displaying the finished wreath.
- Floral Wire: Floral wire helps secure greenery, flowers, and decorations to the wreath frame. It is flexible, easy to work with, and provides a strong hold.
- Wire Cutters: Wire cutters make it easy to trim floral wire and cut thick stems. Using the proper tool helps create clean cuts and speeds up the project.
- Hot Glue Gun: A hot glue gun is useful for attaching smaller decorations and securing loose pieces. It creates a strong bond and works on many different materials.
How to Make a Wreath as a Beginner?
Making a wreath is easier than it looks when you break the process into simple steps. Follow these seven steps to create a beautiful wreath that fits your style, season, or special occasion.
Step 1: Gather Your Wreath-Making Supplies
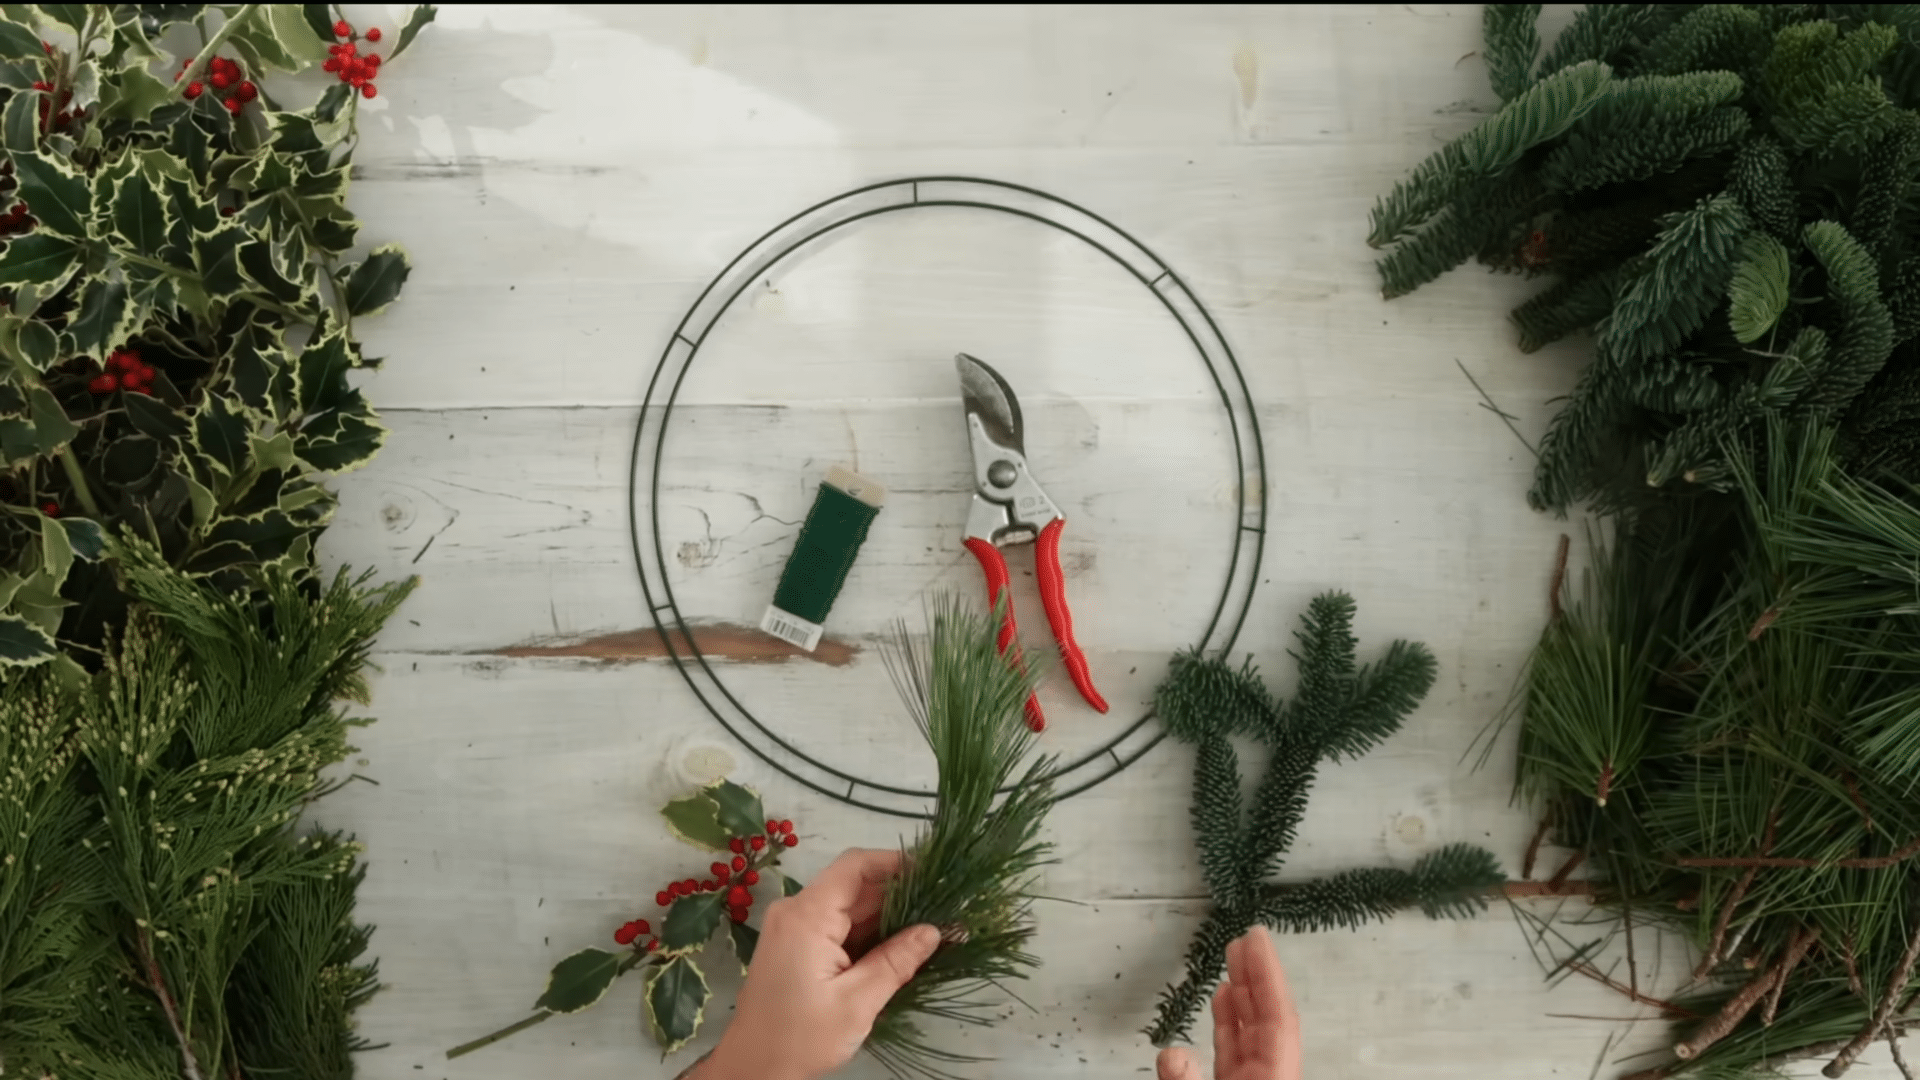
Start by collecting all the materials needed for the wreath. The creator uses a wire wreath form, 22-gauge paddle wire, pruning shears, and a mix of evergreen branches.
Noble fir, princess pine, incense cedar, and variegated holly with berries create a full and colorful look.
You can also gather greenery from your own garden or buy it from a garden center or florist. Having all supplies ready before you begin makes the project much easier and keeps the process organized.
Step 2: Attach the Paddle Wire to the Wreath Form
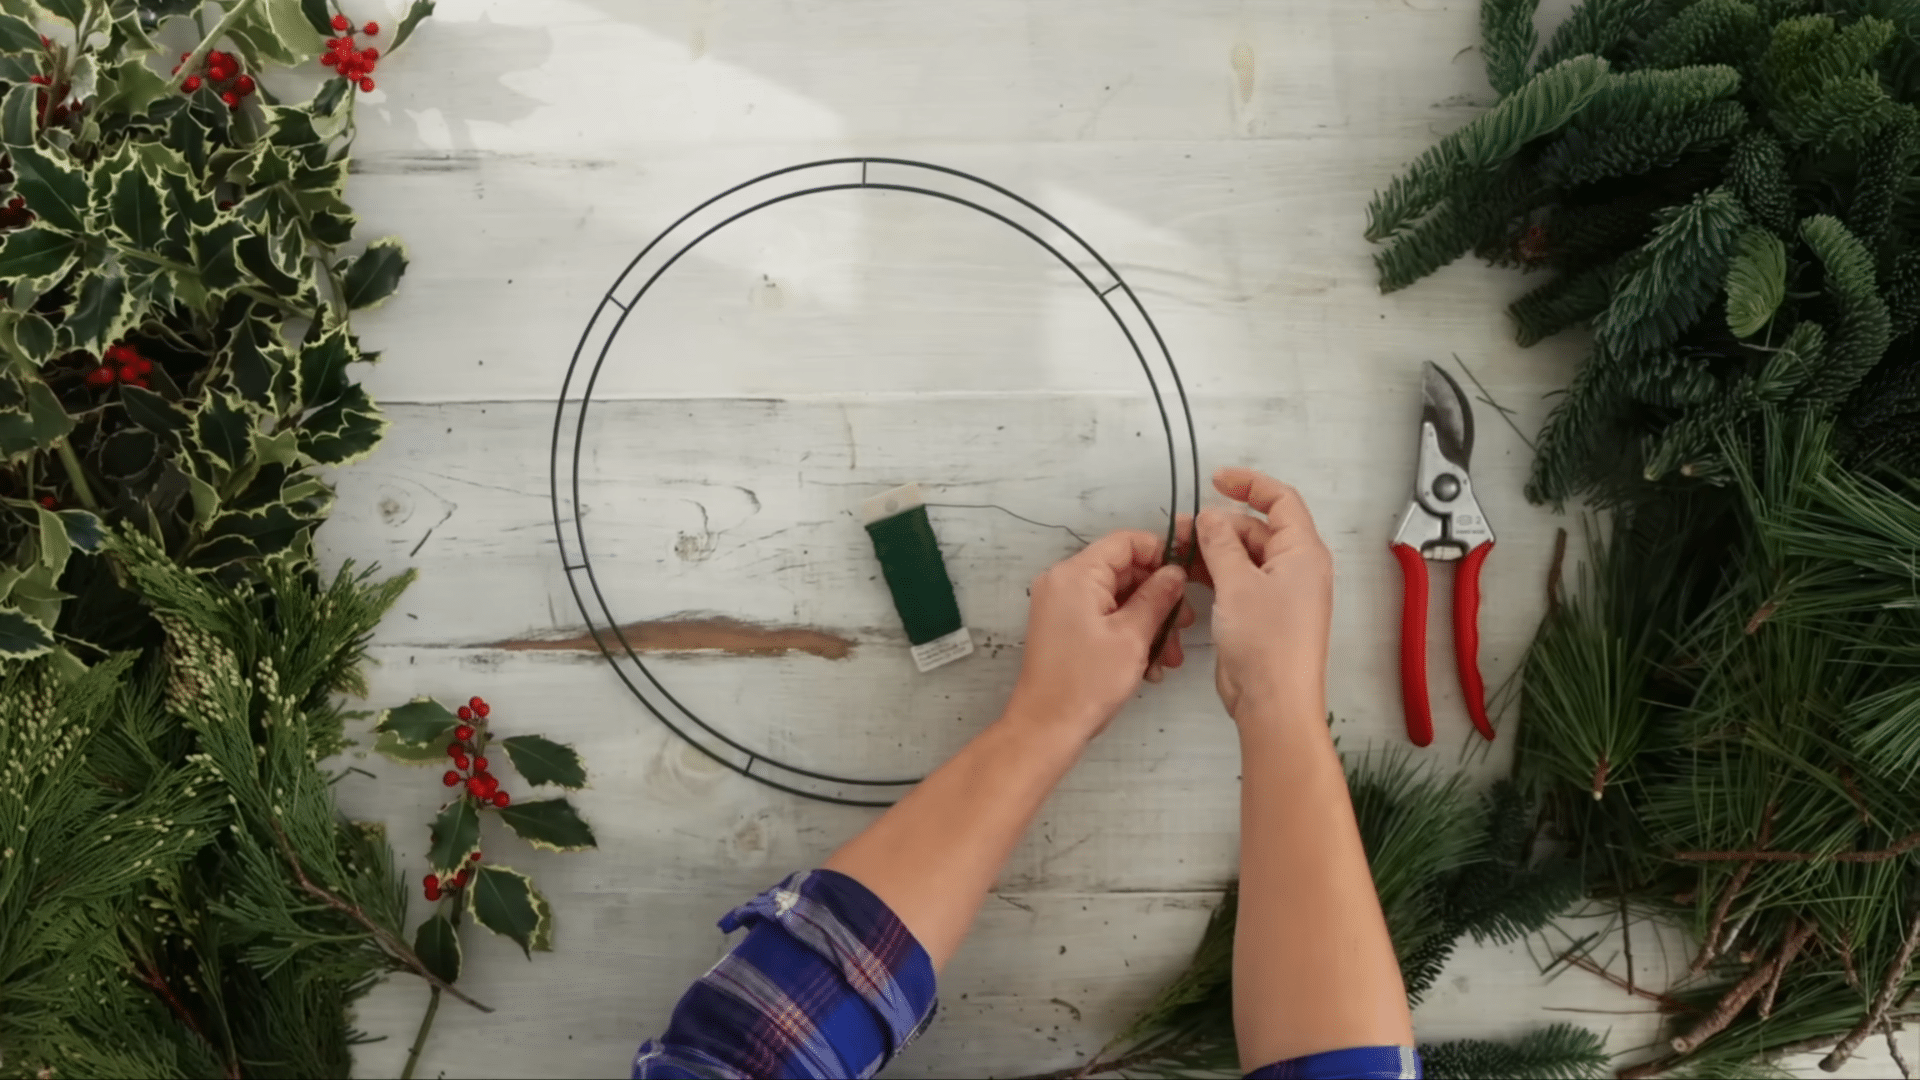
Secure the paddle wire tightly to the wreath form before adding any greenery. Wrap the wire around the frame several times so it will not slip while you work.
Keep the wire attached to the paddle because you will use one continuous piece throughout the entire project.
The creator places the wire on the outside of the frame for easier handling. This strong starting point helps keep every bundle secure as the wreath grows larger.
Step 3: Create and Attach the First Greenery Bundle
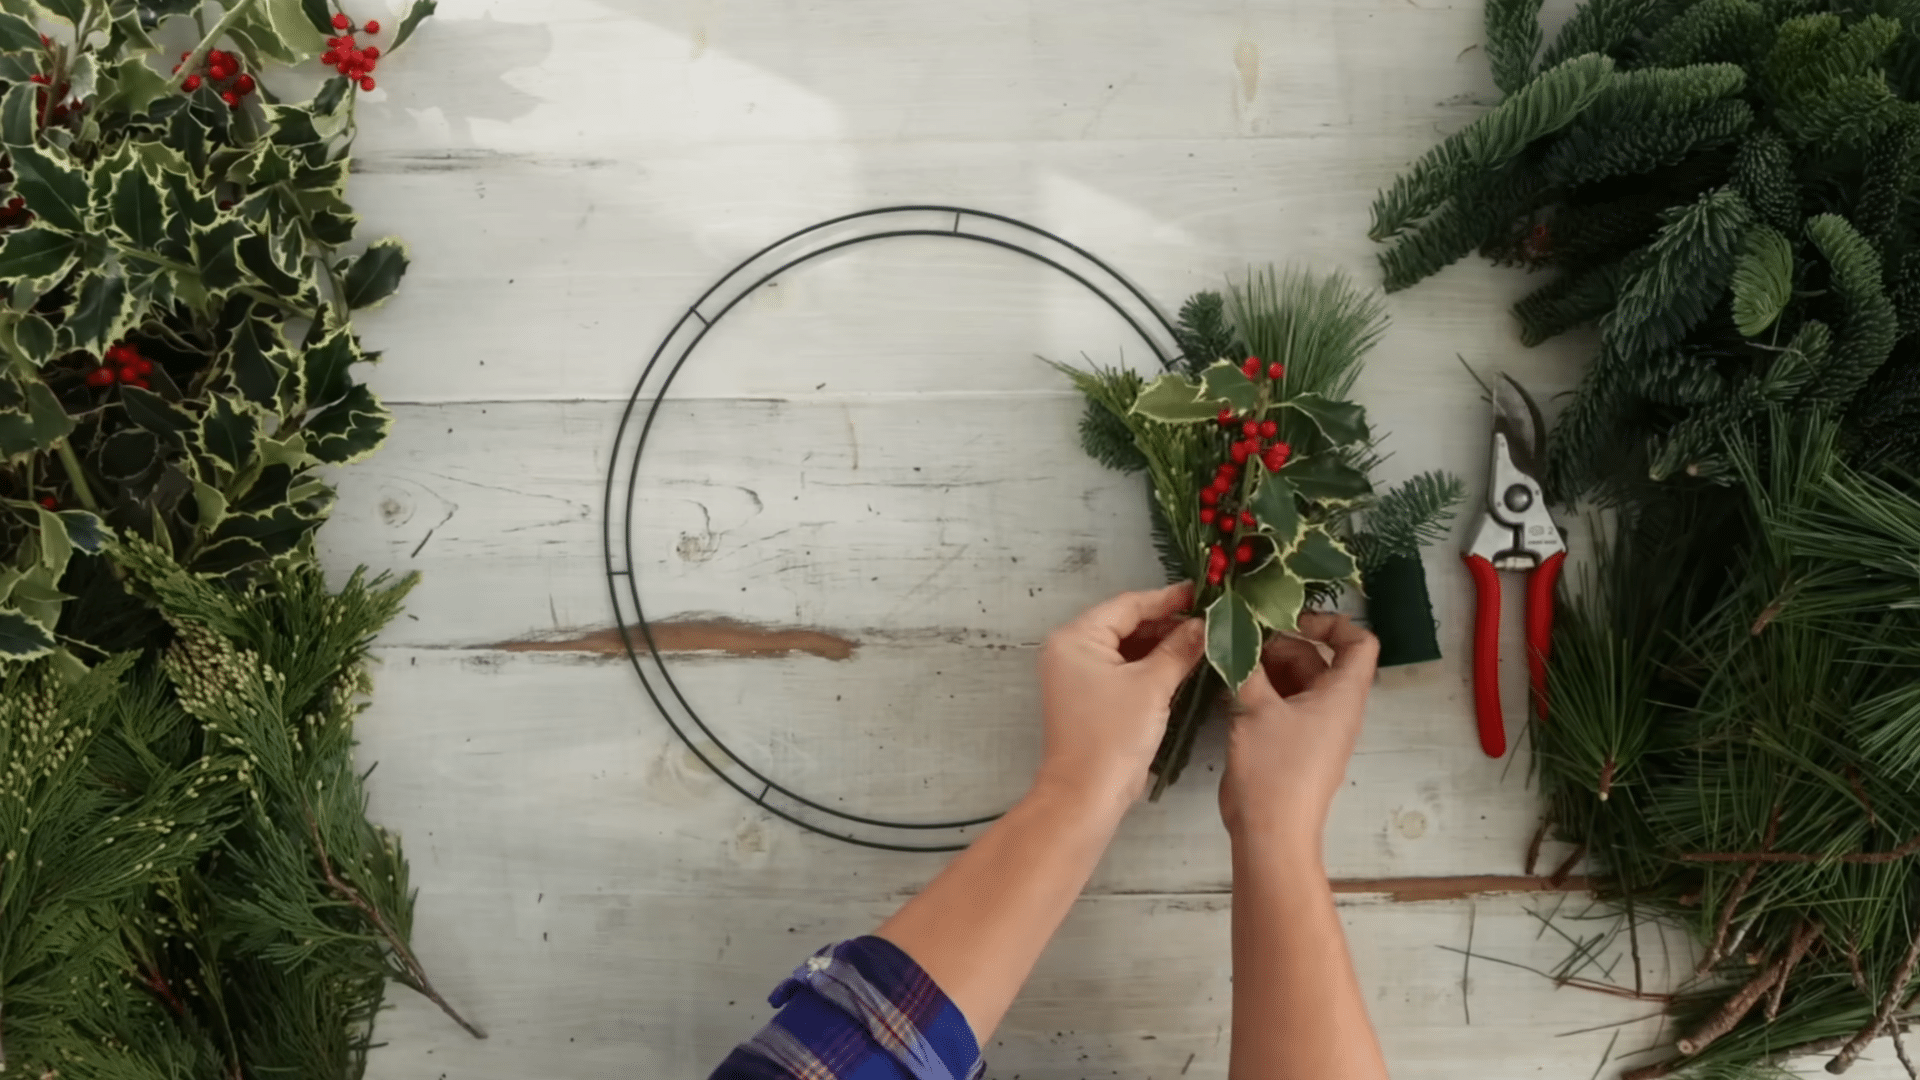
Build your first bundle by combining different types of greenery. The creator layers fir, pine, cedar, and holly together to add texture and color.
Place this bundle directly on the wreath form and wrap the paddle wire around it three times.
Pull the wire tight because fresh greenery shrinks slightly as it dries. A firmly attached first bundle creates the base pattern that you will repeat around the entire wreath.
Step 4: Continue Adding Overlapping Bundles
Make another bundle and overlap it with the stems of the first one. Angle it slightly outward to give the wreath more depth and fullness.
Secure it with three tight wraps of wire. Continue repeating this process, alternating the placement slightly inward and outward while keeping the bundle sizes consistent.
This technique creates an even shape and helps maintain an open center in the wreath instead of filling the entire middle area.
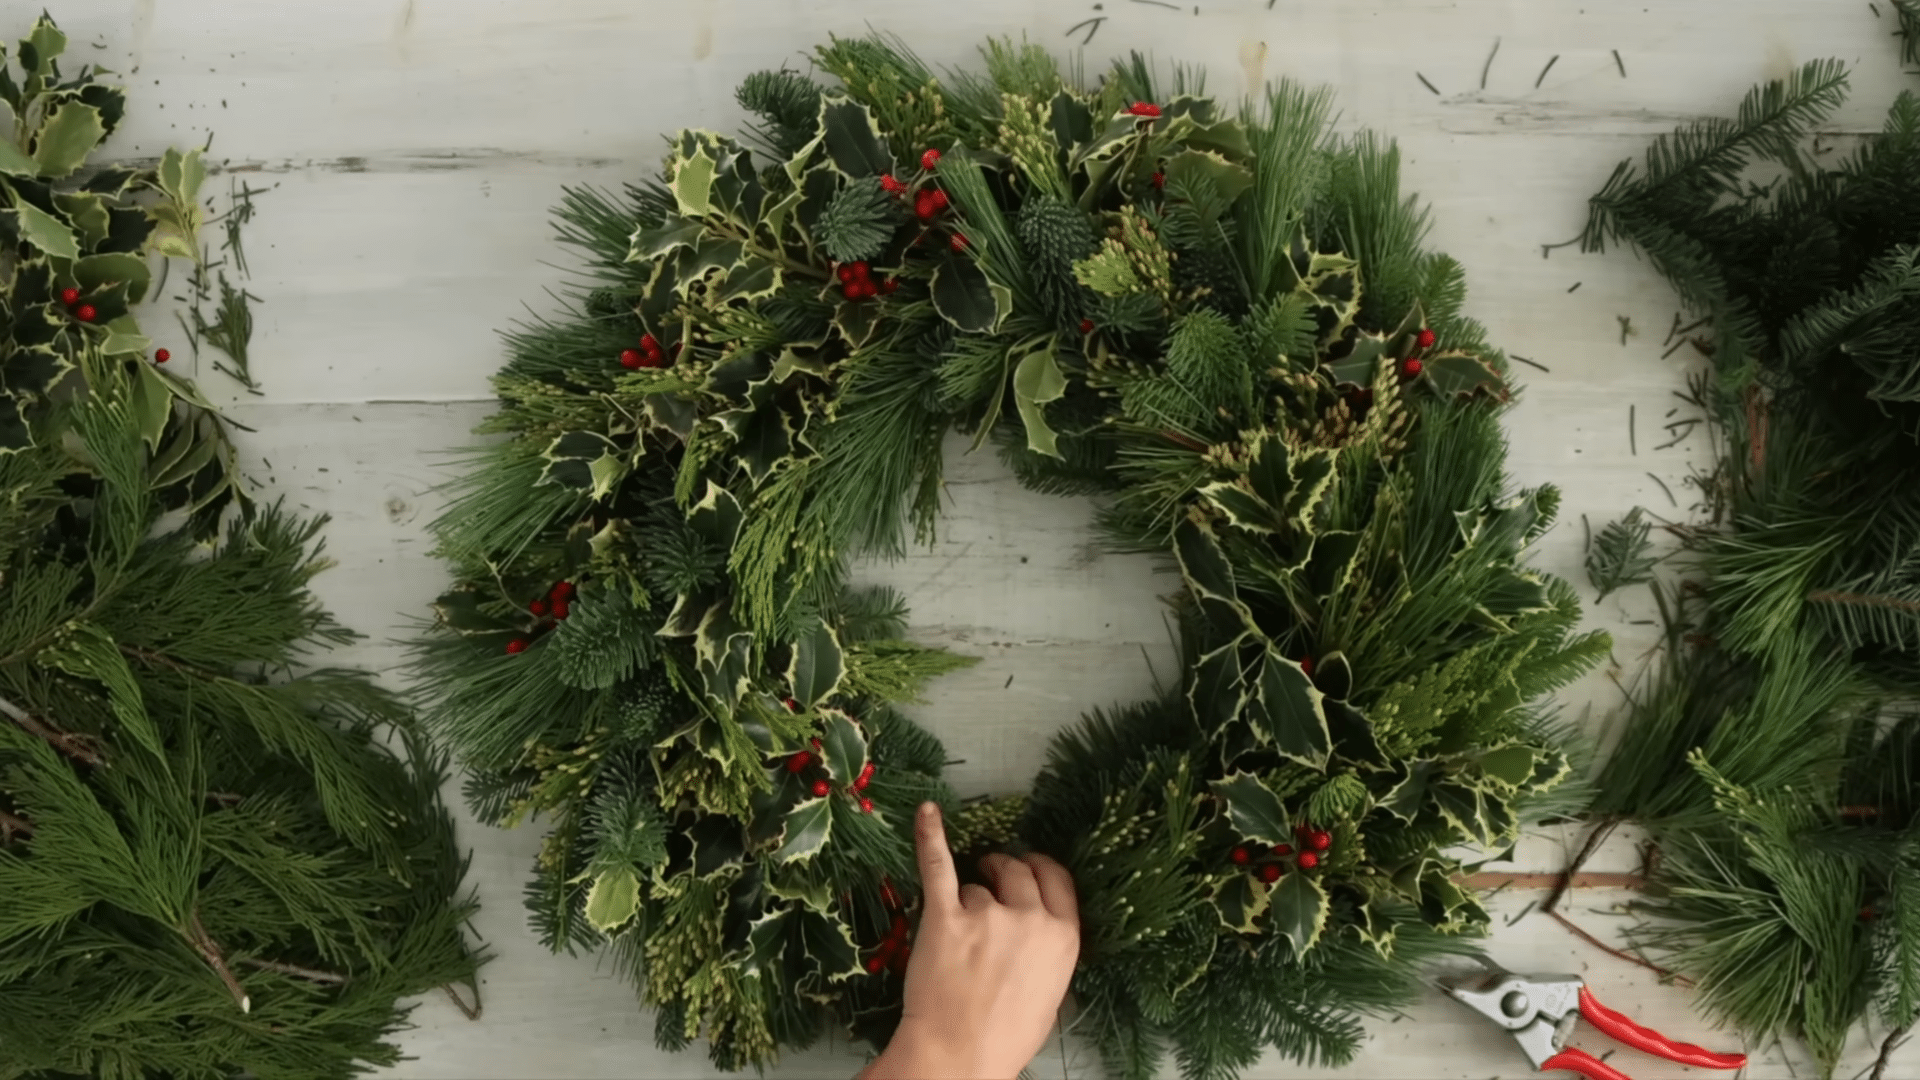
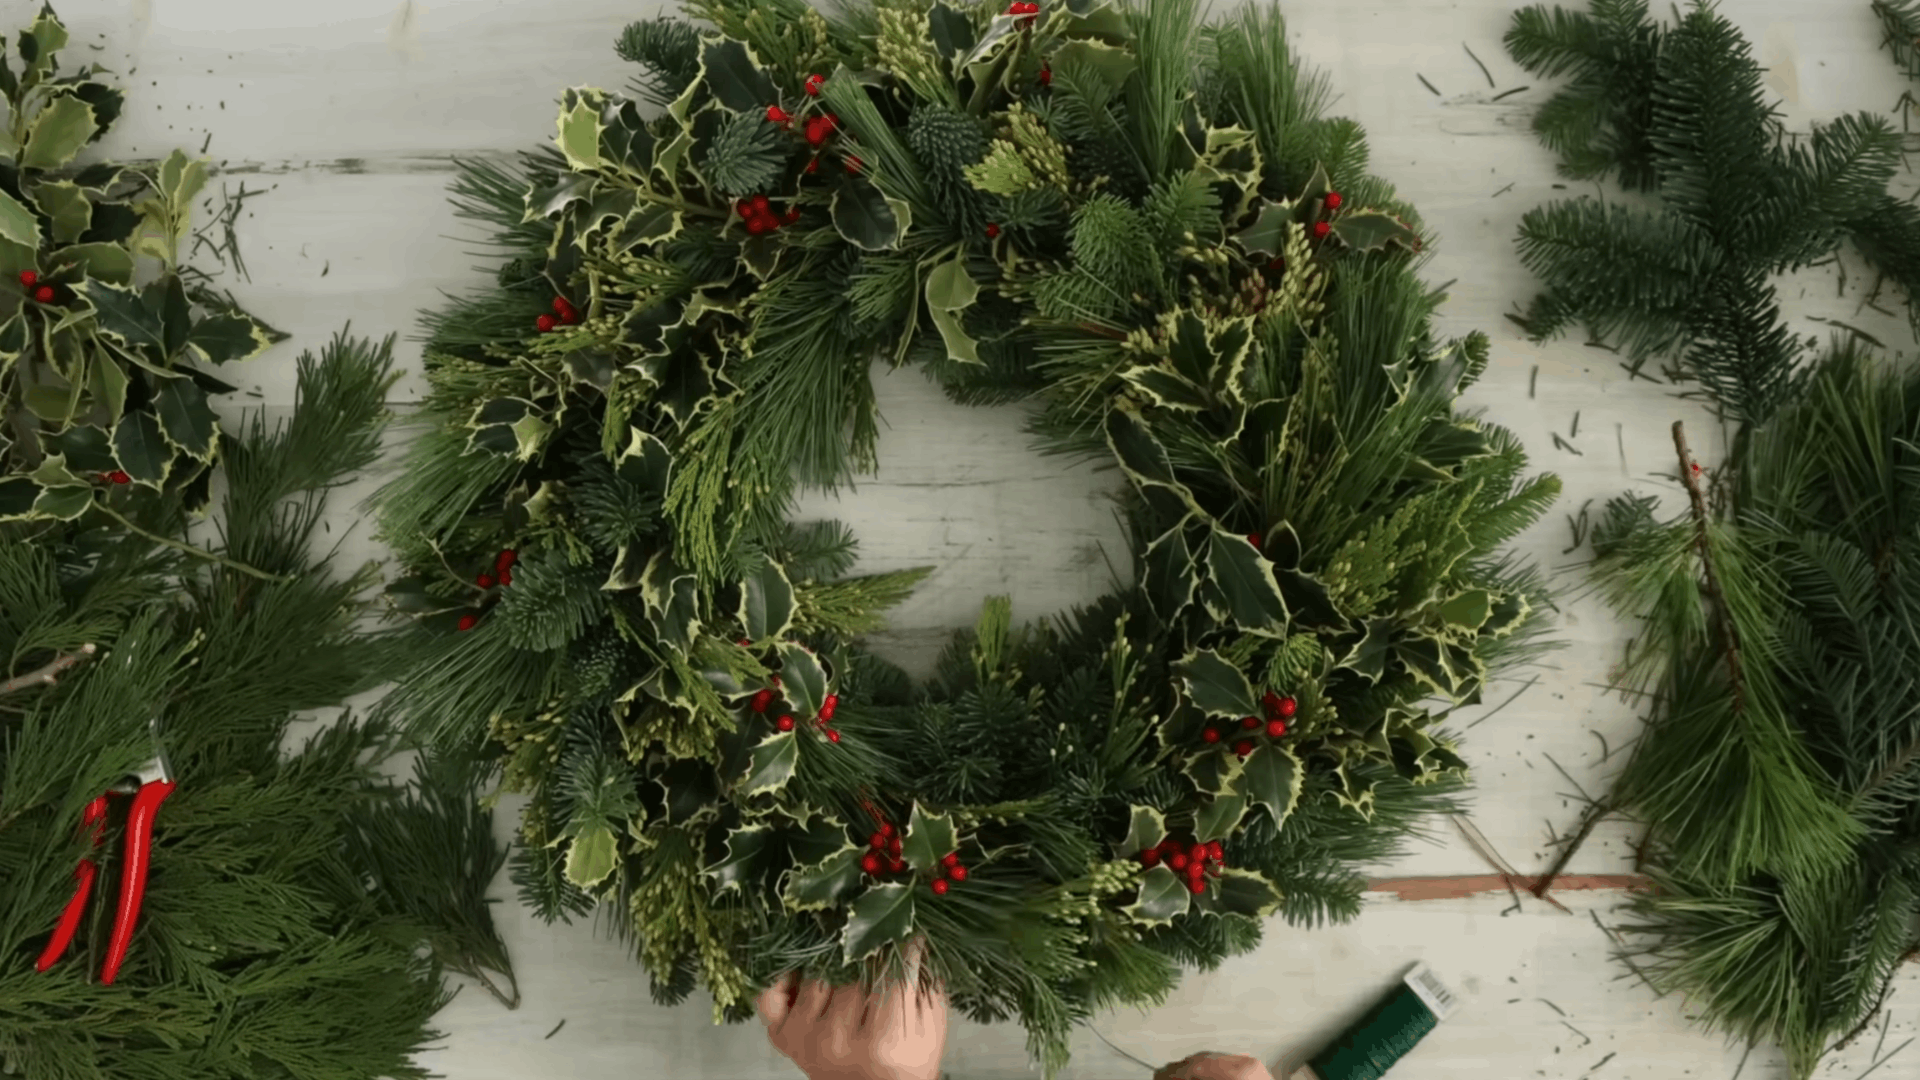
Step 5: Fill the Frame Until Only a Small Gap Remains
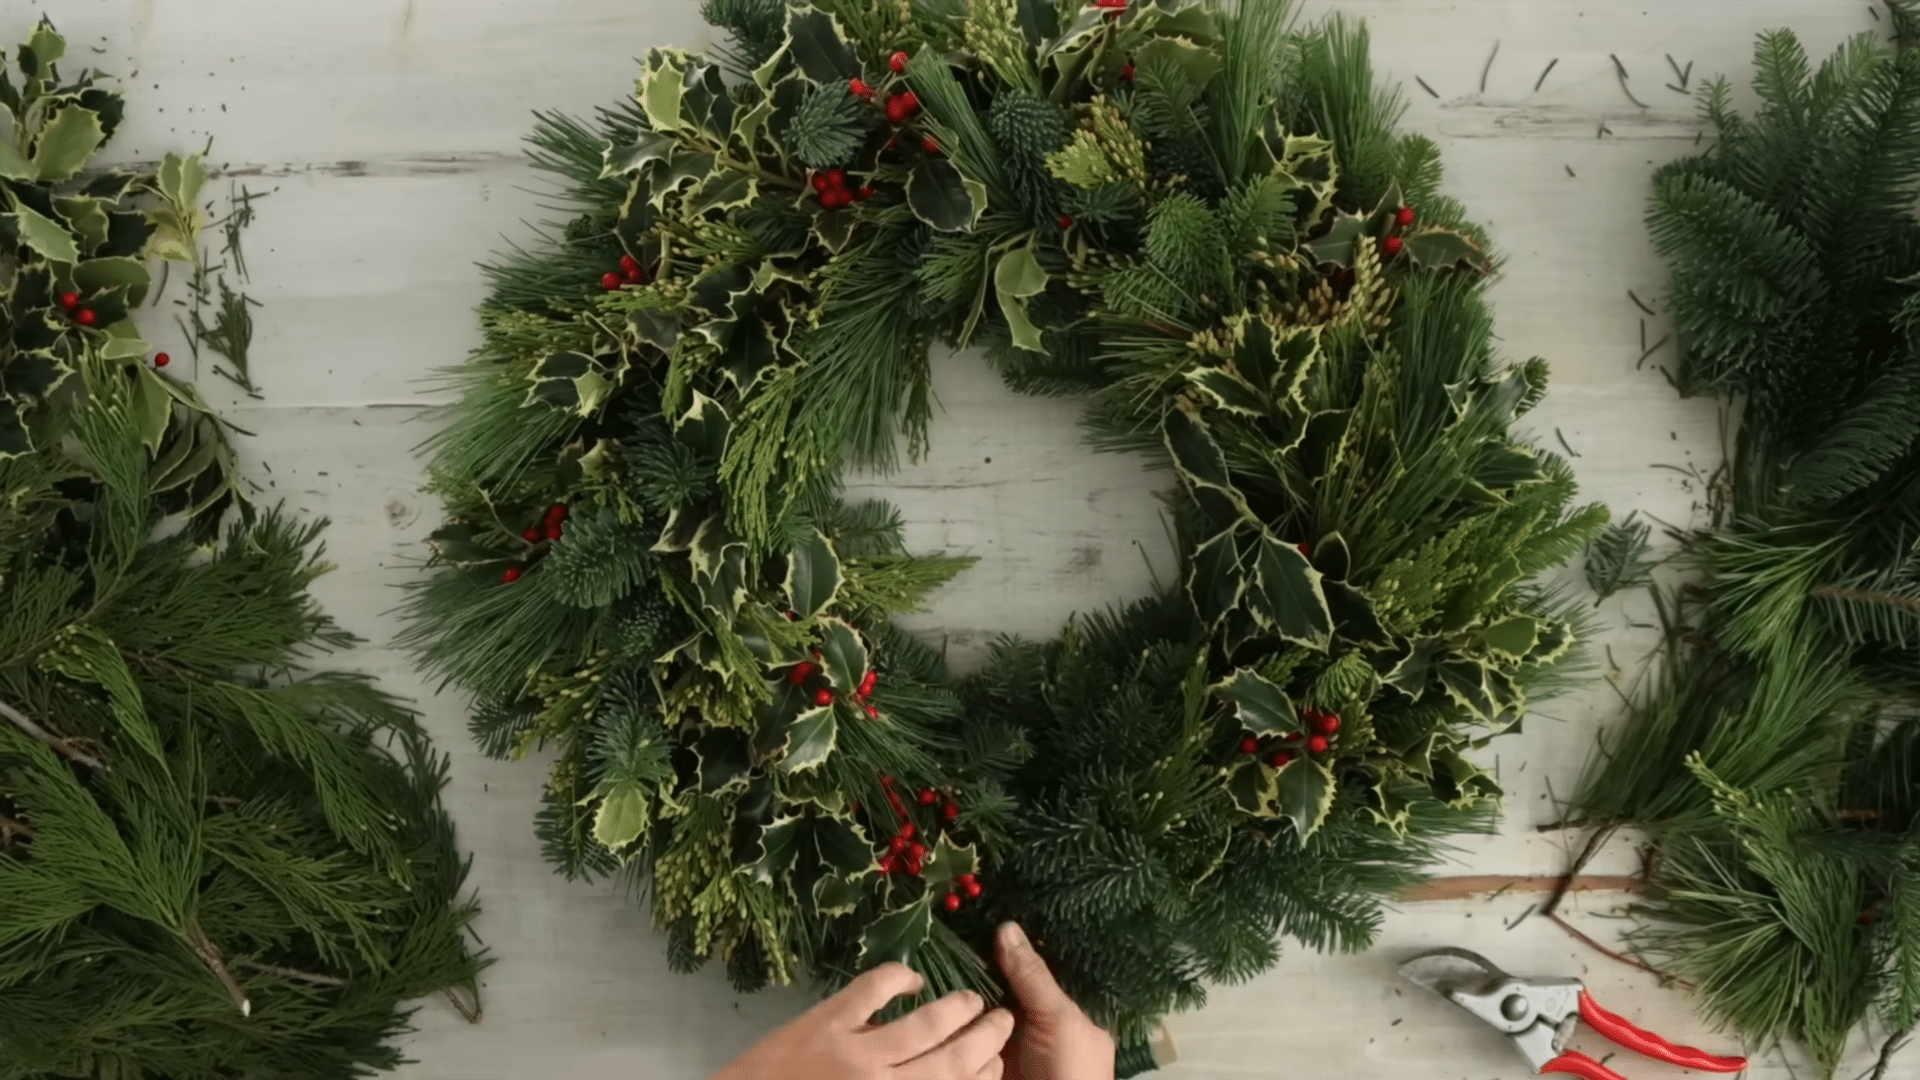
Keep attaching bundles around the wreath form until you reach the starting point. Leave a small opening where the first and last bundles meet.
At this stage, the wreath should look mostly complete with only a small gap visible. Many people stop here and cover the space with a bow, but the creator prefers a fuller look.
This is a good time to check the overall shape and make sure the greenery is evenly spread around the wreath.
Step 6: Close the Gap and Add Final Details
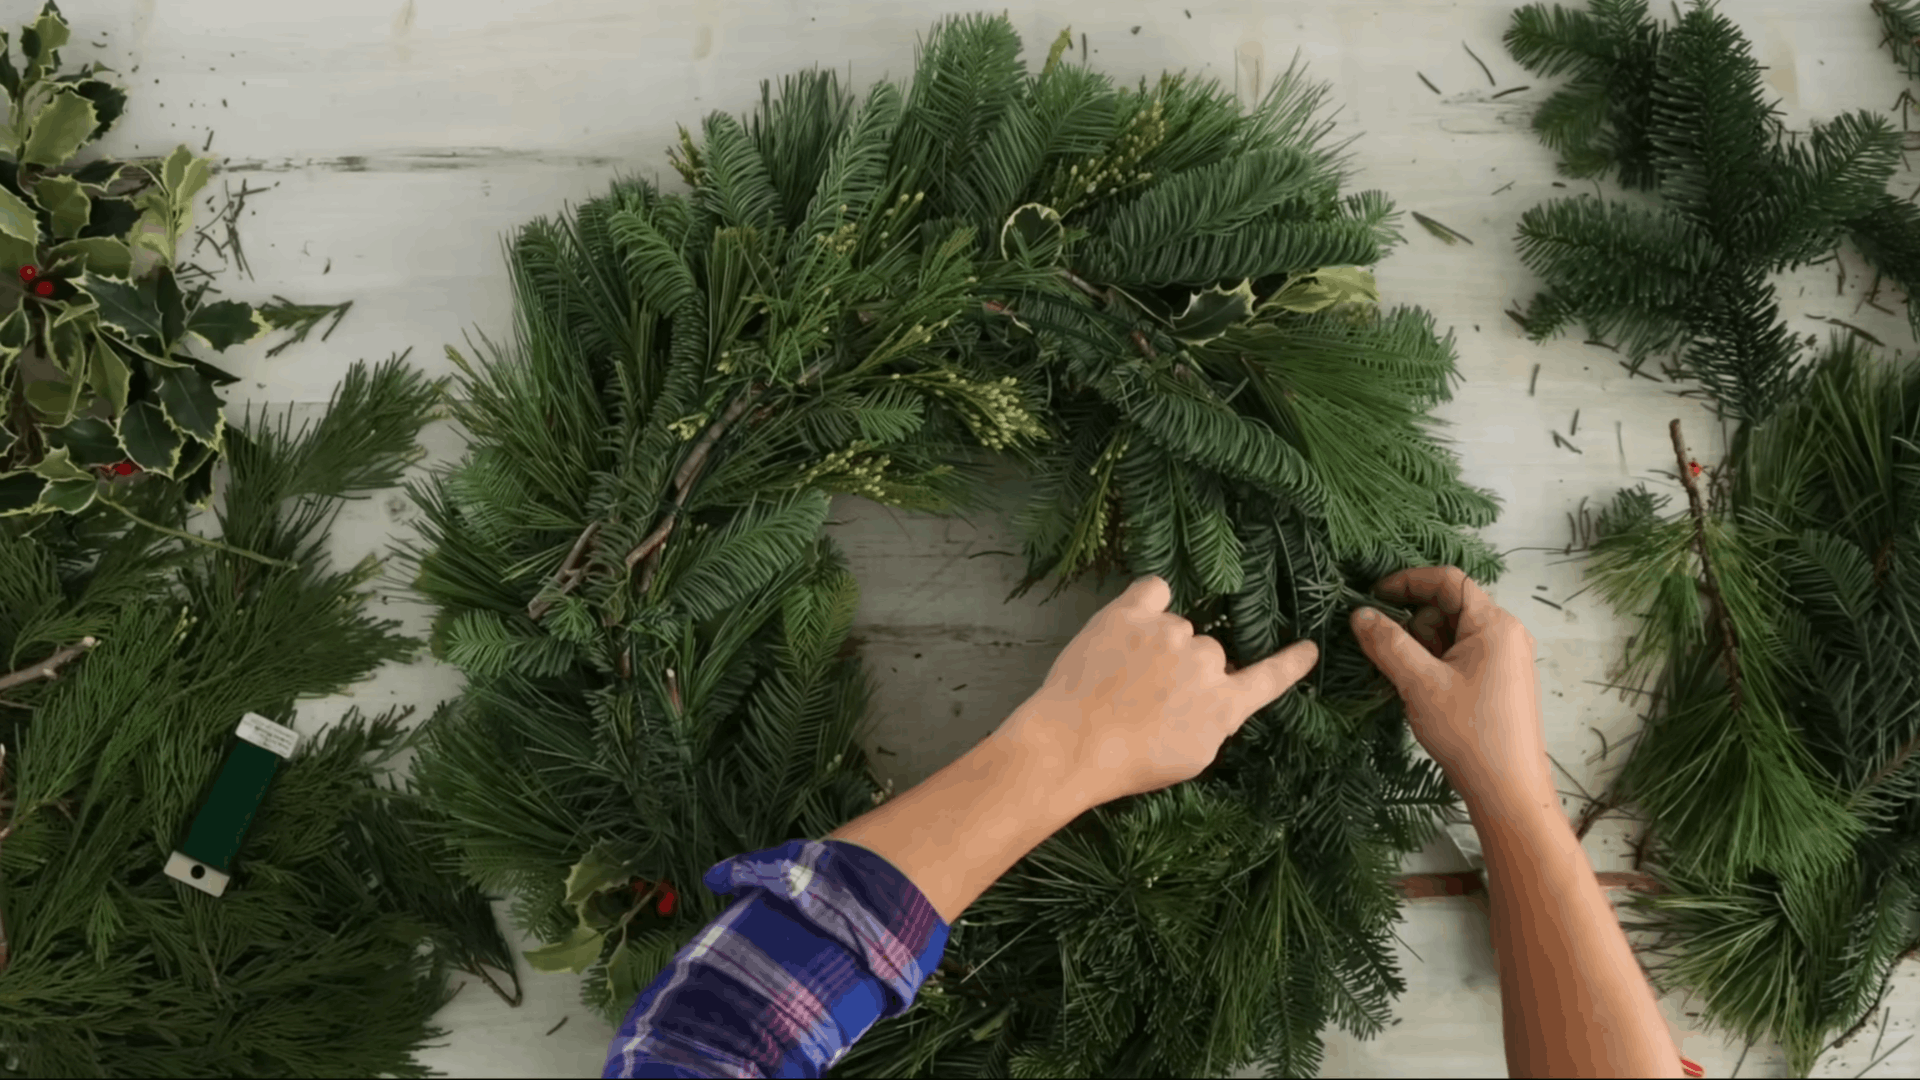
Use larger, fuller evergreen pieces to bridge the remaining opening. Weave individual branches into the gap and secure them with wire.
Add matching textures such as pine, cedar, and holly so the finished area blends with the rest of the wreath.
If small holes remain, you can use hot glue to attach extra greenery, berries, or decorative accents. This finishing step gives the wreath a complete and professional appearance.
Step 7: Secure the Wire and Protect the Wreath
When you are satisfied with the look, cut a 12–18-inch tail of wire and wrap it around the back of the wreath form several times. Twist it securely so nothing loosens over time.
Finally, spray the entire wreath with Wilt Stop or a similar anti-desiccant product.
This coating helps reduce moisture loss and keeps the greenery looking fresh longer. Once dry, your wreath is ready to hang or give as a thoughtful handmade gift.
This tutorial is based on a helpful video by Garden Answer. You can check out the original video on their YouTube channel here or watch it below.
What Decorations Can You Add to Personalize Your Wreath?
Optional decorations are what make a wreath stand out and reflect your personal style. While the base greenery creates the structure, decorative elements add color, texture, and seasonal character.
You can keep the design simple with a few accents or create a more detailed wreath with multiple decorative pieces.
Popular options include pinecones, berries, ornaments, wooden signs, bows, and seasonal items that match the time of year.
For example, pumpkins and leaves work well for fall, while ornaments and ribbons are common for holiday wreaths.
Mixing different textures and colors can help create a balanced design and give your wreath a finished, eye-catching appearance that suits any space.
Easy Wreath Ideas for Beginners
If you’re new to wreath making, starting with a simple design can help build confidence and creativity. These beginner-friendly wreath ideas use easy-to-find materials and require only basic crafting skills.
| Wreath Idea | Best For | Description |
| Simple Greenery Wreath | Everyday home decor | A simple greenery wreath uses fresh or faux leaves to create a clean and natural look. It is easy to make and works well in any season. |
| Spring Flower Wreath | Spring and Easter decorating | This wreath combines colorful flowers and greenery for a bright seasonal display. Soft pastel shades make it perfect for spring decorating. |
| Summer Lemon Wreath | Bright seasonal displays | Faux lemons and green leaves create a cheerful wreath full of summer color. It looks great on front doors, patios, and kitchen walls. |
| Fall Pumpkin Wreath | Autumn decorating | Mini pumpkins, fall leaves, and berries bring warm seasonal colors to your wreath. This design is perfect for welcoming guests during autumn. |
| Christmas Ornament Wreath | Holiday decorating | Colorful ornaments attached to a wreath frame create a festive holiday decoration. Add ribbon and greenery for a fuller Christmas look. |
| Eucalyptus Wreath | Modern decor | Eucalyptus leaves create a soft and simple wreath that suits many home styles. Its clean design works well throughout the year. |
| Pinecone Wreath | Fall and winter displays | Pinecones add texture and a natural look that fits both fall and winter decor. You can leave them natural or paint them for a seasonal touch. |
Common Mistakes to Avoid when Making a Wreath
Even simple wreath projects can run into problems if a few basic steps are overlooked. Avoiding these common mistakes will help you create a wreath that looks balanced, secure, and professionally made.
- Using Too Many Decorations: Adding too many flowers, ribbons, or accents can make the wreath look crowded and messy. Leave some open space so each decoration can create a balanced design.
- Not Securing Items Properly: Loose decorations may fall off when the wreath is moved or exposed to wind. Always use enough floral wire, glue, or ties to keep everything firmly attached.
- Ignoring Color Balance: Using too many colors without a plan can make the wreath look uneven and distracting. Choose a simple color palette and spread colors evenly throughout the design.
- Choosing the Wrong Wreath Base: Some wreath bases work better with certain materials than others. Picking the right base helps support your decorations and makes the assembly process easier.
- Overcrowding One Side: Placing most decorations in one area can make the wreath appear unbalanced. Step back often while decorating to ensure the design looks even from all angles.
How to Store a Wreath After the Season?
Storing your wreath properly helps keep it looking fresh and prevents damage while it is not in use. Before storing, gently remove dust, dirt, or loose decorations and make sure all pieces are securely attached.
Place the wreath in a wreath storage container, a large plastic bin, or a sturdy box that is big enough to protect its shape.
Avoid stacking heavy items on top, as this can flatten greenery and decorations.
Store the wreath in a cool, dry place away from direct sunlight, moisture, and extreme temperatures.
If the wreath contains delicate decorations, wrap them lightly with tissue paper for extra protection. Proper storage makes it easier to reuse your wreath season after season.
Expert Tips for Creating a Beautiful Wreath
A few simple techniques can make a big difference in how your wreath looks. These tips will help you create a fuller, more balanced design that looks polished and professionally made.
- Start with a Clear Design Plan: Choose your colors, theme, and decorations before you begin. Having a plan helps create a cohesive wreath and prevents overcrowding.
- Use Different Textures: Mix greenery, flowers, ribbon, berries, or pinecones to add depth and interest. Combining textures makes the wreath look fuller and more visually appealing.
- Create a Strong Focal Point: Pick one main feature, such as a bow, sign, or flower arrangement. A focal point draws attention and gives the wreath a more organized look.
- Keep Decorations Balanced: Spread decorations evenly around the wreath to avoid a lopsided appearance. Step back often to check that both sides look balanced.
- Layer Materials Gradually: Start with greenery, then add larger decorations before finishing with smaller accents. Layering helps build a natural and professional-looking design.
- Secure Everything Firmly: Use floral wire, hot glue, or zip ties to attach decorations securely. Properly secured items are less likely to shift or fall off over time.
Conclusion
Learning how to make a wreath is a fun DIY project anyone can try. With a few supplies, a simple plan, and easy techniques, you can create a beautiful wreath for any season, holiday, or home style.
Whether you choose a greenery wreath, a floral wreath, or a festive holiday design, the step-by-step process makes it easy for beginners to get great results.
Keep your design balanced, secure the decorations well, and store the wreath carefully after the season ends.
Now that you know how to make a wreath step by step, gather your supplies and start creating a custom wreath that adds a personal touch to your home.
Frequently Asked Questions
What Supplies Are Required to Make a Wreath?
You need a wreath base, greenery, flowers, ribbon, floral wire, wire cutters, scissors, and a hot glue gun. Optional decorations include pinecones, berries, ornaments, bows, and seasonal accents.
How to Attach Flowers to a Wreath?
Attach flowers using floral wire, hot glue, or stem picks. Place larger flowers first, then fill gaps with smaller blooms and greenery for a balanced, secure design.
How to Make a Simple Wreath?
To make a simple wreath, attach greenery to a wreath base, fill empty spaces, add a ribbon or small decorations, then secure everything firmly before hanging it.
What Is the 3 5 8 Rule for Flowers?
The 3-5-8 rule suggests arranging flowers in groups of 3, 5, or 8 stems. Using odd numbers creates a more natural, balanced, and visually appealing floral arrangement.
How to Make a DIY Wreath for Under $10?
You can make a DIY wreath for under $10 by using a wire hanger or cardboard base, inexpensive greenery, ribbon, and decorations from dollar stores or items you already have at home.