

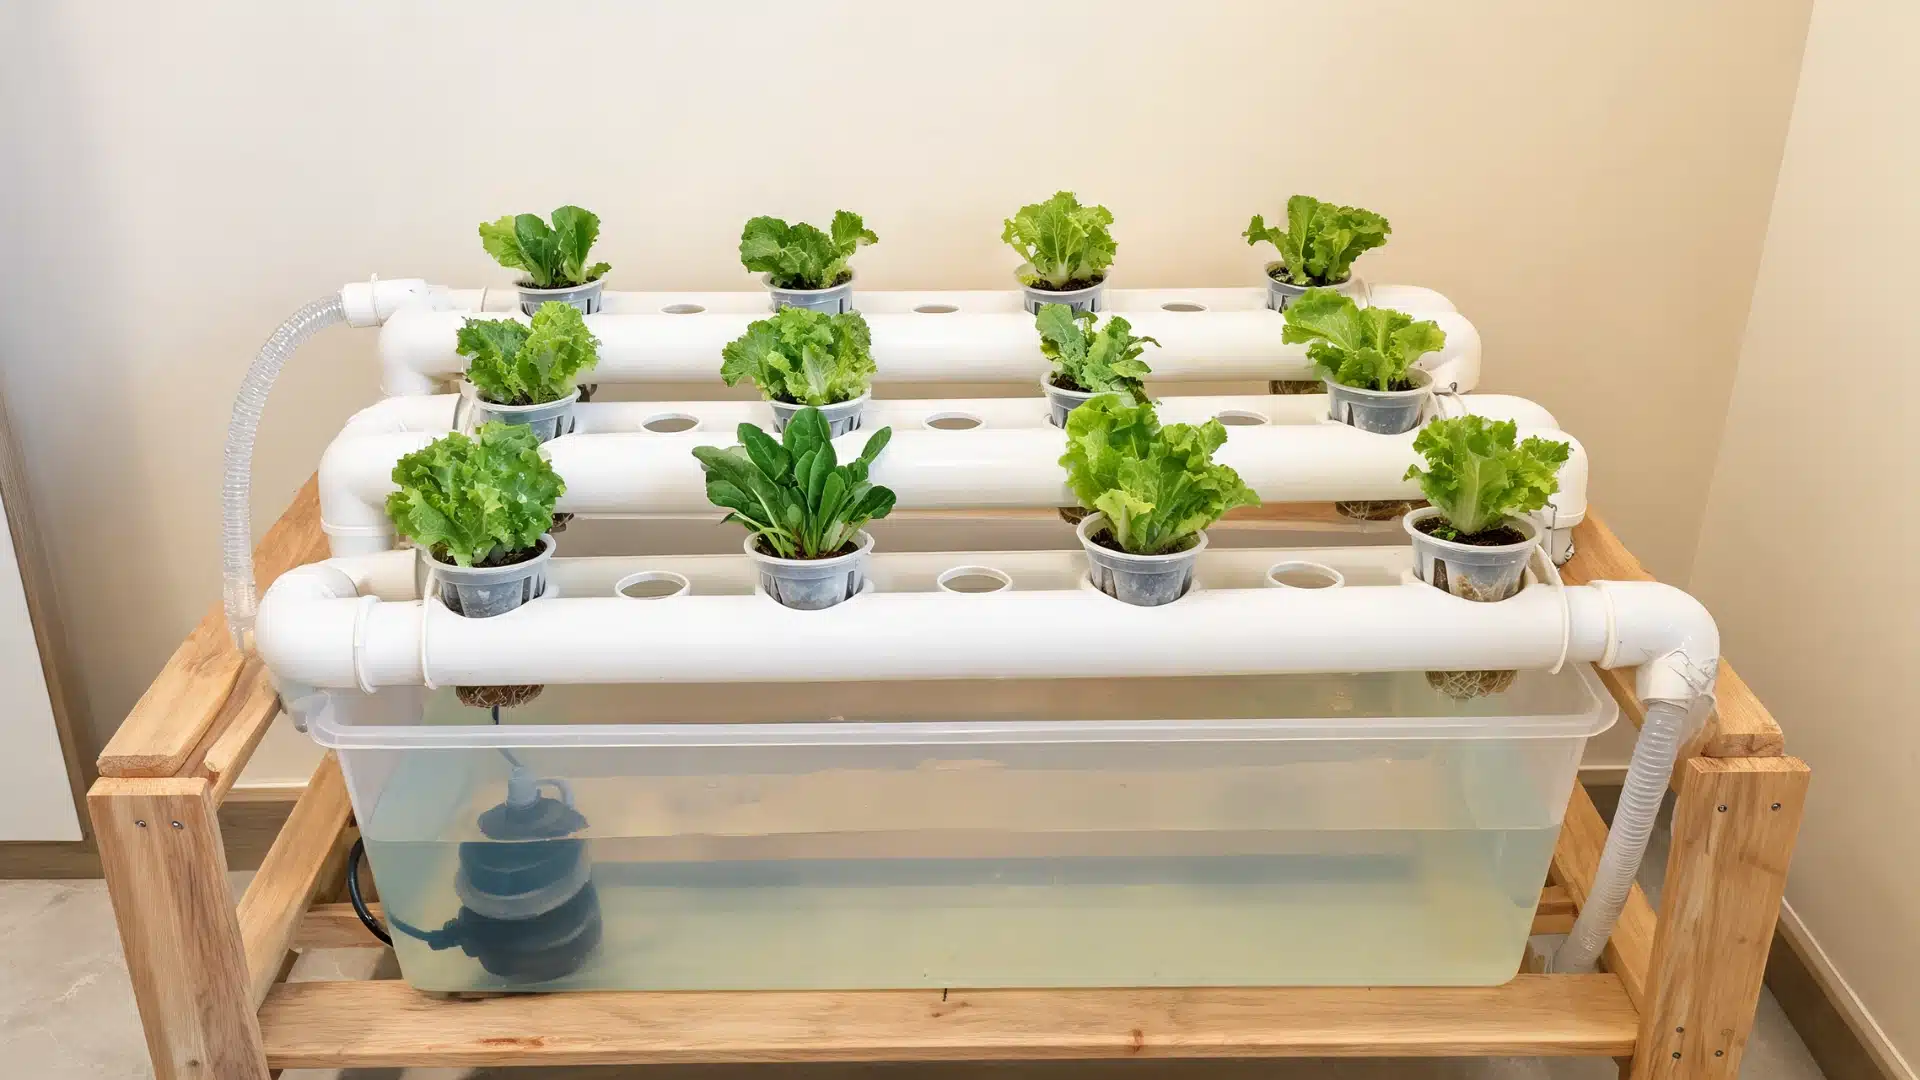
Growing fresh vegetables at home can feel difficult when you have limited space, no garden area, or little experience with traditional gardening.
Many people want a simple way to grow plants but struggle with the mess of soil, maintenance, and knowing where to begin.
A DIY hydroponic system gives you a practical solution by using water, nutrients, and controlled conditions instead of soil. I’ve found that the right setup can make home gardening easier and more enjoyable, even in smaller spaces.
You’ll learn how hydroponic systems work, the materials you need, how to build one step by step, and how to keep your plants healthy.
Understanding Hydroponic Systems
Hydroponic systems allow plants to grow without soil by using nutrient-rich water to deliver essential minerals directly to their roots.
Instead of searching through soil for nutrients, plants receive a controlled supply of water, oxygen, and minerals, which supports steady growth. These systems can be designed using containers, pipes, or channels depending on the setup and available space.
Maintaining proper water circulation, nutrient balance, and oxygen levels helps prevent common problems such as root damage and slow growth.
Hydroponics is useful for indoor gardens, balconies, and areas with limited outdoor space because it offers better control over growing conditions while using resources efficiently.
With regular monitoring and care, hydroponic systems can produce healthy plants throughout the year.
Choose the Right DIY Hydroponic System for Your Home
Choosing the right hydroponic system before starting your project helps prevent unnecessary expenses and construction issues. The ideal setup depends on your available space, budget, maintenance preferences, and the type of plants you want to grow.
Some systems need pumps, air circulation, and regular monitoring, while others use simpler methods with fewer components. Understanding the differences among the types helps you select a system that matches your gardening goals and experience level.
| System Type | Difficulty | Cost | Best For |
|---|---|---|---|
| Kratky Method | Easy | Low | Beginners and small plants |
| DWC System | Easy | Low-medium | Fast-growing crops |
| NFT PVC System | Medium | Medium | Multiple plants |
| Vertical Tower | Advanced | Higher | Small spaces |
1. Kratky Method
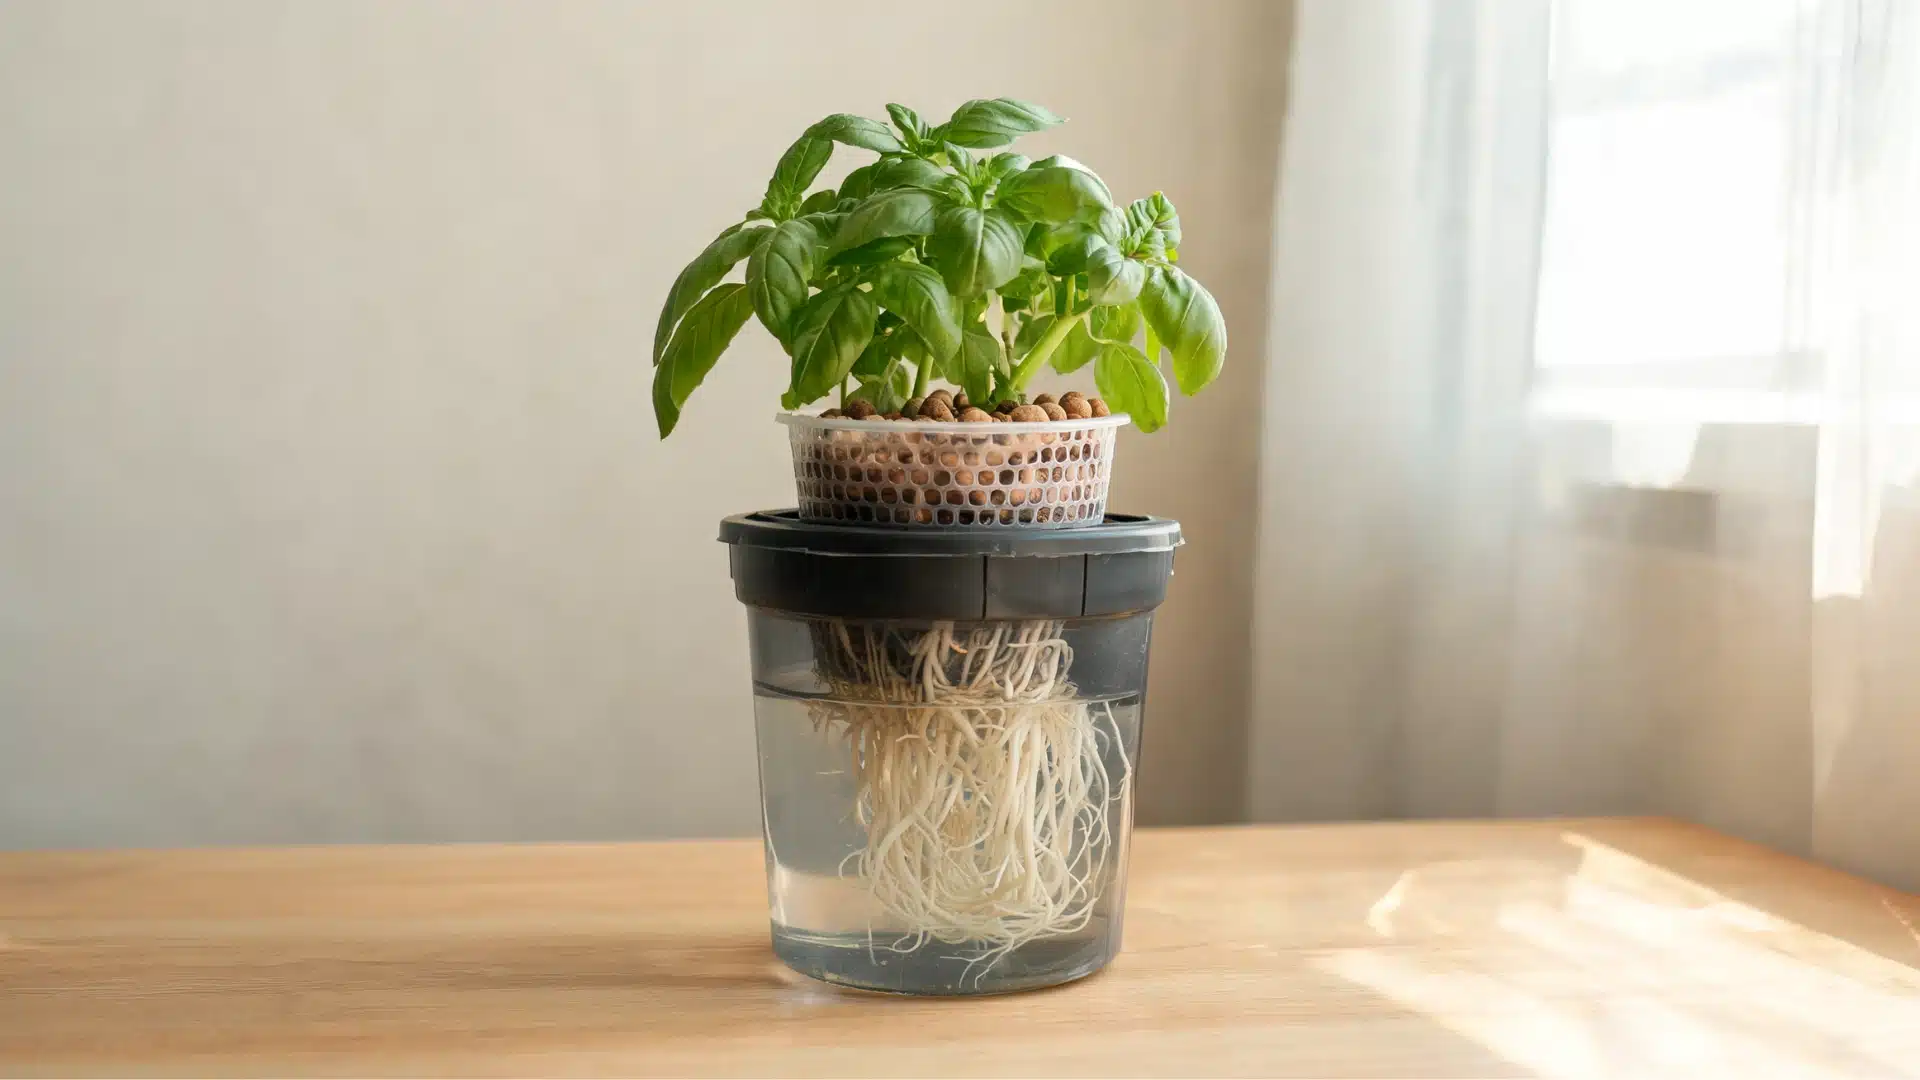
The Kratky method is one of the simplest hydroponic systems because it does not require a pump or electricity. Plants are placed above a nutrient solution, and their roots gradually grow downward to access water as the solution level decreases.
This system is a practical starting point for beginners because it requires fewer materials and less maintenance compared to active hydroponic setups.
2. Deep Water Culture (DWC)
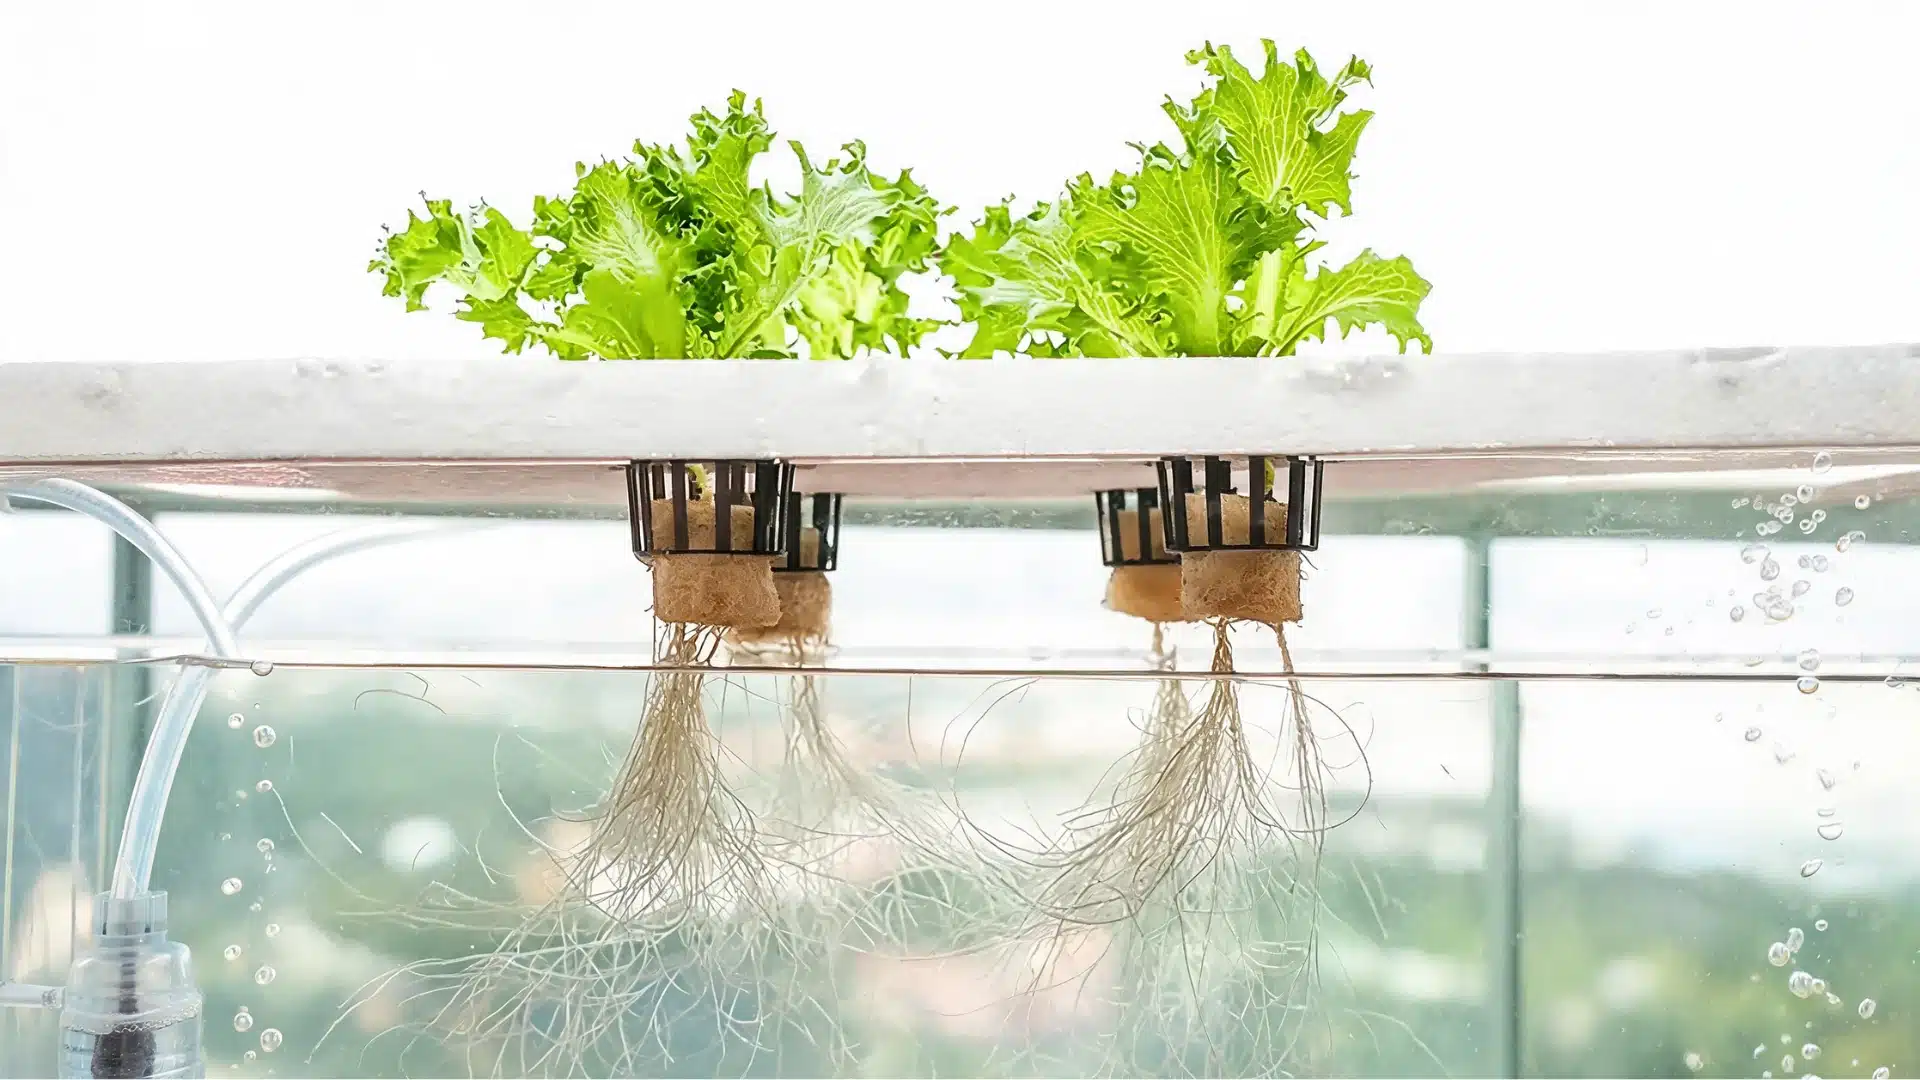
Deep Water Culture systems keep plant roots directly suspended in nutrient-rich water while an air pump supplies oxygen. This continuous oxygen supply supports healthy root development and encourages faster plant growth.
DWC systems are popular among beginners because they are easy to build, require limited space, and provide visible root growth.
3. Nutrient Film Technique (NFT)
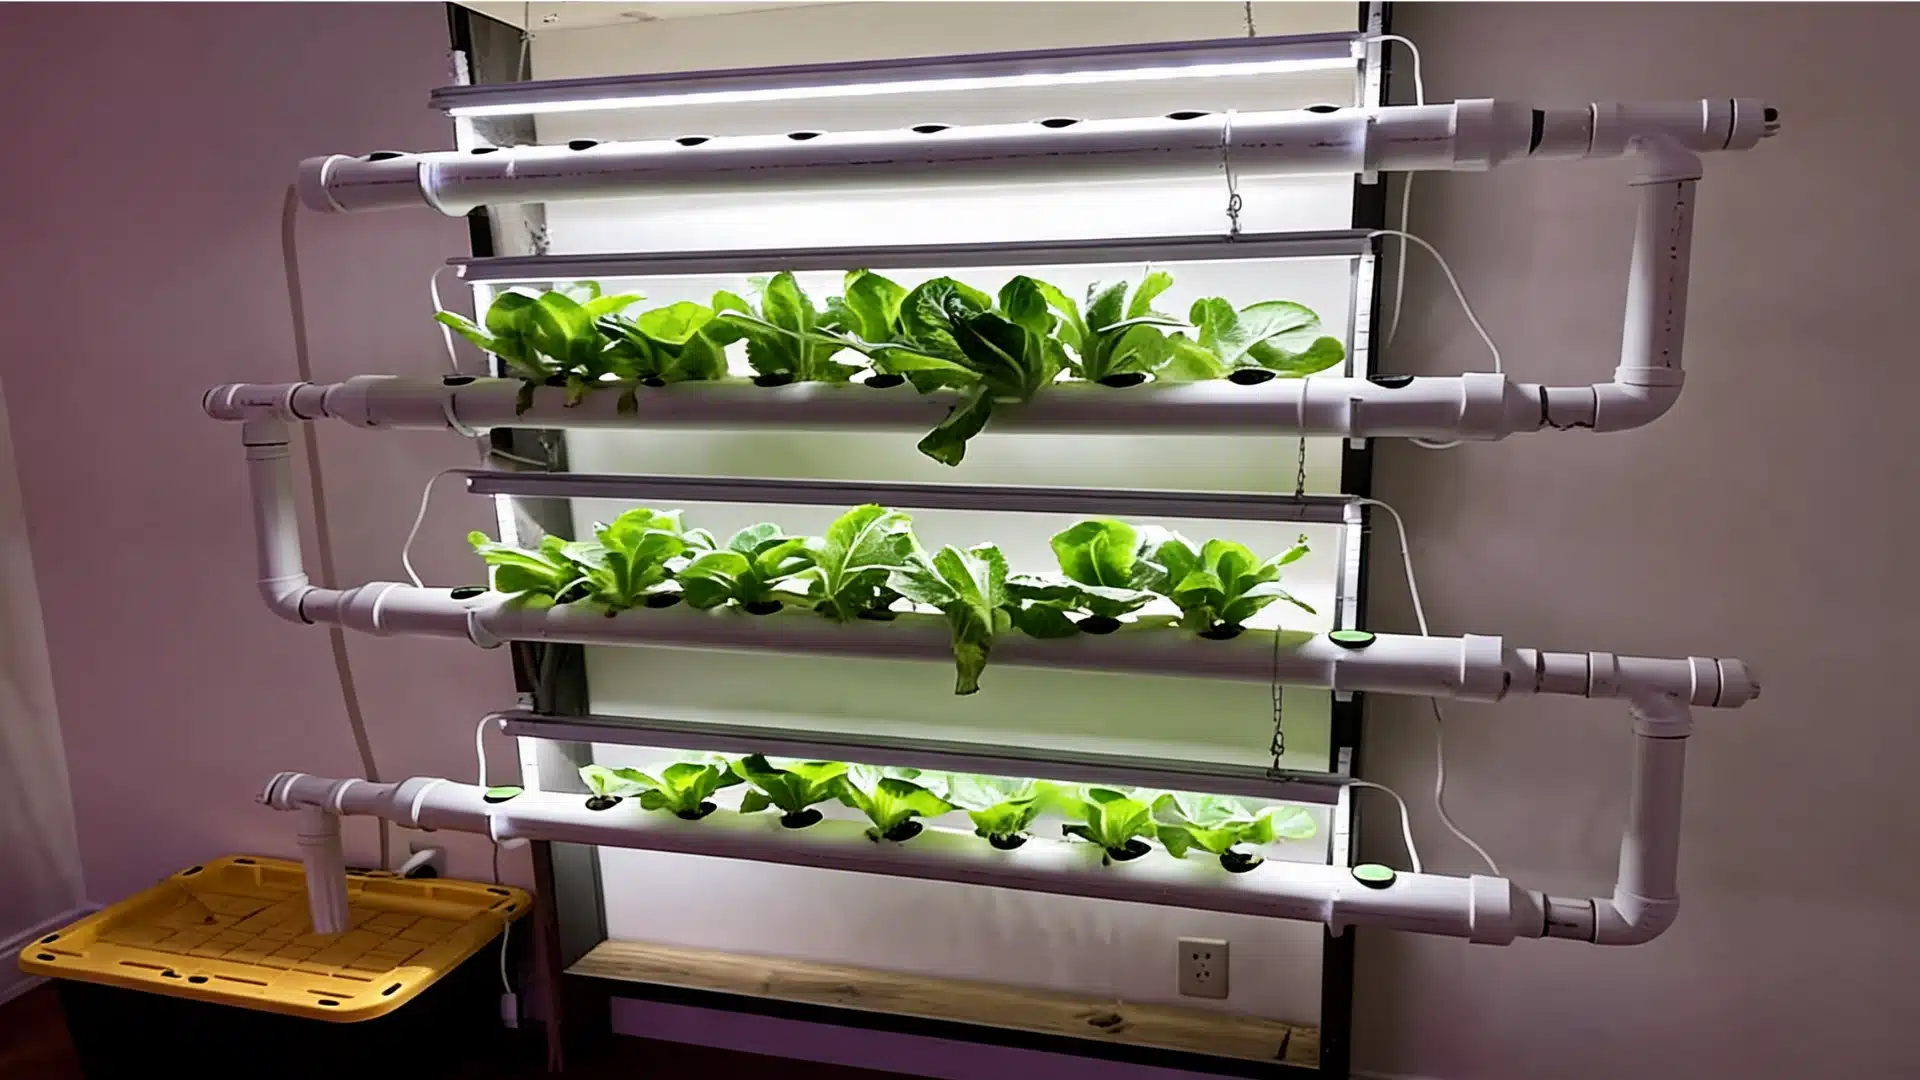
NFT systems use a continuous flow of nutrient water through channels or pipes, allowing plant roots to receive a steady supply of moisture and minerals. These systems are commonly used when growing several plants in a compact area.
They require more setup than simpler methods but offer better water efficiency and more consistent nutrient delivery.
4. Vertical Hydroponic System
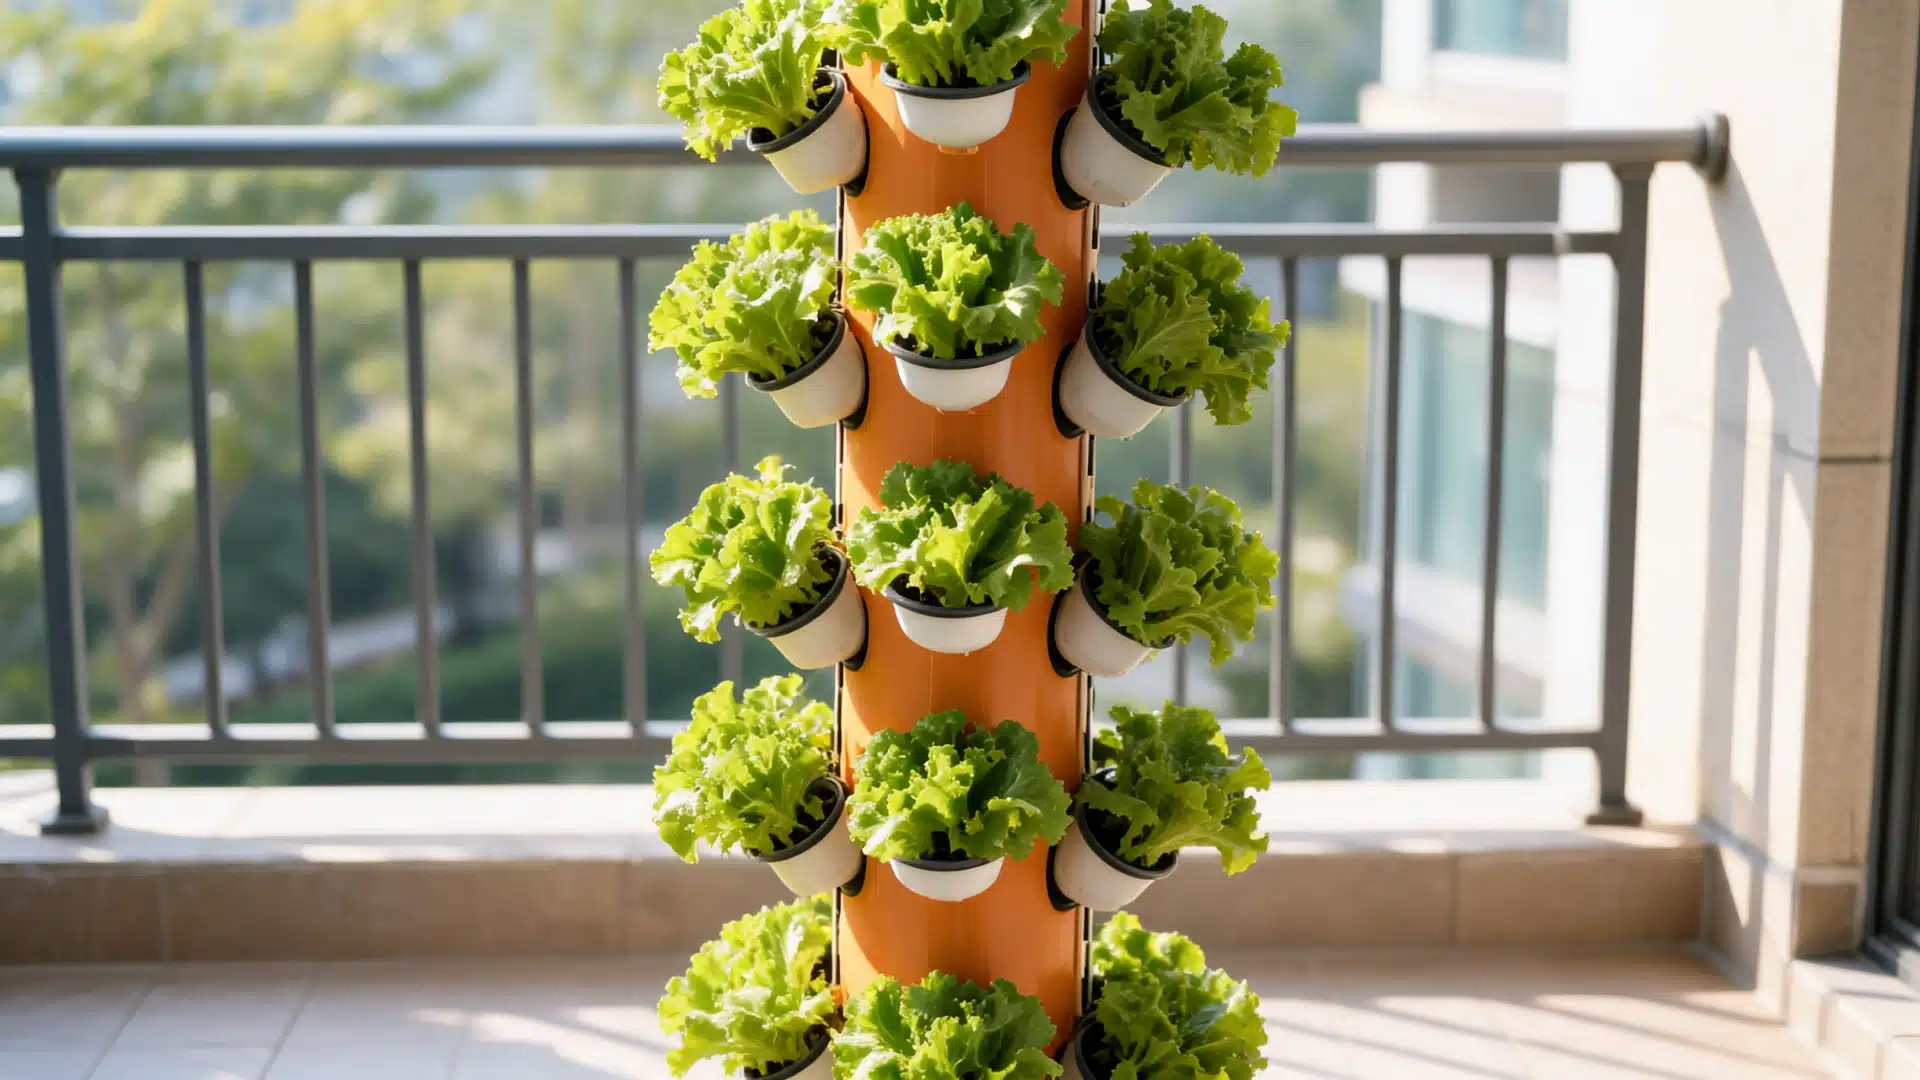
Vertical hydroponic systems arrange growing spaces upward, allowing more plants to be grown without requiring a large footprint. They are useful for homes where floor space is limited, but gardening space is still desired.
These systems usually require more planning and support structures but can maximize production in smaller areas.
How to Build a DIY Hydroponic System Step by Step
Building a hydroponic system requires careful planning, accurate measurements, and proper assembly to ensure smooth water circulation and healthy plant growth. Each stage, from preparing the growing pipes to testing the final setup, plays an important role in creating a stable system.
Materials Required for DIY Hydroponic System
Building a DIY hydroponic system using the Nutrient Film Technique requires the right combination of growing, circulation, and support materials. Preparing these supplies before starting helps create a smoother assembly process and ensures the system functions properly.
- 110 mm diameter PVC pipes: Main growing channels where plant roots develop
- PVC covers and elbows: Close pipe ends and guide water movement
- Plastic cups or hydroponic pots: Hold plants inside growing openings
- Drill and hole saw/wick tool: Create evenly spaced planting holes
- Thread and tape: Keep hole markings straight during drilling
- Metal tape or sealing tape: Prevent leaks around pipe connections
- Tank joints and water level regulators: Control and maintain water height
- PVC pipes and elbows: Build the support stand for growing tubes
- Water pump: Circulate nutrient water through the system
- Water reservoir (around 60 liters): Store water supply for circulation
- Hose and connectors: Link the pump, reservoir, and pipe system
Estimated Time Required: Around 1–2 days, including pipe preparation, drilling, assembly, sealing, and water testing.
Having the correct materials ready before starting helps create a stable hydroponic setup with proper water flow, plant support, and nutrient circulation.
Step 1: Prepare and Measure the Hydroponic Pipes
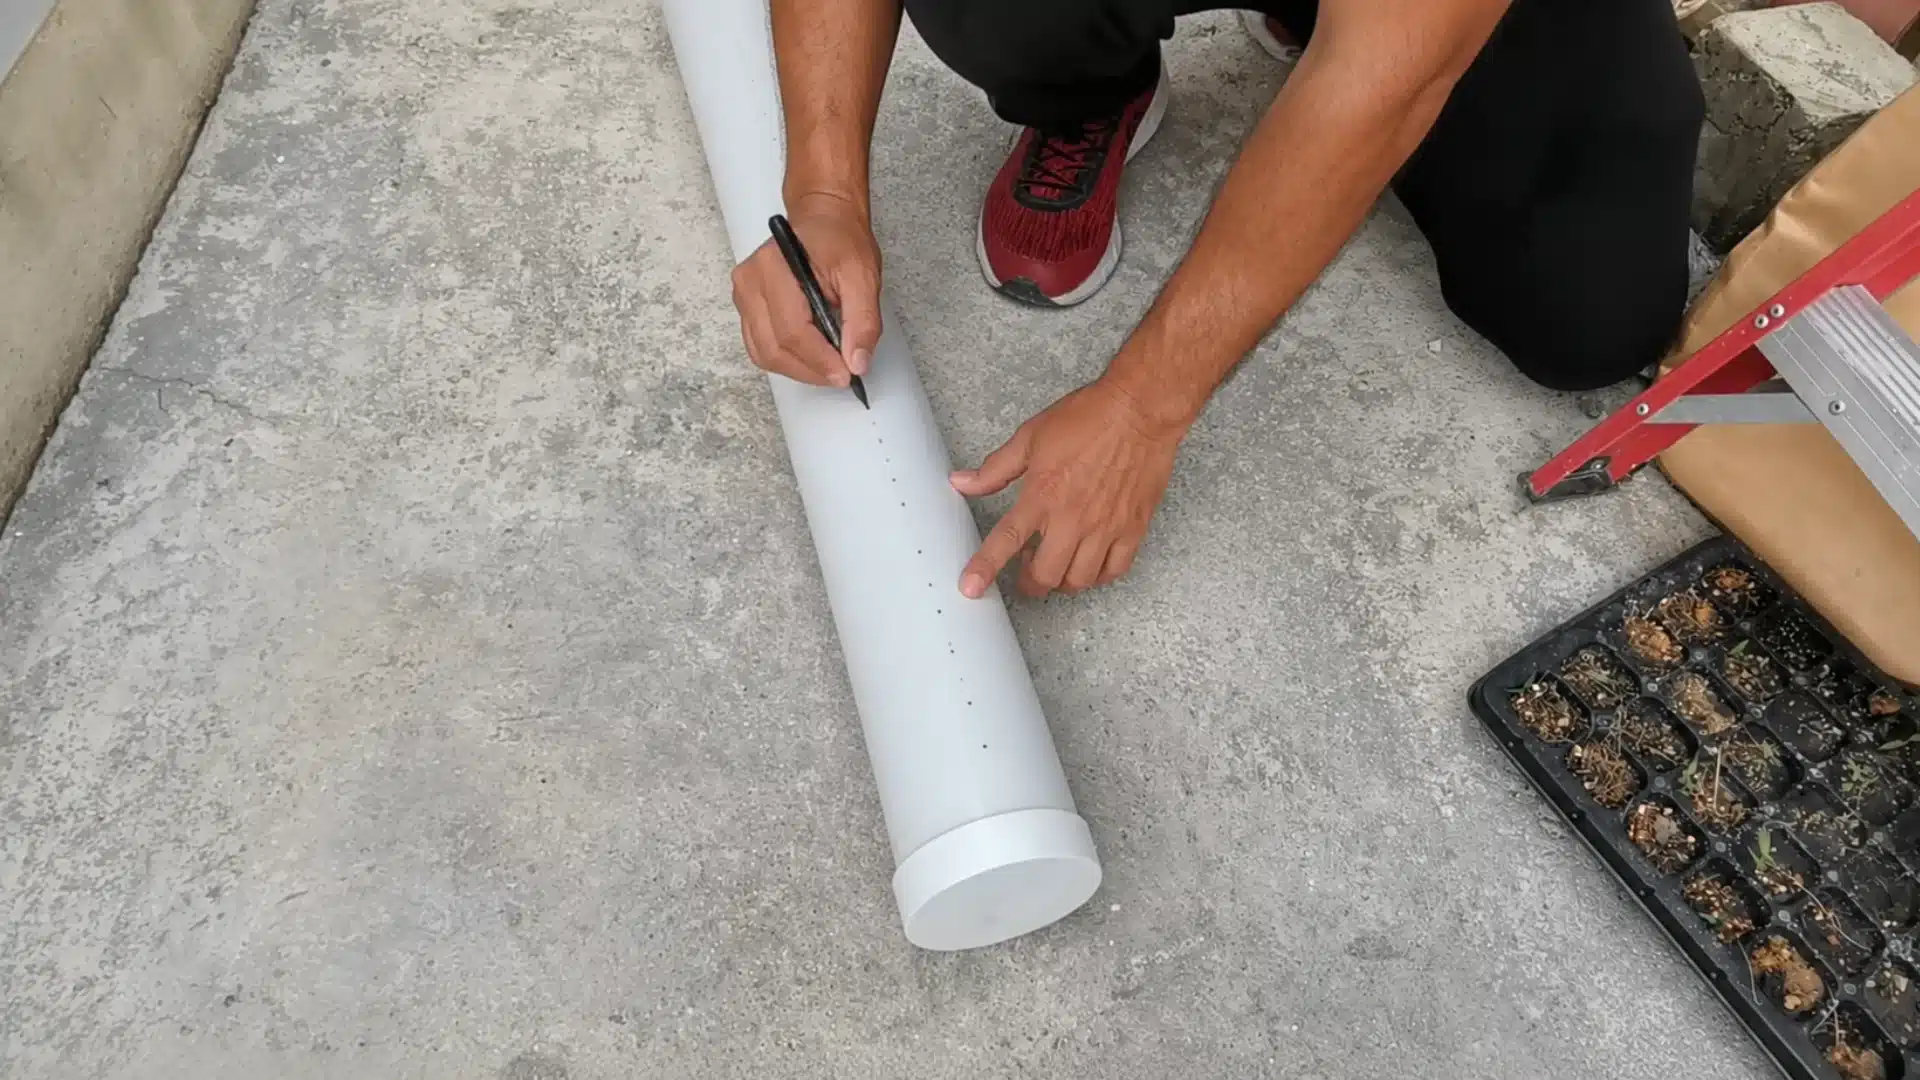
Start by selecting PVC pipes approximately 110 mm in diameter, as wider channels provide enough space for larger root systems and prevent roots from blocking water flow. Cut longer pipes into manageable 1-meter sections and prepare the end covers and elbows required for circulation.
Measure the pipe length carefully and mark the areas where plants will be placed. The video recommends spacing planting holes around 15 cm apart to give each plant enough growing space.
Step 2: Mark and Drill Planting Holes
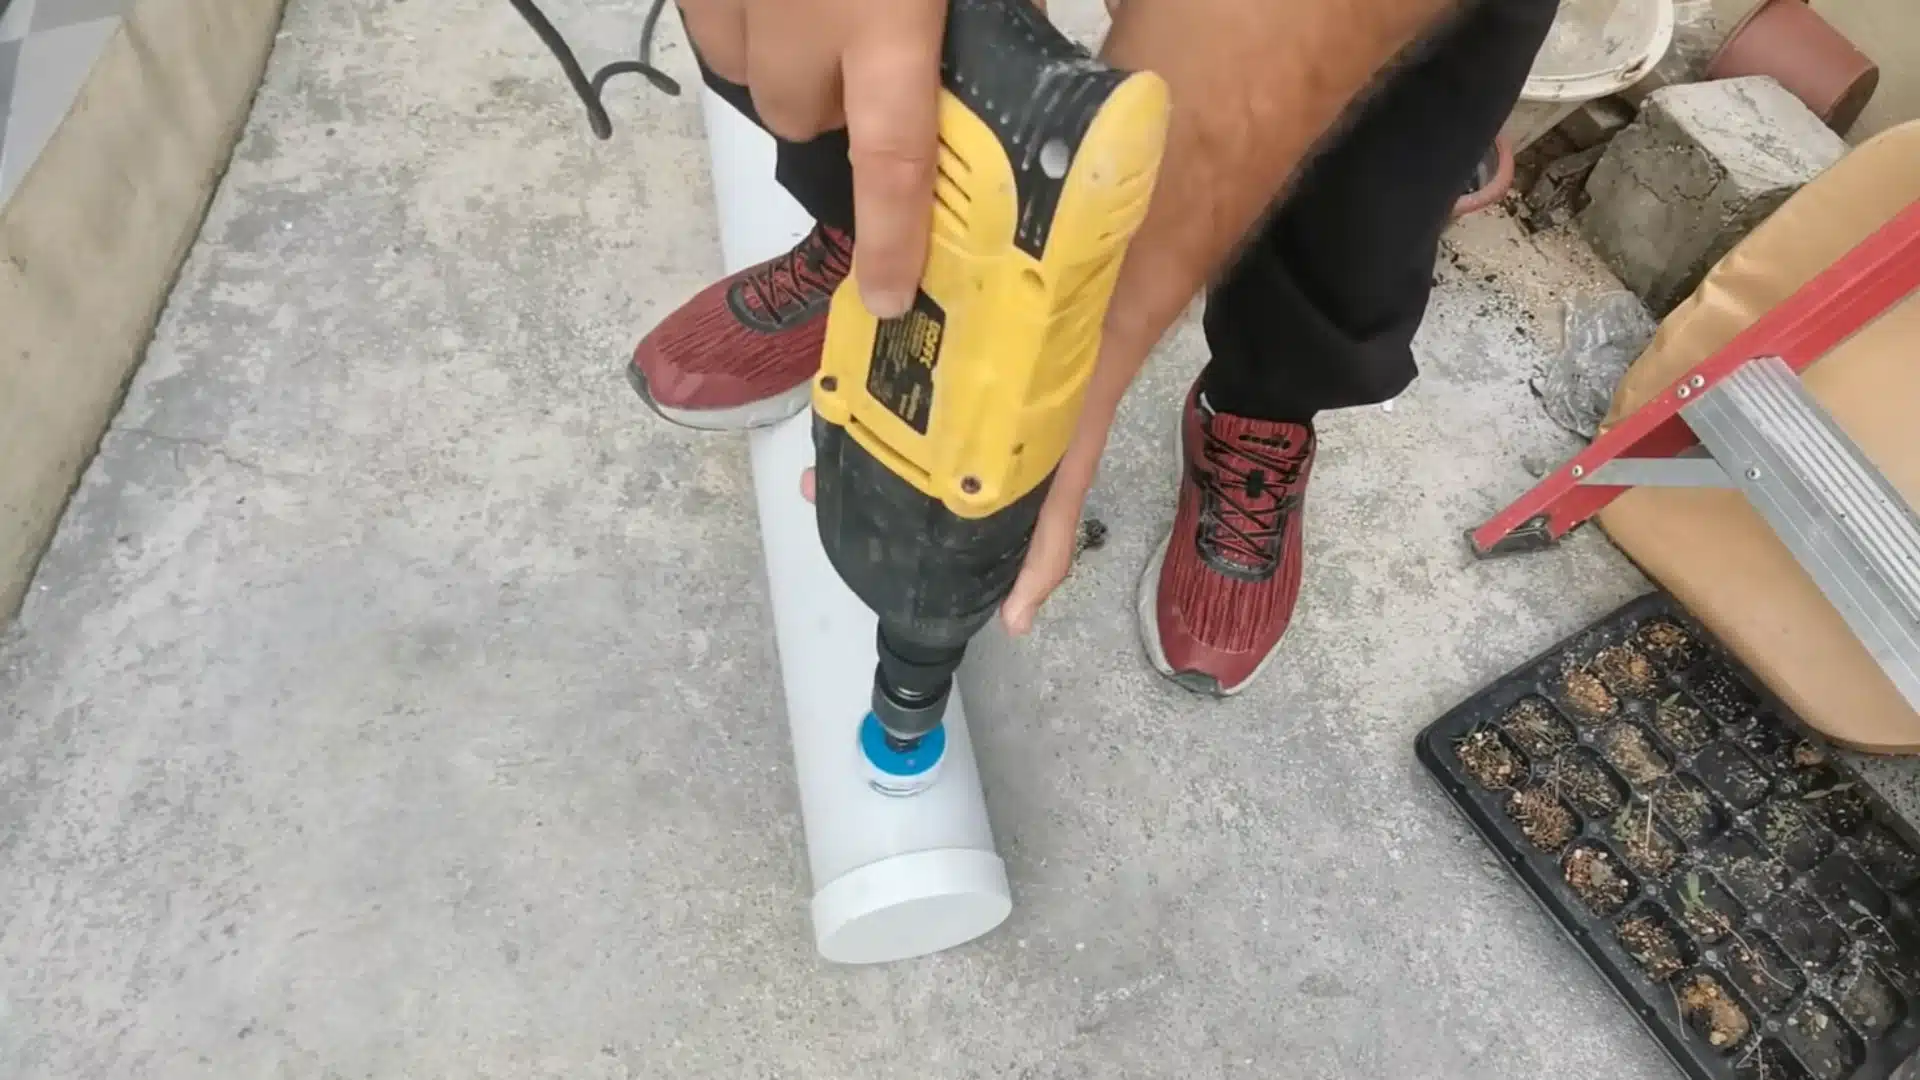
Create evenly spaced planting holes along the upper side of each pipe. Use a thread and tape guide to keep the markings straight and ensure all openings line up properly across the tube.
After drilling, remove remaining PVC pieces around the holes using a smooth knife or trimming tool. Cleaning the edges creates a better fit for cups and prevents plastic debris from entering the water system.
Step 3: Assemble Pipe Ends and Create Water Flow Connections
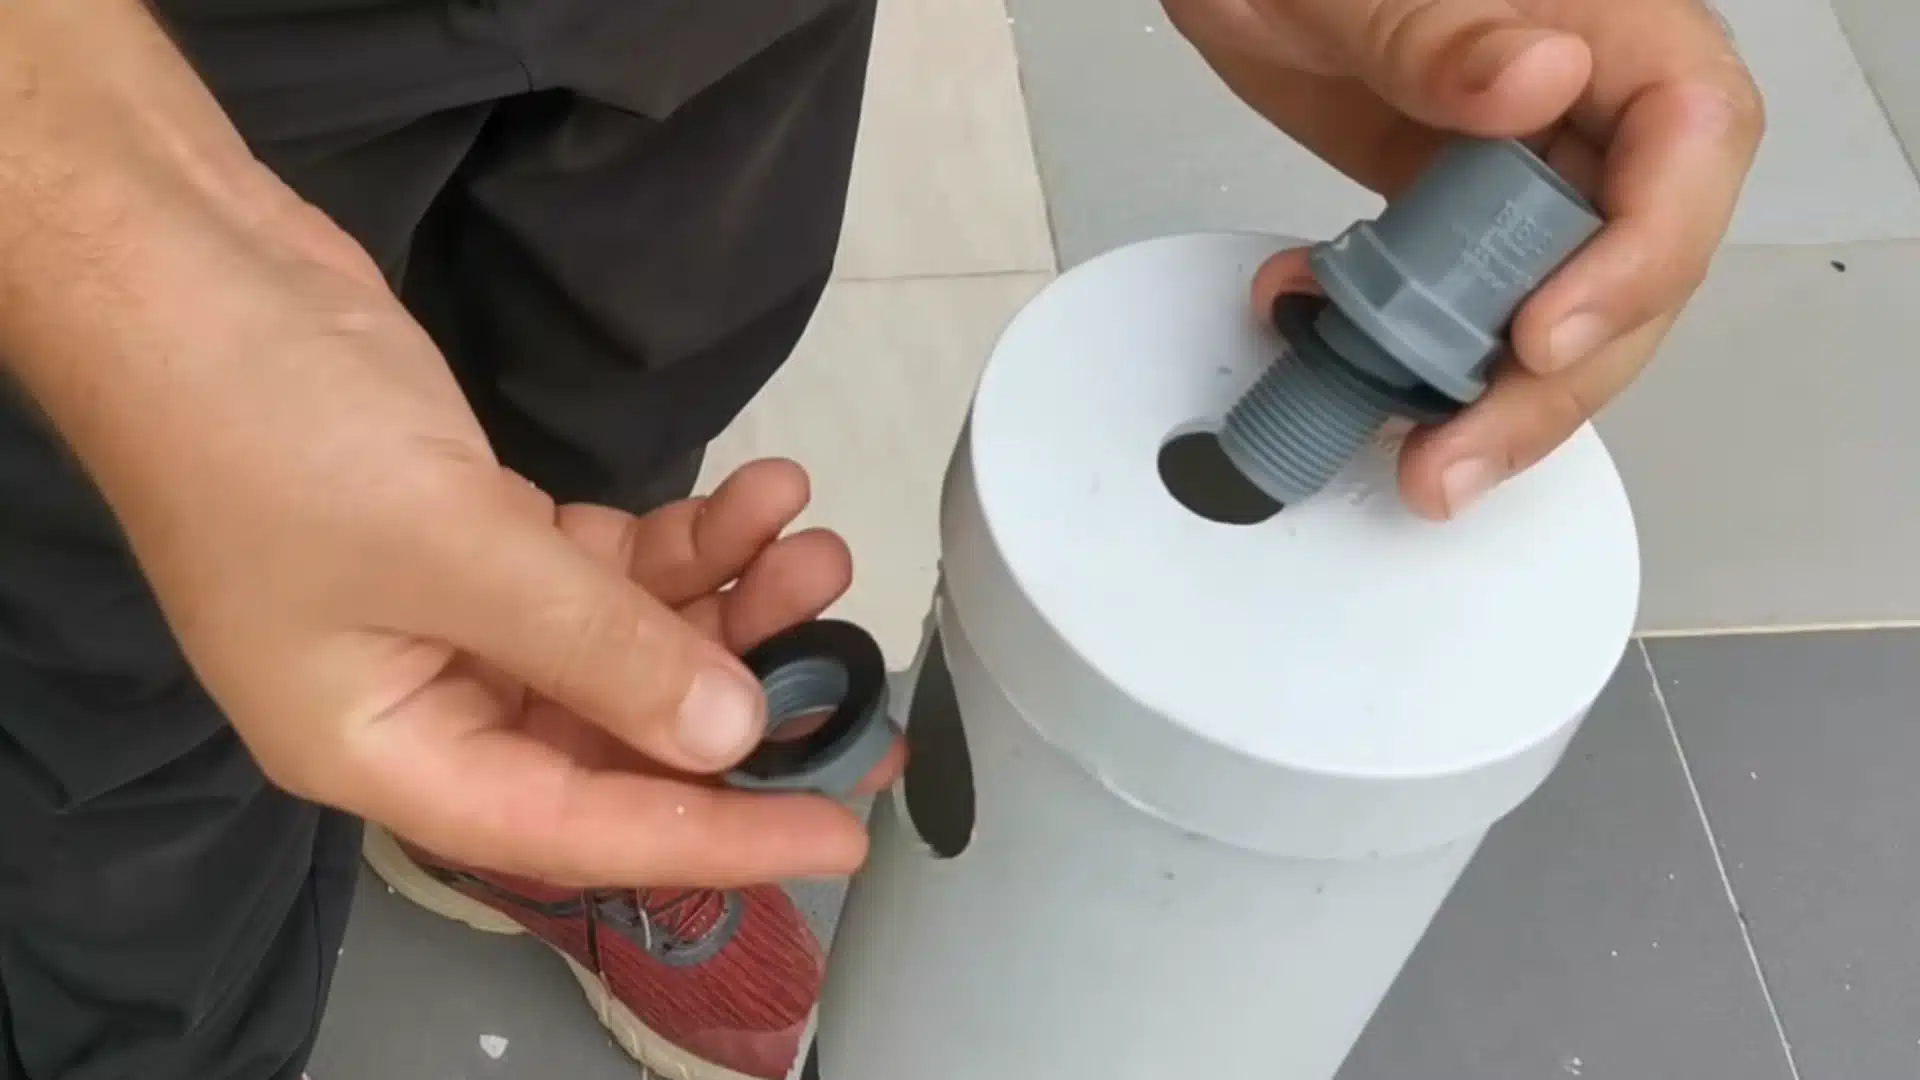
Attach elbows and covers to both ends of the growing pipes while keeping them removable for future cleaning or modifications. Avoid permanently sealing parts that may need adjustment later during maintenance.
Install water level regulators using tank joints to control how much water remains inside the pipes. Keep the water level higher for younger seedlings, then gradually lower it as their roots grow longer.
Step 4: Build the Hydroponic Pipe Support Stand
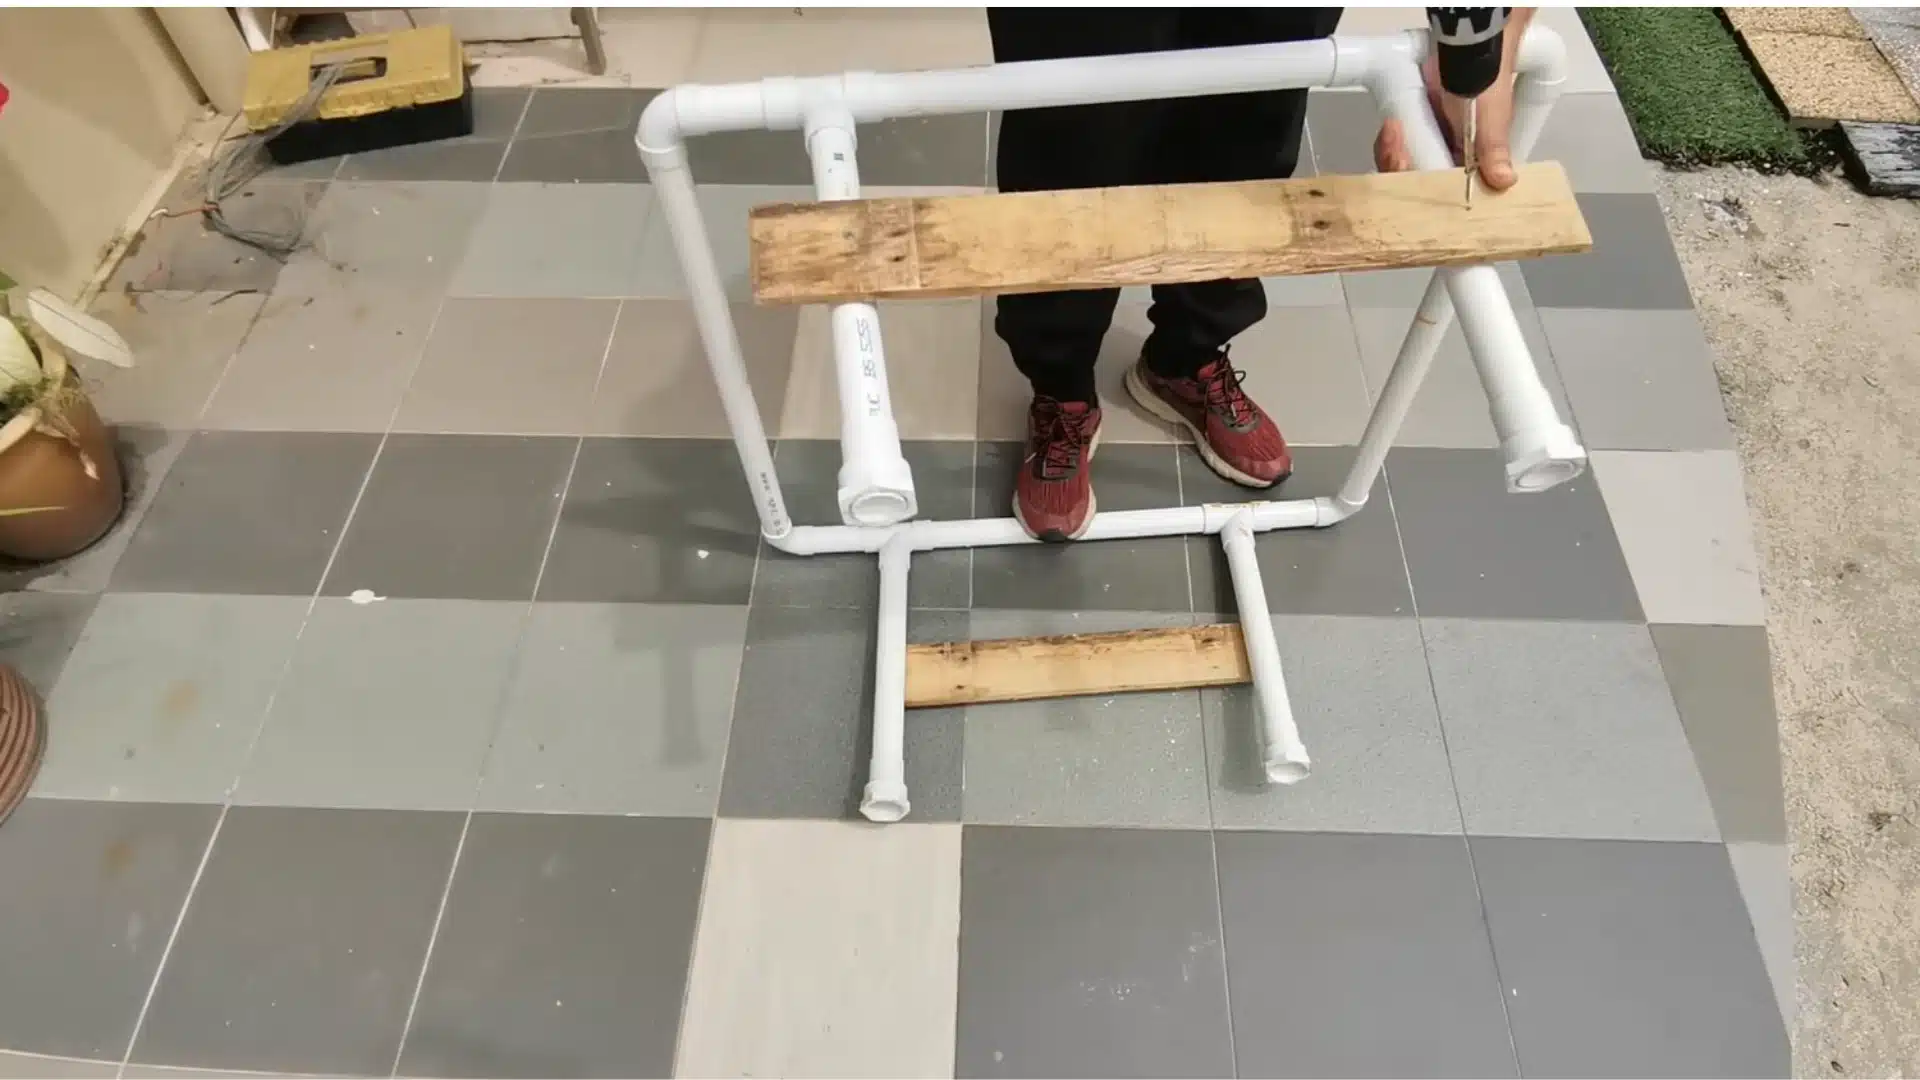
Create a support structure using PVC pipes and elbows to hold the growing channels at a comfortable working height. In the video, the stand is built to be approximately 50 cm high and 1 meter wide.
Place the hydroponic tubes securely on top of the frame, ensuring all planting holes face upward. Proper alignment helps maintain even water distribution throughout the entire system.
Step 5: Install Pump, Reservoir, and Water Circulation System
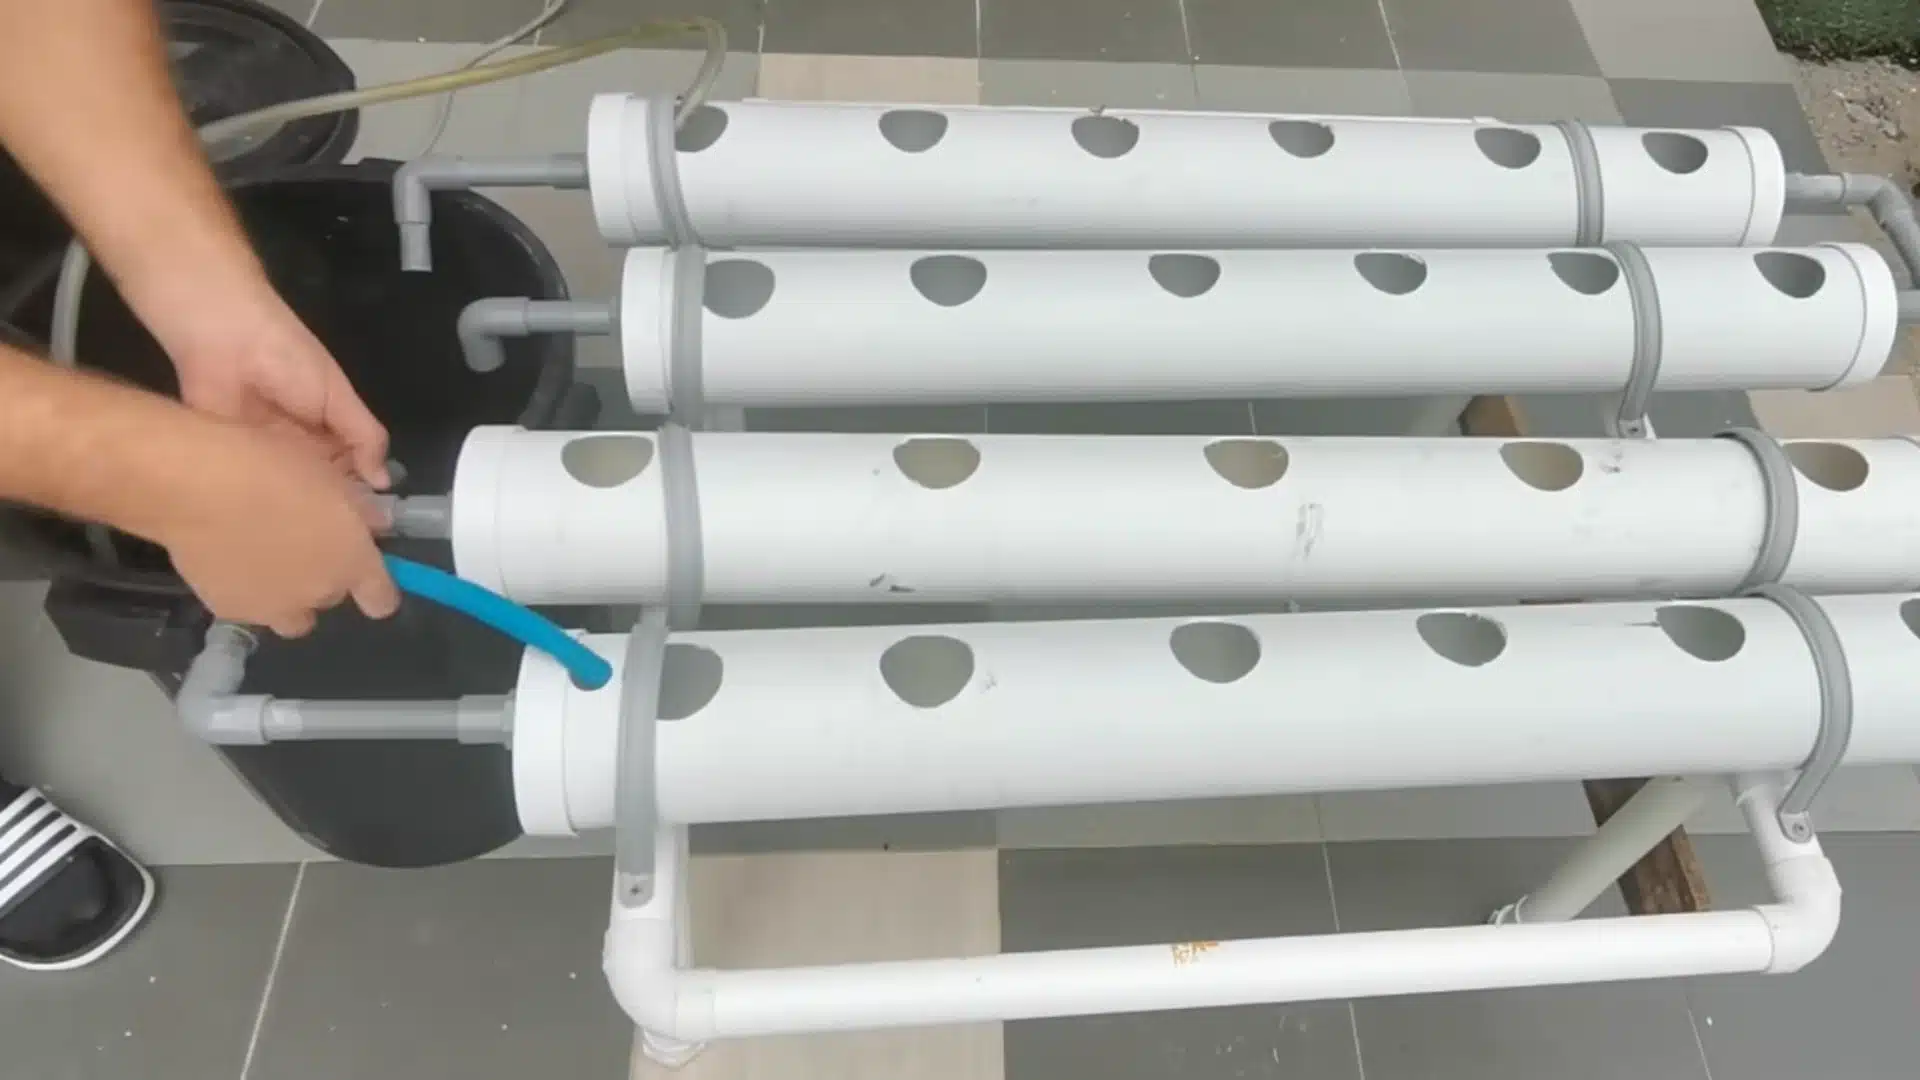
Connect hoses between the growing pipes, water collection tube, and reservoir to create a continuous circulation system. Install a pump strong enough to move water through all channels while maintaining proper oxygen levels.
The video recommends a pump capable of delivering more than 360 liters per hour, roughly double the required flow rate for better performance. A reservoir of approximately 60 liters is recommended for four 1-meter pipes to maintain an adequate water supply.
Step 6: Test Water Flow and Check for Leaks
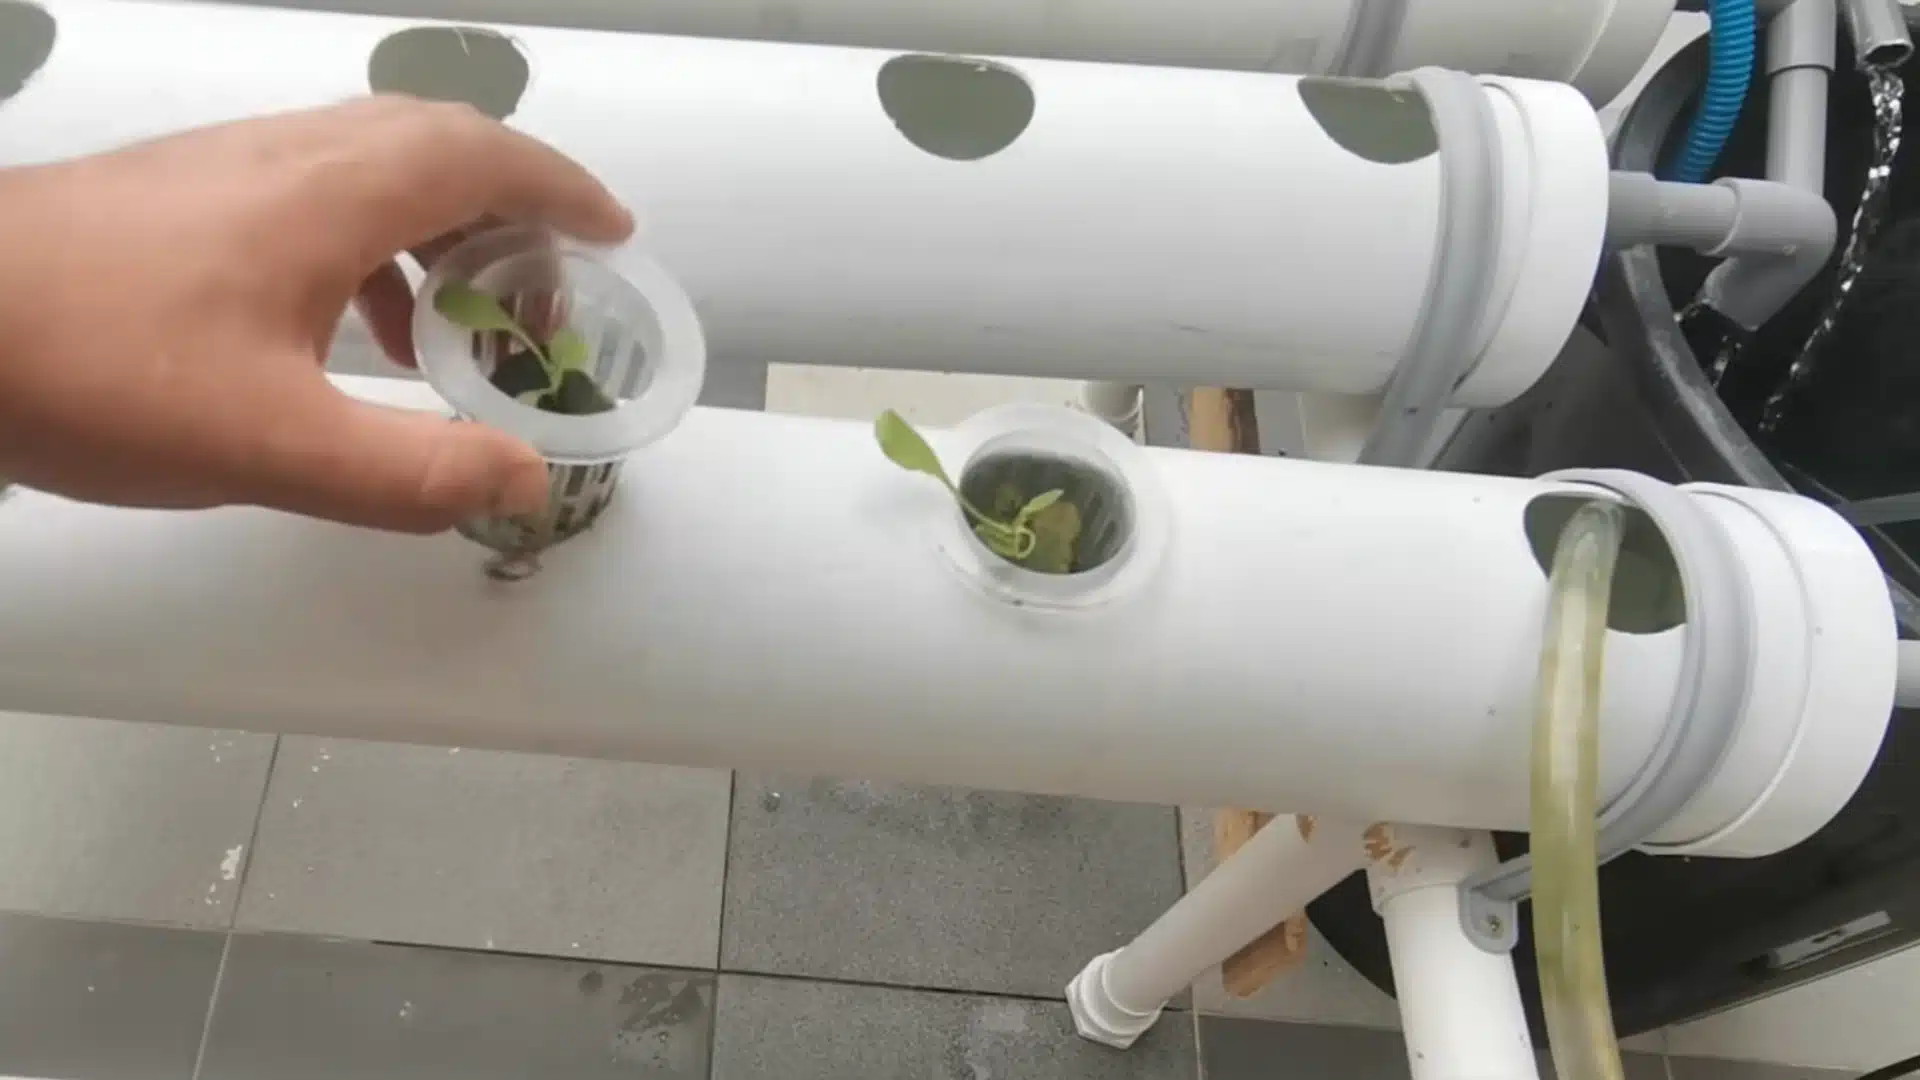
Fill the reservoir with water and allow the system to circulate before adding plants. Check every connection point, pipe joint, and hose attachment carefully to identify leaks or weak areas.
Allow the system to run for about a day to confirm stable water movement. This testing period ensures the pump maintains consistent circulation and the growing channels are ready for planting.
Following these steps from DIY & GARDEN WITH BIBI helps create a functional NFT hydroponic system suitable for growing leafy greens, strawberries, and other small-rooted plants at home. Proper pipe sizing, water movement, and regular maintenance play important roles in supporting healthy roots and successful plant growth.
How to Maintain Your Hydroponic System?
A well-maintained hydroponic system supports healthy roots, stable growth, and improved plant performance. Since plants depend entirely on water and nutrients instead of soil, regular checks are important to keep the growing environment balanced.
Small adjustments to water quality, nutrient levels, and system cleanliness can prevent common issues and improve long-term results.
- Monitor Water Levels: Check the reservoir regularly because plants continuously absorb water during growth. Maintaining proper levels prevents roots from drying out and keeps nutrient access consistent.
- Maintain Proper pH Levels: Keeping the right pH balance helps plants absorb nutrients effectively. Use a pH tester regularly and adjust the pH as needed to prevent nutrient deficiencies.
- Replace Nutrient Solution: Refresh the nutrient solution periodically because plants gradually remove minerals from the water. Use the recommended fertilizer ratio to maintain balanced nutrition.
- Clean the System Regularly: Remove algae, root debris, and buildup from pipes, containers, and pumps. A clean system improves water movement and reduces the chance of plant problems.
- Check Root Health: Healthy roots are usually white or light-colored and firm. Dark, soft, or damaged roots may indicate oxygen issues, poor circulation, or water quality problems.
Consistent maintenance keeps your hydroponic system stable and helps plants receive the right balance of water, oxygen, and nutrients throughout their growth cycle. Regular monitoring also allows you to identify small issues before they affect the entire setup.
Best Plants to Grow in a DIY Hydroponic System
Choosing suitable plants is an important part of starting a successful hydroponic garden. Some crops adapt better because they need less space, simpler nutrient management, and shorter growing periods.
Beginners often get better results by starting with easy-growing greens and herbs before trying larger fruiting plants.
- Lettuce
- Basil
- Kale
- Spinach
- Strawberries
- Tomatoes
Starting with simpler crops helps you understand water levels, nutrient balance, and plant growth before moving to more demanding varieties.
These plant choices make it easier to build confidence with your hydroponic system while enjoying fresh homegrown produce.
Troubleshooting Common Hydroponic Problems
Hydroponic plants can show signs of stress when water quality, nutrient levels, or environmental conditions become unbalanced. Identifying the cause early helps prevent bigger problems and protects the overall health of your system.
Regular monitoring makes it easier to notice changes in plant growth, root condition, and water performance before they impact your entire setup.
| Problem | Possible Cause | Solution |
|---|---|---|
| Yellow leaves | Nutrient imbalance | Adjust nutrients |
| Root rot | Low oxygen | Improve circulation |
| Algae growth | Light exposure | Cover reservoir |
| Slow growth | Incorrect pH | Test water |
| Wilting plants | Low water level | Refill reservoir |
Regular observation is one of the easiest ways to identify problems before they affect the entire system. Addressing issues quickly helps maintain stable growing conditions and allows plants to recover before damage becomes severe.
Final Thoughts
Growing plants without soil can change the way you approach home gardening. A well-planned hydroponic setup gives you better control over water, nutrients, and growing conditions while using less space.
Building a DIY hydroponic system does not have to be complicated when you understand the basics and choose the right method for your needs.
I’ve learned that starting with simple materials, suitable plants, and regular maintenance can make the process much easier. Focus on creating a stable setup, monitor your plants regularly, and adjust as needed.
Start your project with the right system and enjoy growing fresh produce from your own home.
Frequently Asked Questions
Is a DIY hydroponic system expensive?
A DIY hydroponic system can be affordable depending on the method chosen. Simple bucket or jar systems require fewer materials, while larger PVC setups need more equipment and investment.
Do hydroponic plants need sunlight?
Hydroponic plants still need light for photosynthesis. Outdoor systems can use sunlight, while indoor setups usually require grow lights for proper development.
How often should hydroponic water be changed?
Water replacement depends on plant size, system type, and nutrient levels. Many growers refresh the solution every few weeks while monitoring water quality regularly.
Can hydroponics work without electricity?
Yes, some systems like the Kratky method work without pumps or electricity. However, systems that require water circulation usually need pumps to ensure proper movement of oxygen and nutrients.