
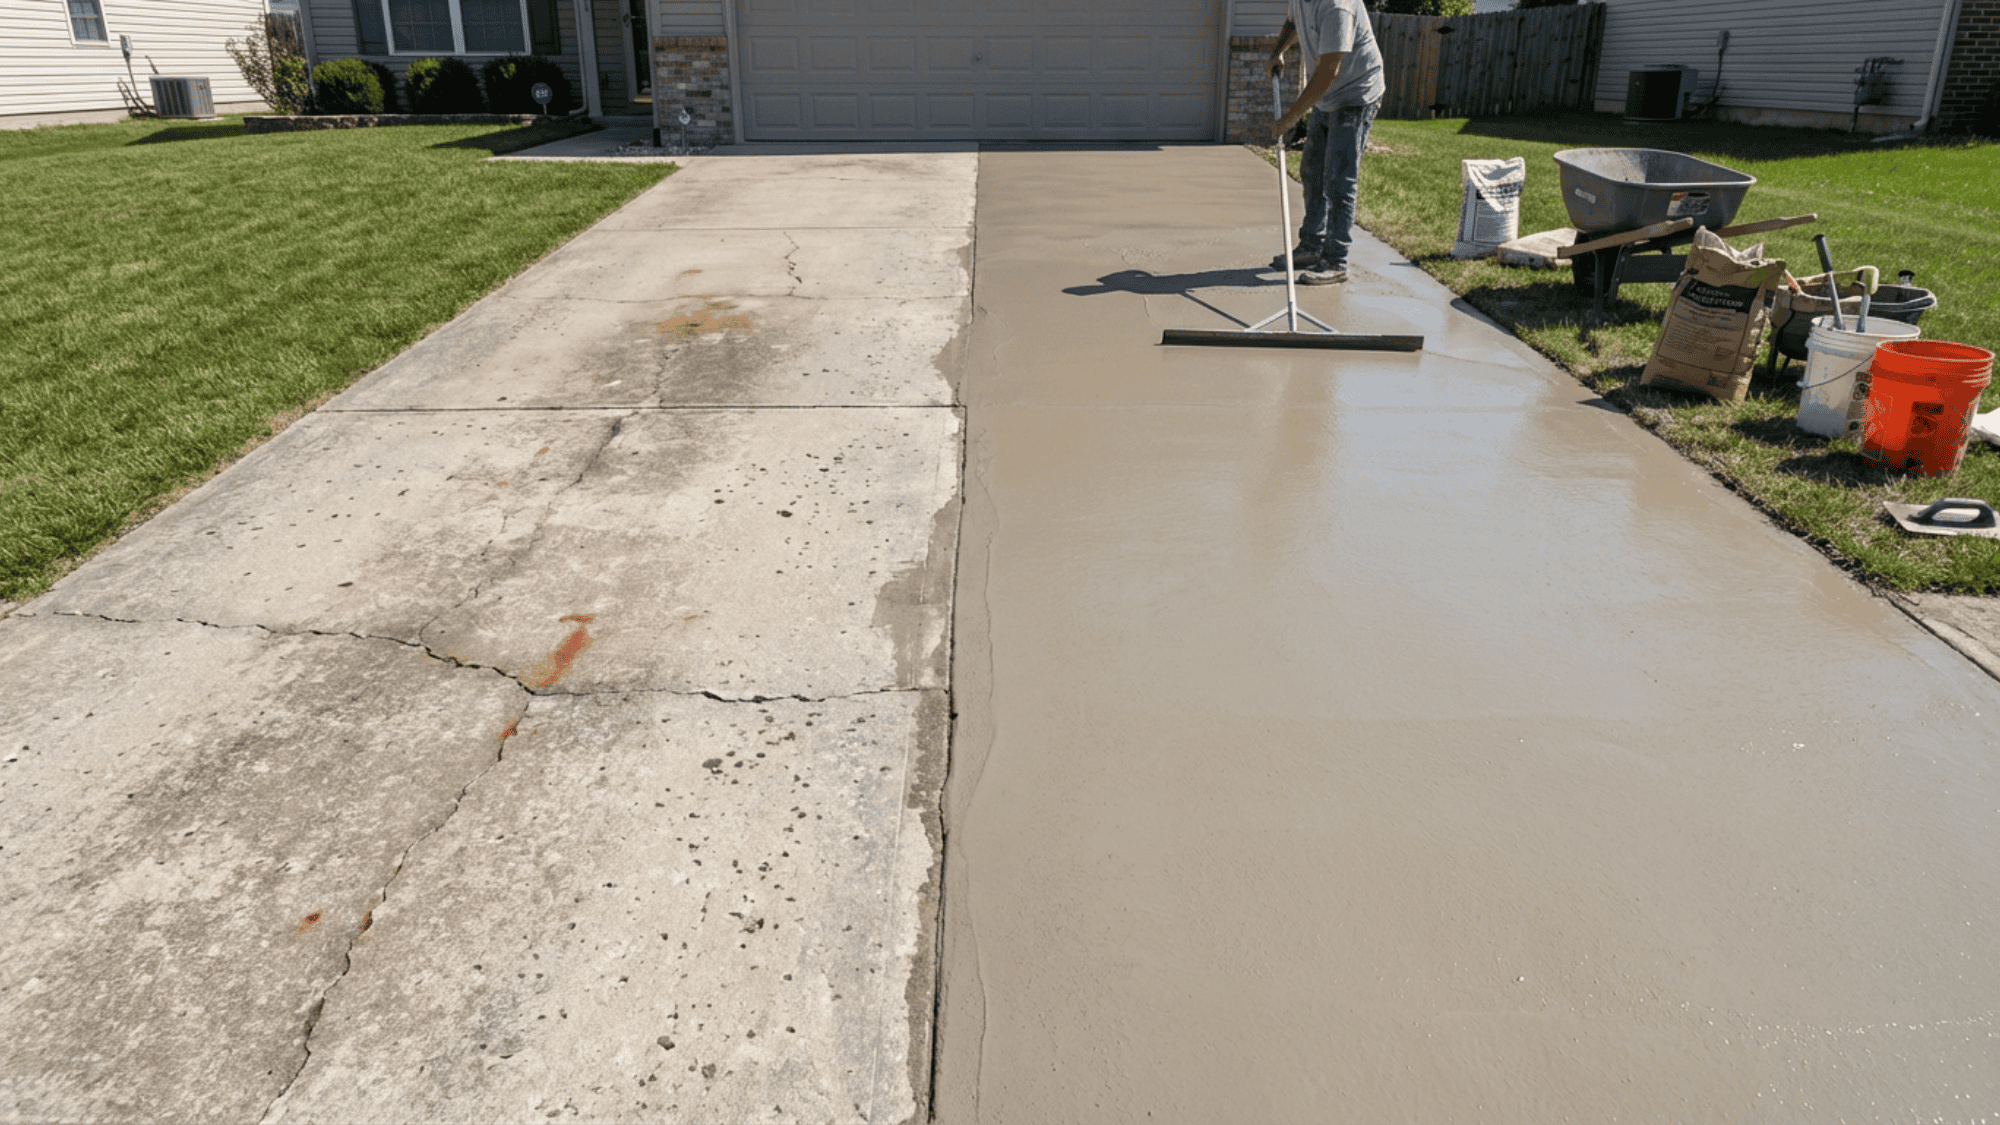
Your driveway has cracks. The surface is chipping. It looks old and worn out. But that doesn’t mean you need to replace the whole thing.
Concrete driveway resurfacing is a simpler, cheaper fix. Instead of breaking out the old concrete and starting over, you add a fresh layer on top. It covers the damage and makes your driveway look new again.
I’ve worked with enough homeowners to know that most driveways just need resurfacing, not replacement.
In this post, you’ll learn what concrete driveway resurfacing is, when it makes sense, what materials to use, and what it costs. If your driveway is looking rough, this guide will help you figure out the best next step.
What Is Concrete Driveway Resurfacing?
Concrete driveway resurfacing is when you put a thin layer of new concrete over your old driveway. It covers cracks and stains, and most jobs are finished in a day or two.
How It Differs from Replacement?
Replacement means breaking up the old concrete, hauling it away, and pouring a completely new slab. It’s expensive and takes several days.
Resurfacing skips all of that. A new layer is applied directly on top of what’s already there. The result looks just as clean, but the cost is much lower, and the work gets done faster.
What Problems It Can and Cannot Fix
Resurfacing works well for surface-level damage. It can cover small cracks, chips, stains, and rough or worn-out patches.
But it won’t fix deeper problems. If your driveway has large cracks, sunken sections, or a damaged base underneath, resurfacing won’t hold.
Those issues need more serious repair or a full replacement before any new layer can be applied.
Signs Your Driveway Is a Good Candidate for Resurfacing
Not every damaged driveway needs the same fix. The type of damage tells you whether resurfacing will work or whether you need something more.
| Damage Type | Signs of the Problem | Solution |
|---|---|---|
| Surface-Level Damage | Small cracks, chips, stains, and worn-out patches. |
Resurfacing: Quick fix, saves money. |
| Severe Damage | Large cracks, sunken spots, uneven sections. The base is weak or shifting, leading to a breakdown. | Full Replacement: Resurfacing won’t last. |
Types of Resurfacing Materials to Choose From
There are a few material options for driveway resurfacing. The right one depends on the condition of your driveway and the finish you want.
- Concrete Overlay: A thick layer of new concrete mix poured over the old surface. Best for driveways with visible cracks and worn-out areas.
- Microtoppings: A very thin coating that gives a smooth, clean finish. Works best on driveways with only minor surface damage.
- Stamped or Textured Finishes: A resurfacing layer pressed with patterns before it dries. Gives your driveway a decorative look at a lower cost than pavers or stone.
How Much Does Concrete Driveway Resurfacing Cost?
Resurfacing costs a lot less than a full replacement. But the final price depends on a few things. Here’s what to keep in mind before you get a quote.
1. Factors That Affect the Price
The size of your driveway is the biggest factor. Larger driveways cost more. The condition of the surface also matters.
If there are a lot of cracks or damage, more prep work is needed, which adds to the cost. The material you choose and where you live can also affect the final price.
On average, resurfacing costs between $3 and $7 per square foot.
2. DIY vs. Hiring a Pro
DIY Estimated Cost
DIY concrete driveway resurfacing typically costs $1 to $3 per square foot for materials alone, far below professional rates of $3 to $7 per square foot that include labor.
For a standard 400-square-foot two-car driveway, expect to spend $400 to $1,200 on supplies like concrete overlay mix, bonding agent, sealer, and tools
Both options can work, but they suit different situations. Here’s a quick comparison to help you decide:
| Factor | DIY | Hiring a Pro |
|---|---|---|
| Cost | Lower upfront cost | Higher upfront cost |
| Materials | Kits available at home improvement stores | Professional-grade materials |
| Prep Work | Done by you | Done correctly by the pro |
| Finish Quality | Depends on your skill level | Consistent and longer lasting |
| Best For | Minor surface damage | Moderate to heavy damage |
| Risk | May need redoing sooner | Less chance of early failure |
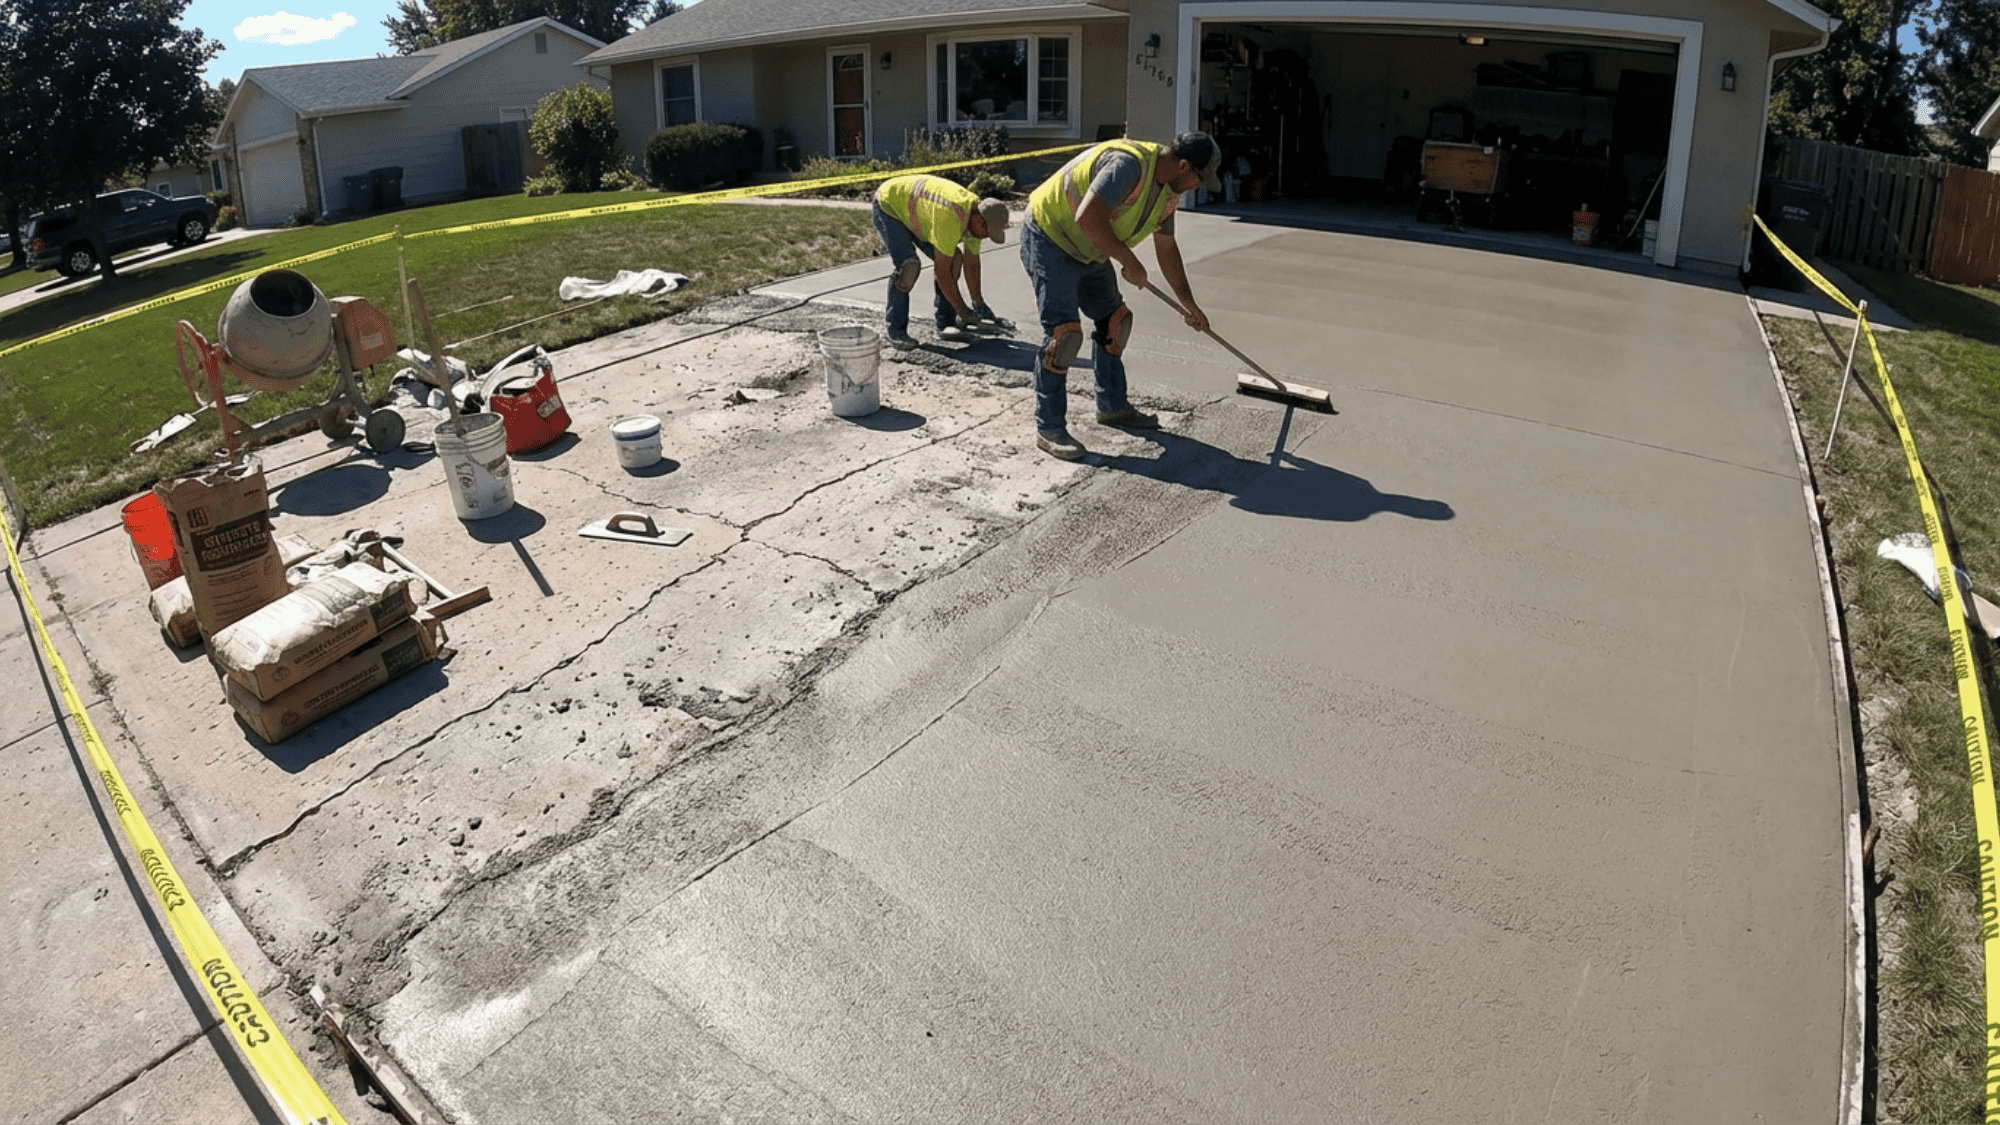
Step-by-Step Overview of the Resurfacing Process
Resurfacing a concrete driveway involves several steps, including inspection, cleaning, crack repair, and applying the final coating. Following the steps in the right order helps the new surface stick well and last longer.
Step 1: Check the Damage and Take Photos
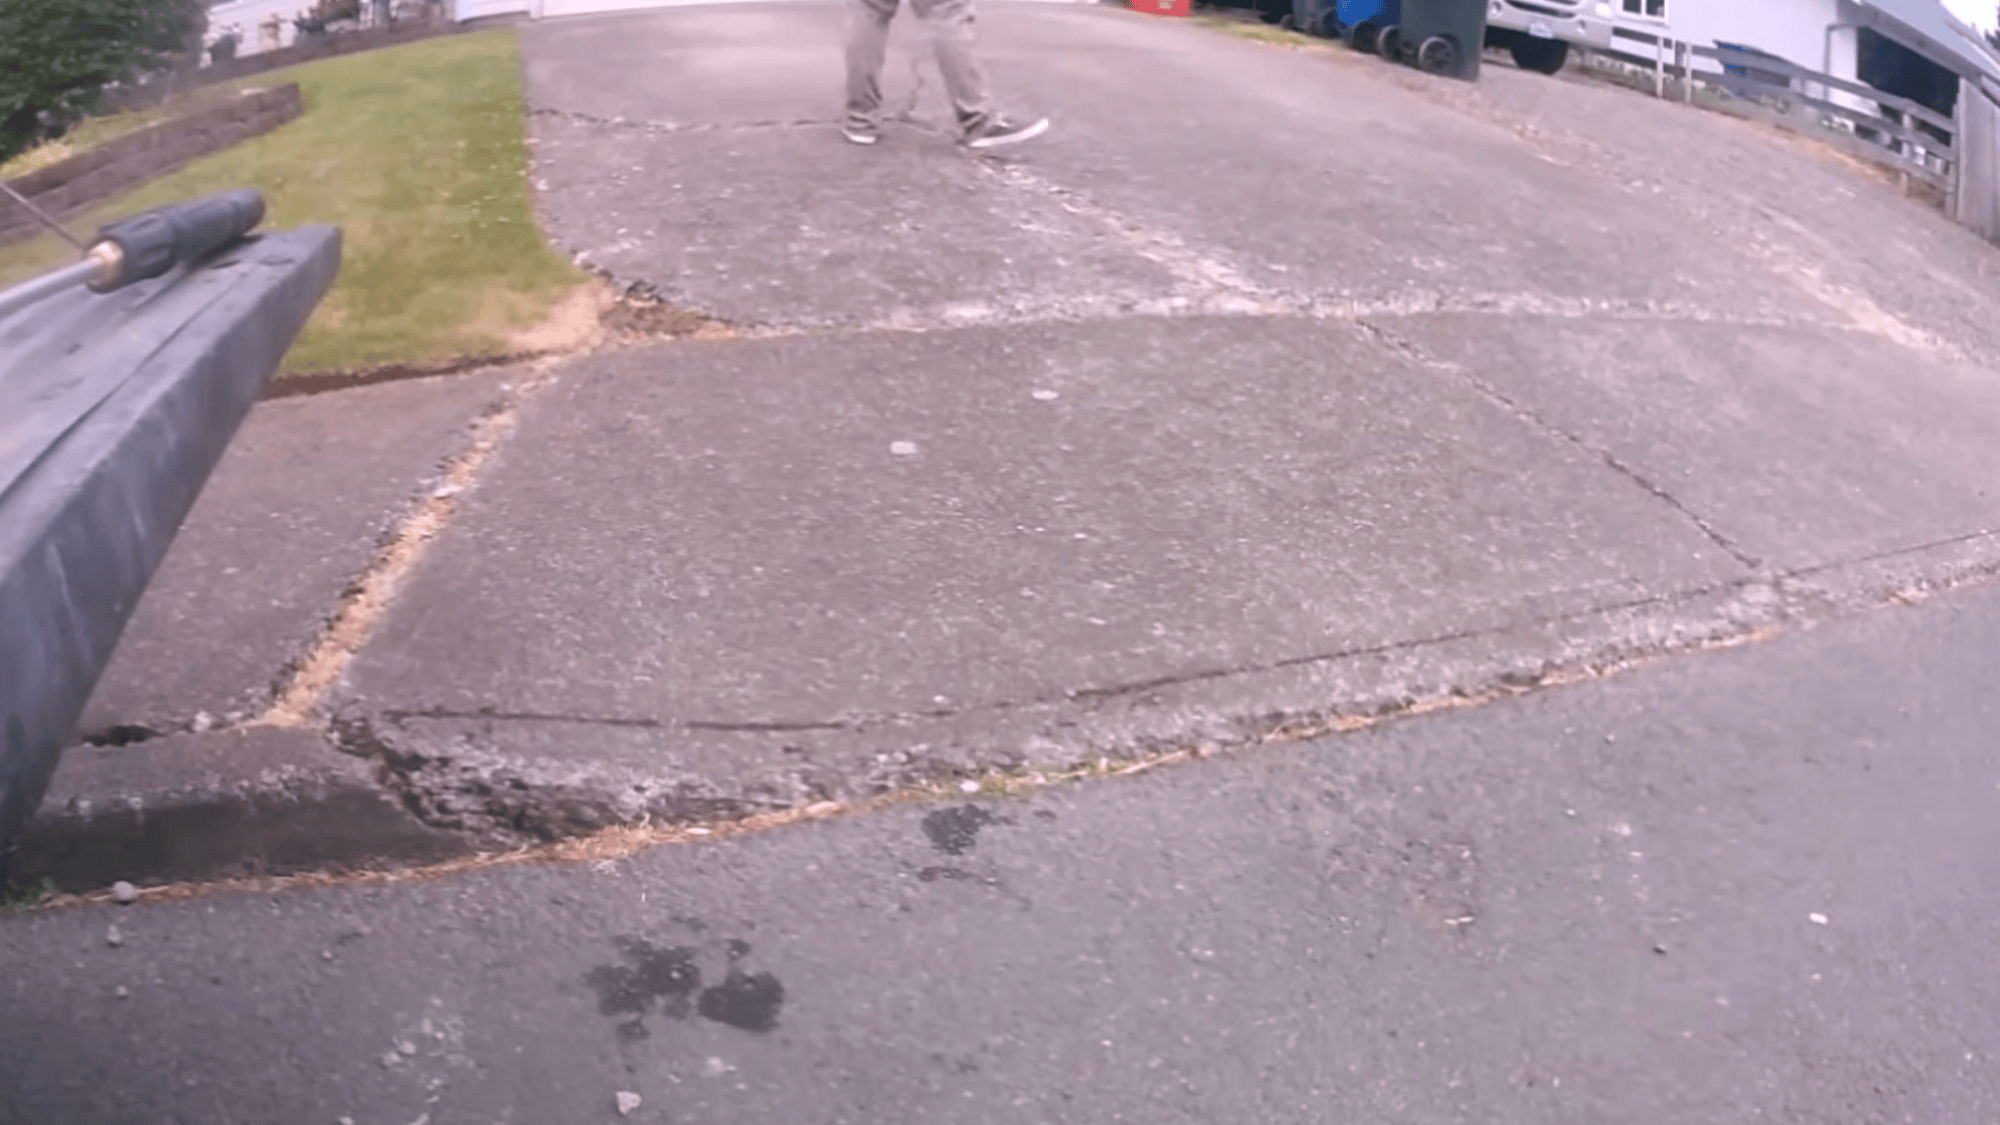
Start by checking the driveway to see how much damage needs fixing. Look for cracks, loose concrete, chipped areas, and spots that have sunk lower than the rest of the surface.
Finding these problems early helps you plan the resurfacing work and gather the right materials. At this stage, take clear before photos of the driveway from different angles.
These photos record the condition before repairs start and make it easier to compare the results after the resurfacing work is finished.
Step 2: Clear the Edges and Prepare the Work Area
Cut back any grass or sod that has grown over the concrete edges so the whole driveway surface is visible. Sweep away gravel, sticks, dirt, and other debris that could get in the way of cleaning or repairs.
During this step, place several bright traffic cones around the driveway to warn people walking nearby and passing vehicles.
The video explains that sidewalks can sometimes be partly closed for less than 24 hours without permits, but visible warning cones are still important to keep people careful and avoid accidents.
Step 3: Pressure Wash the Main Surface
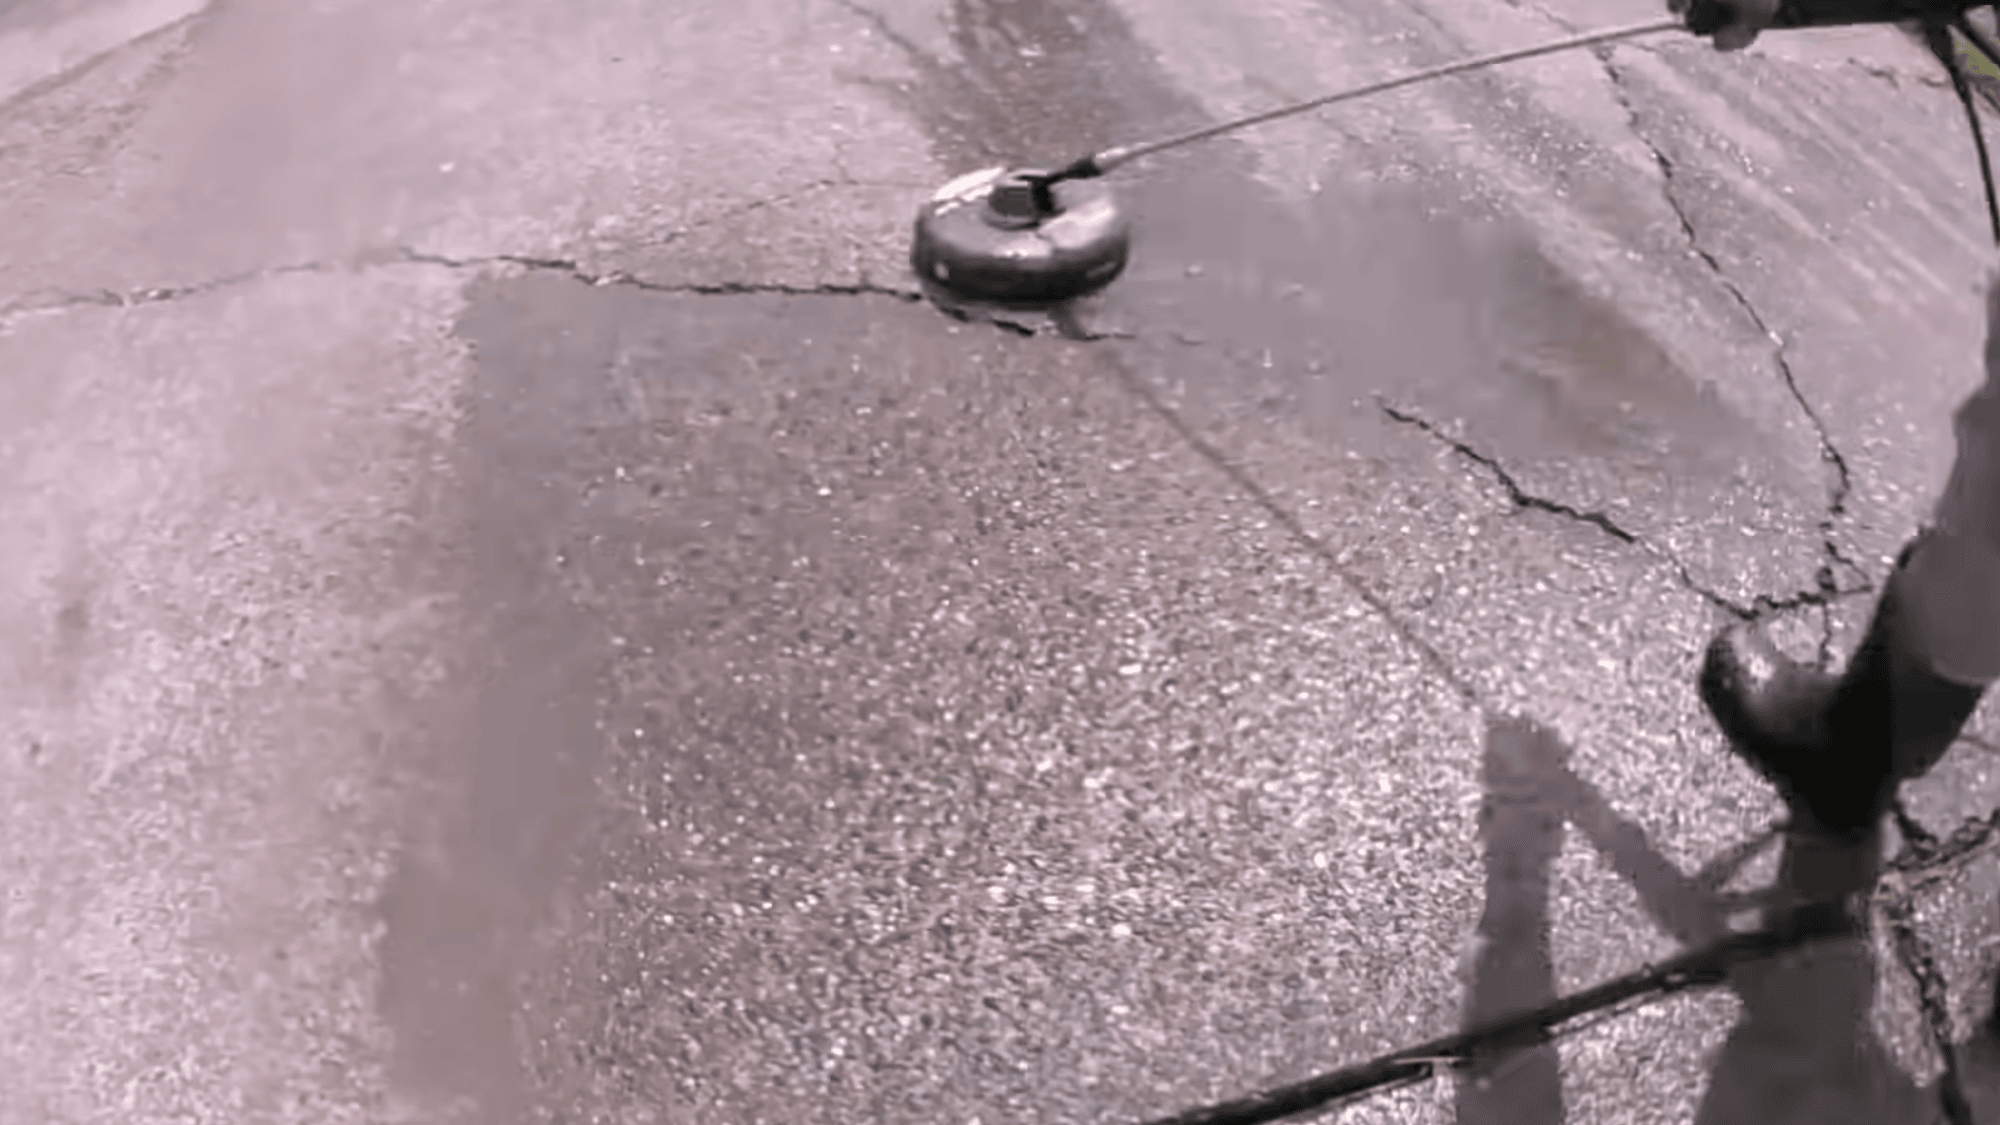
Use a pressure washer with a surface cleaner attachment to clean large areas of the driveway. Move the cleaner slowly across the concrete so it removes built-up dirt, stains, and surface grime evenly.
This cleaning step prepares the driveway for repairs and coatings later. While cleaning, avoid running the surface cleaner directly over cracks because debris may get pushed deeper inside them.
The goal here is to clean the general surface thoroughly while leaving the crack cleaning for the next step.
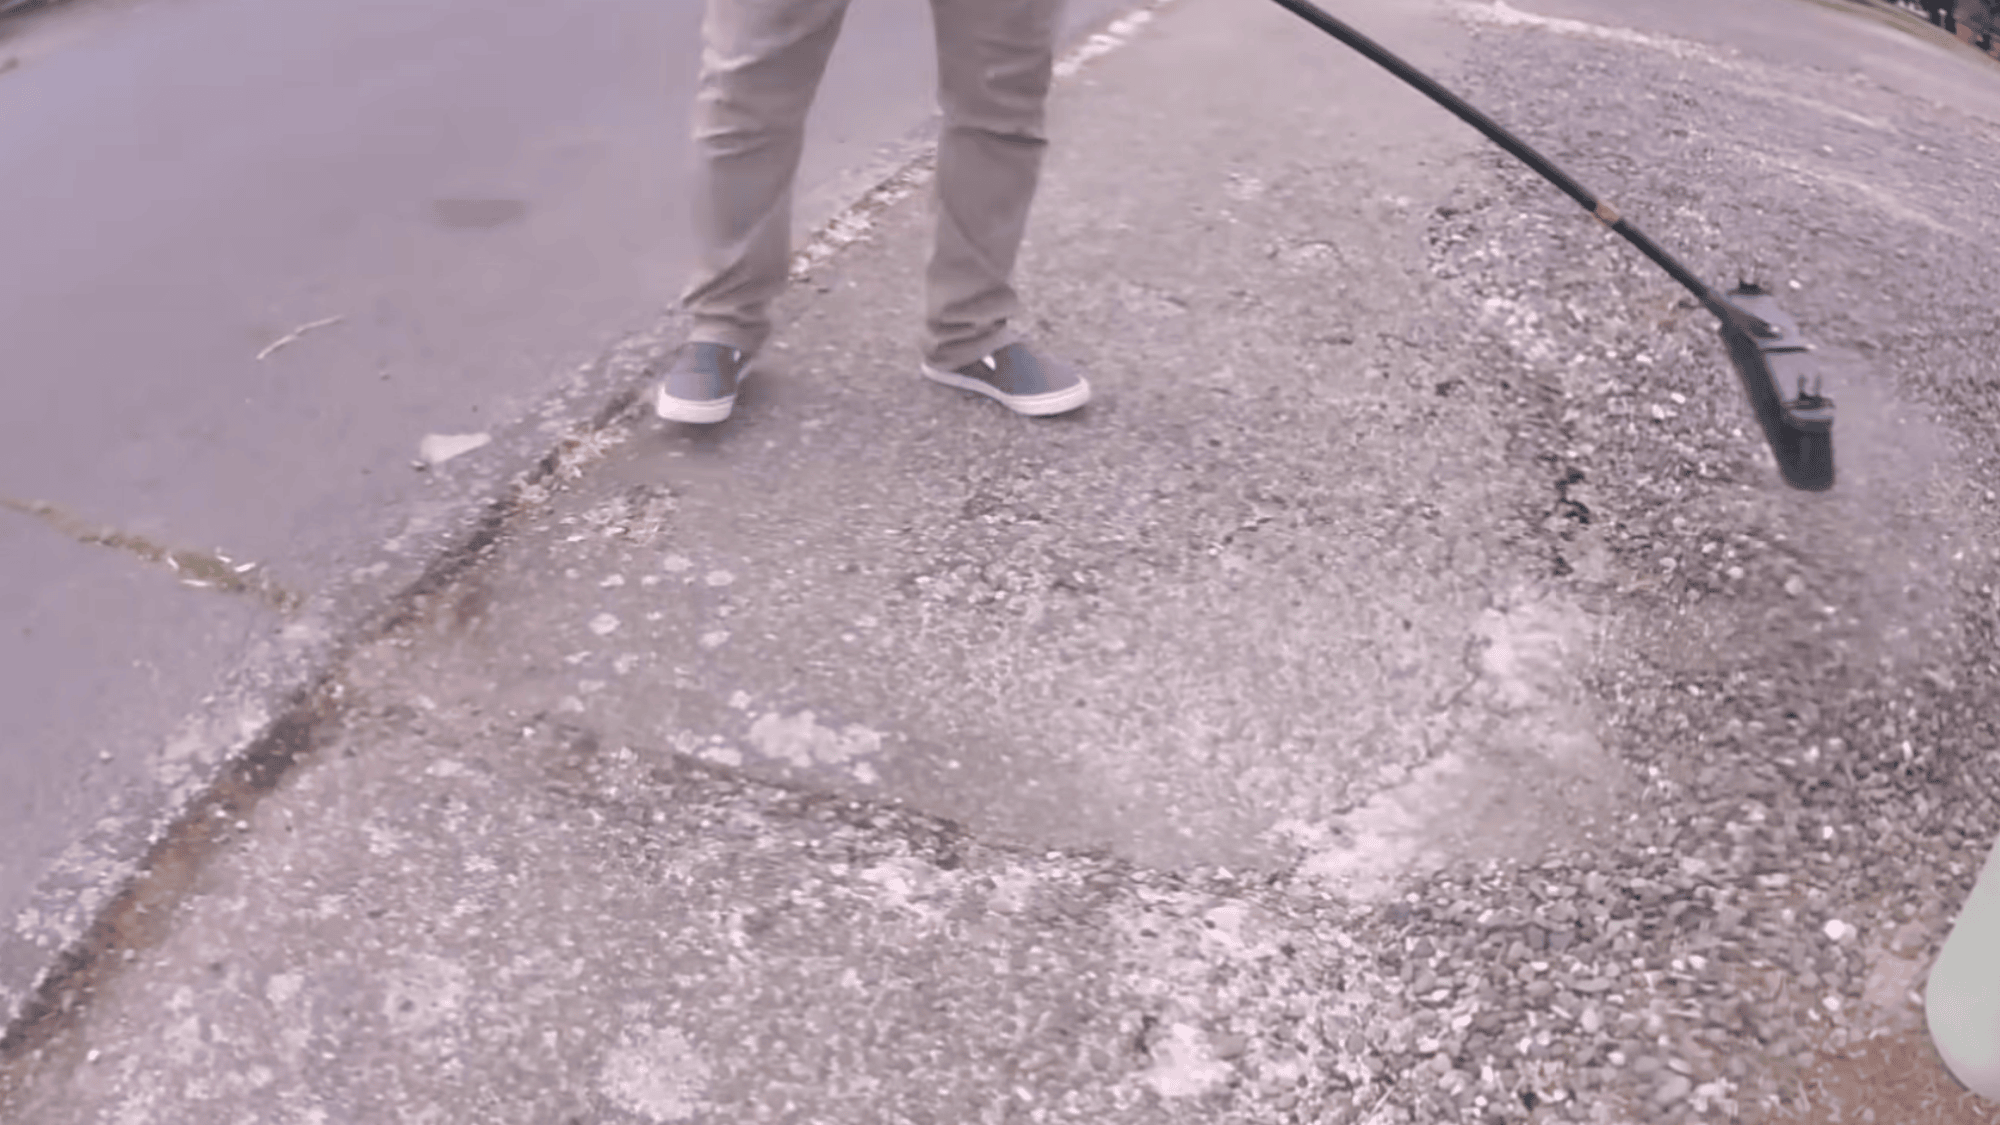
Step 4: Clean Cracks with a Pressure Washer
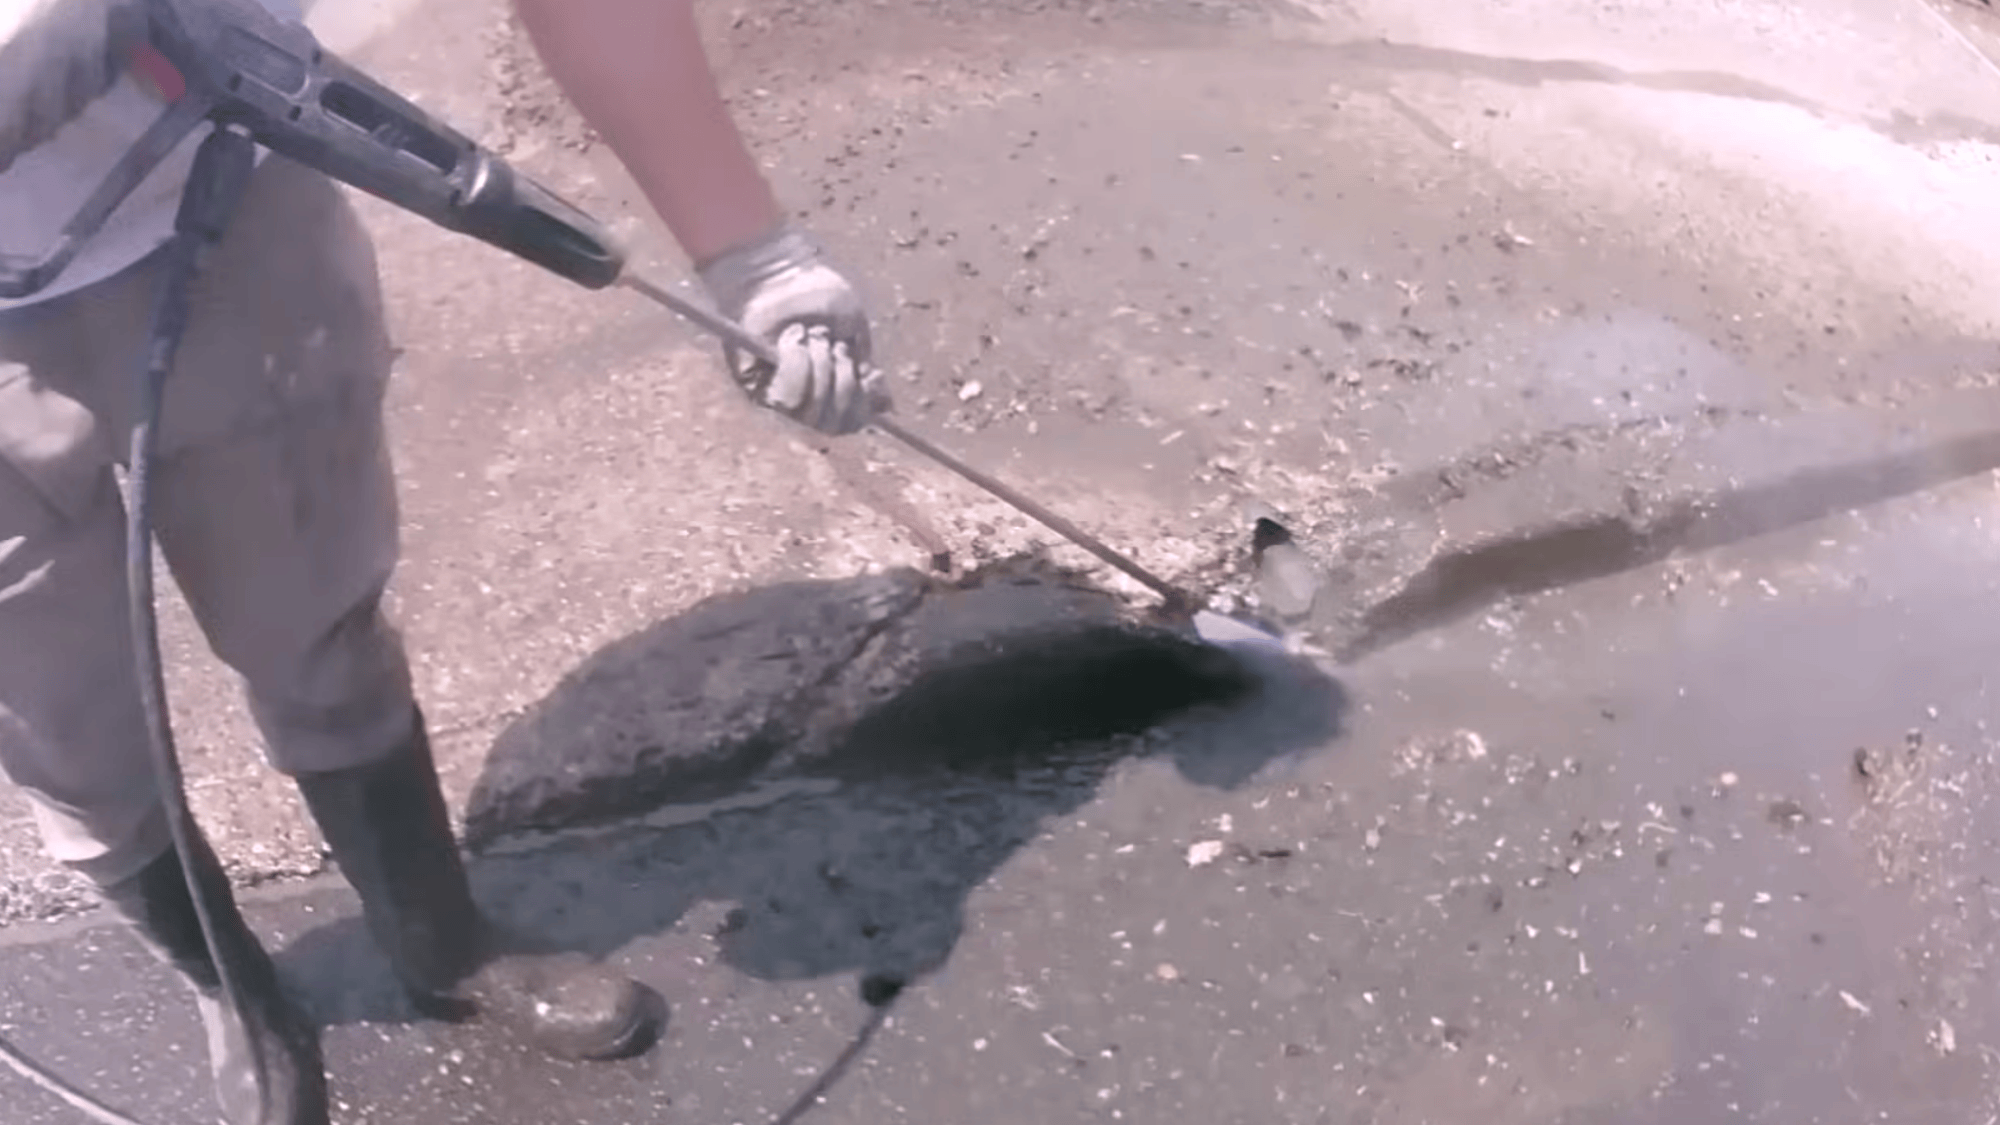
Switch to a 25° pressure washer nozzle and focus on cleaning the cracks. Direct the spray into each crack to remove trapped dirt, sand, and loose debris.
Clearing this material allows repair mixtures to bond properly later. During this step, weak crack edges may also need to be chipped away.
The video shows that loose concrete pieces, sometimes as large as dinner plates, can be pried out or broken away, so unstable sections are removed before repair materials are applied.
Step 5: Sweep Debris and Rinse the Area

After crack cleaning, sweep the driveway to collect loose debris and concrete fragments. Push everything toward the bottom of the driveway so it can be removed easily.
Rinse the driveway and nearby street to wash away remaining dust. Since this step often happens close to traffic, wearing an orange reflective safety vest helps drivers see you clearly.
The video also suggests staying aware of passing vehicles while working near the road so the cleaning process remains safe and controlled.
Step 6: Degrease the Concrete Surface
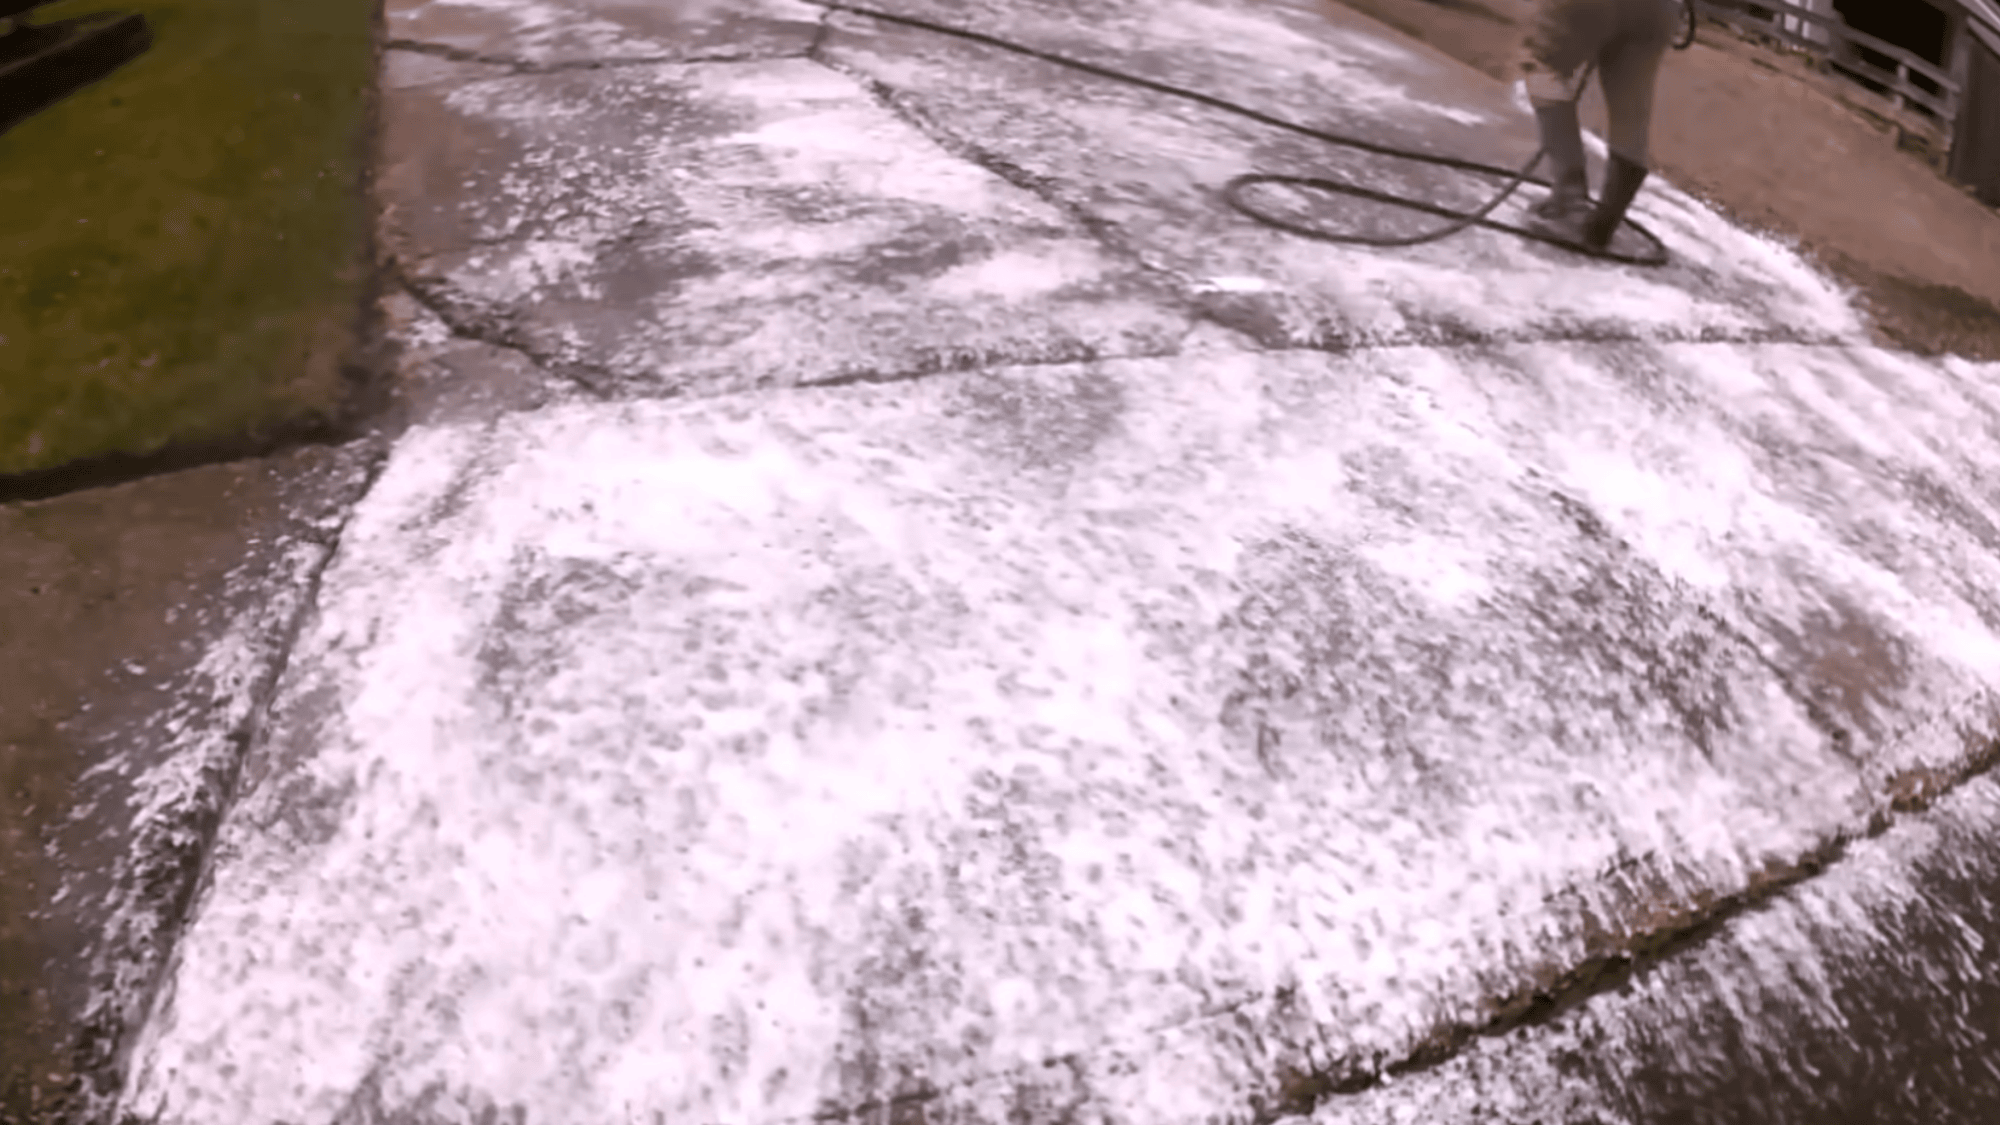
Apply a degreasing cleaner across the entire driveway, even if the surface appears clean. Oils from vehicles and outdoor contaminants can remain trapped inside the pores of the concrete.
Spread the cleaner evenly and scrub it into the surface so it penetrates deeply. The video mentions Outdoor 30-Second Cleaner, though other concrete cleaners can also work.
You can scrub and rinse immediately or allow the cleaner to sit for about 20 minutes so it breaks down grease and stains more effectively.
Step 7: Rinse the Driveway Thoroughly
Once the cleaner has worked into the surface, rinse the driveway carefully to remove all soap residue. Start with a hose set to the jet spray option for the first rinse pass.
After that, switch to a shower spray setting and rinse the surface several more times. This process takes longer than expected because soap can stay trapped in the concrete texture.
Continue rinsing until no bubbles appear anywhere on the driveway surface, ensuring the concrete is completely clean before repairs.
Step 8: Fill Small Cracks with Cement Mix
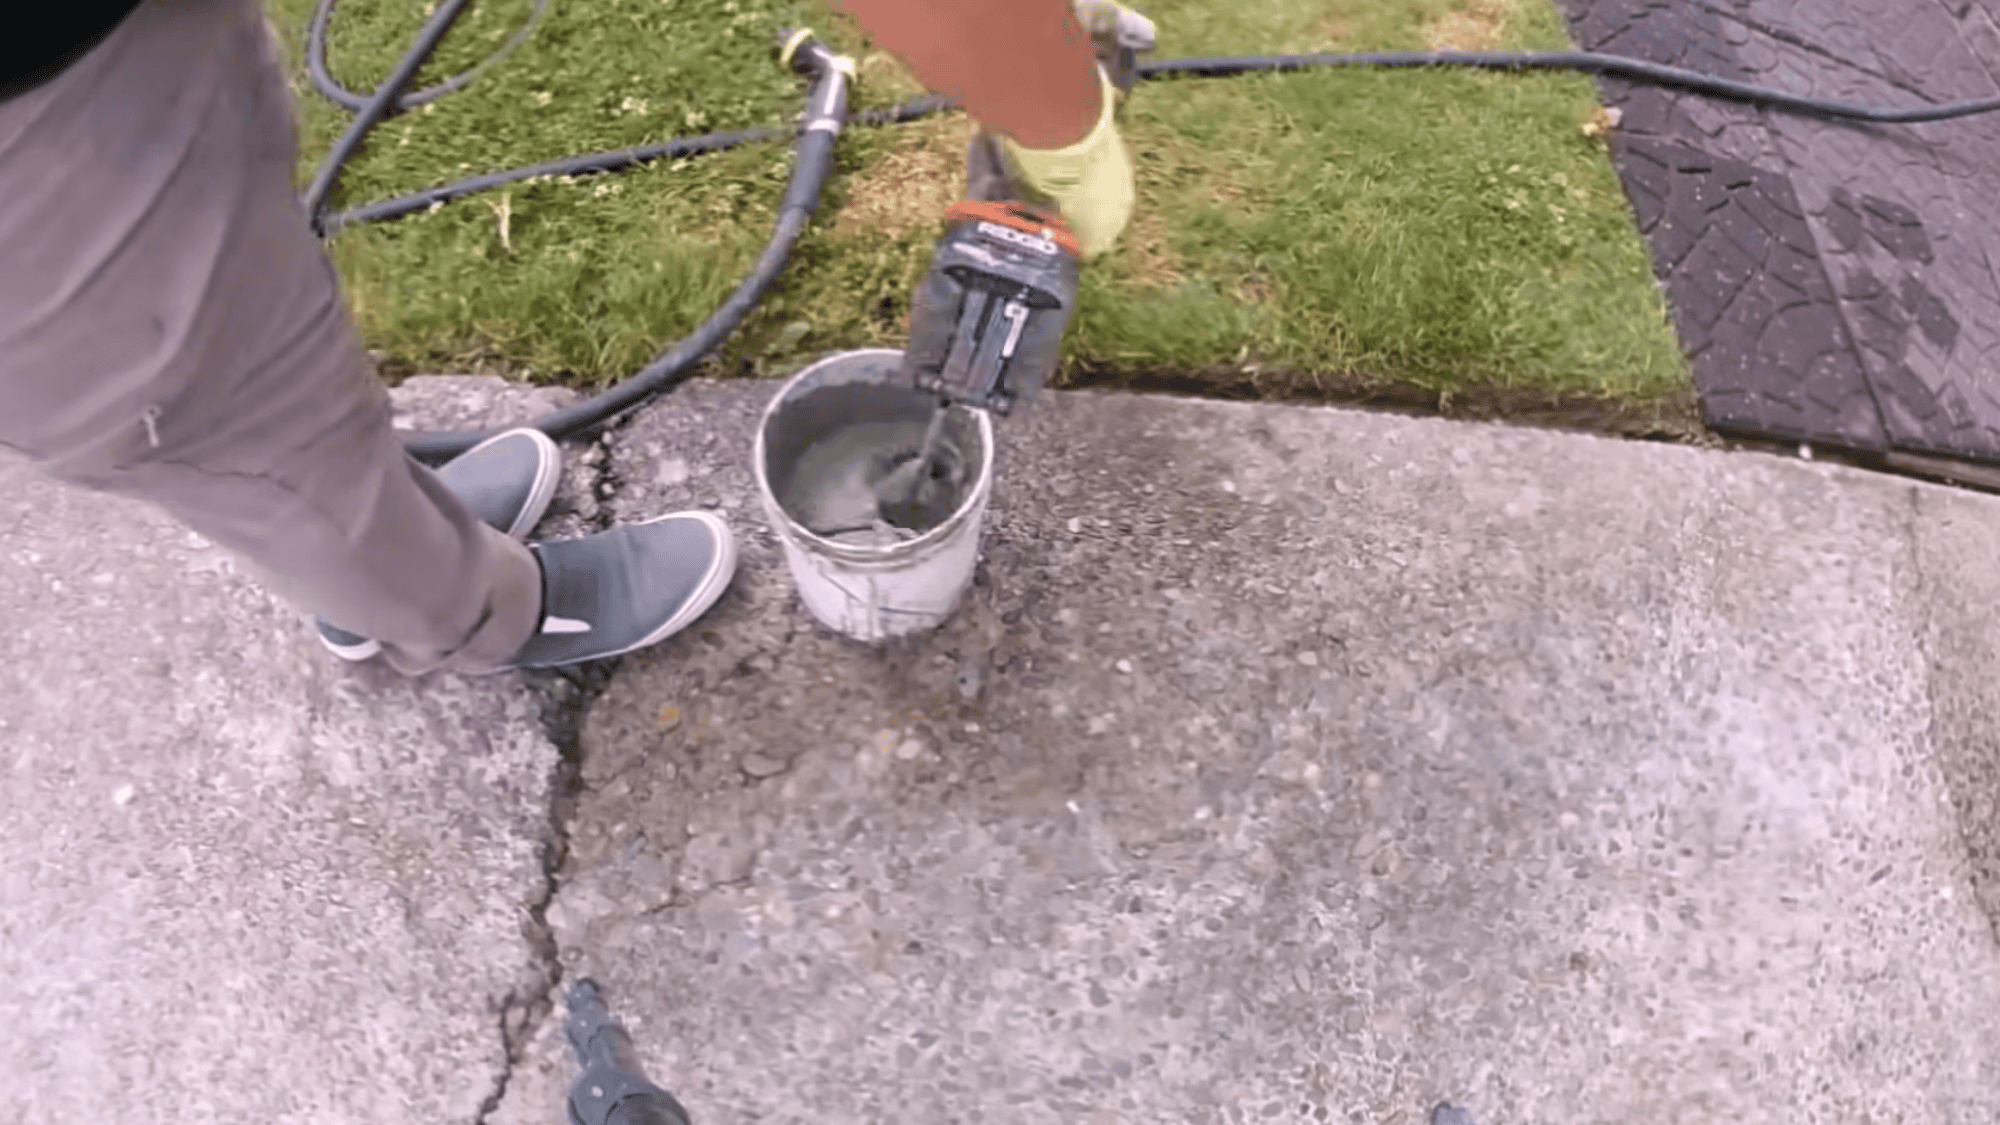
Mix Portland cement powder with water and add a small amount of dish soap to create a workable repair mixture. Use this mixture to fill smaller cracks throughout the driveway.
Apply the mix carefully so it fills the cracks completely, and smooth it so the surface remains level with the surrounding concrete.
The video also notes that concrete caulking can be used as an alternative filler. However, it is not always necessary because the final epoxy coating will help seal and protect these repairs.
Step 9: Repair Large Cracks and Low Sections
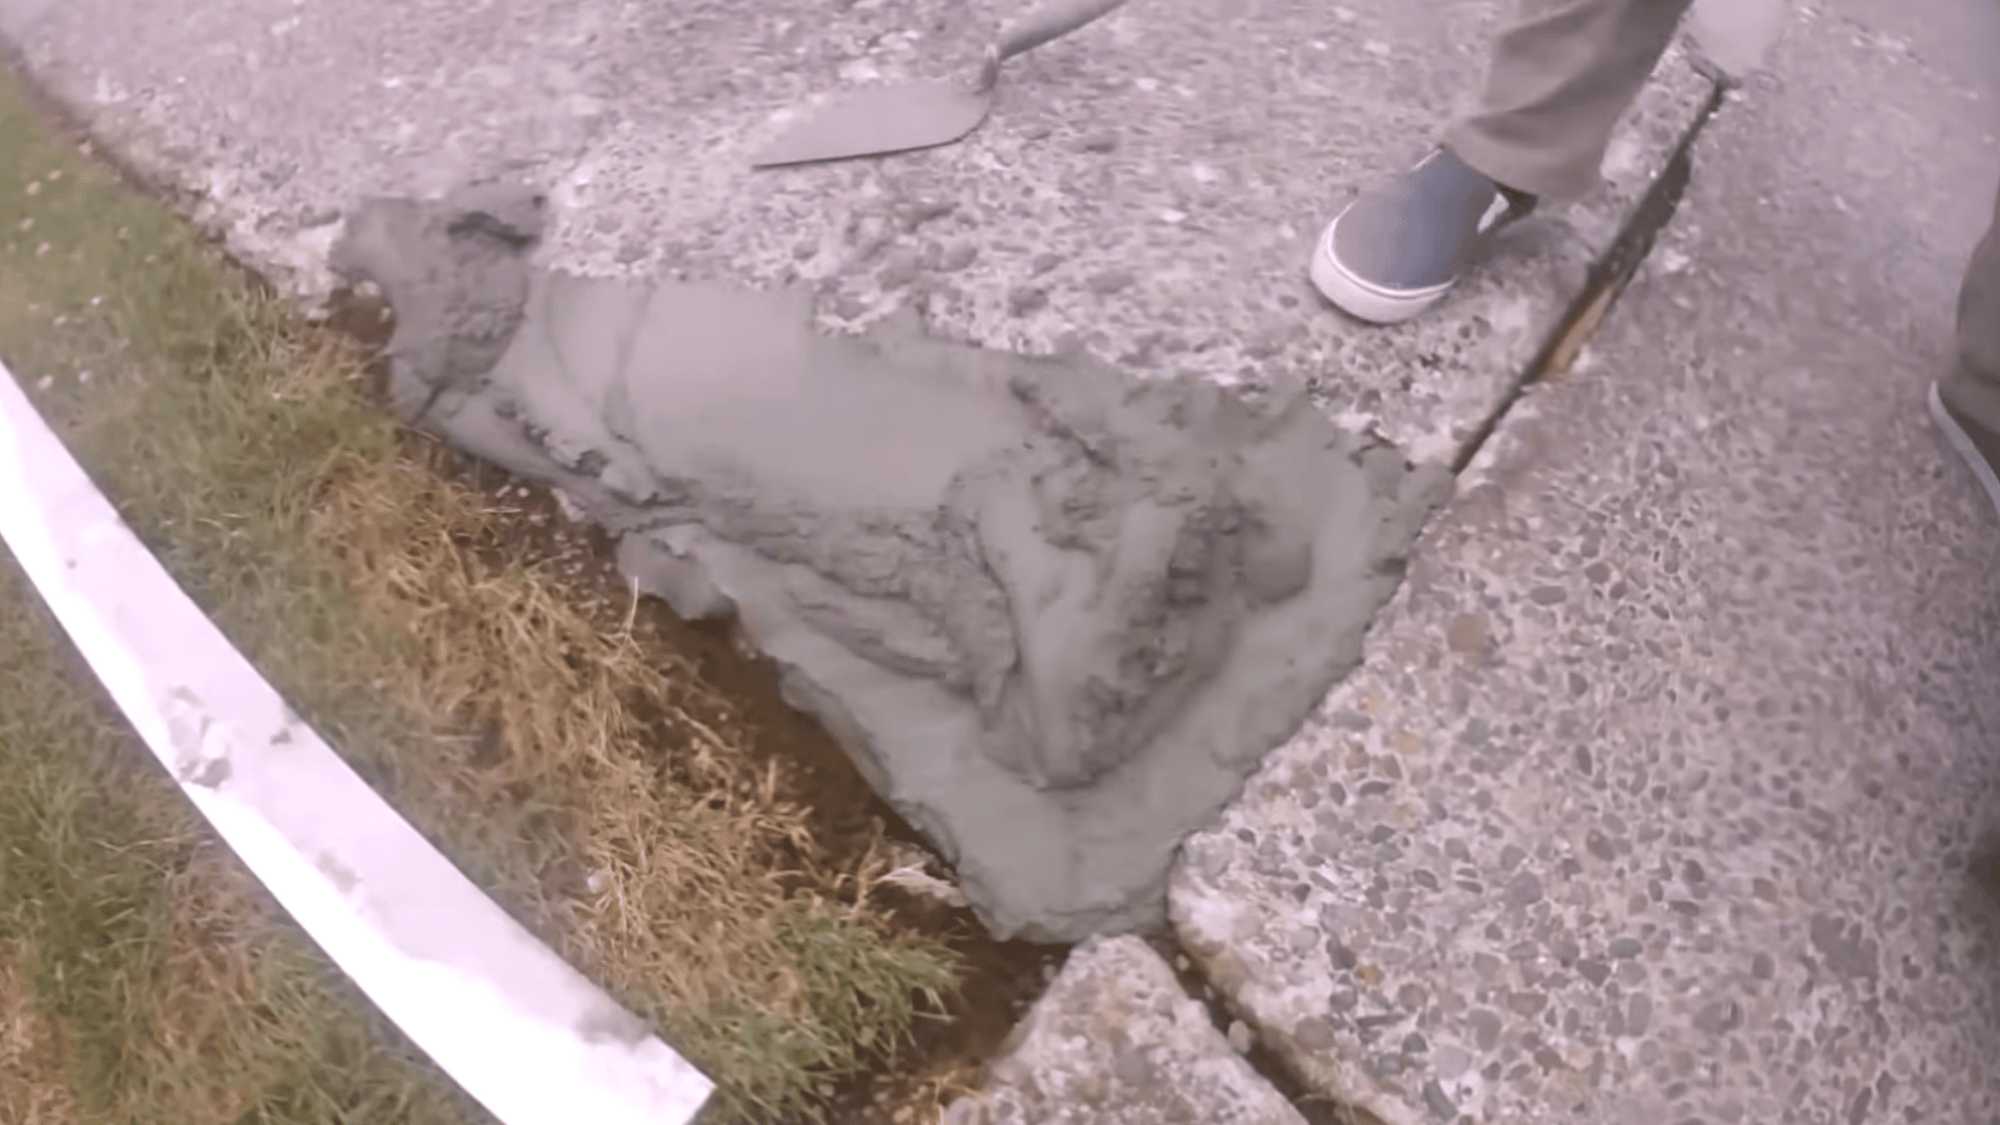
Use mortar to fill larger cracks and any sections where the driveway surface has sunk. Mortar provides stronger support for deeper repairs.
In some cases, several wheelbarrows of mortar may be required, depending on the size of the damaged areas. After placing the mortar, use a straight board to screed the surface so the repair matches the height of the surrounding driveway.
This step is often the most physically demanding part of the process because careful leveling is required to avoid uneven patches.
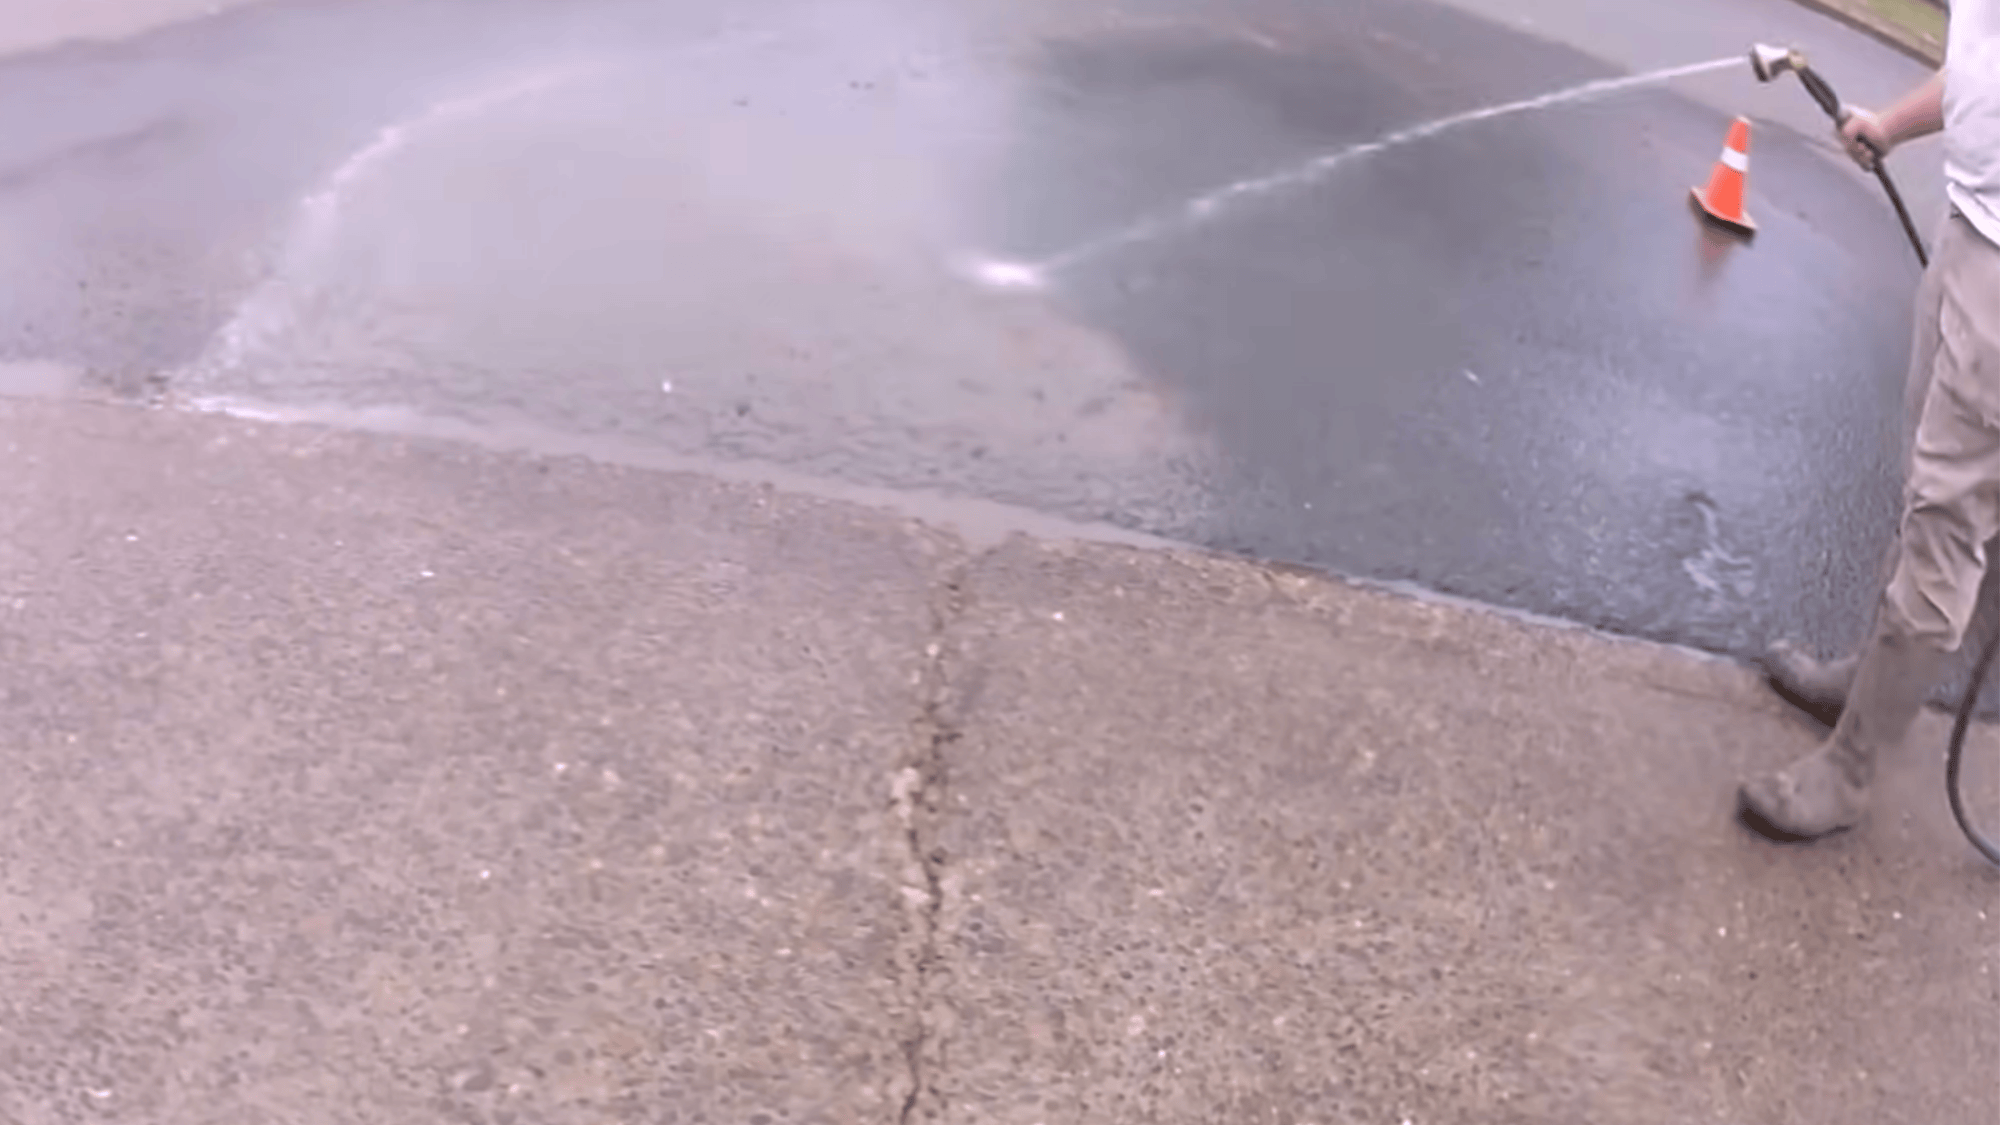
Step 10: Smooth Repairs, Apply Epoxy, and Cure
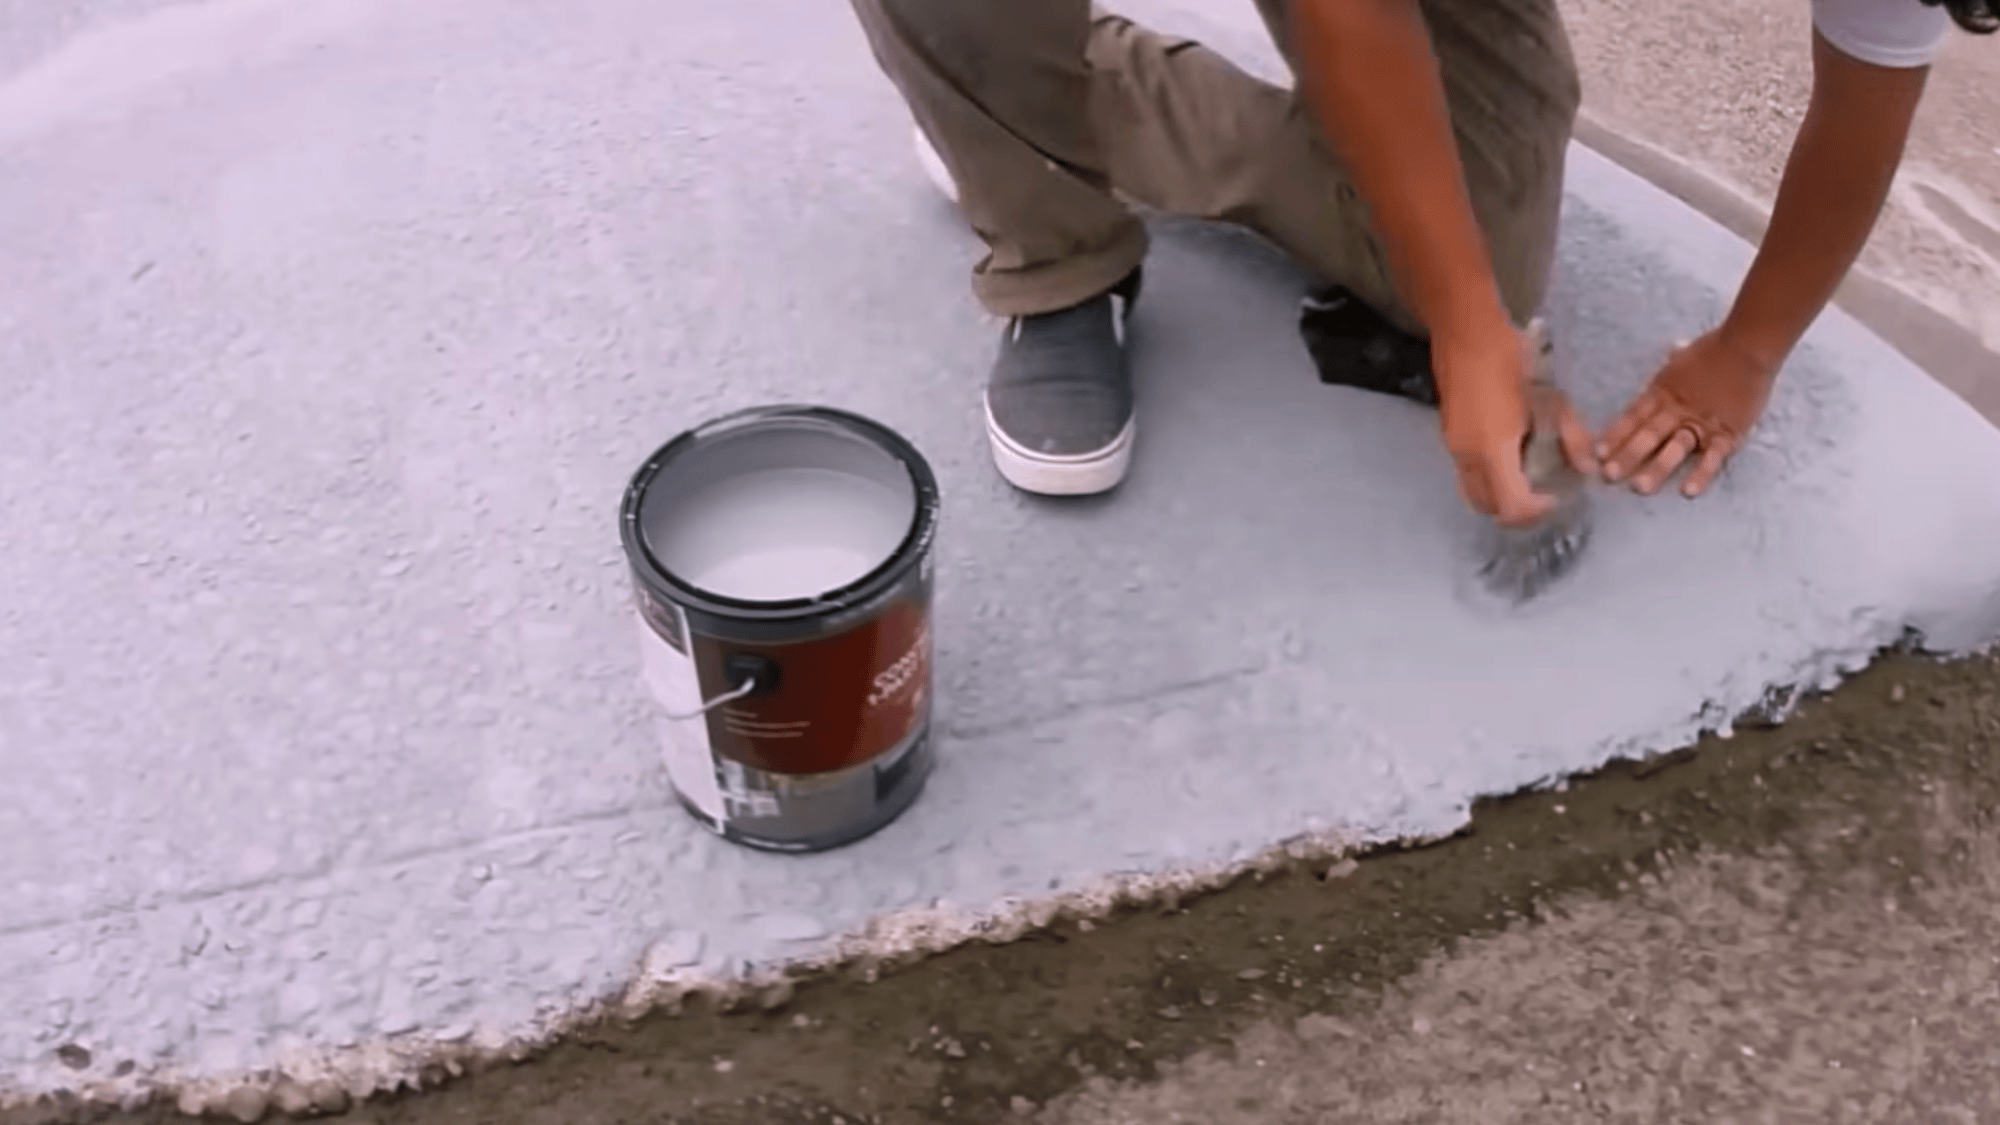
Smoothly repaired cracks using masonry floats. A rubber float works well for small cracks, while larger areas are first leveled with a hardwood float before final smoothing.
Allow mortar repairs to dry for one to two days, then rinse the driveway again. Apply a thinned epoxy primer coat so it penetrates the concrete pores.
After that, apply two epoxy layers mixed with anti-skid sand. Take after photos and place caution tape. The coating requires about seven days before vehicles can drive on it.
This tutorial is based on a helpful video by Clay Banner Masonry. You can check out the original video on their YouTube channel here or watch it below.
Tools and Materials Needed
Before starting concrete driveway resurfacing, gather all the tools and materials so the process goes smoothly.
Tools
- pressure washer
- surface cleaner attachment
- 25-degree pressure washer nozzle
- garden hose with spray settings
- stiff broom
- shovel and dustpan
- wheelbarrow
- mixing drill or paddle mixer
- straight screed board
- rubber float
- wood float
- sponge
- scrub brush
- safety gloves
- reflective safety vest
- traffic cones
- caution tape
Materials
- concrete cleaner or degreaser
- Portland cement powder
- dish soap
- concrete mortar mix
- Concrete crack filler or caulking is optional
- epoxy coating for concrete
- anti-skid powder or fine sand for traction
How Long Does Resurfaced Concrete Last?
A resurfaced driveway doesn’t last forever, but it can hold up well for a long time if it’s done right and looked after properly.
Tips to Make It Last Longer
A resurfaced driveway can last 8 to 15 years with the right care. Here are a few simple things you can do to get the most out of it:
- Seal the surface: Apply a concrete sealer every 2 to 3 years to protect it from water, stains, and weather damage.
- Clean it regularly: Wash off dirt, oil, and debris to prevent them from breaking down the surface over time.
- Fix cracks early: Small cracks should be filled as soon as they appear. Leaving them open lets water in and worsens the damage.
- Avoid heavy loads: Try not to park very heavy vehicles on the surface for long periods. Too much weight can cause the resurfaced layer to crack.
- Use gentle products: Avoid harsh chemicals or de-icing salts in winter. These can break down the surface faster than normal wear and tear.
At the End
Concrete driveway resurfacing is a simple, low-cost way to fix a damaged driveway. If the damage is only on the surface, resurfacing can cover it up, make it look good again, and add years to its life.
The key is knowing when resurfacing is the right fix and when the damage is too serious for it to work. Pick the right material, follow the steps correctly, and look after the surface once the job is done.
A good resurfacing job can last up to 15 years with basic care. Seal the surface every few years, clean it regularly, and fix small cracks before they get bigger. These small steps go a long way in keeping your driveway in good shape.
If your driveway is looking worn out, don’t wait too long. The longer you leave it, the worse the damage gets. Get it checked, figure out what it needs, and take the right steps to fix it the right way.